
AD Tier Model
Premium roomLearn how to create administrative tiers in Active Directory.
medium

To access material, start machines and answer questions login.
One of the toughest challenges you'll face when implementing a Windows domain infrastructure is correctly assigning privileges to each user/service. As a domain admin, you will be faced with questions such as:
- Should all/some users have administrative rights over their PCs?
- Should domain administrative users be able to log in to any domain PC?
- Who needs to be part of the Domain Administrators group?
- How should we provide accounts for external users as contractors?
While there's no answer to fit all cases, most administrators will start by implementing a baseline that follows the least privilege model. In simple terms, the least privilege model consists of assigning each user/service strictly the privileges they need to perform their usual tasks and nothing more.
Having our identity management built upon this model is advantageous for the following reasons:
- We will stop legitimate users from abusing excessive privileges to access sensitive information.
- If a user's credentials are compromised, attackers will be heavily limited to only performing tasks permitted to the compromised user. This will prevent or at least complicate lateral movement and privilege escalation techniques.
- If a user executes malware, its propagation will likely be limited by the strict privileges of the compromised account.
During this room, we will look at implementing the basics of the least privilege model in a Windows domain to establish a common baseline that should apply to most networks. When implementing this in real-world scenarios, you must adapt the proposed configurations to fit each case.
The Problem With Excessive Privileges
As networks grow, it is common to find accounts with more privileges than they should. There are many reasons why this may happen, including:
- Users may be assigned privileges individually rather than based on their roles. This becomes hard to maintain as the company grows.
- Privileges aren't revoked for users who leave the company.
- Users who have moved through different positions in the company may still carry the privileges of their older roles. This problem is known as privilege creep.
- No efforts have been made to reduce the default privileges assigned to users in the network.
A significant number of overly privileged accounts can quickly become a problem. To get a better idea of why, take the following scenario into account:
- An attacker gains an initial foothold into your network using a recently published zero-day exploit. As a result, he gets local administrative privileges on the compromised host.
- Using tools like mimikatz, the attacker dumps the cached credentials of users who have recently logged into the machine. One of such credentials corresponds to the user "John".
- The attacker realises that "John" is a member of the Helpdesk group. Because of poor security practices, Helpdesk users have administrative privileges over all machines in the domain.
- The attacker now has administrative access to all computers through John's account.
While many questionable security practices led to the compromise of the network in our example, had user John had a more restrictive set of privileges, the damage done by the attacker could have been contained to a portion of the network instead of affecting all machines.
Correctly restricting the privileges of our domain users allows us to contain the damage done by an attacker should they steal a set of valid credentials.
Initialising the Lab
Throughout this room, you'll use two Virtual Machines (VMs). One will act as your Domain Controller () and the other will be a regular workstation in the same Windows domain. Since machines are started in random IP addresses in 's network, you will need to sync up both machines by following the process described down below before being able to use them.
1. Starting the
Click the Start Machine button on the top-right corner of this task. This should start the Domain Controller. The DC VM should take up to 3 minutes to boot.
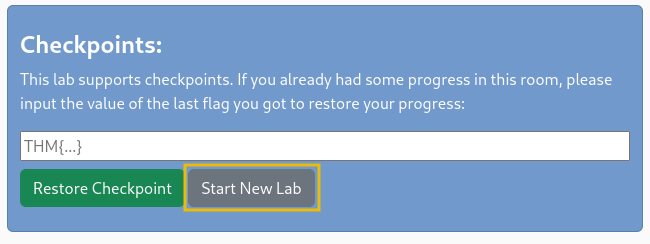
Once the VM is up, navigate to http://MACHINE_IP:5000/ (opens in new tab) in the browser of your AttackBox or VPN connected own machine. If this is your first time through the room, just click Start New Lab on the first screen to spin up a fresh copy of the lab:
The will now be ready to sync and awaiting for the workstation.
Note: For the machines to sync up correctly, it is important that you always follow these steps on the first.
2. Starting the workstation
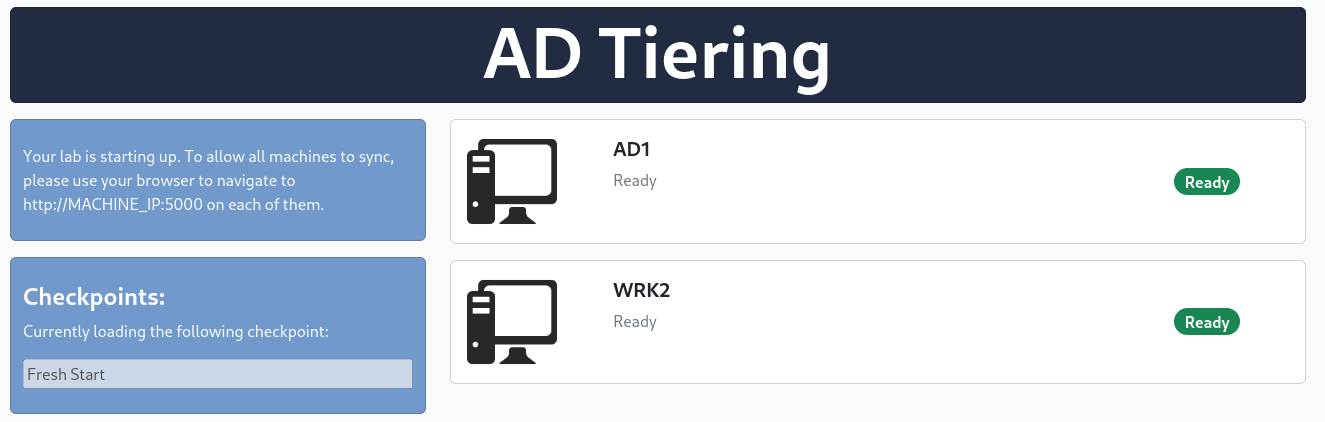
Open this room in a separate tab and follow the instructions to start the workstation . The room will guide you through the process of syncing up the machines. If you followed the process correctly, both machines should change to the "Ready" state after a couple of minutes:
At this point, your lab is set up and ready to continue. You only need to sync the machines once. After the process is complete, port 5000 in both machines will become unavailable.
Once your lab is initialised, you can access any of the machines via RDP with the following credentials:

| Username | THM\Administrator |
| Password | Password321 |
Most of the room will cover configurations on the . All flags can be obtained from this machine.
The complementary workstation use is optional and will allow you to test how the tiered model implementation works. Feel free to use this machine as you need to check if the configurations you are applying on the Domain Controller have the expected results at any point of this room.
You will be able to move this workstation to any tier you need, as many times as you need. Just remember that for the workstation to pick up any configuration changes done to the Group Policy in the immediately, you will need to force a gpupdate /force locally. You can use any user to issue the command.
It is highly recommended that you start a session with the THM\Administrator user on the workstation and keep it open throughout the room. This ensures a way to issue commands to the machine in case you lock yourself out by applying any broken GPOs.
Using checkpoints
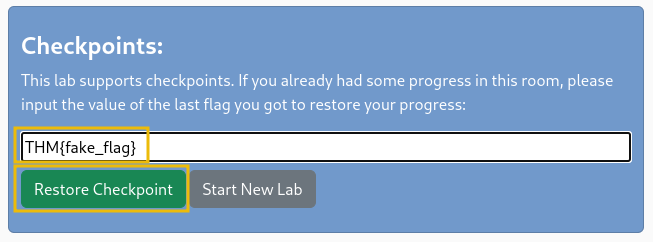
In case you can't finish the room in a single sitting and need to restart the lab from where you left off, you can use the last flag you obtained as a checkpoint. When starting the lab for the second time, just input your current flag in the initial screen and press Restore Checkpoint:
This will restore the state of the machines with all the configurations you had done so far.
Obtaining flags
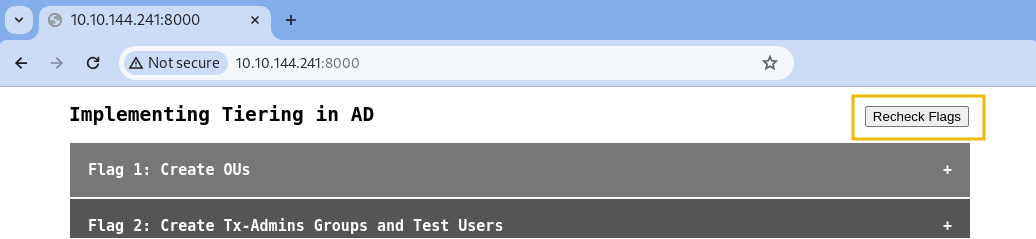
For this room, you will also need to access the flag dispenser at http://MACHINE_IP:8000/ (opens in new tab). Since we'll be doing a lot of configurations on the machine, the flag dispenser will give you flags when you complete certain tasks, and also point you in the right direction if you need help. You can press the Recheck Flags button in the flag dispenser at any time to get your current configurations checked. If you have finished all tasks required for any given flag, you will receive it.
Ready to learn Cyber Security?
The AD Tier Model room is only available for Premium or Max subscribers. Signup now to access more than 500 free rooms and learn cyber security through a fun, interactive learning environment.
Already have an account? Log in