
Digital Forensics Case B4DM755
Acquire the critical skills of evidence preservation, disk imaging, and artefact analysis for use in court.
easy

To access material, start machines and answer questions login.
Disclaimer
This fictional scenario presents a narrative with invented names, characters, and events. It is not meant to suggest any connection or resemblance to actual individuals, locations, structures, or merchandise.
Building up on Intro to Digital Forensics
During Intro to Digital Forensics, we learned about the two types of investigations that either the public-sector or private-sector initiates, the digital forensic process, and some practical examples of how we can apply our newly acquired knowledge of digital forensics.
In this room, we will simulate an actual crime scenario whereby a court of law has authorised us to conduct a search on a specific person and analyse obtained artefacts and evidence.
Room Objectives
Learn about the following to build up the confidence of future Forensics Lab Analysts, First Responders, and Digital Forensics Investigators:
- Ensure proper procedures for transport to the Forensics Laboratory.
- Use FTK Imager to acquire a forensic disk image and preserve digital artefacts and evidence.
- Analyse forensic artefacts received at the Forensics Laboratory for presentation during a trial in a court of law.
Room Prerequisites
Before starting with this room, we recommend you clear Intro to Digital Forensics and Introduction to Cryptography.
Case B4DM755 - Details
|
Suspect:
Nationality:
Charges Pressed / Accused Crimes:
|
|

Scenario
As a Forensics Lab Analyst, you analyse the artefacts from crime scenes. Occasionally, the law enforcement agency you work for receives "intelligence reports" about different cases, and today is one such day. A trusted informant, who has connections to an international crime syndicate, contacted your supervisor about William S. McClean from Case #B4DM755.
The informant provided information about the suspect's whereabouts in Metro Manila, Philippines, which is currently at large, and a transaction that will happen today with a local gang member. They also knew the exact location of the meetup and that the suspect would have incriminating materials at the time.
The law enforcement agency prepared for the operation by obtaining proper search authority and assigning a (Digital Forensics & Incident Response) First Responder (i.e., you) to ensure the appropriate acquisition of digital artefacts and evidence for examination at the Forensics Lab, and eventually for use in litigation. The court issued a search warrant on the same day, allowing law enforcement officers to investigate the suspect and his place of residence based on the informant's tip.
NOTE: In an understaffed agency, one person may be assigned multiple roles, including acquisition and analysis, particularly for high-profile cases. This can help minimize evidence tampering, and ensure accountability as the is mainly handled by a single individual (i.e., you).
What role was assigned to you for this specific scenario?
What do you have to gather?
What document is needed before performing any legal search?
Forensic Acquisition Process for Digital Artefacts and Evidence

|
Each department might have unique protocols for acquiring digital artefacts and evidence. However, First Responders should typically adhere to the following guidelines if there is any computer system at the scene of a crime:
|
Process for Establishing
|
Each department might have unique protocols regarding maintaining the . However, First Responders should typically adhere to the following guidelines when handling digital artefacts and evidence before, during, and after collection:
|
|

Before, during, and after turnover, ensure that the artefacts and evidence are complete and the Field Operative and Forensics Lab Analyst verifies inventory. Any related forms must be adequately filled-out to guarantee a transparent and untainted handover of artefacts and evidence.
Before imaging drives, what must we check them for?
What should be done to ensure and maintain the integrity of original files in the Chain of Custody?
What must be done before sending obtained artefacts to the Forensics Laboratory?
Scenario (continuation)
Unfortunately, law enforcement arrived late at the suspect's residence, where the transaction supposedly happened. Upon arrival, everyone appeared to have already left; there were indications of evidence eradication attempts, and a transaction between the nefarious elements had successfully occurred.

During a thorough search of the suspect's place, law enforcement officers discovered a flash drive under the desk. A key chain with the initials WSM was attached to the flash drive, which the team believes belongs to the suspect. It may have been left behind accidentally in their haste to vacate the place.

As a First Responder accompanying the Field Operatives, you documented, labelled, and preserved the artefact found and completed the form. You then transported the artefact to the Forensics Laboratory for further examination.
Based on the scenario and the previous task, what should be done with that acquired suspect artefact?
What is the crucial aspect of the Chain of Custody that ensures individual accountability and guarantees a transparent and untainted transfer of artefacts and evidence?
Set up your virtual environment

Connecting to the machine
Start the lab machine in split-screen view by clicking on the green Start Lab Machine button on the upper right section of this task. If the is not visible, use the blue Show Split View button at the top-right of the page. Alternatively, you can connect to the via using the credentials below if Split View does not work.

| Username | analyst |
| Password | DFIR321! |
| IP | MACHINE_IP |
IMPORTANT: The attached has a copy of the FTK Imager installation. Proceed to work on the subsequent tasks, and experiment with FTK Imager through a case example.
FTK Imager

|
FTK Imager is a forensics tool that allows forensic specialists to acquire computer data and perform analysis without affecting the original evidence, preserving its authenticity, , and validity for presentation during a trial in a court of law. |
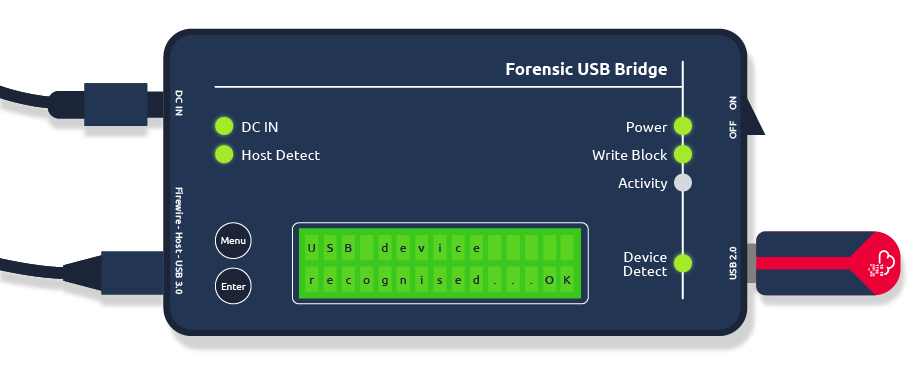
NOTE: In a real-world scenario, a Forensics Lab Analyst will use a write-blocking device to mount the suspect drive / forensic artefact to prevent accidental tampering.
FTK Imager - User Interface (UI)
|
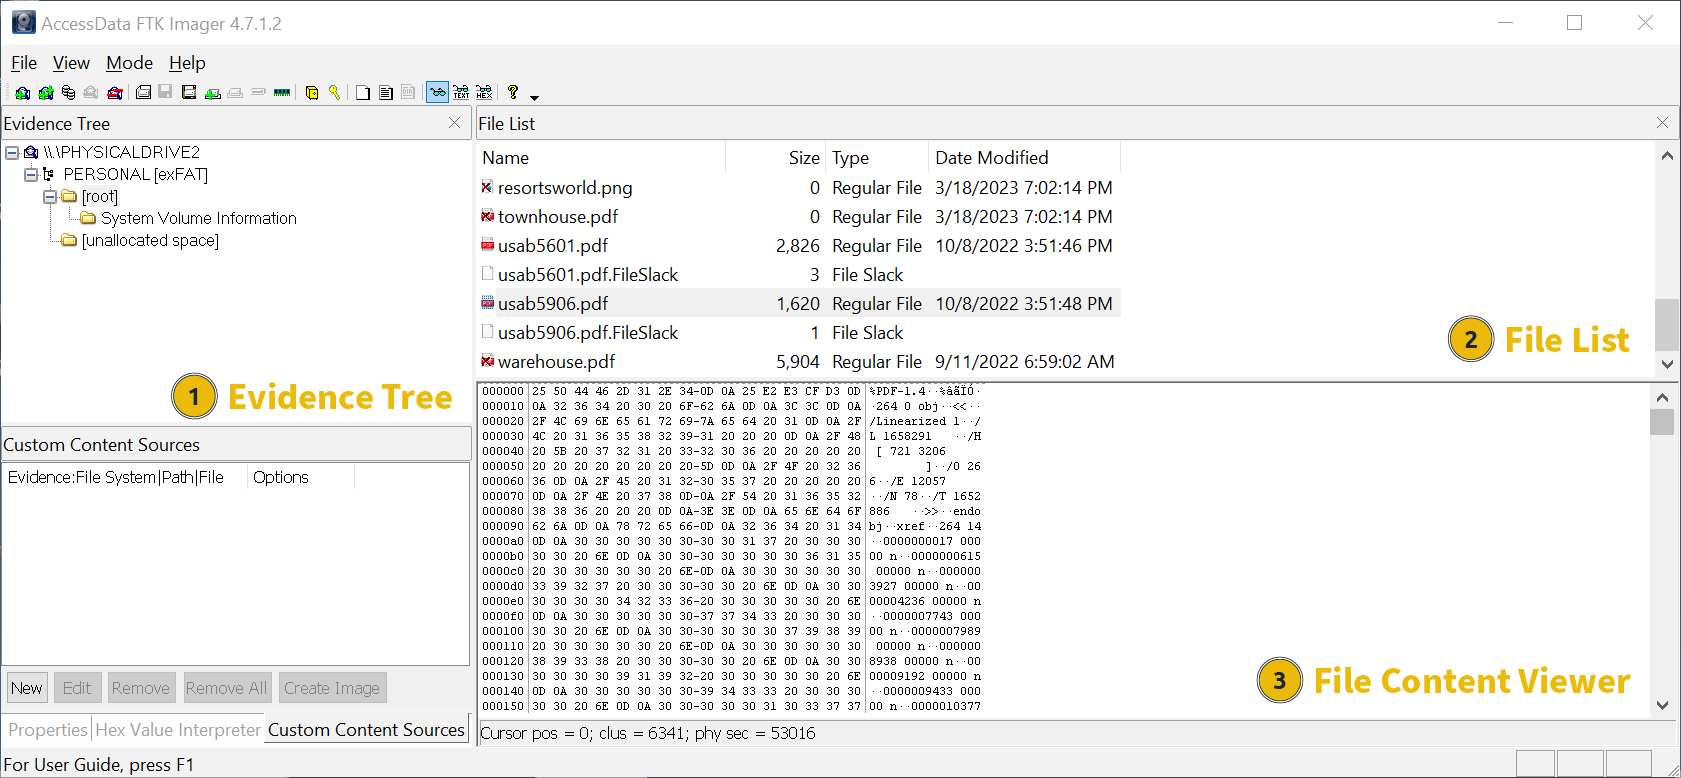
FTK Imager includes vital UI components that are crucial to its functionality. These components are:
|
Working with FTK Imager
OBJECTIVES: Verify encryption, obtain a forensic disk image, and analyse the recovered artefact.
IMPORTANT: The contains an emulated flash drive,"\\PHYSICALDRIVE2 - Microsoft Virtual Disk [1GB SCSI]", to replicate the scenario where a physical drive, connected to a write blocker, is attached to an actual machine for forensic analysis. The steps performed in this activity are practically the same as in real-world situations. The write-protected flash drive is automatically attached to the upon startup.
STEP 1: Detecting Encryption with FTK Imager
IMPORTANT: The drive's must be to utilise encryption. encryption is not compatible with FAT32 or exFAT file systems.
A Forensics Lab Analyst can perform the following steps to detect the presence of encryption on a physical drive:
-
Open FTK Imager and navigate to
File > Add Evidence Item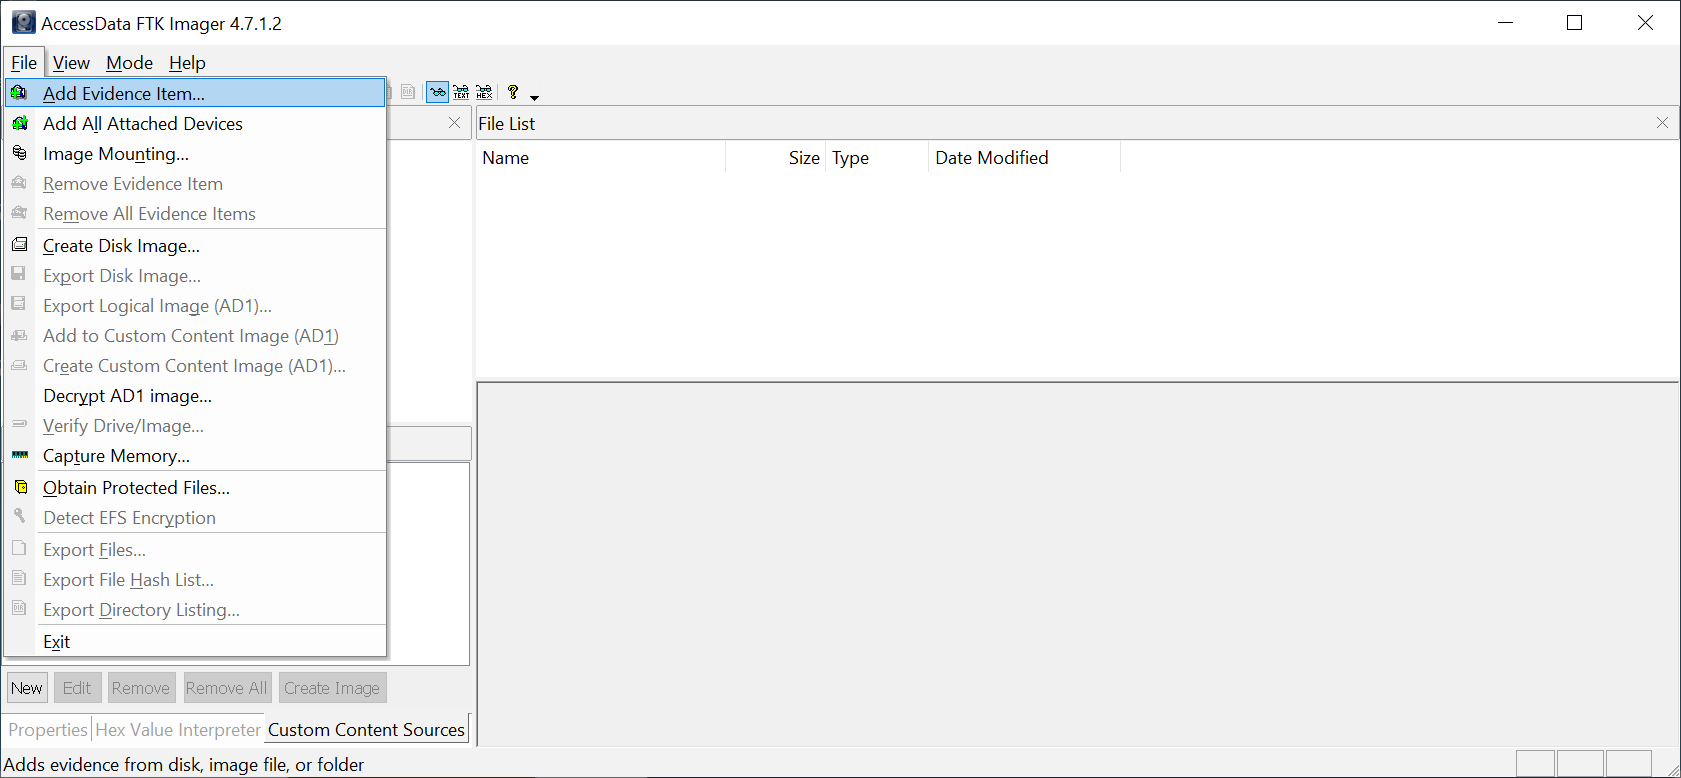
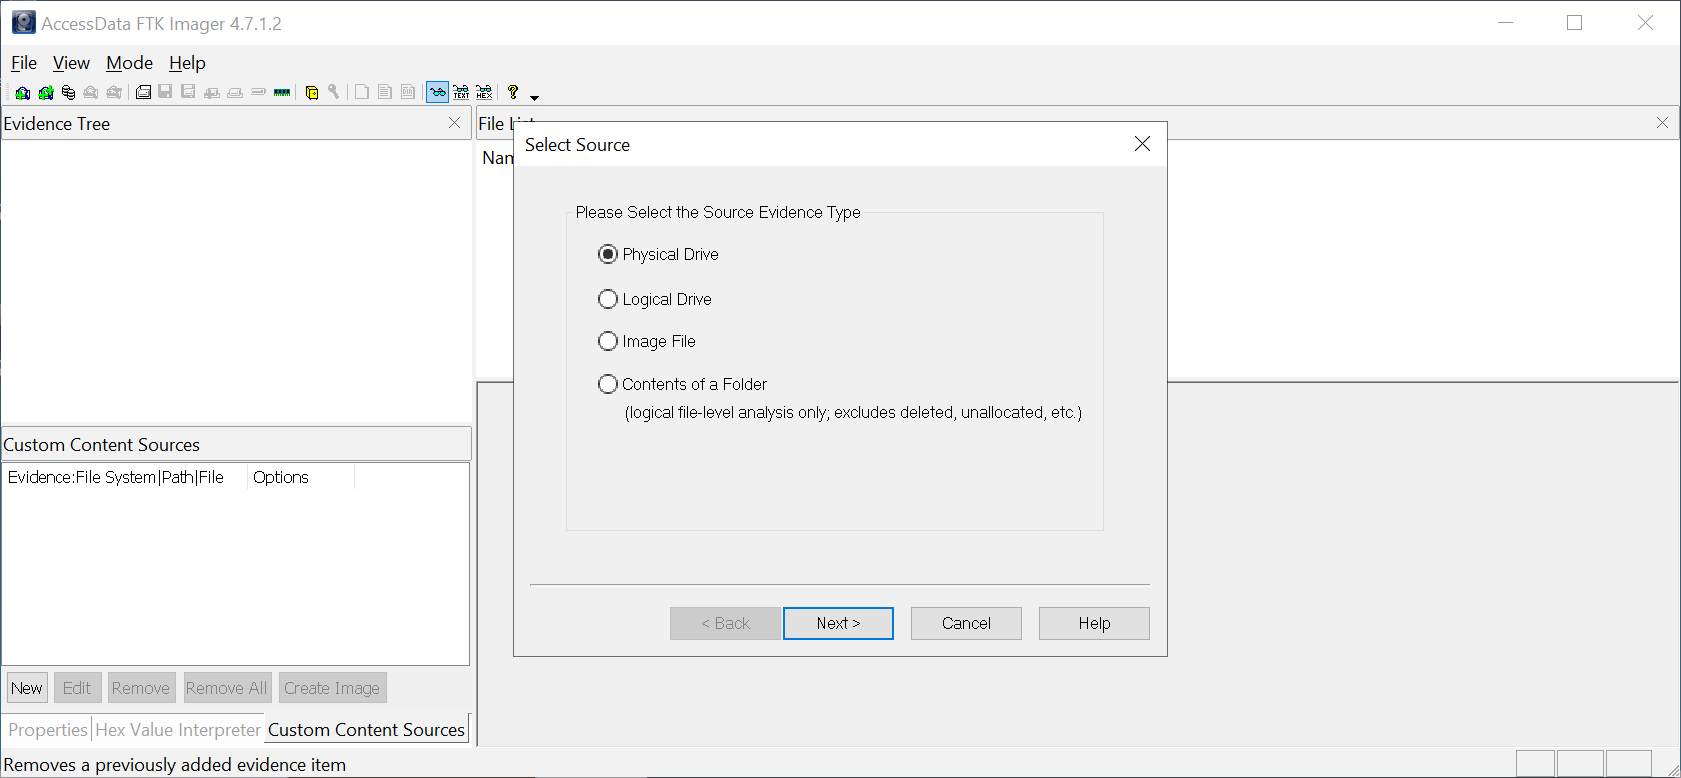
-
Choose Physical Drive on the Select Source window, then click Next.
-
Choose Microsoft Virtual Disk (our virtual flash drive) on the Select Drive window, then click Finish.
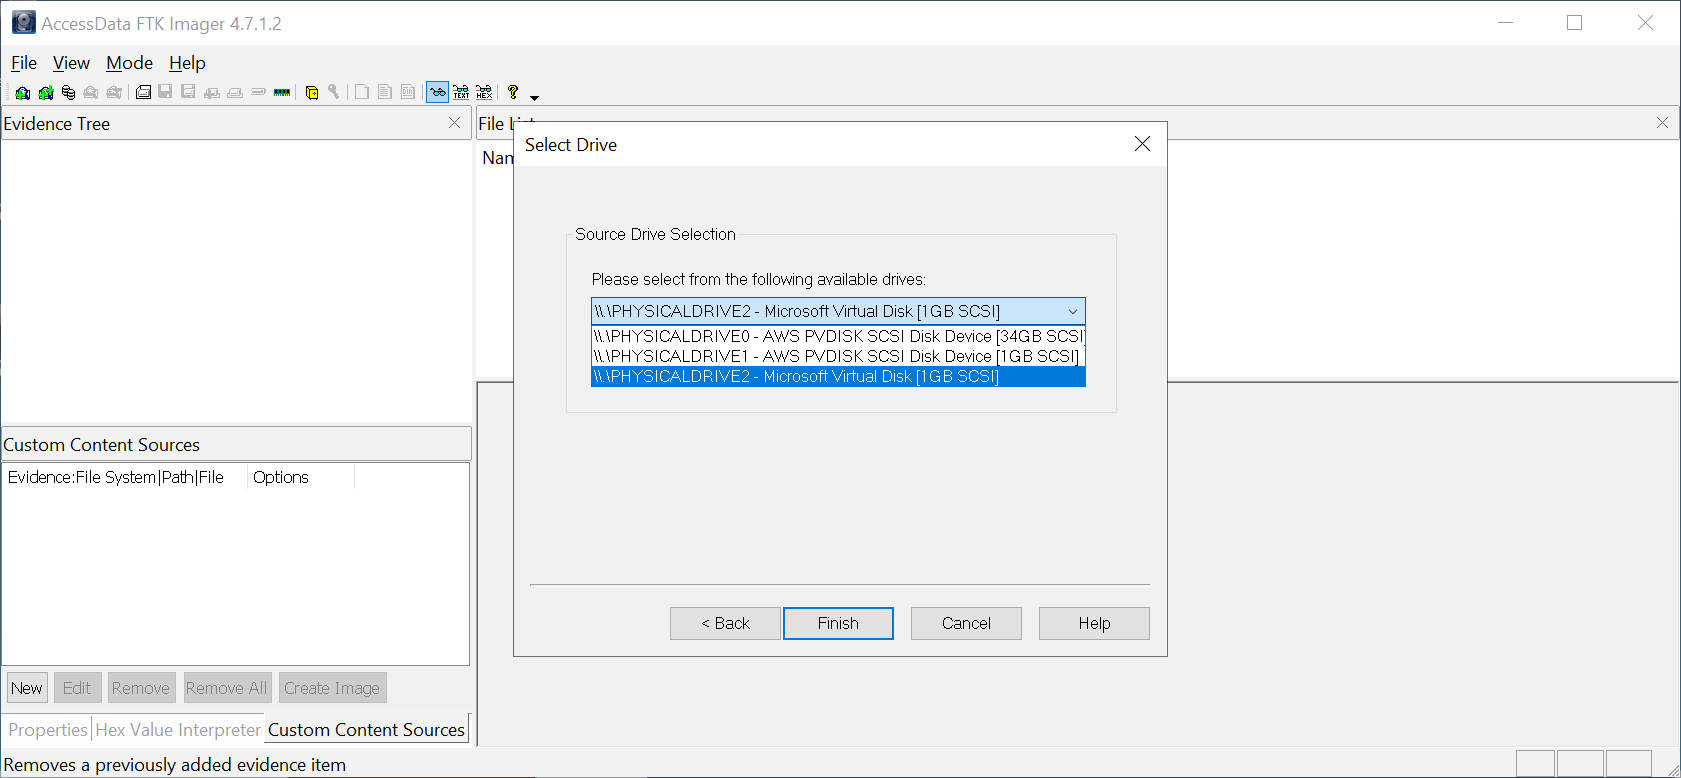
-
Navigate and click
File > Detect EFS Encryptionto scan the drive and detect the presence of encryption.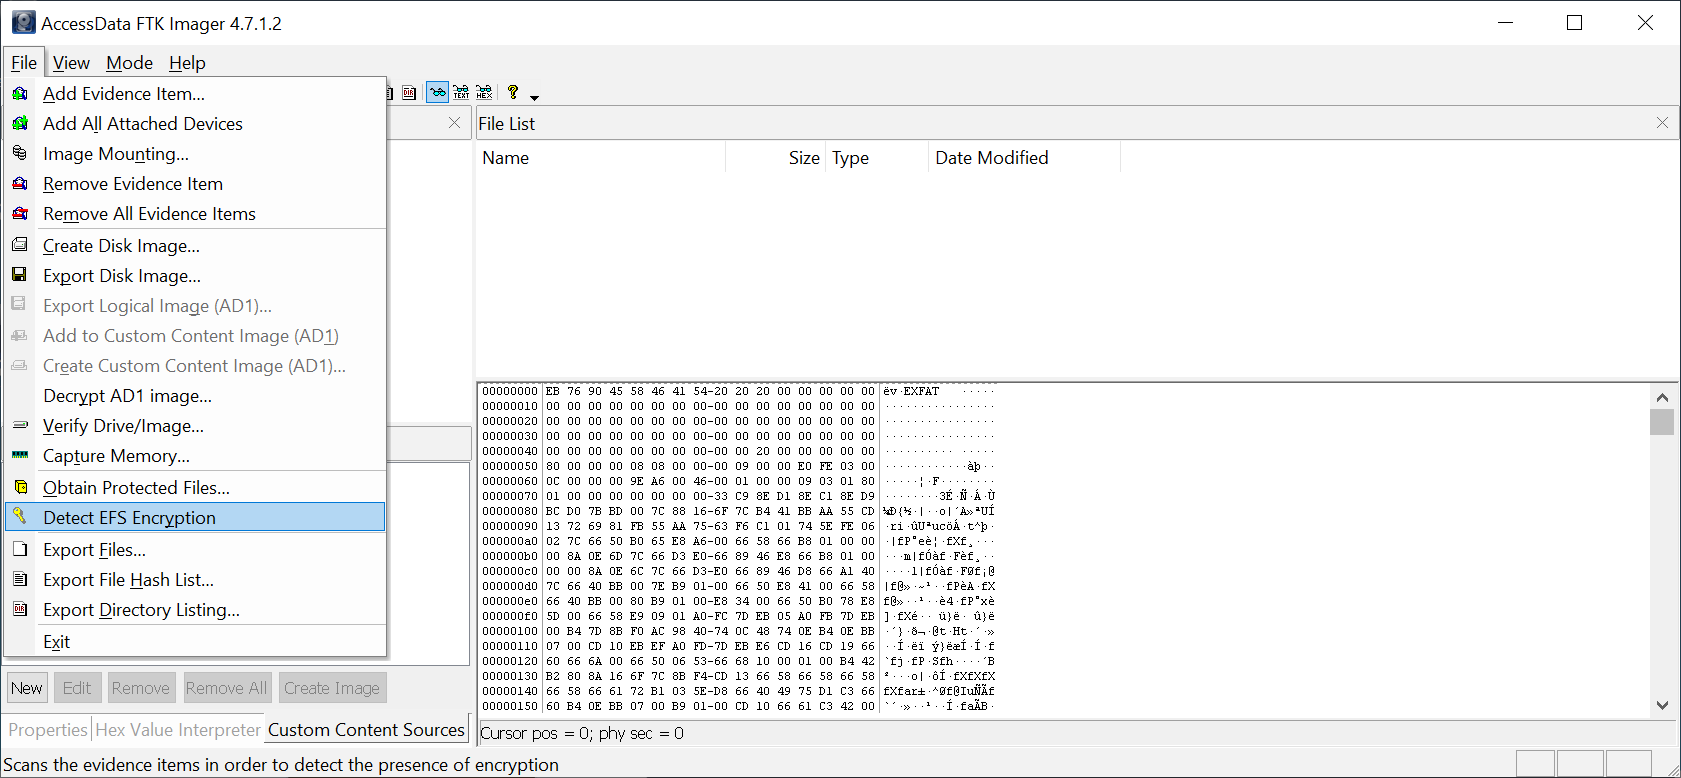
-
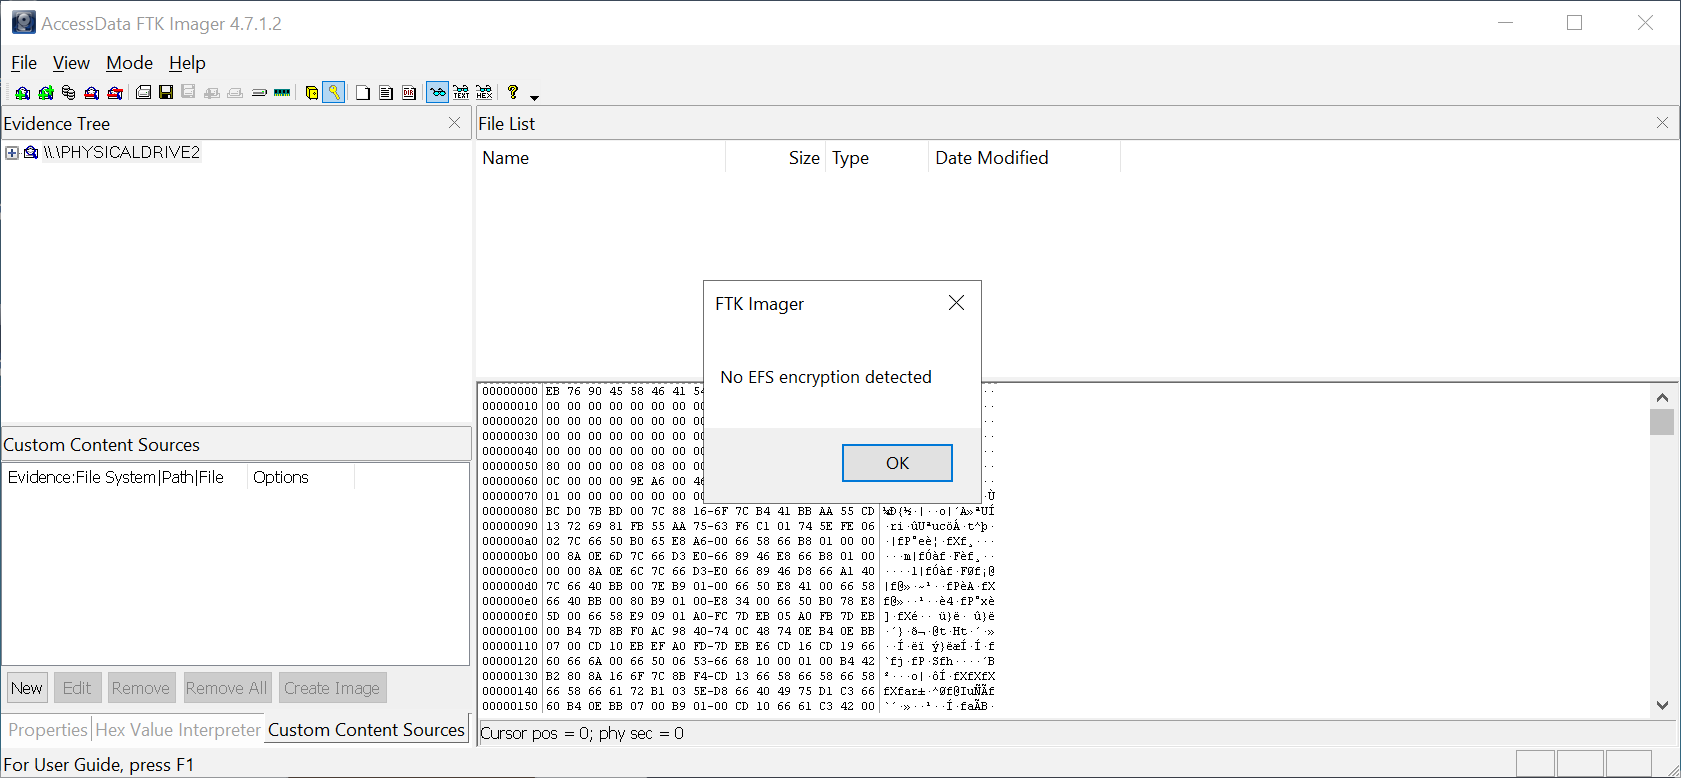
A message box will indicate whether or not encryption is on the attached drive.
Start the attached VM, work on the subsequent tasks, and experiment with FTK Imager through a case example.
What device will prevent tampering when acquiring a forensic disk image?
What is the UI element of FTK Imager which displays a hierarchical view of the added evidence sources?
Is the attached flash drive encrypted? (Y/N)
What is the UI element of FTK Imager which displays a list of files and folders?
STEP 2: Creating a Forensic Disk Image with FTK Imager
A Forensics Lab Analyst can perform the following steps to create a forensic disk image from a physical drive:
-
Open FTK Imager and navigate to
File > Create Disk Image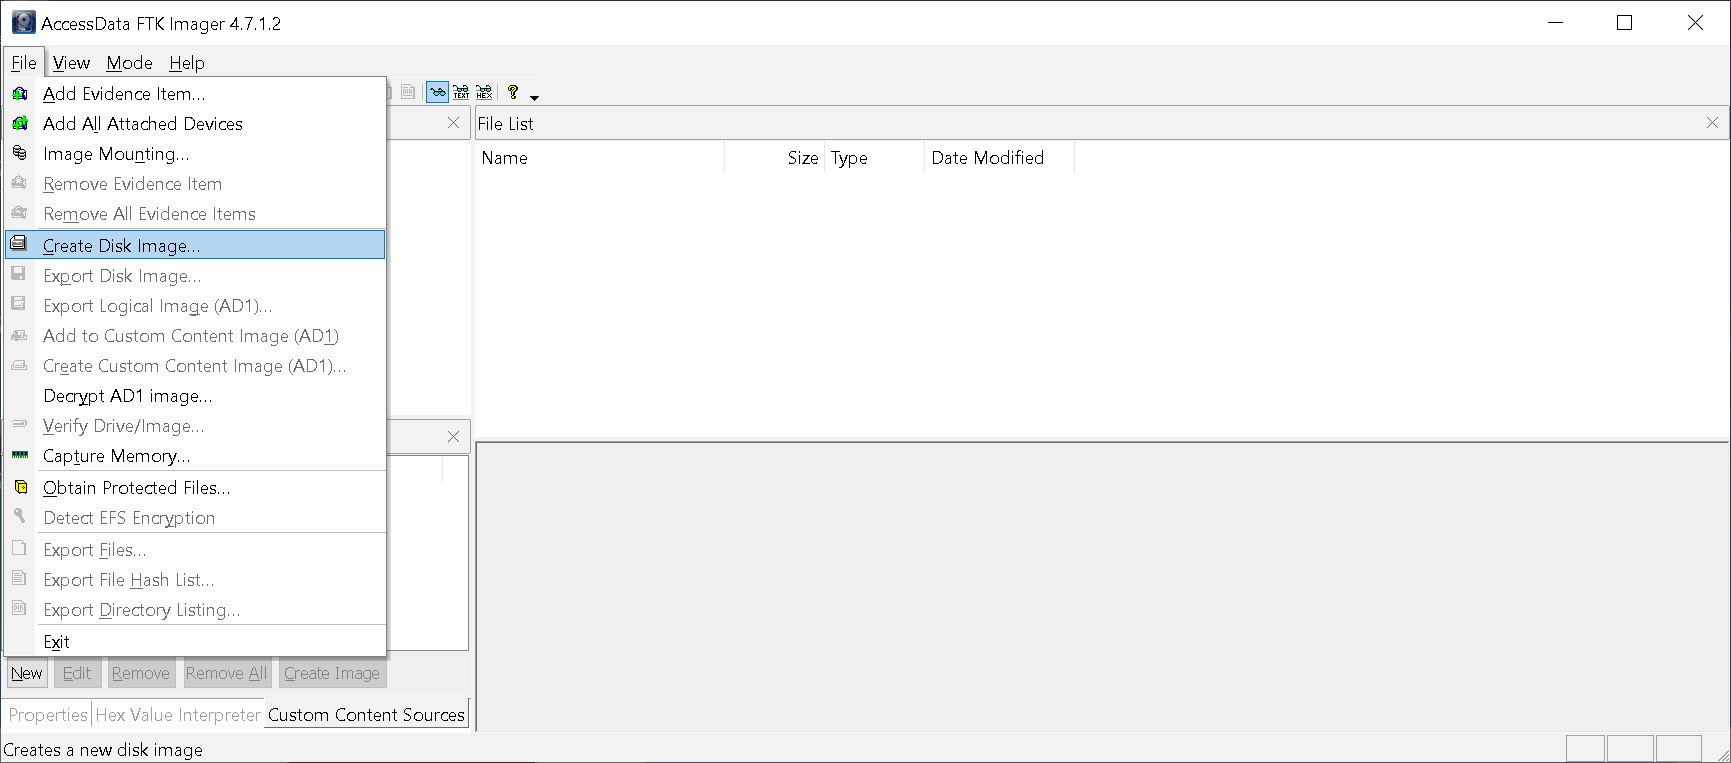
-
Choose Physical Drive on the Select Source window, then click Next.
-
Choose Microsoft Virtual Disk (our virtual flash drive) on the Select Drive window, then click Finish.
-
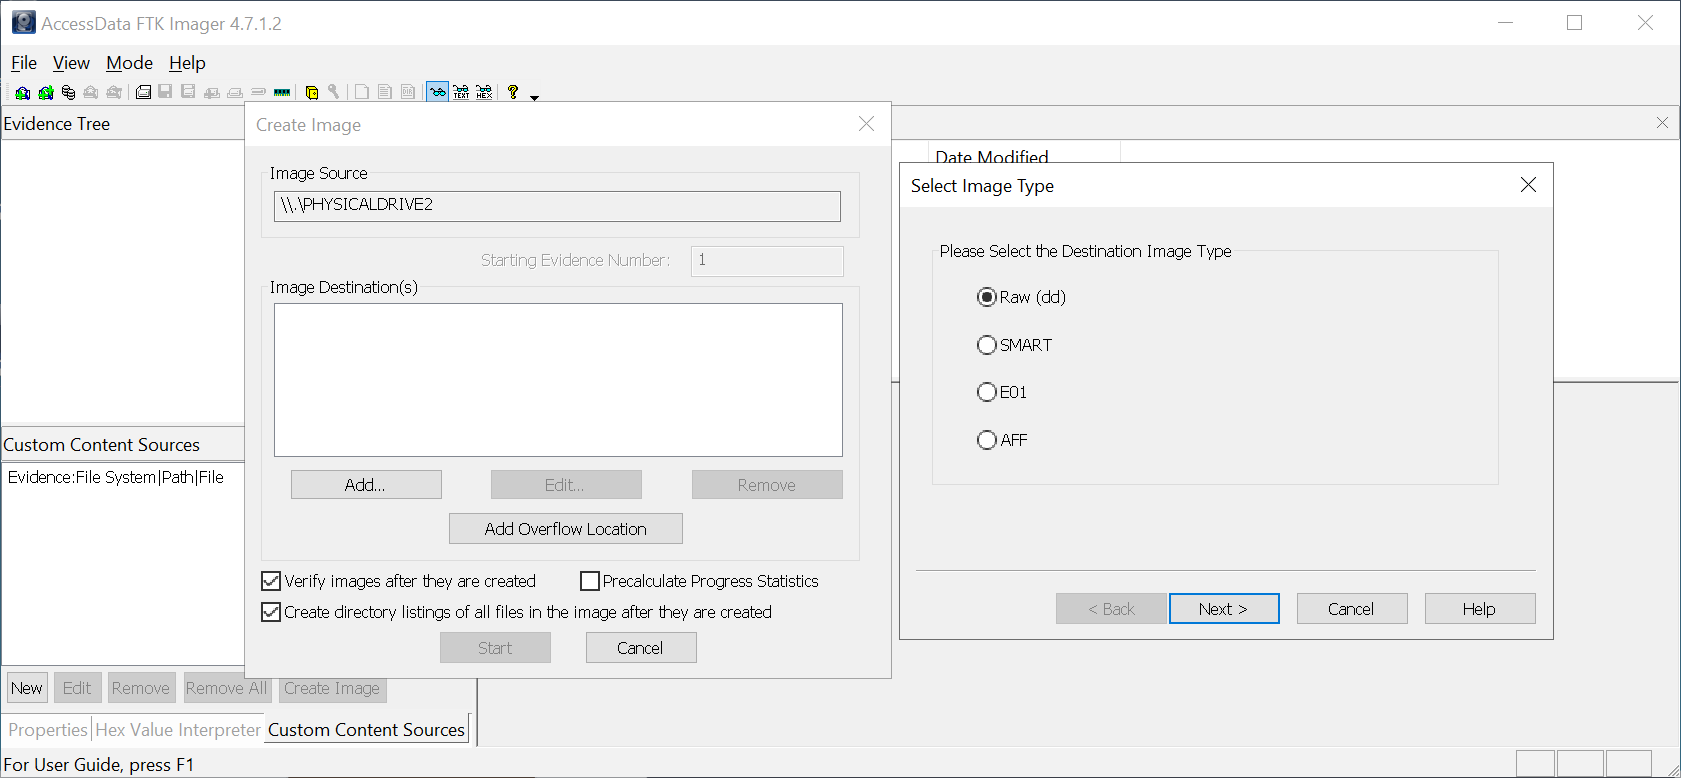
Ensure you check "Verify images after they are created" and "Create directory listings of all files in the image after they are created" on the Create Image window. Press Add to open the Select Image Type window, choose Raw (dd), then click Next.
-
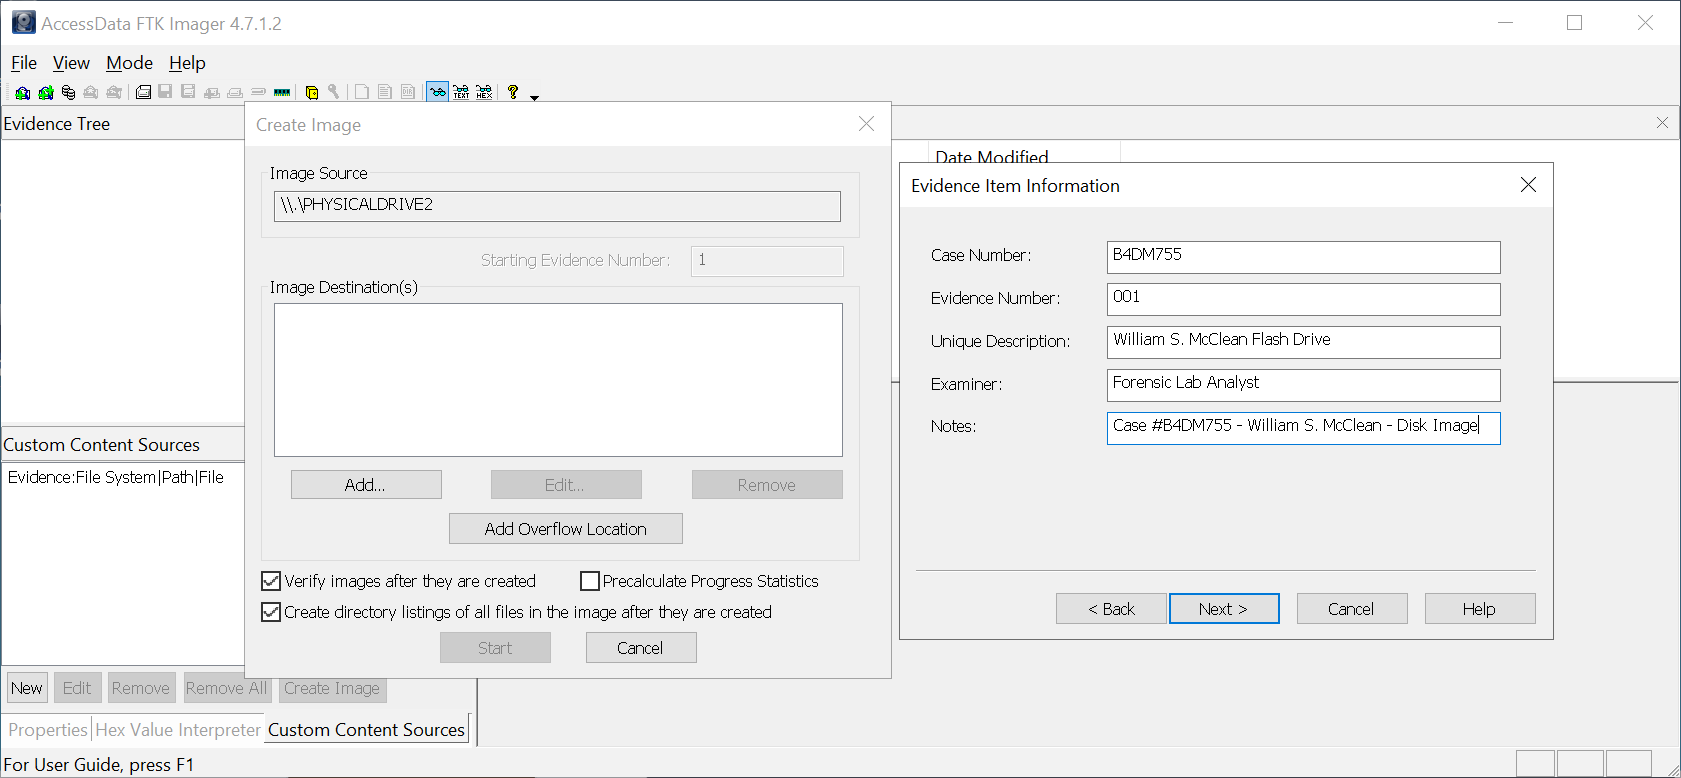
Enter case details in the Evidence Item Information window, then click Next.
-
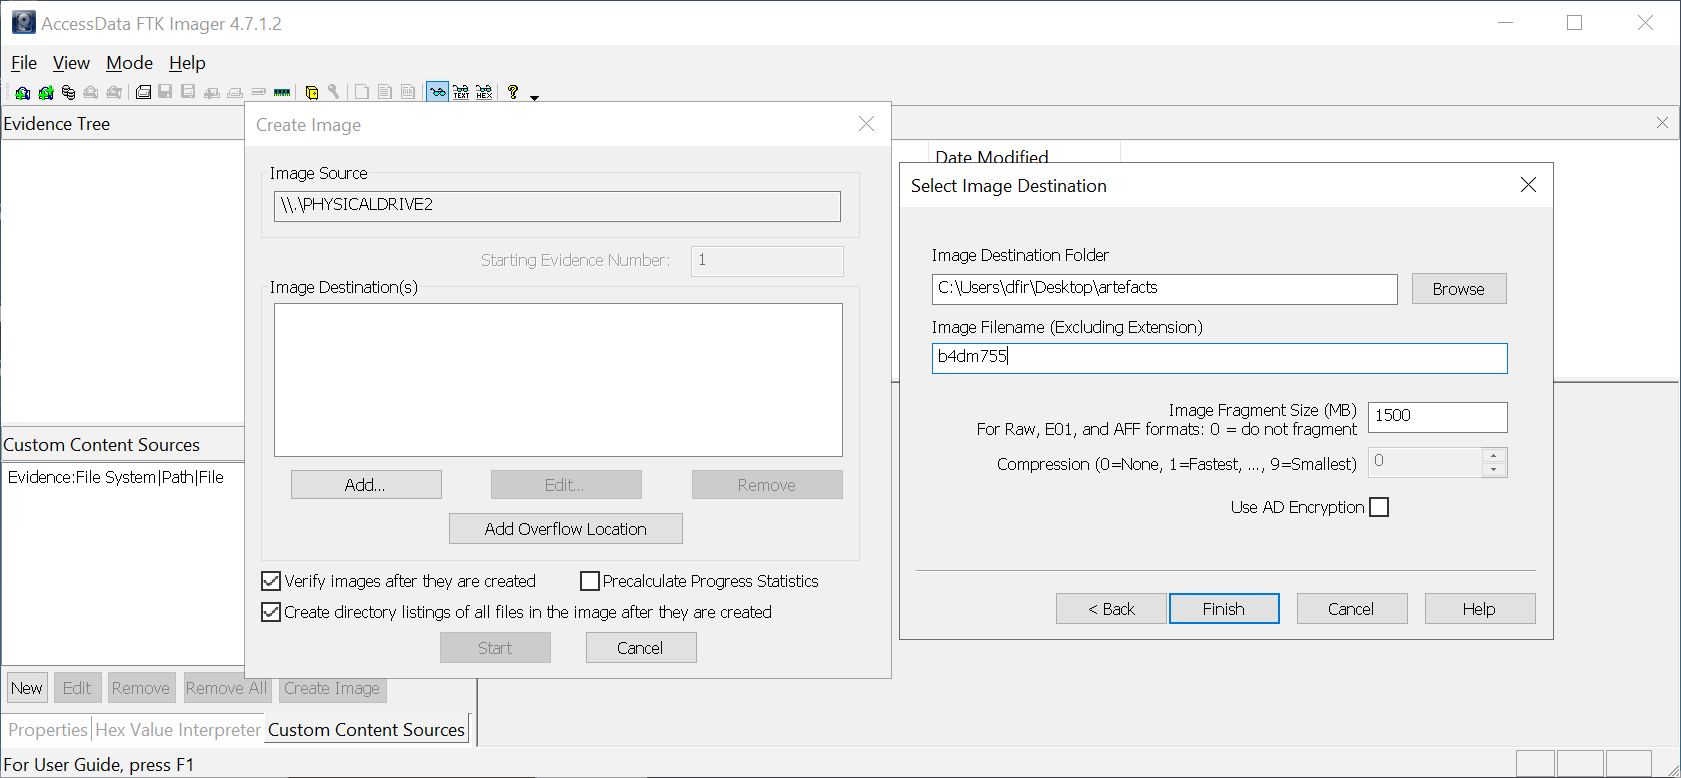
Enter the Image Destination Folder and Image Filename, then click Finish.
-
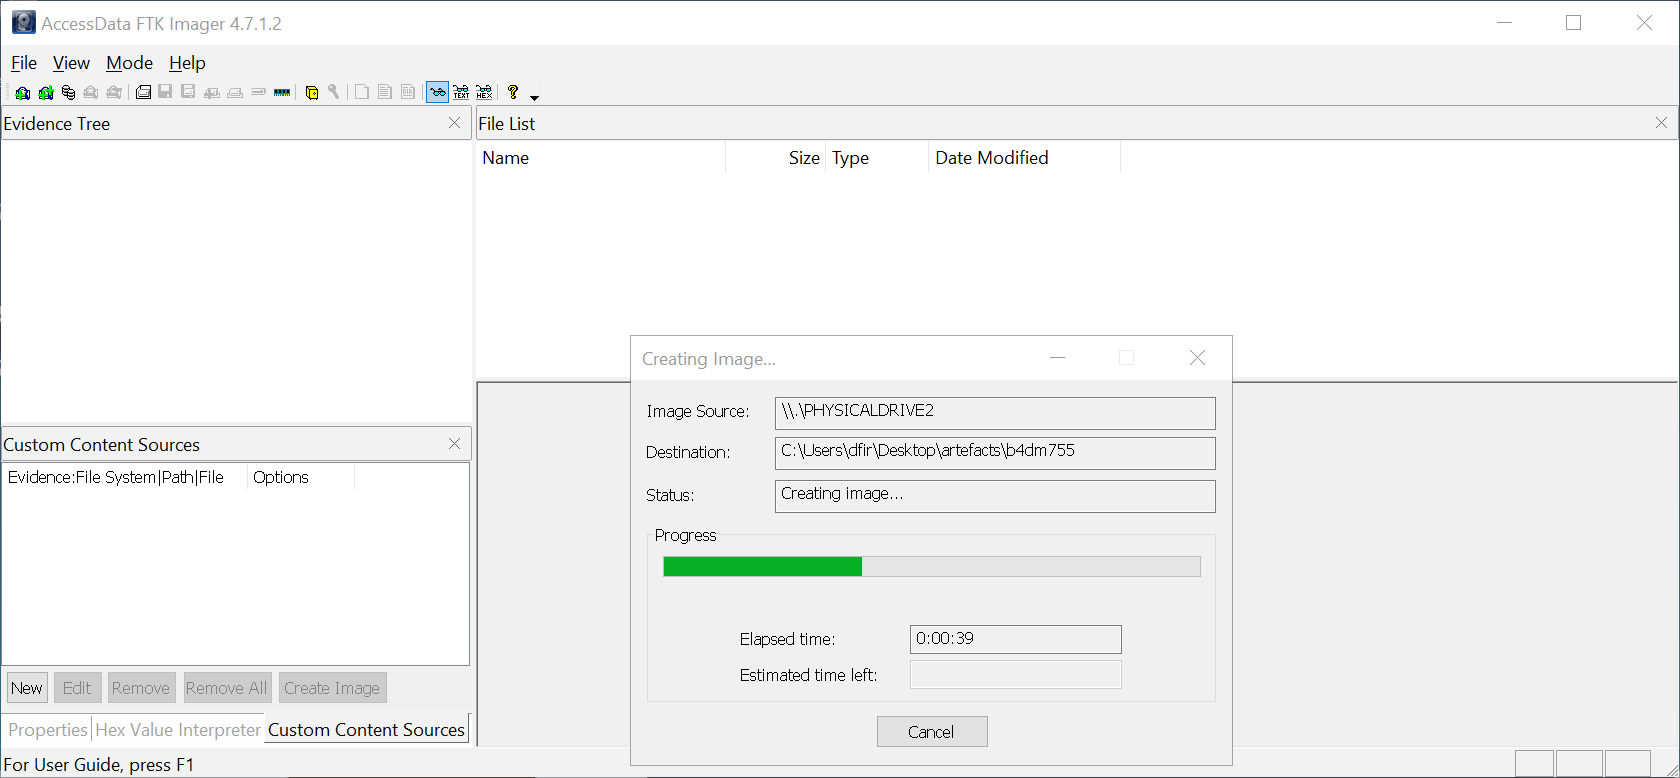
Press Start to begin creating the forensic disk image.

-
When you check "Verify images after they are created", FTK Imager will hash both the physical drive and the forensic disk image after disk imaging. It will then validate if both hashes are equal to confirm a match.

Note: You can go ahead and answer Question 1 and 2, then come back and follow along with the Step 3 section.
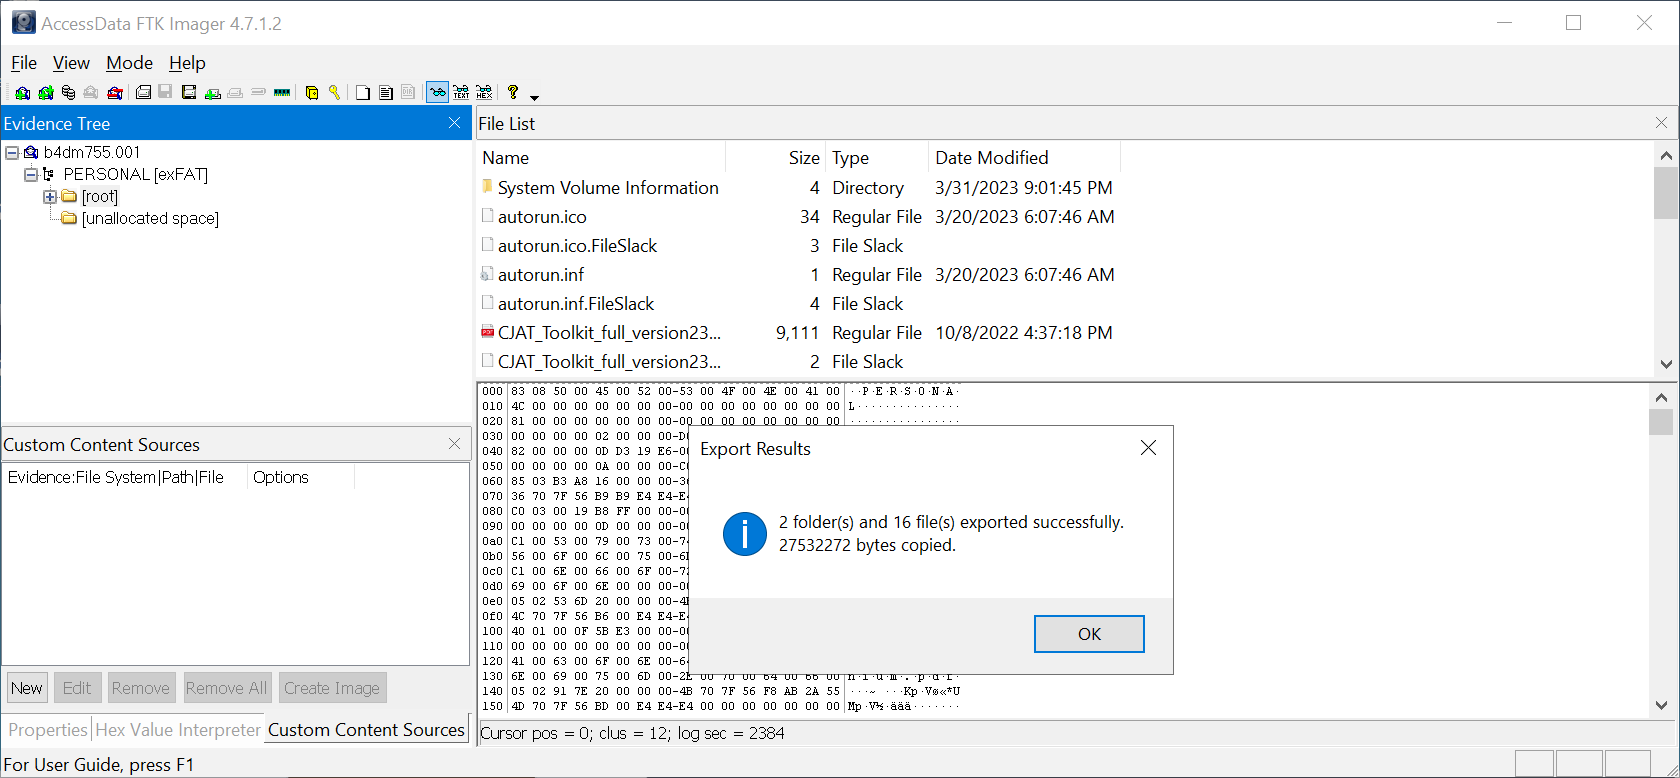
STEP 3: Mounting a Forensic Disk Image and Extracting Artefacts
A Forensics Lab Analyst can perform the following steps to mount a forensic disk image and extract artefacts using FTK Imager:
-
Open FTK Imager and navigate to
File > Add Evidence Item
-
Choose Image File on the Select Source window, then click Next.
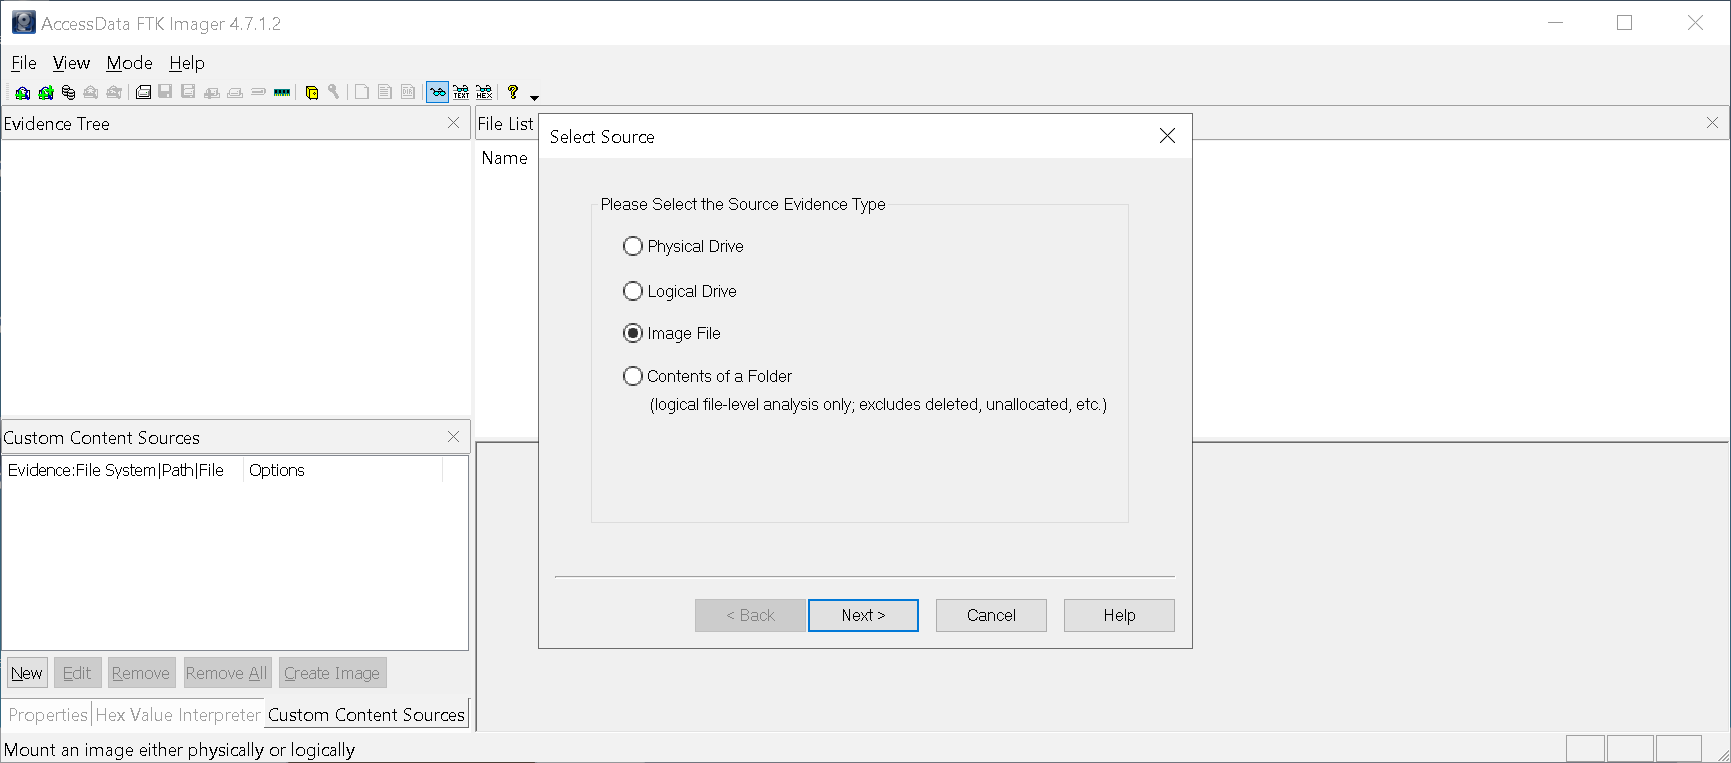
-
Set Evidence Source to the path of the forensic disk image that we created previously and click Finish.
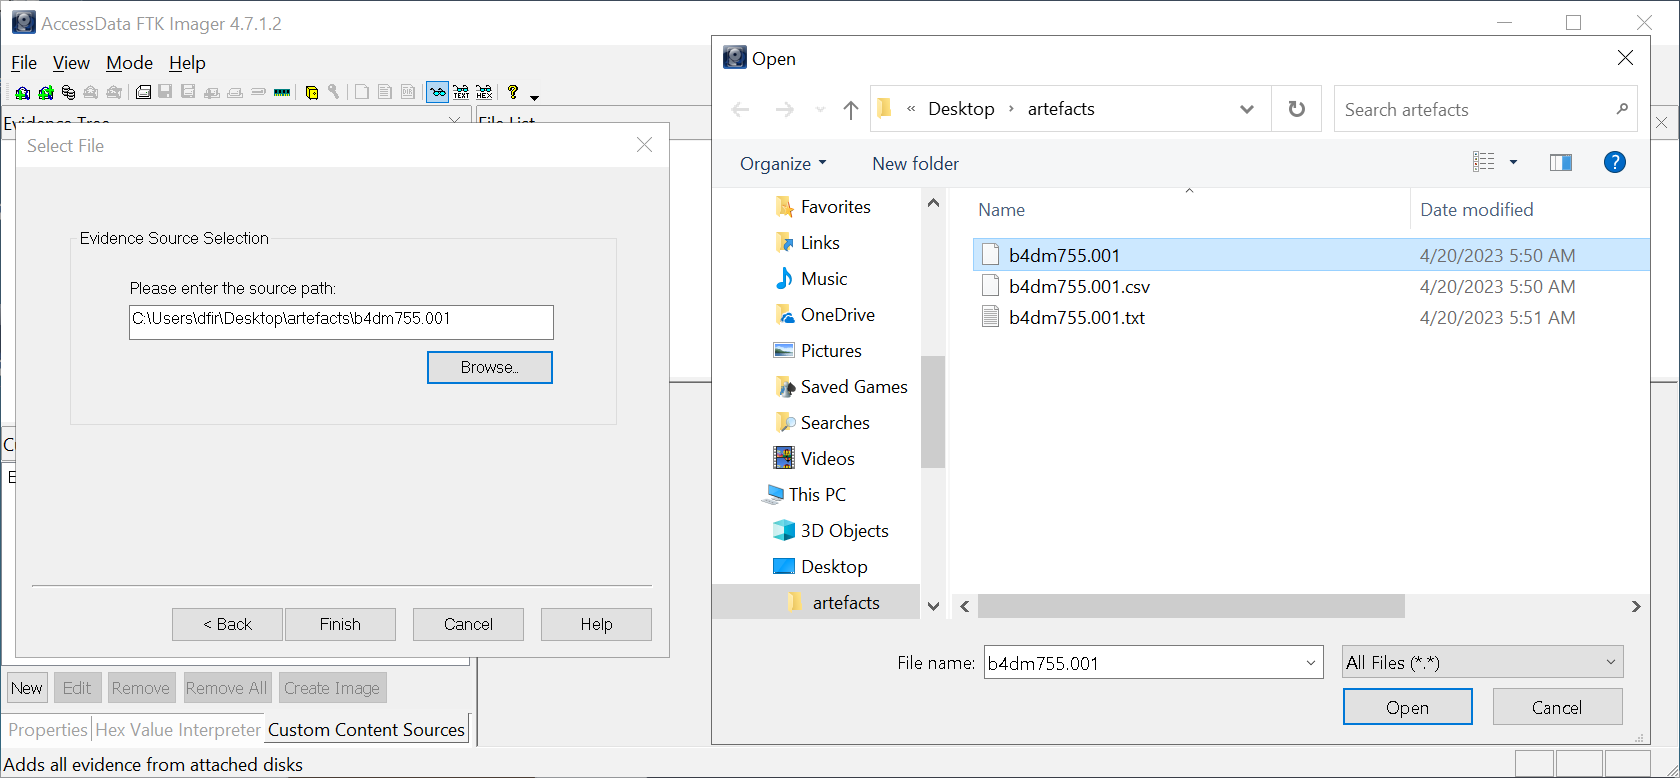
-
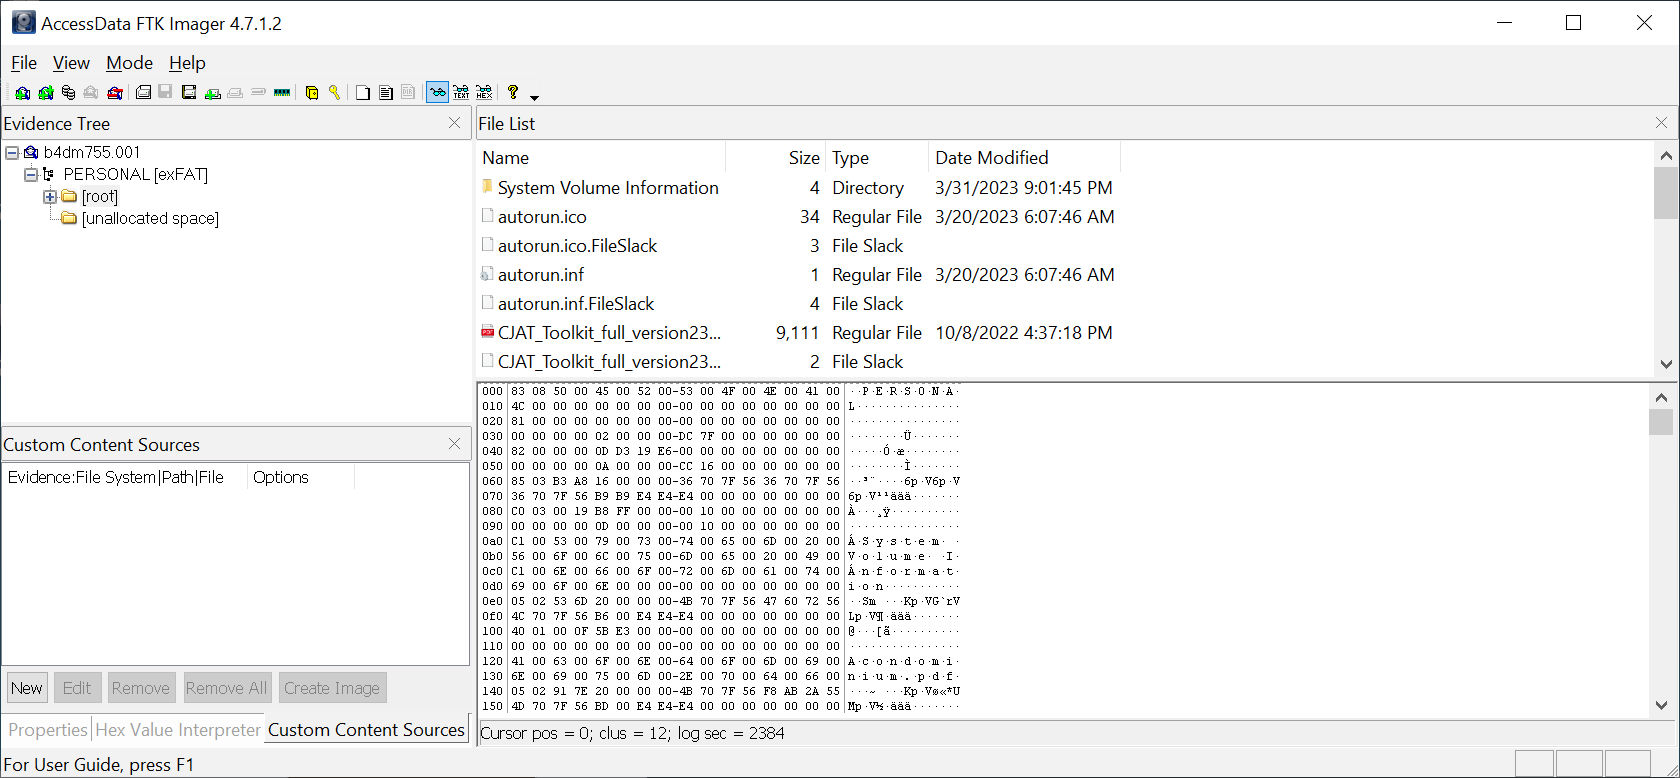
The Evidence Tree Pane will be populated, and artefacts will be visible on the File List Pane. The Viewer Pane will display the contents of selected elements for analysis.
IMPORTANT: During forensic analysis with FTK Imager, it is always crucial to analyse using the forensic disk image that has been created. It is also equally important to look for signs of deleted files (i.e., those with an x symbol), corrupted files (e.g., 0 file size) and obfuscation (e.g., conflicting information about a file's extension and header information).
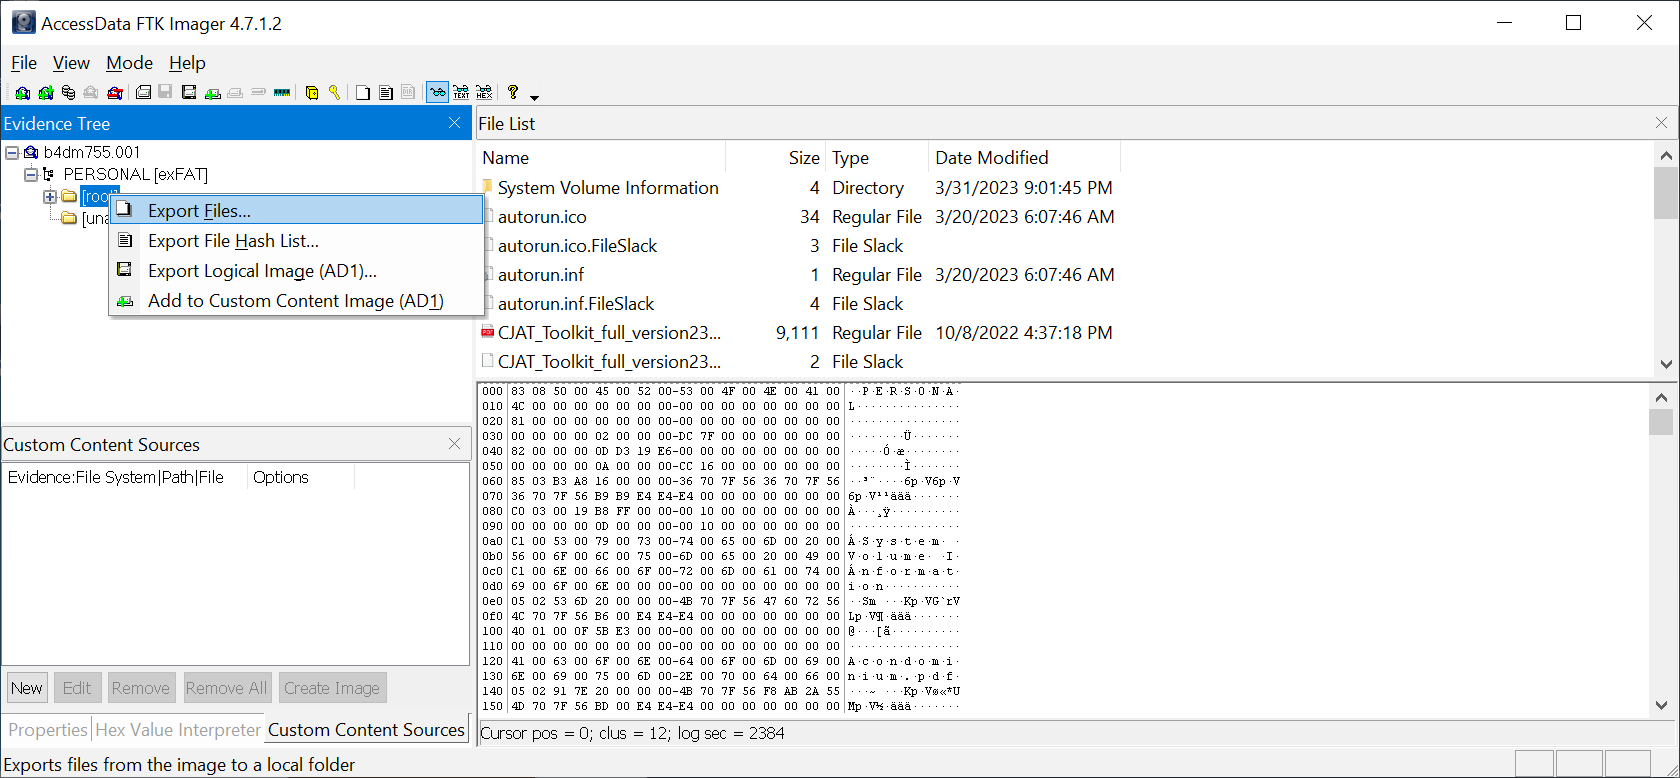
-
To recover all deleted files, right-click on the target directory or file and press Export Files to save artefacts.
What is the UI element of FTK Imager which displays the content of selected files?
What is the SHA1 hash of the physical drive and forensic image?
Including hidden files, how many files are currently stored on the flash drive?
How many files were deleted in total?
How many recovered files are corrupted (e.g., 0 file size)?
Scenario (continuation)
Upon receiving the artefacts and evidence from the crime scene at the Forensics Lab, it is imperative to establish their authenticity. Since the First Responders recovered only a flash drive, you then proceed with the following actions:
- Verify and document every detail of the form from the crime scene to the present.
- Use FTK Imager to create a forensic disk image of the seized flash drive from the suspect's (William S. McClean) residence in Case B4DM755.
- Match the cryptographic hashes of the physical drive and the acquired forensic image to guarantee the authenticity and of the artefacts, making them admissible evidence in a court of law.
- Preserve the physical evidence (i.e., flash drive) for presentation in a court of law during trial after creating a forensic disk image.
- Perform any review and analysis on the created forensic disk image to avoid tampering with evidence.
- Document all examination operations and activities to ensure the admissibility of evidence in court.
- During a presentation at trial, ensure that the cryptographic hashes of the physical evidence and the forensic disk image MATCH.

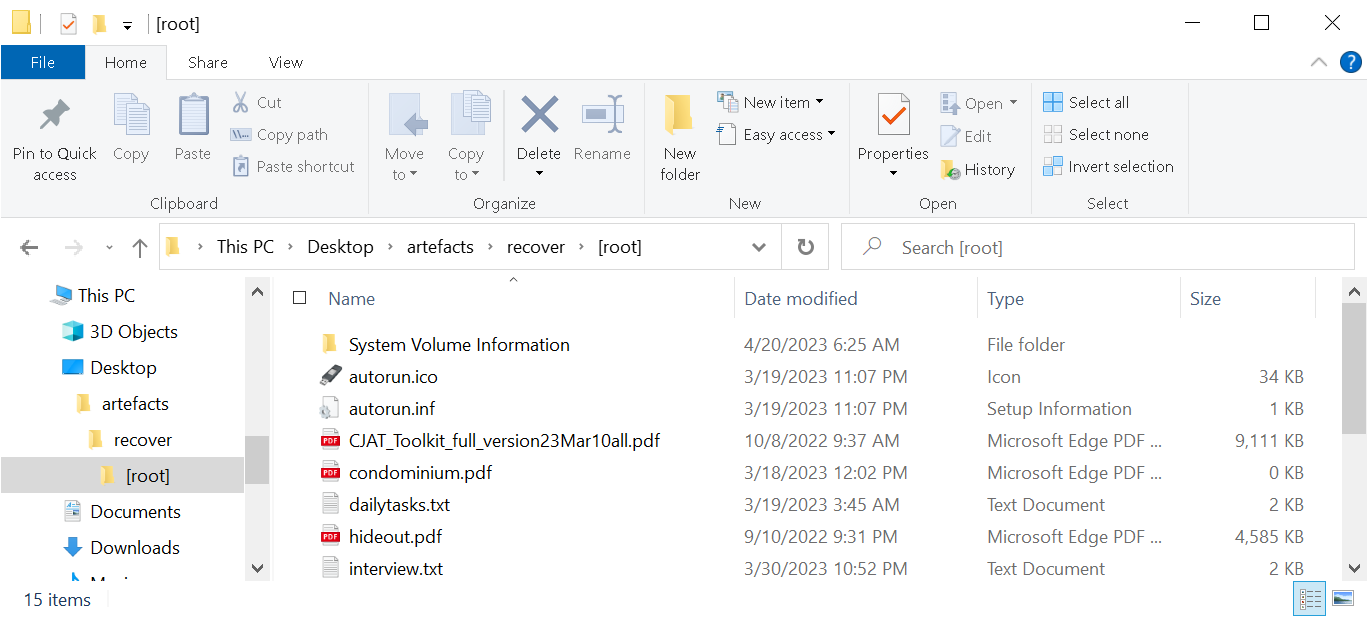
Aside from FTK Imager, what is the directory name of the other tool located in the tools directory under Desktop?
What is the visible extension of the "hideout" file?
View the metadata of the "hideout" file. What is its actual extension?
A phone was used to photograph the "hideout". What is the phone's model?
A phone was used to photograph the "warehouse". What is the phone's model?
Are there any indications that the suspect is involved in other illegal activity? (Y/N)
Who was the point of contact of Mr William S. McClean in 2022?
A meetup occurred in 2022. What are the GPS coordinates during that time?
What is the password to extract the contents of pandorasbox.zip?
From which company did the source code in the pandorasbox directory originate?
In one of the documents that the suspect has yet to sign, who was listed as the beneficiary?
What is the hidden flag?
If there is reasonable suspicion that the suspect possesses and distributes these materials, the law enforcement agency handling the case must follow these 4 Phases of Investigation. Additionally, the First Responder must observe the following steps before, during, and after acquiring digital artefacts and evidence:
|
Pre-search
|

|

|
Search
Post-search
Trial
|

In which phase is a warrant obtained for search, seizure, and examination of the suspect's computer data due to violations of domestic and international laws?
In which phase is a forensic analysis performed on the acquired digital evidence requested from various sources?
Which phase involves presenting forensic artefacts and evidence with proper documentation in a court of law?
Ready to learn Cyber Security?
TryHackMe provides free online cyber security training to secure jobs & upskill through a fun, interactive learning environment.
Already have an account? Log in