
Cluster Hardening
Learn initial security considerations when creating a Kubernetes cluster.
medium

To access material, start machines and answer questions login.

Calling all users and aspiring engineers! You're familiar with , the concepts, the architecture, the landscape, but you want to know how to build your K8s cluster securely, like a true engineer? Well, you've come to the right place. This room takes you through security considerations when starting to develop your cluster, with detailed explanations, examples and, in the last task, a hands-on practical simulating a 'day in the life' of a engineer.
Learning Prerequisites
This room does assume some basic knowledge of ; the knowledge assumed is covered in our Intro to room, so make sure you check that out before starting this. You are also assumed to have foundational knowledge surrounding the technologies that support , which are covered in rooms like Intro to Containerisation and Intro to Docker. For our discussion on network security, some basic understanding of asymmetric encryption and is assumed; this knowledge can be found in Intro to Cryptography.
Learning Objectives
- Understand the concept of
- Understand how to secure network traffic on a cluster
- Understand how to secure the Kubelet component in a cluster
- Understand how to secure traffic in a cluster
- Understand security benchmarks and their use in

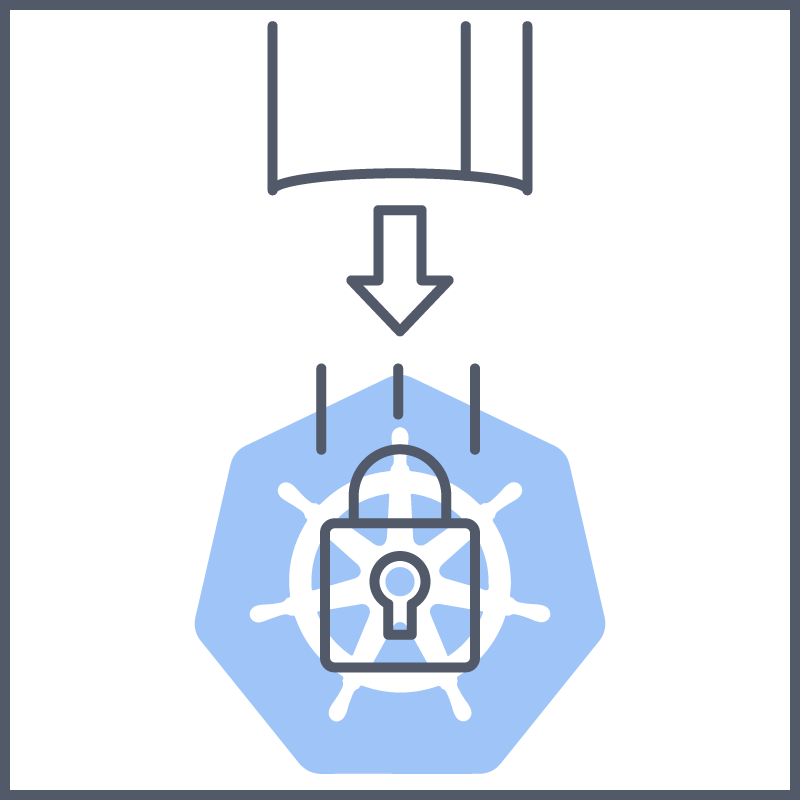
Welcome! Laboratories is building a cluster to support their upcoming release and needs a Engineer for the job. Think you're up for the task. This cluster should be built with practices, but what do you mean by this?
What is ?
As you might remember, a cluster contains nodes, and runs a workload by placing containers into pods that run on these nodes. So, put simply, a cluster lives at the highest level of our architecture and comprises all the lower-level components. With all these different components, which talk to each other, have default configurations, etc, comes a lot of surface area. This surface area, by default, may be vulnerable to attacks/exploitation or have default configurations which would be harmless in a small controlled/local environment, but when present on a cluster for a large scale organisation which handles business-critical operations, not to mention processes highly sensitive customer data, it can become a problem. is the practice of ensuring your Cluster has as few of these vulnerabilities, default configurations and as many secure practices in place.
Security First!
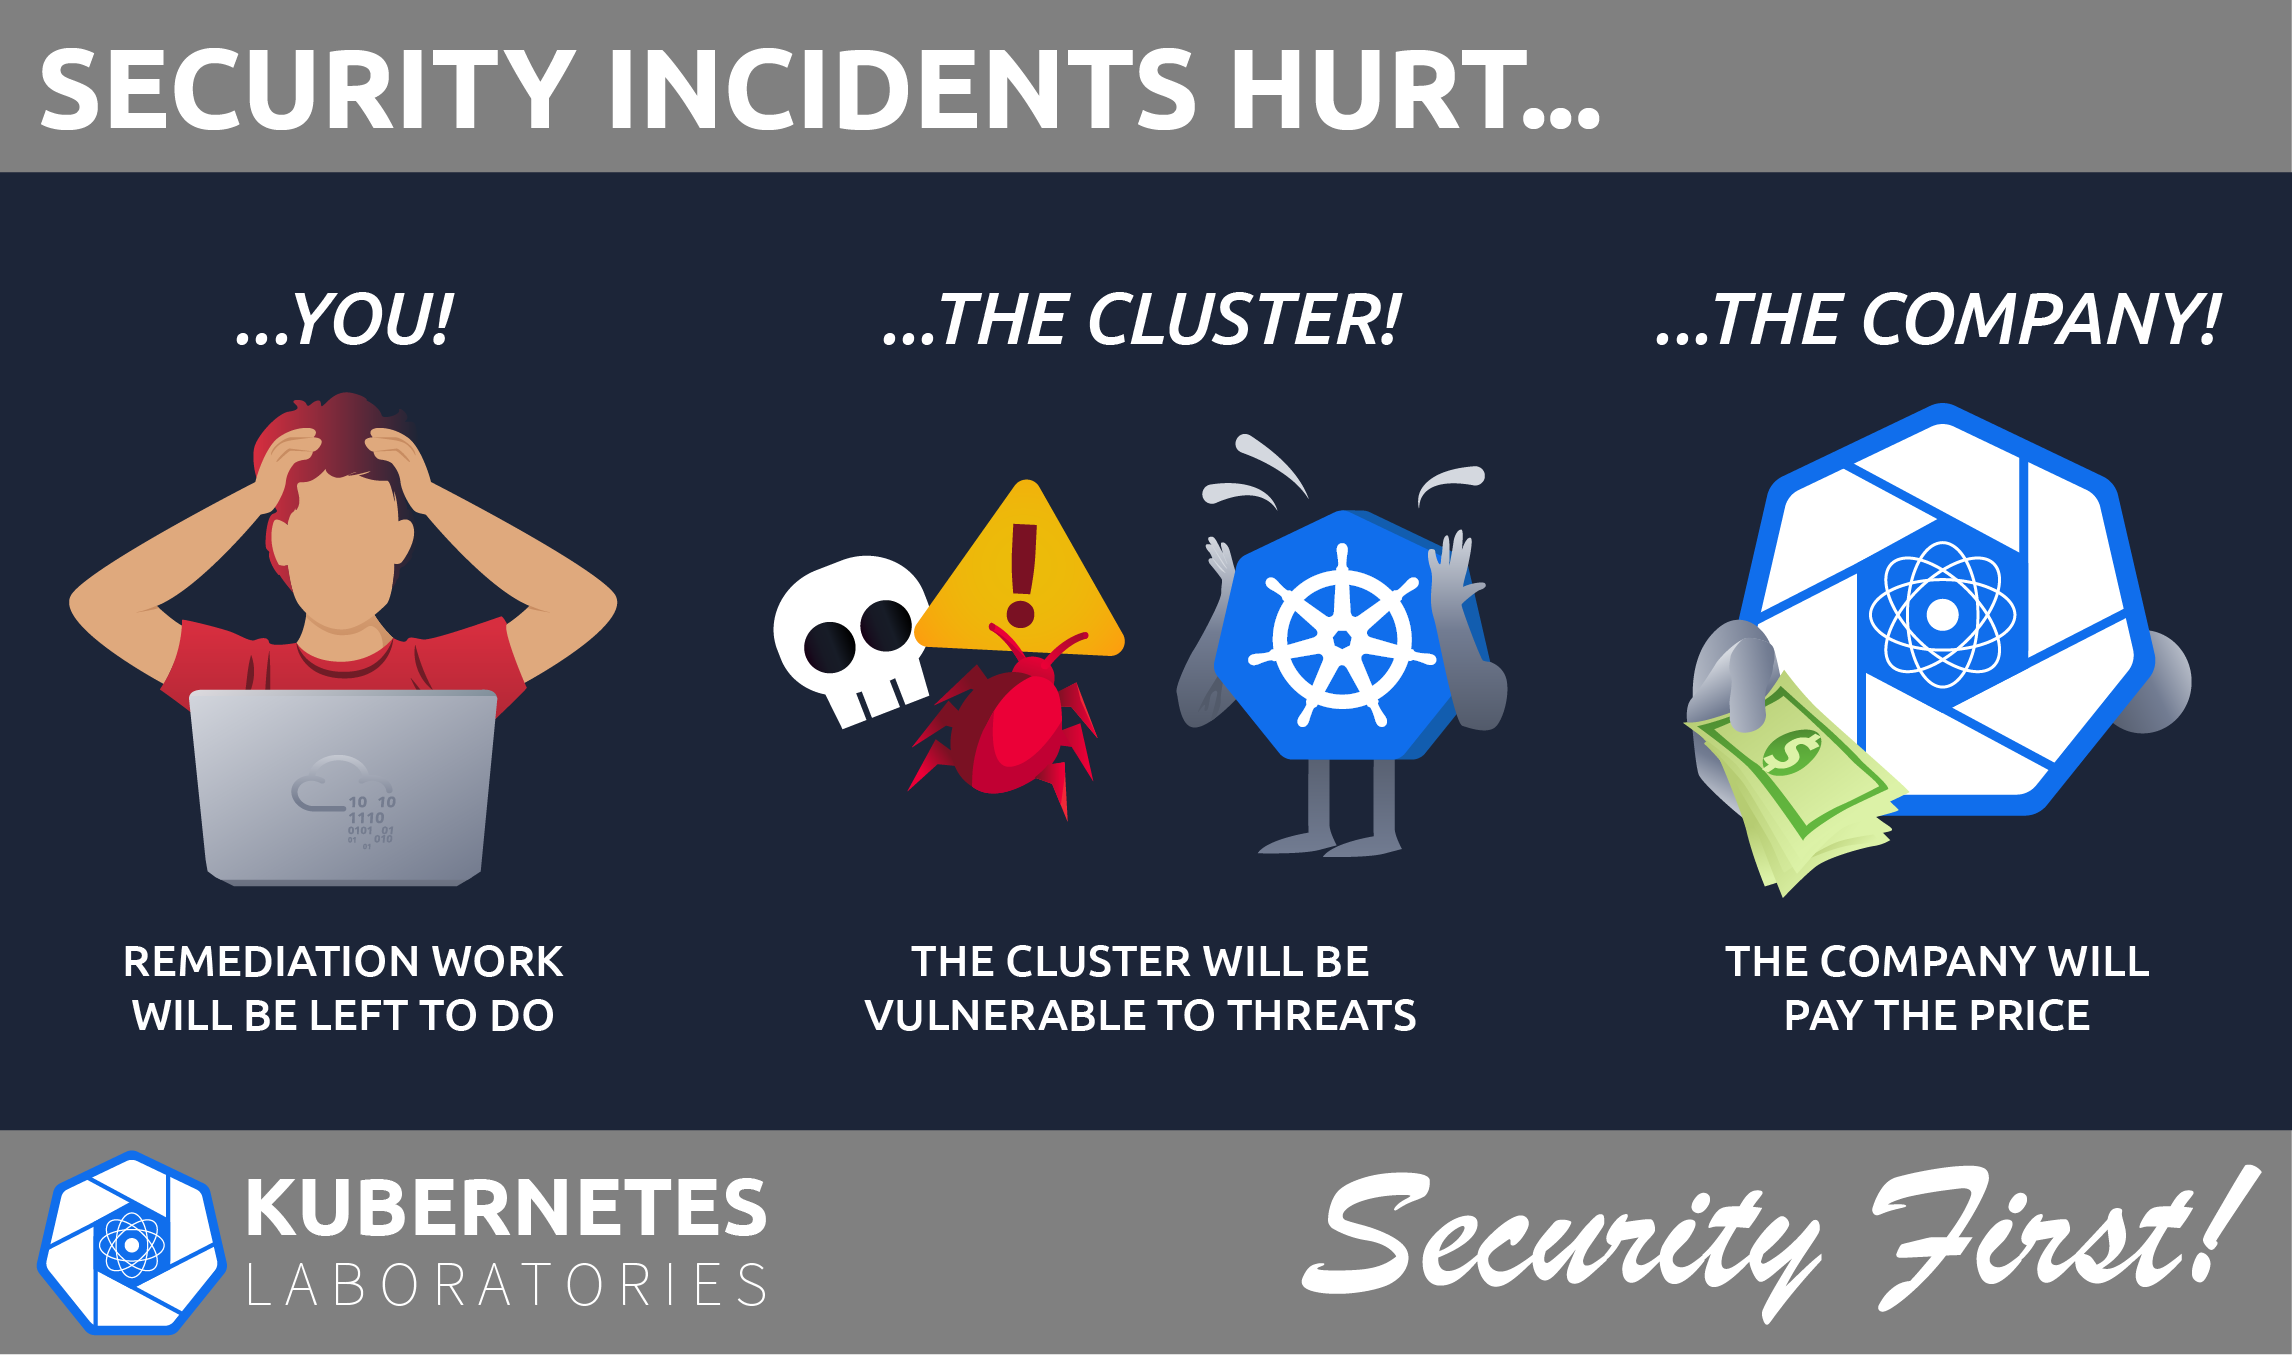
A "Security-first" mindset is always beneficial in the world of cyber, and when working with a technology like , this is no different. Implementing these practices from setup ensures the security of your k8s environment and also saves headaches later on in the development process. As a engineer, you will likely not be creating a single cluster in your time, but many. Learning these practices can ensure you have consistent and secure habits across all of the clusters you implement. Over the course of this room, we will look at some practices you can consider when implementing your cluster. Let's get to work!
What mindset is always beneficial in the world of cyber?

Security Benchmarks
In the previous task, we discussed how implementing the best practices can benefit a environment by reducing vulnerabilities and, therefore, attack surface. However, best practices change regularly as new vulnerabilities are introduced, old features are retired/new features are introduced, etc, so how do we keep up to speed on what these practices are? Thankfully, this is done by (Centre for Internet Security), a non-profit organisation that helps collect and define standards that can be implemented as preventative measures against cyber attacks. They define these standards as "security benchmarks"; this way, your cluster can be checked against these benchmarks to check your level of security.
provides security benchmarks for many different technologies (including browser, database and cloud technologies); we will discuss some of the benchmarks throughout this room, but if you're curious, you can check out the full benchmark document available here (opens in new tab). This document separates the practices into the different components, each providing a method of auditing and remediation. Security Benchmarks are just one example of a cyber security baseline resource; it is one of the most commonly used along with (opens in new tab) (Security Technical Information Guidelines) provided by DISA (US Department of Defence Systems Agency).

Some examples of security benchmarks:
- For the Server:
1.2.25 Ensure that the --tls-cert-file and --tls-private-key-file arguments are set as appropriate(This will be done during the setup of API traffic encryption, more on this in Task 5) - For the Kubelet Component:
4.2.1 Ensure that the --anonymous-auth argument is set to false(if left 'true' kubelet will allow anonymous traffic; more on this in Task 4) - For network policies:
5.3.2 Ensure that all Namespaces have Network Policies defined(By default, there will be no network policies in place to restrict pod-to-pod communication; more on this in Task 7)
Kube-bench
"The best way to implement security practices is to go through a 300-page document page by page" - said no one ever. It is for this reason that the open-source tool 'Kube-bench' was created. This tool (opens in new tab) developed by Aqua Security can perform automated assessments to check if Kubernetes has been implemented using best cluster hardening practices. That's more like it! Kube-bench can be installed in multiple ways, some of which include:
- Kube-bench can be run inside a pod but will need to be granted sufficient permissions to access certain directories/ config files and the host's PID namespace (The process ID namespace to check running processes)
- Run inside of a container
- Run within a cloud provider service such as Azure's AKS (Azure Kubernetes Service) or Amazon's EKS (Elastic Kubernetes Service)
Some points to consider when using Kube-bench for your cluster security compliance: There is not a one-to-one mapping between releases of Kubernetes and CIS security benchmarks, meaning when a new version of Kubernetes comes out, a CIS security benchmark release detailing new benchmarks to be met in this version is NOT released. Instead, CIS security benchmarks can cover multiple releases of Kubernetes at times; what CIS security benchmarks cover which Kubernetes releases can be checked here (opens in new tab). Kube-bench, by default, attempts to detect the running version of Kubernetes and map this to the corresponding CIS security benchmark version, making life a little easier.
Once Kube-bench has been set up on your Kubernetes cluster, here is an example of how the output might look. These checks help identify areas of interest when hardening the cluster, which the CIS security benchmark doc can then help with remediation:
[INFO] 4 Worker Node Security Configuration
[INFO] 4.1 Worker Node Configuration Files
[FAIL] 4.1.1 Ensure that the kubelet service file permissions are set to 600 or more restrictive (Automated)
[PASS] 4.1.2 Ensure that the kubelet service file ownership is set to root:root (Automated)
[WARN] 4.1.3 If proxy kubeconfig file exists ensure permissions are set to 600 or more restrictive (Manual)
[WARN] 4.1.4 If proxy kubeconfig file exists ensure ownership is set to root:root (Manual)
[PASS] 4.1.5 Ensure that the --kubeconfig kubelet.conf file permissions are set to 600 or more restrictive (Automated)
[PASS] 4.1.6 Ensure that the --kubeconfig kubelet.conf file ownership is set to root:root (Automated)
[WARN] 4.1.7 Ensure that the certificate authorities file permissions are set to 600 or more restrictive (Manual)
[WARN] 4.1.8 Ensure that the client certificate authorities file ownership is set to root:root (Manual)
[FAIL] 4.1.9 If the kubelet config.yaml configuration file is being used validate permissions set to 600 or more restrictive (Automated)
[PASS] 4.1.10 If the kubelet config.yaml configuration file is being used validate file ownership is set to root:root (Automated)
[INFO] 4.2 Kubelet
[PASS] 4.2.1 Ensure that the --anonymous-auth argument is set to false (Automated)
[PASS] 4.2.2 Ensure that the --authorization-mode argument is not set to AlwaysAllow (Automated)
[PASS] 4.2.3 Ensure that the --client-ca-file argument is set as appropriate (Automated)
[PASS] 4.2.4 Verify that the --read-only-port argument is set to 0 (Manual)
[PASS] 4.2.5 Ensure that the --streaming-connection-idle-timeout argument is not set to 0 (Manual)
[PASS] 4.2.6 Ensure that the --make-iptables-util-chains argument is set to true (Automated)
[WARN] 4.2.7 Ensure that the --hostname-override argument is not set (Manual)
[PASS] 4.2.8 Ensure that the eventRecordQPS argument is set to a level which ensures appropriate event capture (Manual)
[WARN] 4.2.9 Ensure that the --tls-cert-file and --tls-private-key-file arguments are set as appropriate (Manual)
[PASS] 4.2.10 Ensure that the --rotate-certificates argument is not set to false (Automated)
[PASS] 4.2.11 Verify that the RotateKubeletServerCertificate argument is set to true (Manual)
[WARN] 4.2.12 Ensure that the Kubelet only makes use of Strong Cryptographic Ciphers (Manual)
[WARN] 4.2.13 Ensure that a limit is set on pod PIDs (Manual)
What CIS security benchmark ensures anonymous traffic is disallowed?
What open-source tool can perform automated security assessments on a Kubernetes cluster?

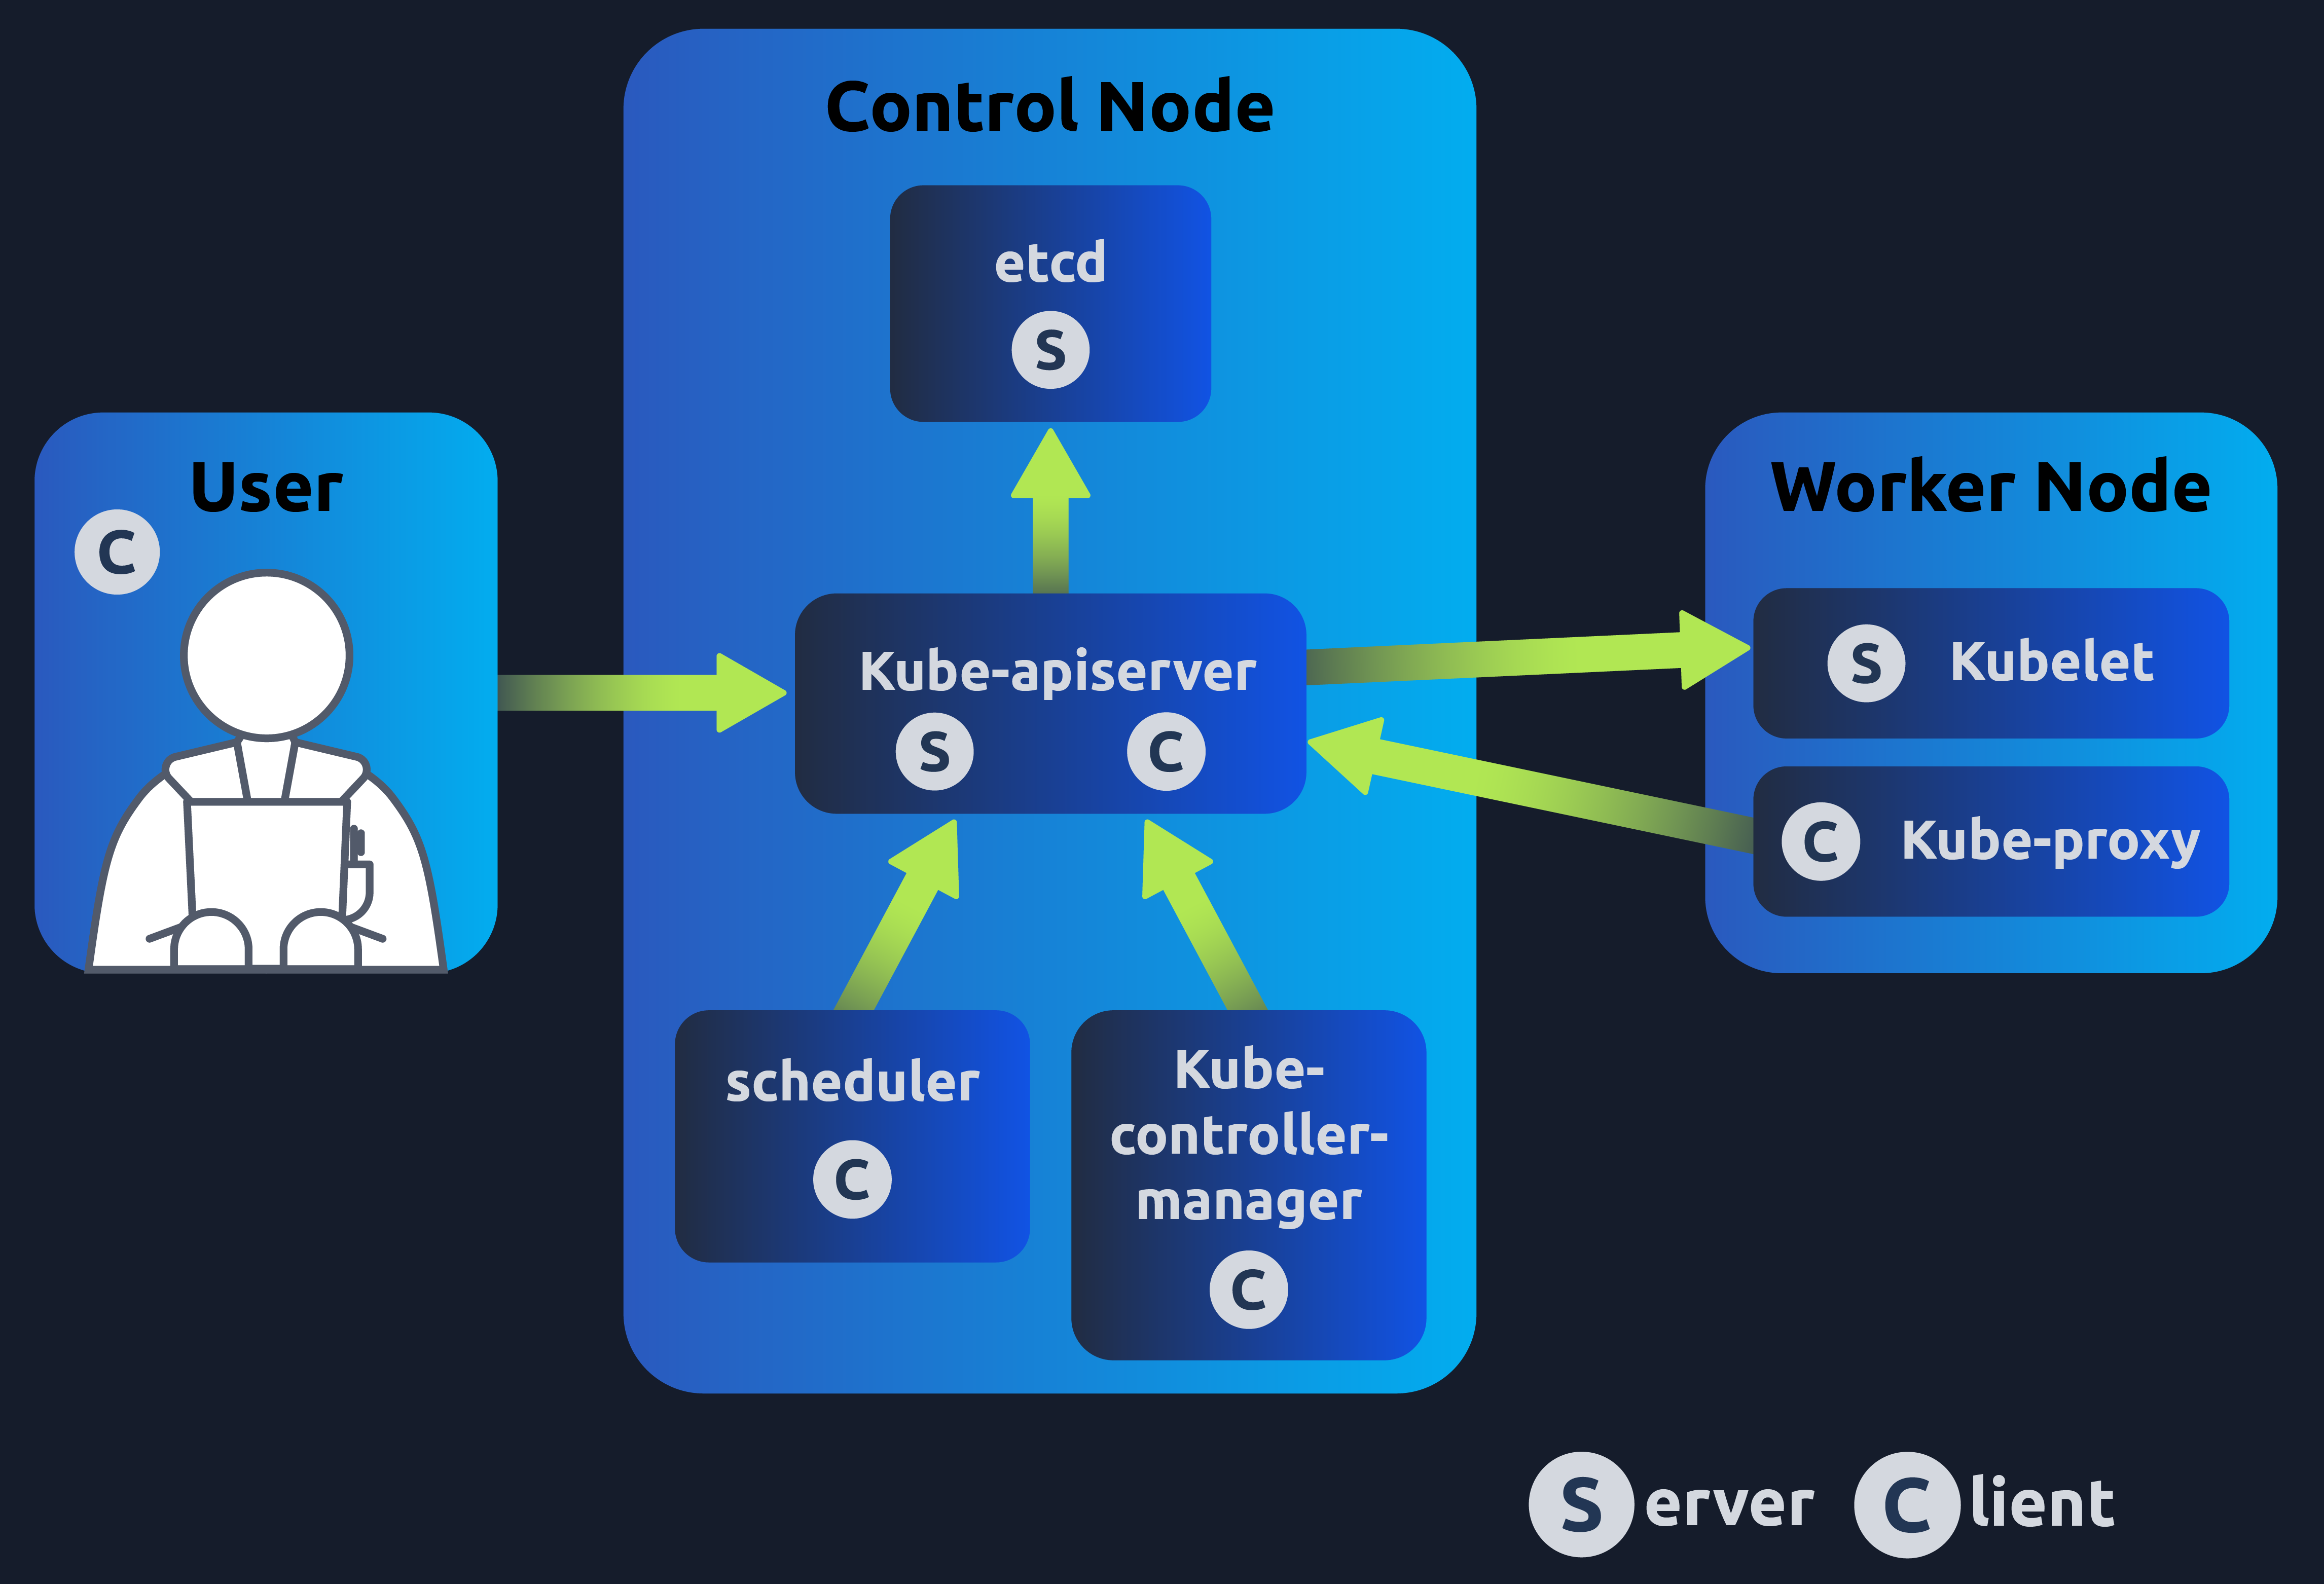
ps ef | grep kubelet and find the directory in the --config flag. The first step to locking down unauthorised traffic is to disable anonymous traffic (this implements CIS security benchmark 4.2.1). We do this by setting authentication:anonymous:enabled to false. Like so: apiVersion: kubelet.config.k8s.io/v1beta1
authentication:
anonymous:
enabled: false
webhook:
cacheTTL: 0s
enabled: true
x509:
clientCAFile: /var/lib/minikube/certs/ca.crt--client-ca-file flag (providing a bundle to authenticate certificates with), separately for this method the apiserver component will have to be started with the --kubelet-client-certificate and --kubelet-client-key flags.--authentication-token-webhook and --kubeconfig. The API group authentication.k8s.io/v1beta1 will also need to be enabled in the server.What value has to be set to "false" to ensure unauthorised traffic is locked down?
One method of kubelet request authentication is "X509 Client Certificate Authentication", what is the other?

- Generate a private key: Example command -
openssl genrsa --out ca.key 2048 - Generate a CSR (Certificate Signing Request): Example command -
openssl req --new --key ca.key --subj "/CN=192.168.0.100" --out ca.csr - Generate certificate (signing with cert and private key): Example command -
openssl x509 --req --in ca.csr --signkey ca.key --out ca.crt --days 365
spec:
  containers:
  - command:
    - kube-apiserver
    - --*******************
    - --*******************
    - --client-ca-file=/var/lib/certs/ca.crt
    - --etcd-cafile=/var/lib/certs/etcd/ca.crt
    - --etcd-certfile=/var/lib/certs/apiserver-etcd-client.crt
    - --etcd-keyfile=/var/lib/certs/apiserver-etcd-client.key
    - --kubelet-client-certificate=/var/lib/certs/apiserver-kubelet-client.crt
    - --kubelet-client-key=/var/lib/certs/apiserver-kubelet-client.key
    - --proxy-client-cert-file=/var/lib/certs/front-proxy-client.crt
    - --proxy-client-key-file=/var/lib/certs/front-proxy-client.key
Which CIS security benchmarks would TLS encryption implement?


- Mutating: This means the admission controller can modify the object related to the request they admit. For example an admission controller which ensures a pod configuration is set to a certain value. The admission controller would receive the request to create a pod and change (or mutate) this configuration value before .
- Validating: This means the admission controller validates the request data to approve or deny the request. For example, if the admission controller receives a request to create a pod but doesn't have a specific label, it is rejected.
The actual check done by the admission controller depends on which admission controller it is. You can think of admission controllers in two groups: Built-in admission controllers and custom user defined admission controller webhooks. Let's first take a look at the built-in admission controllers.
apiVersion: v1
kind: Pod
metadata:
 name: kube-apiserver
 namespace: kube-system
spec:
 containers:
 - name: kube-apiserver
   command:
   - kube-apiserver
   - --admission-control=AlwaysPullImages
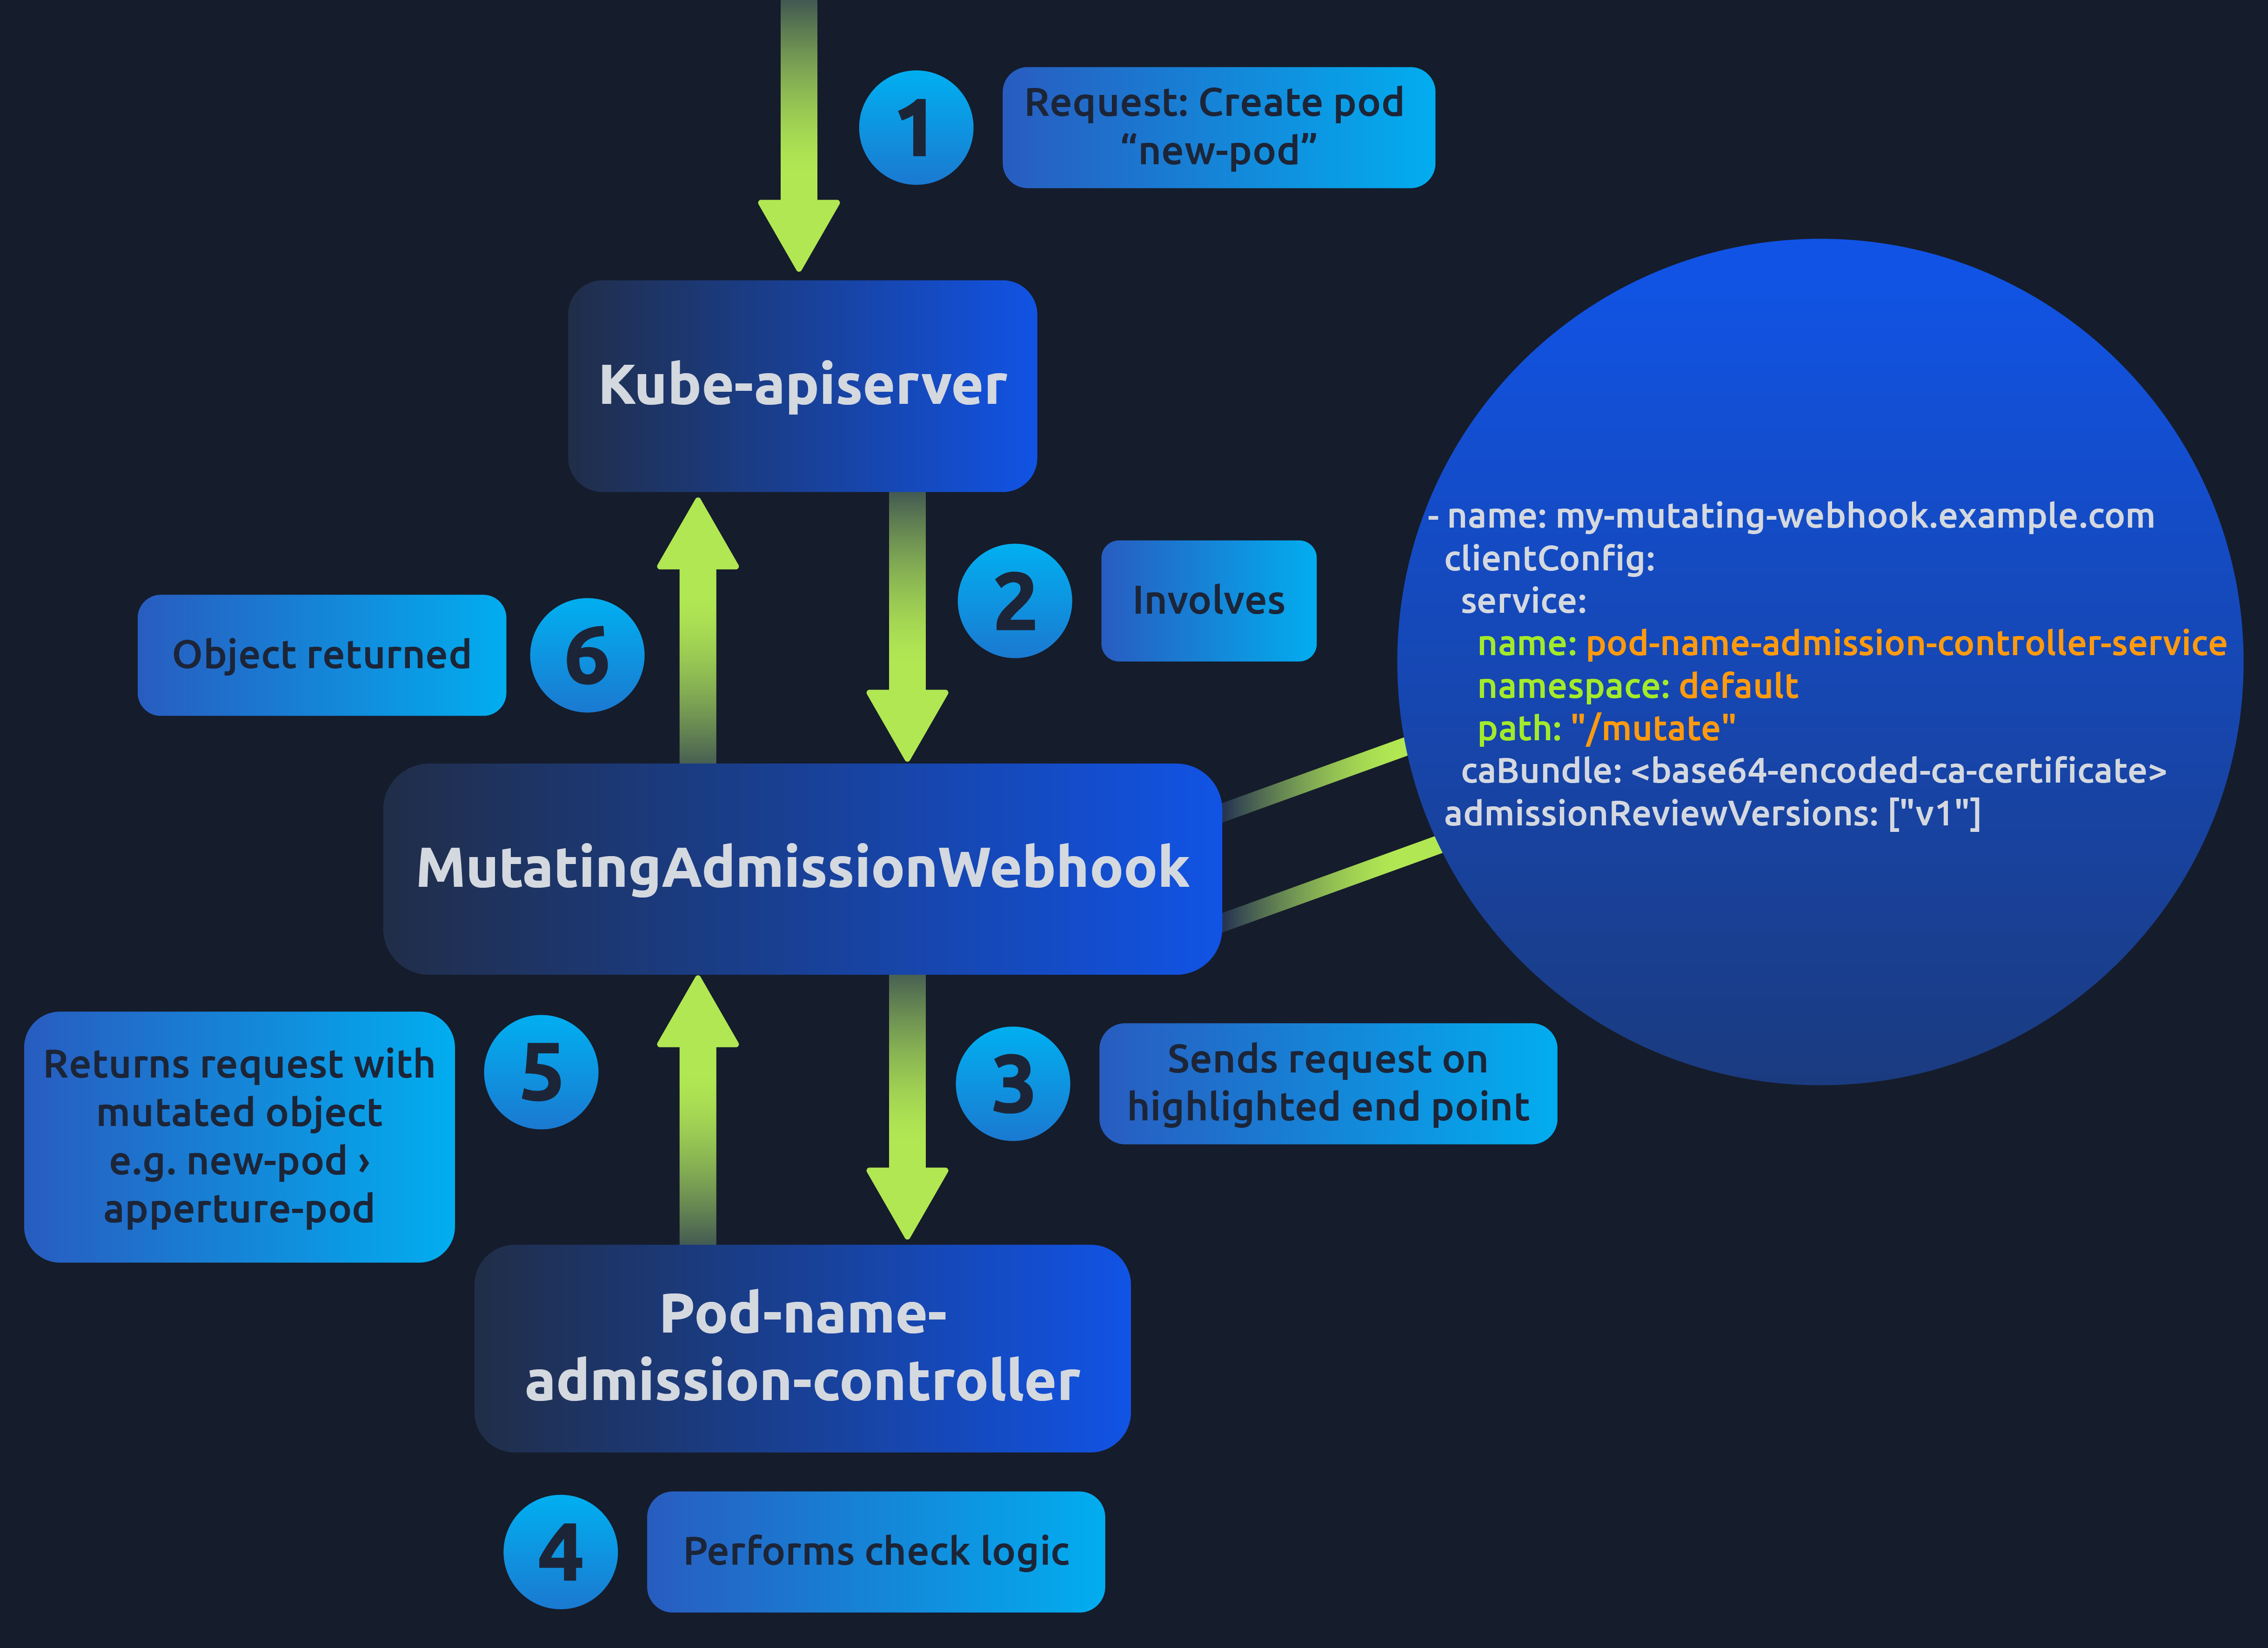
apiVersion: admissionregistration.k8s.io/v1
kind: MutatingWebhookConfiguration
metadata:
  name: my-mutating-webhook
webhooks:
- name: my-mutating-webhook.example.com
  clientConfig:
    service:
      name: pod-name-admission-controller-service
      namespace: default
      path: "/mutate"
    caBundle:
  admissionReviewVersions: ["v1"]
  rules:
  - operations: ["CREATE", "UPDATE"]
    apiGroups: [""]
    apiVersions: ["v1"]
    resources: ["pods"]
Which built-in admission controller helps avoid a problem where the Kubernetes API gets flooded with requests to store new events?
What can be used if your organisation wants to enforce custom security standards or bespoke pod deployment checks specific to its organisation?
What are the names of the two built-in admission controllers that call upon a defined admission controller webhook? Format: Answer1, Answer2

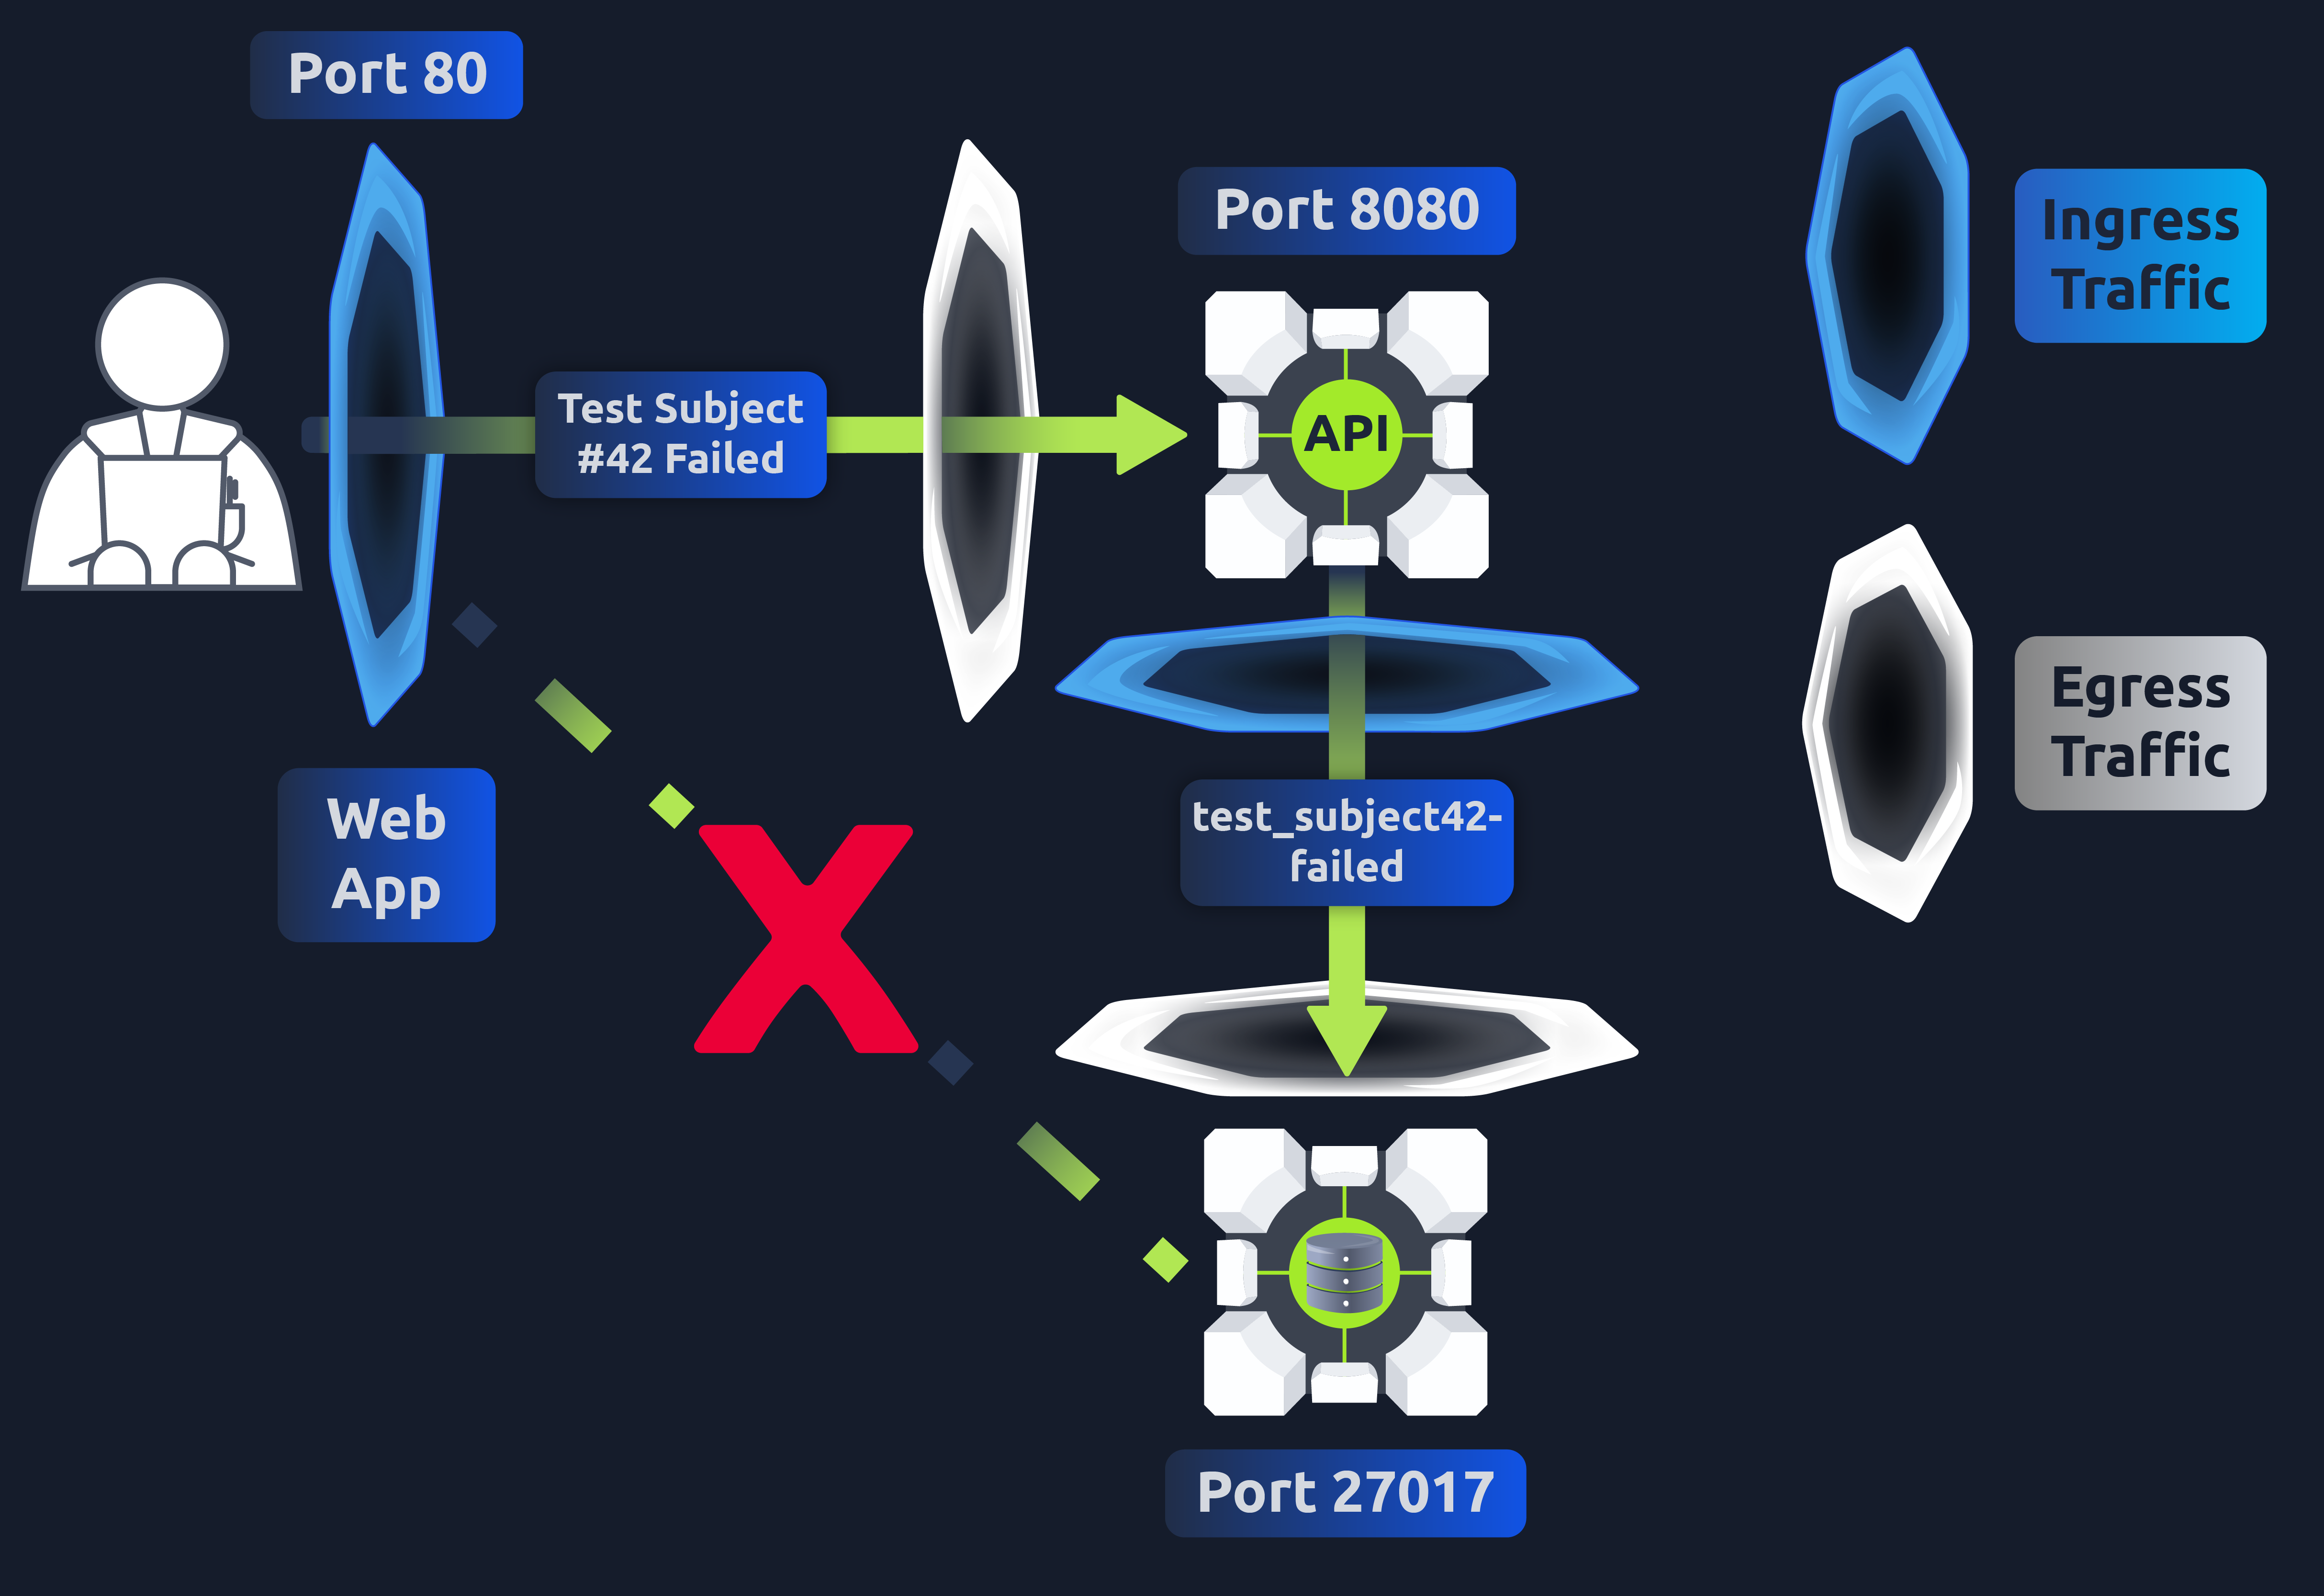
apiVersion: networking.k8s.io/v1
kind: NetworkPolicy
metadata:
  name: db-ingress-policy #policy name
spec:
  podSelector:
    matchLabels:
      app: database #label of app you want to protect
  policyTypes:
  - Ingress
  ingress:
  - from:
    - podSelector:
        matchLabels:
          app: api #label of app you want to allow traffic from
    ports:
    - protocol: TCP
      port: 8080 #port you want to allow traffic on
spec:PodSelector:matchLabels:app field (this will match the app's label defined in the database service spec). Since we only want to let traffic into this database (and not out), we set the spec:policyTypes field to simply "Ingress" However, if we were allowing for both, we would also include "Egress". Finally under the spec:ingress field we declare which service we want to accept traffic from and on what port (and which protocol). You then apply this NetworkPolicy YAML as you would any other configuration using the kubectl apply -f <network-policy-name>.yaml command, and there you have it! You have restricted network traffic into your database service. Note that defining NetworkPolicies in all namespaces implements security benchmark 5.3.2.If we had an app running with the label "database", what field would we put this label in if we wanted to restrict traffic to this app?
Set up your virtual environment


It's another day at Laboratories, and you're attending your daily stand-up meeting, where your team will be discussing their agenda for the day. It gets to the point where outstanding tasks/tickets are being handed out during the meeting. There is a ticket that needs to be assigned; the task involves restricting network traffic into "backend-service2" in the environment. Your manager thinks this would be a good first task for you and so assigns you the ticket. Now's your chance to show off what you've been learning. Let's get to work on that ticket, shall we?
Click the green 'Start Lab Machine' button to boot up the . Allow a couple of minutes for the to boot. The machine will start in Split-Screen view. In case the is not visible, use the blue Show Split View button at the top of the page.
We will be using minikube in this practical, a tool that sets up a environment on a PC. A vanilla minikube installation doesn't support network policies; this is because the default CNI ( Network Interface) 'Kindnet' does not support them by design. So, instead, we will work on a cluster that uses a different CNI named 'calico', which does support network policies. To start the cluster with this CNI enabled run:
minikube start --cni=calico
The first thing you are going to do is get a lay of the land. Run the following command to see what's deployed in this cluster:
kubectl get pods
Note: The boot process may take a minute or two, once all 3 pods are running you're good to continue to the next step!
kubectl get svc
Here, we can see 3 pods are running, all of which have a service exposing them. Currently, the web application can connect to both backend-service1 and backend-service2 services. Let's test this by running the following command:
kubectl exec ts-web-app-7bd668ddcb-dpzt7 -- curl -I -m 2 backend-service2:8888 >/dev/null 2>&1 && echo "Connected to Service!" || echo "Cannot Connect to Service!"
This should return Connected to Service! meaning this web app pod can communicate with backend-service2. We can also test pod connectivity by running a command from inside the pod ourselves. Let's try this with backend-service1. Exec into the pod with:
kubectl exec backend-service1-86dbcf48bc-qvbmb -it -- /bin/sh
And run the following command from inside the pod:
wget --spider --timeout=1 backend-service2:8888
It should return remote file exists
We have now verified that both the web application pod and back-end-service1 pod can communicate with back-end-service2. However, the ticket you have been assigned says that the only pod that should ever communicate with backend-service2 is the backend-service1 pod. Meaning we need to create a network policy that allows traffic FROM backend-service1 pods TO backend-service2 and will reject all other ingress traffic. To refresh our memory on what a NetworkPolicy YAML looks like. Let's take a look at what a NetworkPolicy which rejects ALL ingress traffic TO backend-service2:
apiVersion: networking.k8s.io/v1
kind: NetworkPolicy
metadata:
  name: deny-ingress-backend-service2
spec:
  podSelector:
    matchLabels:
      app: backend-service2
  policyTypes:
  - Ingress
apiVersion: networking.k8s.io/v1
kind: NetworkPolicy
metadata:
  name: allow-backend-service1-ingress
spec:
  podSelector:
    matchLabels:
      app: replace-with-service2-label
  policyTypes:
  - replace-with-policy-type
  ingress:
  - from:
    - podSelector:
        matchLabels:
          app: replace-with-service1-label
    ports:
    - protocol: TCP
      port: replace-with-service2-listening-port
We have added a bit more to the end now. After defining the policy type, we tell what pod we would like to ALLOW ingress traffic FROM by providing its app label. We then tell what port we would like to allow traffic to be received on. In other words, what port is the backend-service2 listening on? Using commands like kubectl describe pod <pod-name> (to look for pod labels) and kubectl get svc (to see what port services are listening on), make a file called network-policy.yaml using the above example and fill in the blanks. Once your network policy is ready, you can apply it with the following command:
kubectl apply -f network-policy.yaml
You have now applied the network policy! Let's test it. First of all, test that the web app can no longer connect to the backend-service2 by rerunning the following command:
kubectl exec ts-web-app-7bd668ddcb-dpzt7 -- curl -I -m 2 backend-service2:8888 >/dev/null 2>&1 && echo "Connected to Service!" || echo "Cannot Connect to Service!"
This should now return Cannot connect to service. Now exec into the backend-service1 pod and run the test command like before:
kubectl exec backend-service1-86dbcf48bc-qvbmb -it -- /bin/sh
wget --spider --timeout=1 backend-service2:8888
You should again receive remote file exists meaning you have completed your first ticket as a DevSecOps Engineer! Congrats! With that in place, to complete the room, run the following command:
kubectl describe networkpolicy allow-backend-service1-ingress
From the output, copy from the Spec: line downwards and paste it in this base64 encoder (opens in new tab). NOTE: Make sure there is no additional whitespace or extra lines after the last line. The answer to the question is the base64 encoded policy!
Ready to learn Cyber Security?
TryHackMe provides free online cyber security training to secure jobs & upskill through a fun, interactive learning environment.
Already have an account? Log in