Compromised Windows Analysis
Learn about some key forensic artifacts and solve an interesting case of a compromised Windows workstation.
easy

To access material, start machines and answer questions login.
A cyber incident is any malicious and unauthorized activity compromising systems or data’s confidentiality, , or availability. The vast figures of Windows usage in desktop computers and laptops worldwide draw our attention to Windows forensics and incident response. Conducting detailed Windows forensics to analyze an incident’s root cause is always exciting and full of learning.
Case
TKM is a tech startup with a few employees, including a junior security engineer, Joe. He ensures the company’s security remains intact. On the 29th of March, 2025, Joe observed some suspicious traffic ( Connections) to a malicious IP address from one of the employee’s (Aashir) host. Joe also observed that the connection attempts repeated after precisely one minute and were refused every time. Joe blocks the IP over the network and contains the host immediately. After conducting the initial investigation, Joe found that Aashir was unaware of this connection and observed a prompt on the screen after every minute. Aashir also found the built-in antivirus, Windows Defender, turned off.
TKM wants us to investigate Aashir’s workstation in detail and analyze the root cause of the subject activity.
Learning Objectives
In this room, we will dive into the investigation of the victim’s compromised Windows . Following are the learning objectives you would take away after the completion of this room:
- Analyzing attacker’s footprints for root cause analysis
- Investigating the of attack
- Gathering evidence of any malicious file execution
- Windows event logs analysis for intrusion & defense evasion
- Building a timeline analysis of the attack
Note: The following are prerequisite rooms that you should visit before solving this room:
Set up your virtual environment

Investigating with Windows Utilities
Windows possesses some key artifacts that prove handy during any forensic investigation. Windows introduced these utilities to enhance the system’s efficiency, but they are also very helpful in Forensic Investigations. We will also utilize some of Eric Zimmerman’s tools during the root cause analysis. This Eric Zimmerman's arsenal of tools are great for digital forensics and incident response cases.
Let’s analyze the artifacts in detail and answer some questions at the end of each task.
Lab Setup
First, let’s start the Lab Machine by pressing the Start Lab Machine button given below. The machine will start in Split-Screen view.
If the is not visible, use the blue Show Split View button at the top of the page. You can also connect with the machine via using the credentials below.

| Username | Administrator |
| Password | compromise@333 |
| IP | MACHINE_IP |
Timeline Explorer is a tool by Eric Zimmerman that allows you to view CSV files easily. It has several cool features that allow filters to be applied to the CSV to extract essential data. It is important to set up this tool before starting the investigation. Following are the guidelines for the tool’s usage in the given machine:
Open the tool Timeline Explorer by double-clicking it from the directory C:\Users\Administrator\Desktop\Forensics Tools\TimelineExplorer. The artifacts analyzed in the upcoming tasks
will mainly generate CSV files. We will import all our CSV files into
this tool to better visualize the parsed results.
Note: The tool will take between 1-3 minutes to open up.
Scheduled Tasks
If you want to perform various tasks automatically after a specific time interval instead of manually performing them repeatedly, you can schedule them. In Windows, this can be done by creating a scheduled task and configuring your file inside. As a forensic investigator, this is one of the crucial artifacts while analyzing a compromised Windows because threat actors often use this utility to create a backdoor to stay persistent.

Utilizing Scheduled Tasks in the Case
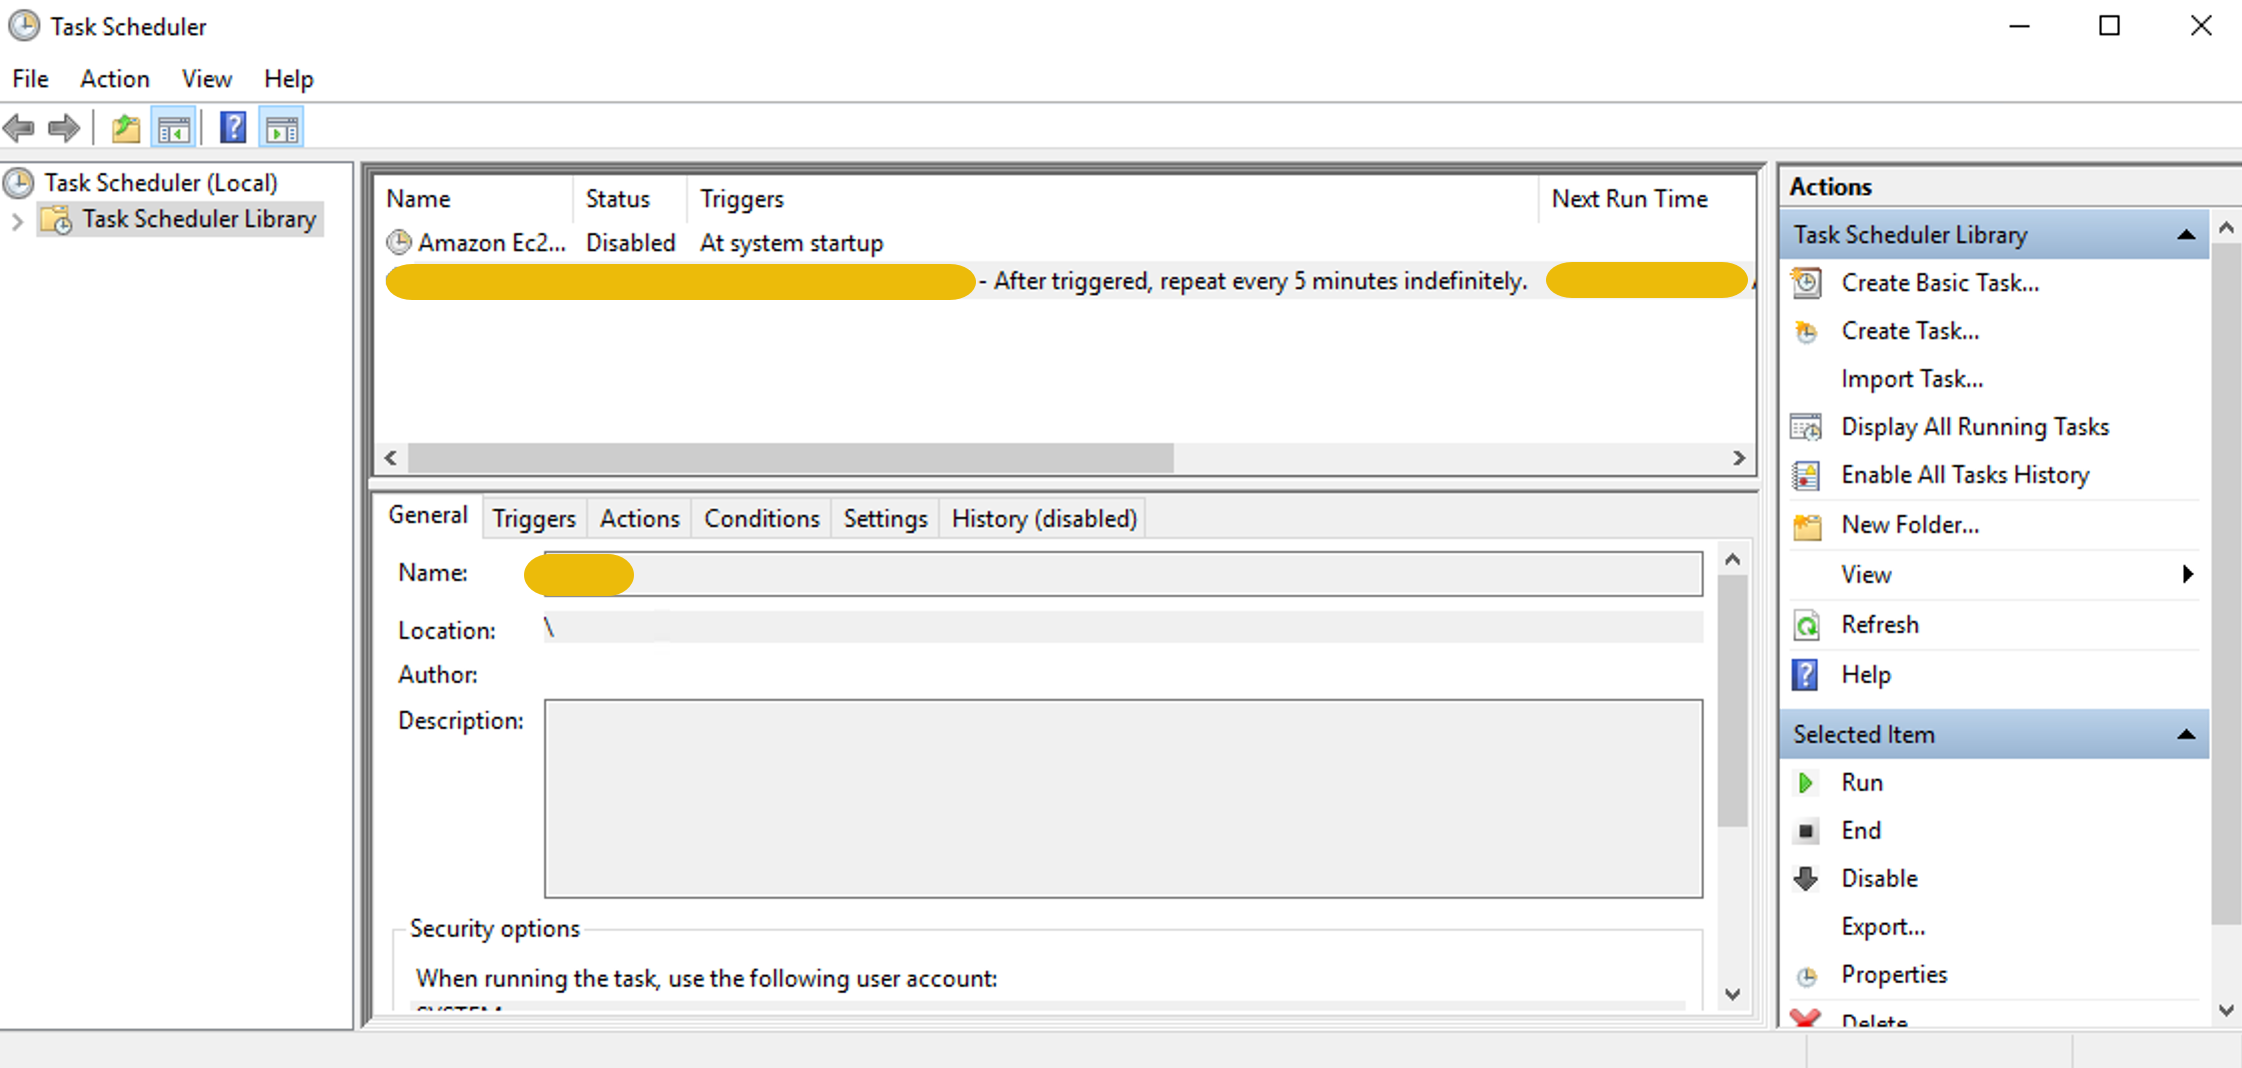
As per the scenario, the victim observed a prompt on his system’s screen after every minute, which means it may be scheduled to execute. Let’s review the machine’s scheduled tasks for this.
To view the scheduled tasks in the system, type Task Scheduler in the search bar.
Below is the screenshot showing the compromised host’s scheduled task, which the attacker created to connect to the malicious command and control via SSH at regular intervals. We can see that the malicious task was created at 10:29.
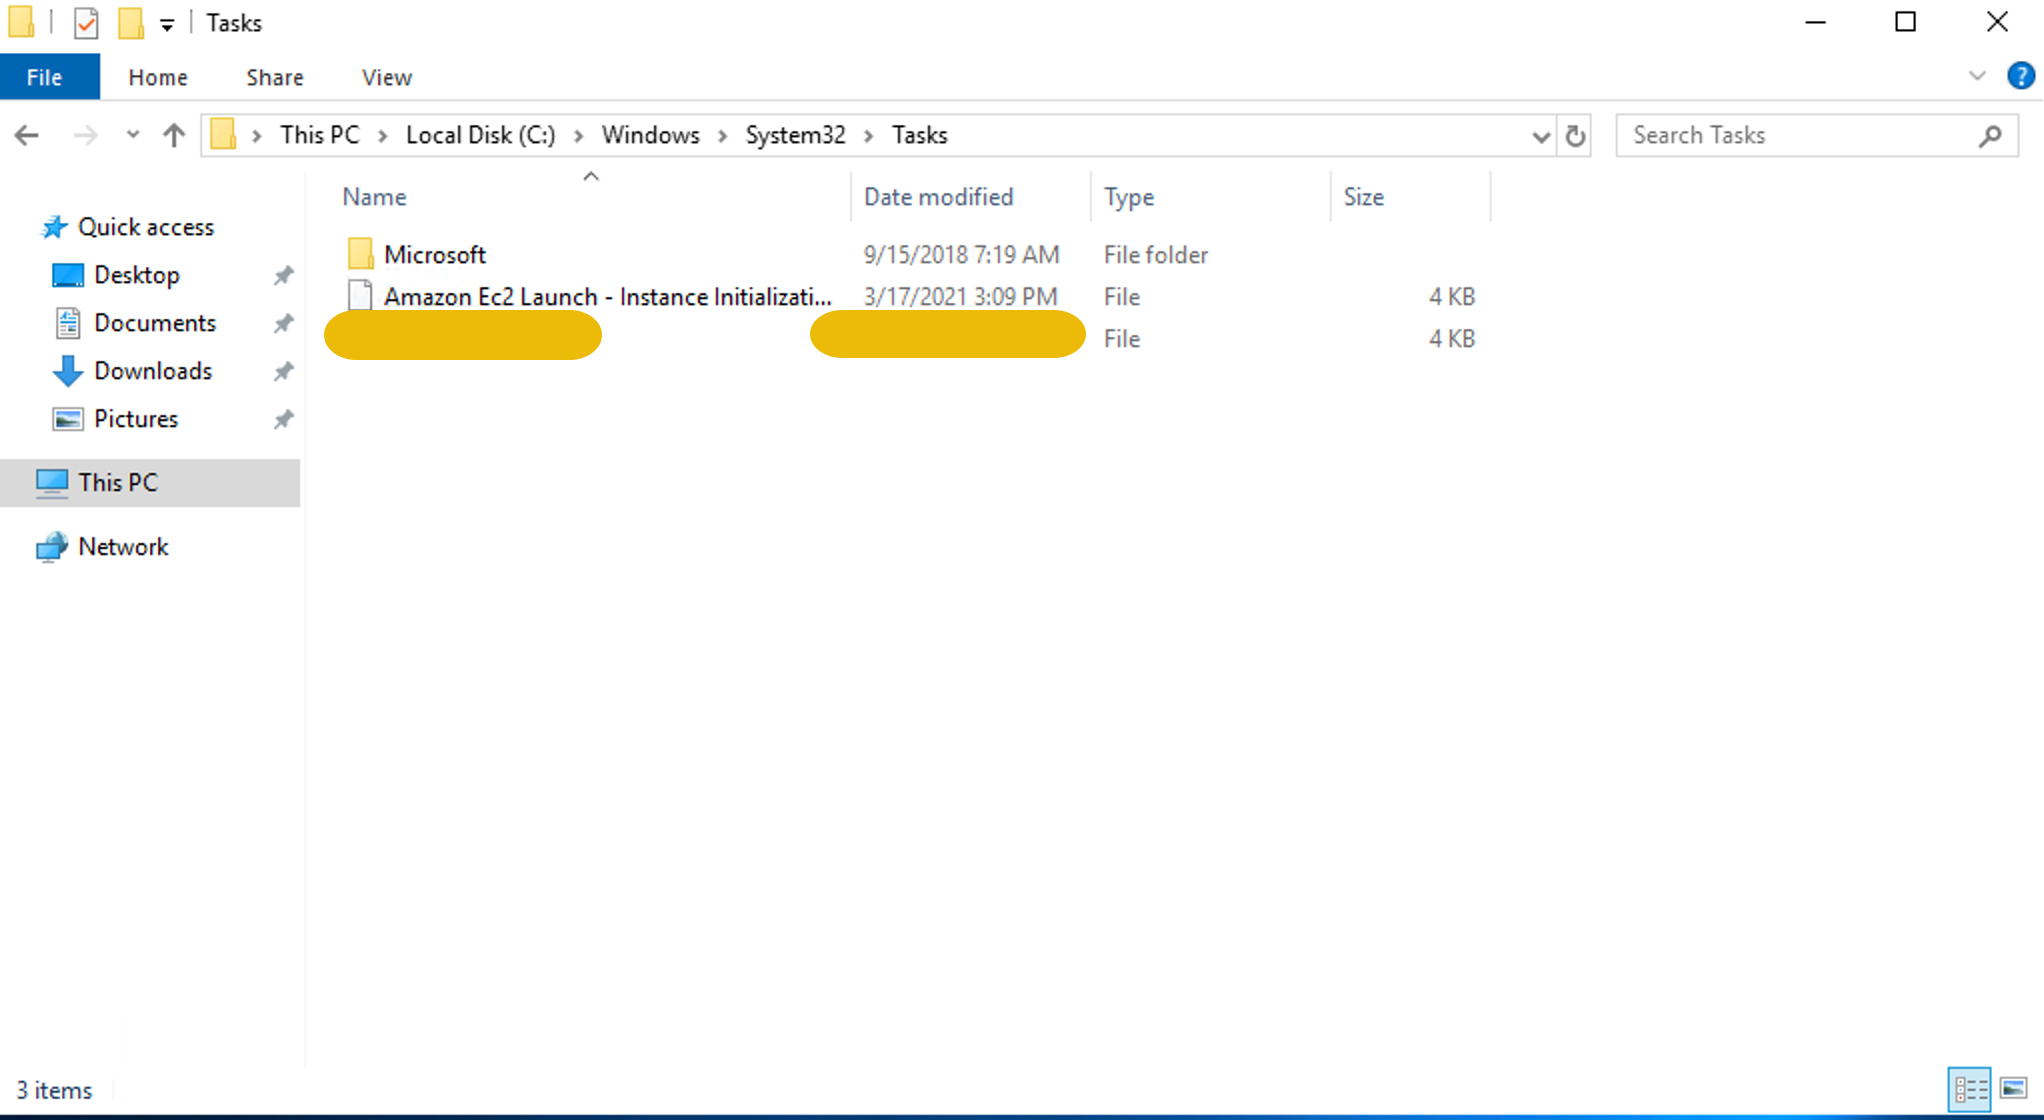
Another way to view the Scheduled tasks is by traversing to the
directory C:\Windows\System32\Tasks as shown below:
What is the name of the scheduled task created by the attacker?
What is the IP of the malicious server to which SSH requests are made?
Files
files are like bookmarks that help you pinpoint a specific page. In terms of the Windows , these are shortcuts to the original files. You just need to click the particular file without navigating to its actual path. It is an easy way to access your favorite programs, files, or folders with a click. In analyzing a compromised Windows , files serve as a valuable artifact while searching for the attacker’s footprints. files give information on the recently accessed files/folders.

Utilizing in the Case
Considering the time of the scheduled task 10:29 that we saw in
the previous task, let’s try to extract the recently accessed files
during that time.
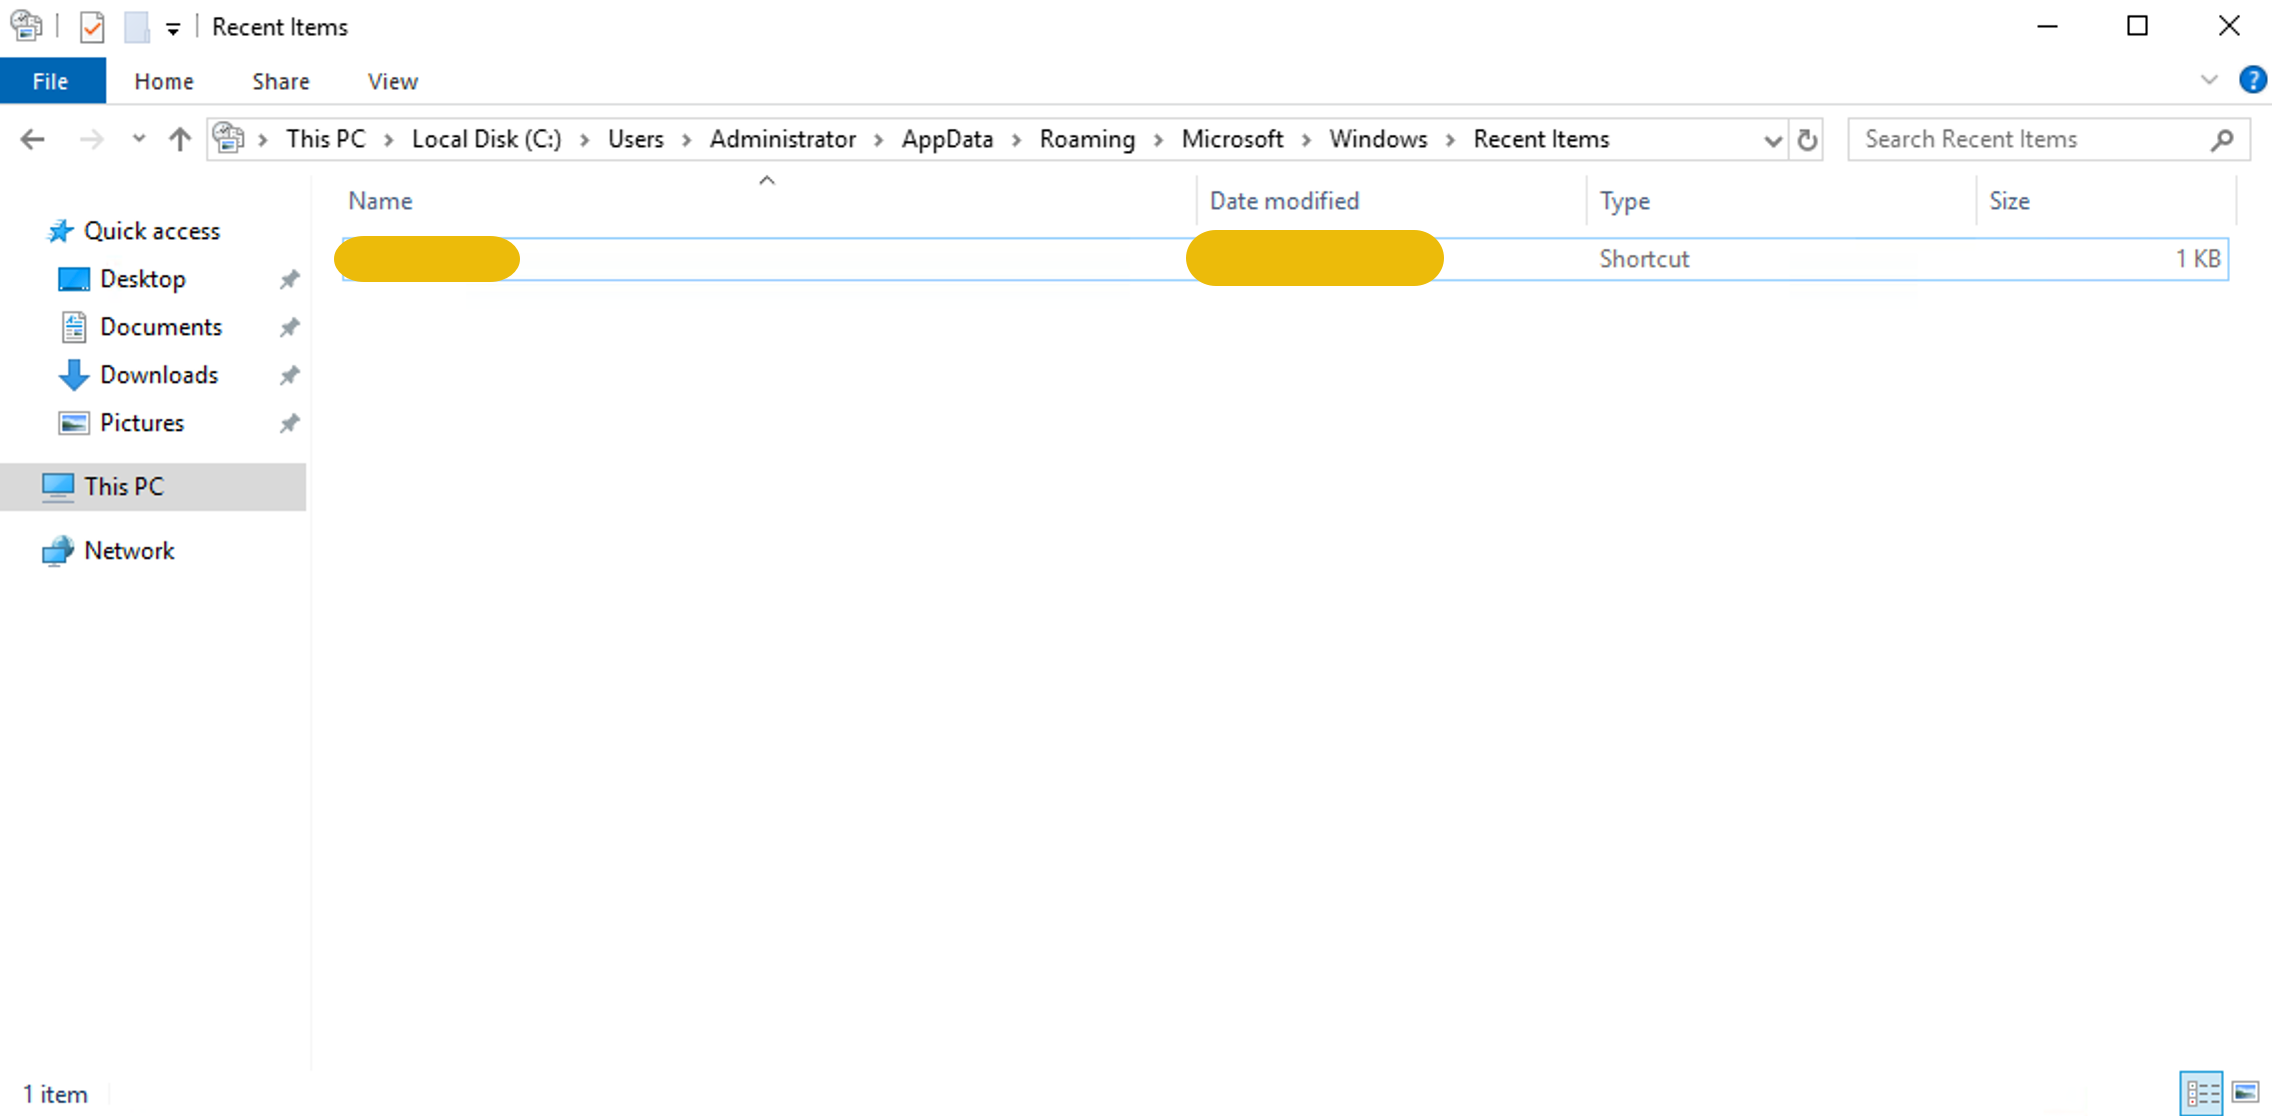
Move to the following LNK files directory: C:\Users\Administrator\AppData\Roaming\Microsoft\Windows\Recent Items. The following
screenshot shows the of a RAR file created just a few minutes
before the scheduled task.
After searching the whole system for this file, we found it nowhere. It seems to have been deleted.
Parsing Files
We have Eric Zimmerman’s tool, LECmd, which will help us parse this file. Let’s see what we can get from there.
Open CMD with Admin privilege and type the following command to move to the tool’s directory:
cd "C:\Users\Administrator\Desktop\Forensics Tools\LECmd"
Now, enter the following command to execute the tool:
.\LECmd.exe -d C:\Users\Administrator\AppData\Roaming\Microsoft\Windows\Recent --csvf Parsed-LNK.csv --csv C:\Users\Administrator\Desktop

This command will parse the files and save the results in CSV format on the Desktop.
Drag and drop the Excel file Parsed-LNK.csv created on the Desktop
into the Timeline Explorer tool. In the screenshot below, the RAR file
was accessed at 10:27 (2 minutes before the scheduled task was
created). We can also see the name of the RAR file along with the file
creation time (Target Created Column) and the creation time (Source
Created Column) in the screenshot below.
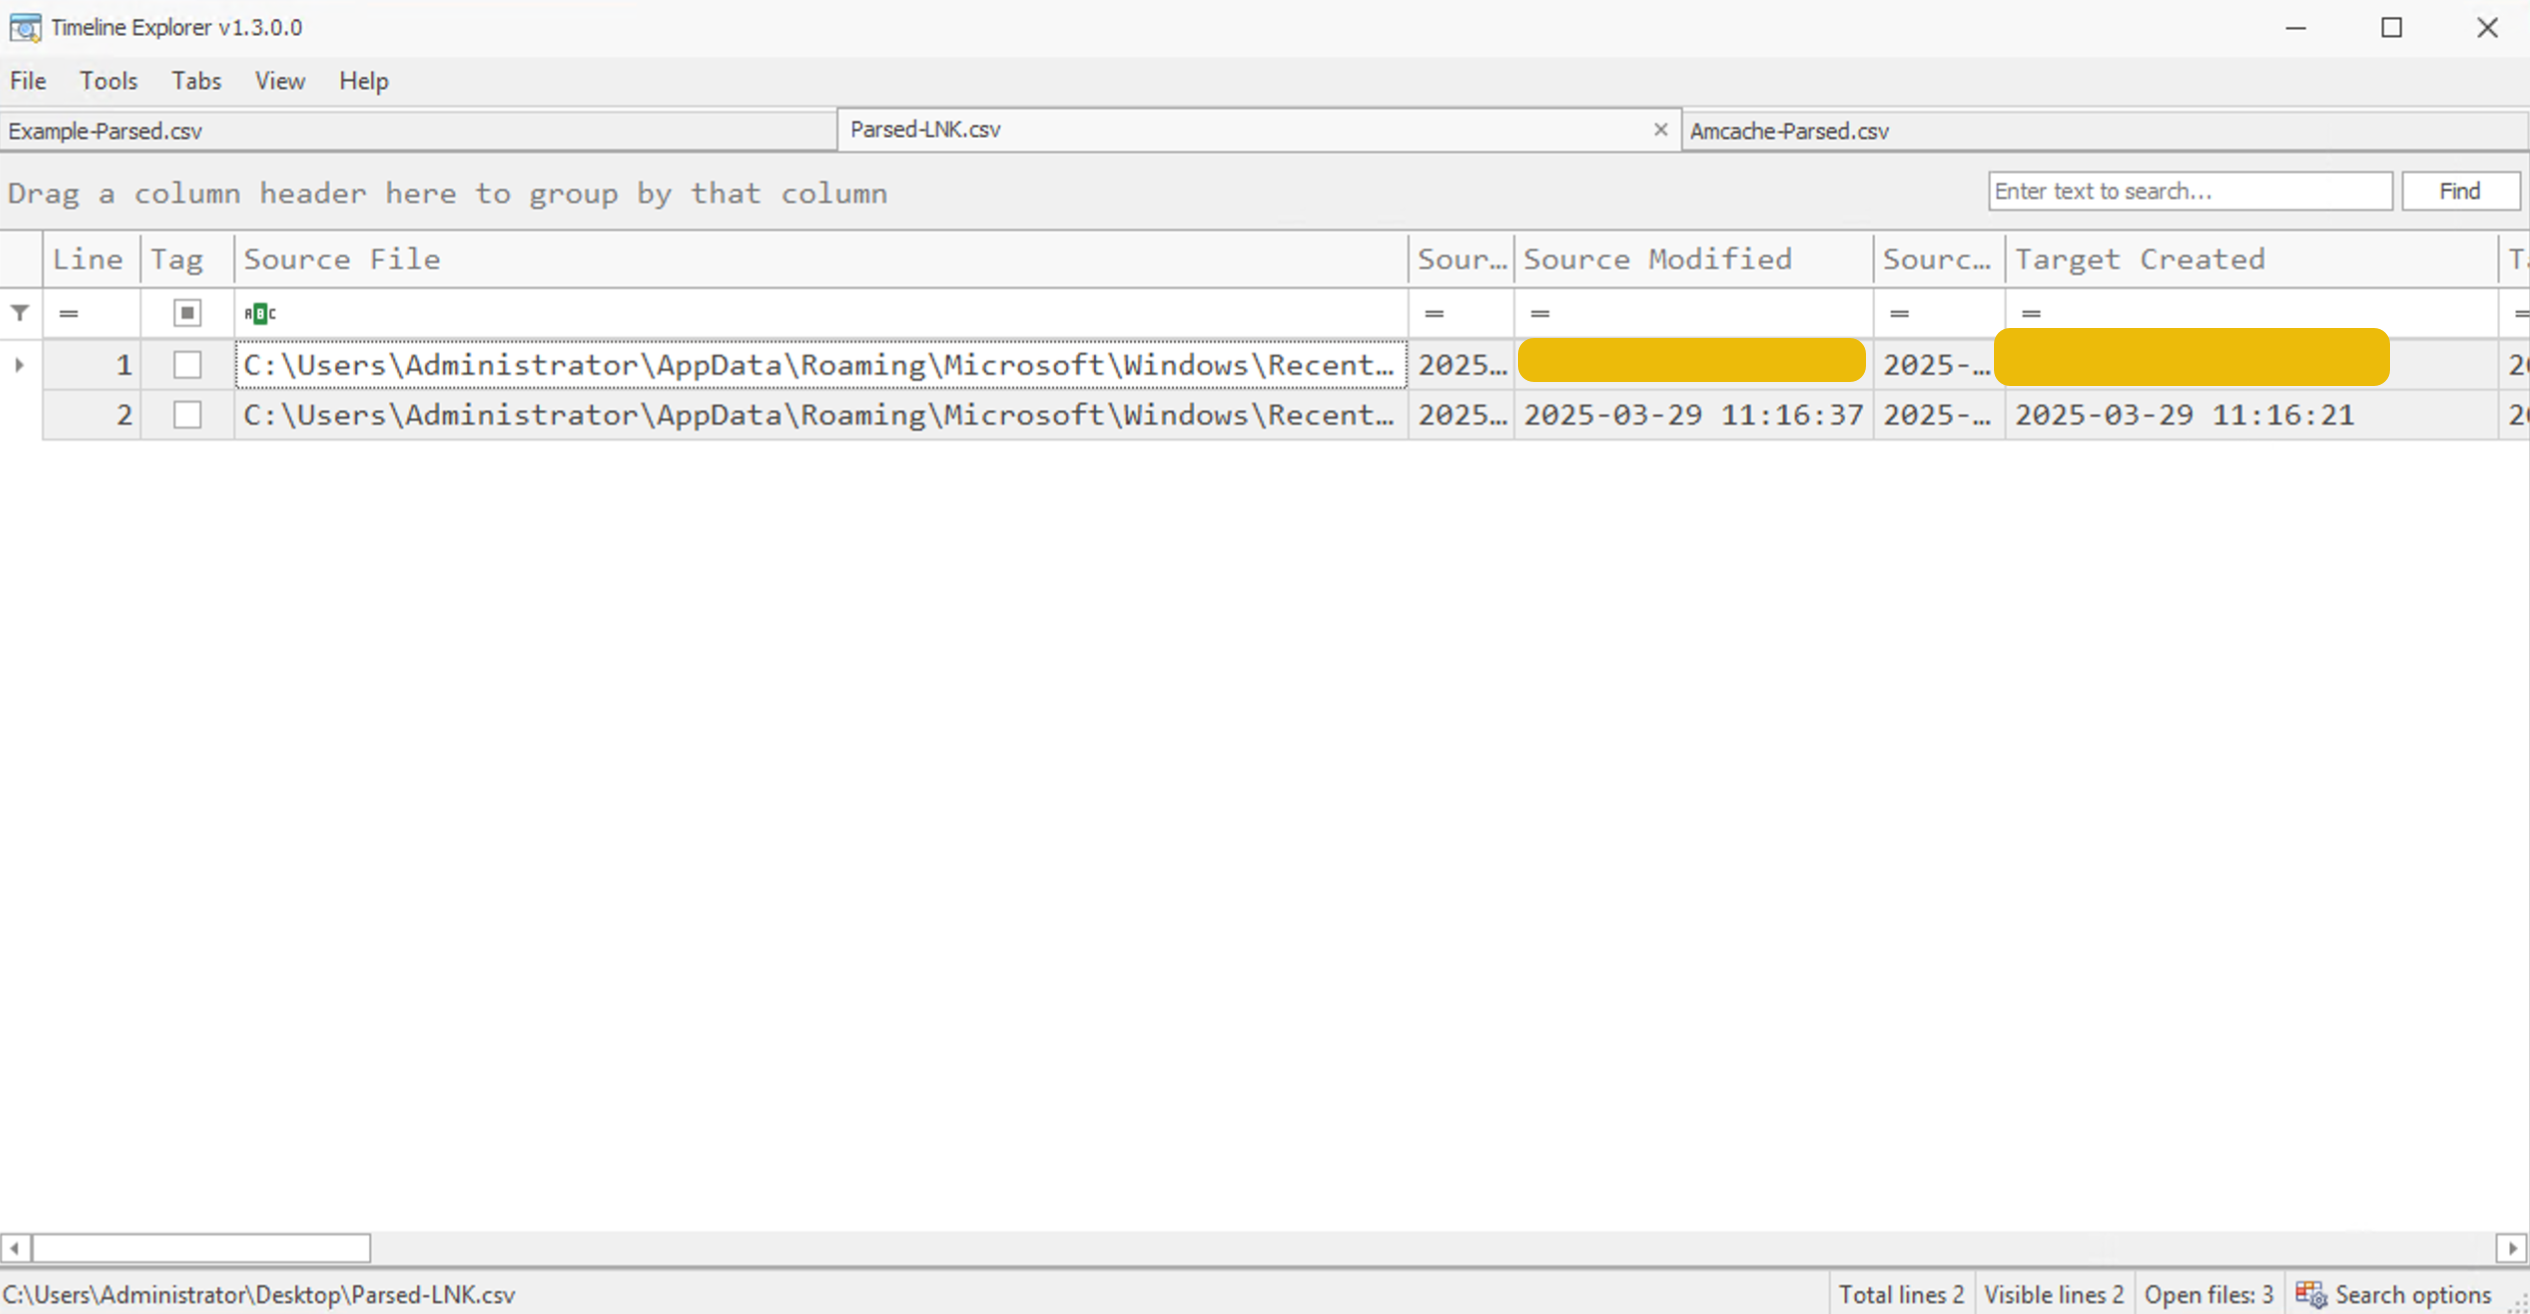
What is the name of the RAR file created during the attack?
When was the RAR file created in the system? Format YYYY-MM-DD HH:MM:SS
Prefetch Files
Prefetch files are part of the Windows operating system that keeps track of your file execution activities. Windows uses this feature for performance optimization. Whenever you execute a file, Windows creates a prefetch file for it and remembers how it was opened and what activity it performed. This helps the operating system load these programs faster the next time you want to open them.
In incident response, these files play a vital role during the investigation because they help investigators find the details of any suspicious or malicious programs executed.
Utilizing Prefetch Files in the Case
In the previous task, we saw the RAR file's creation time in the , which means the malicious executable may be inside it. We will parse the contents of prefetch files to find the execution details of this file.
Parsing Prefetch Files
We will utilize Eric Zimmerman’s tool PECmd to parse the prefetch files.
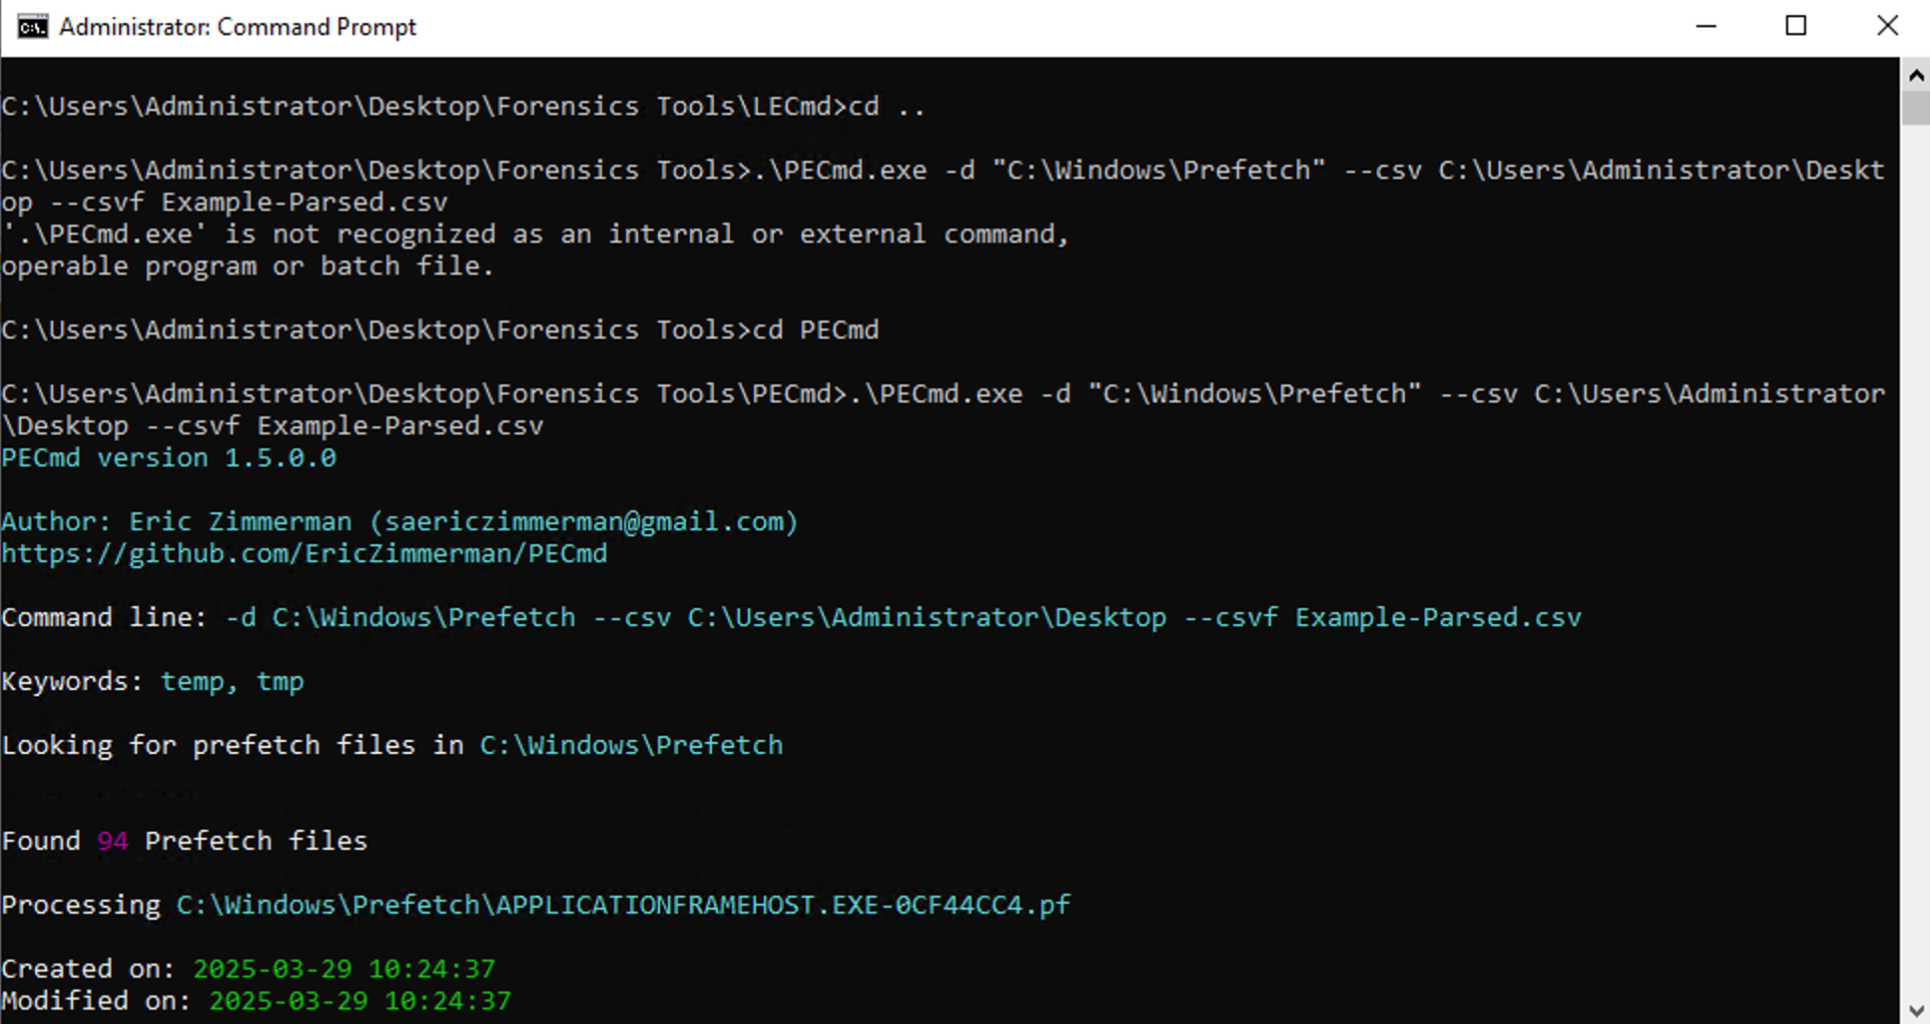
Open CMD with Admin privilege and type the following command to move
to the tool’s directory: cd "C:\Users\Administrator\Desktop\Forensics Tools\PECmd"
Now, enter the following to execute the tool:
.\PECmd.exe -d "C:\Windows\Prefetch" --csv C:\Users\Administrator\Desktop --csvf Prefetch-Parsed.csv
This command will parse the prefetch Files and save the results in CSV format on the Desktop.
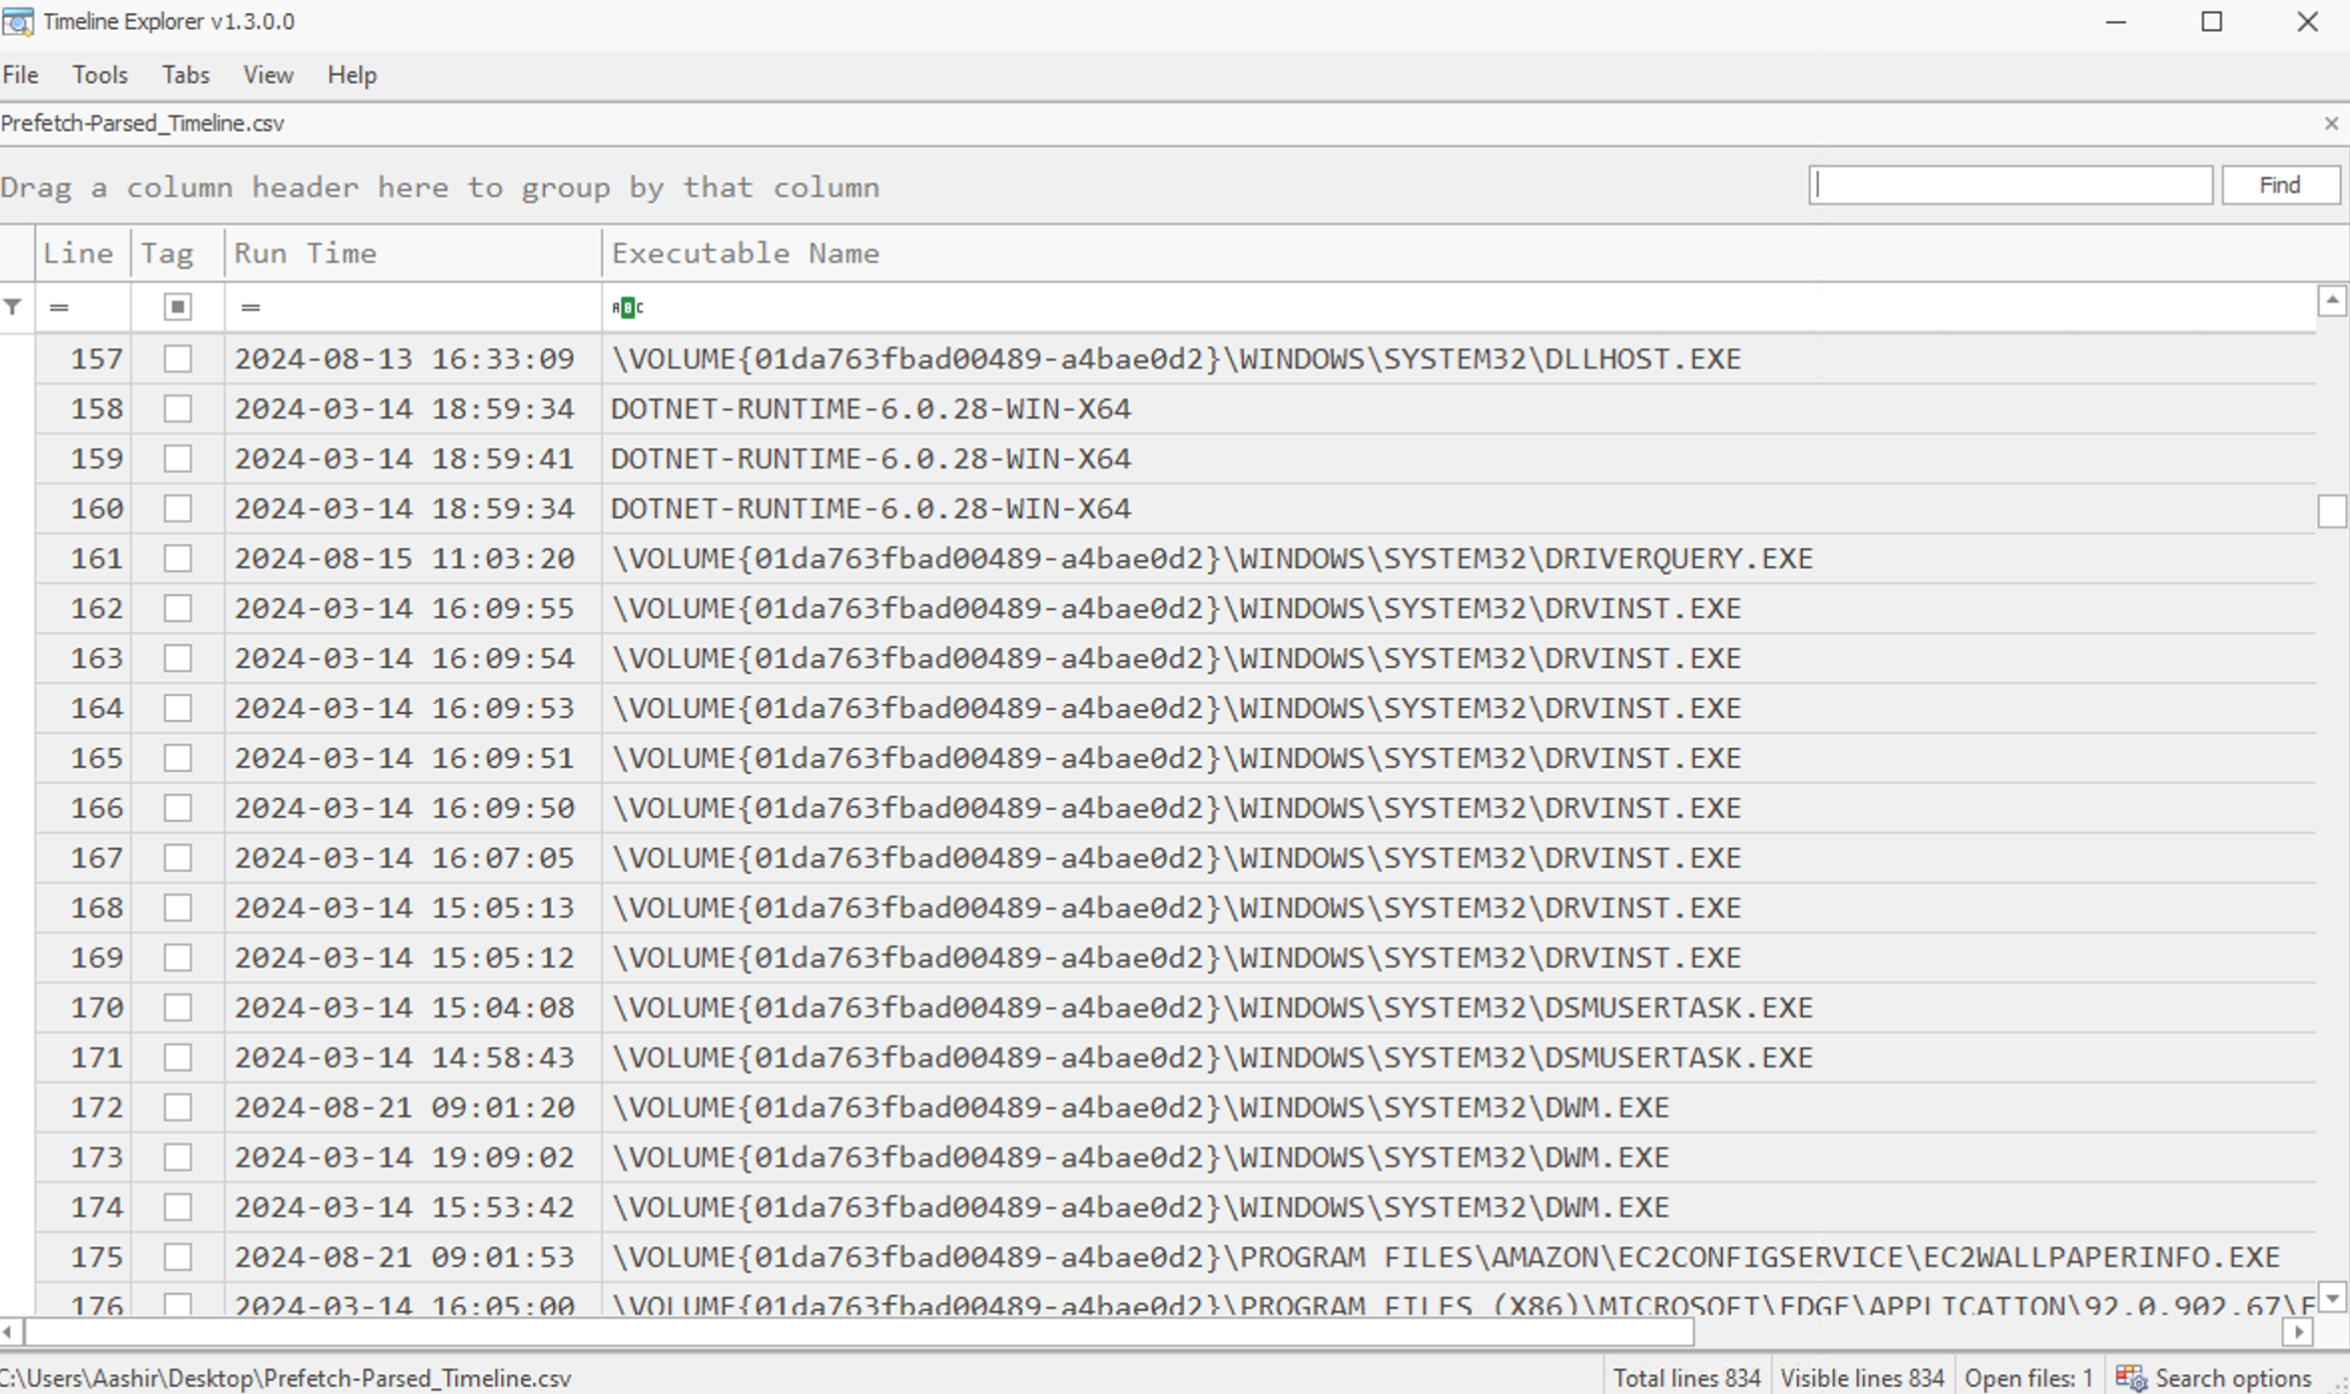
Now, let's start viewing the executions just after the RAR file access time we saw in the . The screenshot below shows that a file was executed after the RAR file was accessed. We can also see the name of the executable file (Executable Name Column), the file execution time (Source Modified Column), and the count of execution (Run Count Column). It also shows the last run time (Last Run) of the file.
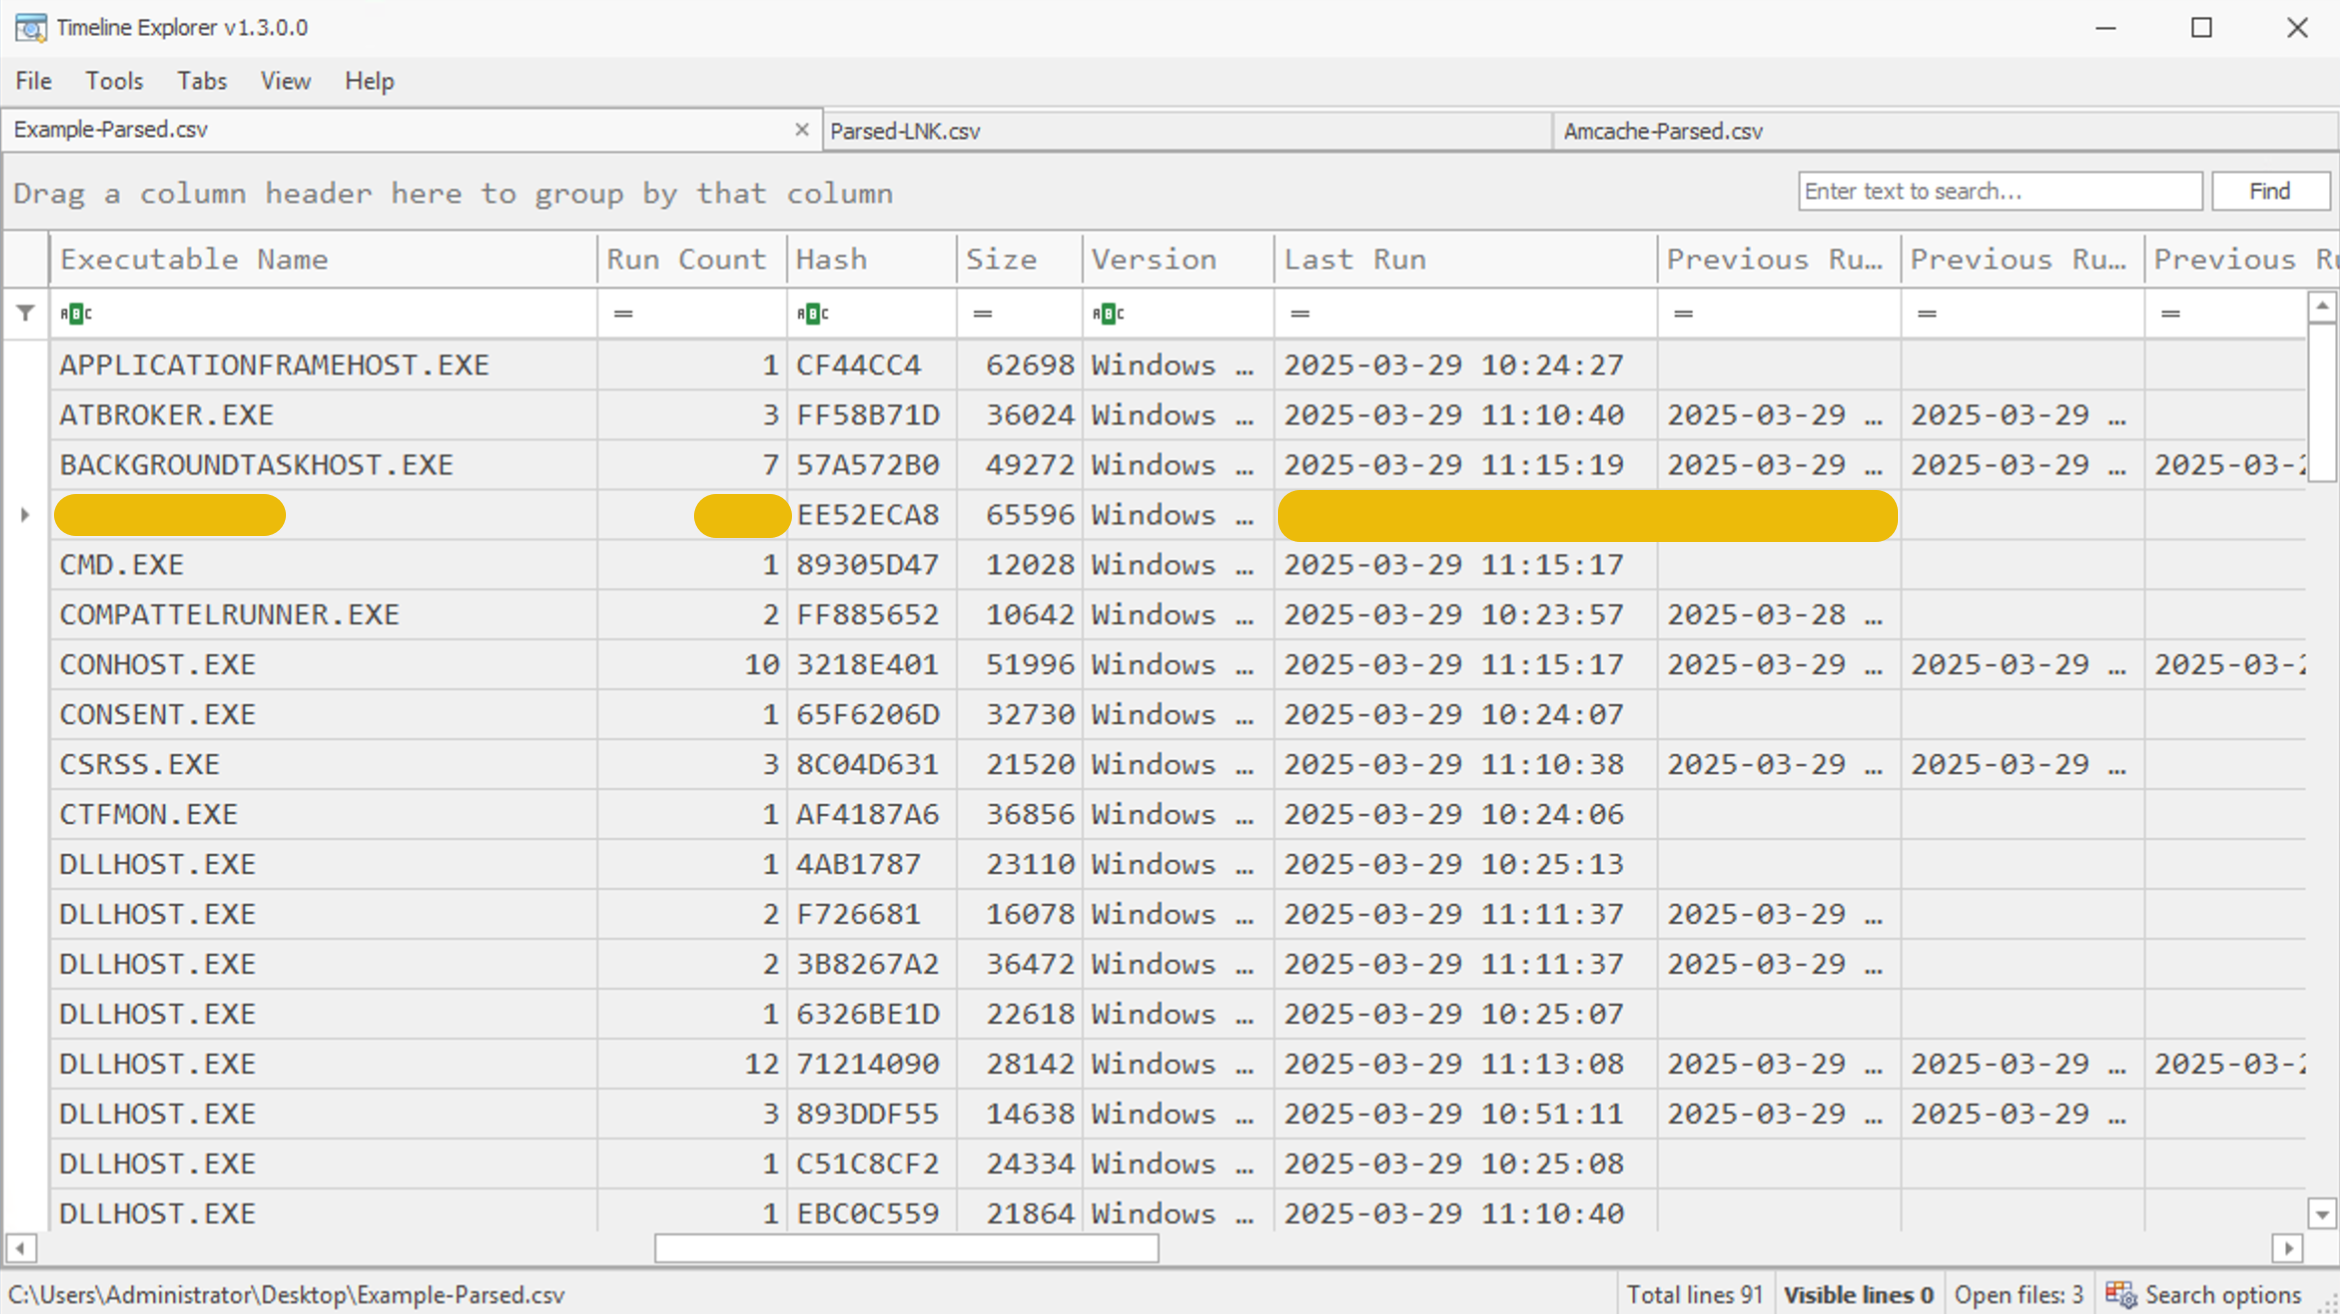
Note: Prefetch files are not enabled by default in Windows Server versions.
What is the name of the malicious executable file?
How many times was this file executed?
When was the last time that this file was executed? Format YYYY-MM-DD HH:MM:SS
Amcache File
Amcache was introduced in the Windows to improve program compatibility by maintaining a cache of information about installed applications. It stores applications’ metadata to ensure their compatibility with the Windows environment. Using this artifact, forensic investigators can extract the file metadata, including the file hash, execution time, and other details.
Utilizing Amcache in the Case
In the previous task, we saw the suspected executables' name and execution time. Let’s gather more details about this file, such as its full path and the hash from the Amcache.
Parsing Amcache
We will utilize Eric Zimmerman’s tool Amcache Parser to parse the amcache file:
Open CMD with Admin privilege and type the following command to move
to the tool’s directory: cd "C:\Users\Administrator\Desktop\Forensics Tools\AmcacheParser"
Now, enter the following command to execute the tool:
.\AmcacheParser.exe -f "C:\Windows\appcompat\Programs\Amcache.hve" --csv C:\Users\Administrator\Desktop --csvf Amcache_Parsed.csv
This command will parse the Amcache File and save the results in CSV format on the Desktop.
Note: The Amcache file is already present on the machine for the reason explained below, so we do not need to run the above command to parse it.
Important Note
The Amcache refreshes itself after every restart, so we have
preserved it during the attack session for you. The results are already
saved on the Desktop with the name
Amcache-Parsed.csv. Drag and drop this
to the Timeline Explorer tool.
We can see the full file path (Full Path Column), the file hash (SHA1 Column), and the last execution time (File Key Last Write Timestamp).

Note: We can also use Shimcache/Appcompatcache, which also gives information on an executable. However, they have a shorter retention period than Amcache.
What is the full path of the malicious file?
What is the SHA1 hash of this file?
Windows Event Logs
Windows Event Logs provides diagnostic information for troubleshooting purposes. These event logs are a significant source of information for forensic investigators. They can help extract user activity logs and establish a chain of events for the incident.

Utilizing Logs in the Case
Previously, we gathered all the details of the malicious executable by utilizing some of the useful Eric Zimmerman’s tools. Let’s see if we can get any important log entries before or in between the execution time.
Windows Event Logs can be accessed from its built-in Event Viewer
utility. You can access it by searching it from the start menu.
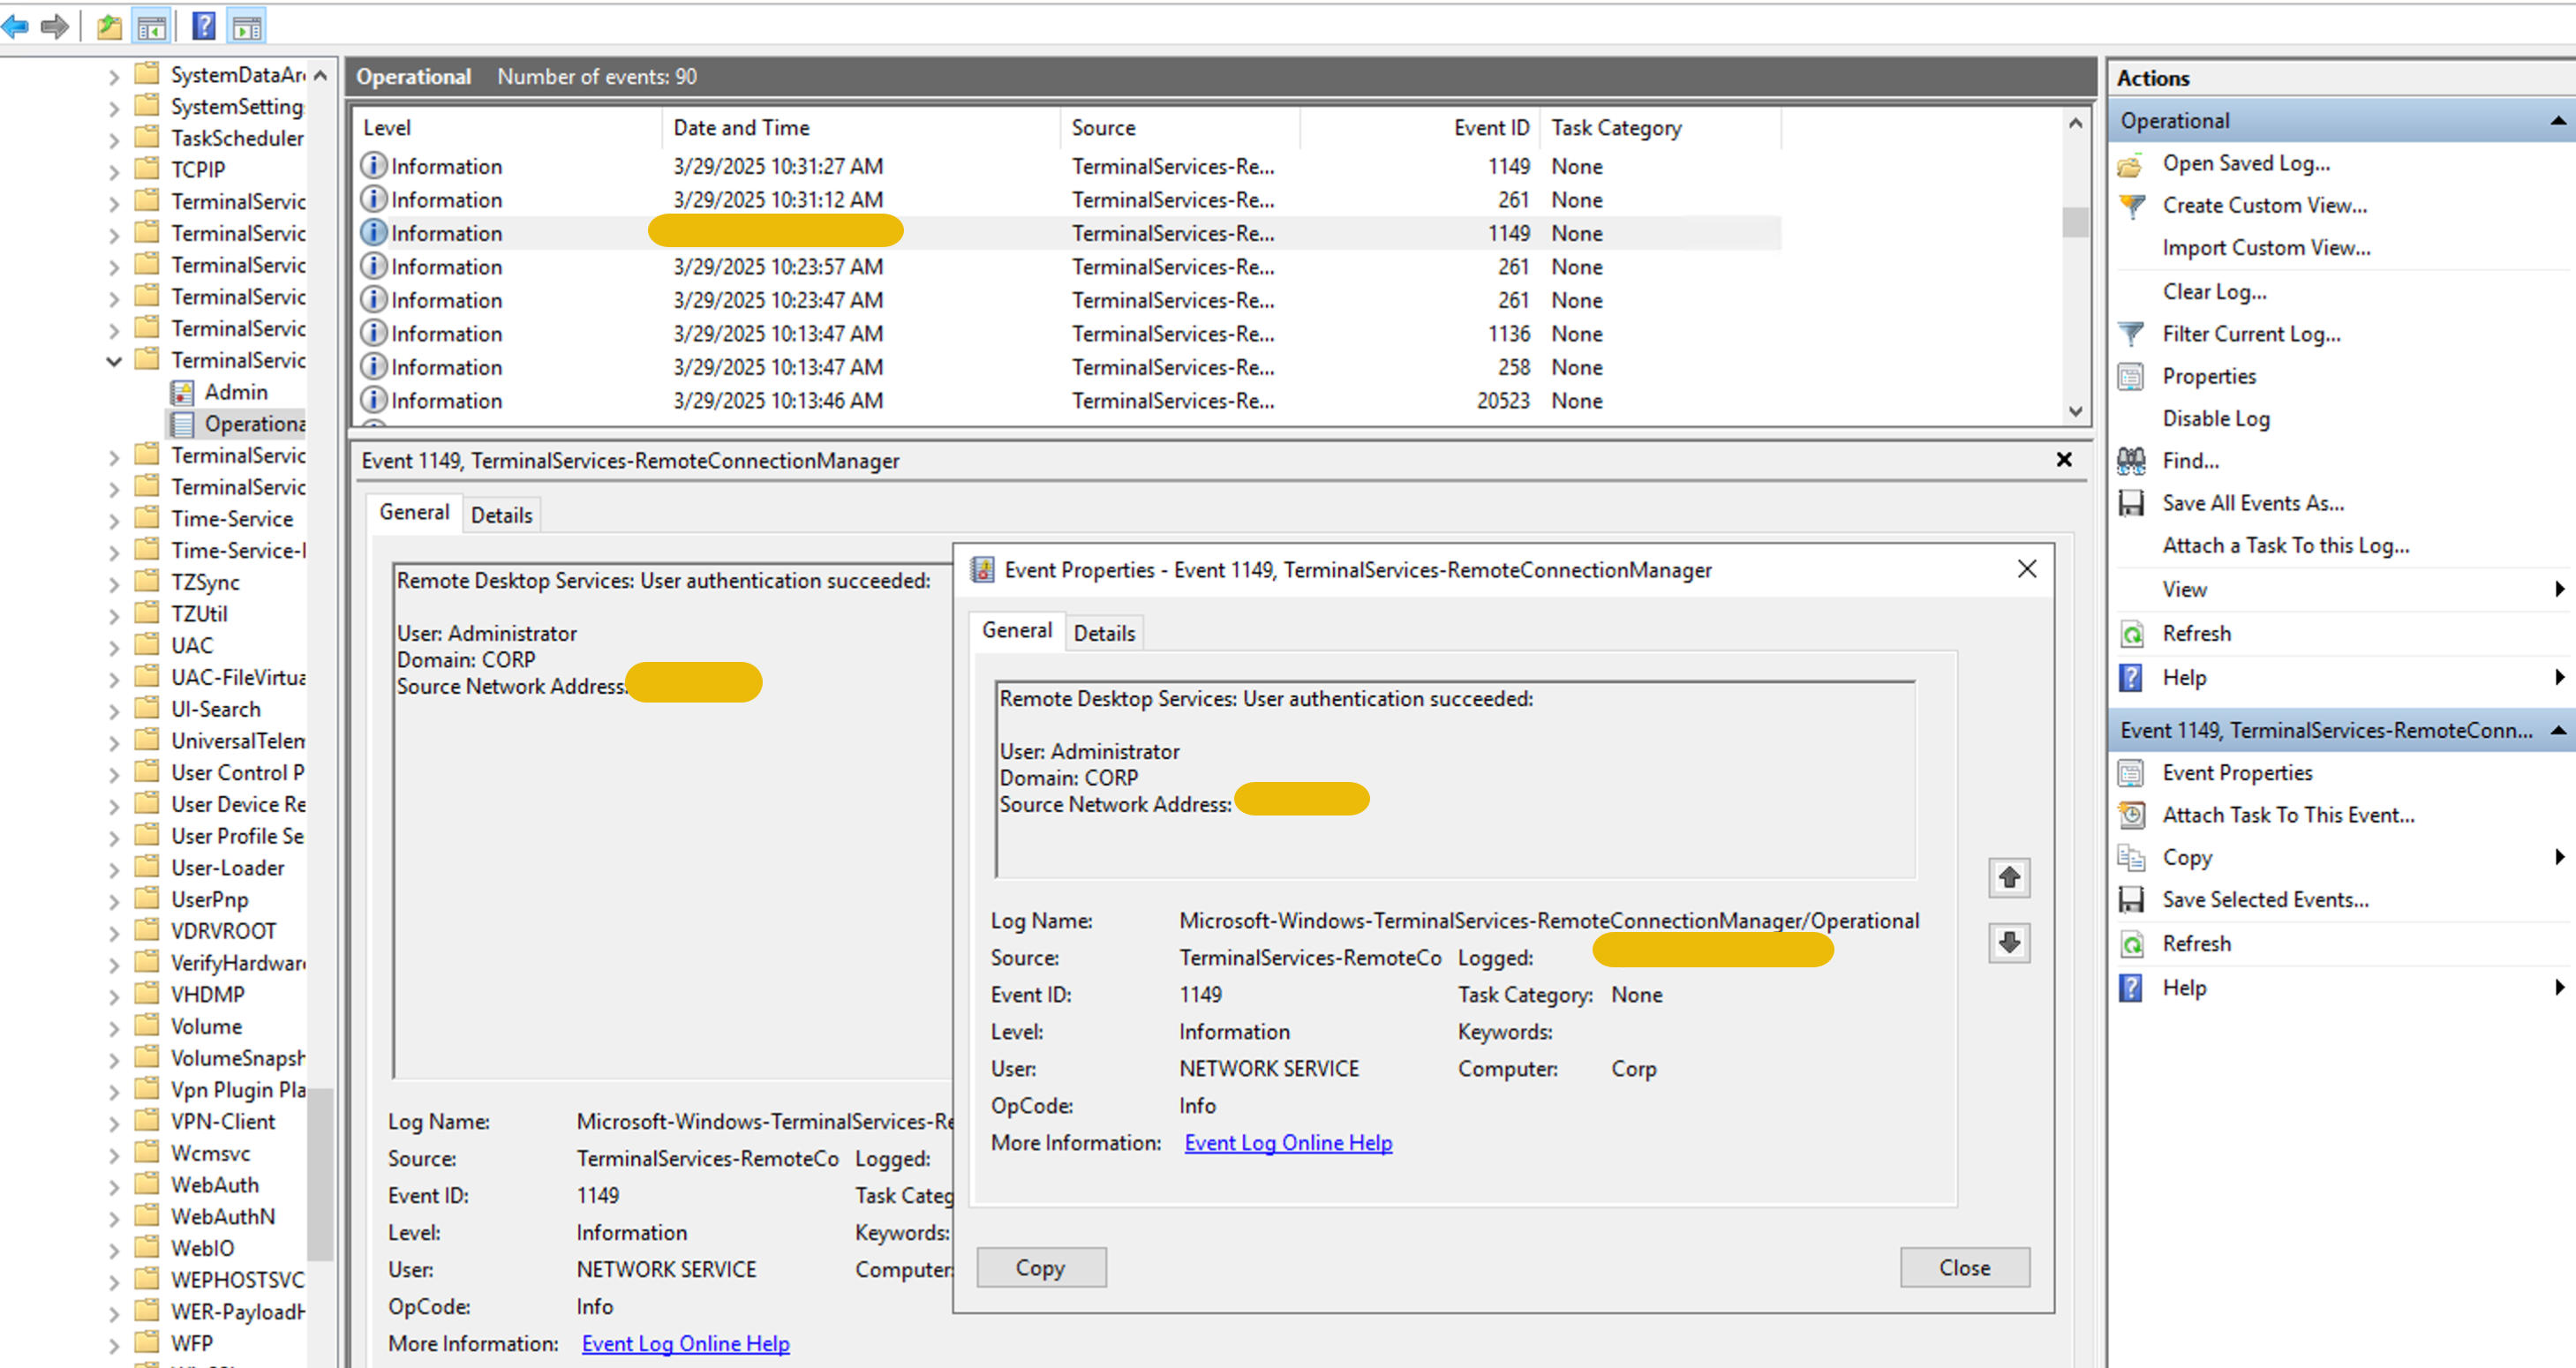
Let's see if there is any RDP connection during this time in this machine. We can verify this by viewing the RDP logs of this specific time from Applications and Services Logs -> Microsoft -> Windows -> Terminal-Services-RemoteConnectionManager > Operational. We can see an successful login with Event ID 1149 just a few minutes before the RAR file was dropped in the system.
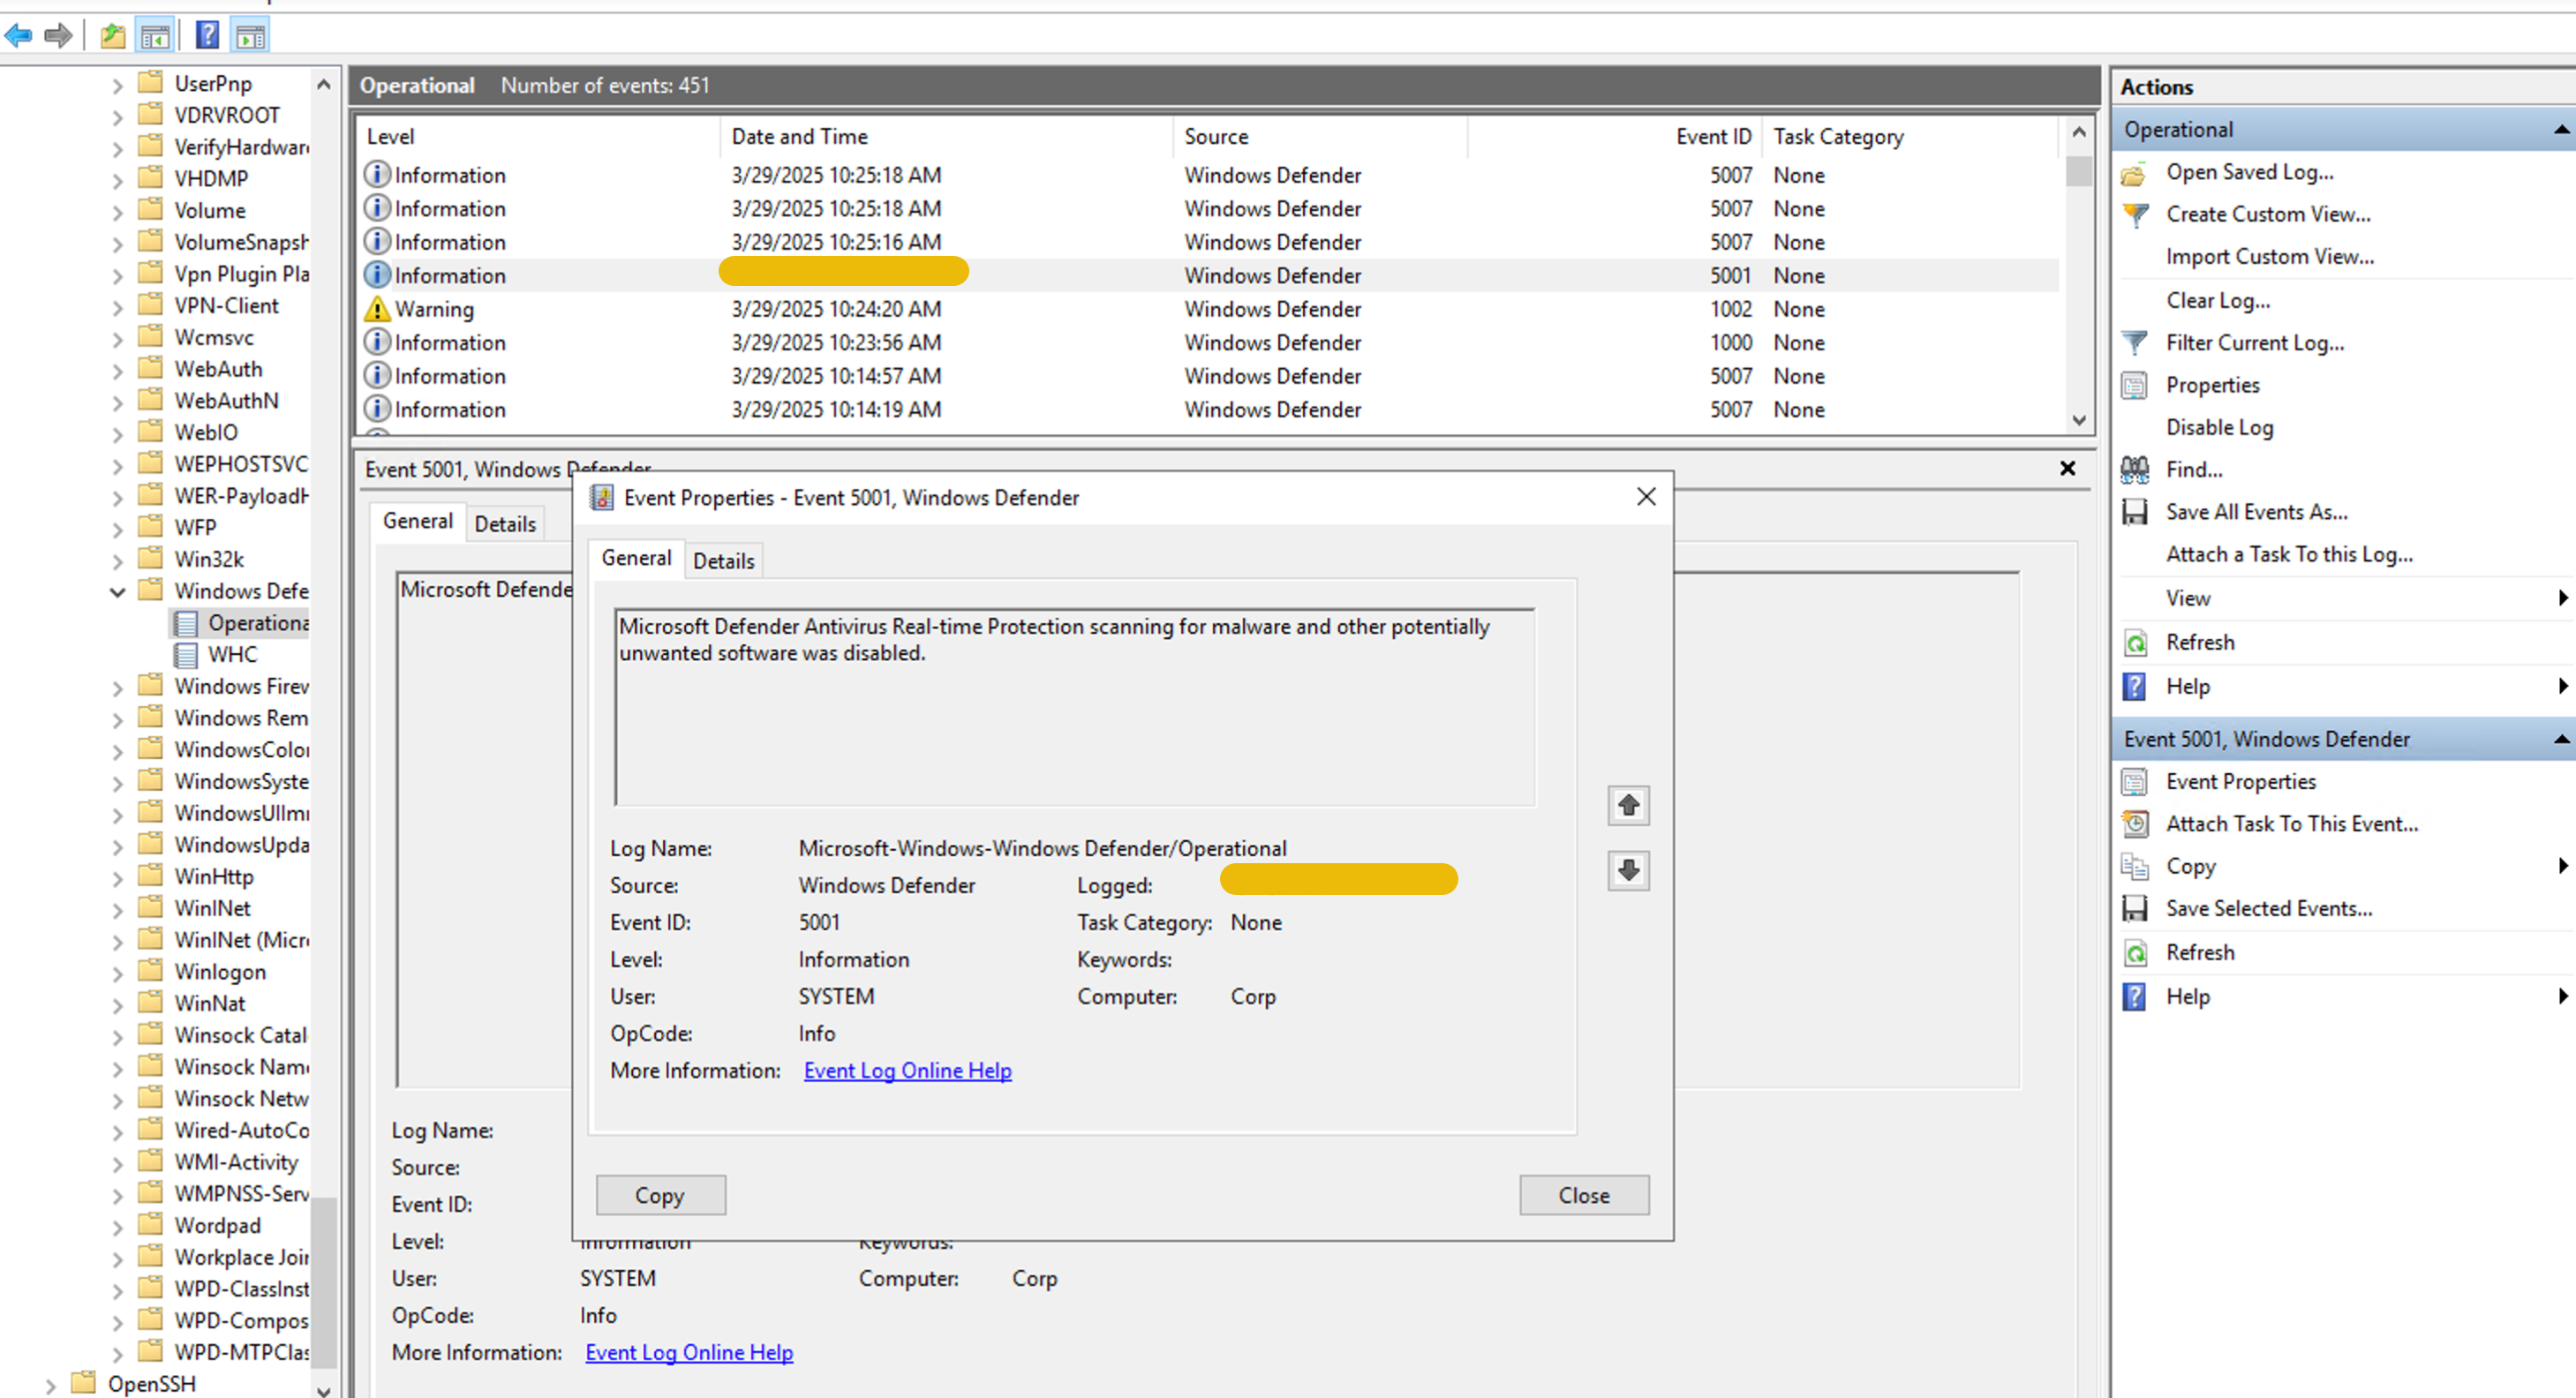
Now, as observed and reported by the user initially, let’s see when
the Windows Defender was turned off. We can see that by moving to Applications and Services Logs > Microsoft > Windows > Windows Defender > Operational in Event Viewer. In the screenshot below, we can see a log with Event ID 5001
When was Defender disabled? Answer in 12 hour clock format. e.g. hours:minutes:seconds AM/PM
We successfully established a chain of attackers’ steps by utilizing some key forensic artifacts in the Windows operating system. The attacker infiltrated the system via , turned off Defender, and dropped the RAR file containing a malicious payload. He then decompressed the file and executed a malicious executable present inside it, which made a scheduled task for in the system. The purpose of this scheduled task was to a malicious CNC server after every minute. After that, he deleted both the RAR file and the executable from the system.
Following is the chronological order of the attack after all the above analysis. We recommend you create this table on your own and write the exact timelines of the activities mentioned in order.
| Activity |
|---|
| Initiated an Session |
| Turned Off |
| RAR File Dropped |
| RAR File Opened |
| Malicious File Executed |
Ready to learn Cyber Security?
TryHackMe provides free online cyber security training to secure jobs & upskill through a fun, interactive learning environment.
Already have an account? Log in