
FAT32 Analysis
Examine the FAT32 filesystem from a forensic point of view.
hard

To access material, start machines and answer questions login.
Introduction
A filesystem tracks how and where files are stored on an Operating System. It provides a translation between the files’ locations on the and their locations on physical storage. A filesystem also tracks file-related changes and options, such as file deletion, file access, file size, and more.
Filesystems are an essential component in forensics. Threat actors often abuse it in attacks. For example, a threat actor could use the hidden space within the filesystem to hide files or mark malicious files as deleted. As we will discuss later, deleting a file does not necessarily mean it is deleted on the physical storage. A forensic analyst needs to know where to find forensic artifacts on filesystems.
This room will teach you where and how to find artifacts related to the FAT32 filesystem. We will start by exploring its structure. Then, we will focus on analysis techniques. We will then continue with data recovery techniques specific to FAT32. We will then focus on the ATT&CK techniques related to defense evasion for filesystems, focusing on FAT32. We will finish this room with a challenge covering all the skills.
Learning Objectives
- Explore the FAT32 filesystem structure
- Apply forensic analysis techniques to the FAT32 filesystem
- Apply data recovery techniques to the FAT32 filesystem
- Detect defense evasion techniques involving FAT32
Prerequisites
Set up your virtual environment

In this room, we will use a Windows Server 2019 lab machine with filesystem forensics analysis tools installed. This will be used from task 4 and on for all the listed tasks and exercises. You can start the machine by clicking the Start Lab Machine button below. The VM will take approximately 2 minutes to boot up and will start in split view. If the VM is not visible, use the blue Show Split View button at the top of the page.
Alternatively, you can connect to the via Remote Desktop (RDP) using the credentials below:

| Username | Administrator |
| Password | TryH@cKMe9#21 |
| IP | MACHINE_IP |
All the necessary files used throughout this room are located in C:\FAT32_analysis\. Note: When starting the tool Autopsy it can take up to 2min to load completely.
Boot up the VM and continue with the next task.
Microsoft introduced File Allocation Table 32-bit when they released Windows 95 Service Release 2 in August 1996. FAT32 is nearing its 30th birthday, so why dedicate a room to outdated technology?
FAT32 is still widely used. Due to its lightweight design and high compatibility with multiple Operating Systems, it has stayed relevant. FAT32 has a file size limit of 4GB and a volume limit of 2TB. Many systems still don’t reach that limit. Examples are embedded systems, devices, USB storage devices, camera memory storage, legacy devices, and more.
Attackers often use USBs formatted with FAT32 due to its high compatibility with different OSs and lack of permissions. Unlike , FAT32 does not include functionality for folder and file permissions. This means anybody can access a file or folder on a FAT32 partition. This offers attackers some flexibility to abuse FAT32. In the table below, you can see ATT&CK techniques that apply to FAT32. Most of these techniques are related to the tactic TA0005 Defense Evasion. The following tasks will show some of these techniques in deeper detail.
| Technique | Description |
|---|---|
| T1006 | Direct Volume Access |
| T1564.001 | Hidden Files and Directories |
| T1564.005 | Hide Artificats: Hidden |
| T1070.004 | Indicator Removal: File Deletion |
| T1070.006 | Indicator Removal: Timestomp |
| T1070.009 | Clear |
| T1027.001 | Binary Padding |
USB attacks
In the following paragraphs, you can find some recent attacks involving the use of a USB for initial infection. Although unconfirmed, each of the USBs used in the examples is highly likely to have been formatted with FAT32. The reasons for this are the same as the upcoming Stuxnet example: lack of permissions, broad compatibility, light weight, and simplicity.
StuxnetAn infamous attack that used some of the above techniques is Stuxnet, a worm that was used in an unprecedented attack against Iran’s nuclear program. The initial access vector was a USB containing the Stuxnet worm as mentioned in the official report (opens in new tab) of the NATO Cooperative Cyber Defense Center of Excellence. A USB was used because the targeted systems were air-gapped (No connection to the internet or other networks). The main reason that FAT32 would have been used is its compatibility with a broad range of different OSs and their versions. The attacker had to ensure that when the USB was inserted into a targeted system, it could read and automatically execute the USB’s content. Additionally, due to the lack of permissions on the FAT32 filesystem, the USB content did not have to be executed by an administrator account.
Mustang Panda Feeds Worm-Driven USB Attack StrategyThis article (opens in new tab), from September 10th, 2024, discusses the recent TTPs for the Chinese state-sponsored Mustang Panda. Since the COVID-19 period, using USBs as initial infection vectors has revived. Mustang Panda uses USBs for targeted attacks.
Evolution of UNC4990: Uncovering USB Malware’s Hidden DepthsThis article (opens in new tab), from January 30th, 2024, discusses UNC4990, a threat actor that heavily uses USB for initial infection. What is interesting about this attack is the use of an . file. These files are typically used in conjunction with the FAT32 filesystem.
Attack Media Using FAT32
One of the most famous attack media formatted with FAT32 is the Rubber Ducky. A Rubber Ducky is a USB that acts as a keyboard and allows for a Keystroke Injection attack. It can execute scripts as if the attacker were behind the keyboard himself. Below, you can find an image of a Rubber Ducky from the official website (opens in new tab) of its creators.
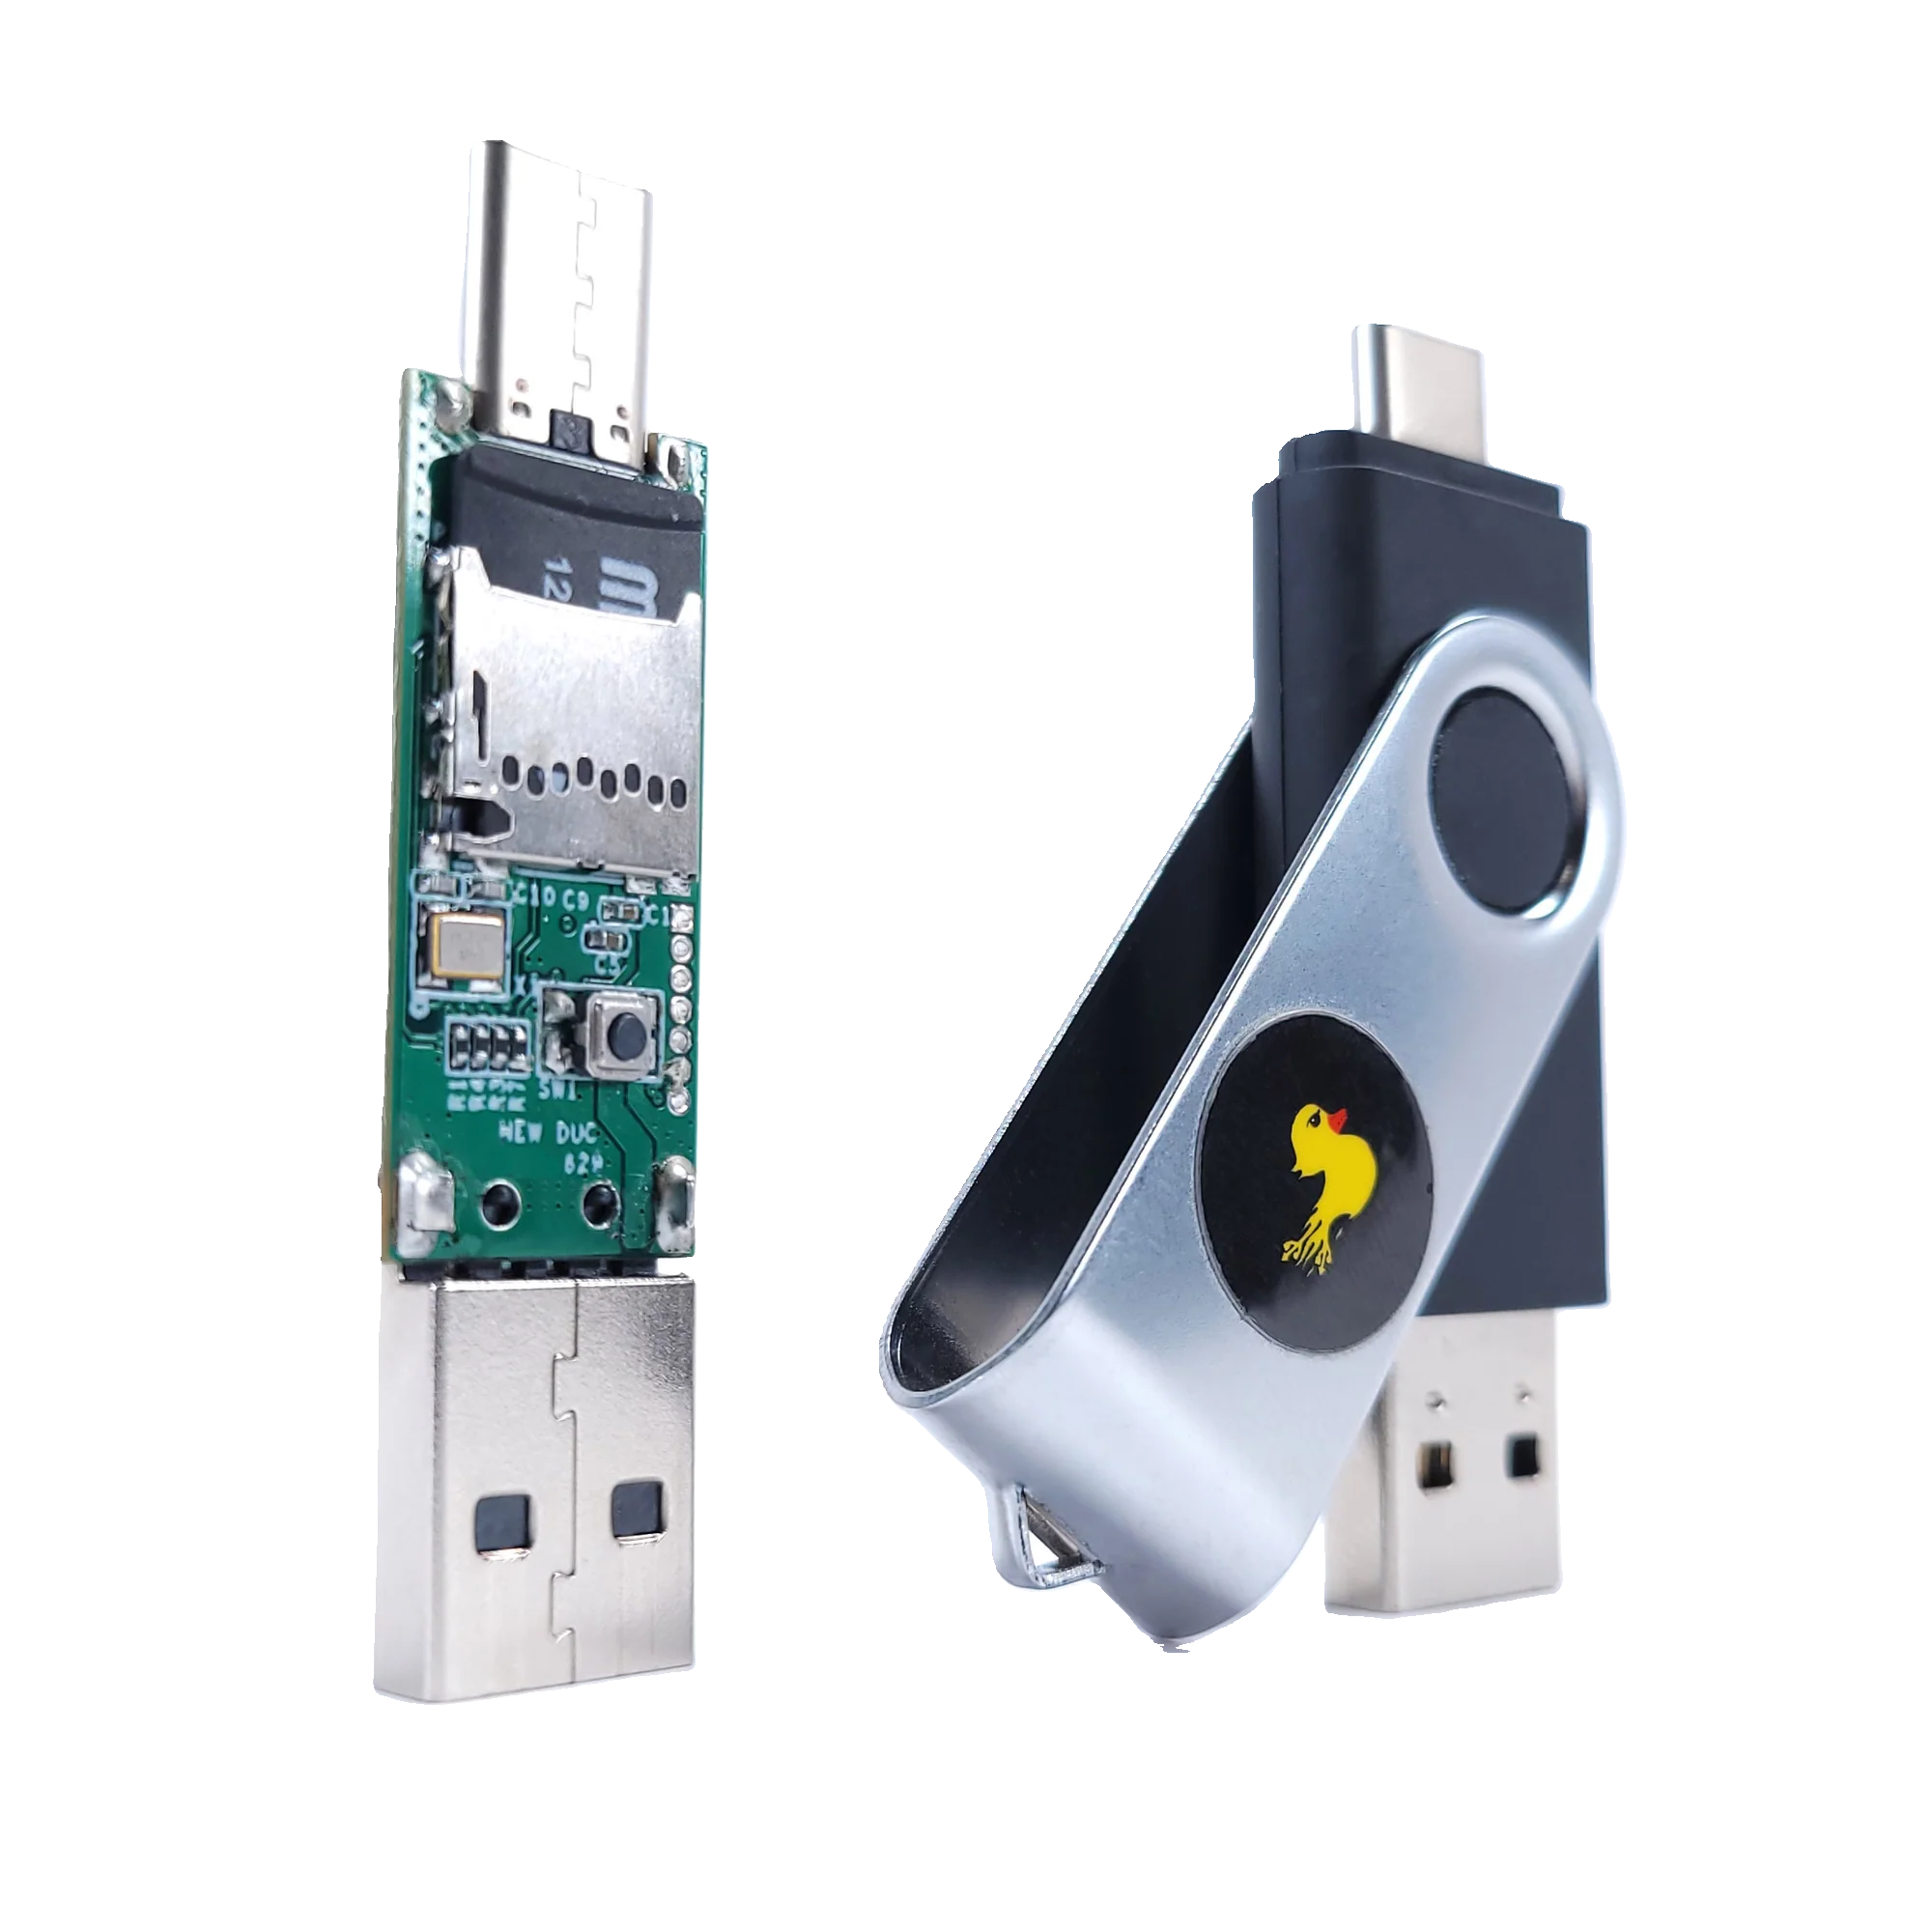
Many attackers often create malicious USBs themselves using similar techniques that a Rubber Ducky USB uses. Once inserted, a custom-configured USB offers many possibilities for attacking a system. This can range from running scripts that execute a Keystroke Injection attack to exfiltrating data and hiding it in the filesystem’s .
During this task, we discussed why FAT32 is still relevant and listed ATT&CK techniques where FAT32 is involved. To conclude, we viewed some recent attacks using USBs and a common attack medium that uses FAT32 as a filesystem. In the next task, we will dive deeper into the structure and characteristics of FAT32.
What category of tactic is MITRE ATT&CK TA0005?
Before we explore FAT32 forensics, we need to deeply understand its structure and characteristics. We want to answer questions like:
- How does FAT32 store files?
- Where is the metadata of files stored?
- What about the metadata of the partition itself?
- How is a file deleted?
- Can you set file or folder permissions?
- And more.
Let’s start by analyzing the structure of FAT32.
FAT32 Structure
A FAT32 partitioned volume typically consists of the following parts:
- Reserved Area
- , also named Volume Boot Record
- FSinfo Sector (FS is an acronym for Filesystem)
- Reserved Sectors
- FAT Area
- File Allocation Table (FAT1)
- Backup File Allocation Table (FAT2)
- Data Area
- Root Directory
- Data Region
The image below shows a visual representation of how these parts are ordered.
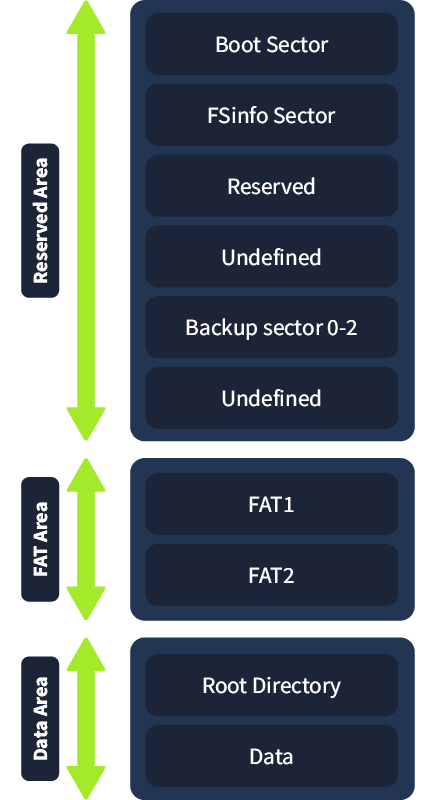
In the following paragraphs, we will discuss every part extensively. We will also use a hex editor and open a FAT32 image to see the structure of each part effectively.
Reserved Area
The reserved area contains the important filesystem structures required for the volume to function. The reserved sector always starts from sector 0 on the partition and includes:
- FSinfo sector
- Backup
- Additional reserved sectors
To know where these sectors are located, we need to take a look at the .
The table below shows an overview of the different parts of the reserved area.
| Field | Sector number |
|---|---|
| 0 | |
| FSinfo sector | 1 |
| Backup | 6 |
| Additional reserved sectors | Starting from sector 7 until the start of the File Allocation Table |
How do we need to interpret this table? A sector is the smallest addressable unit on a disk. In most cases the size of a sector is 512 bytes. So, if we apply this info to the table above, it means the following:
- The starts at sector 0 and encompasses 512 bytes.
- The FSinfo sector starts at sector 1 and encompasses 512 bytes.
- Sectors 2 to 5 are reserved sectors. The total size is 4 times 512 bytes, which equals 2048 bytes.
- The backup starts at sector 6 and encompasses 512 bytes.
- The additional reserved sectors start from sector 7 and stretch until the start of the FAT area. We need to analyze the to determine the complete size of the Reserved Area.
The is the first sector (sector 0) on a FAT32 partitioned volume. It contains the metadata of the partition. This information is essential for the to know how to access the partition, where to look for the File Allocation Table, where the Root Directory is located, and where the Data Region begins. Let’s have a look at the available metadata. The highlighted fields are interesting when doing analysis.
| Field | Subfield | Size (bytes) | Offset (Hex) | Explanation |
|---|---|---|---|---|
| Jump Instruction | 3 | Allows the or bootloader to bypass the Parameter Block (BPB) and start executing the boot code. | ||
| OEM Name | 8 | Contains the name of the Original Equipment Manufacturer that formatted the disk (Can refer to physical or logical disk). | ||
| Parameter Block (BPB) | Contains essential metadata about the volume. Without this, the could not read the partitioned volume. | |||
| Bytes per Sector | 2 | Lists the size of a sector. The standard sector size is often 512 bytes. | ||
| Sectors per Cluster | 1 | How many sectors are used to form a cluster? A cluster is the smallest addressable unit to store a file. | ||
| Reserved Sectors | 2 | How many sectors are reserved for metadata storage? | ||
| Number of FATs | 1 | How many File Allocation Table instances are on the partition. The standard value for this is 2. The FAT table and its backup (Named FAT1 and FAT2) | ||
| Maximum Root Directory Entries | 2 | How many entries can the root directory contain. For FAT32, this is set to 0 because the root directory can dynamically grow. | ||
| Total Sectors | 2 or 4 | The total number of sectors on the formatted volume. This field is 0 for FAT32. | ||
| Media Descriptor | 1 | Describes what type of media the partition is present on. For example, 0xF8 means that the media is a fixed hard disk. Note: Modern OSs don’t set this value accurately anymore. They generally use the value 0xF8 for a fixed disk or a USB drive. | ||
| Sectors per FAT | 2 | Lists how large the File Allocation Table is. | ||
| Sectors per Track | 2 | This field refers to the parts of a mechanical hard drive. | ||
| Number of Heads | 2 | This field refers to the parts of a mechanical hard drive. | ||
| Hidden sectors | 4 | Used to indicate the number of sectors before the start of the current partition when the partition does not start at the physical beginning of the disk. | ||
| Total Sectors 32 | 4 | The total amount of sectors on the partition expressed in 32-bit. This field can't be zero for FAT32 volumes | ||
| Extended BPB | Extends the BPB with additional data specific to the FAT32 filesystem. | |||
| Sectors per FAT | 4 | The number of sectors assigned to the File Allocation Table. If there is a backup FAT, it will also take the same size. | ||
| Flags | 2 | This value refers to the mirroring of the FAT table. In other words, is there a backup configured? If the value is 0, mirroring is enabled. | ||
| Version | Refers to the version of the FAT32 filesystem. Typically this is V0.0. | |||
| Cluster Root Directory | 4 | Points to the cluster number that the root directory is located at relative to the beginning of the data area. | ||
| FSInfo Sector | 2 | Contains information about the free clusters and the next available cluster. | ||
| Backup | 2 | Points at the cluster that has a copy of the . | ||
| Boot Code | 420 | Contains the data the needs to boot up. | ||
| Signature | 2 | Used for validation of the . |
Let’s take a look at a FAT32 on the . Open the HxD editor by double-clicking the logo on the Desktop. Then navigate to File -> Open and select the FAT32 image located at C:\FAT32_analysis\FAT32_structure.001. After opening the image, you should get a view similar to the one shown below.
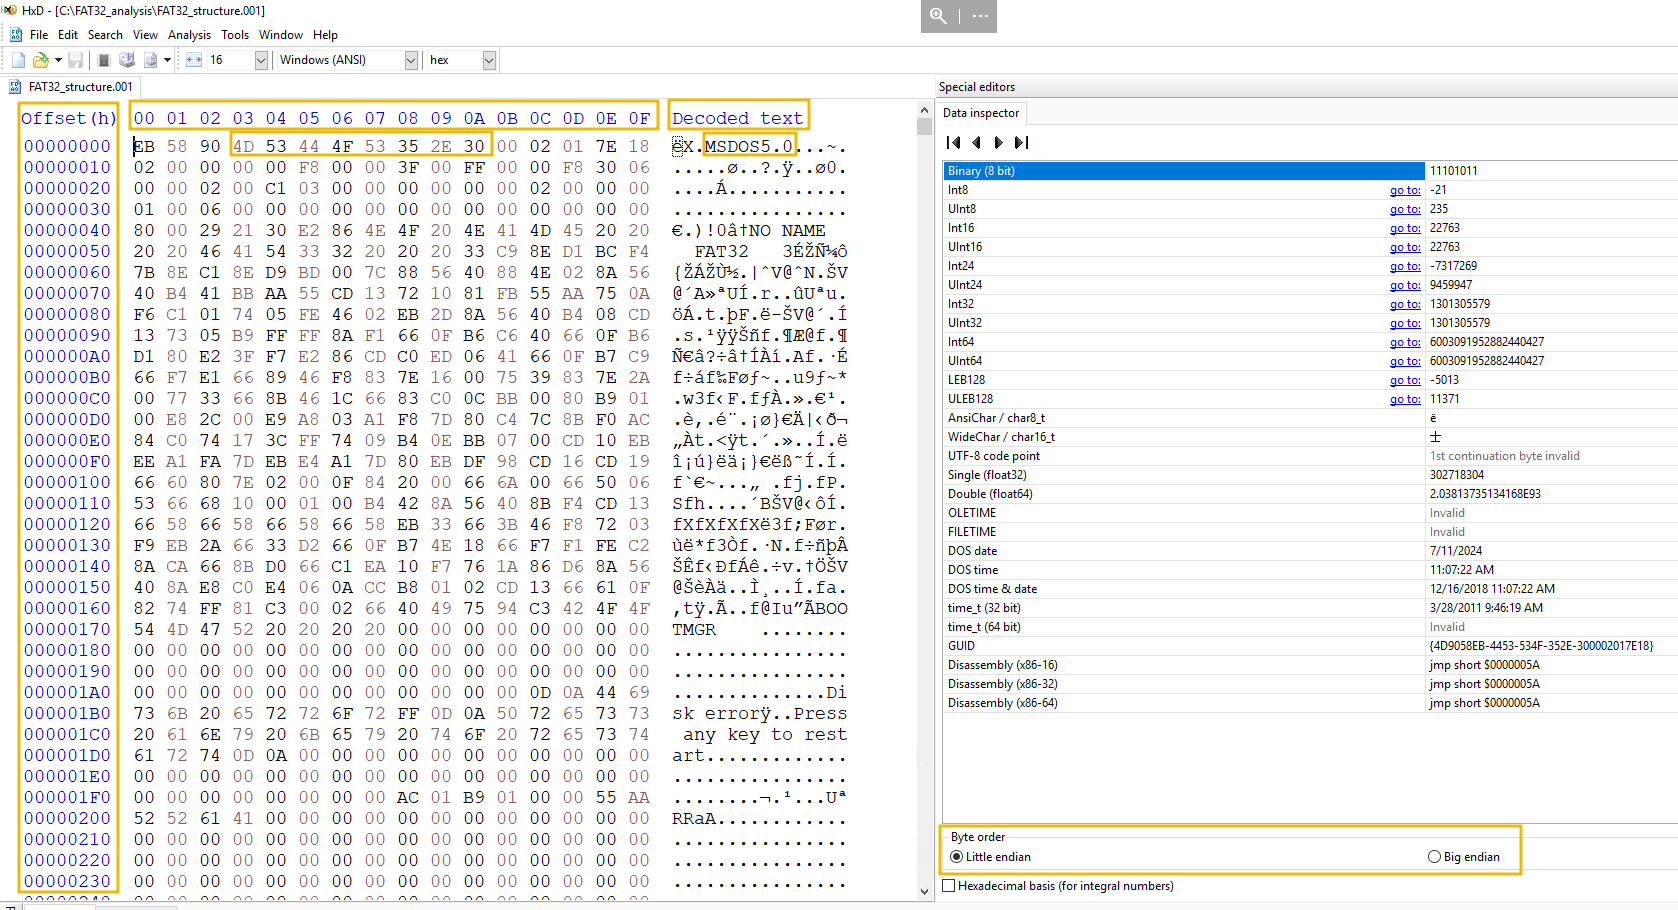
The important parts that we need to know to interpret the data correctly are highlighted:
- On the left side, the
Offset (h)column is displayed. This column indicates the offset position in the partition you are looking at. For example,0000 0000is the starting address of the partition. In the current configuration, each row shows exactly 16 bytes. So if a sector is 512 bytes, the sector will encompass 32 rows of 16 bytes. You can change the row size according to your preferences. - The highlighted row starting with the address
00needs to be interpreted together with theOffset (h)column. The values refer to addresses. Starting at offset00000000you will have the addresses00000000,000000001,000000002, and so on. - The highlighted row starting with the value
4Dindicates the value present at that address. For example, the address00000003contains the value4D. - The
Decode Textcolumn contains the translated values read at a certain address. - The
Byte orderfield is important. Certain fields’ values can be displayed in Little Endian or Big Endian. This refers to how bytes are read. In the case of FAT32, initially designed for x86 (that uses Little Endian), the byte order is Little Endian. This means that when reading from left to right, the Least Significant Byte comes first. For example: If we have a hex value of 02 00 in Little Endian, this means the bytes are stored with the Least Significant Byte first. To interpret the correct value, we reverse the byte order to 00 02, which corresponds to 0x0002. Converting this to decimal gives us 2. If we represent 0x0002 in binary as 0000 0000 0000 0010, the value comes from the bit representing 2^1. Therefore, the calculation is 1 * 2^1 = 2.
Note: CPU instructions and ASCII values are read as is; there is no endianness. - The
Data inspectorscreen shows the value in different representations. This way, we don’t have to manually convert it from hexadecimal.
Let us look at each field’s values and uncover its meaning. To avoid needing to translate values in Little Endianess format, this table includes a column "Hex Value To Translate" that reorders the values so the LSB is the rightmost bit.
| Field | Offset | Address | Hex Value (Little Endianess) | Hex Value To Translate | Translated Value | Explanation |
|---|---|---|---|---|---|---|
| Jump instruction | 0000 0000 | 00 | EB | EB | jmp short $0000005A | Jump to address. |
| 01 | 58 | 58 | Represents 88 bytes in hex. | This is the number of bytes to jump over. | ||
| 02 | 90 | 90 | NOP | This instruction does nothing. It is added for padding. | ||
| OEM name | 0000 0000 | 03-0A | 4D 53 44 4F 53 35 2E 30 | - | MSDOS5.0 | This value indicates that the partition was formatted with a tool using MS-DOS version 5.0 |
| Bytes per Sector | 0000 0000 | 0B-0C | 00 02 | 02 00 | 512 | 1 sector has a size of 512 bytes |
| Sectors per Cluster | 0000 0000 | 0D | 01 | 01 | 1 | 1 cluster has 1 sector. This is often not the case. Clusters of 4KB are used most of the time. |
| Reserved Sectors | 0000 0000 | 0E-0F | 7E 18 | 18 7E | 6270 | The amount of reserved sectors, including the boot sector, is 6270. After that, the FAT1 starts. |
| Number of FATs | 0000 0010 | 00 | 02 | 02 | 2 | The partition has 1 FAT table and a backup. Respectively named FAT1 and FAT2. |
| Maximum Root Directory Entries |
0000 0010 | 01-02 | 00 00 | 00 00 | 0 | This is not used in FAT32. |
| Total Sectors | 0000 0010 | 03-04 | 00 00 | 00 00 | 0 | NA for FAT32. The Total Sectors 32 value of the extended BPB will be used. |
| Media Descriptor | 0000 0010 | 05 | F8 | F8 | Fixed disk | |
| Sectors per FAT | 0000 0010 | 06-07 | 00 00 | 00 00 | 0 | This field is used for FAT16 and not for FAT32. This can be discarded |
| Sectors per Track | 0000 0010 | 08-09 | 3F 00 | 00 3F | 63 | A track on a hard drive platter contains 255 sectors. This is a logical placeholder used for compatibility. It does not represent real physical disk tracks. |
| Number of Heads | 0000 0010 | 0A-0B | FF 00 | 00 FF | 255 | The total heads of the hard drive is 255. This value is a logical placeholder used for compatibility. It does not represent real physical disk heads. |
| Hidden sectors | 0000 0010 | 0C-0F | 00 F8 30 06 | 06 30 F8 00 | 103872512 | If we multiply this value with the sector size and then convert it to GB, it comes down to 49GB, which is the size of the C:\ partition. |
| Total sectors 32 | 0000 0020 | 00-03 | 00 00 02 00 | 00 02 00 00 | 131072 | If we multiply this value with the sector size and then convert it to MB, it comes down to 64MB, which is the size of the image. |
| Sectors per FAT | 0000 0020 | 04-07 | C1 03 00 00 | 00 00 03 C1 | 961 | amount of sectors assigned to the FAT1 and FAT2 (2 times 961). |
| Flags | 0000 0020 | 08-09 | 00 00 | 00 00 | 00 | This means FAT mirroring is enabled. FAT entries are simultaneously written to FAT1 and FAT2 |
| Version | 0000 0020 | 0A-0B | 00 00 | 00 00 | 0 | FAT32 version is 0.0 |
| Cluster Root Directory | 0000 0020 | 0C-0D | 02 00 | 00 02 | The root directory is located at the 2nd cluster of the data region. | |
| FS Info Sector | 0000 0030 | 00-02 | 01 00 | 00 01 | 1 | information about the free clusters and the next available cluster is located at sector 1 (right behind the ) |
| Backup | 0000 0030 | 02-03 | 06 00 | 00 06 | 6 | Sector 6 contains the backup for our boot information. |
| Boot Code | 00000030-000001F0 | 0E-0D | - | - | - | Contains the boot code necessary for the BIOS or UEFI to boot up the volume. |
| Signature | 0000 01F0 | 0E-0F | 55 AA | - | - | Indicates that the current sector is bootable |
FAT Area
The FAT area contains the File Allocation Table (FAT1) and its backup (FAT2) and has the following functions:
- It contains information about the allocation of clusters to a file or directory and the next free clusters.
- It helps with the fragmentation (data stored in non-contiguous clusters) of files. It keeps track of all the clusters that are assigned to a file.
- It does integrity checking to identify bad clusters and mark them not to be used for storing data. Each entry in the FAT is 32 bits, but only 28 bits are effectively used. It is this 32-bit value that is referenced in the filesystem name FAT 32 .
The FAT has to be interpreted together with the root directory entries for files and directories. The root directory entries reference the cluster index number of the FAT where the file or directory starts. The index of the FAT entries corresponds with the index of the clusters in the data region. For example, a hypothetical file A uses cluster index number 5 of the data area (cluster index number starts at 2, clusters 0 and 1 are reserved). The index number of the corresponding FAT entry will be 5 (counting from 0).
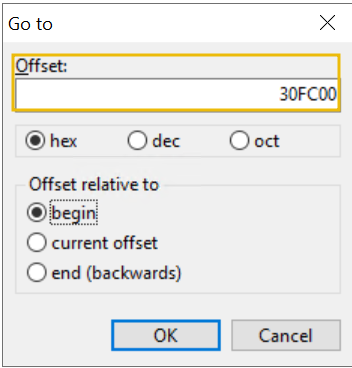
Let us have a look at the FAT1 on our VM. Continue with the FAT32_structure.001 image and navigate to offset 0030FC00. You can calculate this offset value by taking the value of the Reserved Sectors (6270) field, multiplying it by the sector size (512 bytes) and converting it to hexadecimal ( 6270 * 512 = 3.210.240 => 0030FC00).
The backup of the FAT1, also named FAT2, starts right after FAT1. To find the offset for the FAT2 you would need to add the value of the Sectors per FAT (961) field to the Reserved Sectors (6270) field, multiply it by the sector size (512 bytes) and convert it to hexadecimal.
Navigate to the HxD editor and press CTRL+G to enter the offset value in hexadecimal ( 0030FC00). You should see a popup like the one below.
After clicking OK you should see the following results:

Each 4 bytes represents a FAT entry. The table below explains the meaning of the typical values you will find in a FAT table.
| Value | Meaning |
|---|---|
| 00 00 00 00 | Free cluster. |
| 00 00 00 02 - 0F FF FF F6 | Used cluster: Next Cluster in the Chain is XX. |
| 0F FF FF F7 | Bad cluster. |
| 0F FF FF F8 - 0F FF FF FF | End of File (EOF). |
| FF FF FF FF | End of File (EOF). |
Lets discuss the highlighted table entries a bit more in detail.
Used Cluster
A cluster chain consists of one or more clusters. Each entry in the data area has exactly one cluster chain assigned. The Used cluster field indicates the index number of the next cluster that is part of the chain.
End of File
The End of File field is to indicate that the cluster at that index is the last cluster of the chain. Note: The values 0F FF FF FF and FF FF FF FF are both used for marking the end of a cluster chain. The difference lies in the first 4 bits that are reserved. Some tools process these bits, others do not. The FF FF FF FF representation is a simplified representation that does not take those 4 bits into account. Generally, it is recommended by standards to use the 0F FF FF FF value.
Example
Let's say we have a file test.txt, and its content is saved on clusters 5 and 6 in the data area. Clusters 5 and 6 form a cluster chain. The FAT entries will look like this:
- Cluster 5: 06 00 00 00 (
Used cluster - Next Cluster in the Chain: cluster 6) - Cluster 6: 0F FF FF FF (
End of File: this is the last cluster of the cluster chain)
Let’s apply this knowledge to the entries of our File Allocation Table of the image on our . Since FAT32 uses little endianness, we have to interpret each 4-byte entry from right to left to get the correct value. In the table below, each 4-byte entry has already been ‘reversed’.
| Cluster index FAT | Cluster index data region | Value | Meaning |
|---|---|---|---|
| 0 | 0F FF FF F8 | End of File. Note: cluster 0 and cluster 1 are reserved clusters and are not mapped to a data area entry. Therefore the data area index numbering starts at number 2. | |
| 1 | FF FF FF FF | End of File. Note: cluster 0 and cluster 1 are reserved clusters and are not mapped to a data area entry. Therefore the data area index numbering starts at number 2. | |
| 2 | 2 | 0F FF FF FF | End of File. Cluster chain consists of one cluster: cluster 2. |
| 3 | 3 | 0F FF FF FF | End of File. Cluster chain consists of one cluster: cluster 3. |
| 4 | 4 | 0F FF FF FF | End of File. Cluster chain consists of one cluster: cluster 4. |
| 5 | 5 | 0F FF FF FF | End of File. Cluster chain consists of one cluster: cluster 5. |
| 6 | 6 | 0F FF FF FF | End of File. Cluster chain consists of one cluster: cluster 6. |
| 7 | 7 | 00 00 00 08 | First cluster of a new chain. Points to the next cluster that is part of the chain: cluster 8. |
| 8 | 8 | 0F FF FF FF | End of File. Cluster chain consists of two clusters: clusters 7 and 8. |
| 9 | 9 | 00 00 00 0A | First cluster of a new chain. Points to the next cluster that is part of the chain: cluster 10. |
| 10 | 10 | 00 00 00 0B | Points to the next cluster that is part of the chain: cluster 11 (B). |
| 11 | 11 | 00 00 00 0C | Points to the next cluster that is part of the chain: cluster 12 (C). |
| 12 | 12 | 0F FF FF FF | End of File. Cluster chain consists of 4 clusters: clusters 9,10 (A),11 (B) and 12 (C). |
Now that we have extensively covered the reserved and FAT area, let's continue to the next task to discuss the final puzzle piece of the FAT32 filesystem: The Data Area.
F and ends at cluster 10 . What would be the value of the FAT entry at cluster F? Provide the value as you would read it in the HxD editor (e.g. 00001111). Note: File B is not a file on the image. Using the FAT32_structure.001 image, answer the following question: At which offset does the FAT2 table start ( give in the offset value without spaces)? Remember, FAT1 starts right after the Reserved Sectors and FAT2 starts right after FAT1.
In the previous task we discussed the general structure of the FAT32 filesystem and the Reserved and FAT area's. This task will handle the the data area.
Data Area
The data area is the part where the root directory and the data region are present. The root directory is similar to an index that stores metainformation about the files stored in the data region. The first two clusters of the data area are reserved for system use. These two clusters are not physical clusters but virtual ones. The root directory starts from the third cluster on (cluster 2). It is important to note that since FAT32, the root directory does not have reserved clusters. It will first use the starting cluster and then expand to the following free cluster mentioned in the FAT.
The root directory contains two types of entries: Long File Name (LFN) and Short File Name (SFN). We will discuss both in the following paragraphs.
Long File Name
An LFN entry stores the name of a file. This type of format was implemented due to the limitations of the Short File Name format. A filename could only consist of 8 bytes for the filename, and 3 bytes for the extension. Each LFN entry has a corresponding SFN entry. A filename may be spread amongst multiple LFN entries. To keep track of this, a sequence number is used in the first byte. The first nibble indicates whether the entry is the last or if the entry has been deleted. The second nibble indicates the sequence number.
| Offset | Size | Description |
|---|---|---|
| 0x00 | 1 | Sequence number, last entry flag, deleted entry flag. |
| 0x01 | 10 | First 5 characters of the filename (UTF-16). |
| 0x0B | 1 | Attributes (0x0F for LFN entry). No functional use at this time. |
| 0x0C | 1 | Type (reserved, set to 0x00). |
| 0x0D | 1 | Checksum of the short name. |
| 0x0E | 12 | Next 6 characters of the filename (UTF-16). |
| 0x1A | 2 | Reserved for FAT first cluster (legacy), used for compatibility with current disk utilities. |
| 0x1C | 4 | Last 2 characters of the filename (UTF-16). |
Short File Name
A SFN entry stores a file’s attributes and its starting cluster. This value is then used to find its corresponding FAT entry.
| Offset | Size | Field Name | Description |
|---|---|---|---|
| 0x00 | 11 | File Name | Short file name in 8.3 format (8 bytes for name, 3 bytes for extension). |
| 0x0B | 1 | Attributes | File attributes: READ_ONLY (0x01), HIDDEN (0x02), SYSTEM (0x04), VOLUME_ID (0x08), DIRECTORY (0x10), ARCHIVE (0x20) |
| 0x0C | 1 | Reserved | Reserved, usually set to 0x00. |
| 0x0D | 1 | Creation Time (Tenths) | Tenths of a second when the file was created. |
| 0x0E | 2 | Creation Time | Time the file was created (hours, minutes, seconds) starting from LSB bit 0: Bits 0–4: 2-second count, valid value range 0–29 inclusive (0 – 58 seconds). Bits 5–10: Minutes, valid value range 0–59 inclusive. Bits 11–15: Hours, valid value range 0–23 inclusive. |
| 0x10 | 2 | Creation Date | Date the file was created (year, month, day): Bits 0–4: Day of the month, valid value range 1-31 inclusive. Bits 5–8: Month of year, 1 = January, valid value range 1–12 inclusive. Bits 9–15: Count of years from 1980, valid value range 0–127 inclusive (1980–2107). |
| 0x12 | 2 | Last Access Date | Date the file was last accessed. |
| 0x14 | 2 | High Word of First Cluster | High 16 bits of the file’s starting cluster number (FAT32 only). Together with the Low Word, it forms the cluster number. |
| 0x16 | 2 | Last Modification Time | Time the file was last modified. |
| 0x18 | 2 | Last Modification Date | Date the file was last modified. |
| 0x1A | 2 | Low Word of First Cluster | Low 16 bits of the file’s starting cluster number. |
| 0x1C | 4 | File Size | File size in bytes (maximum 4 GiB - 1). |
Example
Let’s take a look at a file entry in the root directory. Go to the VM and continue with the FAT32_structure.001 file in the HxD editor. Press CTRL+G and enter the offset 0400000 (determined by using the information in the boot sector) in hexadecimal and click OK. You should see a similar output to the one below.

This is the beginning of the data region and the root directory (remember that the first 2 clusters are virtual and reserved for system use).
Now navigate to offset 00400100. This is a 32-byte LFN entry for a file on the partition. Let’s deduct the filename by analyzing each field. You should see the following 32-byte value: 41 41 00 62 00 6F 00 75 00 74 00 0F 00 36 5F 00 54 00 48 00 4D 00 2E 00 74 00 00 00 78 00 74 00.
| Offset | Size | Field name | Value (hex) | Meaning |
|---|---|---|---|---|
| 0x00 | 1 | Sequence number and flags | 41 | The sequence number is 1, the last entry. |
| 0x01 | 10 | First 5 characters of the filename (UTF-16) | 41 00 62 00 6F 00 75 00 74 00 | about |
| 0x0B | 1 | Attributes (0x0F for LFN entry) |
0F | LFN entry. |
| 0x0C | 1 | Type (reserved, set to 0x00) |
00 | Reserved |
| 0x0D | 1 | Checksum of the short name | 36 | Checksum is 36. |
| 0x0E | 12 | Next 6 characters of the filename (UTF-16) | 5F 00 54 00 48 00 4D 00 2E 00 74 00 | _THM.t |
| 0x1A | 2 | FAT first cluster | 0 | This value is always set to zero, for compatibility reasons |
| 0x1C | 4 | Last 2 characters of the filename ( UTF-16) | 78 00 74 00 | xt |
We can deduct that the file’s name is about_THM.txt and it is linked to an SFN entry with the checksum 36.
The matching SFN entry starts at offset 00400120 right after the LFN entry. Let’s analyze the metadata stored in this SFN entry. You should see the following 32-byte value: 41 42 4F 55 54 5F 7E 31 54 58 54 20 00 BD F4 84 83 59 83 59 00 00 21 85 83 59 07 00 22 02 00 00.
| Offset | Size | Field Name | Value (hex) | Meaning |
|---|---|---|---|---|
| 0x00 | 11 | File Name | 41 42 4F 55 54 5F 7E 31 54 58 54 | ABOUT_~1TXT |
| 0x0B | 1 | Attributes | 20 | The file has the attribute ARCHIVE |
| 0x0C | 1 | Reserved | 00 | Reserved for use by Windows NT. |
| 0x0D | 1 | Creation Time (Tenths) | BD | 20 ms |
| 0x0E | 2 | Creation Time | F4 84 (1111 0100 1000 0100) | 16h 39min 40s |
| 0x10 | 2 | Creation Date | 83 59 | 2024-12-03 |
| 0x12 | 2 | Last Access Date | 83 59 | 2024-12-03 |
| 0x14 | 2 | High Word of First Cluster | 00 00 | 0000 0000 0000 0000 |
| 0x16 | 2 | Last Modification Time | 21 85 | 16h 41min 02s |
| 0x18 | 2 | Last Modification Date | 83 59 | 2024-12-03 |
| 0x1A | 2 | Low Word of First Cluster | 07 00 | 0000 0111 0000 0000 |
| 0x1C | 4 | File Size | 22 02 00 00 | 546 bytes |
Key Takeaways
In the previous task and this one, we extensively covered the structure of the FAT32 filesystem. We learned that it is divided into three large areas: reserved, FAT, and data.
The reserved area houses the FSinfo sector, the , and its backup, which are essential for a FAT32 volume to function properly. The also contains much information we can use in forensic analysis.
The FAT area houses the File Allocation Table and its backup. These tables track the assignment of clusters to files and directories and which clusters are free.
The data area consists of the root directory and the data region. The root directory is an index of the files located in the data region. It uses SFN and LFN entries to store each file's metadata.
The following task will examine how to use this information in forensic analysis.
Creation time field.Now that we have seen the FAT32 structure in detail, we will examine how to use this data in filesystem forensics. We will start with an overview of techniques for analyzing the FAT32 filesystem. Each technique focuses on a part or field of the FAT32 filesystem. Next, we will discuss the tools we can use to perform our analysis, focusing on the ones we will use throughout this room.
Filesystem Analysis Techniques
There are many techniques for analyzing the FAT32 filesystem. These techniques are not unique to the FAT32 filesystem and can also be used to examine different filesystems. We can divide these techniques into roughly two categories: and structural analysis and data recovery and content analysis. In the next tasks, we will do a hands-on activity to explore the more commonly used techniques.
Filesystem and Structural Analysis
This category focuses on detecting corruption, tampering, and anomalies in the filesystem by analyzing its metadata, structural consistency, and organization. More often than not, we will combine several techniques to do our analysis. The table below shows each technique we can apply to the FAT32 filesystem, together with the fields needed and a short description of what the technique encompasses.
| Analysis Technique | Related FAT32 Field(s) | Description |
|---|---|---|
| Cluster Chain Analysis | File Allocation Table (FAT), Root Directory Entries | Tracks and analyzes cluster chains to reconstruct fragmented files and detect allocation anomalies. |
| Directory Structure and File Name Analysis | Directory Entries (File Name, Attributes, First Cluster) |
Investigates file names, attributes, and directory structures for hidden or deleted files. |
| Volume Serial Number and Boot Sector Analysis | Boot Sector (BPB), Volume Metadata |
Analyzes metadata such as volume label, serial number, sector size, and file system version for tampering or inconsistencies. |
| Analyzing FAT Table Corruption or Manipulation | FAT, Backup FAT, Root Directory | Detects inconsistencies or tampering by comparing the primary FAT with its backup and analyzing cluster allocation. |
| Examining System Volume Information (Windows only) | Reserved Metadata Files, Root Directory | Analyzes Windows-specific system files, such as System Volume Information, for user activity or tampering evidence. |
| Corruption and Tampering Detection | FAT, Boot Sector, Directory Entries | Detects tampering or corruption by verifying structures and metadata integrity. |
Data Recovery and Content Analysis
This category focuses on recovering deleted or hidden data, checking data in allocated and unallocated spaces, and searching for specific content patterns. We can combine multiple of these techniques to ensure a holistic analysis. The table below shows each technique we can apply to the FAT32 filesystem, together with the fields needed and a short description of what the technique encompasses.
| Analysis Technique | Related FAT32 Field(s) | Description |
|---|---|---|
| File Carving | Unallocated Clusters, Data Area | Recovers files by searching for file headers/footers or specific patterns in unallocated space. |
| Slack Space Analysis | Data Clusters, Directory Entries | Examines unused space within allocated clusters for residual or hidden data. |
| Deleted File Recovery | Directory Entries (Status Byte, First Cluster), FAT |
Recovers deleted files by analyzing directory entries marked as deleted and reconstructing cluster chains. |
| Keyword and Pattern Search | Unallocated Clusters, Data Area | Searches for specific strings, patterns, or file signatures across allocated and unallocated space for evidence. |
| Timeline Analysis | Last Access Date, Creation Date/Time, Last Modified Date/Time |
Builds a timeline of file and folder activities using timestamps from directory entries. |
Now that we know which techniques are available, let’s proceed to the next task and get hands-on experience with them.
Which analysis technique can we use to look for hidden files and directories?
In the FAT32 overview task, we briefly mentioned the ATT&CK TTPs linked to FAT32. In this and the following tasks, we will cover some of these TTPs in a practical setting and use the analysis techniques mentioned in the previous task. We will start with the technique T1564.001 Hidden Files and Directories.
Many attackers will set their malicious directories and files to be hidden to prevent detection or avoid file deletion by wary users. A standard user often does not have settings configured on their to show hidden files. For example, a user finds a relatively new USB and plugs it into his system. He then opens the USB folder and sees nothing. This makes the user happy, he just got a free USB, but it makes an attacker equally delighted. The one that will be less happy is the security team.
Within the FAT32 filesystem, it is easy to alter a file’s attributes because no permission system is implemented. Let’s look at how we can find hidden files and directories on a FAT32 USB image. Before we begin, it is important to note that when doing forensic analysis, we often start with a copy of the original volume image that needs to be analyzed. This is important so we don’t alter the original evidence and render it useless.
Manual Analysis
To find hidden files or directories on a FAT32 image, we will need to analyze the SFN entries in the Root Directory. We can apply the analysis technique of Directory Structure and File Name Analysis from task 6 to reach our goal.
Remember that an SFN entry is 32 bytes long. We are interested in the value of the 12th byte of the SFN entry. This byte represents the attributes of a file or directory. The file or directory is hidden if the byte is set to 0x02.
Let’s look at the FAT32 image that the user found. Navigate to the VM and use the HxD editor to open FAT32_HIDDEN.001 in C:\FAT32_analysis\. Once the image has loaded, press CTRL+G and enter the hex value 00400000 to navigate to the root directory (This value is determined by analyzing the boot sector). In the image below, we can see that there are multiple entries.
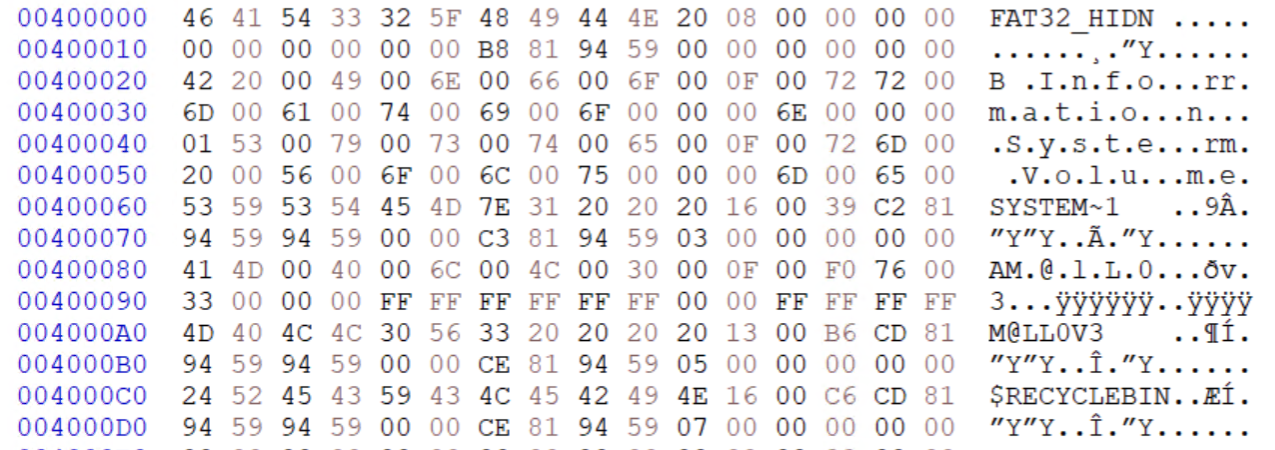
Let’s look at each of them and see which entries are hidden. But before that, we should first check if the root directory is not fragmented (split over multiple clusters); otherwise, we could miss valuable information. In our case, the directory entries and file entries are split. For efficiency reasons, Windows often splits the file and directory entries and maps them to a different cluster. There are root directory entries on the clusters starting with offsets 00400200 and 00400600.
Directories
Let’s start by looking at the entries of the first cluster, which starts at offset 00400000. The image below highlights two interesting entries.
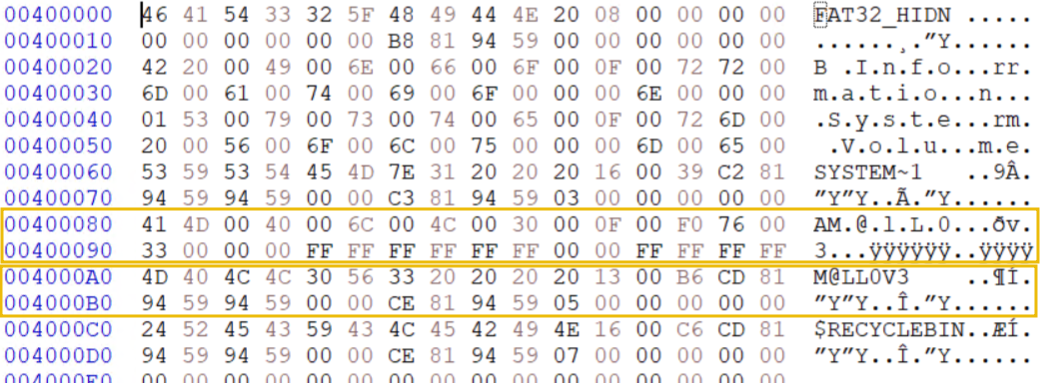
The first entry is an LFN entry that links to the second one, an SFN entry. Let’s zoom in on the SFN entry starting at offset 004000A0.
| Offset | Size | Field Name | Value (Hex) | Meaning |
|---|---|---|---|---|
0x00 | 8 bytes | File Name | 4D 40 4C 4C 30 56 33 20 | “M@LL0V3” |
0x08 | 3 bytes | File Extension | 20 20 20 | Space-filled (no file extension) |
0x0B | 1 byte | File Attributes | 13 | Read-only + Hidden + Directory (0x01 + 0x02 + 0x10) |
0x0C | 1 byte | Reserved (NT) | 00 | Reserved for NT (unused, zero-filled) |
0x0D | 1 byte | Creation Time (tenths) | B6 | 182 tenths of a second |
0x0E | 2 bytes | Creation Time | CD 81 | Time: 16:14:26 (binary decoded as hours:minutes:seconds) |
0x10 | 2 bytes | Creation Date | 94 59 | Date: Friday, December 20th, 2024 (binary decoded as year, month, day) |
0x12 | 2 bytes | Last Access Date | 94 59 | Date: Friday, December 20th, 2024 (same as creation date) |
0x14 | 2 bytes | High-Order Cluster Number | 00 00 | High word of the first cluster |
0x16 | 2 bytes | Last Modification Time | CE 81 | Time: 16:14:28 |
0x18 | 2 bytes | Last Modification Date | 94 59 | Date: Friday, December 20th, 2024 |
0x1A | 2 bytes | First Cluster Number | 05 00 | Cluster 5 |
0x1C | 4 bytes | File Size | 00 00 00 00 | File size = 0 bytes => This indicates that the entry is a directory |
Based on the information in the table above, we can conclude the following things for this SFN entry:
- The entry represents a directory with the name
M@LL0v3. - The directory has the attributes
hiddenandread-only. - It was created on December 20th, 2024 at 16:14:27.
- The directory contents start at cluster 5 (the actual cluster number is 3. The first two clusters should not be counted as they are virtual, reserved clusters).
Look at that. We have found a hidden directory. Let’s analyze the other root directory entries in the next clusters to see if we can find more valuable forensic evidence.
Files
Navigate to the cluster starting with offset 00400200 by pressing CTRL+G in the HxD editor and entering the offset value. You should see the same entries displayed in the image below.
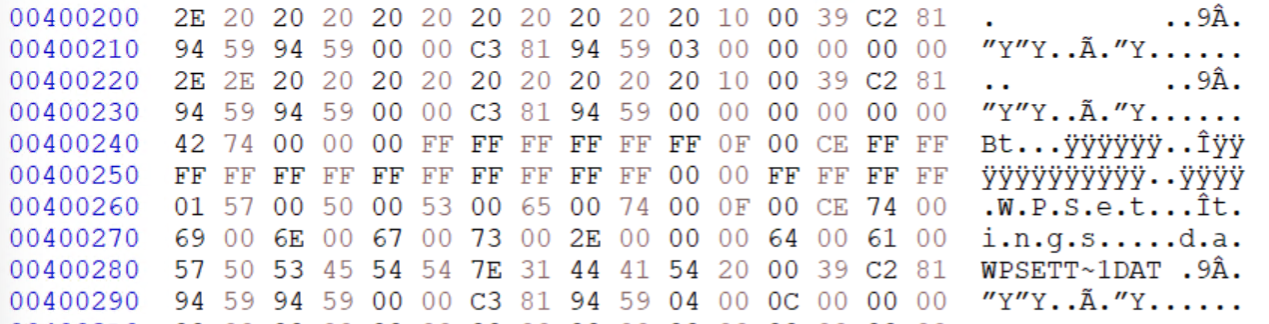
These entries are standard on a Windows FAT32 partition. Windows and its services use the WPSettings.dat file to store information related to indexing, backup, and more. The other entries refer to the current directory (.) and the parent directory (..)
Let’s examine the next cluster. Navigate to the cluster starting with offset 00400600. You should see the same entries displayed in the image below. The entries of interest are highlighted.

The highlighted entries are, respectively, an LFN and an SFN. The LFN entry links to the SFN entry. Let’s examine the SFN entry starting at offset 00400680.
| Offset | Size | Field Name | Value (Hex) | Meaning |
|---|---|---|---|---|
0x00 | 7 bytes | File Name | 42 45 4D 59 56 41 7E 31 | BEMYVA~1 (Shortened version of the long file name “BeMyValent1ne.txt”) |
0x08 | 3 bytes | File Extension | 54 58 54 | TXT (File extension for a text file) |
0x0B | 1 byte | File Attributes | 02 | Hidden file attribute (0x02) |
0x0C | 1 byte | Reserved (NT) | 00 | Reserved for NT (not used, set to zero) |
0x0D | 1 byte | Creation Time (tenths) | B6 | 182 tenths of a second |
0x0E | 2 bytes | Creation Time | CD 81 | Time: 16:14:26 (binary decoded as hours:minutes:seconds) |
0x10 | 2 bytes | Creation Date | 94 59 | Date: Friday, December 20th, 2024 (binary decoded as year, month, day) |
0x12 | 2 bytes | Last Access Date | 94 59 | Date: Friday, December 20th, 2024 |
0x14 | 2 bytes | High-Order Cluster Number | 00 00 | High-order word of the first cluster (only used in FAT32, 0 for FAT16/FAT12) |
0x16 | 2 bytes | Last Modification Time | CE 81 | Time: 16:14:28 |
0x18 | 2 bytes | Last Modification Date | 94 59 | Date: Friday, December 20th, 2024 |
0x1A | 2 bytes | First Cluster Number | 06 00 | Cluster: 6 (starting cluster for the file’s content) |
0x1C | 4 bytes | File Size | 17 00 00 00 | Size: 23 bytes |
Based on the information in the table above, we can conclude the following things for this SFN entry:
- The entry refers to a text file named
BeMyValent1ne.txt. - The file has the attribute
hidden. - The file was created on the
20th of December, 2024 at 16:14:26. - The file was last edited on the
20th of December, 2024 at 16:14:28. - The file was last accessed on the
20th of December, 2024. - The file content can be found starting from cluster 6 (The actual cluster number is 4. The first two clusters should not be counted as they are virtual).
We have found a hidden file. Let’s navigate to cluster 4 and check the content of this file. Press CTRL+G and navigate to the offset 00400810.
Automated Analysis
Manual analysis can be quite lengthy. It is also prone to mistakes during the various calculations that need to be made. To speed up our analysis, we can use automated tools. We will use Autopsy to analyze the FAT32_HIDDEN image and find the relevant forensic artifacts.
Now open Autopsy by navigating to the Desktop and double-clicking its icon. You should see the following screen.
Click on New Case and fill in the Case Information as follows:
- Case Name:
FAT32_HIDDEN - Base Directory:
C:\FAT32_analysis\
Continue by clicking Next. On the Optional Information screen, you can leave all the fields blank and click Finish to finalize the creation of a new case.
You should now see a new screen titled Add Data Source. On this screen, we will add the image we want to analyze. Select Generate new host name based on data source name and click Next.
Select the data source Disk Image or VM file and click Next. You should see the screen below.
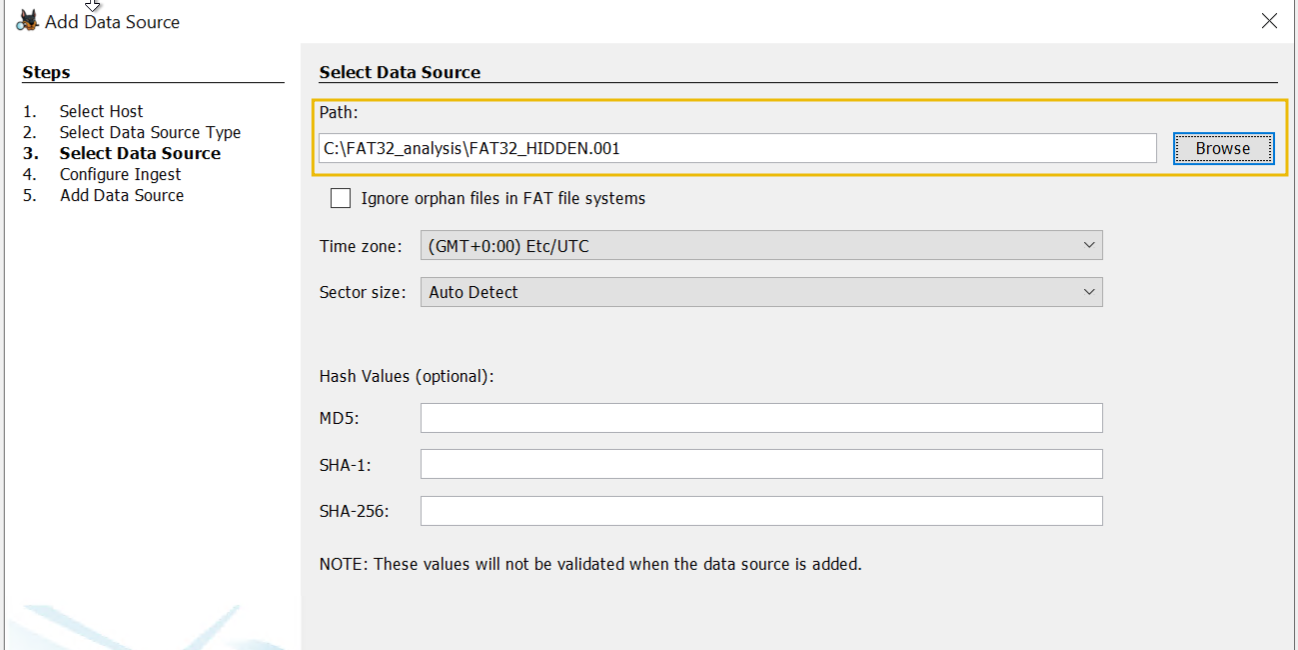
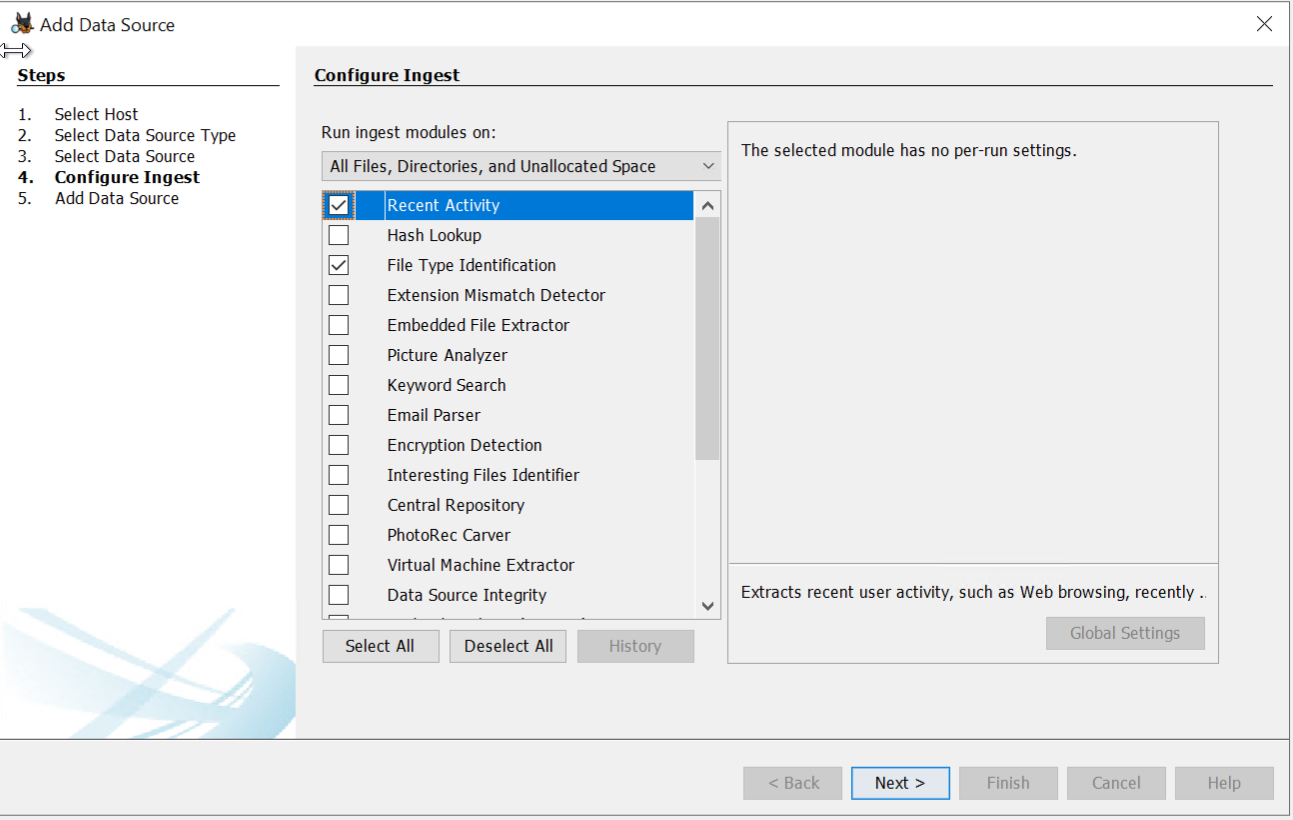
Enter the path C:\FAT32_analysis\FAT32_HIDDEN.001 as shown in the image above. Click on Next to navigate to the Configure Ingest screen. Here, you can configure which analytical modules to run on the image. Select Recent Activity and File Type Identification and click Next.
Click Finish to finalize adding the data source. You should now see the following screen.
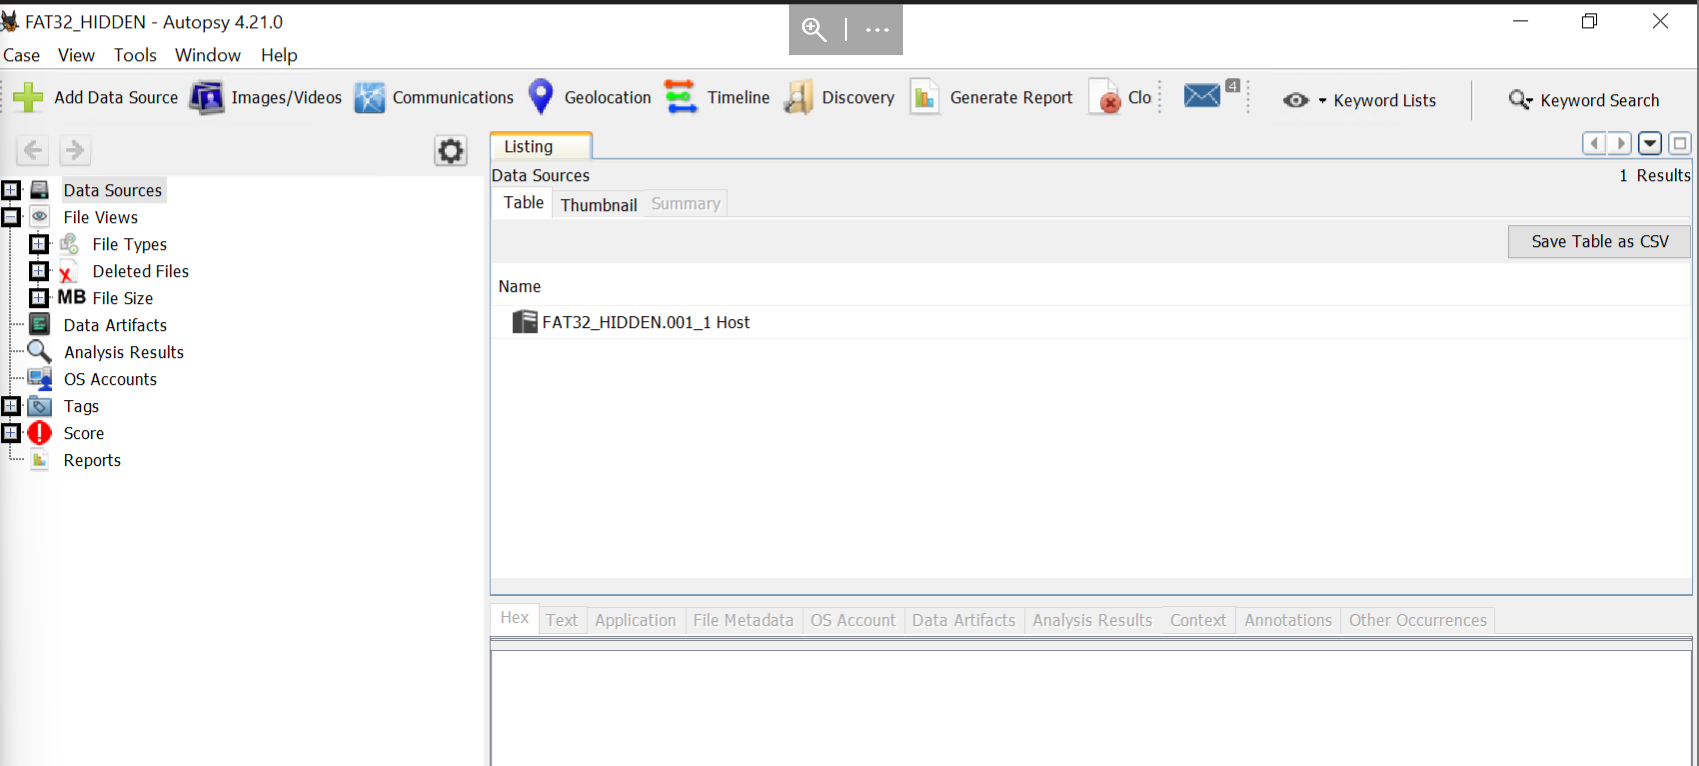
Now, we are ready to start looking for forensic artifacts. On the left-hand side of the screen, expand the Data sources item by clicking on the + sign. You should now see a data source element called FAT32_HIDDEN.001_1 Host. Expand this element by clicking the + sign next to it. Now click on the FAT32_HIDDEN.001 image. You should see the following screen that displays the structure of the image.
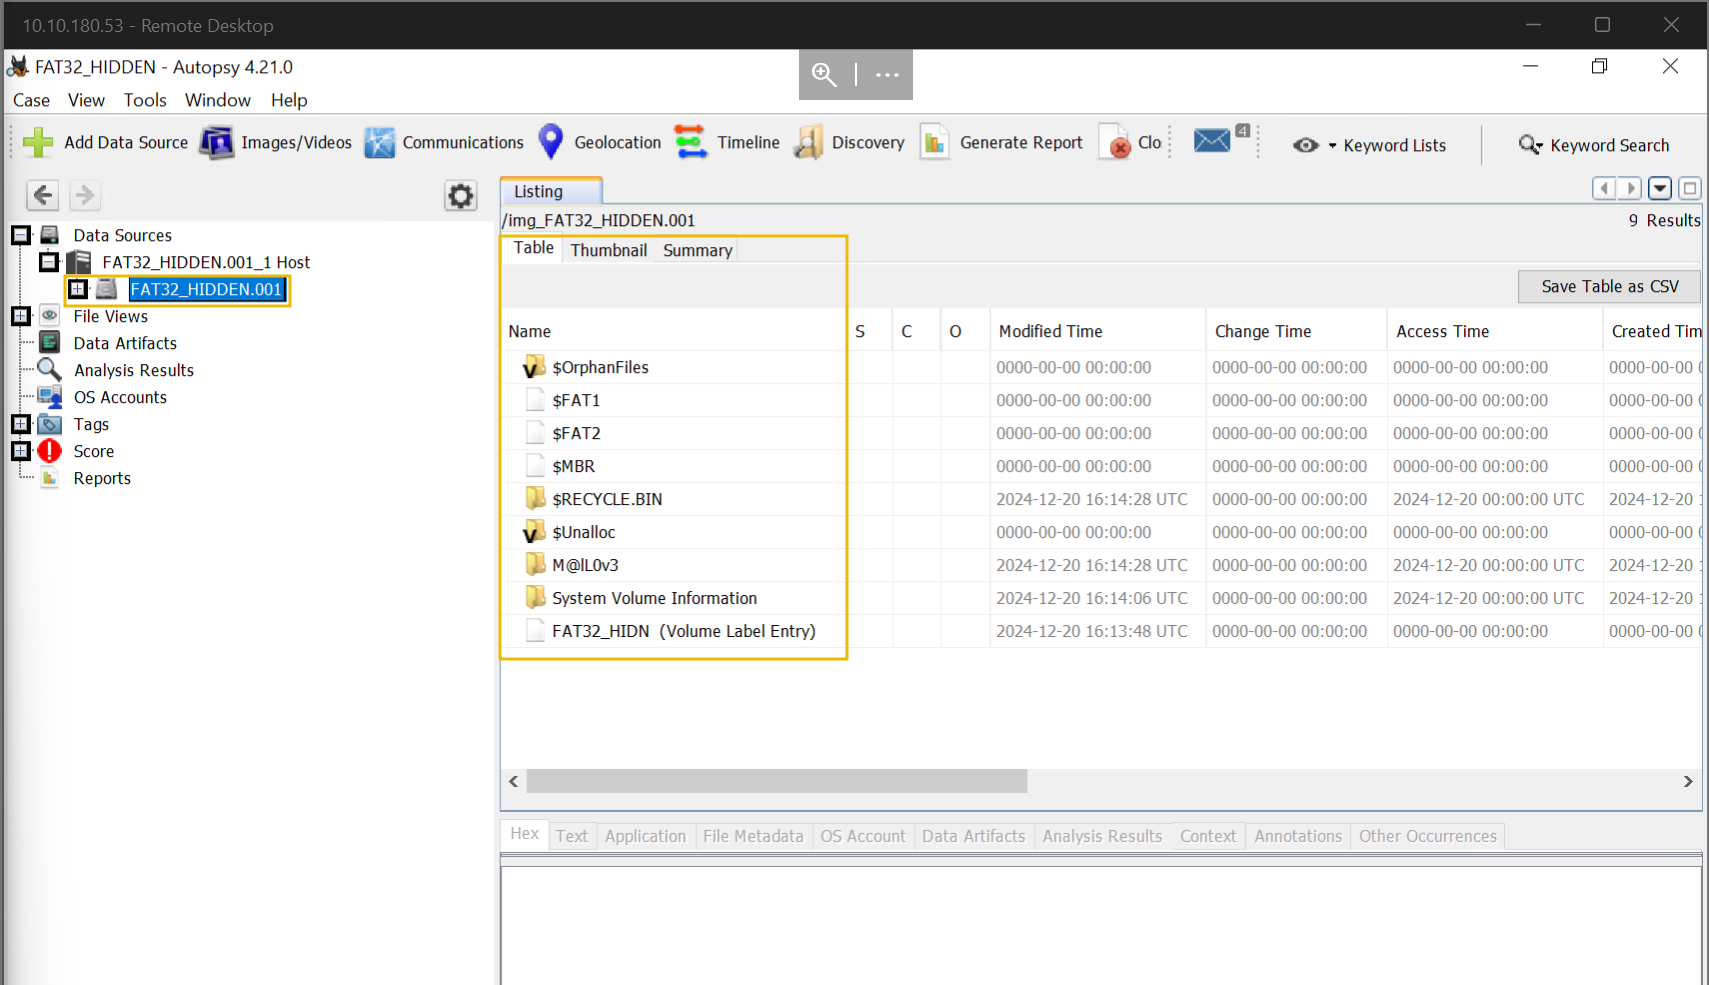
This screen shows us the complete structure of the image we are analyzing. We can see the FAT tables, the Master Boot Record, and the different directories on the image. We also can see columns with additional information such as Modified time, Change Time, and more.
Directories
Let’s have a closer look at the directories. The directory of interest is named M@lL0v3. Based on the information in the table, we can already note down some information about this directory:
- The directory was created on the 20th of December, 2024 at 16:14:27 UTC.
- The directory was last modified on the 20th of December, 2024 at 16:14:28 UTC.
- The directory was last accessed on the 20th of December, 2024. Click on the
M@lL0v3directory to see more information about it. The information is shown below theListingscreen, as highlighted in the image below.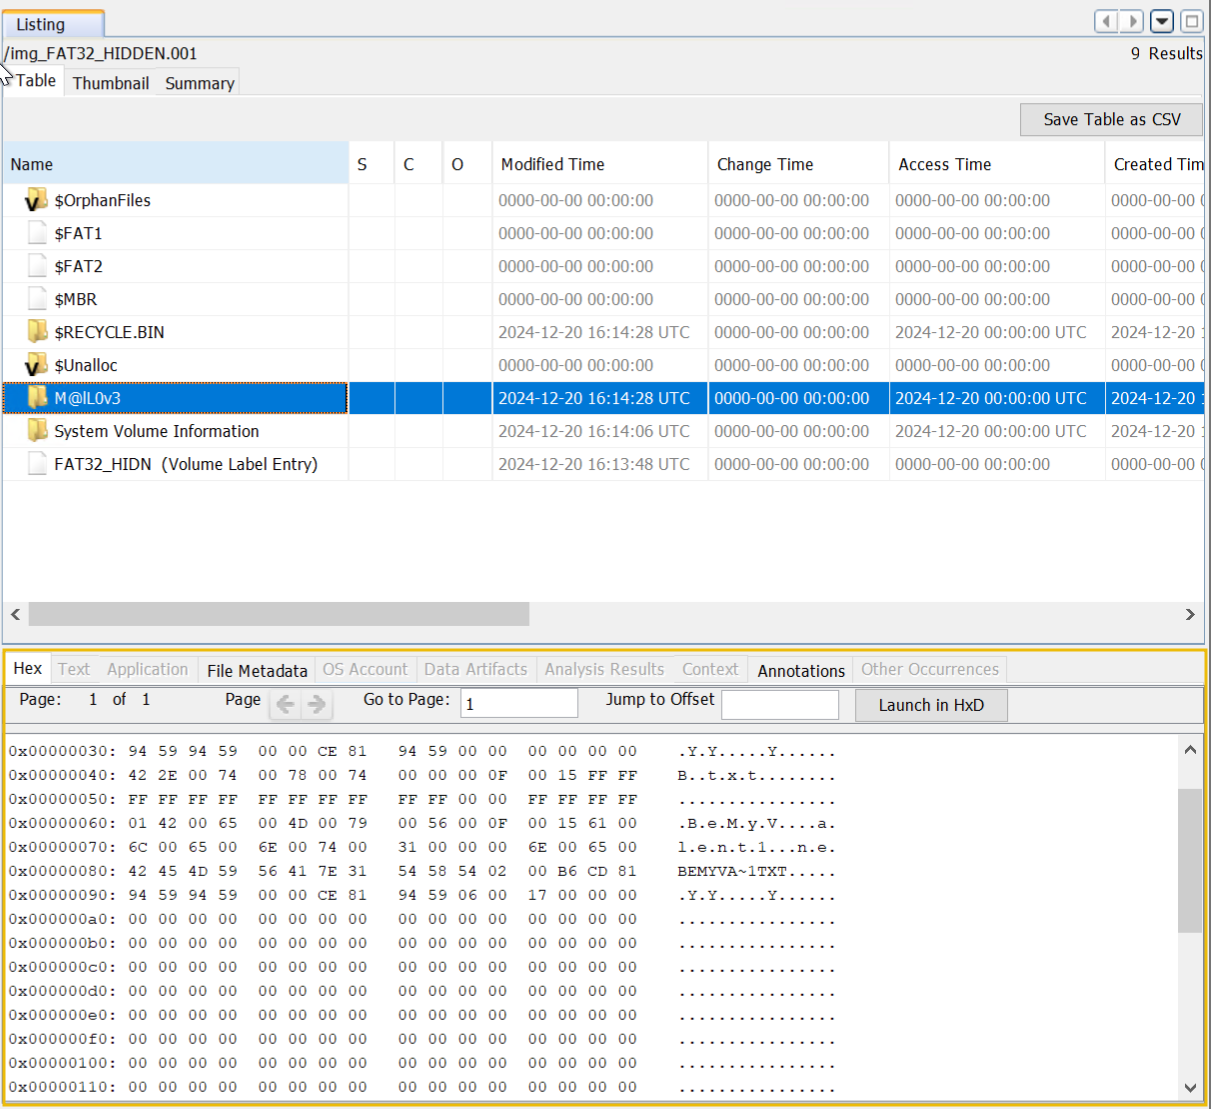
Additional information tabs will appear depending on the selected item. The ones available for the selected directory are Hex, File Metadata, and Annotations. The Hex tab shows the raw data in hexadecimal, similar to using the HxD editor. We can see that the directory M@lL0v3 contains an LFN and SFN entry for a file. We will later look into this file.
Click on the File Metadata tab for more detailed information about the directory. Scroll down until you see the From the Sleuth Kit istat Tool title, as shown below.
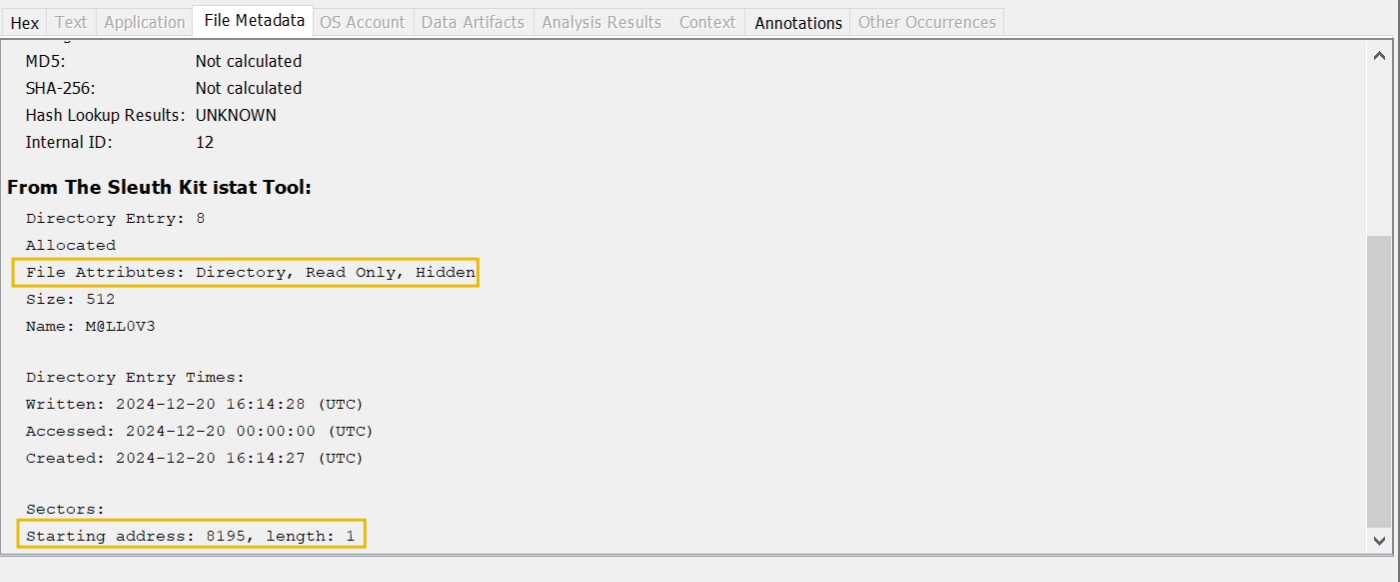
The highlighted rows provide us with additional information about the directory:
- The directory has the attributes
Directory,Read OnlyandHiddenassigned. - You can find the directory starting from sector 8195 on the image.
- The directory uses one sector of space. To calculate the offset where to look for the directory on our image we can use the following formula: Sector number X Sector size (bytes), then convert the output to hexadecimal. Let’s apply this to our example:
8195 X 512 bytes= 4.195.840 = 00400600.
Files
The hidden directory M@lL0v3 contained an LFN and SFN entry. Let’s have a closer look at this file. On the screen’s left side, expand the image FAT32_HIDDEN.001 and click on the M@lL0v3 directory, as shown below.
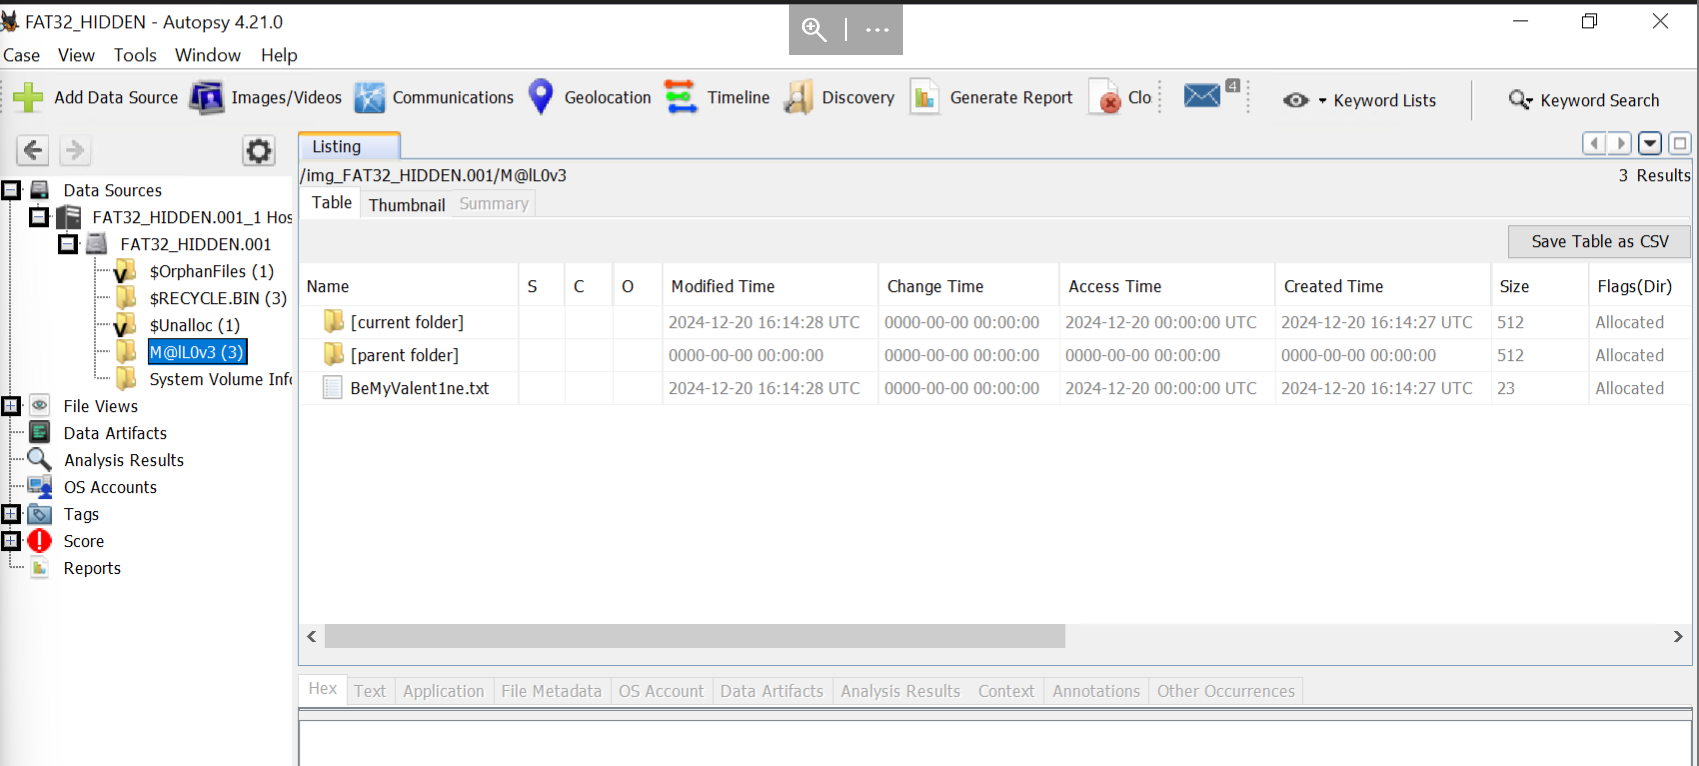
We can see that the M@lL0v3 directory contains three entries in the table:
- Current folder is represented by a
. - Parent folder is represented by a
.. - Text file named
BeMyValent1ne.txt
Based on the table, we can already note down some valuable information:
- The directory contains a file named
BeMyValent1ne.txt, which is a text file. - The file was last modified on the
20th of December, 2024 at 16:14:28 UTC. - The file was created on the
20th of December, 2024 at 16:14:27 UTC. - The file was last accessed on the
20th of December, 2024. - The file is
23 bytes.
Click on the BeMyValent1ne.txt entry in the table and look at the screen below it. This time, four tabs with additional information are available: Hex, Text, File Metadata, and Annotations. Enter the flag seen in the Hex and Text tabs as an answer to question 3 below.
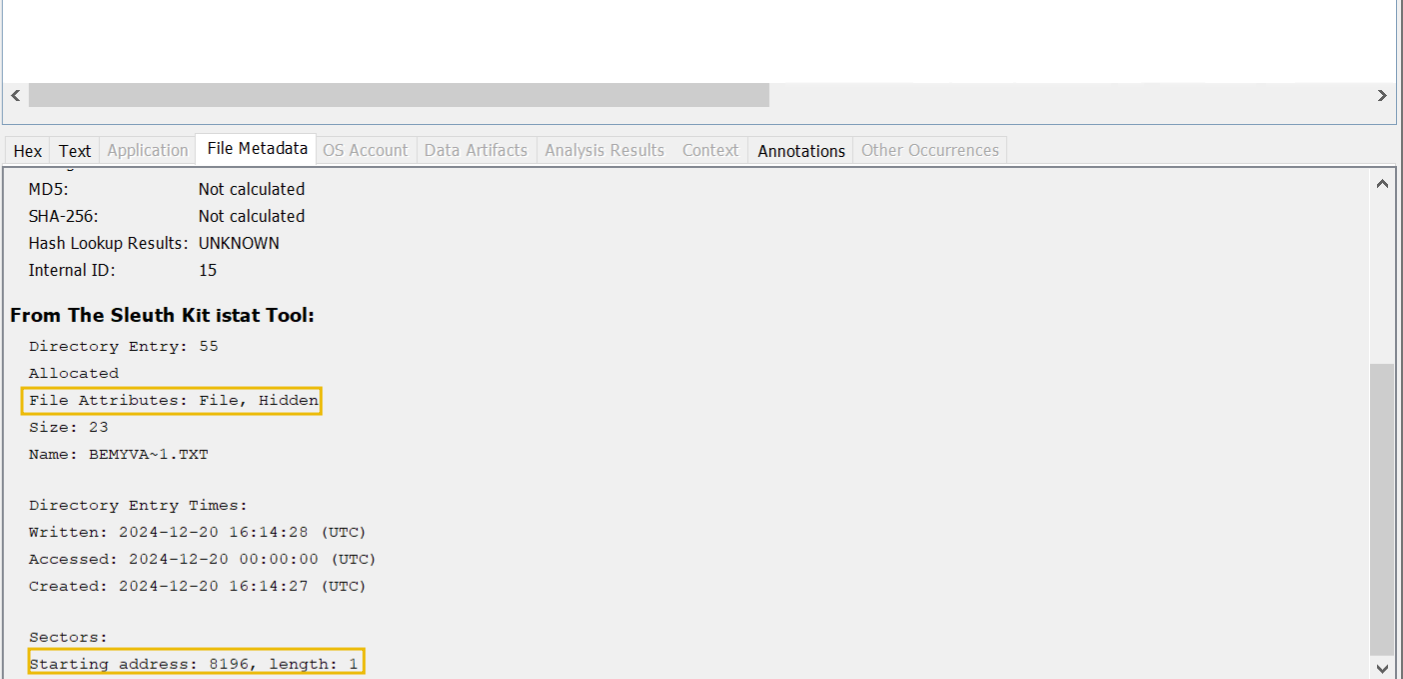
Navigate to the File Metadata tab and scroll down until you see the From the Sleuth Kit istat Tool title. There you can find the file's attributes as shown below. The highlighted rows provide us with additional information:
- The file has the attributes
FileandHidden(File Attributes). - You can find the file starting from sector 8196 on the image (Starting address).
- The file uses one sector (length).
Let’s have a look at another Technique in the next task.
What is the short file name of the hidden file in the M@lL0v3 directory?
What is the flag found during automated analysis?
Attackers will often change the timestamps of files to evade detection. There are several types of timestamps an attacker can modify:
- Creation time
- Last access time
- Modify time
Depending on the attacker’s goal, he will change one or multiple of them. Some examples:
- An attacker edits a legitimate configuration file on the lab machine. To ensure the changes are not easily picked up, he alters the
Last access timeand theModify time. - An attacker adds a new file to a folder, checks the timestamps of the other files, and modifies his file accordingly so the timestamps are similar.
Depending on the sophistication of the attacker, he might make some mistakes while altering timestamps. Some examples are:
- The creation timestamp is later than its last modified or accessed timestamp.
- The timestamps are very old or recent compared to other files in the folder.
Detecting time stomping is not always easy, even less so with FAT32 since it doesn’t implement journaling. There are some key detection techniques we can use:
- We can cross-reference the file’s current timestamps with other log records of the file’s timestamps. For example, we can use Windows Event logs and compare them with data we retrieved from the image.
- We can implement tools that monitor file integrity.
- We can focus on detecting tools that can alter timestamps like
timestamp.exe. We can focus on looking for inconsistencies in the timestamps, such as thecreation timebeing later than thelast accessed time.
In this task, we will look for inconsistencies in the timestamps. Similar to the previous task, we will first analyze an image manually with the HxD editor and then use Autopsy for automated analysis. The analysis techniques we can use here are Timeline Analysis and Directory Structure and File Name Analysis discussed in task 6.
Manual Analysis
Continuing with the VM, open the HxD editor, navigate to the menu bar, click file, and then open. Navigate to the C:\FAT32_analysis\ directory, select the image FAT32_TIMESTOMP.001, and click Open.
Navigate to offset 00400000 by pressing CTRL+G and entering the offset value. Similar to the image in the previous task, the root directory is spread over 3 clusters. We will take each cluster’s SFN entries and gather the timestamps. The results are displayed in the table below.
| Name | Modified Date | Modified Time | Last Access Date | Creation Date | Creation Time |
|---|---|---|---|---|---|
| [current folder] | 2024-11-27 | 17:02:30 | 2025-01-07 | 2025-01-07 | 10:38:50 |
| [parent folder] | 0000-00-00 | 00:00:00 | 0000-00-00 | 0000-00-00 | 00:00:00 |
| _EWCOM~1.ZIP | 2025-01-07 | 10:39:26 | 2025-01-07 | 2025-01-07 | 10:39:25 |
| changelog.txt | 2021-01-10 | 16:06:00 | 2025-01-07 | 2025-01-07 | 10:38:50 |
| HxD.exe | 2021-02-10 | 22:20:12 | 2025-01-07 | 2025-01-07 | 10:38:50 |
| install.txt | 2021-01-10 | 16:04:00 | 2018-01-10 | 2025-01-07 | 10:39:33 |
| license.txt | 2021-01-10 | 16:03:02 | 2025-01-07 | 2025-01-07 | 10:38:50 |
| New Text Document.txt | 2025-01-07 | 10:39:34 | 2025-01-07 | 2025-01-07 | 10:39:33 |
| readme.txt | 2021-01-10 | 16:06:56 | 2025-01-07 | 2025-01-07 | 10:38:50 |
| unins000.dat | 2024-11-27 | 17:02:32 | 2025-01-07 | 2025-01-07 | 10:38:50 |
| unins000.exe | 2024-11-27 | 17:02:28 | 2025-01-07 | 2025-01-07 | 10:38:50 |
Findings
- When we compare the
Creation Datewith theModified Date, you will notice that the files were modified before they were created. This is standard behavior when you copy an existing folder with files to a new location. The modified timestamp is preserved, but the access and creation timestamps are updated. - The table has a file with an anomaly: the
last Access Dateis earlier than theModified Date. Enter thefilename.extensionas the answer to question 1.
As you have noticed, it is time-intensive to calculate all the different timestamps for every file. For example, you could write a script yourself, but there is no need to reinvent the warm water. Let’s use Autopsy to make our work easier.
Automated Analysis
Analyzing an image to look for traces of time stomping is best done using an automated tool like Autopsy. The image we are using was adjusted for this task and did not contain many entries. In real-life scenarios, there will often be many more entries to analyze. Autopsy has an excellent feature called Timeline that allows us to see a timeline of all the files. Let’s take a look at the image using Autopsy.
Open Autopsy, create a new case and add the image FAT32_TIMESTOMP.001 as a Data Source (similar to what we did in task 7).
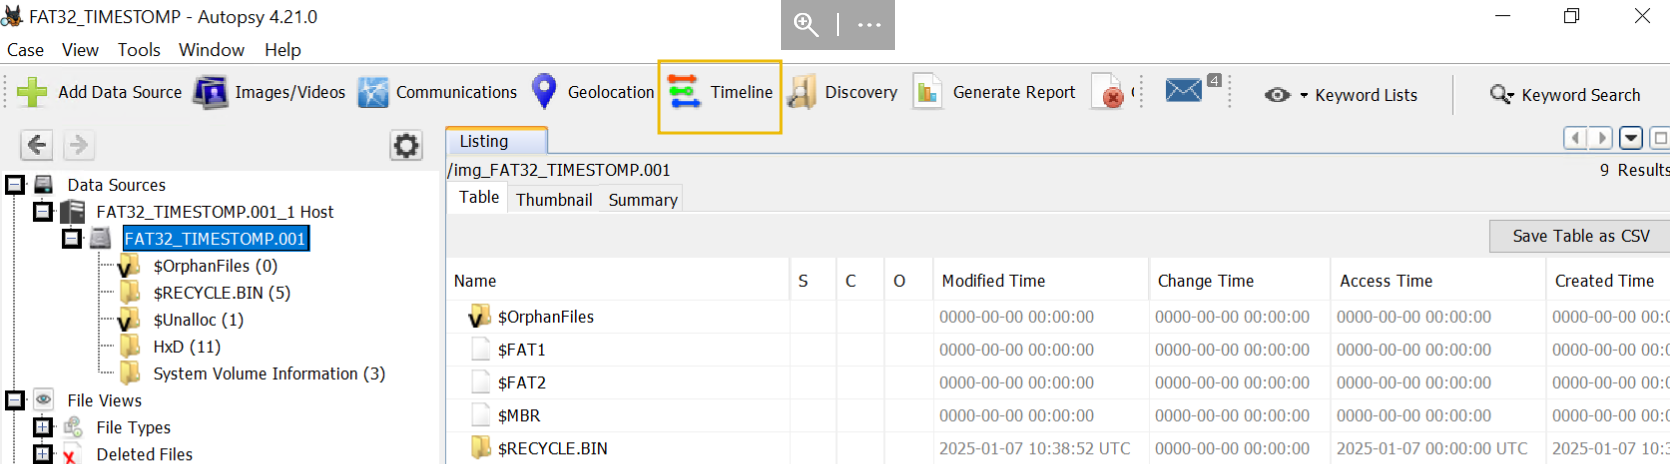
Similar to the previous task, we can explore the structure of the image by navigating to Data Sources -> FAT32_TIMESTOMP.001_1 Host -> FAT32_TIMESTOMP.001. We can then explore the folders and list the details of the files in those folders. Processing and analyzing the data this way still requires some time. As mentioned before, Autopsy includes a tool called Timeline, designed for analyzing timestamps. We will use this tool for our analysis.
Click on Timeline in the toolbar as highlighted in the image below.
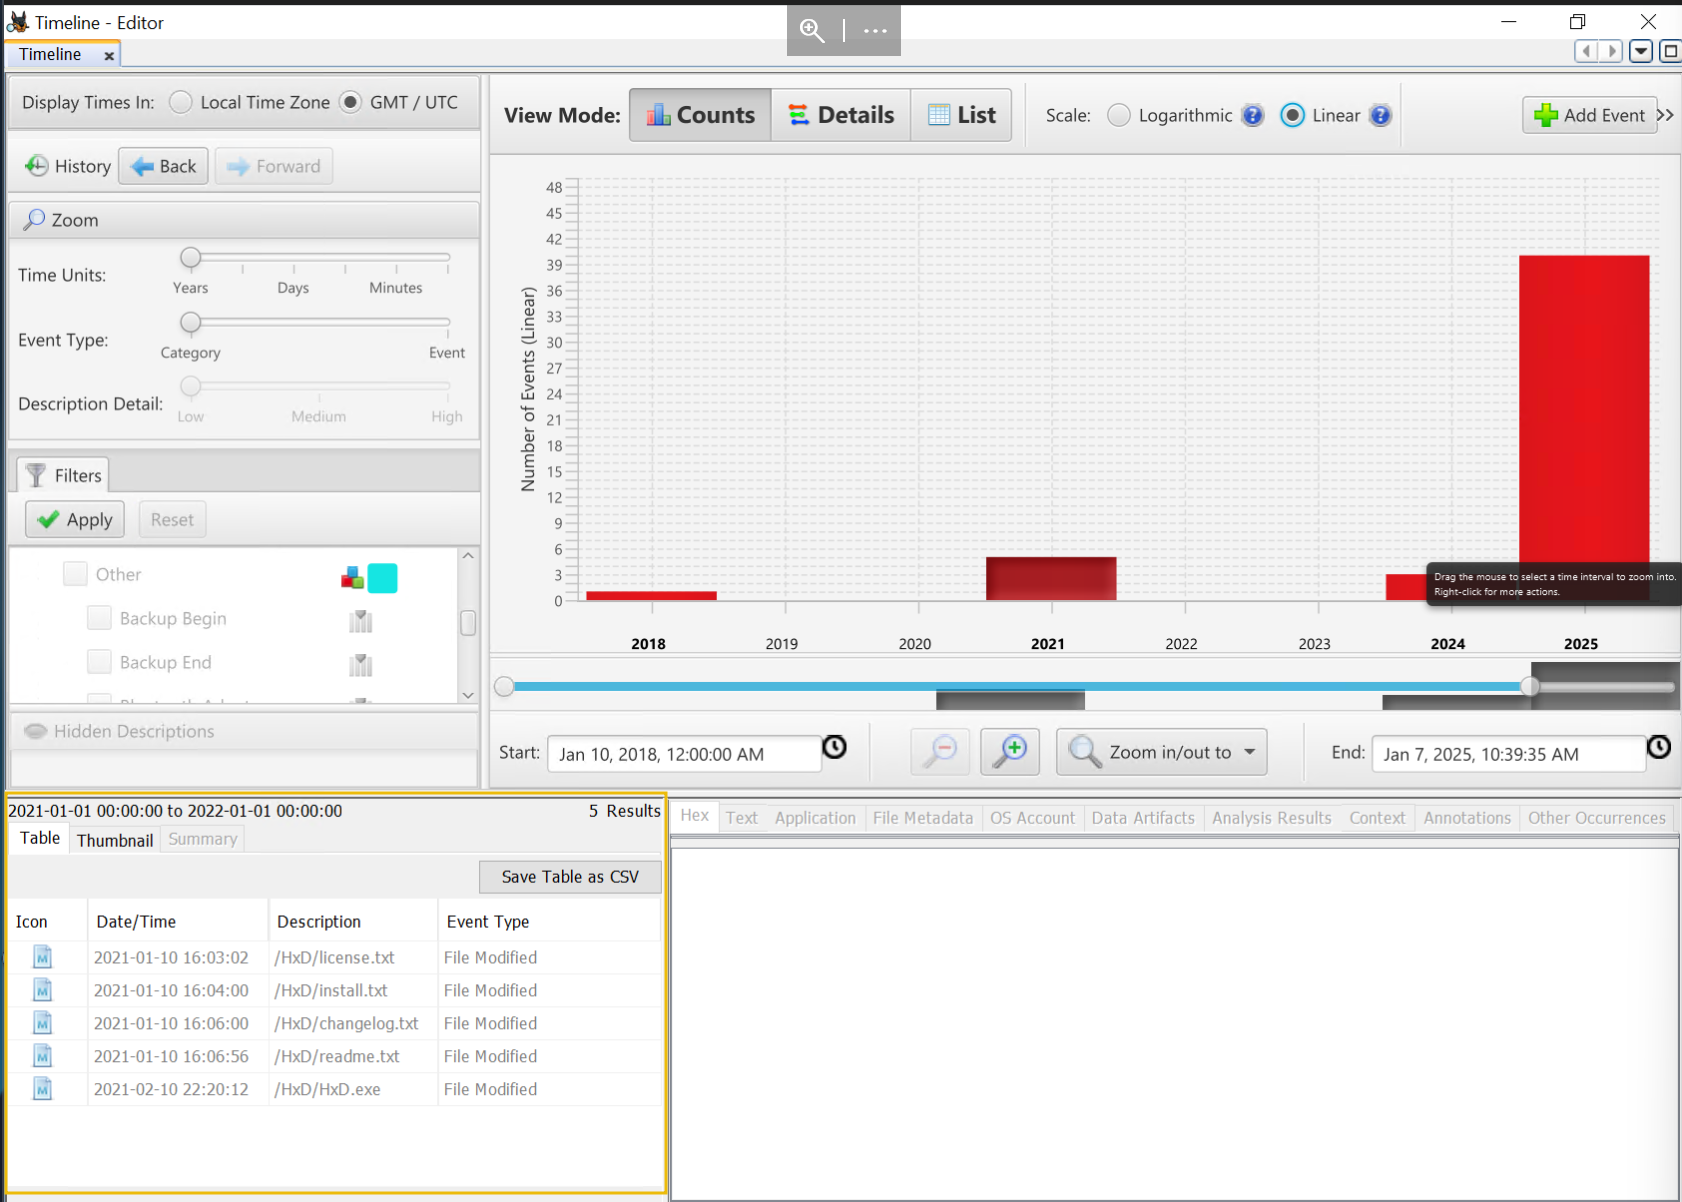
You should now see a new window titled Timeline Editor. This window shows a graph with all the timestamps of each file on the image. Adjust the start and end datetime to the range highlighted in the image below and change the Scale to Linear. The Linear option makes seeing the number of events for any given year easier.
Before we continue analyzing, it is important to note that you should configure the Display Times In option according to the standard you agree on with your team. You should be consequent with the chosen option, as it can alter the analysis results significantly. If your team only works in one location without any 3rd parties, it would make sense to configure it to Local Time Zone. This way, the timestamps can easily be matched with, for example, working hours.
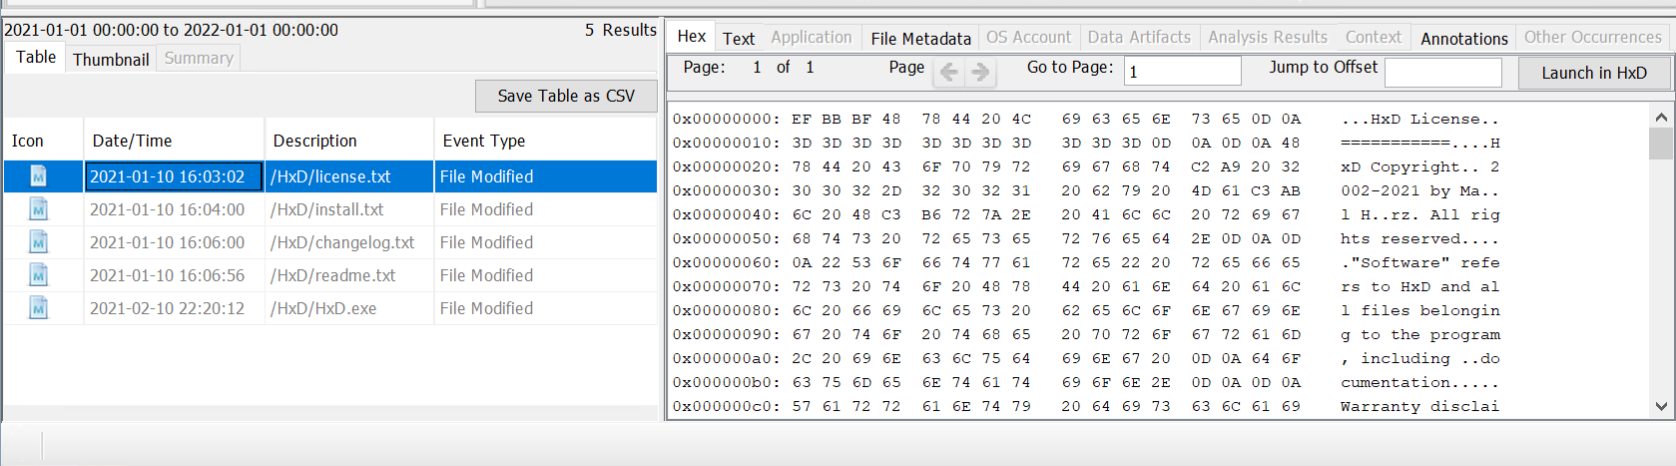
The graph displays four bars, each representing a year. Depending on the number of events in a particular year, the bar will be higher or lower. Click on the bar representing the year 2021. In the lower-left corner, you should now see a table with all the events for that year, as shown in the image below. The table shows theEvent Type, Description of the file, and Date/Time.
Click on an event in the table to see more details in the right pane, as shown in the image below.
The graph shows a single event in 2018. This is worth investigating since it occurred three years before the files were modified in 2021.
Click on the bar representing 2018 and look at the table in the lower left corner. It seems we have a single event for a File Accessed without any prior File Creation event. This is suspicious. Select the record in the table and look at the details in the right pane. Enter the flag as the answer to question 2 at the end of this task.
Findings
We have arrived at the same conclusion as the manual analysis. The install.txt file is suspicious. It has an Accessed timestamp without any Creation timestamp prior. This is not standard behavior.
Let's continue to the next task to discuss another technique.
What is the Accessed timestamp of the discovered suspicious file?
What is the flag found during the automated analysis?
ATT&CK techniques T1070.004 File Deletion and T1070.009 go hand in hand. An attacker will delete any evidence that could be traced back to them, or that could help a defender undo the attack. Clearing is broader than just deleting files on disk, but for the context of this task, we will narrow the scope to detecting on a FAT32 partition.
In this task we will analyze a FAT32 image that contains deleted files and retrieve its contents. We will start with manual analysis by opening the FAT32 image in the HxD editor, then continue with automated analysis using Autopsy.
Manual Analysis
Continuing with the , open the HxD editor, navigate to the menu bar, click file, and then open. Navigate to the C:\FAT32_analysis\ directory, select the image FAT32_DELETED.001, and click Open.
Navigate to offset 00400000 by pressing CTRL+G and entering the offset value. Similar to the image in the previous task, the root directory is spread over multiple clusters. In this FAT32 image, the clusters assigned to the root directory are non-contiguous. We have to look at the FAT table entries to deduct where the root directory entries continue—the FAT entry for the root directory points at cluster 17. So, we should find the next root directory entries starting from cluster 15 (17 minus two virtual reserved clusters). Cluster 15 starts at offset 00401E00.
Now that we have located all the root directory entries, we can analyze them and find deleted files. We are looking for entries starting with the hexadecimal value E5. Below is an overview of all the SFN root directory entries. For each entry, we listed the filename and the hexadecimal value. Additionally, we have highlighted the deleted entries.
| Filename | Hexadecimal Value |
|---|---|
| FAT32_DEL | 46 41 54 33 32 5F 44 45 4C 20 20 08 00 00 00 00 00 00 00 00 00 00 24 77 29 5A 00 00 00 00 00 00 |
| SYSTEM~1 | 53 59 53 54 45 4D 7E 31 20 20 20 16 00 98 23 77 29 5A 29 5A 00 00 24 77 29 5A 03 00 00 00 00 00 |
| FILE6.TXT | 46 49 4C 45 36 20 20 20 54 58 54 20 18 3B 42 78 29 5A 29 5A 00 00 6C 4B 28 5A 0A 00 5E 00 00 00 |
| FILE7.TXT | 46 49 4C 45 37 20 20 20 54 58 54 20 18 3B 42 78 29 5A 29 5A 00 00 6C 4B 28 5A 0B 00 5E 00 00 00 |
| FILE8.TXT | 46 49 4C 45 38 20 20 20 54 58 54 20 18 3C 42 78 29 5A 29 5A 00 00 6C 4B 28 5A 0C 00 5E 00 00 00 |
| FILE9.TXT | 46 49 4C 45 39 20 20 20 54 58 54 20 18 3C 42 78 29 5A 29 5A 00 00 6C 4B 28 5A 0D 00 5E 00 00 00 |
| FILE10.TXT | 46 49 4C 45 31 30 20 20 54 58 54 20 18 3C 42 78 29 5A 29 5A 00 00 6D 4B 28 5A 0E 00 5E 00 00 00 |
| FILE11.TXT | 46 49 4C 45 31 31 20 20 54 58 54 20 18 3D 42 78 29 5A 29 5A 00 00 6D 4B 28 5A 0F 00 5E 00 00 00 |
| FILE12.TXT | 46 49 4C 45 31 32 20 20 54 58 54 20 18 3D 42 78 29 5A 29 5A 00 00 6D 4B 28 5A 10 00 5E 00 00 00 |
| FILE13.TXT | 46 49 4C 45 31 33 20 20 54 58 54 20 18 3E 42 78 29 5A 29 5A 00 00 6D 4B 28 5A 12 00 5E 00 00 00 |
| FILE14.TXT | 46 49 4C 45 31 34 20 20 54 58 54 20 18 3E 42 78 29 5A 29 5A 00 00 6D 4B 28 5A 13 00 5E 00 00 00 |
| FILE15.TXT | 46 49 4C 45 31 35 20 20 54 58 54 20 18 3F 42 78 29 5A 29 5A 00 00 6D 4B 28 5A 14 00 5E 00 00 00 |
| FILE16.TXT | 46 49 4C 45 31 36 20 20 54 58 54 20 18 3F 42 78 29 5A 29 5A 00 00 6D 4B 28 5A 15 00 5E 00 00 00 |
| FILE17.TXT | 46 49 4C 45 31 37 20 20 54 58 54 20 18 40 42 78 29 5A 29 5A 00 00 6D 4B 28 5A 16 00 5E 00 00 00 |
| FILE18.TXT | 46 49 4C 45 31 38 20 20 54 58 54 20 18 41 42 78 29 5A 29 5A 00 00 6D 4B 28 5A 17 00 5E 00 00 00 |
| FILE19.TXT | 46 49 4C 45 31 39 20 20 54 58 54 20 18 41 42 78 29 5A 29 5A 00 00 6D 4B 28 5A 18 00 5E 00 00 00 |
| FILE20.TXT | 46 49 4C 45 32 30 20 20 54 58 54 20 18 41 42 78 29 5A 29 5A 00 00 6D 4B 28 5A 19 00 5E 00 00 00 |
| ?.1 | E5 73 00 31 00 00 00 FF FF FF FF 0F 00 9B FF FF FF FF FF FF FF FF FF FF FF FF 00 00 FF FF FF FF |
| Cstrikepers.ps1 | E5 43 00 73 00 74 00 72 00 69 00 0F 00 9B 6B 00 65 00 50 00 65 00 72 00 73 00 00 00 2E 00 70 00 |
| STRIKE~1.PS1 | E5 53 54 52 49 4B 7E 31 50 53 31 20 00 68 47 78 29 5A 29 5A 00 00 30 78 29 5A 1C 00 EC 01 00 00 |
The highlighted entries are worth investigating. A first look shows that they are LFN and SFN entries. Inspecting the filename, they seem linked. Let’s have a closer look at the SFN entry.
| Offset | Size | Field Name | Value (hex) | Meaning |
|---|---|---|---|---|
| 0x00 | 11 | File Name | E5 53 54 52 49 4B 7E 31 50 53 31 | STRIKE~1.PS1 |
| 0x0B | 1 | Attributes | 20 | The file has the attribute ARCHIVE |
| 0x0C | 1 | Reserved | 00 | Reserved for use by Windows NT. |
| 0x0D | 1 | Creation Time (Tenths) | 68 | 14 ms |
| 0x0E | 2 | Creation Time | 47 78 | 15:02:15 |
| 0x10 | 2 | Creation Date | 29 5A | 2025-01-09 |
| 0x12 | 2 | Last Access Date | 29 5A | 2025-01-09 |
| 0x14 | 2 | High Word of First Cluster | 00 00 | Cluster 28 (combination with low word of first cluster) |
| 0x16 | 2 | Last Modification Time | 30 78 | 15:01:32 |
| 0x18 | 2 | Last Modification Date | 29 5A | 2025-01-09 |
| 0x1A | 2 | Low Word of First Cluster | 1C 00 | Cluster 28 (combination with high word of first cluster) |
| 0x1C | 4 | File Size | EC 00 00 00 | 492 bytes |
Findings
The SFN entry refers to cluster 28 as the starting point for the file’s content. We can recover the content of the deleted file by navigating to cluster 28, which starts at offset 00403400, as shown in the image below.
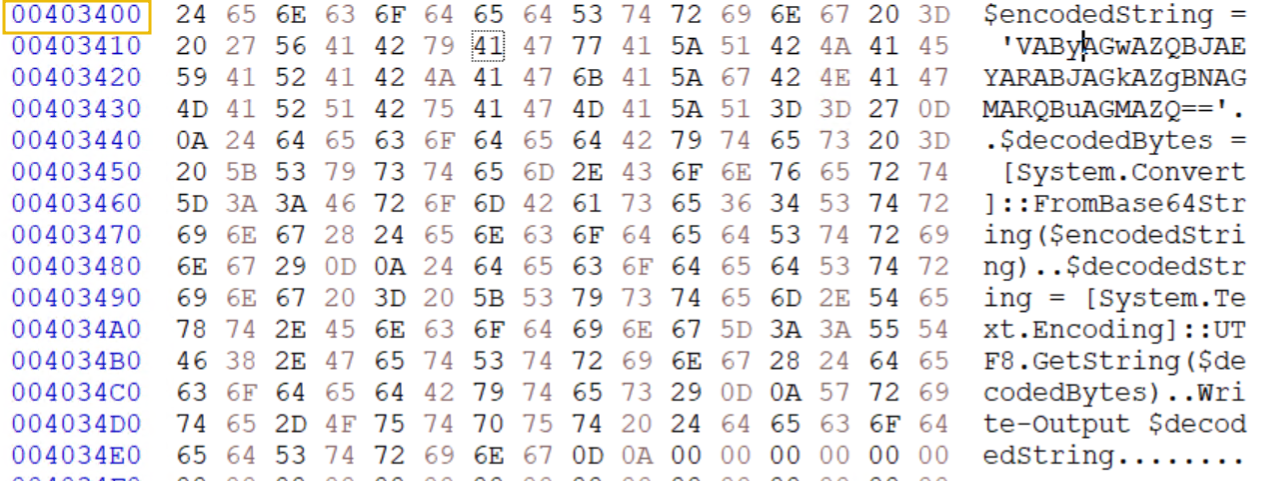
The content of the PowerShell file seems completely intact. Since we are working in a safe environment, we can try running the script to see what it does. Copy the recovered content and paste it into a PowerShell window. Enter the Flag as the answer to question 2.
Let’s move on to automated analysis to verify our results.
Automated Analysis
Similar to the previous tasks, manual analysis takes some time and is prone to mistakes during the various calculations. The image provided for this task was also adjusted to make it easier to find the deleted files. In reality, the size of the partition and the number of files and directories are much larger. Doing manual analysis would take up too much time. A tool like Autopsy can make this much easier for us. Let’s analyze the image with Autopsy.
Open Autopsy, create a new case and add the image FAT32_DELETED.001 as a Data Source (similar to what we did in task 7).
Similar to the previous task, we can explore the structure of the image by navigating to Data Sources, FAT32_DELETED.001_1 Host, FAT32_DELETED.001. We can then explore the folders and list their details.
There are two locations where we can look for the deleted files:
- The directory where the file was deleted.
- The
$RECYCLE.BINdirectory.
Let’s first check the root of the image. Following the steps above, you should already see a deleted file, as shown in the image below.
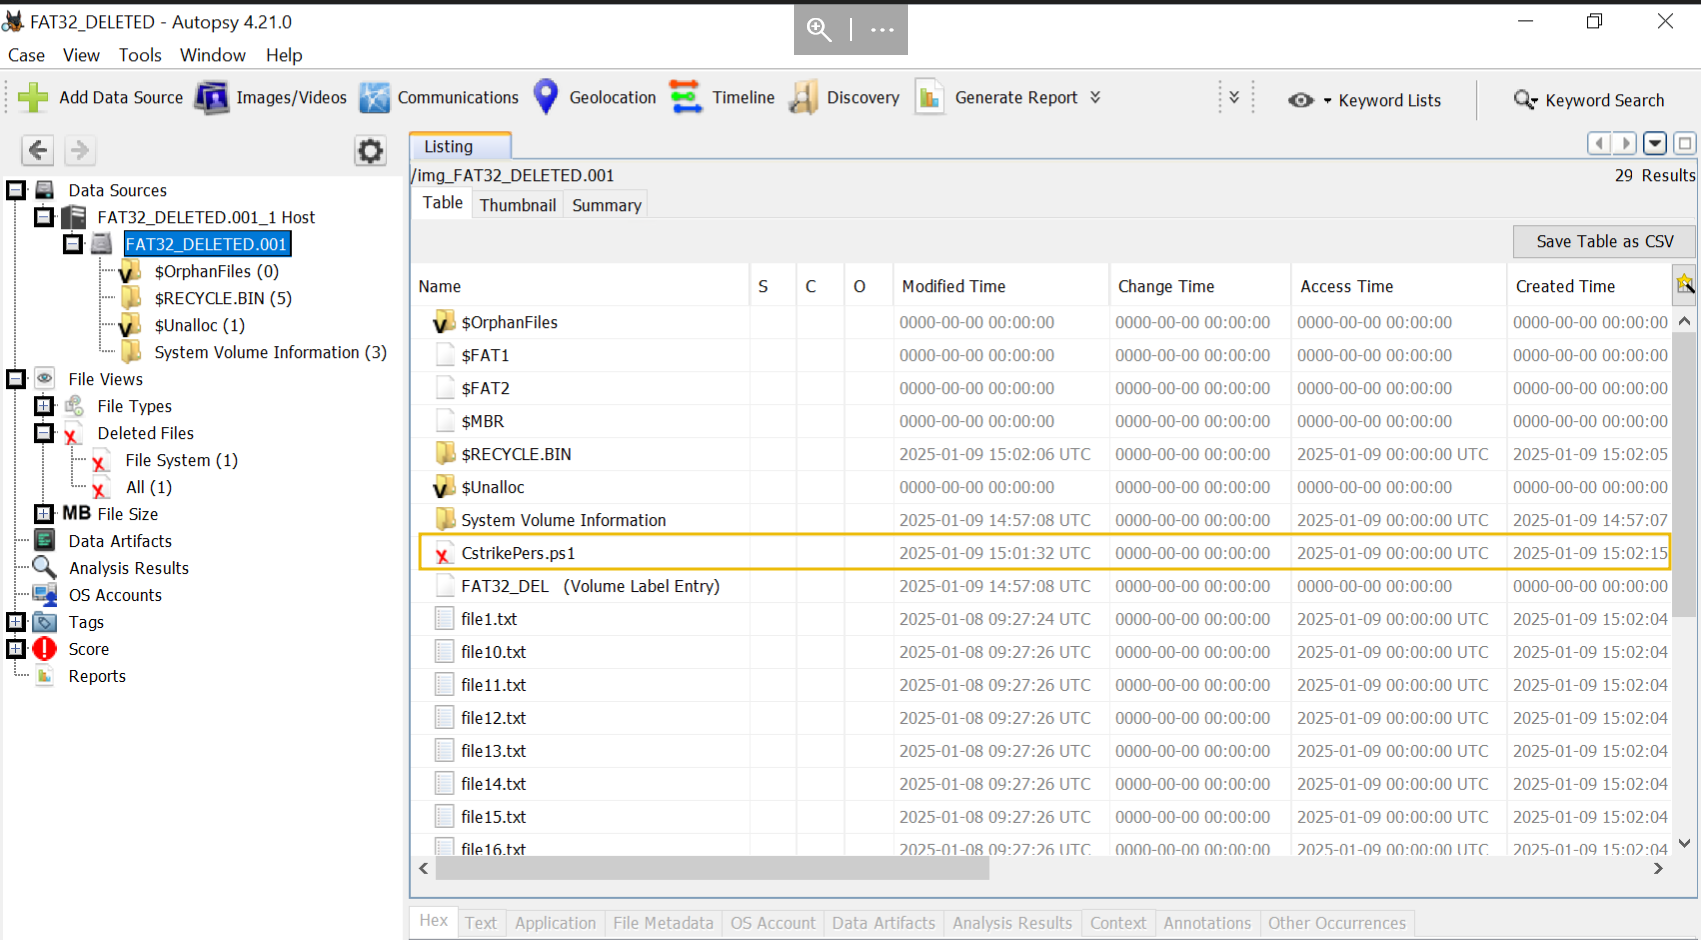
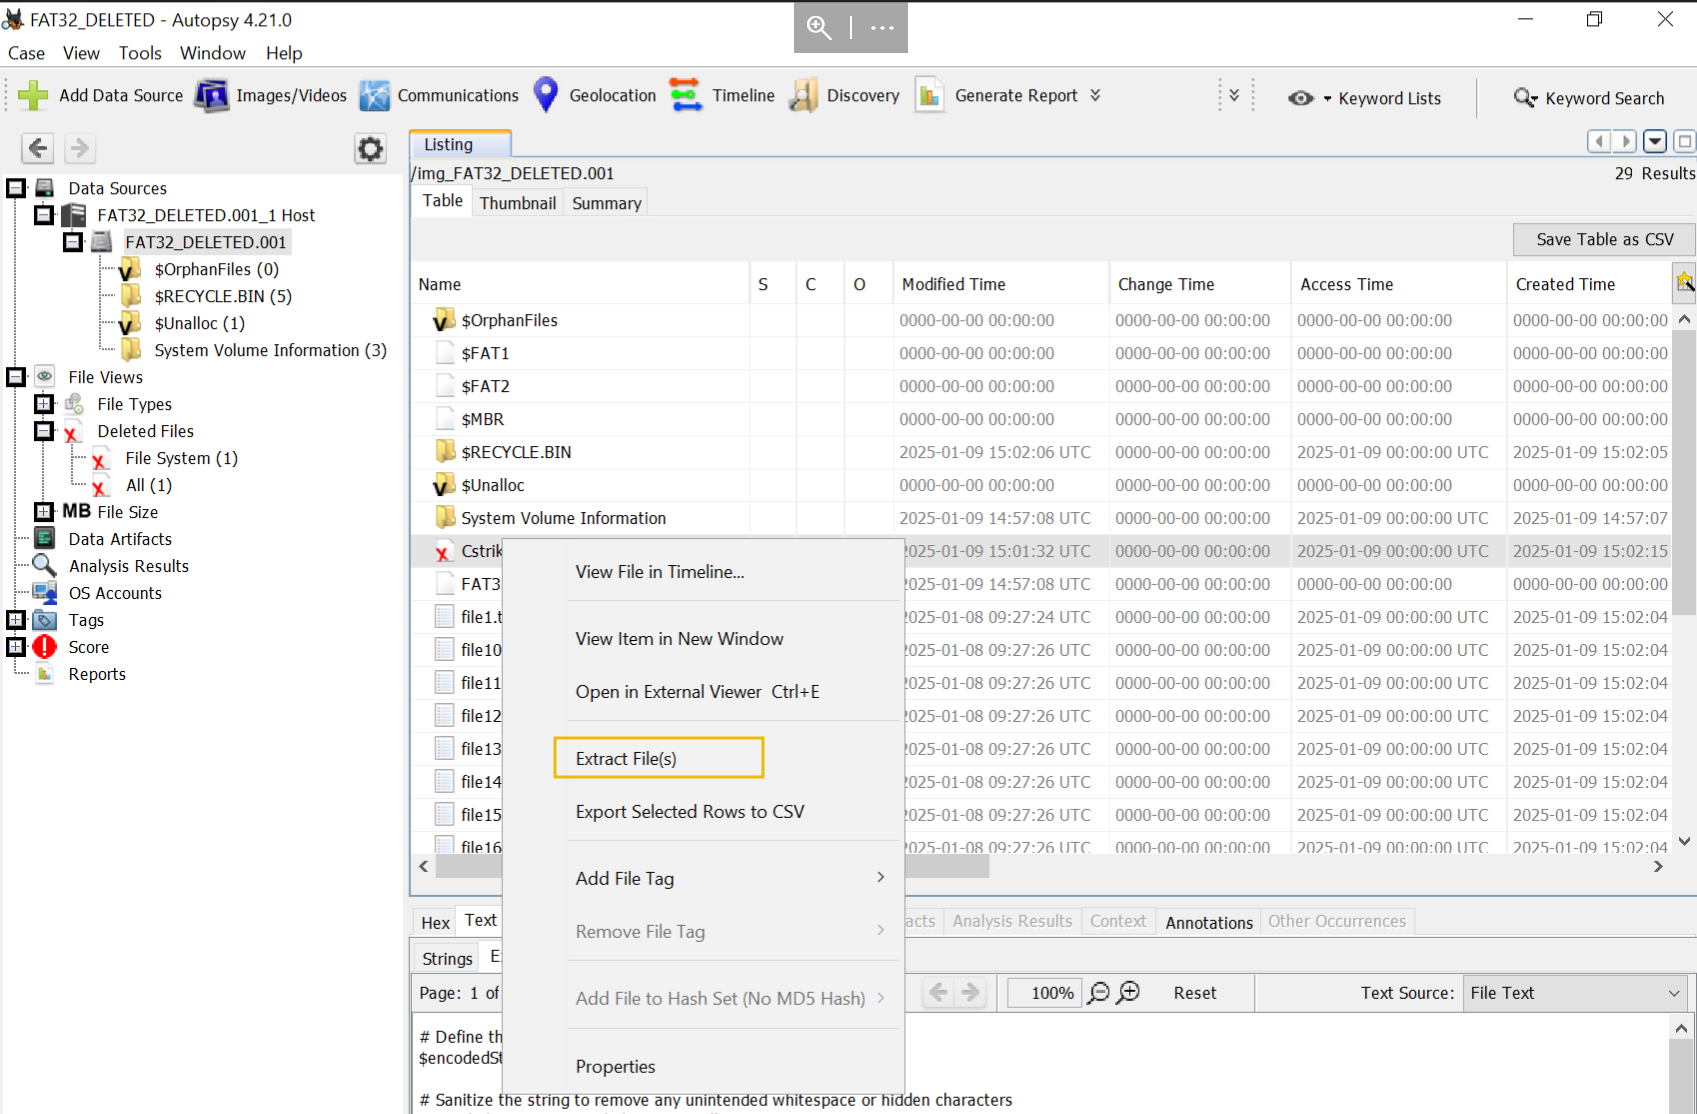
Select the file and verify its content. It should be the same as the file content we found during the manual analysis. You can also extract and save the file by right-clicking it and selecting Extract File(s) as shown in the image below.
Now, navigate to the $RECYCLE.BIN directory to see if there are other deleted files. As we can see in the image below, there are two deleted entries. We found that these entries correspond with the LFN and SFN entries for the CstrikePers.ps1 file. Select each entry and confirm that it relates to CstrikePers.ps1.
Findings
We found a deleted PowerShell file named CstrikePers.ps1. We were able to recover the file’s content completely and determine what the script does when executed.
Which hexadecimal sequence identifies a deleted file?
What is the output of the deleted PowerShell script after executing it? Note: In real-life investigations, we will only execute a suspicious file in a sandboxed environment.
The has retrieved an image from a compromised system and has submitted it to the forensic analysis team for further investigation. As a forensic analyst, you are tasked with analyzing the submitted image and discovering relevant forensic artifacts. Please answer the questions below to complete the investigation (if you want a more demanding challenge, you can answer all the questions using only the HxD editor.)
Image details:
- Name:
FAT32_CHALLENGE.001 - Location:
C:\FAT32_analysis
At which offset does the FAT1 table begin? Fill in the complete offset number XXXXXXXX.
What is the name of the hidden directory on the image? (Excluding the System Volume Information folder and the Recycle Bin).
What is the flag found in the hidden directory?
What is the size (bytes) of the archive file in the hidden directory?
What is the name of the deleted file that is present on the image?
What is the flag included in the deleted file?
What is the name of the file that has suspicious timestamp(s) (name.extension)?
What is the flag included in the file with suspicious timestamps?
Summary
We started this room by answering "Why is FAT32 still relevant in forensics?" We concluded that FAT32 is still widely used in legacy devices, , and mobile storage solutions such as USBs. FAT32 is lightweight, compatible with multiple OSes, and does not implement features such as permissions and tracking changes. Because of this, attackers often use FAT32.
We then continued this room by analyzing the structure of the FAT32 filesystem. The FAT32 filesystem consists of 3 significant parts: the reserved, FAT, and data areas. The reserved area contains the containing the filesystem metadata. This metadata is a roadmap that helps us to explore the other areas. The FAT area contains the File Allocation Table and its backup, respectively called FAT1 and FAT2. The FAT tracks the mapping of assigned and free clusters. The data area starts with the root directory that contains a 32-byte entry for each file and directory. There are two types of entries:
- A Short File Name entry that contains important metadata about the file and directory: this metadata includes timestamps, attributes, location on the disk, short filename, and more.
- A Long File Name contains the complete name of the file it refers to and a reference to the corresponding SFN entry.
Right after the root directory comes the actual data, which contains the content of the files.
After a deep dive into the structure of the FAT32 filesystem, we continued with an overview of the available techniques and tools to assist us in analyzing it. We divided the analysis techniques into "Filesystem and Structural Analysis" and "Data Recovery and Content Analysis".
Knowing the techniques, we covered 3 scenarios mapped to ATT&CK TTPs in which we analyzed a FAT32-formatted image. For each scenario, we covered how to manually extract forensic artifacts and how to use an automated tool. We concluded that in most of the scenarios, it is better to use an automated tool due to the reduced risk of errors and the speeding up of the analysis.
We finished the room with a challenge that encompassed all the skills and knowledge learned throughout the room.
What's Next
This room covers one filesystem. To explore more filesystems, such as and , continue the module which this room is part of.
Are you ready for the next filesystem?
Ready to learn Cyber Security?
TryHackMe provides free online cyber security training to secure jobs & upskill through a fun, interactive learning environment.
Already have an account? Log in