
K8s Best Security Practices
Best Kubernetes security practices at a cluster level.
medium

To access material, start machines and answer questions login.

This room is for all those aspiring engineers and those enthusiasts who have taken the time to learn the basics of the tool. It’s for those who know the tool, how it works and the initial steps to take when building a secure cluster. But what now? You’ve built a secure cluster, but how do you keep it secure? With being used as a platform to orchestrate containerised applications, many different security considerations must be made at different layers. This can be overwhelming for those looking to hop aboard the express, or even for those already aboard. So this room aims to collect some key best security practices to make your journey that much smoother. All aboard!
As hinted at above, this room will assume basic knowledge of both and technologies. If you’re new to , you will need to tackle the Intro to room before taking this on. This room acts as a direct continuation of the room so this should also be completed. If you’re unfamiliar with containerisation entirely then, you should consider doing rooms like Intro to Containerisation, Intro to Docker and Hardening rooms.
- Understand the importance of implementing best security practices in
- Understand ServiceAccounts in , their function and best security practices surrounding them, being able to independently define their own
- Understand how to independently define roles and RoleBindings to implement on a cluster, and why this is needed
- Understand requests in

One of the most important security practices in is the efficient and secure implementation of access control. Service Accounts are a part of the Access Control puzzle you'll need to complete to understand how to implement. Service accounts were briefly touched on in the Intro to room, but now it's time to take a deeper look at what they are and how they are used in . "Service account" is a general term that you may be familiar with if you use other cloud technologies. In this task, we will define a Service account in the context of , a ServiceAccount object.
Service accounts can be thought of as digital identities or non-human accounts. In , this identity is used in a security context to associate an identity with a specific process. In other words, system components, application pods, or other entities, both inside and outside of the cluster, can use ServiceAccount credentials to identify as this ServiceAccount. From a security perspective, this means authentication can take place or, as just mentioned, identity/access control can be implemented using these ServiceAccounts.
Here would be a good point to emphasise the "non-human account" aspect of a ServiceAccount and clear up any confusion regarding human users being authenticated/authorised into a cluster. Here is some information regarding ServiceAccounts and Users.
| ServiceAccounts | Users |
| Managed by K8s | Managed outside of K8s |
| Created by the | There is no “User” Object |
| Have Associated Credentials which are stored as Secrets | Cannot be created by |
Essentially, user access is usually handled using some kind of account management solution. does have one built-in, but this is generally integrated with another user management system such as or . Non-human access to the cluster and its resources is handled using ServiceAccounts.
Lightweight: ServiceAccounts allow you to create an account associated with a specific task/process in your cluster. This saves many of the headaches that come with using a user account to run processes (with special systems and business logic tied to databases involved in user account creation) and makes it easier to define more granular, task-specific permissions following the principle of least privilege.
Namespaced: In , ServiceAccounts are a namespaced resource, meaning ServiceAccount names need only be unique within the they are associated with. Every , upon creation, gets a default ServiceAccount associated with it aptly named "default". Suppose you don't manually define a ServiceAccount in the pod/deployment definition. In that case, this "default" ServiceAccount (in the the pod is being created in) will be assigned to it, and the ServiceAccounts credentials (a token) will be mounted to it as a secret. Note that the "default" ServiceAccount has few permissions by default, so if a task needs more, a ServiceAccount will need to be created.
Portable: Because ServiceAccounts are lightweight and only need to be unique at a level, they can be bundled together for use in other namespaces or projects, making them portable.
- A task/process running in a pod needs to communicate with the to retrieve secret or sensitive information. A ServiceAccount could be used here to grant read-only access to this secret.
- You have a pod running in "example-". Its process involves ensuring all pods are running in "other-." A ServiceAccount can be used here, with a combination of (more on this soon), to ensure this pod has sufficient permissions to list pods in "other-".
- ServiceAccounts can be used to authenticate external services. For example, imagine you have a / pipeline, and a stage in this pipeline involves authentication to your cluster.
ServiceAccounts are very easy to define using kubectl. You can create a ServiceAccount on your cluster using the following command.
Note: serviceaccount can be abbreviated as sa
thm@k8s:~$ kubectl create serviceaccount example-name --namespace example-namespace
If you wanted this ServiceAccount to be associated with a specific pod, you would define that in the pod/deployment configuration YAML like so:
apiVersion: v1
kind: Pod
metadata:
  name: example-pod
  Namespace: example-namespace
spec:
  serviceAccountName: example-sa
  containers:
  - name: example-container
    image: nginx:latest
    ports:
- containerPort: 80Kubernetes ServiceAccounts are Lightweight, Namespaced and which other attribute?

Why ?
For example, a pod which checks the running status in the "x" should ONLY have the required permissions to perform that action and no other. This way, if an attacker were to gain access to this resource, they would only be able to perform authorised actions, which in this case would give them little access. We can implement this using (Role Based Access Controls).
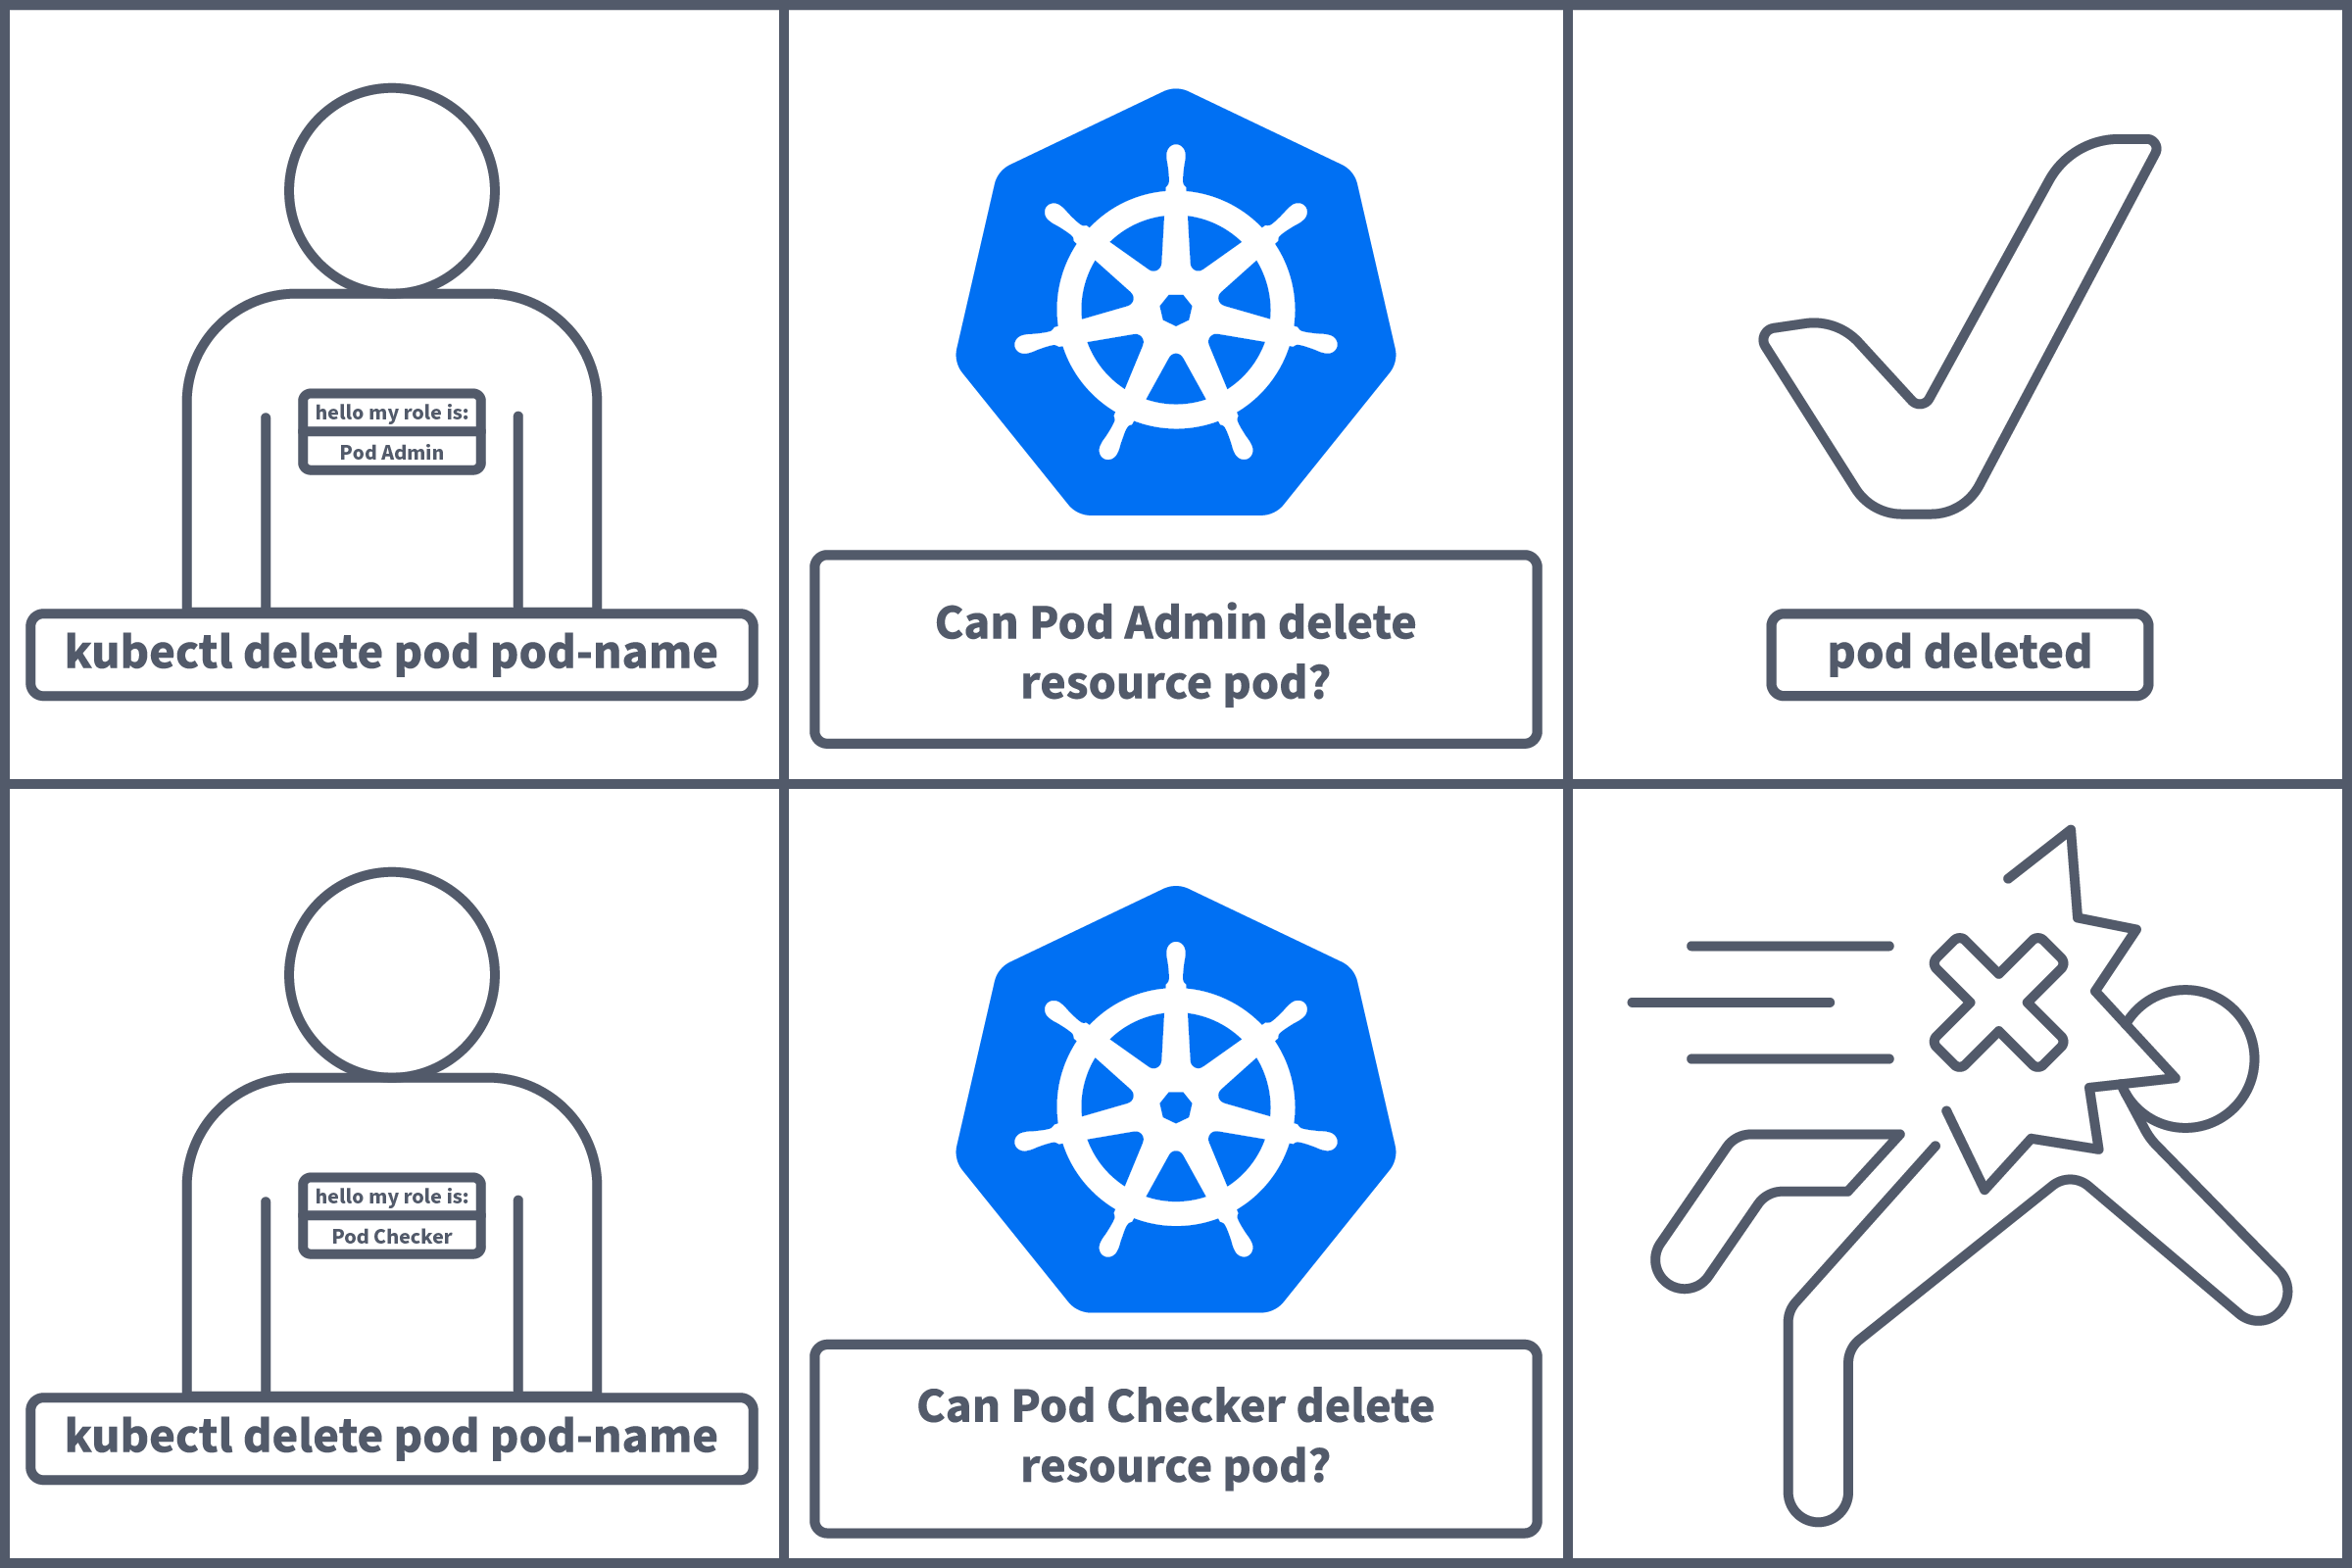
Role: What can this role do, and to what resource(s)? Permissions are additive, meaning there are no deny permissions. Think of this as allowlisting for access. You will provide a verb (what can this role do), e.g. "get" or "delete", and a resource (and to what), e.g. "pods" or "secrets". Note that sub-resources can also be defined here using a / after the resource name, e.g. pods/log. This will be visualised with a configuration example soon. Roles are namespaces, meaning they can allow actions within a given , not the entire cluster.
RoleBinding: The RoleBinding object does what it says on the tin. It binds a Role (defined above) to a ServiceAccount or User. As Roles are namespaced, the role mentioned in the RoleBinding configuration will need to exist in the same as the RoleBinding.
ClusterRole: A ClusterRole is functionally the same as a Role, except roles are granted on a (non-namespaced) cluster level. This would be used if access is needed to cluster-level resources like nodes or resources across multiple namespaces. Again, only if this is NEEDED, with least privilege in mind.
ClusterRoleBinding: A ClusterRoleBinding is functionally the same as a RoleBinding except it binds a ClusterRole to a ServiceAccount or user.
Now that we've established the different kinds of objects, let's give some more context as to where these would be used. As mentioned, roles can be bound to either ServiceAccounts or Users. ServiceAccounts will be used if we are granting authorisation to an application, e.g. an application running in a pod within the cluster or a 3rd party external service like Istio (opens in new tab). Meanwhile, users will be used if we are granting authorisation to, you guessed it, users! Let's now look at in the context of both of these.
| Role/RoleBinding | ClusterRole/ClusterRoleBinding | |
| ServiceAccount | A Role and RoleBinding would be used to allow an application/pod to perform a certain action on a namespaced resource. For example, allow a pod to get the running pods in a . The pod would then have this ServiceAccount assigned to it. | Same as Role/RoleBinding but for performing actions on a cluster-level resource like a node. |
| Users | Imagine user "Bob" has been tasked with monitoring pods in the "dev" to ensure a deployment is in working order and can be deployed in "staging." For this, the user should be granted permission to "get" "pods" in the "dev" . Using a Role would be preferable in this case since we are defining a namespaced resource, and the user should only be able to access what he NEEDS to, not pods in all namespaces. | Now imagine there is another user, "Alice". Alice is a cluster admin and needs permissions to "create" multiple resource types across all namespaces to set up the cluster. For this to be authorised, a ClusterRole would need to be defined (and bound to Alice's user with a ClusterRoleBinding) since the authorisation required is at a cluster level. |
Let's consider the example mentioned earlier. Let's say we have a pod that is supposed to check the running status of pods in the "example-" . The pod identifies as ExampleServiceAccount. The pod definition may look something like this:
apiVersion: v1
kind: Pod
metadata:
  name: up-checker
  namespace: example-namespace
spec:
  serviceAccountName: ExampleServiceAccount
  containers:
  - name: kubectl
    image: bitnami/kubectl:latest
    command:
# commands for pod status check logic would go hereapiVersion: rbac.authorization.k8s.io/v1
kind: Role
metadata:
name: up-checker-role
namespace: example-namespace
rules:
- apiGroups: [""]
resources: ["pods"]
verbs: ["get", "list", "watch"]apiVersion: rbac.authorization.k8s.io/v1
kind: RoleBinding
metadata:
name: up-checker-role-binding
namespace: example-namespace
subjects:
- kind: ServiceAccount
name: ExampleServiceAccount
namespace: example-namespace
roleRef:
kind: Role
name: up-checker-role
apiGroup: rbac.authorization.k8s.ioHere, we tell Kubernetes the subjects (or, in this case, a single subject) to which we want to bind this role (the ServiceAccount ExampleServiceAccount) and what role we would like to bind this subject to (up-checker-role). Remember we can apply each configuration YAML using the following command:
thm@k8s:~$ kubectl apply -f filename.yaml
Defining a ClusterRole/ClusterRoleBindng is almost identical, except there is no need to define a and the "kind" would changed to ClusterRole/ClusterRoleBindng.
You now want to define permissions at a cluster level; what do you define?
In which field under "rules" would you define to what those actions should be applied? (in the role YAML/spec)

Okay, so if you're going to secure anything and follow best practices, it's fundamental that you understand how exactly it is being accessed. Between this room and the prerequisite room, you have now accrued enough knowledge to understand how a cluster is accessed. This task will collect the knowledge covered so far and use it to explain methods of accessing a cluster and the request stages involved.
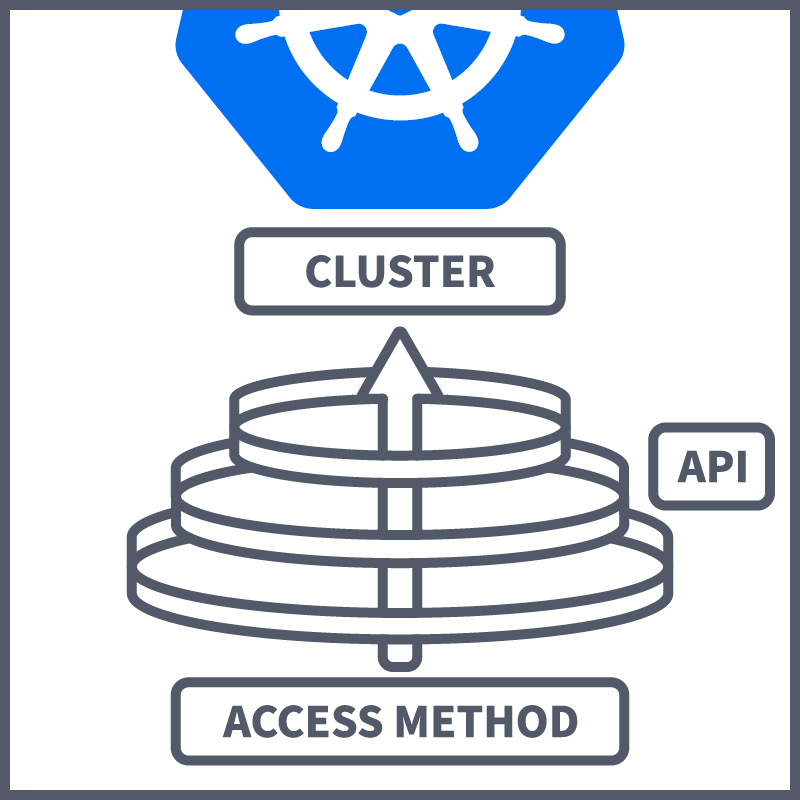
Accessing the cluster is done through the use of the . This is our communication channel to the cluster, and there are different methods of accessing the itself:
Kubectl - We've covered this before. Kubectl is ' command line tool. When accessing a cluster, you need to know two things: the cluster location and credentials. When configured, kubectl handles the locating and authenticating to the server—making it easy to perform actions on the cluster using various kubectl commands. This is the most common method of accessing a cluster; however, if you wish to directly access the cluster yourself (using curl, wget or a browser), there are a couple of ways to do this, which will be discussed next.
- Kubectl can be run in " mode" using the kubectl command. This command will start a server on port 8080 that will forward requests to the server. This is the recommended method for directly accessing the because it uses the stored server location and verifies the identity of the server using a self-signed certificate, meaning a man-in-the-middle () attack is not possible.
Auth Token - This method accesses the directly by providing the client with the cluster location and credentials. For this reason, it is not recommended (as it would be vulnerable to a attack).
Programmatic - supports programmatic access to the using client libraries. It officially supports client libraries such as Python, Java, Javascript, Go, and some community-supported libraries (although these do not have official support).
Those are the different methods that can be used to access the /Cluster. From this point, the conversation turns to how we control access to the cluster. You'll be pleased to know that much of what you've learned thus far has been methods of controlling access to a cluster. Let's contextualise them by looking at request stages. When you communicate with the , you will be asking to do something, whether that be getting some logs, creating a pod or deleting a service. When you perform one of these actions, you will be sending a request to the . This request will go through multiple stages before being actioned. Let's take a look at what those stages are:
Authenticating an request can be done in multiple ways. These include methods covered in the room (covered in Tasks 4 and 5), such as setting up client certificate authentication or using bearer tokens. Authentication can also be done using other auth plugins such as Authenticating or basic auth. Another authentication method would be ServiceAccount tokens, which are used to authenticate a ServiceAccount. Multiple authentication methods can be used, and it is often the case that at least two would be used (ServiceAccount Tokens and another auth plugin for user authentication). A request passes this stage only when it has the right attributes needed to confirm the requestee identity.

Once the requester's identity has been authenticated, it needs to be determined if this user/ServiceAccount is allowed to make this request (e.g., access this resource). For example, does user example-user have sufficient permissions to delete pod example-pod. The request needs to be authorised. has four authorisation modes. One commonly used and the most important for our current context ( best security practices) is . There are three other authorisation modes:
- Node authorisation: As you might remember, a cluster has a kubelet process running in each node. This process communicates with the . This authorisation method is used to authorise requests made by kublet processes. It is not intended for user authorisation.
- ABAC (Attribute Based Access Control) - ABAC is similar to , but instead of granting authorisation based on roles, it grants access based on, you guessed it! Attributes. These attributes include user attributes (such as name, position, clearance level, etc.), resource attributes (creation date, resource owner, resource group) or environmental attributes (such as the time and location from which the resource is being accessed). ABAC allows for a very granular level of access control; for example, you could allow a user to access a resource from one location (an office) but not another (their home). However, implementing this for a growing user base can quickly become complex, and the maintenance of ABAC policies can become difficult. This is often cited as a reason is favoured over ABAC for organisations: its implementation simplicity.
- Webhook - Another authorisation method is delegating the authorisation to an external service (known as a webhook). A webhook allows a user/organisation to define custom logic for authorisation and have requests authorised using this logic. This is useful for organisations with more complex authorisation requirements or ones that want to defer to an external service (like Active Directory or , etc) to make authorisation decisions. The webhook would then send back a response based on the outcome.
Using one of the above methods, a request is checked to see if the authenticated user is authorised to access the resources/perform the action requested. Before the request is accepted, there is one more stage.

After a request has been authenticated and authorised the next request stage is Admission Controllers. Covered in the room (covered in Task 6), Admission Controllers are checks done against an request. They can be validating (is this action permitted, does it breach a check) or Mutating (e.g. in a request to create a pod, the pod's name might need to be changed to match a custom naming convention). As well as built-in admission controllers, you may remember it is possible to define custom checks. These admission controllers are triggered after the authentication and authorisation stages, and only after all admission controller checks have been passed will this request persist.

We have followed an Request through all of its stages. When asked how to restrict access to a cluster, you should now be able to elaborate more than just "harden your cluster" and discuss how a cluster is accessed and how access can be restricted at each stage. Great work! Your skills are growing with every task.

Which API request stage would RBAC be involved in?
In which API request stage would we find the words "Mutating" and "Validating"?
In which API request stage would a ServiceAccount token be used to verify a ServiceAccount?

With the knowledge gained so far, your understanding of is growing. A more in-depth look at and ServiceAccounts has allowed for a deeper understanding of cluster access. This task is going to be dedicated to shouting out some other notable Best Security Practices, a collection of when it comes to K8s security. Without further ado lets get started!
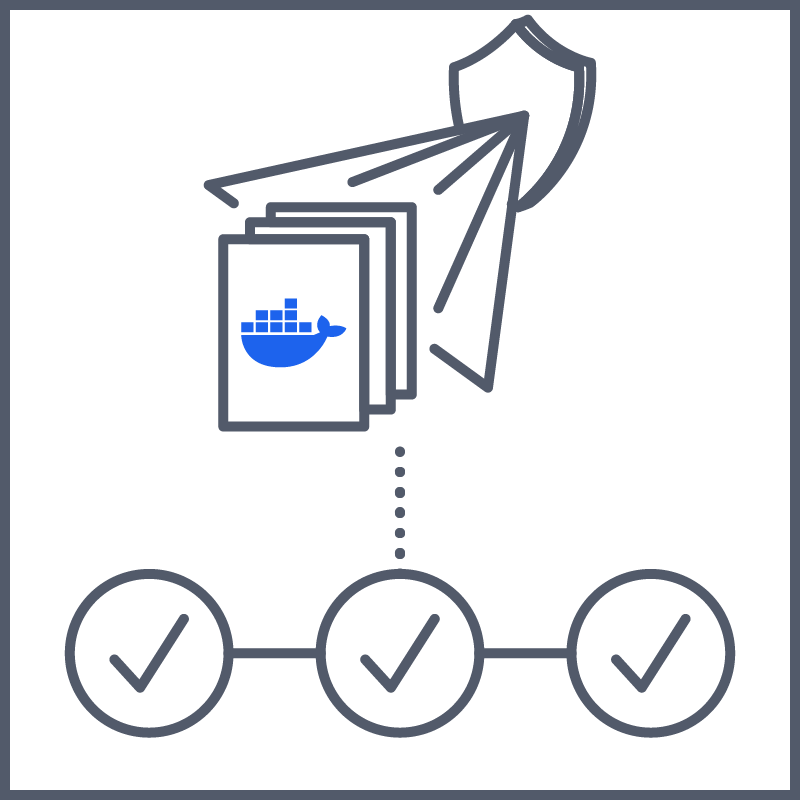
Let's start by taking things back a step. Why do we want in the first place? To deploy our apps, right? Well, those apps are made using images. The app image will contain everything needed for the app to run on the , but what else does it contain? Image scanning is one way to find out! Images are generally made up of a series of commands (or Layers) that create directories/users , copy/run scripts, and install tools/libraries. All of these have security implications:
- The tools, libraries and code we use in our app may come from an untrusted source. This can lead to backdoors in your application code (intentional or otherwise), giving an attacker access.
- Official images are often used as a base image (and built upon) when making an application. For example, if you are building a web application, you may use the Nginx base image, or if you're building a database application, you may use any of the Postgres, Nginx, MongoDB, or Redis base images. These official images are often considered safe because…well, they're "official". However, these official images can contain vulnerabilities, and they frequently do. Of course, non-official images and outdated images can pose security concerns as well.
- Because of the above-mentioned security implications, it is a best security practice to minimise attack surface in your image by using only the libraries an application NEEDS and using the most lightweight base image for its intended purpose.

These security implications are not to be taken lightly, as a vulnerability in your application image could be just what an attacker is looking for. An attacker could exploit this vulnerability and use it to break out the the application is running in and access the host, wreaking havoc on the cluster and gaining access to critical cluster information such as kubelet authentications certs/tokens. This would be a massive security incident. This is why image scanning should always be introduced into a / pipeline as a best security practice.
Image scanning tools (like Snyk (opens in new tab)) scan the image being used against a database of vulnerabilities and look for things like hard-coded secrets. With an image scanning step in place, you can easy knowing that what is being deployed into your cluster is secure.
Keeping up to date is a general best security practice, not one specific to . Running an old version of comes with all the same security concerns; if an attacker finds a cluster running an older version node, they may know a few vulnerabilities that have since been patched. And, of course, updating a cluster comes with the same Stable vs Latest considerations. Stable releases have been thoroughly and fully tested (and so are generally favoured from a security perspective). However, the latest version (which will have been internally tested) will include patches for issues in the stable version. Ultimately, as long as you are at least using the stable version, you are following the best k8s security practices.
Note: When choosing the version to upgrade to (the latest stable version, for example), you cannot skip minor versions. For example, you cannot upgrade your cluster from version 1.21 -> 1.23 as you would be skipping minor version 1.22. So if the latest stable version were 1.23, you would have to do 1.21 -> 1.22, then 1.22 -> 1.23.
Upgrading a cluster usually falls to a engineer, or at the very least, a engineer will work alongside a engineer to ensure this is done. Due to the nature of versioning, there are constantly new versions being released, and keeping the cluster up to date can become quite a task. Because of this, teams sometimes overlook the upgrade process and fall behind on a few versions. Following best k8s security practices, your team will regularly assign you tickets to get the cluster upgraded. This will usually have to be done in the following order:
- Upgrade (Primary) Control Plane Node (upgrading components in this order, etcd, kube-apiserver, kube-controller-manager,kube-scheduler, cloud controller manager)
- If the cluster has additional control plane nodes, upgrade those
- Upgrade worker nodes
- Upgrade clients like kubectl
- Make changes to manifests and resources based on changes in the new version (for example, if some of your resources are using a now depreciated feature, update them to use the replacement)
- More than one worker node can be upgraded at a time.
- When upgrading a cluster, only internal components are touched. In other words, your apps and workloads should remain untouched and unharmed. However, it is always a good practice to take a backup of important components before the upgrade, just in case.
- Nodes need to be drained; this way, pods are evicted from the cluster and workloads are unaffected.
- Upgrading a cluster often comes with downtime. Depending on the importance of workloads being run in the cluster, this may lead to downtime for external services (internal or external). For this reason, a downtime notification with a maintenance window attached should be sent to the affected parties.
Unless there is an operational need for it (which there almost never is), a should be run as a non-root user. This is because if, like previously covered, your image has vulnerabilities in it and an attacker gains access to the , you're making their life a lot easier if that has root privileges.
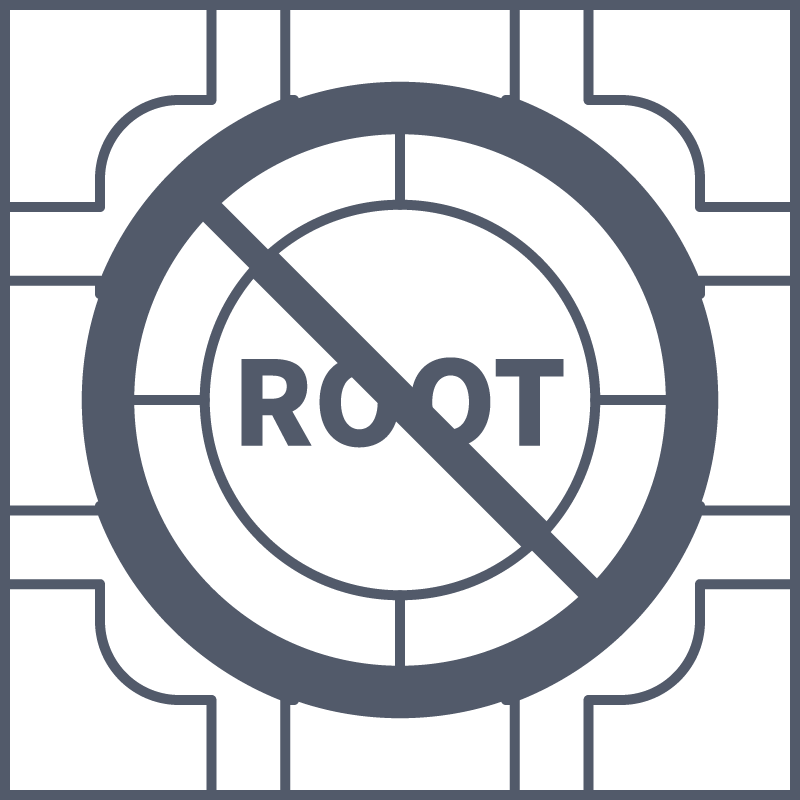
This can be done when defining the image. However, certain specifications in your pod configuration can override this. As a engineer, you'll likely be reviewing your fair share of resource configurations. If you see in the spec, under “securityContext” values like runAsUser: <UID> (where the has root privileges) or allowPrivilegeEscalation: true, your alarm bells should be ringing. You should verify this is not required (which again, it almost never will be) and change the pod spec to look more like this:
apiVersion: v1
kind: Pod
metadata:
  name: example-pod
  Namespace: example-namespace
spec:
  securityContext:
      allowPrivilegeEscalation: false
Non Root User
apiVersion: v1
kind: Pod
metadata:
  name: example-pod
  Namespace: example-namespace
spec:
  securityContext:
runAsUser:As you may remember, etcd is ' key/value store where cluster data is kept. You hear "cluster data is kept", an attacker hears "goldmine", and they're right. Changes made in the cluster (such as a pod being deleted) are then reflected in the etcd store. However, it goes both ways; if a change were made in the etcd (such as a new pod entry), that change would be reflected in the cluster. Imagine now an attacker gaining access to the etcd. Suddenly, they're not so concerned with finding ways to gain access to the cluster, but they've found a way to bypass the altogether. An attacker gaining full access to the etcd is one of the worst things that could happen in a cluster, as it is essentially unlimited access.
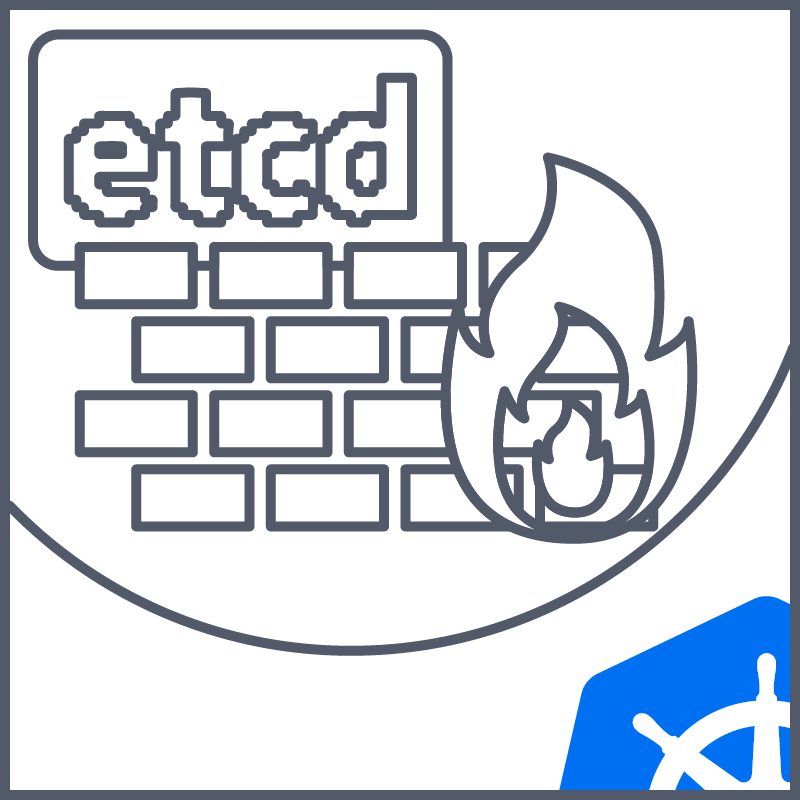
- Etcd can be isolated from the cluster and run separately, putting distance between the cluster and the etcd store should the cluster be breached.
- Put etcd behind a , ensuring it can only be accessed via the (going through the appropriate request stages).
- Encrypt all etcd data, this would be done using either built-in encryption at mechanisms or an encryption provider. This way, if an attacker was able to access the etcd, they wouldn't be able to decipher the contents.
What should be set as "false" in configuration to ensure a container cannot have its privileges escalated?
To ensure the security of etcd , it should be isolated, behind a firewall and?
How many cluster upgrades would you have to do to go from version 1.21 to 1.25
Set up your virtual environment


It's another week for you at Laboratories. Your journey continues with another standup meeting. Everyone is dished out a ticket, including you! The ticket you have been assigned is to "review configuration for test chambers checker". Okay, it sounds like you're going to be able to put your best security practices knowledge to use. Let's first boot up the machine by clicking the green "start lab machine" button. The machine will start in Split-Screen view. In case the is not visible, use the blue Show Split View button at the top of the page. Give it some time to boot up, and you can begin your investigation!
First things first let's boot up the cluster using the command (allow a couple of minutes for the cluster to boot up).
thm@k8s:~$ minikube start
With the cluster started up. Let's take a look at the "test-chamber" namespace; this is where we are going to be reviewing the configuration. Use this command to see what's running in this namespace (the pod-status-checker can take a minute or two to enter "running" status):
thm@k8s:~$ kubectl get pods -n test-chambers
We can see three test-chamber pods running as well as a "pod-status-checker", it's this checker the ticket says we have to review the RBAC configuration for. The ticket details the purpose of this checker, and it is simply to list the status of the pods in the "test-chamber", and log it. Let's get some info about the pod using the command. Use your DevSecOps skills to analyse this pod info and see if you can find any red flags:
thm@k8s:~$ kubectl describe pod -n test-chambers pod-status-checker
The red flag in question was in the first few lines. We can see that this pod is configured to use the ServiceAccount "pod-admin". Sounds like this pod is running with higher permissions than required. The ticket also details the current configuration for this pod-status-checker. It tells us the pod runs using the pod-admin ServiceAccount (which we now know), using the "pod-admin-role" ClusterRole, and is bound to the pod-admin ServiceAccount using the pod-admin-binding ClusterRoleBinding. Okay so your alarm bells should also be ringing here. Given the scope of this pod's function, it only needs access to a single namespace and not the entire cluster. For this configuration, using a Role and Rolebinding makes more sense. Let's take a look at the ClusterRole and ClusterRoleBinding using the following commands:
thm@k8s:~$ kubectl describe clusterrole -n test-chambers pod-admin-role
thm@k8s:~$ kubectl describe clusterrolebinding -n test-chambers pod-admin-binding
The output of most interest to us is the following:
           thm@k8s:~$ kubectl describe clusterrole -n test-chambers pod-admin-role
Name:         pod-admin-role
Labels:
Annotations:
PolicyRule:
  Resources  Non-Resource URLs  Resource Names  Verbs
  ---------  -----------------  --------------  -----
  pods       []                 []              [get list create delete]
  secrets    []                 []              [get list create delete]
  services   []                 []              [get list create delete]
If you've completed those steps, then you've done it! Another ticket closed, and you're well on your way to passing your probation here at Kubernetes Laboratories. To complete the task, run the following command:
thm@k8s:~$ kubectl describe role pod-checker-role -n test-chambers
Paste the output into this (opens in new tab) base64 encoder; the encoded output is the answer!

By going through this lesson, you've continued your journey, picking up some best security practices along the way. Slowly but surely, your knowledge of the tool and cluster architecture will start supporting your knowledge of security practices, so you know not just what to implement but why. Before ending this room, let's go over what we've covered:
- ServiceAccounts can be used to implement access control. In a security context, these ServiceAccounts tie an application/pod/service to a digital identity so access can be restricted based on this identity.
- As mentioned above, is one method of restricting permissions based on identity. should be configured with the least privilege principle in mind across the cluster, considering the use case of each user/application before assigning a Role or ClusterRole.
- When an Request is made, it goes through the following request stages before being carried out: Authentication -> Authorisation -> Admission Controllers.
- Vulnerabilities in an image your application is running can lead to your cluster being breached. Image Scanning should be introduced into the / pipeline to avoid this.
- Upgrading a cluster ensures the cluster is running with the latest patches and features.
- To limit an attacker's ability to escalate privileges should they gain access to a , containers should run with no root privileges.
- An attacker gaining access to the etcd would be a catastrophe. For this reason, the etcd should be isolated from the cluster, behind a , and encrypted.
With that, this room is complete! With this knowledge, your brain is now a more valuable resource to companies like Laboratories, which can be safeguarded against misconfigurations and attackers.
All done!
Ready to learn Cyber Security?
TryHackMe provides free online cyber security training to secure jobs & upskill through a fun, interactive learning environment.
Already have an account? Log in