macOS Forensics: Artefacts
Understand the forensic artefacts in macOS and learn to leverage them for forensic analysis.
hard

To access material, start machines and answer questions login.
Set up your virtual environment

In the macOS Forensics: The Basics room, we learned some basics of macOS forensics and the challenges we might face when performing forensics on macOS. Now that we have this knowledge, we need to know what forensic artefacts are present in macOS and what value we can derive from them.
Learning Objectives
- The different forensic artefacts present in macOS.
- Where to find these artefacts?
- How can these artefacts aid in a forensic investigation?
Prerequisites
Before starting this room, it is highly recommended that the following room is completed:
Furthermore, this room requires an advanced knowledge of the /Unix command line, so it is recommended to have that knowledge before continuing with this room. Throughout the room, we will discuss accessing the forensic artefacts both on a live system and on a macOS disk image in a system. We will practice accessing and analysing these artefacts from a disk image using an attached .
Machine Access
Before moving forward, please press the Start Lab Machine button to start the attached .
The machine will open in split view. The attached machine is a machine with a macOS disk image named mac-disk.img placed in the home directory. As we learned previously, we will mount this disk image using the apfs-fuse utility and perform analysis on the image.
In the coming tasks, we will explore examples of forensic artefacts extraction on a live system and practice extracting them on an acquired disk image placed in a machine. Please note that the disk image has been obtained from a purpose-built , and, as with all forensic investigations, not all artefacts will be present in all machines.
What command can be used to mount the image named mac-disk.img to the directory ~/mac in the attached VM, making sure the Data volume is mounted?
Most artefacts in macOS can be categorised into a few types. These types often require special tools or parsers to extract data. Therefore, we will go over these artefacts in this task so that when we encounter them in the upcoming tasks, we already know what tools and techniques to use to parse them.
Plist Files
Plist or property list files are among the most common artefact types we will find while performing forensics on a macOS device. We also learned about plist files in the macOS Forensics: The Basics room, where we identified that these could be or BLOB files. We can read the type of plist files using built-in utilities like cat, more, or head. However, we need a specific plist utility to read BLOB files properly. One such utility is present by default in macOS systems, and we can read a BLOB type of plist file with the command plutil -p <file>.plist.
      umair@Umairs-MacBook-Pro ~ % plutil -p APMExperimentSuiteName.plist
{
  "APMExperimentFetchSuccessTimestamp" => 1728475253.533066
}
However, if we are analysing data in Linux, we must install plistutil (opens in new tab), which works similarly to plutil in macOS. In a Linux system, we can read a BLOB type of plist file using the command plistutil -p <file>.plist. This utility is already installed on the attached VM.
      ubuntu@tryhackme:~$ plistutil -p APMExperimentSuiteName.plist
{
  "APMExperimentFetchSuccessTimestamp" => 1728475253.533066
}
Database Files
Certain forensic artefacts in macOS are saved as database files, such as chat history, browsing history, and application usage. We will need a tool to extract data from these database formats. In this room, we will use DB Browser for SQLite. (opens in new tab) It is a tool available for Windows, Linux, and macOS systems. In the attached , we can start the DB Browser by navigating to Applications > Accessories > DB Browser for SQLite from the top menu.
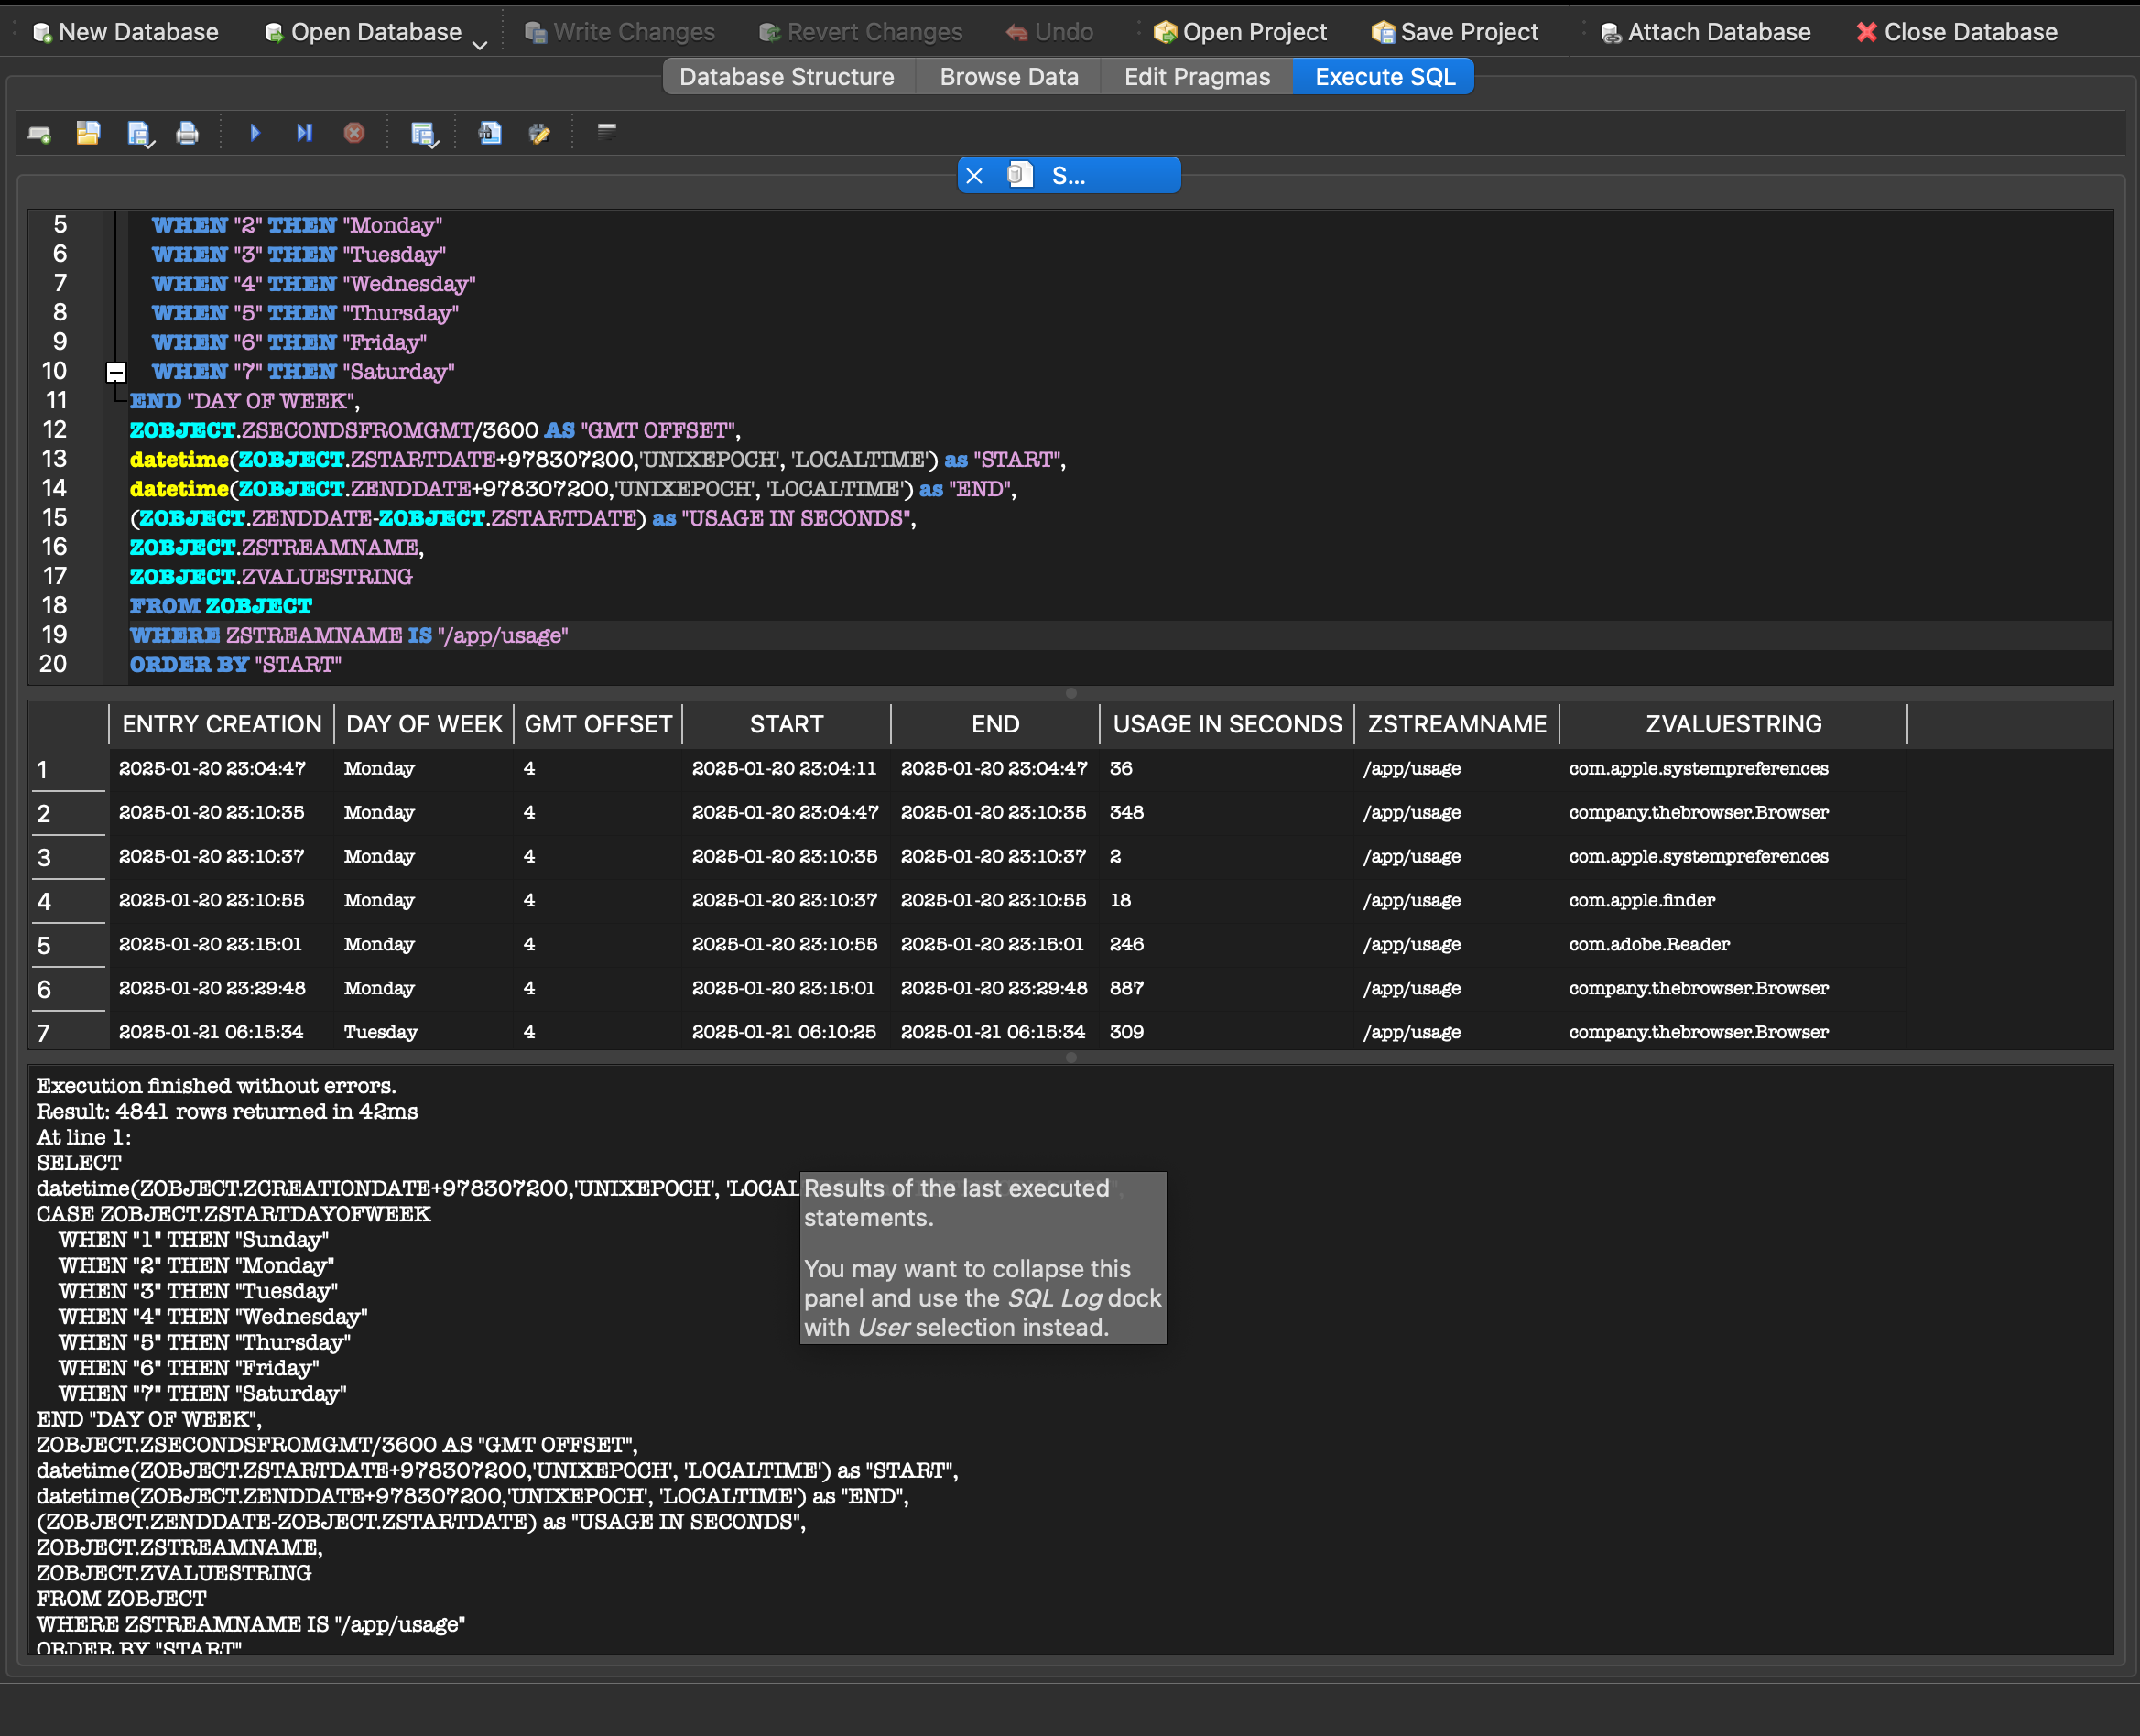
The following screenshot shows the UI of DB browser, where we have run a query to search for application activity in knowledgeC.db, which we will learn about further in the upcoming tasks. We run a modified form of the query found in this (opens in new tab) blog.
In addition to DB browser, we will need some information on what to extract from the databases and how to do that. We can use APOLLO (opens in new tab) to gather databases from the macOS system or parse data from different databases into one database. Various modules of APOLLO can be used to identify the different database queries required to extract data for a specific artefact, and then create a timeline of events using these databases. Both DB Browser and APOLLO are already present in the attached VM for performing analysis. However, we will not extract databases in the attached VM, rather just perform analysis on the individual databases when required.
      umair@Umairs-MacBook-Pro ~ % python3 apollo.py extract -osql_json -pyolo -vyolo modules tmp_apollo

--------------------------------------------------------------------------------------
APOLLO Modules Version: 11182020
Action: extract
Platform: yolo
Version: yolo
Output: sql_json
Data Directory: tmp_apollo
Modules Directory: modules
Current Working Directory: /Users/umair/APOLLO
--------------------------------------------------------------------------------------
...Parsing Modules in...modules

==> Parsing 411 modules (Note: Some modules may be run on more than one database.)
	[1] modules/aggregate_dictionary_distributed_keys.txt on ADDataStore.sSQLite DB SQL Query 8,9,10,11,12,13,14
	[2] modules/aggregate_dictionary_scalars.txt on ADDataStore.sqlitedb: SQL Query 8,9,10,11,12,13,14
	[3] modules/call_history.txt on CallHistory.storedata: SQL Query 10.13,10.14,10.15,10.16
	[4] modules/call_history.txt on CallHistory.storedata: SQL Query 8

.
.
.
.
Logs
macOS systems contain multiple types of logs that provide a wealth of forensic information. We will use these logs to extract valuable artefacts in the upcoming tasks. Three types of logs are present in macOS devices.
Apple System Logs (ASL)
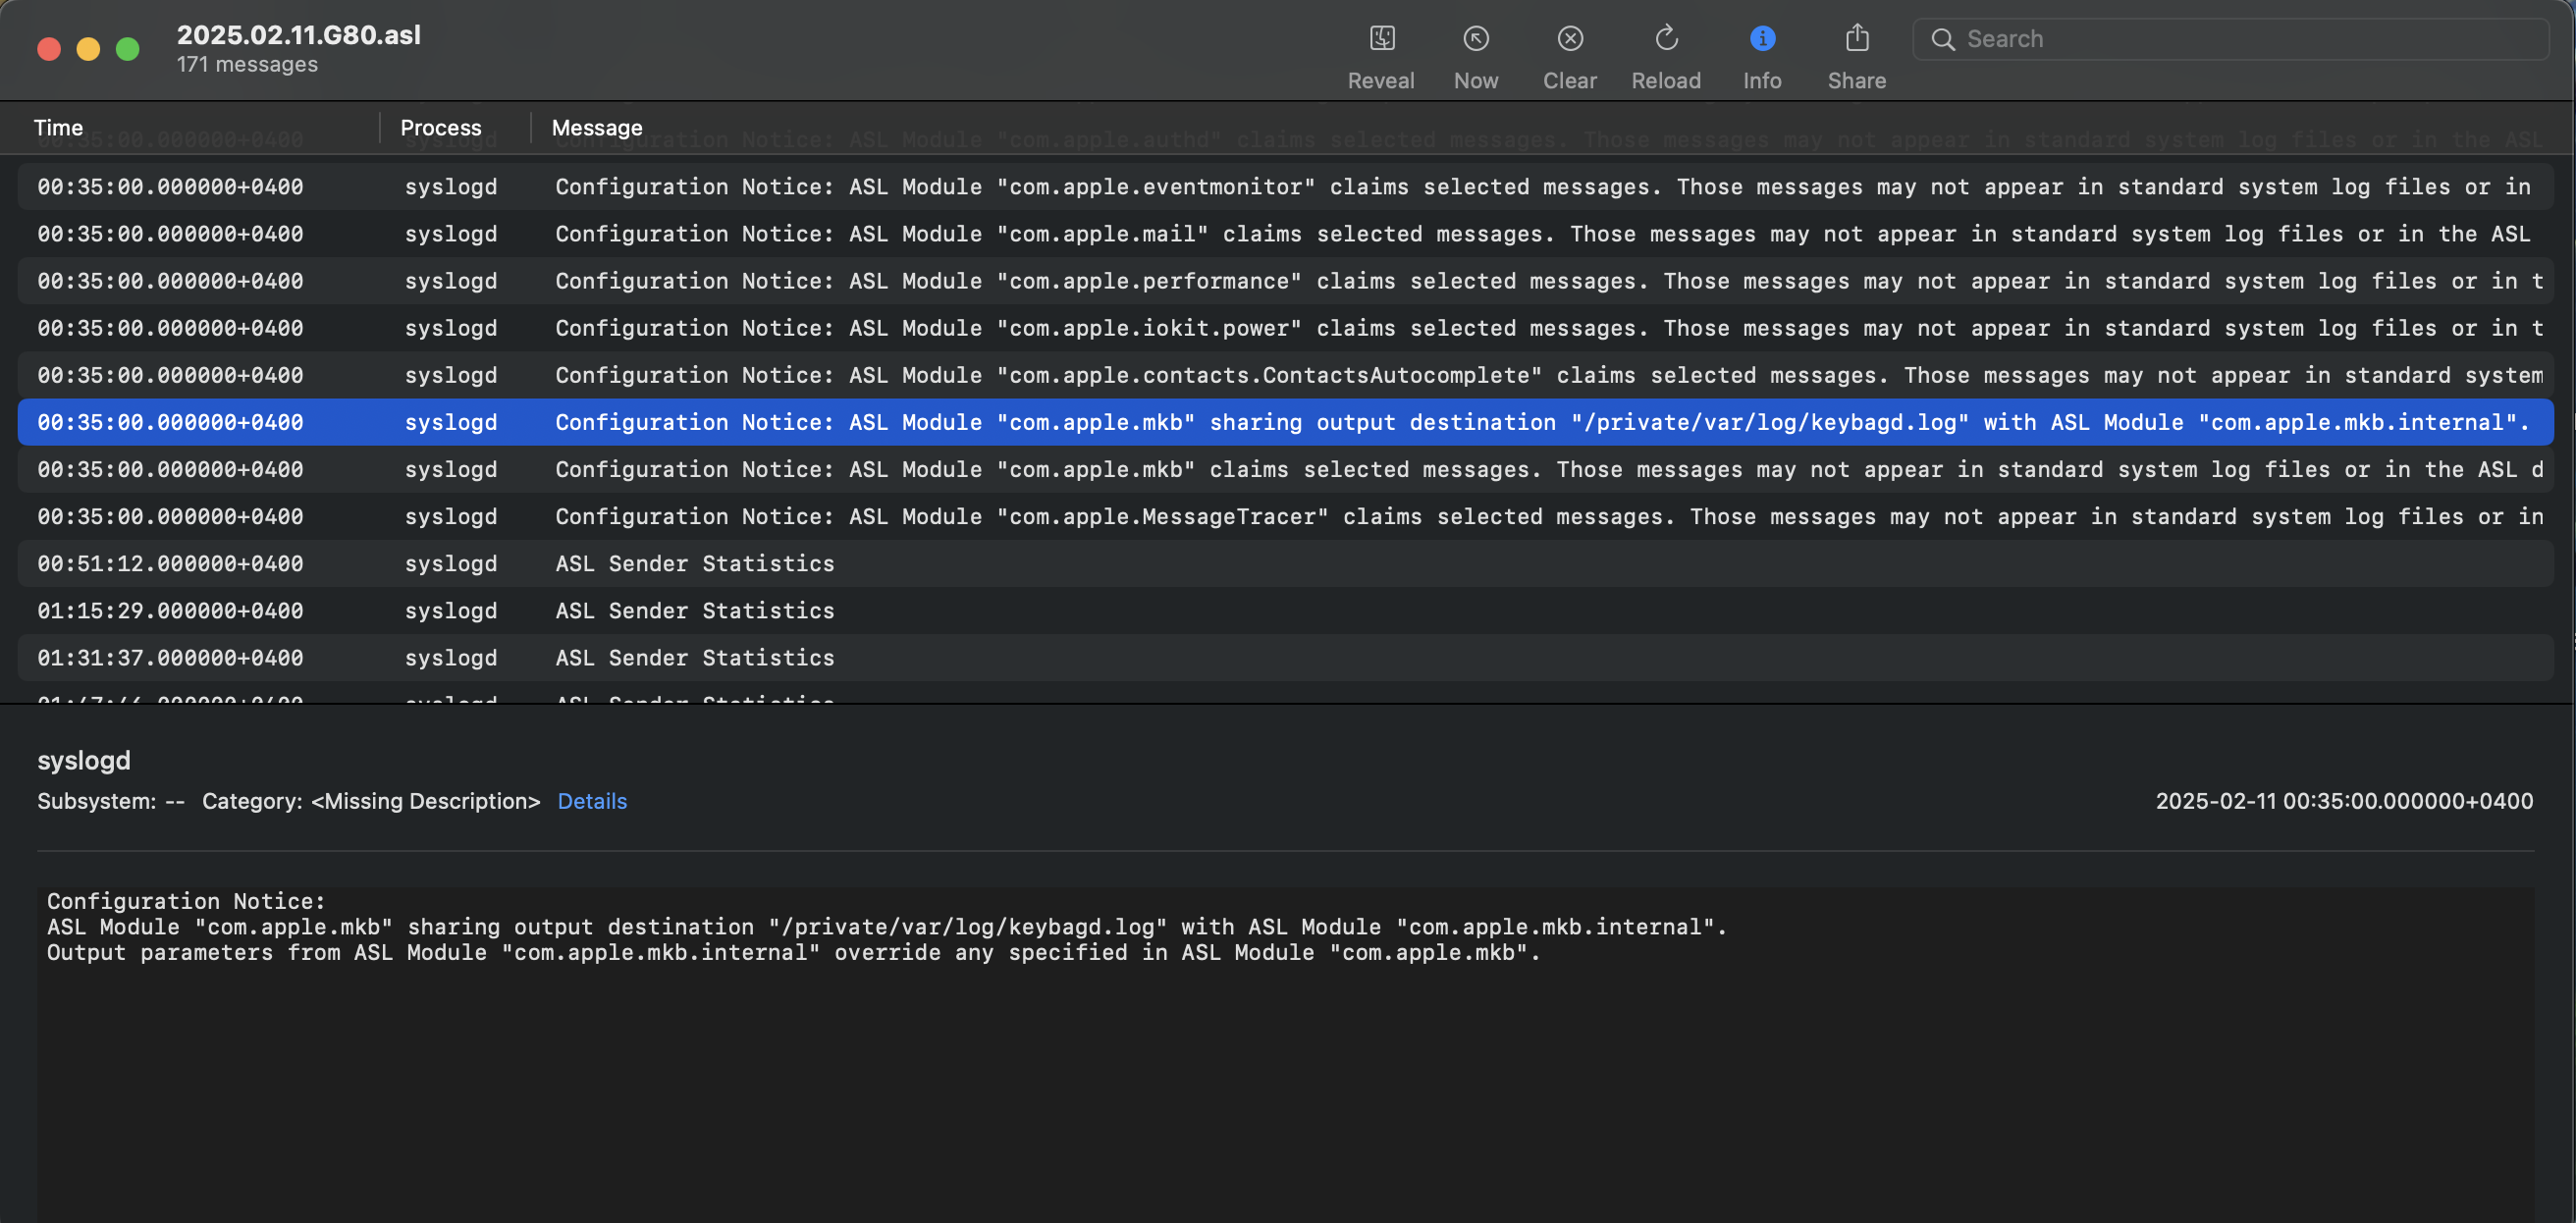
The Apple System Logs (ASL) are in the location /private/var/log/asl/. This directory contains multiple types of logs, such as utmp, wtmp, and login details. On a live macOS system, we need to use the Console app to open these logs using the command open -a Console /private/var/log/asl/<log>.asl.
However, we will need a separate parsing tool when analysing data on a Linux or Windows system. We can use mac_apt (opens in new tab) for this purpose. It is a Python-based tool that takes different artefacts as input (not limited to ASL) and can output them in CSV, JSON, or other formats.
      umair@Umairs-MacBook-Pro ~ % python3 mac_apt.py -h
usage: mac_apt.py [-h] [-o OUTPUT_PATH] [-x] [-c] [-t] [-j] [-l LOG_LEVEL] [-p PASSWORD] [-pf PASSWORD_FILE] [-d] input_type input_path plugin [plugin ...]

mac_apt is a framework to process macOS forensic artifacts
You are running macOS Artifact Parsing Tool version 1.12.0.dev (20250110)

Note: The default output is now sqlite, no need to specify it now

positional arguments:
  input_type            Specify Input type as either DD, DMG, E01, VMDK, AFF4, SPARSE, AXIOMZIP or MOUNTED
  input_path            Path to macOS image/volume
  plugin                Plugins to run (space separated). FAST will run most plugins

options:
  -h, --help            show this help message and exit
  -o OUTPUT_PATH, --output_path OUTPUT_PATH
                        Path where output files will be created
  -x, --xlsx            Save output in Excel spreadsheet
  -c, --csv             Save output as CSV files
  -t, --tsv             Save output as TSV files (tab separated)
  -j, --jsonl           Save output as JSONL files
  -l LOG_LEVEL, --log_level LOG_LEVEL
                        Log levels: INFO, DEBUG, WARNING, ERROR, CRITICAL (Default is INFO)
  -p PASSWORD, --password PASSWORD
                        Personal Recovery Key(PRK) or Password for any user (for decrypting encrypted volume).
  -pf PASSWORD_FILE, --password_file PASSWORD_FILE
                        Text file containing Personal Recovery Key(PRK) or Password
  -d, --dont_decrypt    Don't decrypt as image is already decrypted!

The following 48 plugins are available:
    APPLIST             Reads apps & printers installed and/or available for
                        each user from appList.dat
    ARD                 Reads ARD (Apple Remote Desktop) cached databases about
                        app usage
    ASL                 Reads macOS ASL (Apple System Log) from asl.log, asl.db,
                        and ".asl" files.
    AUTOSTART           Retrieves persistent and auto-start programs, daemons,
                        services
    BASICINFO           Gets basic system and OS configuration like SN,
                        timezone, device name, last logged in user, FS info,
                        etc..

.
.
.
.
.
    UTMPX               Read utmpx entries
    WIFI                Gets wifi network information from the
                        com.apple.airport.preferences.plist file
    WIFI_INTELLIGENCE   Gets Wifi connect/disconnect information from Apple
                        Intelligence db
    XPROTECT            Parses XProtect diagnostic files and XProtect Behavior
                        Service database and extract timestamp, signature/rule
                        names, and so on.
    ----------------------------------------------------------------------------
    FAST                Runs all plugins except IDEVICEBACKUPS, SPOTLIGHT, UNIFIEDLOGS
    ALL                 Runs all plugins
Once done, mac_apt will output results in CSV files as well as database files, which we can open using the built-in utilities or the DB browser utility to analyse further. Here, we might notice that mac_apt parses a lot of different types of data that can help us quickly perform analysis covering not just logs but several other artefacts of interest.
System Logs
System Logs are similar to syslog in . They are present in the location /private/var/log/system.log. They are in simple text format and can be read using text editors or utilities such as cat, more, or head. We have to note, however, that the system log is rotated into .gz files. To search all these files, we will have to concatenate them into a single big log file or use the grep utility to read through all these logs.
      umair@Umairs-MacBook-Pro ~ % zgrep BOOT_TIME system.log*
system.log.5.gz:Feb 12 22:05:59 Umairs-MacBook-Pro bootlog[0]: BOOT_TIME 1739383559 185882
Unified Logs
Unified Logs are in the locations /private/var/db/diagnostics/*.tracev3 and /private/var/db/uuidtext. We can use the built-in log utility in macOS to view these logs, use mac_apt to parse the logs, or we can use Mandiant's Unified Logs Parser (opens in new tab)utility. This utility can be used on a live system or a log archive to convert the logs into CSV or JSON files. The resulting files will be huge, but we can use awk or cat to parse these files and extract the necessary information. We will need to compile this utility from source to be able to use it in the attached VM, or we can use mac_apt to parse the Unified logs and open them in DB browser.
      umair@Umairs-MacBook-Pro ~ % ./unifiedlog_parser -h
Starting Unified Log parser...
unifiedlog_parser 0.1.0

USAGE:
    unifiedlog_parser [OPTIONS] --output


OPTIONS:
    -h, --help               Print help information
    -i, --input
                Path to logarchive formatted directory [default: ]
    -l, --live
                  Run on live system [default: false]
    -o, --output
              Path to output file. Any directories must already exist
    -V, --version            Print version information
Here, we must note that we have to give the complete name of the output file for the utility to write to it. Otherwise, we will get an error.
On a live system, we can use the following command to view logs for the last minute.
      umair@Umairs-MacBook-Pro ~ % log show --last 1m
Skipping info and debug messages, pass --info and/or --debug to include.
Timestamp                       Thread     Type        Activity             PID    TTL
2025-03-10 15:12:30.771989+0400 0x33ddd    Default     0x0                  657    0    nearbyd: [com.apple.nearbyd:general] #ses-devicepresence,Ignoring weak RSSI -70.000000 on channel 39 for device:
         (device hash: 0x16512e1) because we cannot trust weak RSSI due to a BT FW bug
2025-03-10 15:12:30.783781+0400 0x175c     Default     0x0                  669    0    sharingd: (IO80211) Apple80211EventMonitoringHelper: Skipping Padding Read offset is 16348
2025-03-10 15:12:30.783784+0400 0x175c     Default     0x0                  669    0    sharingd: (IO80211) Apple80211EventMonitoringHelper: Skipping Padding Read offset is 16352
2025-03-10 15:12:30.783785+0400 0x175c     Default     0x0                  669    0    sharingd: (IO80211) Apple80211EventMonitoringHelper: Skipping Padding Read offset is 16356
2025-03-10 15:12:30.783786+0400 0x175c     Default     0x0                  669    0    sharingd: (IO80211) Apple80211EventMonitoringHelper: Skipping Padding Read offset is 16360
2025-03-10 15:12:30.783787+0400 0x175c     Default     0x0                  669    0    sharingd: (IO80211) Apple80211EventMonitoringHelper: Skipping Padding Read offset is 16364
.
.
.
.
We might see that the number of logs generated in the last minute is enormous. Therefore, it is necessary to have some way to filter these logs. Apple provides the option of predicate (opens in new tab) for this purpose. We can use the --predicate flag to tell the log command that we want to filter the logs. Further, we can add the filters in single quotes based on subsystem, category, and message.
      umair@Umairs-MacBook-Pro ~ % log show --predicate 'subsystem=="com.apple.sharing" and category=="AirDrop" and eventMessage contains "Discoverable"'
Filtering the log data using "subsystem == "com.apple.sharing" AND category == "AirDrop" AND composedMessage CONTAINS "Discoverable""
Skipping info and debug messages, pass --info and/or --debug to include.
Timestamp                       Thread     Type        Activity             PID    TTL
2025-03-09 16:57:25.609833+0400 0x1d9d     Default     0x0                  694    3    sharingd: [com.apple.sharing:AirDrop] Discoverable mode changed from
         to
          , posting notification
2025-03-09 16:57:37.926188+0400 0x1790     Default     0xf308               711    3    ControlCenter: (Sharing) [com.apple.sharing:AirDrop] Discoverable mode changed to

2025-03-09 18:07:58.804412+0400 0x175c     Default     0x0                  669    3    sharingd: [com.apple.sharing:AirDrop] Discoverable mode changed from
               to
                , posting notification
--------------------------------------------------------------------------------------------------------------------
Log      - Default:          3, Info:                0, Debug:             0, Error:          0, Fault:          0
Activity - Create:           0, Transition:          0, Actions:           0
In the coming tasks, we will explore some filters for the log command to reduce artefacts in a macOS system.
In the attached VM, which utility can we use to parse plist files?
When performing forensics, the best practice is to verify the system Information to ensure we are working on the correct system. In this task, we will start by identifying where we can find different artefacts that help us verify system information.
Version
The macOS machine's version can be found in a plist file present in the following location:
/System/Library/CoreServices/SystemVersion.plist
The following terminal window shows the contents of this file when we use the cat utility to read it. We must remember that some plist files can be read using the cat utility as they are in XML format; however, some plist files are in binary format, and we will need plutil to read their contents. Please note that we will need to mount the System volume instead of the Data volume to access this data.
      umair@Umairs-MacBook-Pro ~ % cat /System/Library/CoreServices/SystemVersion.plist
<?xml version="1.0" encoding="UTF-8"?>
<!DOCTYPE plist PUBLIC "-//Apple//DTD PLIST 1.0//EN" "http://www.apple.com/DTDs/PropertyList-1.0.dtd">
<plist version="1.0">
<dict>
<key>BuildID</key>
<string>2B3829A8-E319-11EF-8892-025514DE0AB1</string>
<key>ProductBuildVersion</key>
<string>24D70</string>
<key>ProductCopyright</key>
<string>1983-2025 Apple Inc.</string>
<key>ProductName</key>
<string>macOS</string>
<key>ProductUserVisibleVersion</key>
<string>15.3.1</string>
<key>ProductVersion</key>
<string>15.3.1</string>
<key>iOSSupportVersion</key>
<string>18.3</string>
</dict>
</plist>
Serial Number
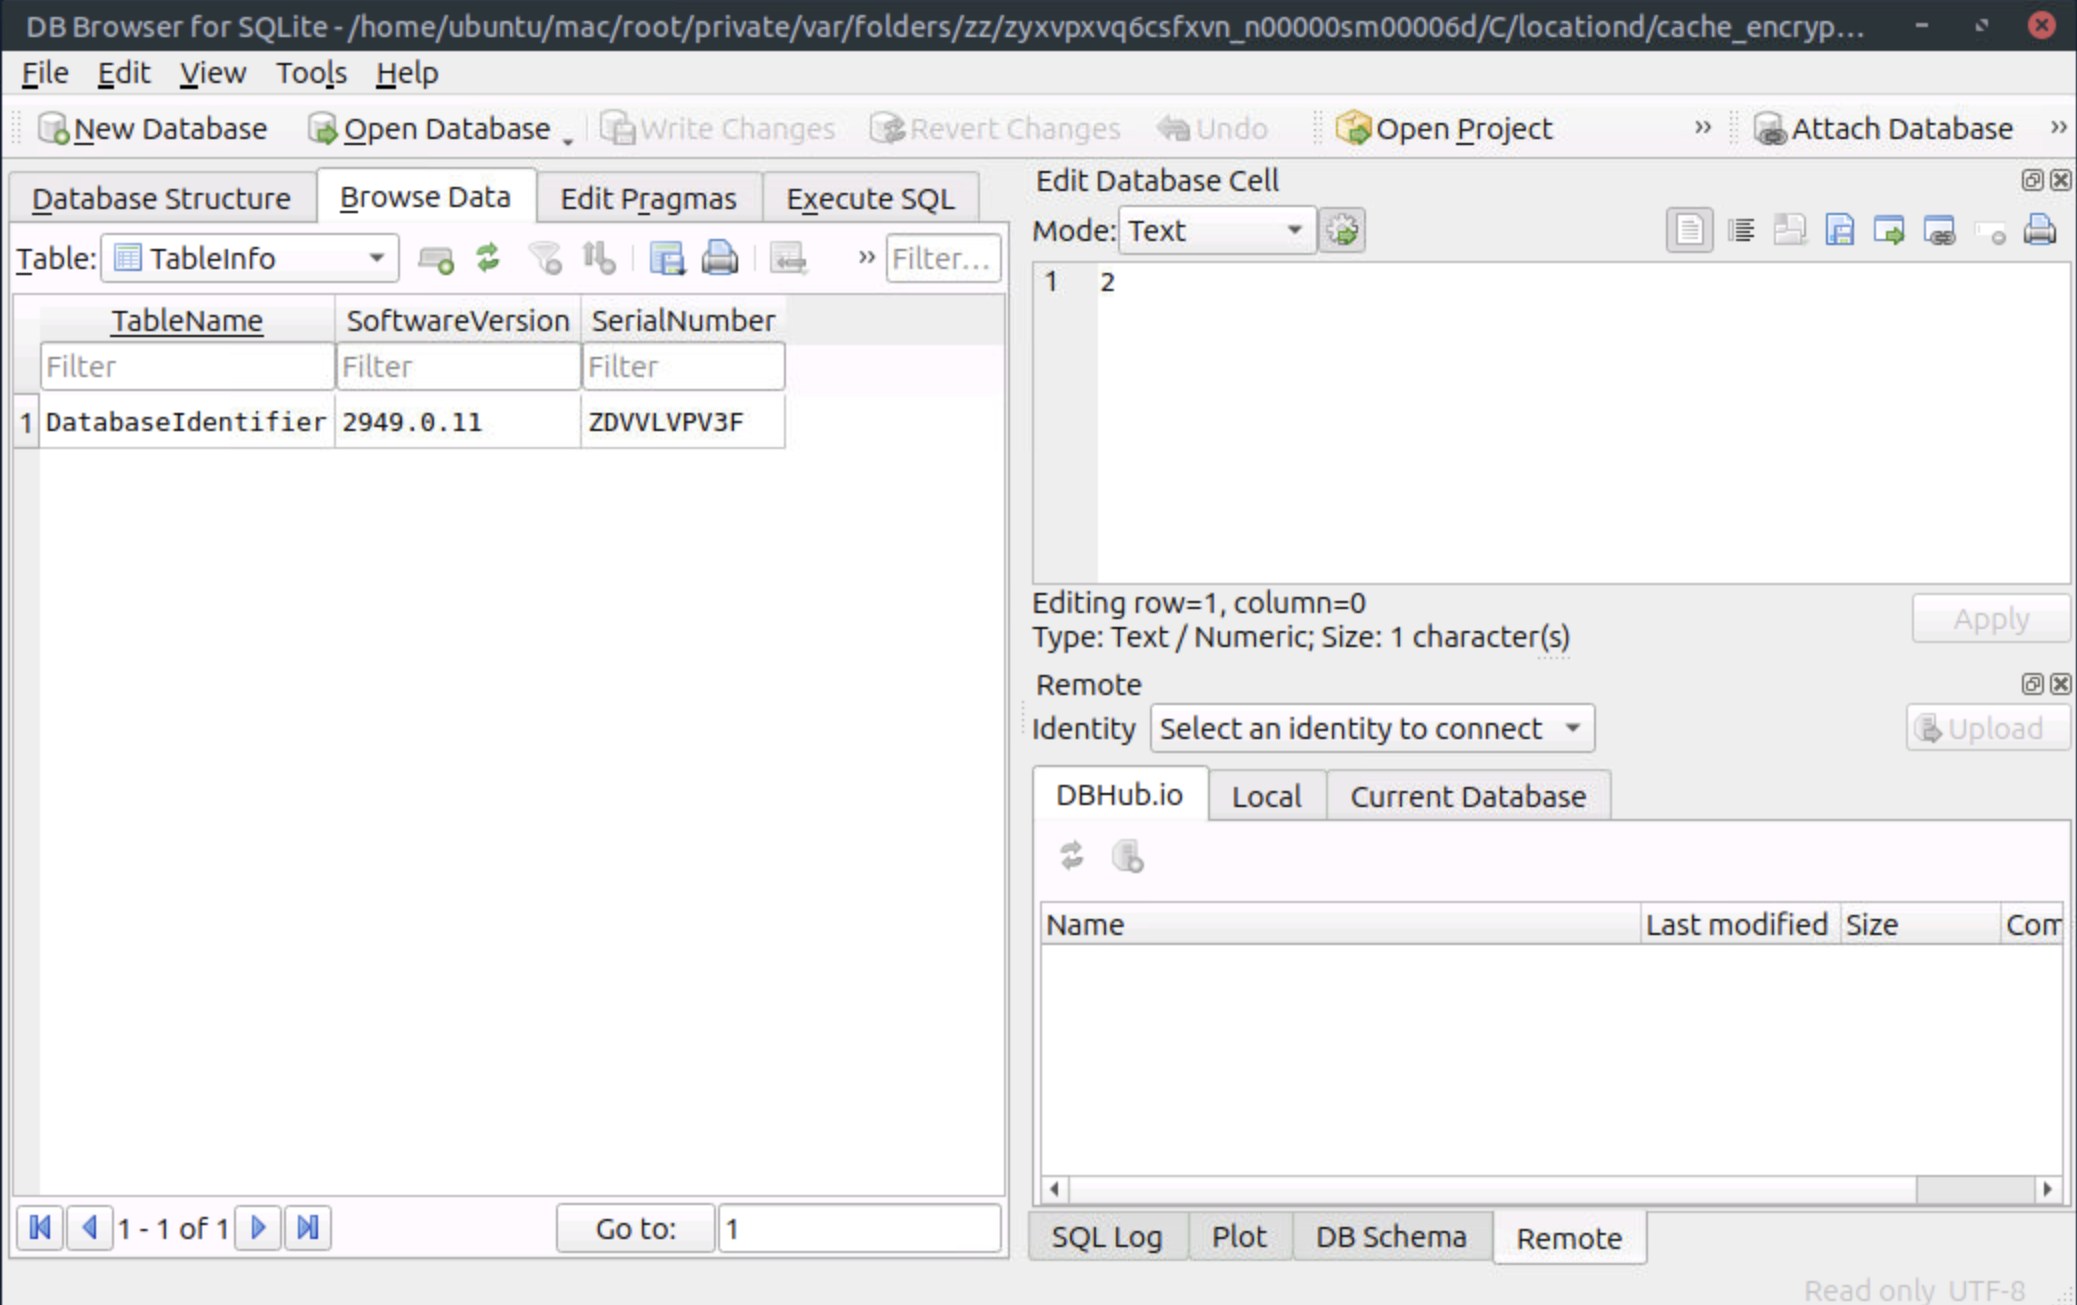
The Serial number of a Mac is stored in the location /private/var/folders/*/<DARWIN_USER_DIR>/C/locationd/consolidated.db or /private/var/folders/*/<DARWIN_USER_DIR>/C/locationd/cache_encryptedA.db. We can use DB Browser to access these databases. If we go to the Browse Data tab, and select the TableInfo table, we will see the Serial Number as shown in the screenshot below.
OS Installation Date
Using the stat command on the file /private/var/db/.AppleSetupDone, we can find the date of installation and the date of update installation. In the terminal below, the Birth timestamp of the file shows the date when the was installed, whereas the Change timestamp shows the date when the latest updates were installed. In a Mac environment, we can find this using the stat -x command, while we can use stat to get the same information in a Linux machine.
      umair@Umairs-MacBook-Pro ~ % stat -x /private/var/db/.AppleSetupDone
  File: "/private/var/db/.AppleSetupDone"
  Size: 0             FileType: Regular File
  Mode: (0400/-r--------)         Uid: (     0/     root)   Gid: (     0/   wheel)
Device: 1,17   Inode: 270717     Links: 1
Access: Tue Feb 18 21:55:34 2025
Modify: Sat Jul 20 14:43:01 2024
Change: Wed Feb 12 22:06:51 2025
Birth: Sat Jul 20 13:29:58 2024
Another way to find when the was installed and updated is by reading the /private/var/db/softwareupdate/journal.plist file. The following terminal shows what the results will look like. We can see the installation date of 20 July 2024, with macOS Sonoma 14.5 installed on this date, followed by an update on 15 August 2024 with macOS Sonoma 14.6.1. This file provides more elaborate details of when the OS was installed and the times when it was updated.
      umair@Umairs-MacBook-Pro ~ % cat /private/var/db/softwareupdate/journal.plist
<?xml version="1.0" encoding="UTF-8"?>
<!DOCTYPE plist PUBLIC "-//Apple//DTD PLIST 1.0//EN" "http://www.apple.com/DTDs/PropertyList-1.0.dtd">
<plist version="1.0">
<array>
<dict>
<key>__isMobileSoftwareUpdate</key>
<true/>
<key>__isSoftwareUpdate</key>
<true/>
<key>installDate</key>
<date>2024-07-20T09:52:15Z</date>
<key>productKey</key>
<string>MSU_UPDATE_23F79_patch_14.5_minor</string>
<key>release-notes</key>
<string></string>
<key>title</key>
<string>macOS Sonoma 14.5</string>
<key>version</key>
<string>14.5</string>
</dict>

<dict>
<key>__isMobileSoftwareUpdate</key>
<true/>
<key>__isSoftwareUpdate</key>
<true/>
<key>installDate</key>
<date>2024-08-15T16:06:23Z</date>
<key>productKey</key>
<string>MSU_UPDATE_23G93_patch_14.6.1_minor</string>
<key>release-notes</key>
<string></string>
<key>title</key>
<string>macOS Sonoma 14.6.1</string>
<key>version</key>
<string>14.6.1</string>
</dict>
.
.
.
.
Time Zone
The /etc/localtime file contains the time zone information. The following terminal window shows us how we can extract this info.
      umair@Umairs-MacBook-Pro ~ % ls -la /etc/localtime
lrwxr-xr-x   1 root   wheel   36 Feb 12 22:07 /etc/localtime -> /var/db/timezone/zoneinfo/Asia/Dubai
As seen in the terminal, this specific machine's time zone is Asia/Dubai. The last modified timestamp of this file shows when the time zone was changed.
Another way to check the of a system is using the /Library/Preferences/.GlobalPreferences.plist file. This file also contains information about historical time zones and languages. However, this file might not have the updated time zone if location services are active.
      umair@Umairs-MacBook-Pro ~ % plutil -p /Library/Preferences/.GlobalPreferences.plist
{
  "AppleLanguages" => [
    0 => "en-AE"
    1 => "ar-AE"
    2 => "ur-AE"
  ]
  "AppleLocale" => "en_AE@calendar=gregorian"
  "AppleTextDirection" => 0
  "com.apple.AppleModemSettingTool.LastCountryCode" => "US"
  "com.apple.preferences.timezone.new.selected_city" => "turw"
  "com.apple.preferences.timezone.selected_city" => {
    "AppleMapID" => "turw"
  }
  "com.apple.TimeZonePref.Last_Selected_City" => [
    0 => "37.31931"
    1 => "-122.0293"
    2 => "0"
    3 => "America/Los_Angeles"
    4 => "US"
    5 => "Cupertino"
    6 => "U.S.A."
    7 => "Cupertino"
    8 => "U.S.A."
    9 => "DEPRECATED IN 10.6"
  ]
  "Country" => "SA"
  "MultipleSessionEnabled" => 1
}
To check if location services are active, we can check the /Library/Preferences/com.apple.timezone.auto.plist file. The following terminal window shows that this machine's time zone auto adjustment is active.
      umair@Umairs-MacBook-Pro ~ % plutil -p /Library/Preferences/com.apple.timezone.auto.plist
{
  "Active" => 1
}
Boot, Reboot and Shutdown Times
The system log contains information about boot, reboot, and shutdown times. It is located in the location /private/var/log/system.log. We can grep for BOOT_TIME to find the last boot time and SHUTDOWN_TIME to see the last shutdown time. Since the logs are rotated into gz files, we can use zgrep to ensure we are searching inside all historic logs.
      umair@Umairs-MacBook-Pro ~ % zgrep BOOT_TIME system.log.*
Feb 12 22:05:59 Umairs-MacBook-Pro bootlog[0]: BOOT_TIME 1739383559 185882
umair@Umairs-MacBook-Pro % zgrep SHUTDOWN_TIME system.log.*
Feb 12 22:04:19 Umairs-MacBook-Pro reboot[27104]: SHUTDOWN_TIME: 1739383459 133812
The timestamps of the above logs show the machine's last boot and shutdown times, which are in the machine's local time zone. We can also see an associated Epoch time, which can be converted to find the GMT.
Another place to find data about boot or shutdown times is in the Unified Logs. These logs also contain information about screen lock, unlock, and other login-related information. To view these logs, we can filter the subsystem in the Unified Logs with the term loginwindow, as seen in the screenshot below, taken from the DB Browser app.
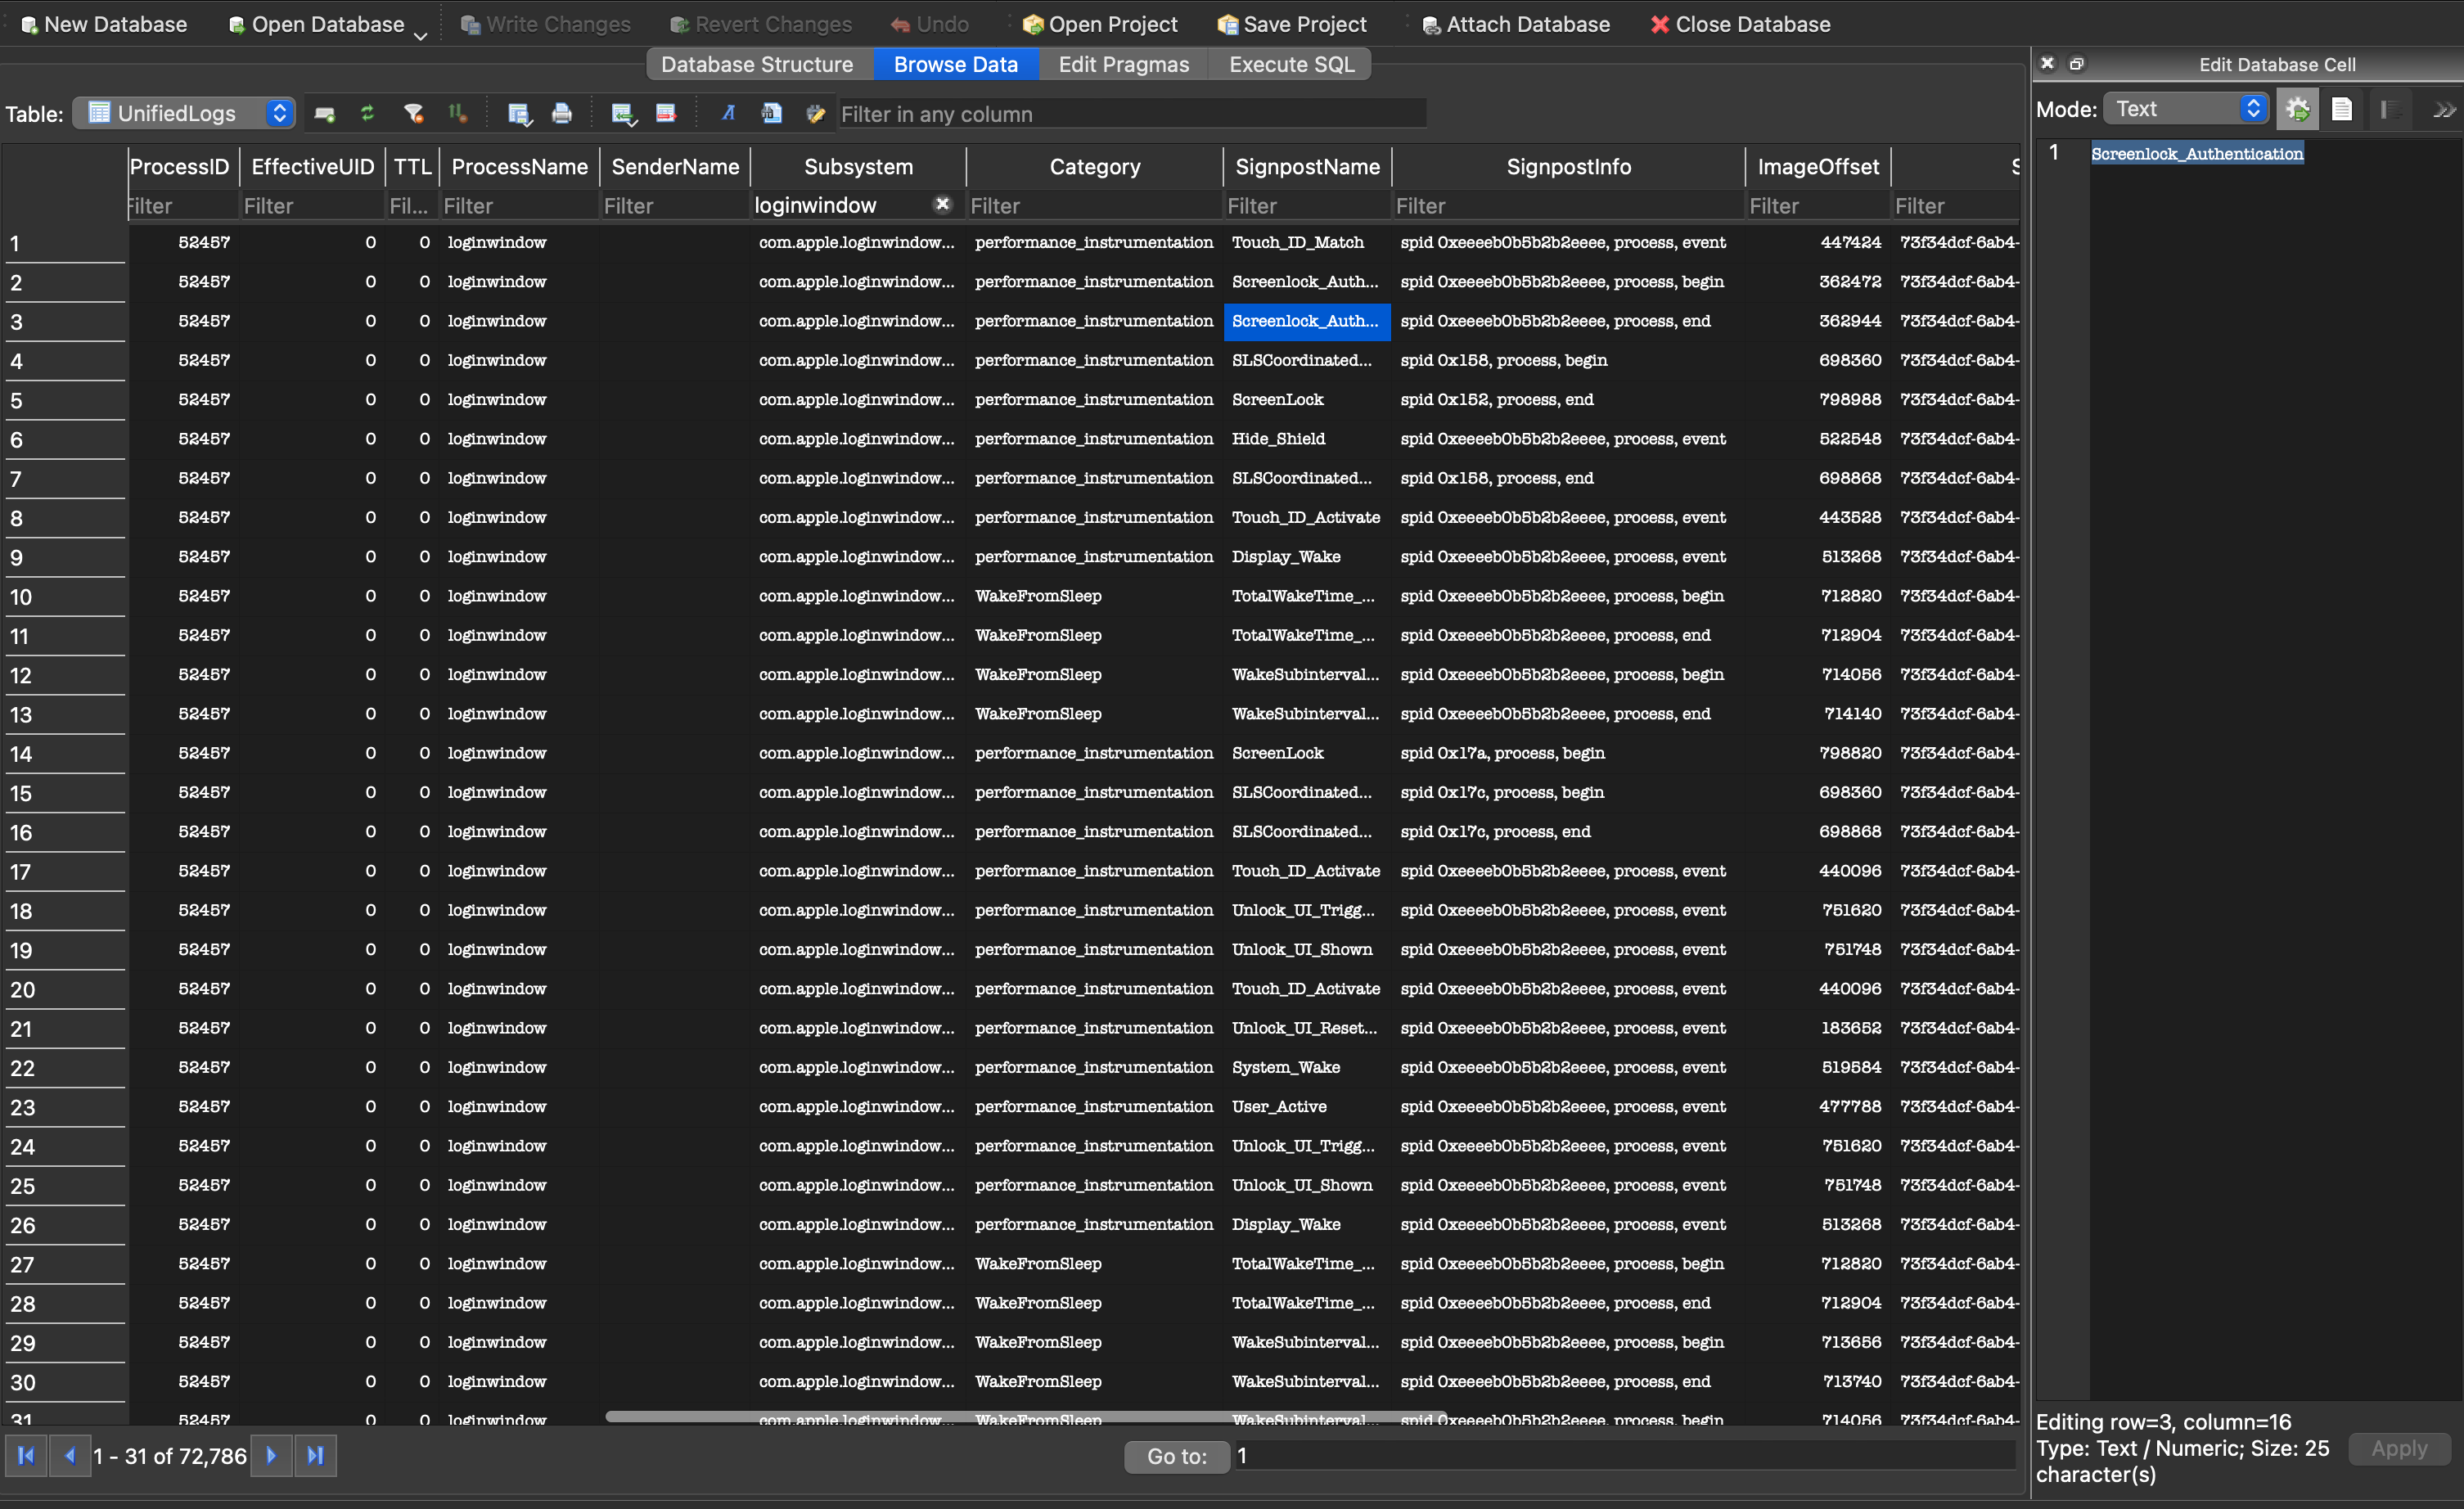
The screenshot shows filtered results for the login window, showing several events related to screen lock, Touch ID activation, and WakeFromSleep. Scrolling to the left will also give us timestamps for these events.
We can use the following filters to see similar results using the log command on a live system.
      umair@Umairs-MacBook-Pro ~ % log show --info --predicate 'eventMessage contains "com.apple.system.loginwindow" and eventMessage contains "SessionAgentNotificationCenter"'
Filtering the log data using "composedMessage CONTAINS "com.apple.system.loginwindow" AND composedMessage CONTAINS "SessionAgentNotificationCenter""
Skipping debug messages, pass --debug to include.
Timestamp                       Thread     Type        Activity             PID    TTL
2025-03-09 16:55:35.489871+0400 0x112f     Default     0x0                  591    5    loginwindow: [com.apple.loginwindow.logging:Standard] -[SessionAgentNotificationCenter sendSystemBSDNotification:object:] | sendSystemBSDNotification: com.apple.system.loginwindow.shutdownInitiated, with object:503
2025-03-09 16:55:35.490273+0400 0x112f     Default     0x0                  591    5    loginwindow: [com.apple.loginwindow.logging:Standard] -[SessionAgentNotificationCenter sendSystemBSDNotification:object:] | sendSystemBSDNotification: com.apple.system.loginwindow.likelyShutdown, with object:503
2025-03-09 16:55:35.490427+0400 0x112f     Default     0x0                  591    5    loginwindow: [com.apple.loginwindow.logging:Standard] -[SessionAgentNotificationCenter sendSystemBSDNotification:object:] | sendSystemBSDNotification: com.apple.system.loginwindow.likelyUserSessionExit, with object:503
2025-03-09 16:55:49.533113+0400 0x112f     Default     0x0                  591    5    loginwindow: [com.apple.loginwindow.logging:Standard] -[SessionAgentNotificationCenter sendSystemBSDNotification:object:] | sendSystemBSDNotification: com.apple.system.loginwindow.logoutNoReturn, with object:503
2025-03-09 16:55:49.533371+0400 0x112f     Default     0x0                  591    5    loginwindow: [com.apple.loginwindow.logging:Standard] -[SessionAgentNotificationCenter sendSystemBSDNotification:object:] | sendSystemBSDNotification: com.apple.system.loginwindow.shutdownNoReturn, with object:0
2025-03-09 16:57:20.117203+0400 0xedd      Default     0x0                  398    5    loginwindow: [com.apple.loginwindow.logging:Standard] -[SessionAgentNotificationCenter sendSystemBSDNotification:object:] | sendSystemBSDNotification: com.apple.system.loginwindow.loginInitiated, with object:503
2025-03-09 16:57:22.012261+0400 0xedd      Default     0x0                  398    5    loginwindow: [com.apple.loginwindow.logging:Standard] -[SessionAgentNotificationCenter sendSystemBSDNotification:object:] | sendSystemBSDNotification: com.apple.system.loginwindow.desktopUp, with object:503
2025-03-09 16:57:32.173045+0400 0xedd      Default     0x0                  398    5    loginwindow: [com.apple.loginwindow.logging:Standard] -[SessionAgentNotificationCenter sendSystemBSDNotification:object:] | sendSystemBSDNotification: com.apple.system.loginwindow.shutdownInitiated, with object:503
2025-03-09 16:57:32.173227+0400 0xedd      Default     0x0                  398    5    loginwindow: [com.apple.loginwindow.logging:Standard] -[SessionAgentNotificationCenter sendSystemBSDNotification:object:] | sendSystemBSDNotification: com.apple.system.loginwindow.likelyShutdown, with object:503
2025-03-09 16:57:32.173344+0400 0xedd      Default     0x0                  398    5    loginwindow: [com.apple.loginwindow.logging:Standard] -[SessionAgentNotificationCenter sendSystemBSDNotification:object:] | sendSystemBSDNotification: com.apple.system.loginwindow.likelyUserSessionExit, with object:503
2025-03-09 16:57:42.051571+0400 0xedd      Default     0x0                  398    5    loginwindow: [com.apple.loginwindow.logging:Standard] -[SessionAgentNotificationCenter sendSystemBSDNotification:object:] | sendSystemBSDNotification: com.apple.system.loginwindow.logoutNoReturn, with object:503
2025-03-09 16:57:42.051821+0400 0xedd      Default     0x0                  398    5    loginwindow: [com.apple.loginwindow.logging:Standard] -[SessionAgentNotificationCenter sendSystemBSDNotification:object:] | sendSystemBSDNotification: com.apple.system.loginwindow.shutdownNoReturn, with object:0
2025-03-09 18:07:54.502899+0400 0xeb1      Default     0x0                  382    5    loginwindow: [com.apple.loginwindow.logging:Standard] -[SessionAgentNotificationCenter sendSystemBSDNotification:object:] | sendSystemBSDNotification: com.apple.system.loginwindow.loginInitiated, with object:503
2025-03-09 18:07:56.426160+0400 0xeb1      Default     0x0                  382    5    loginwindow: [com.apple.loginwindow.logging:Standard] -[SessionAgentNotificationCenter sendSystemBSDNotification:object:] | sendSystemBSDNotification: com.apple.system.loginwindow.desktopUp, with object:503
2025-03-09 18:08:16.026008+0400 0xef8      Default     0x0                  382    5    loginwindow: [com.apple.loginwindow.logging:Standard] -[SessionAgentNotificationCenter sendSystemBSDNotification:object:] | sendSystemBSDNotification: com.apple.system.loginwindow.delayedLoginItemsInitiated, with object:503
--------------------------------------------------------------------------------------------------------------------
Log      - Default:         15, Info:                0, Debug:             0, Error:          0, Fault:          0
Activity - Create:           0, Transition:          0, Actions:           0
Here, we can see different types of login and shutdown events in the logs and their timestamps.
When was the OS installed on the disk image present in the attached VM? Write your answer in the format: YYYY-MM-DD hh:mm:ss
What is the country code for this machine?
When was the last time this machine booted up? Write your answer as GMT in the format: YYYY-MM-DD hh:mm:ss
We can verify other configurations once we have confirmed that we are analysing the correct machine. In this task, let's review the artefacts that help us identify a machine's network configuration.
Network Interfaces
The information about network interfaces is in the /Library/Preferences/SystemConfiguration/NetworkInterfaces.plist file.
      umair@Umairs-MacBook-Pro ~ % cat /Library/Preferences/SystemConfiguration/NetworkInterfaces.plist
<?xml version="1.0" encoding="UTF-8"?>
<!DOCTYPE plist PUBLIC "-//Apple//DTD PLIST 1.0//EN" "http://www.apple.com/DTDs/PropertyList-1.0.dtd">
<plist version="1.0">
<dict>
	<key>Interfaces</key>
	<array>
		<dict>
			<key>Active</key>
			<true/>
			<key>BSD Name</key>
			<string>en0</string>
			<key>IOBuiltin</key>
			<true/>
			<key>IOInterfaceNamePrefix</key>
			<string>en</string>
			<key>IOInterfaceType</key>
			<integer>6</integer>
			<key>IOInterfaceUnit</key>
			<integer>0</integer>
			<key>IOMACAddress</key>
			<data>
			gKmXJAg/
			</data>
			<key>IOPathMatch</key>
			<string>IOService:/AppleARMPE/arm-io@10F00000/AppleH15IO/apcie@80000000/AppleT6030PCIe/pci-bridge0@0/IOPP/wlan@0/AppleBCMWLANBusInterfacePCIe/AppleBCMWLANCore/AppleBCMWLANSkywalkInterface/IOSkywalkLegacyEthernet/en0</string>
			<key>SCNetworkInterfaceInfo</key>
			<dict>
				<key>UserDefinedName</key>
				<string>Wi-Fi</string>
			</dict>
			<key>SCNetworkInterfaceType</key>
			<string>IEEE80211</string>
		</dict>
		<dict>
			<key>Active</key>
			<true/>
			<key>BSD Name</key>
			<string>en1</string>
			<key>IOBuiltin</key>
			<true/>
			<key>IOInterfaceNamePrefix</key>
			<string>en</string>
			<key>IOInterfaceType</key>
			<integer>6</integer>
			<key>IOInterfaceUnit</key>
			<integer>1</integer>
			<key>IOMACAddress</key>
			<data>
			NvDA4lvA
			</data>
			<key>IOPathMatch</key>
			<string>IOService:/AppleARMPE/arm-io@10F00000/AppleH15IO/acio0@1F00000/AppleThunderboltHALType5/AppleThunderboltNHIType5/IOThunderboltControllerType5/IOThunderboltLocalNode/AppleThunderboltIPService/AppleThunderboltIPPort/en1</string>
			<key>SCNetworkInterfaceInfo</key>
			<dict>
				<key>UserDefinedName</key>
				<string>Thunderbolt 1</string>
			</dict>
			<key>SCNetworkInterfaceType</key>
			<string>Ethernet</string>
		</dict>
The <dict> tag encloses each interface type. Here, we can see two interfaces, one with the name Wi-Fi and the other with the name Thunderbolt 1. The first is a wireless interface, as seen in the SCNetworkInterfaceType key, and the second is a wired network, as the SCNetworkInterfaceType is Ethernet for it.
DHCP Settings
We can find the DHCP settings of a machine in the /private/var/db/dhcpclient/leases/en0.plist file. Here, en0 is the interface name for which we want to extract the settings.
      umair@Umairs-MacBook-Pro ~ % sudo cat /private/var/db/dhcpclient/leases/en0.plist
<?xml version="1.0" encoding="UTF-8"?>
<!DOCTYPE plist PUBLIC "-//Apple//DTD PLIST 1.0//EN" "http://www.apple.com/DTDs/PropertyList-1.0.dtd">
<plist version="1.0">
<dict>
	<key>ClientIdentifier</key>
	<data>
	AbYL5Nb9rQ==
	</data>
	<key>IPAddress</key>
	<string>192.168.1.79</string>
	<key>LeaseLength</key>
	<integer>86400</integer>
	<key>LeaseStartDate</key>
	<date>2025-02-22T08:59:54Z</date>
	<key>NetworkID</key>
	<string>D6DEF8F1-3BD5-41B7-B5E6-9A4E8AC3B76F</string>
	<key>PacketData</key>
	<data>
	AgEGAL+fi78AAAAAAAAAAMCoAU/AqAEBAAAAALYL5Nb9rQAAAAAAAAAAAAAAAAAAAAAA
	AAAAAAAAAAAAAAAAAAAAAAAAAAAAAAAAAAAAAAAAAAAAAAAAAAAAAAAAAAAAAAAAAAAA
	AAAAAAAAAAAAAAAAAAAAAAAAAAAAAAAAAAAAAAAAAAAAAAAAAAAAAAAAAAAAAAAAAAAA
	AAAAAAAAAAAAAAAAAAAAAAAAAAAAAAAAAAAAAAAAAAAAAAAAAAAAAAAAAAAAAAAAAAAA
	AAAAAAAAAAAAAAAAAAAAAAAAAAAAAAAAAAAAAAAAAABjglNjNQEFNgTAqAEBMwQAAVGA
	AQT///8AAwTAqAEBBgTAqAEBDxBldGlzYWxhdC1nYXRld2F5fTUAAA3pMAQGNTA3RTVE
	BQtKMjIwNjAyNjk2MgYZRVRJU0FMQVQtV1JWOTUxOEJIQVgzNC1FVP8=
	</data>
	<key>RouterHardwareAddress</key>
	<data>
	qKI3Tf/l
	</data>
	<key>RouterIPAddress</key>
	<string>192.168.1.1</string>
	<key>SSID</key>
	<string>402-5G</string>
</dict>
</plist>
This output shows details of the settings for the en0 interface, which was the Wi-Fi interface. We can see important information such as assigned IP address, lease length, assigned date, router IP address, and network SSID. Similarly, we can identify the details of each interface.
Wireless Connections
A lot of information about user activity can be revealed if we look at their historical wireless connections. We can check the /Library/Preferences/com.apple.wifi.known-networks.plist file to check the wireless connection history of a machine. We will get an output similar to the below terminal window:
      umair@Umairs-MacBook-Pro ~ %  sudo plutil -p /Library/Preferences/com.apple.wifi.known-networks.plist
{
  "wifi.network.ssid.2 Floor 1" => {
    "__OSSpecific__" => {
      "ChannelHistory" => [
      ]
      "CollocatedGroup" => [
      ]
      "RoamingProfileType" => "None"
      "TemporarilyDisabled" => 0
    }
    "AddedAt" => 2024-03-20 21:31:02 +0000
    "AddReason" => "Cloud Sync"
    "CaptiveProfile" => {
      "CaptiveNetwork" => 0
    }
    "Hidden" => 0
    "JoinedBySystemAtWeek" => 1211
    "JoinedByUserAt" => 2024-03-20 21:31:02 +0000
    "Moving" => 0
    "PrivateMACAddressEvaluationState" => 1
    "SSID" => {length = 9, bytes = 0x3220466c6f6f722031}
    "SupportedSecurityTypes" => "WPA/WPA2 Personal"
    "SystemMode" => 1
    "UpdatedAt" => 2024-10-04 06:36:19 +0000
  }
  "wifi.network.ssid.Accor" => {
    "__OSSpecific__" => {
      "ChannelHistory" => [
        0 => {
          "Channel" => 6
          "Timestamp" => 2024-04-29 04:56:57 +0000
        }
        1 => {
          "Channel" => 1
          "Timestamp" => 2024-04-30 04:50:05 +0000
        }
        2 => {
          "Channel" => 11
          "Timestamp" => 2024-04-30 05:59:25 +0000
        }
      ]
      "CollocatedGroup" => [
        0 => "wifi.ssid.556d616972e2809973206950686f6e65"
        1 => "wifi.ssid.464c4f4f5220342d31"
        2 => "wifi.ssid.4143434f52"
        3 => "wifi.ssid.4f6e65506c75732031302050726f"
        4 => "wifi.ssid.343032"
        5 => "wifi.ssid.50485f4755455354"
        6 => "wifi.ssid.496e646578"
        7 => "wifi.ssid.4d4153544552"
        8 => "wifi.ssid.3430322d3547"
      ]
      "RoamingProfileType" => "Multi"
      "TemporarilyDisabled" => 0
    }
    "AddedAt" => 2024-04-20 15:03:43 +0000
    "AddReason" => "WiFi Menu"
    "BSSList" => [
      0 => {
        "BSSID" => "d8:9d:67:91:aa:60"
        "Channel" => 1
        "ChannelFlags" => 10
        "DHCPServerID" => {length = 4, bytes = 0x0a100001}
        "IPv4NetworkSignature" => "IPv4.Router=10.16.0.1;IPv4.RouterHardwareAddress=02:ad:34:e3:90:0c"
        "LastAssociatedAt" => 2024-04-30 02:06:23 +0000
        "Location" => {
          "LocationAccuracy" => 151.1677743535733
          "LocationLatitude" => 24.39545439999999
          "LocationLongitude" => 54.51604842999998
          "LocationTimestamp" => 2024-04-26 03:01:59 +0000
        }
      }
      1 => {
        "BSSID" => "c8:cb:b8:9f:c3:10"
        "Channel" => 1
        "ChannelFlags" => 10
        "DHCPServerID" => {length = 4, bytes = 0x0a100001}
        "IPv4NetworkSignature" => "IPv4.Router=10.16.0.1;IPv4.RouterHardwareAddress=02:ad:34:e3:90:0c"
        "LastAssociatedAt" => 2024-04-30 04:50:05 +0000
        "Location" => {
          "LocationAccuracy" => 101
          "LocationLatitude" => 24.39516489824783
          "LocationLongitude" => 54.51665309854874
          "LocationTimestamp" => 2024-04-30 02:56:26 +0000
        }
      }
      2 => {
        "BSSID" => "b4:99:ba:91:60:30"
        "Channel" => 1
        "ChannelFlags" => 10
        "DHCPServerID" => {length = 4, bytes = 0x0a100001}
        "IPv4NetworkSignature" => "IPv4.Router=10.16.0.1;IPv4.RouterHardwareAddress=02:ad:34:e3:90:0c"
        "LastAssociatedAt" => 2024-04-30 04:50:05 +0000
        "Location" => {
          "LocationAccuracy" => 101
          "LocationLatitude" => 24.39517312192141
          "LocationLongitude" => 54.51663624712052
          "LocationTimestamp" => 2024-04-30 03:49:29 +0000
        }
      }
      3 => {
        "BSSID" => "3c:d9:2b:81:32:e0"
        "Channel" => 11
        "ChannelFlags" => 10
        "DHCPServerID" => {length = 4, bytes = 0x0a100001}
        "IPv4NetworkSignature" => "IPv4.Router=10.16.0.1;IPv4.RouterHardwareAddress=02:ad:34:e3:90:0c"
        "LastAssociatedAt" => 2024-04-30 05:59:25 +0000
      }
    ]
    "CaptiveProfile" => {
      "CaptiveNetwork" => 1
      "CaptiveWebSheetLoginDate" => 2024-04-24 02:30:50 +0000
    }
    "Hidden" => 0
    "JoinedBySystemAt" => 2024-04-30 05:59:25 +0000
    "JoinedByUserAt" => 2024-04-29 14:53:04 +0000
    "LastDiscoveredAt" => 2024-04-30 04:50:05 +0000
    "PrivateMACAddressEvaluationState" => 1
    "SSID" => {length = 5, bytes = 0x4163636f72}
    "SupportedSecurityTypes" => "Open"
    "SystemMode" => 1
    "UpdatedAt" => 2025-02-18 11:49:10 +0000
    "UserPreferredNetworkNames" => {
      "Umair’s iPhone" => 2024-04-29 14:25:37 +0000
    }
  }
}
We have shortened the above output to only two types of historical connections for brevity. Each result is enclosed in curly brackets starting with wifi.network.ssid.<name>. If the machine we investigate is portable and the user moves around frequently, we might find many connections here. For now, let's dive into these results.
The first result we see here is 2 Floor 1. We can see information such as the date this connection was joined, the security type of the network, the last connection date, and whether the connection is a captive network (a network that asks you to log in after connecting, such as the ones found in hotels or airports).
The second result we see here has a lot more juicy information. This is a captive network, and the login date for the captive sheet can be found in the results. This network has multiple access points, indicating that this is a network inside a large building where one access point might not be enough to provide complete coverage. Each access point is logged separately; interestingly, we can also find the access point coordinates. Correlating this information with the dates of connection, we can identify if the machine was in a particular location at a specific time.
The disk image in the attached VM does not contain this artefact as that was a VM without a wireless LAN interface.
Network Usage
The unified logs can provide information about which network connections were previously connected. In a live system, we can search for logs where the senderImagePath contains IPConfiguration and the eventMessage contains SSID, Lease, or network changed.
      umair@Umairs-MacBook-Pro ~ % log show --info --predicate 'senderImagePath contains "IPConfiguration" and (eventMessage contains "SSID" or eventMessage contains "Lease" or eventMessage contains "network changed")'
Filtering the log data using "senderImagePath CONTAINS "IPConfiguration" AND (composedMessage CONTAINS "SSID" OR composedMessage CONTAINS "Lease" OR composedMessage CONTAINS "network changed")"
Skipping debug messages, pass --debug to include.
Timestamp                       Thread     Type        Activity             PID    TTL
2025-03-08 22:19:33.092287+0400 0x102164d  Default     0x0                  530    0    configd: (IPConfiguration) [com.apple.IPConfiguration:Server] en0: SSID 402-5G BSSID
         NetworkID 6262A8C5-88A4-4237-8EF7-4C490E59AD0D Security FT_PSK
2025-03-08 22:19:33.113262+0400 0x102164d  Default     0x0                  530    0    configd: (IPConfiguration) [com.apple.IPConfiguration:Server] en0: SSID 402-5G BSSID
           NetworkID 6262A8C5-88A4-4237-8EF7-4C490E59AD0D Security FT_PSK
.
.
.
If we are not on a live system, we can convert the output of the unified logs into CSV using Unified Log Parser and then search for the keywords like IPConfiguration, SSID, or network changed in the resulting CSV file. We can use the following command to convert the Unified logs to CSV, where system_logs.archive is the directory which contains the logs.
./unifiedlog_parser -i system_logs.logarchive -o logs/output1.csv
Please note that we need a directory named logs for this command to work. The Unified Log Parser utility is primarily compiled for macOS, so it will not work on our machine.
What is the name of the machine's built-in network interface?
What is the IP address of the router this machine was last connected to?
Once we have verified the system and network information, we can identify the machine's users.
User Accounts and Passwords
User account and password information is stored in the file /private/var/db/dslocal/nodes/Default/users/<user>.plist. A separate plist file for each user contains information such as creation time, failed login time, last password reset time, and failed login count. This file also includes information about the iCloud account associated with this username. One thing to note is that the time mentioned here is in Unix Epoch format.
      umair@Umairs-MacBook-Pro ~ % sudo cat /private/var/db/dslocal/nodes/Default/users/john.plist
bplist00?
"$&*,.02468;=?ACEGIKMOQSUWY__writers_unlockOptions_accountPolicyData_record_daemon_versionYjpegphoto_authentication_authority__writers_picture\inputSources]unlockOptions]HeimdalSRPKey__writers_AvatarRepresentationThintXrealnameTname_AvatarRepresentation__writers_UserCertificateUshell__writers_inputSources^ShadowHashData\KerberosKeysThome__writers_passwdSuid^LinkedIdentity\generateduid_altsecurityidentitiesSgidVpasswd]_writers_hint__writers_jpegphoto?john?!O?<?xml version="1.0" encoding="UTF-8"?>
<!DOCTYPE plist PUBLIC "-//Apple//DTD PLIST 1.0//EN" "http://www.apple.com/DTDs/PropertyList-1.0.dtd">
<plist version="1.0">
<dict>
<key>creationTime</key>
<real>1739202907.2755179</real>
<key>failedLoginCount</key>
<integer>0</integer>
<key>failedLoginTimestamp</key>
<integer>0</integer>
<key>passwordLastSetTime</key>
<real>1739203049.84038</real>
</dict>
</plist>
.
.
.
.
User Login History
We can find information about the last logged-in users from the /Library/Preferences/com.apple.loginwindow.plist file. In addition to that, we can also find out if a guest account is enabled.
      umair@Umairs-MacBook-Pro ~ % plutil -p /Library/Preferences/com.apple.loginwindow.plist
{
  "AccountInfo" => {
    "FirstLogins" => {
      "umair" => 1
    }
    "MaximumUsers" => 1
    "OnConsole" => {
    }
  }
  "GuestEnabled" => 0
  "lastUser" => "loggedIn"
  "lastUserName" => "umair"
  "OptimizerLastRunForBuild" => 50342784
  "OptimizerLastRunForSystem" => 251658496
  "OptimizerPreviousBuild" => "24D70"
  "RecentUsers" => [
    0 => "umair"
    1 => "john"
  ]
  "UseVoiceOverLegacyMigrated" => 1
}
We can see here that the last user in this machine is logged in, which means this information has been retrieved from a live system. The username for the previous user is umair. Furthermore, we can see that the guest account is disabled. Recently, the user john logged in to the machine apart from the user umair.
SSH Connections
The public keys of hosts connected using SSH can be found in the known hosts file. This file is located at /users/<user>/.ssh/known_hosts and contains the IP address of the host and their public keys. This is similar to how the known hosts file works in Linux.
      umair@Umairs-MacBook-Pro ~ % cat .ssh/known_hosts
192.168.1.152 ssh-ed25519 AAAAC3NzaC1lZDI1NTE5AAAAIF3LjWlxYPmFAJk2HDDhaLtZ997MrPiUlne4SOt79dZa
192.168.1.152 ssh-rsa AAAAB3NzaC1yc2EAAAADAQABAAABgQCQ6xJwbNGj1WfwsS8uck+0ZTH40My4t8XP3NQa2DhYYKluTS6mQfSBT9/KwKvqSMg7shYb7R9/oVIaXBNJGEkzpBh4VjAVvZJhARHdTt0/mHfYL96JNz2S53/FlkIWw8lD6AjALFpYzNcaAi6dOVjxqyw5+83KodMdYJcN2dWYan19xb9+ywhpmFqGZSzHObAw73EE85ur26gzs99+gnl+QKi+ZQ/LjFl6BE/jnTr325OgnMzq5Rux5HZxfCbDT64Sn5g/ZdjTrOEK0jFKy1d5MoC8f/5OpbpRVXUT3+6zE581w23mAjHlyzzy+lPxZfUaIzWGDu/2HLJvB2OGN3X8KCa6PKHbyq7e8V9BP0OkHrvCl+uI+gqslY+XB4nmm382G75meZ6LjQBmQ/q/KAafuITICWuRLc9oYm4JztTrUoCCq8+U9vRQjL5YUxoCyx0F2uMITXMazLVMzBqXi/YVGjgSuEK7aIk1A3fUXzJ0cpBRZIRAF+TmpOeJ02jR02M=
192.168.1.152 ecdsa-sha2-nistp256 AAAAE2VjZHNhLXNoYTItbmlzdHAyNTYAAAAIbmlzdHAyNTYAAABBBOYn9Qz2HNP8A7lImD861DLKm7XTjgDRMJuk4+u3WBxZnXJv4tlx4LtEU6tFpgGquh1bTaF6Sd/nXaHtf4HEPWo=
10.10.66.165 ssh-ed25519 AAAAC3NzaC1lZDI1NTE5AAAAIHcrLhTGHnTGP/sJk6y+wIpLPD1HdZi+LYRsDpxBhi4y
10.10.9.159 ssh-ed25519 AAAAC3NzaC1lZDI1NTE5AAAAIJBHxUJp4QBjsmbJI+WjlYPIO9TpFHAcs+US9kKmtz6D
Privileged Accounts
Similar to , accounts and groups with the privilege to use sudo are found in the /etc/sudoers file. An example can be seen in the terminal below:
      umair@Umairs-MacBook-Pro ~ % sudo cat /etc/sudoers
#
# Sample /etc/sudoers file.
#
# This file MUST be edited with the 'visudo' command as root.
#
# See the sudoers man page for the details on how to write a sudoers file.

##
# Override built-in defaults
##
Defaults	env_reset
.
.
.
##
# Cmnd alias specification
##
# Cmnd_Alias	PAGERS = /usr/bin/more, /usr/bin/pg, /usr/bin/less

##
# User specification
##

# root and users in group wheel can run anything on any machine as any user
root		ALL = (ALL) ALL
%admin		ALL = (ALL) ALL

## Read drop-in files from /private/etc/sudoers.d
## (the '#' here does not indicate a comment)
#includedir /private/etc/sudoers.d
On this machine, users in the admin group can escalate to sudo if required. Well, as much as macOS allows, as we learned previously, there are some things that even root users can't access in macOS so that restriction remains on sudo as well.
Login and Logout Events and Logs
User login and logout events can be found in system logs and ASL. We can search for login or logout in system logs to find login events.
      umair@Umairs-MacBook-Pro ~ % zgrep login system.log*
system.log.1.gz:Feb 16 11:02:56 Umairs-MacBook-Pro login[1316]: DEAD_PROCESS: 1316 ttys000
system.log.1.gz:Feb 16 11:02:59 Umairs-MacBook-Pro login[16606]: USER_PROCESS: 16606 ttys000
system.log.5.gz:Feb 12 22:02:57 Umairs-MacBook-Pro login[52696]: DEAD_PROCESS: 52696 ttys000
system.log.5.gz:Feb 12 22:03:00 Umairs-MacBook-Pro loginwindow[27045]: USER_PROCESS: 27045 console
DEAD_PROCESS shows a logout event in these logs, whereas USER_PROCESS shows a login event, followed by the process ID. Further information can be found in ASL as well. If we have converted ASL to CSV using mac_apt, we can use grep to search for login events as shown in the terminal below.
      umair@Umairs-MacBook-Pro ~ % grep USER_PROCESS asl_ver2.csv
2025-01-01 15:25:18,321294000,12656,2,Umairs-MacBook-Pro,login,com.apple.system.lastlog,Notice,10000,0,20,,0,USER_PROCESS: 10000 ttys001,,"{'ut_user': 'umair', 'ut_id': 's001', 'ut_line': 'ttys001', 'ut_pid': '10000', 'ut_type': '7', 'ut_tv.tv_sec': '1735745118', 'ut_tv.tv_usec': '321236', 'SenderMachUUID': 'AA6FB408-35FB-314B-A0A6-E87CE002C71E', 'ASLExpireTime': '1767367518'}",/private/var/log/asl/BB.2026.01.31.G80.asl
2025-01-21 08:07:13,489833000,14879,2,Umairs-MacBook-Pro,login,com.apple.system.lastlog,Notice,18045,0,20,,0,USER_PROCESS: 18045 ttys000,,"{'ut_user': 'umair', 'ut_id': 's000', 'ut_line': 'ttys000', 'ut_pid': '18045', 'ut_type': '7', 'ut_tv.tv_sec': '1737446833', 'ut_tv.tv_usec': '489717', 'SenderMachUUID': 'AA6FB408-35FB-314B-A0A6-E87CE002C71E', 'ASLExpireTime': '1769069233'}",/private/var/log/asl/BB.2026.01.31.G80.asl
2025-01-21 08:16:55,482494000,14918,2,Umairs-MacBook-Pro,loginwindow,com.apple.system.lastlog,Notice,402,0,0,,0,USER_PROCESS: 402 console,,"{'ut_user': 'umair', 'ut_id': '0x2f 0x00 0x01 0x01', 'ut_line': 'console', 'ut_pid': '402', 'ut_type': '7', 'ut_tv.tv_sec': '1737447415', 'ut_tv.tv_usec': '482393', 'SenderMachUUID': 'B28C2613-1ADF-32F1-BD34-FED0143CF748', 'ASLExpireTime': '1769069815'}",/private/var/log/asl/BB.2026.01.31.G80.asl
2025-01-21 08:16:57,571341000,14919,2,Umairs-MacBook-Pro,login,com.apple.system.lastlog,Notice,771,0,20,,0,USER_PROCESS: 771 ttys000,,"{'ut_user': 'umair', 'ut_id': 's000', 'ut_line': 'ttys000', 'ut_pid': '771', 'ut_type': '7', 'ut_tv.tv_sec': '1737447417', 'ut_tv.tv_usec': '571297', 'SenderMachUUID': 'AA6FB408-35FB-314B-A0A6-E87CE002C71E', 'ASLExpireTime': '1769069817'}",/private/var/log/asl/BB.2026.01.31.G80.asl
2025-01-21 10:36:38,707688000,14981,2,Umairs-MacBook-Pro,loginwindow,com.apple.system.lastlog,Notice,381,0,0,,0,USER_PROCESS: 381 console,,"{'ut_user': 'umair', 'ut_id': '0x2f 0x00 0x01 0x01', 'ut_line': 'console', 'ut_pid': '381', 'ut_type': '7', 'ut_tv.tv_sec': '1737455798', 'ut_tv.tv_usec': '707518', 'SenderMachUUID': 'B28C2613-1ADF-32F1-BD34-FED0143CF748', 'ASLExpireTime': '1769078198'}",/private/var/log/asl/BB.2026.01.31.G80.asl
The above command shows us using grep on a file named asl_ver2.csv, which has been converted to CSV from ASL using mac_apt. We can see here that ASL contains a lot more information about login/logout events, especially the username.
Screen lock/unlock
In Unified logs, we can search for com.apple.sessionagent.screenIsLocked and com.apple.sessionagent.screenisUnlocked to find screen lock and unlock events respectively.
      umair@Umairs-MacBook-Pro ~ % grep com.apple.sessionagent.screenIsLocked output.csv
2025-03-09T19:51:43.417Z,Log,Default,com.apple.loginwindow.logging,219777,382,0,/System/Library/CoreServices/loginwindow.app/Contents/MacOS/loginwindow,73F34DCF6AB4348F85E49529092F776E,0,Standard,/System/Library/CoreServices/loginwindow.app/Contents/MacOS/loginwindow,73F34DCF6AB4348F85E49529092F776E,"-[SessionAgentNotificationCenter setNotifySharedSpace:key:toValue:] | setNotifySharedSpace: com.apple.sessionagent.screenIsLocked, to value:1 using token:114","%s | setNotifySharedSpace: %@, to value:%d using token:%d",AFB2C1E286E44A8A3BEE4AEA3DEC769,Dubai
2025-03-09T19:51:43.417Z,Log,Default,com.apple.loginwindow.logging,219777,382,0,/System/Library/CoreServices/loginwindow.app/Contents/MacOS/loginwindow,73F34DCF6AB4348F85E49529092F776E,0,Standard,/System/Library/CoreServices/loginwindow.app/Contents/MacOS/loginwindow,73F34DCF6AB4348F85E49529092F776E,"-[SessionAgentNotificationCenter sendBSDNotification:object:] | sendBSDNotification: com.apple.sessionagent.screenIsLocked, with object:503","%s | sendBSDNotification: %@, with object:%@",AFB2C1E286E44A8A3BEE4AEA3DEC769,Dubai
2025-03-09T19:51:48.081Z,Log,Default,com.apple.loginwindow.logging,3761,382,0,/System/Library/CoreServices/loginwindow.app/Contents/MacOS/loginwindow,73F34DCF6AB4348F85E49529092F776E,0,Standard,/System/Library/CoreServices/loginwindow.app/Contents/MacOS/loginwindow,73F34DCF6AB4348F85E49529092F776E,"-[SessionAgentNotificationCenter setNotifySharedSpace:key:toValue:] | setNotifySharedSpace: com.apple.sessionagent.screenIsLocked, to value:0 using token:114","%s | setNotifySharedSpace: %@, to value:%d using token:%d",AFB2C1E286E44A8A3BEE4AEA3DEC769,Dubai
The above terminal window shows screen lock events extracted from Unified logs after they were converted to CSV using mac_apt or Unified Logs Parser.
What is the name of the last logged in user?
What is the password hint for the user?
When was the last time a user logged out of the machine? Format MMM DD hh:mm:ss
Evidence of execution is an important type of forensic data that we need in most investigations. In this task, we will review some of the important evidence of execution artefacts found in a machine.
Terminal History
macOS saves a history of commands run in the terminal for every user. These commands are saved in order of execution, and up to 1000 commands are saved. This history is saved in the /Users/<user>/.zsh_history file. Zsh is the default terminal in macOS systems right now, so we will use that in our examples, but if any other terminal is installed, we might see the history file names according to that terminal, such as bash_history for bash.
      umair@Umairs-MacBook-Pro ~ % tail .zsh_history
cat /private/var/db/BootCache.data
sudo cat /private/var/db/BootCache.data
sudo cat /private/var/db/BootCache.data
sudo plutil -p /private/var/db/BootCache.data
ls /private/var/db/BootCaches/clear
clear
cat /Library/Preferences/com.apple.systemprefs.plist
plutil -p /Library/Preferences/com.apple.systemprefs.plist
clear
sudo grep -r "IOPlatformSerialNumber" /
The /Users/<user>/.zsh_sessions/<GUID>. The history file contains the history for each terminal session and is saved with the name of the terminal session GUID.
      umair@Umairs-MacBook-Pro ~ % tail .zsh_sessions/BBD4B4C0-FA0A-4AA8-8823-F3865815ADD8.history
cat /private/var/db/BootCache.data
sudo cat /private/var/db/BootCache.data
sudo cat /private/var/db/BootCache.data
sudo plutil -p /private/var/db/BootCache.data
ls /private/var/db/BootCaches/clear
clear
cat /Library/Preferences/com.apple.systemprefs.plist
plutil -p /Library/Preferences/com.apple.systemprefs.plist
clear
sudo grep -r "IOPlatformSerialNumber" /
Please note that these files have a zsh prefix because macOS uses the zsh terminal by default. If the bash terminal is used, the files will be prefixed with bash (e.g. bash_history).
The history files are different for each user. So, when collecting or analysing data, we must include data from each user's home directory.
      umair@Umairs-MacBook-Pro ~ % history
 1066  python3 apollo.py extract -ocsv -vyolo modules tmp_apollo
 1067  head apollo.
 1068  head apollo.csv
 1069  cat apollo.csv|wc -l
 1070  clear
 1071  history
 1072  vim apollo.csv
 1073  python3 apollo.py extract -osql -vyolo modules tmp_apollo
 1074  cd
 1075  clear
It might be noted that on a live system, the history for the current session is not yet written in the shell history files. These files are updated when the user logs out, and session files are updated when the session is terminated. We can use the history command to check the history before logging out.
Application Usage
The knowledgeC.db is a database that tracks application usage, including the start and end times of the application. This database is located at /Users/<user>/Library/Application\ Support/Knowledge/knowledgeC.db for the user and at /private/var/db/CoreDuet/Knowledge/knowledgeC.db for the system. On a live system, the later database is not easily accessible and is restricted.
We can use the SQL queries available in the modules of the APOLLO utility to get the required information. In the screenshot below, we see the query from the module knowledge_app_usage, after loading the user knowledgeC database in the DB Browser tool. This module parses the /app/usage stream of the knowledgeC.db.
      umair@Umairs-MacBook-Pro modules % cat knowledge_app_usage.txt
# --------------------------------------------------------------------------------
#       Copyright (c) 2018-2020 Sarah Edwards (Station X Labs, LLC,
#       @iamevltwin, mac4n6.com). All rights reserved.

.
.
.
.

#       You should have received a copy of the GNU General Public License
#       along with APOLLO.  If not, see .
# --------------------------------------------------------------------------------


[Module Metadata]
AUTHOR=Sarah Edwards/mac4n6.com/@iamevltwin
MODULE_NOTES=Application Usage

[Database Metadata]
DATABASE=knowledgeC.db
PLATFORM=IOS,MACOS
VERSIONS=12,13,10.14,10.15,10.16,14

[Query Metadata]
QUERY_NAME=knowledge_app_usage
ACTIVITY=Application Usage
KEY_TIMESTAMP=START

[SQL Query 12,13,10.14,10.15,10.16,14]
QUERY=
   SELECT
      DATETIME(ZOBJECT.ZSTARTDATE+978307200,'UNIXEPOCH') AS "START",
      DATETIME(ZOBJECT.ZENDDATE+978307200,'UNIXEPOCH') AS "END",
      ZOBJECT.ZVALUESTRING AS "BUNDLE ID",
      (ZOBJECT.ZENDDATE - ZOBJECT.ZSTARTDATE) AS "USAGE IN SECONDS",
      (ZOBJECT.ZENDDATE - ZOBJECT.ZSTARTDATE)/60.00 AS "USAGE IN MINUTES",
      ZSOURCE.ZDEVICEID AS "DEVICE ID (HARDWARE UUID)",
     ZCUSTOMMETADATA.ZNAME AS "NAME",
     ZCUSTOMMETADATA.ZDOUBLEVALUE AS "VALUE",
      CASE ZOBJECT.ZSTARTDAYOFWEEK
         WHEN "1" THEN "Sunday"
         WHEN "2" THEN "Monday"
         WHEN "3" THEN "Tuesday"
         WHEN "4" THEN "Wednesday"
         WHEN "5" THEN "Thursday"
         WHEN "6" THEN "Friday"
         WHEN "7" THEN "Saturday"
      END "DAY OF WEEK",
      ZOBJECT.ZSECONDSFROMGMT/3600 AS "GMT OFFSET",
      DATETIME(ZOBJECT.ZCREATIONDATE+978307200,'UNIXEPOCH') AS "ENTRY CREATION",
      ZOBJECT.ZUUID AS "UUID",
      ZSTRUCTUREDMETADATA.ZMETADATAHASH,
      ZOBJECT.Z_PK AS "ZOBJECT TABLE ID"
   FROM ZOBJECT
         LEFT JOIN
         ZSTRUCTUREDMETADATA
         ON ZOBJECT.ZSTRUCTUREDMETADATA = ZSTRUCTUREDMETADATA.Z_PK
      LEFT JOIN
         ZSOURCE
         ON ZOBJECT.ZSOURCE = ZSOURCE.Z_PK
       LEFT JOIN Z_4EVENT
      ON ZOBJECT.Z_PK = Z_4EVENT.Z_11EVENT
    LEFT JOIN ZCUSTOMMETADATA
      ON Z_4EVENT.Z_4CUSTOMMETADATA = ZCUSTOMMETADATA.Z_PK
   WHERE
      ZSTREAMNAME = "/app/usage"
We can either execute APOLLO to parse the information, or we can go to the relevant file in the modules, copy the query from the appropriate module, and execute the query in the Execute SQL tab in DB Browser, the latter providing us with a more detailed result for specific artefacts. In the above terminal, we can see the query mentioned at the end of the module. We can copy this query and execute it in the Execute SQL tab of DB Browser after loading the knowledgeC database to get our desired results. The following screenshot shows the results of executing the query from the module knowledge_app_usage.
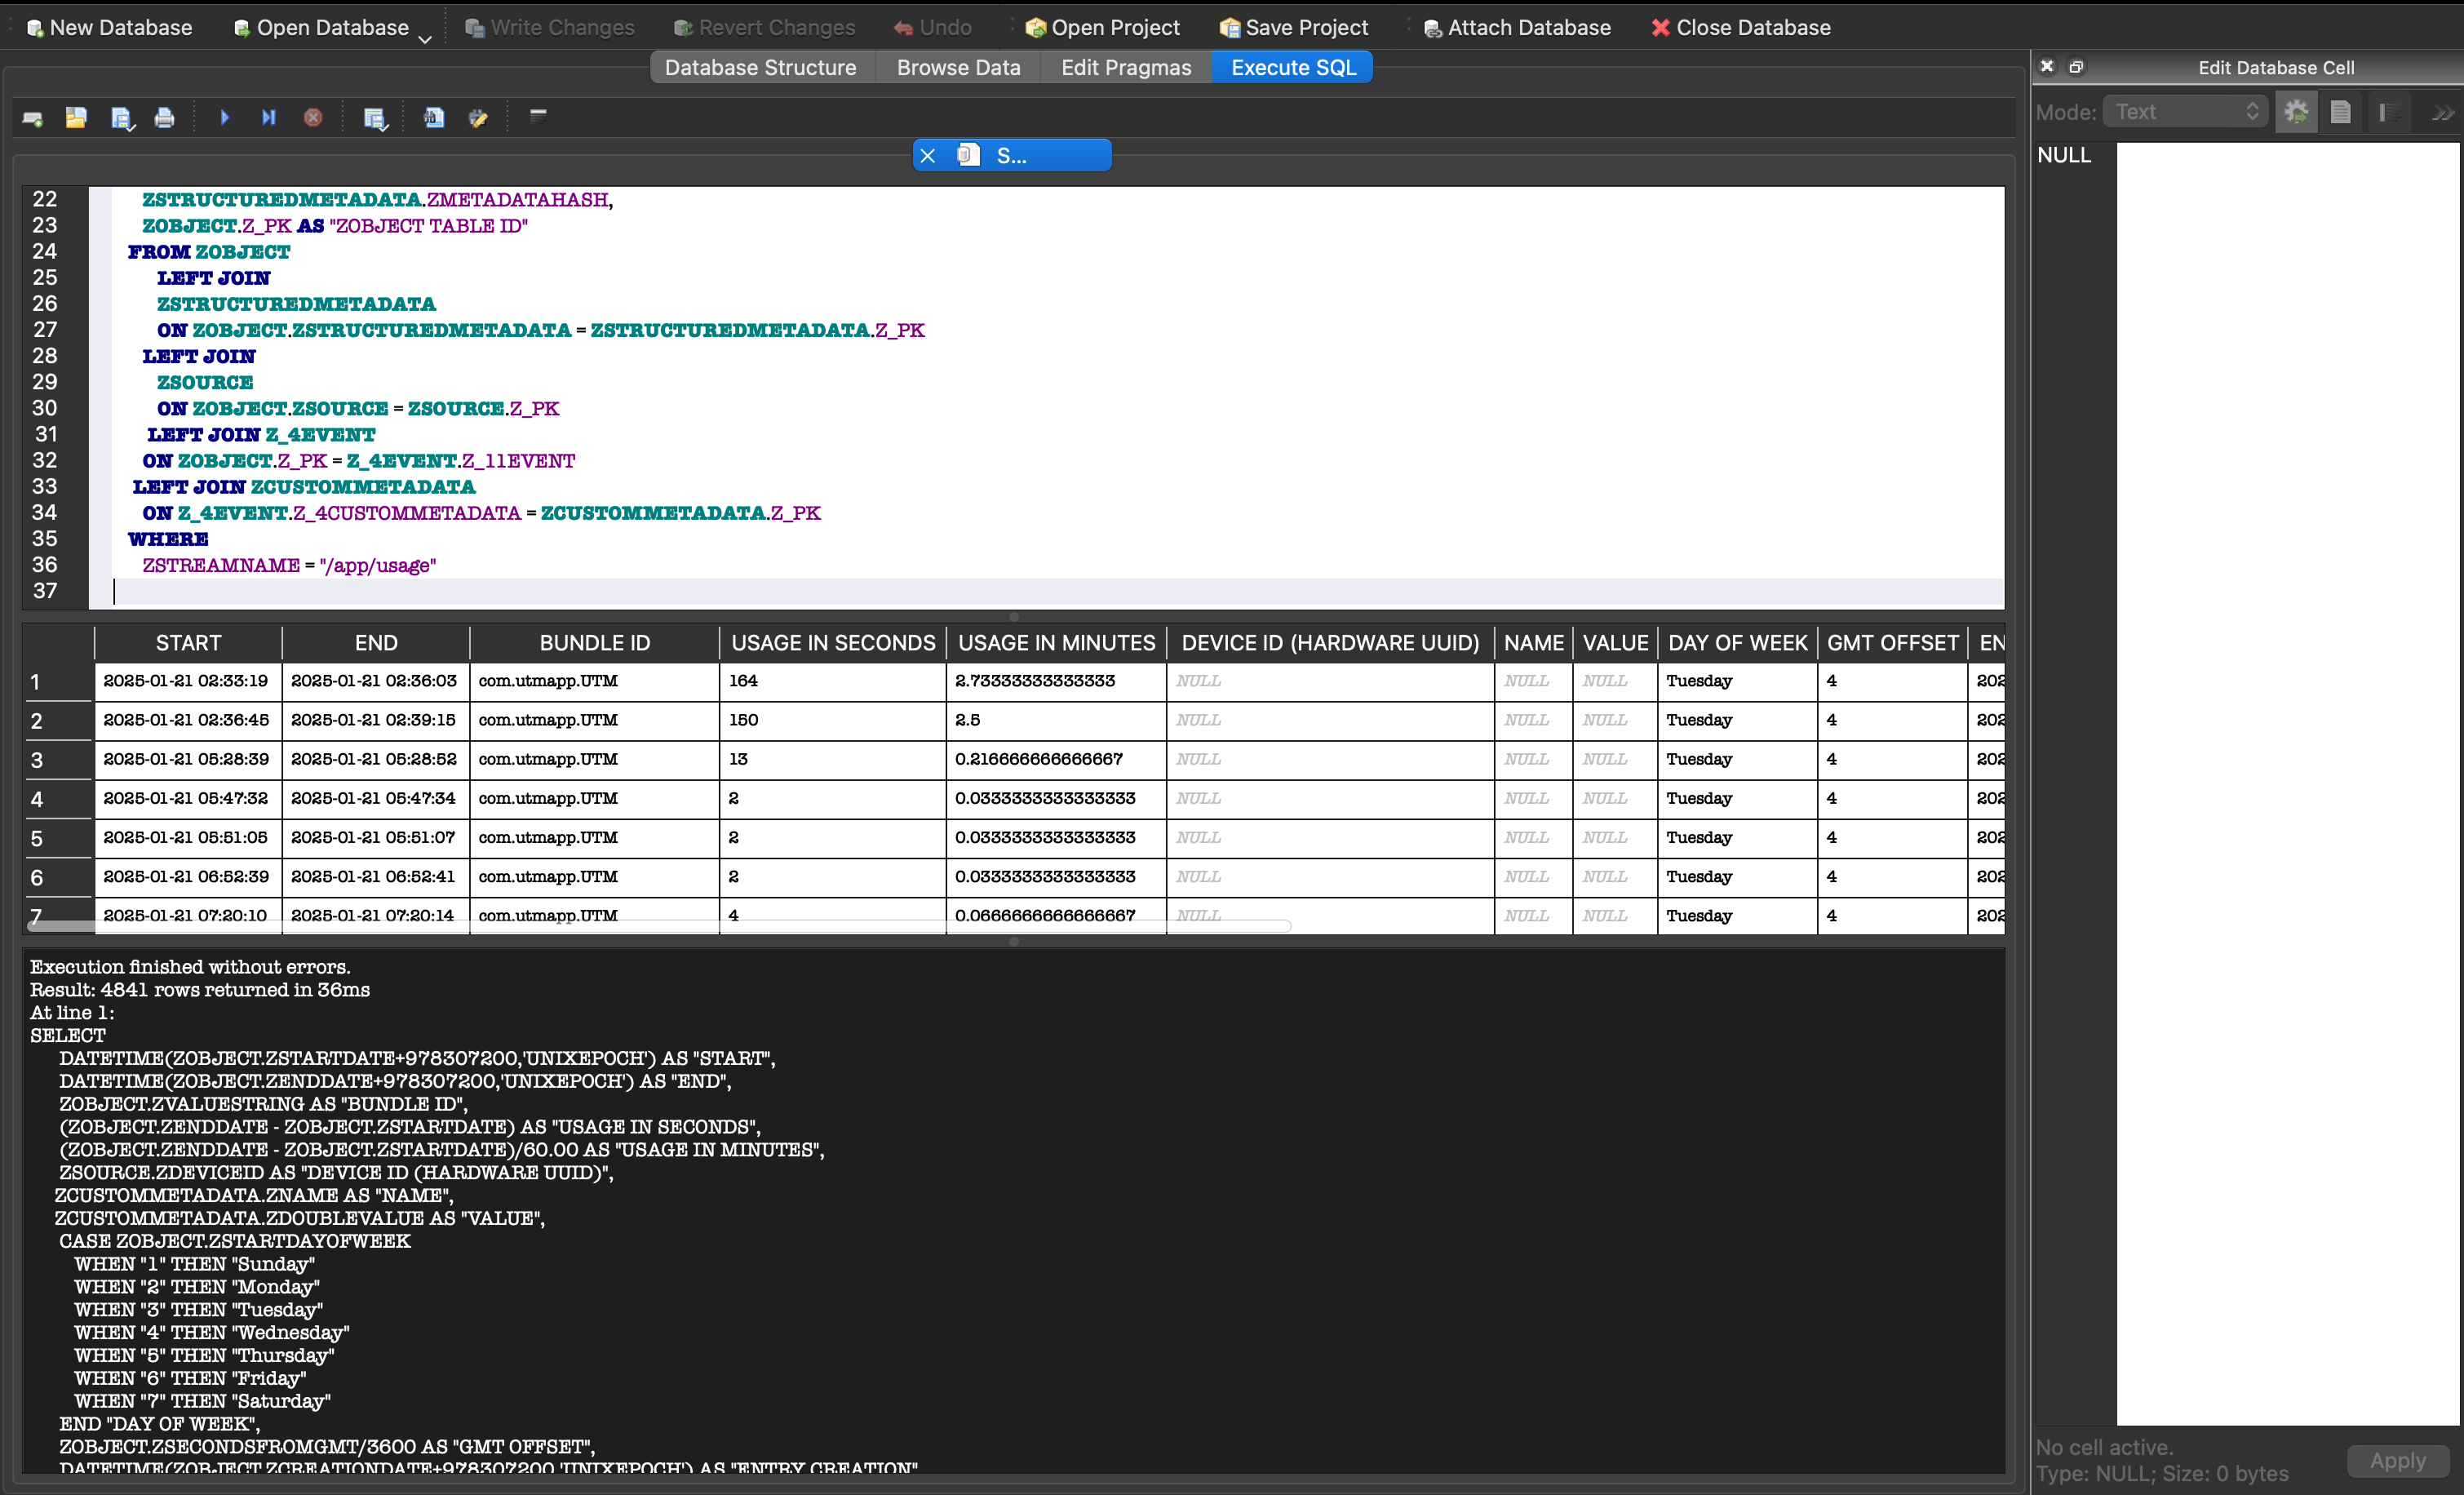
At the top, we can see the UTM application was used for 164 seconds. We can also see the start and end dates and times. Similarly, we can use the knowledge_app_intents module to parse the /app/intents stream, which tracks activity inside the applications, such as sending messages for WhatsApp.
Another source of application usage data is present in the CurrentPowerlog database in the location /private/var/db/powerlog/Library/BatteryLife/CurrentPowerlog.PLSQL. This database includes similar data to the knowledgeC database.
In the attached VM, APOLLO is present in the location /home/ubuntu/APOLLO.
What was the last command executed by the user on the machine?
What is the GUID of the terminal session in which this command was executed?
When was the last time the user closed the terminal? Format YYYY-MM-DD hh:mm:ss
For how many seconds was the terminal in focus during this session?
One important part of any forensic investigation is finding evidence of file/folder access, opening, modification, or sharing. macOS logs events related to such activity in several different places. In this task, let's review these artefacts.
Events Store DB
Events Store DB or fseventsd is a database that is present in every volume connected to a macOS device. This is a directory that contains multiple files and is similar to the USN Journal in , keeping records of all the changes. It contains events such as file/folder creation, deletion, rename, and volumes being mounted or unmounted. In earlier versions, this directory used to be in the root directory (/.fseventsd). However, sometimes, this directory is now present in the location /System/Volumes/Data/.fseventsd. The leading dot indicates that it is a hidden directory. We can use mac_apt to parse the files in this directory into a CSV or DB format using the command python3 mac_apt.py -o . -c DMG ~/mac-disk.img FSEVENTS. The following terminal shows the same artefacts being extracted from a live system.
      umair@Umairs-MacBook-Pro % sudo python3 mac_apt.py -o . -c MOUNTED / FSEVENTS
Password:
Output path was : /Users/umair/mac_apt
.
.
.
MAIN-INFO-Finished in time = 00:02:11
MAIN-INFO-Review the Log file and report any ERRORs or EXCEPTIONS to the developers
umair@Umairs-MacBook-Pro ~ % head FsEvents.csv
LogID,EventFlagsHex,EventType,EventFlags,Filepath,File_ID,Log_Unknown,SourceModDate,Source
000000002DA73F9E,01000000,Folder,,.fseventsd/sl-compat,,,2025-02-12 18:06:35,/System/Volumes/Data/.fseventsd/000000002da73f48
000000002DA73F9F,21000000,Folder,EndOfTransaction,,,,2025-02-12 18:06:35,/System/Volumes/Data/.fseventsd/000000002da73f48
000000002D855D03,00800014,File,InodeMetaMod|Modified,Users/umair/Library/Application Support/AddressBook/Sources/023F5274-E570-42C8-9FDE-D5BCE180B576/Metadata/.info,39714076,0,2025-02-12 10:48:20,/System/Volumes/Data/.fseventsd/000000002d8585da
000000002D855CFD,00800014,File,InodeMetaMod|Modified,Users/umair/Library/Application Support/AddressBook/Sources/023F5274-E570-42C8-9FDE-D5BCE180B576/SyncAnchor,381360,0,2025-02-12 10:48:20,/System/Volumes/Data/.fseventsd/000000002d8585da
000000002D8543CD,00800013,File,Created|Removed|Modified,Users/umair/Library/Application Support/AddressBook/Sources/023F5274-E570-42C8-9FDE-D5BCE180B576/SyncOperations.plist,39716988,0,2025-02-12 10:48:20,/System/Volumes/Data/.fseventsd/000000002d8585da
000000002D8544A5,00800014,File,InodeMetaMod|Modified,Users/umair/Library/Application Support/AddressBook/Sources/0DE50723-CF55-4001-84F4-65005DE0AA94/AddressBook-v22.abcddb-shm,1969067,0,2025-02-12 10:48:20,/System/Volumes/Data/.fseventsd/000000002d8585da
000000002D8543EE,00800013,File,Created|Removed|Modified,Users/umair/Library/Application Support/AddressBook/Sources/0DE50723-CF55-4001-84F4-65005DE0AA94/SyncOperations.plist,39716992,0,2025-02-12 10:48:20,/System/Volumes/Data/.fseventsd/000000002d8585da
000000002D8571C3,00800014,File,InodeMetaMod|Modified,Users/umair/Library/Application Support/AddressBook/Sources/6BDA2C03-3C1C-42A6-8624-8024B932E3DB/Metadata/.info,39714077,0,2025-02-12 10:48:20,/System/Volumes/Data/.fseventsd/000000002d8585da
000000002D8560B7,00800014,File,InodeMetaMod|Modified,Users/umair/Library/Application Support/AddressBook/Sources/6BDA2C03-3C1C-42A6-8624-8024B932E3DB/SyncAnchor,17141543,0,2025-02-12 10:48:20,/System/Volumes/Data/.fseventsd/000000002d8585da
Please note that the output can be enormous due to the amount of information it contains.
DS Store
In a macOS device, hidden .DS_Store files can be found in every directory that is opened using the Finder app. It is created when the Finder is used to access the folder. This means any folder accessed using the Finder should have an entry in this file. Hence, this file can act as evidence of access to a folder using the Finder. Detailed information on the DS Store files can be found in this (opens in new tab) wiki. We can use the DS Store parser (opens in new tab) utility to parse DS store files.
      umair@Umairs-MacBook-Pro DS_Store-parser % python3 parse.py ../.DS_Store
Applications
	Icon location: x 775px, y 77px, 0xffffffffffff0000
	Logical size: 530264B
	Modification date (timestamp, format unknown: 4739609139890696511
	Modification date, alternative (timestamp, format unknown): 4739609139890696511
	Physical size: 536576B
Desktop
	Icon location: x 115px, y 77px, 0xffffffffffff0000
	Layout property list:
		ShowStatusBar: False
		ShowToolbar: True
		ShowTabView: False
		ContainerShowSidebar: True
		WindowBounds: {{222, 94}, {1290, 850}}
		ShowSidebar: True
	Icon view property list:
		backgroundColorBlue: 1.0
		iconSize: 64.0
		textSize: 12.0
		backgroundColorRed: 1.0
		backgroundType: 0
		backgroundColorGreen: 1.0
		gridOffsetX: 0.0
		gridOffsetY: 0.0
		scrollPositionY: 0.0
		showItemInfo: False
		viewOptionsVersion: 1
		scrollPositionX: 0.0
		labelOnBottom: True
		arrangeBy: none
		showIconPreview: True
		gridSpacing: 54.0
	Logical size: 312505328B
	Modification date (timestamp, format unknown: 4739666058071822613
	Modification date, alternative (timestamp, format unknown): 4739666058071822613
	Physical size: 312623104B
	vSrn (unknown): 1
	View style: Icon view
mac_apt
	Icon location: x 285px, y 494px, 0xffffffffffff0000
	fdsc (unrecognized): False
macos-UnifiedLogs
	fdsc (unrecognized): False
velociraptor-docker
	Icon location: x 665px, y 189px, 0xffffffffffff0000
	Open in list view: False
	Logical size: 466275650B
	Modification date (timestamp, format unknown: 4739601447313639217
	Modification date, alternative (timestamp, format unknown): 4739601447313639217
	Physical size: 466563072B
Lab Machines.localized
	Icon location: x 115px, y 301px, 0xffffffffffff0000
	Layout property list:
		ShowStatusBar: False
		ShowToolbar: True
		ShowTabView: False
		ContainerShowSidebar: True
		WindowBounds: {{35, 94}, {1443, 850}}
		ShowSidebar: True
	Open in list view: True
	Logical size: 6780B
	Modification date (timestamp, format unknown: 4739619739493982596
	Modification date, alternative (timestamp, format unknown): 4739619739493982596
	Physical size: 40960B
	vSrn (unknown): 1
We can see different types of information for different items in the DS Store file. However, the primary forensic value remains that this folder was accessed using Finder. Any other information can be considered as a bonus.
In the attached VM, the DS Store Parser is present at the location /home/ubuntu/DS_Store-parser. DS Store Parser needs to be run from the directory it is present in, and we need to provide the absolute path of the DS Store file to execute without errors.
Most Recently Used
We can find the most recently used folders in the plist file at /Users/<user>/Library/Preferences/com.apple.finder.plist. The information is in the FXRecentFolders key, with item 0 being the latest. The file-bookmark BLOB in this key contains the full folder path, volume name and volume GUID.
      umair@Umairs-MacBook-Pro Preferences % plutil -p com.apple.finder.plist
{
  "ComputerViewSettings" => {
    "CustomViewStyleVersion" => 1
    "WindowState" => {
      "ContainerShowSidebar" => 1
      "ShowSidebar" => 1
      "ShowStatusBar" => 0
      "ShowTabView" => 0
      "ShowToolbar" => 1
      "WindowBounds" => "{{222, 94}, {1290, 850}}"
    }
.
.
.
  "FXRecentFolders" => [
    0 => {
      "file-bookmark" => {length = 948, bytes = 0x626f6f6b b4030000 00000410 30000000 ... 04000000 00000000 }
      "name" => "detections"
    }
    1 => {
      "file-bookmark" => {length = 904, bytes = 0x626f6f6b 88030000 00000410 30000000 ... 04000000 00000000 }
      "name" => "soc"
    }
    2 => {
      "file-bookmark" => {length = 840, bytes = 0x626f6f6b 48030000 00000410 30000000 ... 04000000 00000000 }
      "name" => "Downloads"
    }
    3 => {
      "file-bookmark" => {length = 844, bytes = 0x626f6f6b 4c030000 00000410 30000000 ... 04000000 00000000 }
      "name" => "tensorflow-metal"
    }
    4 => {
      "file-bookmark" => {length = 796, bytes = 0x626f6f6b 1c030000 00000410 30000000 ... 04000000 00000000 }
      "name" => "umair"
    }
  ]
For Microsoft applications, we can find a similar list in the location /Users/<user>/Library/Containers/com.microsoft.<app>/Data/Library/Preferences/com.microsoft.<app>.securebookmarks.plist. The below terminal window shows the data for Microsoft Excel.
      umair@Umairs-MacBook-Pro Preferences % plutil -p com.microsoft.Excel.securebookmarks.plist
{
  "file:///Users/umair/APOLLO/apollo.csv" => {
    "kBookmarkDataKey" => {length = 696, bytes = 0x626f6f6b b8020000 00000410 30000000 ... 04000000 00000000 }
    "kLastUsedDateKey" => 2025-02-22 15:19:49 +0000
    "kUUIDKey" => "66DDA458-FE03-4C06-B71E-213742CCA596"
  }
  "file:///Users/umair/Downloads/Asset_Inventory.xlsx" => {
    "kBookmarkDataKey" => {length = 708, bytes = 0x626f6f6b c4020000 00000410 30000000 ... 04000000 00000000 }
    "kLastUsedDateKey" => 2024-12-01 11:16:29 +0000
    "kUUIDKey" => "29E5EE07-6CBB-4016-9C1B-21F82651F342"
  }
}
Here, the kBookmarkDataKey is similar to the file-bookmark key in the previous plist file, which contains a BLOB of data related to the full folder path, volume GUID, and volume name. We can use a hex editor to extract this information.
What are the viewing options for the Users/thm folder?
What is the last directory visited by the user using the Finder application?
An important part of forensics is determining whether any external drives were connected to the system. Let's examine the possible artefacts that might help us determine this information.
Mounted Volumes
macOS stores a list of drives mounted on the system in the location /Users/<user>/Library/Preferences/com.apple.finder.plist. In this plist file, we can find USB drives and mounted images such as DMG or IMG files. This information can be found in the FXDesktopVolumesPositions key.
      umair@Umairs-MacBook-Pro ~ % plutil -p com.apple.finder.plist
{
  "ComputerViewSettings" => {
    "CustomViewStyleVersion" => 1
    "WindowState" => {
      "ContainerShowSidebar" => 1
      "ShowSidebar" => 1
      "ShowStatusBar" => 0
      "ShowTabView" => 0
      "ShowToolbar" => 1
      "WindowBounds" => "{{51, 88}, {1290, 850}}"
    }
  }
.
.
.
 "FontSizeCategory" => "DEFAULT"
  "FXArrangeGroupViewBy" => "Name"
  "FXDesktopTouchBarUpgradedToTenTwelveOne" => 1
  "FXDesktopVolumePositions" => {
  "Lenovo PS8_-0x1.d27e44p+29" => {
      "AnchorRelativeTo" => 0
      "ScreenID" => 0
      "xRelative" => 325
      "yRelative" => 147
    }
    "Microsoft NTFS by Tuxera 2023.1_0x1.044f569p+28" => {
      "AnchorRelativeTo" => 2
      "ScreenID" => 0
      "xRelative" => -309
      "yRelative" => -344
    }
    "Microsoft NTFS by Tuxera 2024-RC_0x1.044f569p+28" => {
      "AnchorRelativeTo" => 2
      "ScreenID" => 0
      "xRelative" => -309
      "yRelative" => -232
    }
    "New Volume_0x1.2be84dfdd01dfp+29" => {
      "AnchorRelativeTo" => 1
      "ScreenID" => 0
      "xRelative" => -309
      "yRelative" => 302
    }
    "New Volume_0x1.226e8bb7e3675p+29" => {
      "AnchorRelativeTo" => 1
      "ScreenID" => 0
      "xRelative" => -309
      "yRelative" => 302
    }
    "nmap-7.95_0x1.5e8c7d98p+29" => {
      "AnchorRelativeTo" => 0
      "ScreenID" => 0
      "xRelative" => 203
      "yRelative" => -77
    }
We can see that Lenovo PS8 and New Volume were mounted on the system. However, we also see -7.95 mounted, which can be a mounted DMG or IMG file.
Connected iDevices
Apple devices connected to the system can be found in the plist file /Users/<user/Library/Preferences/com.apple.iPod.plist. The information contains IMEI, device serial number, iOS version, and the number of times the device was connected.
      umair@Umairs-MacBook-Pro ~ % plutil -p com.apple.iPod.plist
{
  "com.apple.PreferenceSync.ExcludeAllSyncKeys" => 1
  "conn:128:Last Connect" => {length = 4, bytes = 0xe3f1f16e}
  "Devices" => {
    "000220C62650801E" => {
      "Build Version" => "22D72"
      "Connected" => 2025-03-08 09:06:54 +0000
      "Device Class" => "iPad"
      "Family ID" => 10129
      "Firmware Version" => 256
      "Firmware Version String" => "18.3.1"
      "ID" => "[Redacted]"
      "IMEI" => "[Redacted]"
      "Product Type" => "iPad13,10"
      "Region Info" => "LL/A"
      "Serial Number" => "[Redacted]"
      "Use Count" => 2
    }
    "000228813E12001C" => {
      "Build Version" => "21F90"
      "Connected" => 2024-07-26 15:45:44 +0000
      "Device Class" => "iPhone"
      "Family ID" => 10155
      "Firmware Version" => 256
      "Firmware Version String" => "17.5.1"
      "ID" => "[Redacted]"
      "IMEI" => "[Redacted]"
      "IMEI2" => "[Redacted]"
      "Product Type" => "iPhone16,2"
      "Region Info" => "AH/A"
      "Serial Number" => "[Redacted]"
      "Use Count" => 1
    }
  }
}
In the above terminal, we can see an iPad and an iPhone connected to the system, with the iPad connected twice and the iPhone connected once.
Bluetooth Connections
The knowledgeC database also contains information about historical Bluetooth device connections. This information is in the /Bluetooth/isConnected stream in the database. We can use APOLLO's knowledge_audio_bluetooth_connected module to extract this information or use the SQL query in DB Browser.
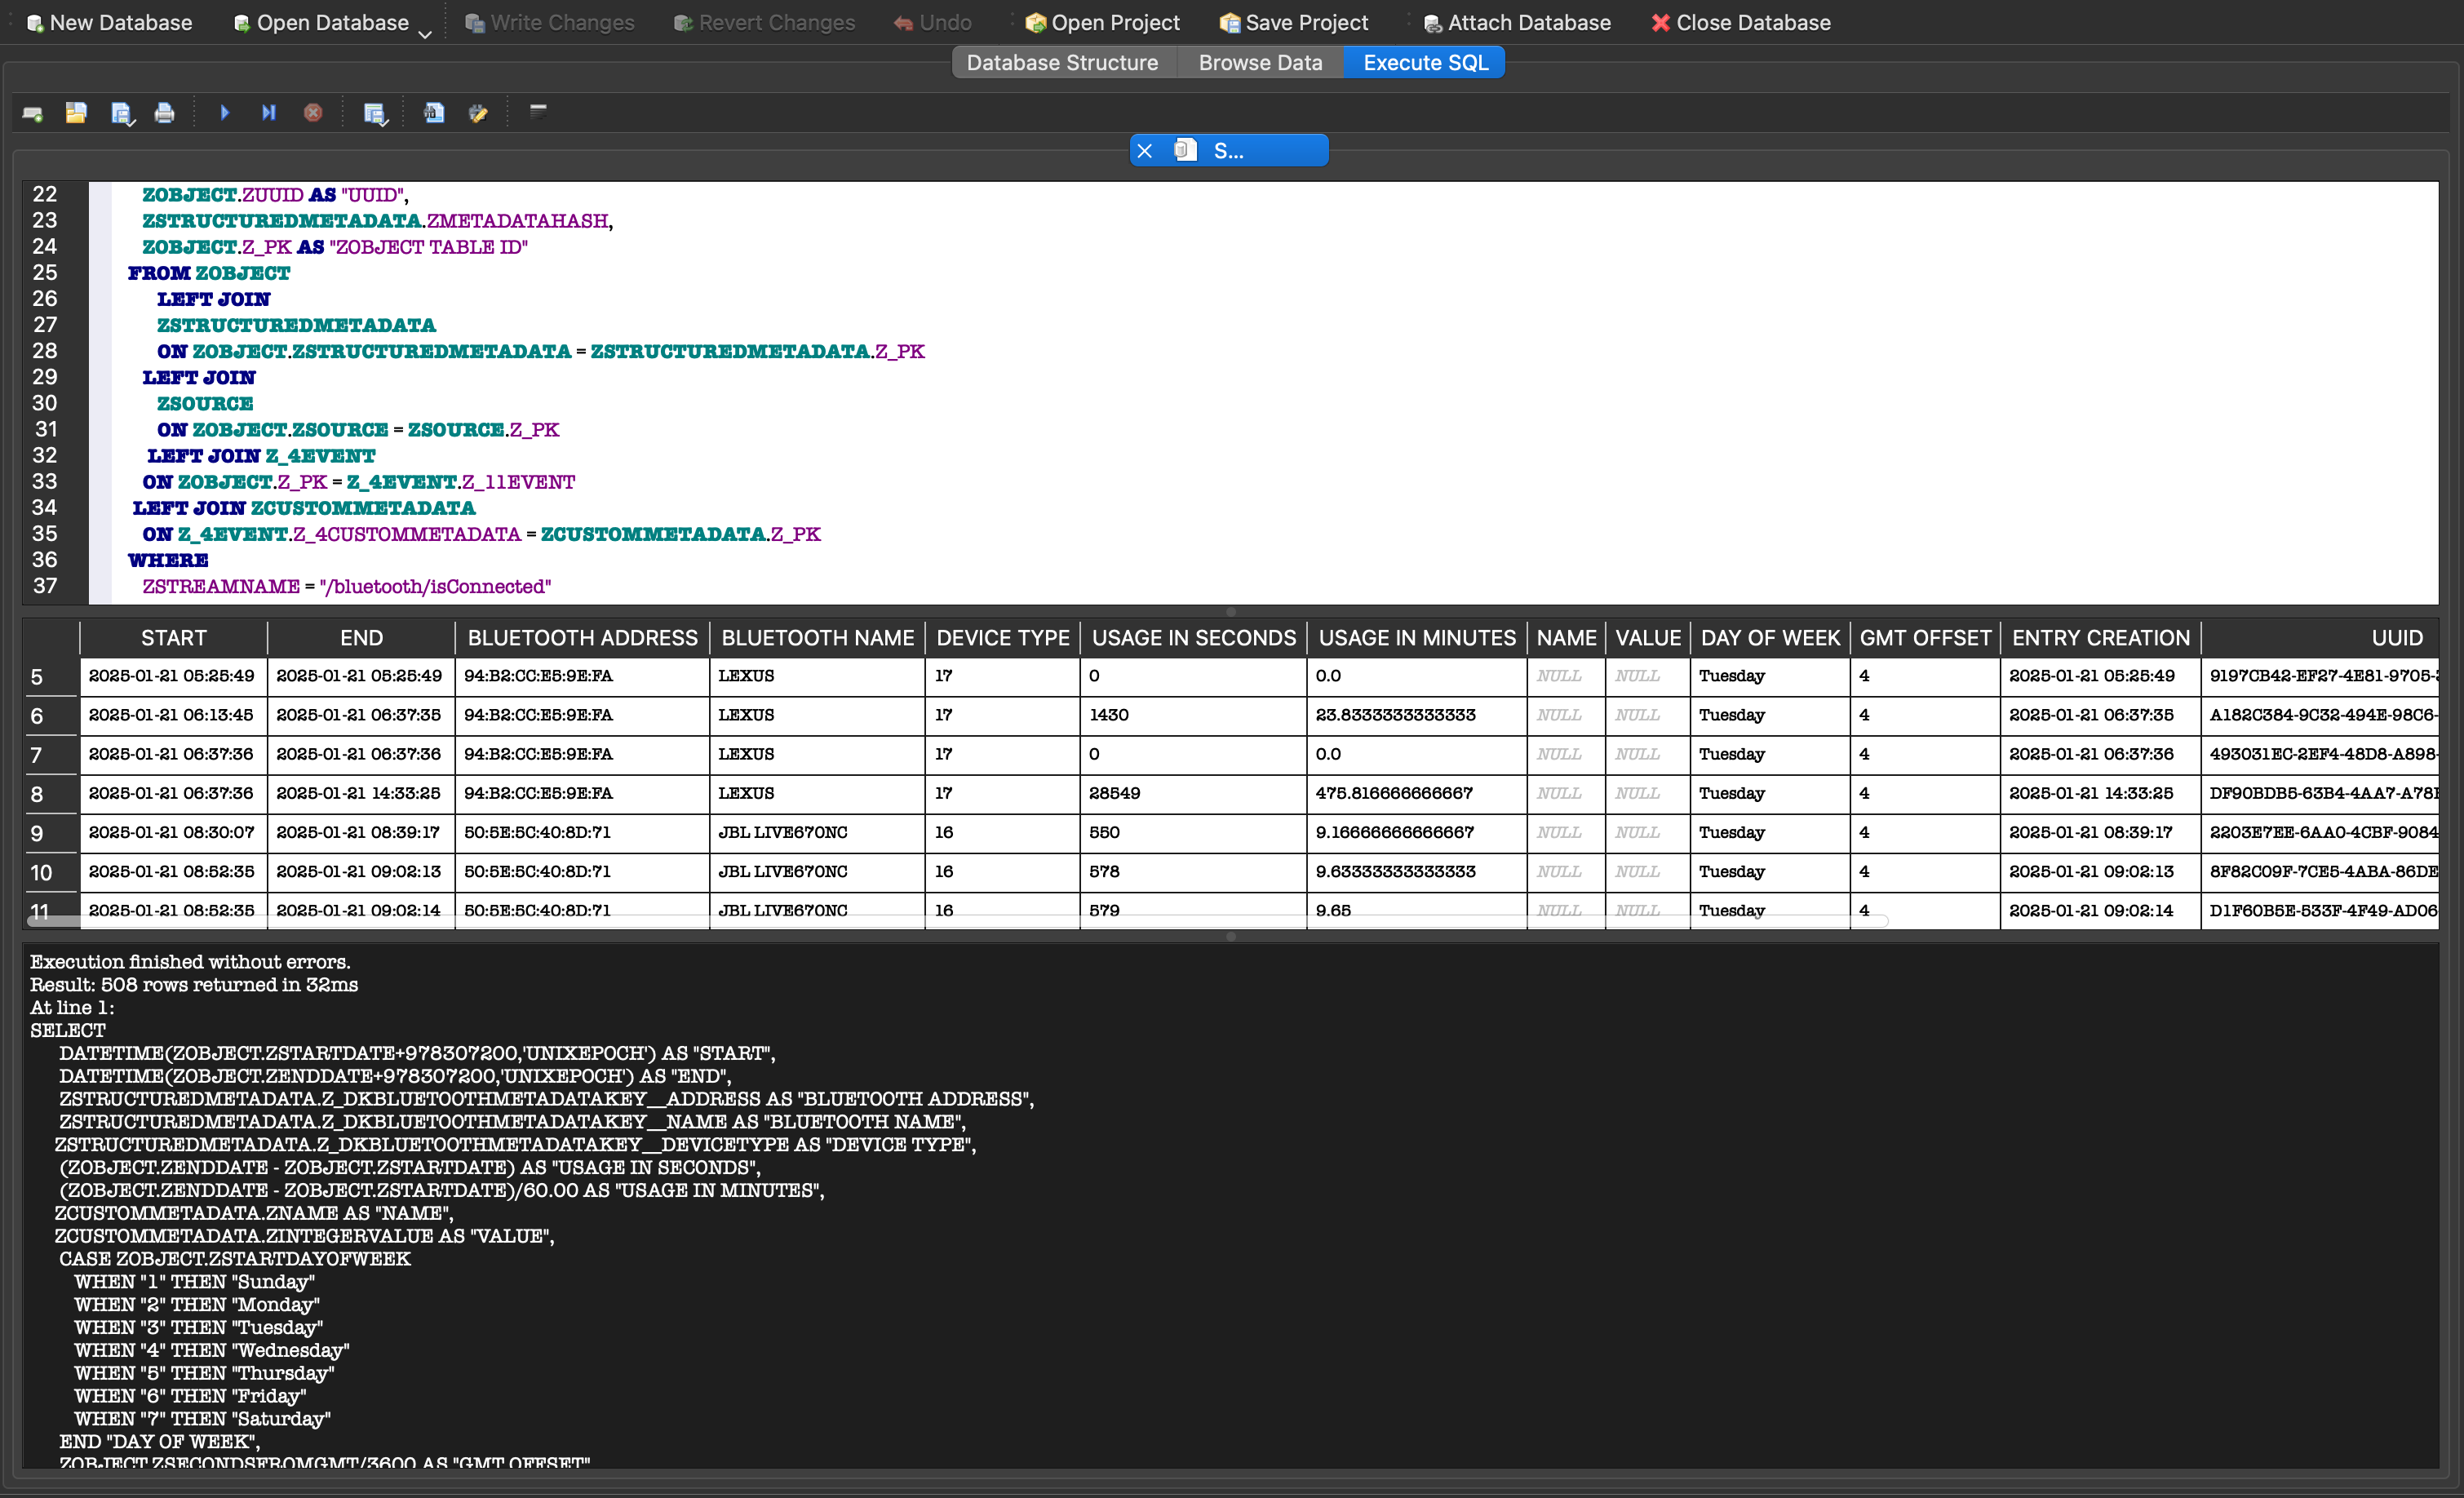
In the above screenshot, we can see the date and time of connections of different Bluetooth devices and their time of disconnection. We can also see the minutes each device was connected. The SQL query used here is from the APOLLO module discussed above.
Connected Printers
The /Users/<user>/Library/Preferences/org.cups.PrintingPrefs.plist file contains information about the printers installed and used on the system. It also informs us on whether the printer is a network printer.
      umair@Umairs-MacBook-Pro ~ % plutil -p org.cups.PrintingPrefs.plist
{
  "com.apple.print.useGenericPrinterFeaturesDict" => {
    "HP_DeskJet_3700_series" => 0
  }
  "LastUsedPrinters" => [
    0 => {
      "Network" => "fe80::1"
      "PrinterID" => "HP_DeskJet_3700_series"
    }
    1 => {
      "Network" => "fe80::1000"
      "PrinterID" => "HP_DeskJet_3700_series"
    }
    2 => {
      "Network" => "172.16.0.1"
      "PrinterID" => "HP_DeskJet_3700_series"
    }
  ]
  "UseLastPrinter" => 1
}
Here, we can see the details of the connected printers, including whether they are network printers and their IP addresses.
Which stream in the knowledgeC database contains information about connected Bluetooth devices?
Well, wasn't that fun? We seem to be getting confident performing forensics on macOS devices. Overall, we have learned and practised:
- Identifying system information of a macOS machine.
- Exploring the network interfaces and last known networks on a machine.
- Discovering available accounts and past account activity.
- Unearthing any commands and applications executed on the machine.
- Analysing activity on the machine.
- Finding out what devices are connected to the machine.
It looks like we learned a lot of exciting forensic artefacts in macOS, but we are not done yet. We will discuss even more artefacts in the macOS Forensics: Applications room.
Do you know of any other artefacts that can be found in a macOS machine? Let us know in our Discord channel (opens in new tab) or X account (opens in new tab). See you around.
Yoohoo! I loved exploring macOS Forensics!
Ready to learn Cyber Security?
TryHackMe provides free online cyber security training to secure jobs & upskill through a fun, interactive learning environment.
Already have an account? Log in