
Microservices Architectures
Explore the problems associated with building a Microservice Architecture and how to overcome these to build a secure environment.
easy

To access material, start machines and answer questions login.

When was first introduced in the Intro to room, it was done using the context of the increase in popularity of microservices architectures. That is, instead of having an application built as a single unit (a monolithic architecture), they were separated into containerised microservices. In this room, you will continue your journey by learning about security concerns when working with microservices architectures and how they can be addressed within a cluster. This room will teach you methods of securing a microservices architecture to help Laboratories address some concerns they have.
Learning Prerequisites
First, make sure the basics have been covered by completing Intro to . Then, the two rooms that proceed this should be completed: and K8s Best Security Practices. If you’re unfamiliar with containerisation entirely, then you should consider doing rooms like Intro to Containerisation, Intro to Docker, and Hardening.
Learning Objectives
- The user will understand Pod Security Standards and Pod Security Admission and the depreciation of Pod Security Policies
- The user will understand the problems faced when working with a microservices architecture
- The user will understand and how it can be used to secure communication between microservices
- The user will understand what a is and how it answers problems associated with a microservices architecture
- The user will understand Istio architecture and how it can be used with a microservices architecture
Click to continue to the next task!

Let's kick off this room by clearing up a common point of confusion. One way you can secure a architecture is by ensuring the pods running these microservices have to meet certain security configuration requirements before they are accepted into the system. In the past, this was done by defining PSP (Pod Security Policies). This term is a real buzzword in the world of security; if your curiosity for this topic has taken you to read articles or blog posts, then it's likely you will have seen PSP mentioned frequently. What currently is not mentioned frequently is that PSP has since been deprecated (as of version 1.21) and removed (as of version 1.25). This task aims to first address the deprecation of PSP to clear up any confusion about its absence in these rooms, then define ’ replacement for them. That replacement would be (Pod Security Standards) and (Pod Security Admission).
Pod Security Standards
Pod Security Standards in essentially define three levels of security you want to be enforced. These levels of security are (rather confusingly) referred to as 3 policies in the official documentation. These levels/policies outline different restrictions for different use cases. Let’s take a look at what they are:
- Privileged: As the name suggests, this is the most relaxed policy and is unrestricted, with the widest level of permission being granted. Known privilege escalations are allowed using this policy but they are intentional. Use Case: for a policy like this would be a system or infrastructure-level workload, which is managed by a trusted cluster administrator.
- Baseline: The baseline policy is designed for ease of adoption. It is a minimally restrictive policy that prevents known privilege escalations. A default pod definition would be allowed using this policy. Use Case: This policy is for application operators and developers working on non-critical applications. Some applications will need Baseline permissions to run as ‘Restricted’ since the latter would be too, well, restrictive.
- Restricted: As it sounds, this policy is highly restrictive and follows current pod hardening best practices. However, this does come at a cost of compatibility. Use Case: This policy would be used in the development and running of security-critical applications.

These are the 3 levels/policies which can be enforced, ensuring pods created follow a pre-defined standard so you can easy knowing what is being deployed into your cluster. Only how are these standards enforced?
Pod Security Admission
In the Best Security Practices room, we covered the 3 stages an request goes through before being accepted/persisted. If you remember, the last of those 3 stages is “Admission Controllers”. Checks that are done against a request depending on which ones have been enabled. It was mentioned that has many built-in Admission Controllers, one of which is the PodSecurity Admission Controller. It is this admission controller that enforced the pod security standards outlined in the previous section and is what is being referred to when we discuss (Pod Security Admission). If a has been set, for example, against a then the PodSecuirty Admission controller will be triggered upon any pod creation requests in this . What the PodSecurity admission controller will do upon a violation of this standard will depend on the mode that has been selected. There are 3 modes:
- Enforce: If a pod creation request violates the policy, the request will be rejected.
- Audit: If a pod creation request violates the policy, the event will be recorded in the audit log. However, the request will be allowed, and the pod will be created.
- Warn: If a pod creation request violates the policy, a user-facing warning will be triggered. However, the request will be allowed, and the pod will be created.
and in a Cluster
Now we’ve established how they work, let’s take a look at how we would apply these to our cluster. Let’s consider a common use case; we have a non-critical application running in “example-” and want to ensure all pods running in this are protected against known privilege escalations, denying all pods that do not meet these standards. To enable these pod security standards at a level, we can use labels. defines labels that you can set to determine which of the pre-defined Pod Security Standards you want to use in a and what mode you want to use. Here is the syntax of the label:
pod-security.kubernetes.io/<MODE>=<LEVEL>
For example, if you wanted to set a baseline level and have it be enforced:
pod-security.kubernetes.io/enforce=baseline
An optional label can also be included if you want to pin the version of the policy being enforced (or audited/warned) to the one included in a minor release (or the latest release). This could be done with:
pod-security.kubernetes.io/enforce-version: v1.30
That's the format of the label, but how would we apply this label to our “example-namespace”? We can do this using a Kubectl command.
Note: The dryrun option is not essential, but it is best practice, as it allows you to check if all running pods in the namespace you are labelling would be admitted with the security standard you are applying. Essentially you are trying to avoid an instance where an application pod in this namespace created before labelling restarts but gets denied as it does not meet the newly labelled security standards. If the dryrun command returns “<namespace> labelled” without any warnings, this means all pods running in this namespace would be admitted using the security standards you are about to apply. The command would then be run without the dryrun flag to label the namespace.
Kubectl label –dry-run=server –overwrite ns example-namespace \ pod-security.kubernetes.io/enforce=baseline
One final note on Pod Security Admission. We have just gone through how to ensure a pod security standard is applied and enforced at a level using labels. However, there are some configuration changes that can be made at a cluster level. As mentioned, provides us with the PodSecurity Admission Controller, which enforces the Pod Security Standards. You can configure this Admission controller (on the master node) to make custom changes. This includes defaults when a mode level is not set and exemptions, for example, authenticated users or namespaces, which should be exempt from the PodSecurity Admission Controller. More on this is available in the documentation (opens in new tab).
Which Pod Security Standard level would you use to ensure cluster hardening best practices are followed?
Which Pod Security Standard level allows known privilege escalations?
Which Pod Security Admission mode rejects a request upon policy violation?
What would the syntax of a label enforcing a restricted policy look like?

Visualising a Microservices Architecture
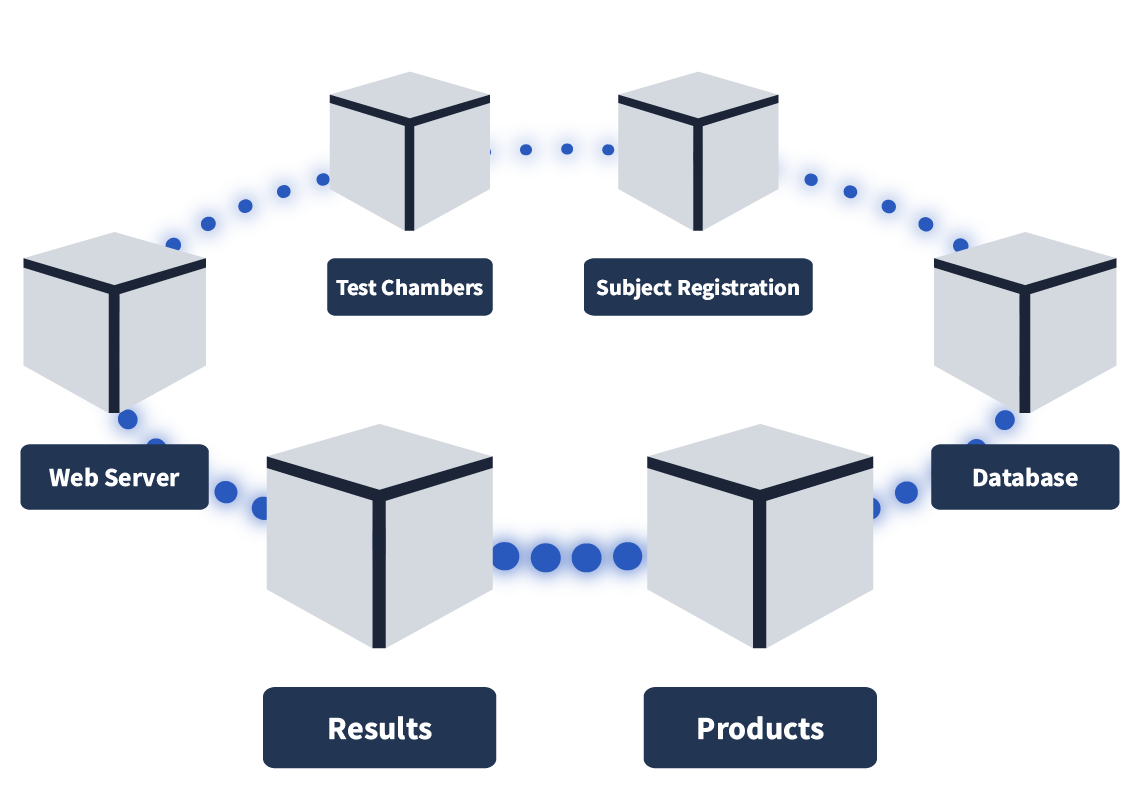
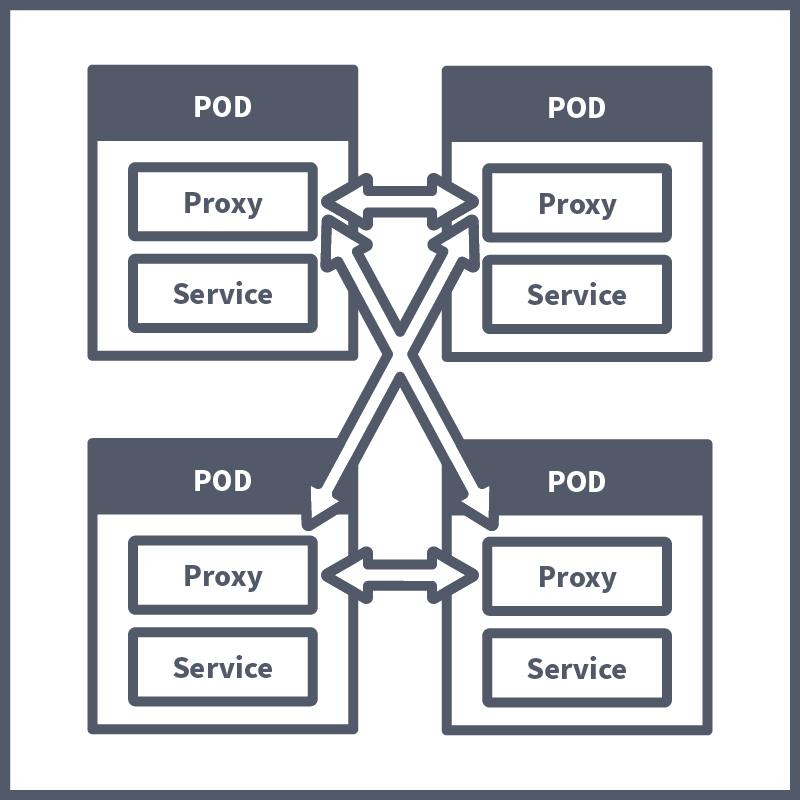
Before we dive into some of the problems that can arise when building out a microservices architecture, let's visualise what we mean by it. As covered, a microservices architecture involves separating parts of an application into microservices (which run as containerised workloads) instead of having a single piece of code (known as a monolithic architecture). Let’s consider a few examples. A streaming company like Netflix (an early adopter of this style of architecture) may choose to split their application into microservices like: Streaming, Recommendations, Profiles, and Catalogue Query. An online storefront, such as Amazon, may have microservices like WebApp, Basket, Orders, and Product Query. Here is how the microservices architecture is set up here at Laboratories:
The Problems With Microservices Architecture
Securing Pod-to-Pod Communication
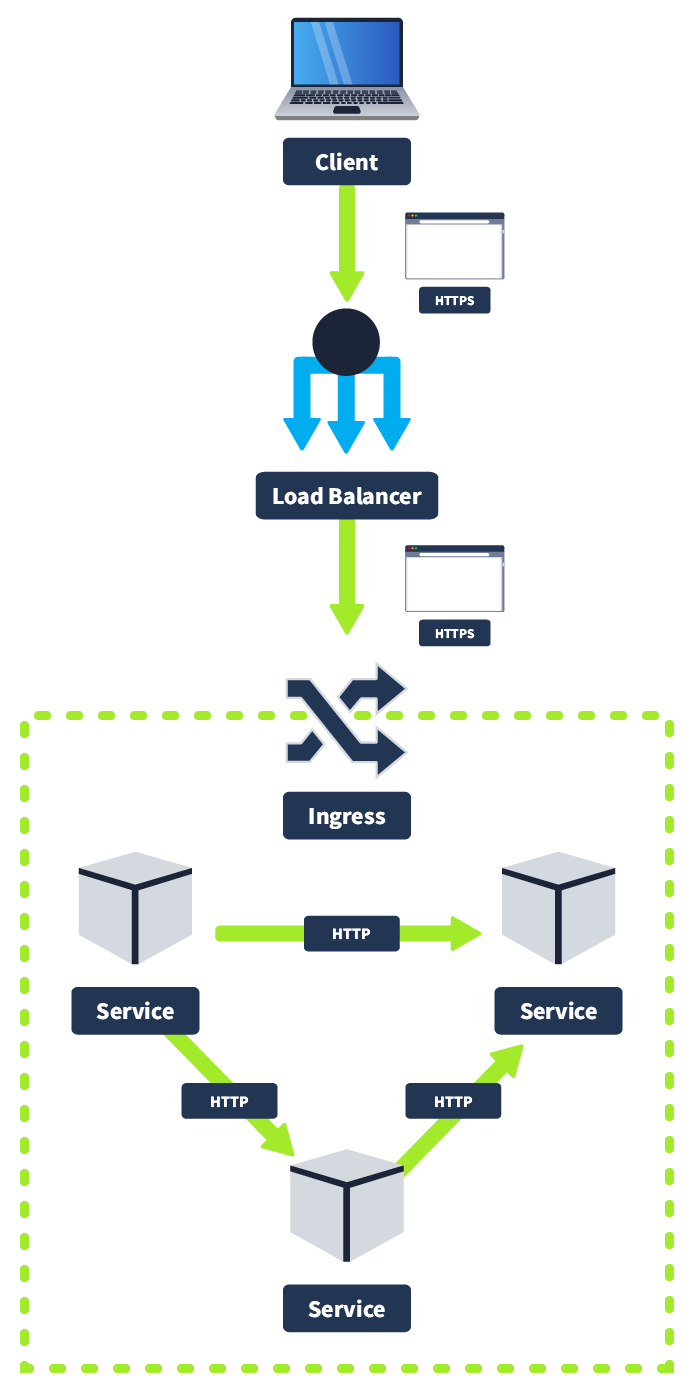
You may remember in the room, we discussed how to restrict pod-to-pod communication using network policies. Now we will discuss how to secure communication between pods. A typical microservices architecture will be set up as follows: a client will connect to the cluster using HTTPS, will hit the load balancer, which will then forward the request to the ingress controller also using HTTPS. Likely there will be a protecting the cluster as well. However, from this point onwards, once we are inside the cluster, pod-to-pod communication is done using or some other insecure protocol. In other words, the cluster itself is protected, but once inside, there is insecure, unencrypted traffic.
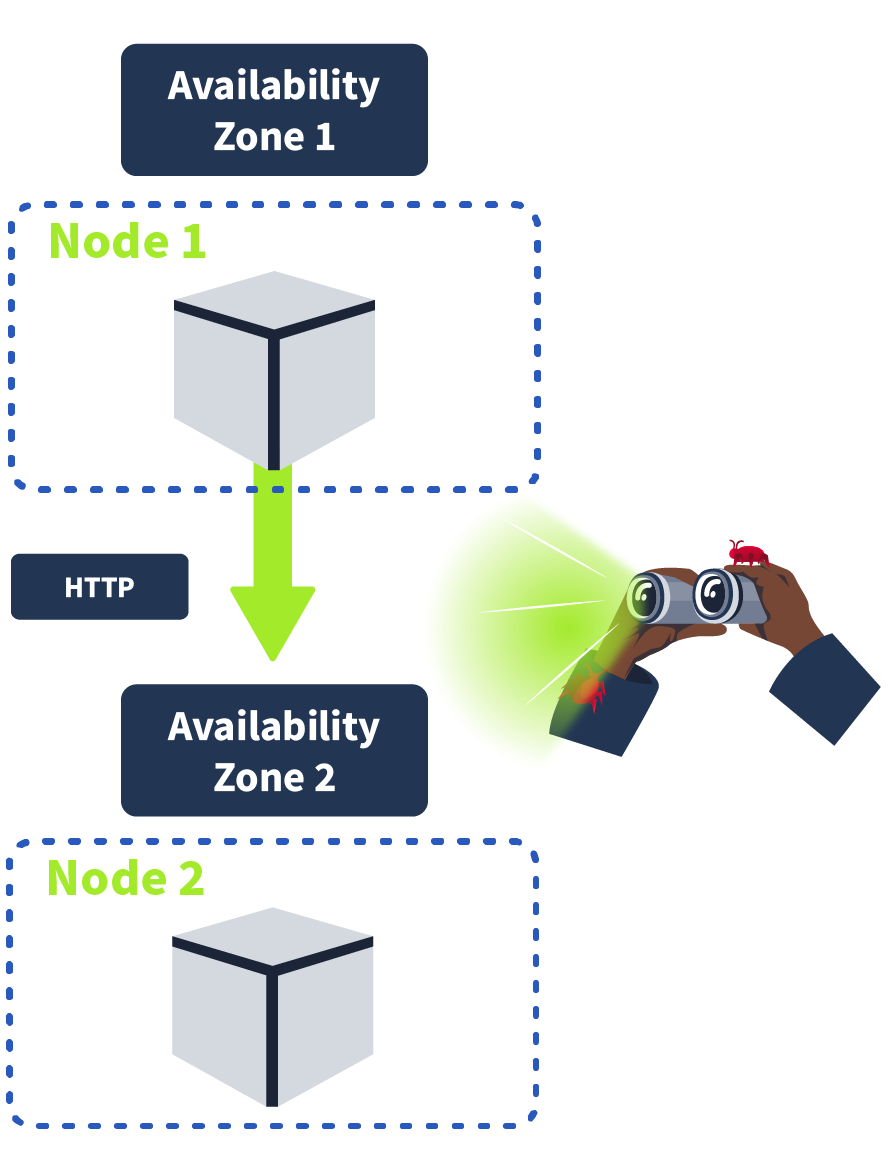
This has certain implications for an on-premises network; it would not be following best practices, but the implications are worse when you consider a cloud deployment, which architectures frequently are. Cloud Service Providers provide multiple AZ (Availability Zones) to ensure the uptime of your application; if one AZ goes down, another one remains up. Because of this, some services in your cluster may be running on different AZ, meaning unencrypted communication between services could be intercepted by an eavesdropper. It’s for this reason traffic between services should be encrypted using .
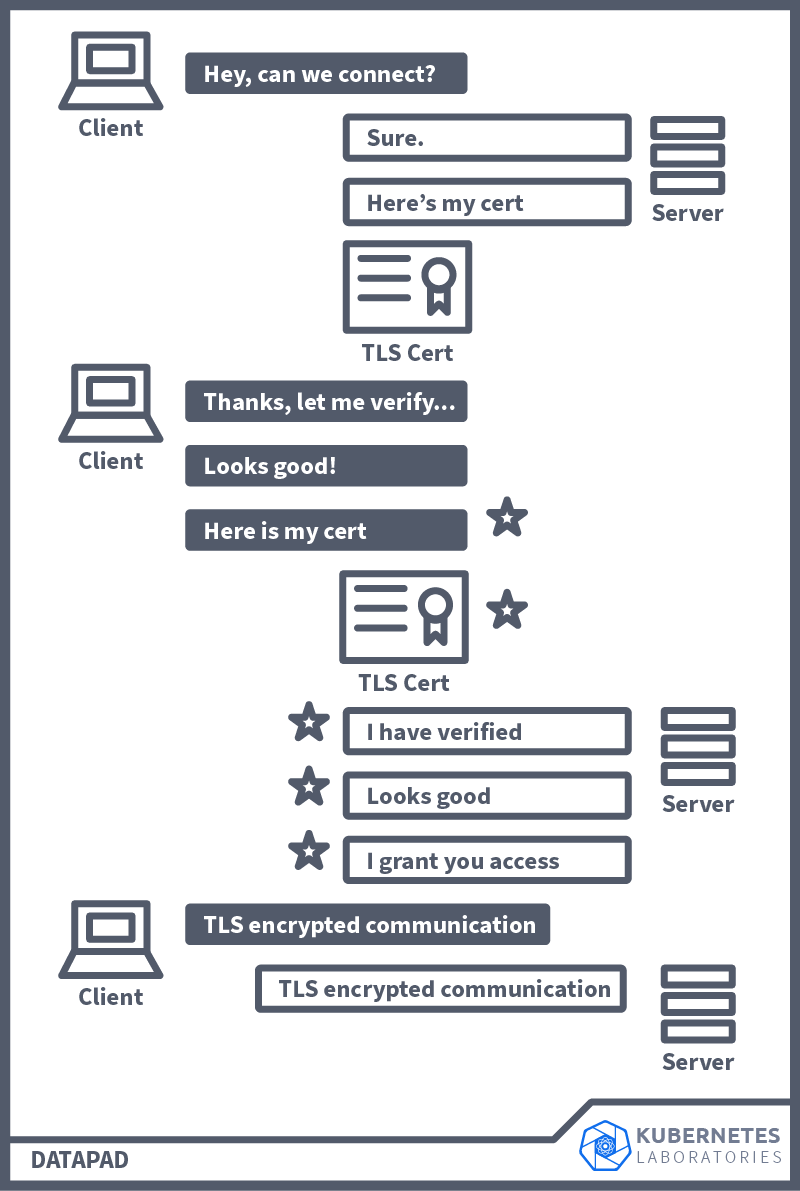
(Mutual Transport Layer Security) provides mutual authentication, ensuring that both sides of a connection are authenticated using certificates. As you know, when using (transport layer security), a server has a certificate and a public/private key pair. However, the client does not. In , on the other hand, both client and server have a certificate and authentication using a public/private key pair. Another noteworthy difference is that with , the organisation that is implementing it acts as its own (certificate authority) instead of having an external organisation validate its identity. Here is a visualisation of how works and the connection steps that happen between a client and a server. The steps highlighted with a star are additional steps in (versus ).
A Lot To Consider
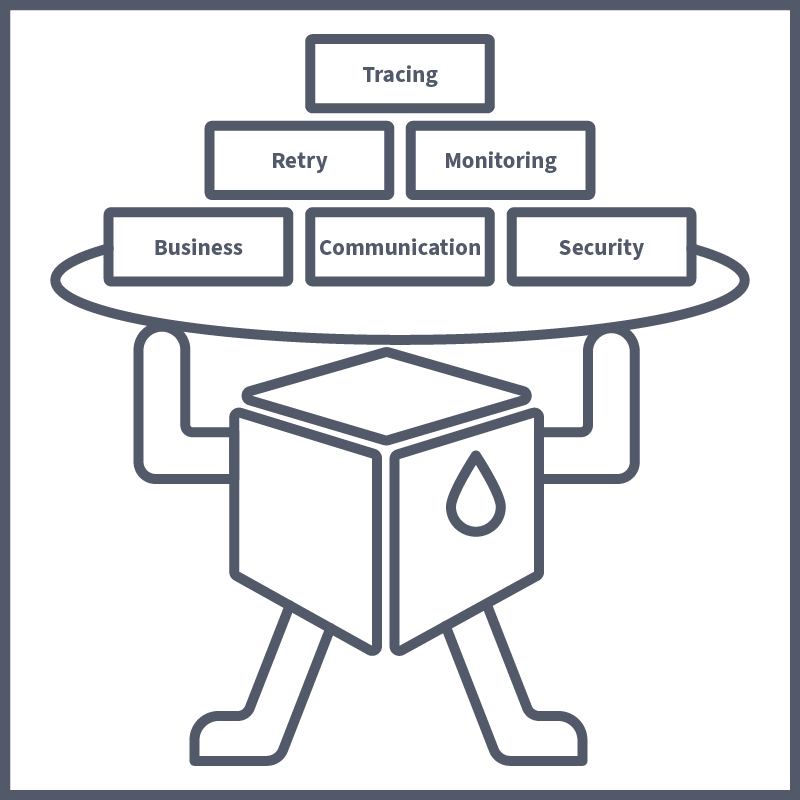
Let's consider this example of microservices architecture. Each of our microservices is running inside of a pod. Each one will have its own business logic, aka functionality, which is its purpose in our application. Then, our microservices will talk to each other; for example, one of our employees may connect to the WebApp service, which will talk to the Results service, which, when logged, will communicate with the DB. For this, each will need to know the endpoint of all the microservices it talks to; this is known as communication configuration. Above, we discussed the importance of having pod-to-pod communication secured using ; for this, the will need to have the security logic included as well. For a to be robust, it will need to include some kind of retry logic, which retries a connection if the it communicates with is down, for example. As well as all this, service monitoring is frequently needed to gain business insights into usage and performance as well as tracing data, which can be useful in troubleshooting contexts. Put all of this together, and suddenly, your isn’t looking so micro.
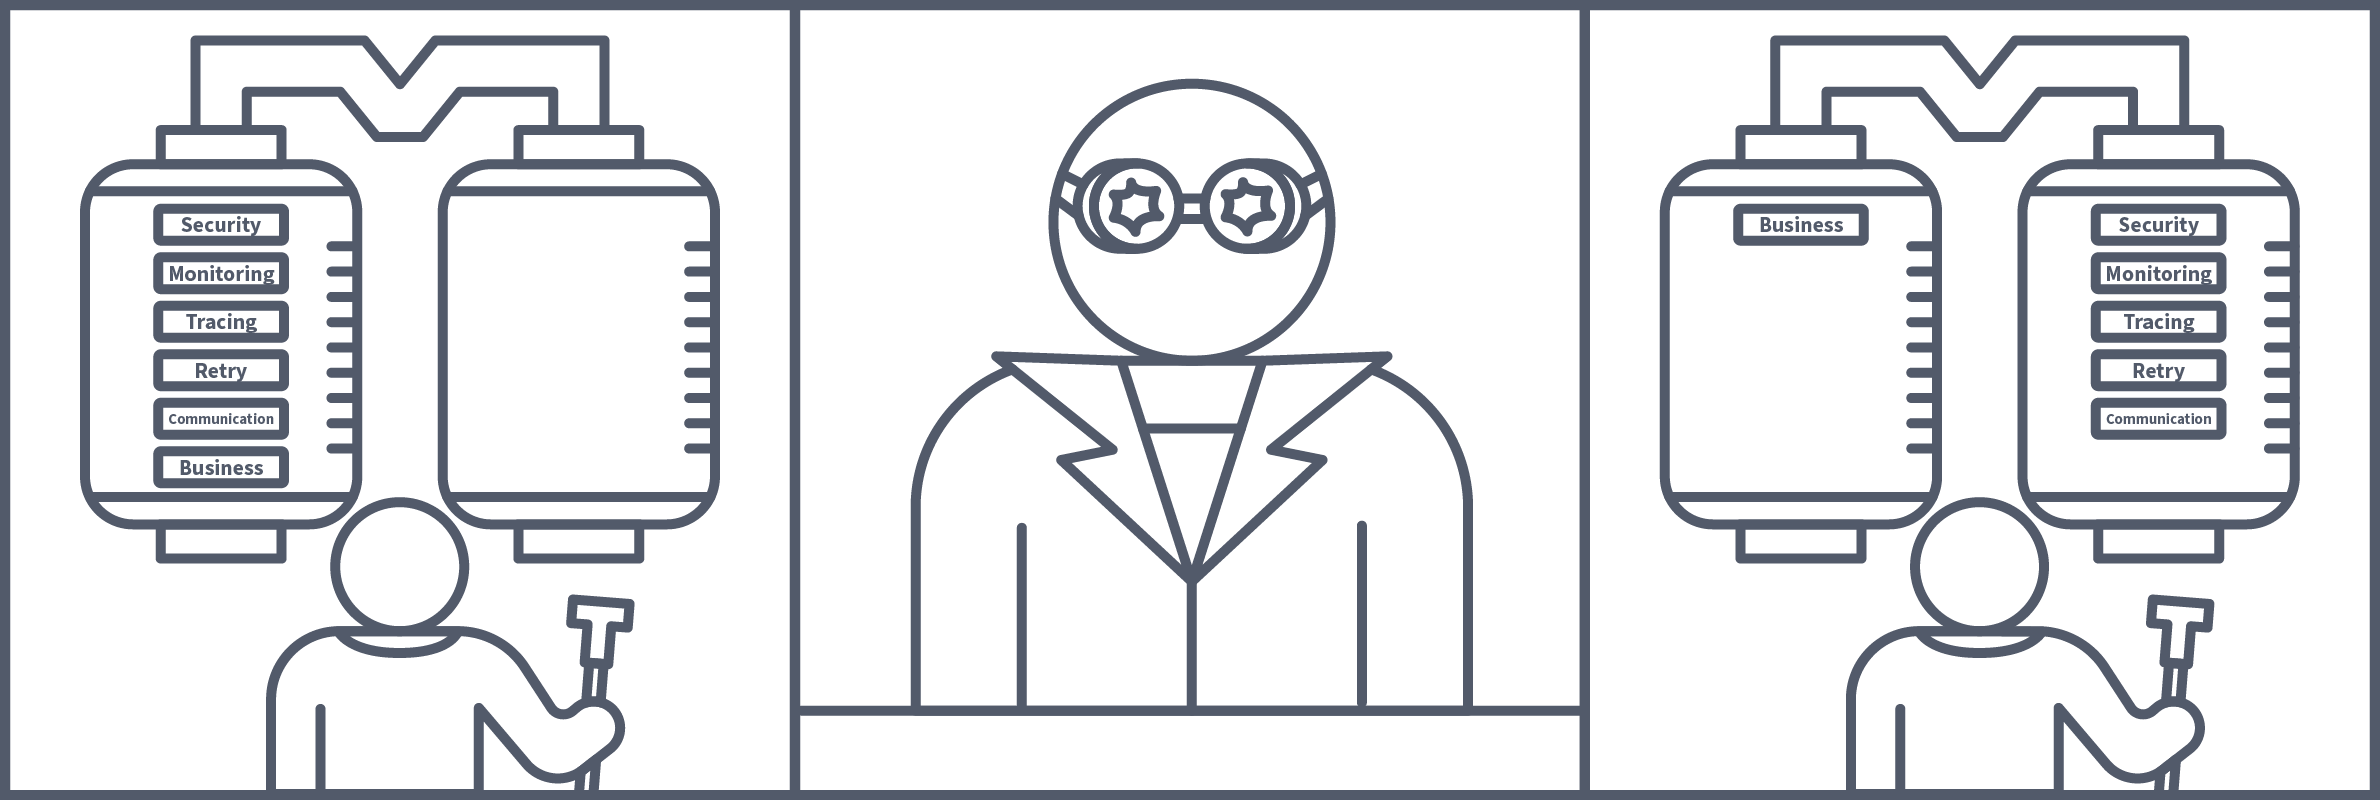
All of this non-business logic needs to be added to each /application, which can lead to the developers spending all of their time on these configurations instead of the actual application development itself. On top of this, the manual configuration of this non-business logic, sometimes across different teams (with different dev teams assigned to certain microservices), can lead to misconfigurations, which is especially concerning in a security context. This is where Service Meshes come in.
A Microservice architecture is an alternative to what style of architecture?
A problem with microservice architectures is that service-to-service communication is usually?
The solution to the above problem would be to have both sides of a connection authenticated using?

The Answer to Our Problems
All of the issues outlined in the previous task can be solved with one convenient and efficient solution: a . A is a dedicated infrastructure layer that can be used to control and manage service-to-service communication. This task will explain how this is done and how it solves the problems outlined in the previous task. Truly, a engineer's best friend. Given the issue that was established, having all of this additional logic and configurations to develop on top of the business logic on a service-to-service basis can be a lot of work. Would it not then make sense to separate the business logic of the from all of the other logic and configurations and have this be handled separately and repeatedly across all microservices? This is exactly what can be achieved using a .
How Is This Achieved
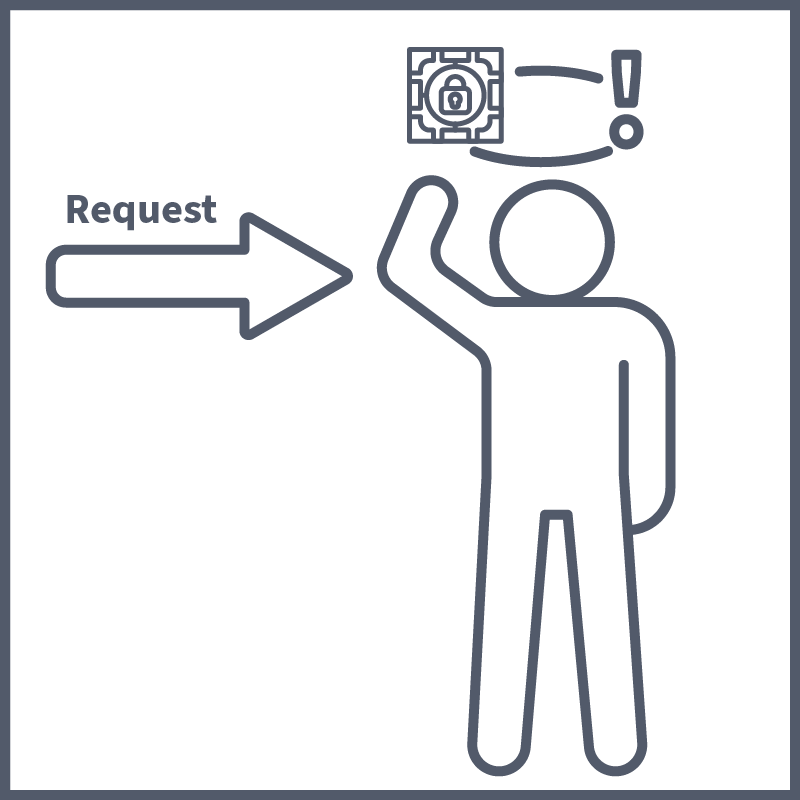
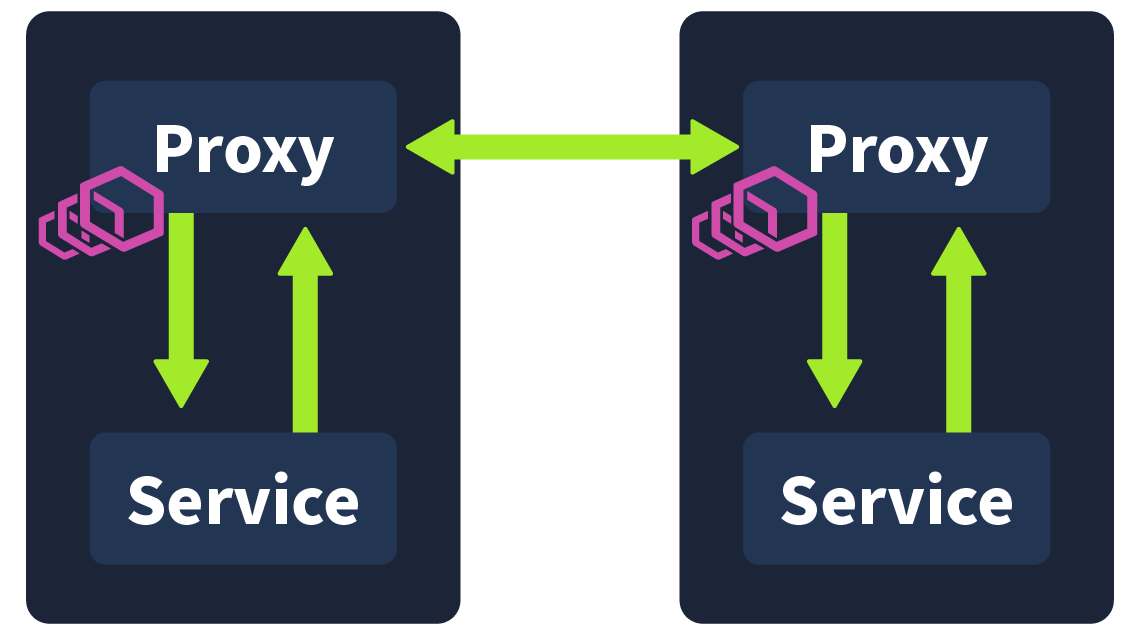
A achieves this by extracting all of the non-business logic and configurations and having them run in its own in parallel to the , called a . A conjures up images of those motorbikes with a little comportment attached to its side; this, in essence, is how we define a in tech. The motorbike is the primary application, and the is a service or process deployed in parallel, which supports the primary application. In this case, the is being used as a . Proxies are commonly used in security, with a regularly used example being an employee accessing a webpage via their workstation. This request would first be received by their company's web ; it would have to pass the 's security checks before being forwarded to the web server. The server would then return the page to the web , where it would again need to pass security checks before finally being forwarded to the employee.
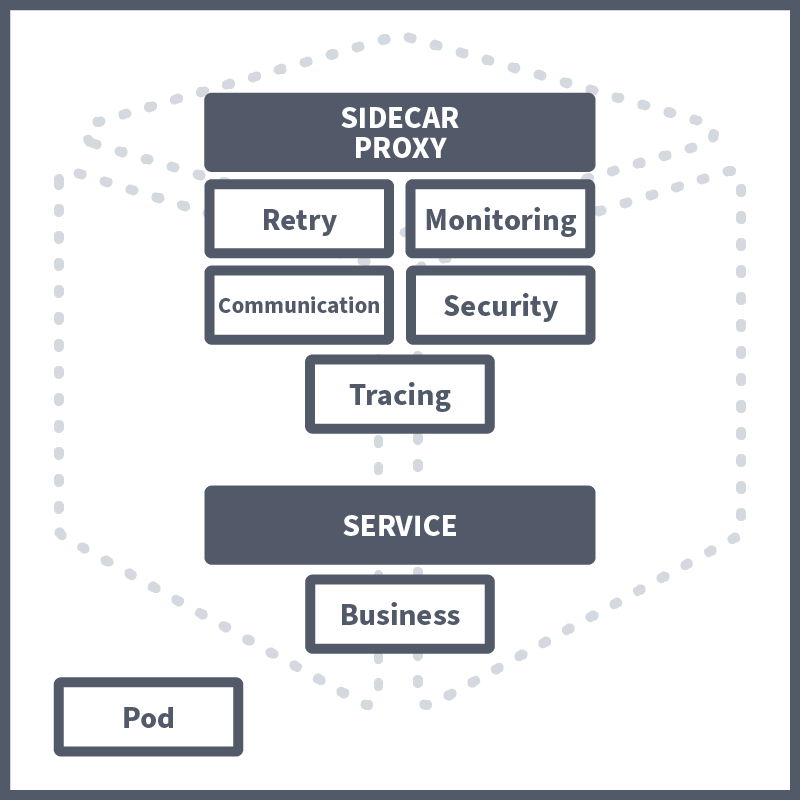
In a , these proxies are used, forming their own infrastructure layer where requests between microservices can be routed. In other words, all security logic, communication configuration, retry logic, service monitoring, and tracing are taken care of by this . They are called sidecars because they run alongside the , which contains the actual business logic. These interconnected proxies form a mesh network.
How Engineers Benefit
The example architectures discussed in earlier tasks are very primitive examples. In reality, large organisations can have very complex architectures with numerous microservices. Adding another or another instance of an existing can complicate the architecture even further with additional communication channels and security configurations, and as the architecture grows, finding the root cause of issues can become harder and harder. A becomes a engineer’s best friend by extracting this all, not only ensuring consistency and security in service-to-service communication but capturing metrics on performance can help ensure a robust architecture (e.g. the average time it takes for a service to restart can be factored into when a retry is attempted). Taking away the need to configure all non-business logic on a per-application basis and having it all run in a also makes applications more scalable.

Service meshes are a win for everyone; from a developer perspective, they can focus on developing the application business logic without worrying about the need to build things like communication configuration and security logic into the app. From a security perspective you can assured that the is managing the secure connection between services. For this reason, when managing a microservices architecture in , a should always be considered.
A Service Mesh separates which logic from the rest?
The rest are separated into a separate proxy, which runs alongside the application pod, known as?

Istio to the Rescue
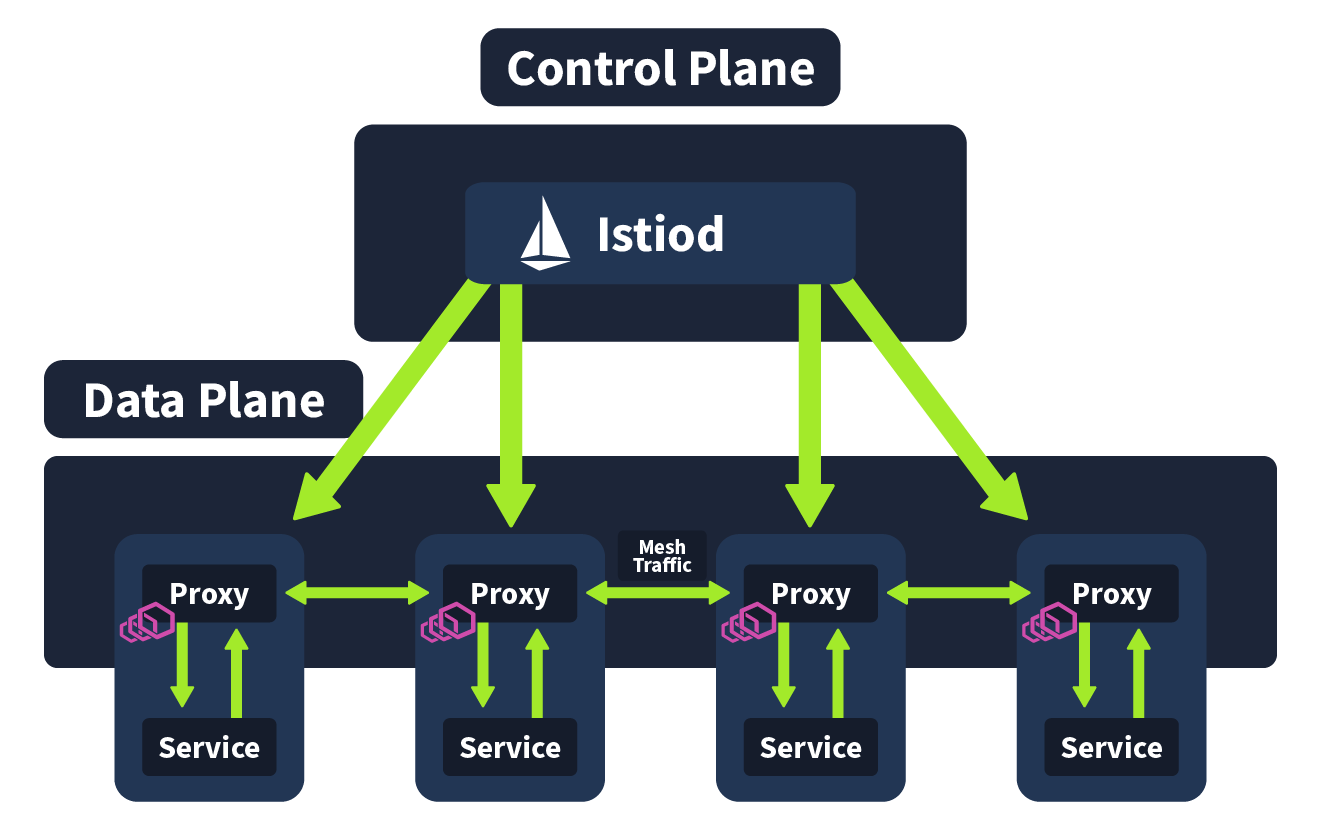
We have covered what a is and how exactly it can help a engineer to secure a microservices architecture; now we will take a look at a popular implementation of , Istio (opens in new tab). Essentially, is a concept, and Istio is one of the technologies we can use to achieve this (other implementations include Linkerd (opens in new tab) and Hashicorp Consul (opens in new tab)). A popular choice for implementing a in a microservices architecture, it has a security-by-default security model, making it ideal for engineers looking to deploy security-conscious applications. In this task, we will break down Istio architecture to give you a better understanding of how a works within a cluster. Istio architecture is logically split into two sections: the Data Plane and the Control Plane. We will now define each of these sections and how they work, but at a high level, the Data Plane is a collection of intelligent proxies deployed as sidecars, and the Control Plane is responsible for the management and configuration of these proxies.
Envoy Proxies (Data Plane)
In the previous task, it was mentioned that, in a , all of the non-business logic is extracted and run as a side care in parallel to the service. In Istio (and many other implementations), this is achieved using Envoy. Envoy is an open source, high-performance edge and service that is used in this instance to manage inbound and outbound traffic between services. These envoy proxies interact with network traffic and allow features such as encryption between services, as has been configured. The communication between these envoy proxies form the data plane, one of two architecture planes in Istio.
Istiod (Control Plane)
Istiod is the name of the component that makes up the Control Plane. Istiod allows for service discovery, configuration and certificate management. This component is responsible for taking the high-level routing rules that have been defined and turning them into envoy-specific configurations. These configurations are then injected into the proxies at runtime. This component is also able to abstract platform-specific (for example, ) service discovery mechanisms and turn them into a standard format that can be consumed by the Envoy . So when a new Service is spun up in your cluster, the control plane will detect and inject an envoy to run alongside it.
It’s worth noting that prior to v1.5, the Istio control plane was made up of multiple components (Pilot, Citadel, Mixer, and Gallery). However, now all of these components were combined into a single Istiod component. This made it easier for users to configure/operate. I am pointing this out because some other resources are outdated and refer to the control plane being made up of these components.

Putting It Together
Combining the Data Plane and the Control Plane, we get a complete Istio architecture. The control plane is responsible for configuration, discovery, and certificates and propagates all running services with an envoy , a network that communicates with mesh traffic forming the data plane.
In this task, we looked at an implementation of a Service Mesh named what?
In this Service Mesh implementation, what is used to achieve the proxies?
What is the name given to this area of the architecture where the proxies communicate with services (and other proxies)?
What is the name of the component that makes up the Control Plane?
Set up your virtual environment


Getting Started
Before starting with the intro, it's a good idea to get the and minikube cluster booted up. Click the green "Start Lab Machine" button, and allow 2 minutes for this to boot up. The machine will start in Split-Screen view. In case the is not visible, use the blue Show Split View button at the top of the page. Once booted up, run the following command to start the minikube cluster:
thm@k8s$ minikube start
Now onto the lesson.
It is now your third week here at Kubernetes Laboratories; slowly but surely, your DevSecOps skills are growing, and the team is trusting you with more and more work. During this morning's stand-up meeting, it was mentioned that there is an outstanding ticket for the security surrounding Kubernetes Laboratories Microservice architecture. This ticket explains that a review needs to be done by a member of the DevSecOps team, changing some configurations and advising the development team on how to configure their microservices going forward.
Configuration Check
With the minikube cluster booted up, let's start investigating. First off, let's check if Istio has been installed in this Kubernetes cluster. We can do this by checking if the istio-system namespace exists. We can verify this using the following command:
thm@k8s$ kubectl get namespaces
Here, we can see the "istio-system" is present, which means Istio has been installed in the cluster. In this , a pod will run the Istiod component (aka the control plane).
Now we know Istio has been installed in the cluster the next thing we want to ensure as a engineer is that it is being used correctly. The ticket assigned to us asks us to review the microservices running in the default . Let's continue the investigation by running the following command to check the status of the pods running in the default :
thm@k8s$ kubectl get podsRunning this command should return something like the following output:
           thm@k8s$
NAME                                    READY   STATUS    RESTARTS      AGE
database-5c6bcbb7d8-ht8pg               1/1     Running   1 (15m ago)   2d1h
products-7f5984db48-z9rst               1/1     Running   2 (15m ago)   2d3h
results-674478647d-s8ppb                1/1     Running   2 (15m ago)   2d3h
subject-registration-666cd768cb-rgprq   1/1     Running   2 (15m ago)   2d3h
test-chambers-6bff7bc878-zp7wm          1/1     Running   2 (15m ago)   2d3h
web-server-8569bb59bd-48gcr             1/1     Running   2 (15m ago)   2d3h
Note: If the status says “Error” please allow 1-2 more minutes for the pods to show as "Running".
Enabling Proxy Injection
Here we see each of the pods running in the default namespace. In the "READY" column, we see 1/1 next to all of the running pods. This is in reference to how many containers are running inside the pod. If you remember from our lesson, when a service mesh has been configured correctly, two containers should be running inside the pod (one running the application and the other a sidecar proxy). From this, we can determine that Istio proxy injection hasn't been enabled. That is the automatic injection of a sidecar proxy into running application pods. We can enable this using a Kubernetes label (provided, as we have confirmed, that Istio is installed in the Kubernetes cluster). Here is the command we would use to label the default namespace so that all pods started in this namespace are automatically injected with a sidecar proxy :
thm@k8s$ kubectl label namespace default istio-injection=enabledWith this labelled for automatic injection, we now want to restart all of the pods running in the default . To make this easier, there is a manifest yaml (in the /home/ubuntu directory) containing the configuration for the running pods in this namespace. We can restart everything running in this namespace by simply deleting and applying this manifest using the following two commands (when in the /home/ubuntu directory):
           thm@k8s$ kubectl delete -f microservice-manifest.yaml

thm@k8s$ kubectl apply -f microservice-manifest.yaml
Allowing for some time for the pods to come back up, with a kubectl get pods , we should now see the pods running status as follows:
           thm@k8s$ kubectl get pods
NAME                                    READY   STATUS    RESTARTS   AGE
database-5c6bcbb7d8-vzgct               2/2     Running   0          7m12s
products-7f5984db48-hzndf               2/2     Running   0          7m12s
results-674478647d-9qjvs                2/2     Running   0          7m12s
subject-registration-666cd768cb-tgwsl   2/2     Running   0          7m12s
test-chambers-6bff7bc878-k65lq          2/2     Running   0          7m12s
web-server-8569bb59bd-r52pn             2/2     Running   0          7m12s
With that, we now have a sidecar proxy running in each of our pods in the namespace. If curious, you can use the kubectl describe pod <pod-name> command to get more details about the Istio container.

Enforcing mTLS Traffic
Now that we have enabled proxies to be automatically injected, the next thing we want to consider as a DevSecOps engineer is the mTLS configuration. That is ensuring all of our internal traffic is secure. Now, Istio automatically configures workload sidecars to use mTLS when calling other workloads. However, by default Istio configures mTLS in Permissive mode. Permissive mode allows for a service to receive both mTLS traffic AND plaintext (unencrypted) traffic. This is the default as this fits a lot of use cases, with large organisations not being able to upgrade all of their environment at once, so services need to be able to receive both plaintext and mTLS traffic. However, in our case, we have upgraded this entire environment, so we don't want permissive mode to be used. We want Strict mode which only allows mTLS traffic. Istio handles this using "Authentication Policies", where we define what level of authentication we want.
These policies allow us to define authentication policies for certain resources as well. Say, for example, we had an application that handled particularly sensitive traffic. We could make an authentication policy like so to ensure only mTLS traffic is allowed:
           apiVersion: security.istio.io/v1beta1
kind: PeerAuthentication
metadata:
  name: "sensitive-peer-policy"
  namespace: "example-namespace"
spec:
  selector:
    matchLabels:
      app: sensitive-app
  mtls:
    mode: STRICT
Given we want to apply our authentication policy to all of the pods in the , we can structure ours like so:
           apiVersion: security.istio.io/v1beta1
kind: PeerAuthentication
metadata:
  name: default
  namespace: default
spec:
  mtls:
    mode: STRICT
Copy the above file contents and make a file named "auth.yaml" with its contents. You can then apply this authentication policy using kubectl:
thm@k8s$ kubectl apply -f auth.yamlWith that applied, our service mesh is configured, and internal traffic is secured. We can mark our ticket as complete and advise the dev team of the changes that have been made. With a third week complete at Kubernetes Laboratories you are almost past your probation here and ready to don the title of DevSecOps engineer. Run the following command to describe the auth policy you've just made and submit the value contained in the API version field to complete this task:
thm@k8s$ kubectl describe peerauthentication defaultWhat value is contained within the API version field when you describe the authentication policy?

By going through this room, you have increased your knowledge base by gaining a greater understanding of microservices architectures, a foundational term in , and what methods can be used to secure them. Your arsenal is now getting pretty stacked. Let’s recap what we’ve covered in this room to keep the knowledge sealed up tight. In this room, you have learned:
- Pod Security Standards define three levels of pod security: Privileged, baseline and restricted.
- The above mentioned standards are enforced by Pod Security Admisson which has three modes: enforce, audit and warn.
- Building a microservices architecture comes with problems, such as securing pod-to-pod communication and configuration/logic-filled application pods.
- A solution to the above mentioned problems can be found in Service Meshes, which separate the business logic of the application and runs everything else in a concurrently.
- Istio is a implementation which is made up of two parts, the Control Plane and the Data Plane.
- Istio can be installed into a cluster, automatic injection can be enabled and authentication policies made to ensure secure internal communication.
And with that, you’ve completed another room and are one step closer to mastery. Log off after another hard day at Laboratories.
All done!
Ready to learn Cyber Security?
TryHackMe provides free online cyber security training to secure jobs & upskill through a fun, interactive learning environment.
Already have an account? Log in