
Re-Testing
Verify vulnerability remediations, spot incomplete fixes, and produce re-test reports for auditors.
medium

To access material, start machines and answer questions login.
A penetration test delivers a report. The client implements fixes. Then they ask you the question every client asks: "Are we actually fixed?"
That question is what re-testing is for, and it is harder to answer than it sounds. Research from Netlas (opens in new tab)found that 15.5% of security patches are unreliable in some way: 8.05% are classified as incomplete, 4.15% as wholly incorrect, and the remainder as covering other failure modes. For any given engagement, roughly one in six findings that clients believe are closed will not survive a competent re-test. The clients do not know this. They look at the closed Jira ticket and assume the problem is gone.
The re-test phase is where you find out whether the fix actually addressed the vulnerability or just made the exact payload from the report stop working. Those are not the same thing, and this room is about the difference.
Learning Objectives
- Distinguish between a re-test and a full reassessment, and explain when each is appropriate
- Define pass, fail, partial pass, and risk-accepted outcomes and apply them to different remediation types
- Identify incomplete fixes by testing variant payloads when the original proof-of-concept is blocked
- Collect and organise evidence for both fixed and failed findings
Prerequisites
- Penetration testing fundamentals (prior rooms in this module)
- Basic usage; you need to be comfortable with History and Repeater
- Familiarity with pentest report structure (prior rooms in this module)
Start the machine below by clicking the Start Lab Machine button. The target web application will be ready in approximately two minutes.
Set up your virtual environment

I have successfully started the machine.
Re-Testing vs Full Reassessment are the two engagement types that are not interchangeable, and clients use "re-test" to mean both. Part of a Jr Pentester's job is understanding what the client actually needs, even when they do not know the difference themselves.
What a Re-Test Is
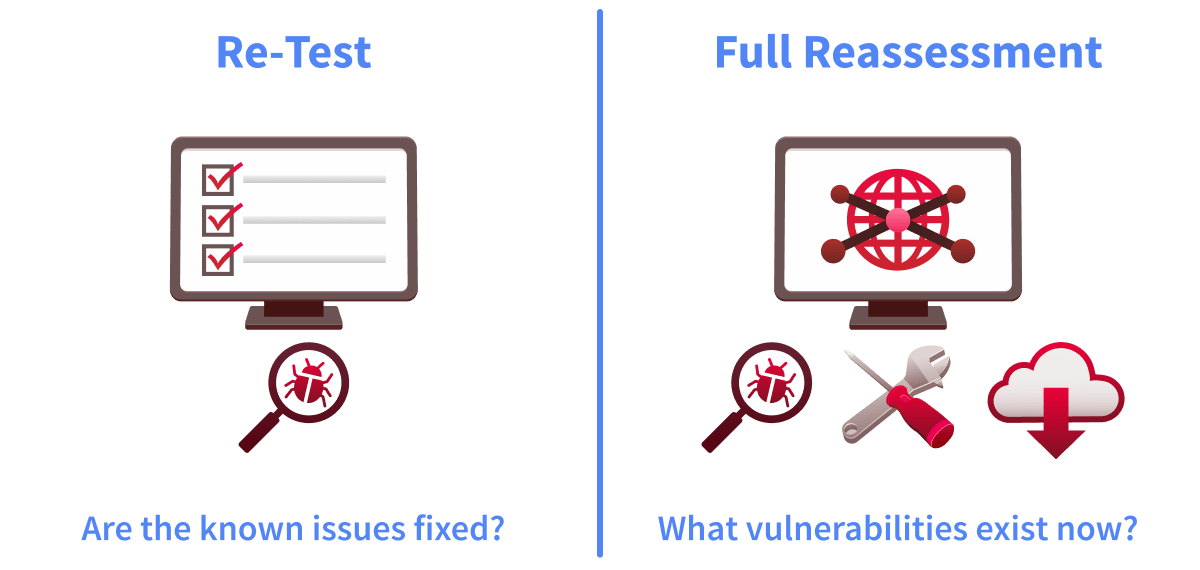
A re-test, also called remediation verification or remediation validation, is scoped exclusively to the findings in the original report. You use the same attack vectors, payloads, and techniques from the original test. You do not explore new attack surface or pursue chains through newly discovered paths. The engagement is much shorter than the original, and the deliverable is an addendum or updated report, not a fresh full report. The question you are answering is: "Are the known issues fixed?"
What a Full Reassessment Is
A full reassessment treats the environment as if no prior test had been performed. It covers the full attack surface defined in scope, may incorporate updated tools and new threat intelligence, and produces a new pentest report. It is appropriate after major infrastructure changes such as a cloud migration, a merger or acquisition, or a significant code rewrite. The question you are answering is: "What vulnerabilities exist now?"
The Confusion Problem
Clients reach out asking for a "re-test" after rebuilding their e-commerce platform from scratch. They are using the word they know. What they actually need is a reassessment, because the attack surface has changed entirely and the original findings are no longer a relevant baseline. If you proceed with a scoped re-test under those conditions, you will confirm that the three specific vulnerabilities from the original report no longer exist, while potentially missing entirely new problems in the rebuilt application.
Clarifying this is a communication skill, not a technical one. Ask what changed between the original test and now. If the answer is "everything," they need a reassessment.
The table below captures the practical differences:
| Dimension | Re-Test | Full Reassessment |
|---|---|---|
| Scope | Findings from the original report only | Full attack surface |
| Baseline | Original report and notes | Treat the environment as new |
| Duration | 30% of the original engagement time | Full engagement time |
| Triggers | Client remediates findings | Major infrastructure change, M&A, code rewrite |
| Output document | Addendum or updated report | New pentest report |
| Question answered | Are the known issues fixed? | What vulnerabilities exist now? |
Where Re-Testing Fits in the Pentest Lifecycle
The Penetration Testing Execution Standard (PTES) (opens in new tab) defines seven phases that end at Reporting. Re-Testing is not one of those phases; it is a separate engagement that begins after the client has acted on the report. This matters commercially: when a client asks, "Isn't this just part of what we already paid for?", the answer is that the original authorisation, Statement of Work (), and scope document all belong to a closed engagement. A retest requires its own pre-engagement documentation, even when performed by the same team.
A client rebuilt their entire e-commerce platform after remediation. Should they request a re-test or a full reassessment? (Answer Format: two words)
What document governs whether re-testing is included in the original engagement, and should be reviewed before the original assessment ends? (Answer Format: abbreviation)
Re-Testing feels straightforward because the hard part seems already done. The original report exists, the scope is defined, and the client has told you what they fixed. But "the original authorisation still applies" is not a substitute for pre-engagement checks, and skipping them causes real problems.
The Remediation Window
The remediation window is the agreed period between the delivery of the original report and the re-test, during which the client implements fixes. This window needs to be defined in the original Statement of Work, not negotiated after the report lands. Expectations set after delivery are almost always contentious.
Common window lengths seen in commercial engagements vary by firm and should be defined in the rather than assumed:
| Window Length | Context |
|---|---|
| 15 - 30 days | Hotfixes for critical and high findings only |
| 30 - 60 days | Standard web application or network engagement |
| 60 - 90 days | Full assessment with complex findings requiring code changes or architectural work |
| 90+ days | Large enterprise engagements or findings requiring infrastructure changes |
Scoping Language Matters
There is a real difference between "re-test the finding," "re-test the login form," and "re-test authentication." The first is tightly scoped to the documented vulnerability. The second includes the entire login form. The third potentially covers all authentication surfaces. If the scope language in the re-test authorisation is ambiguous, clarify it before testing, not after you have found something unexpected.
New Attack Surface During Re-Testing
You will sometimes discover something during a re-test that was not in the original report. Maybe you notice an endpoint that shouldn't exist, or you observe behaviour that wasn't tested the first time. The correct protocol is: document it, report it to the client as a separate memo, observation letter, or supplemental advisory, depending on the firm. The name matters less than the fact that it is written, dated, and clearly separated from the retest report. This written record exists to protect both parties: it documents that you observed but did not test out-of-scope surface, creating a clear legal and compliance boundary.
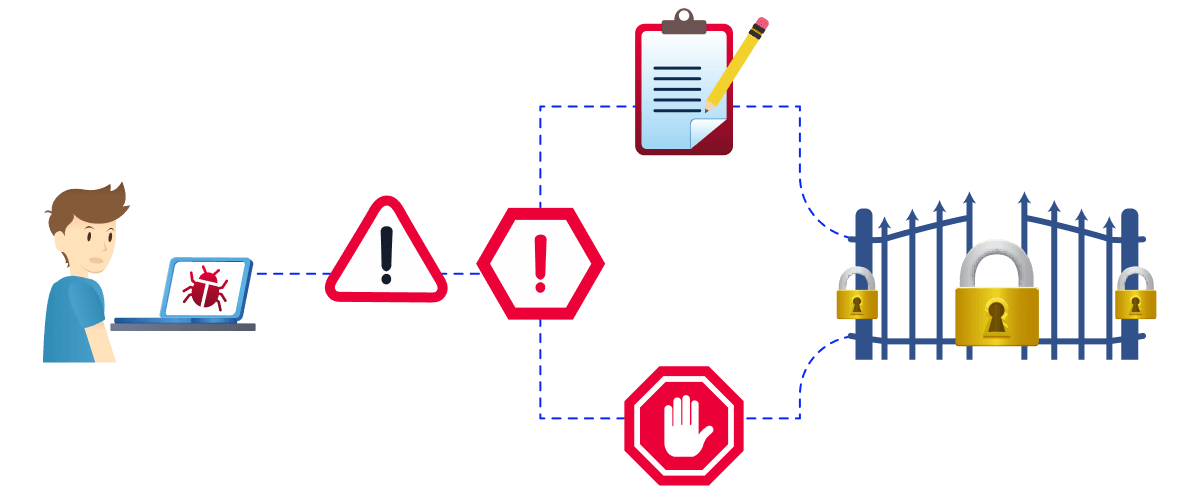
Do not test the new surface further without written authorisation. This is a compliance and legal boundary, not a style preference. Proceeding without authorisation is an out-of-scope action regardless of how clearly vulnerable the surface appears.
Risk Acceptance and Compensating Controls
Risk acceptance is a valid and documented outcome. When a client formally decides not to fix a finding because the business constraints outweigh the risk, they sign a document accepting that risk. That outcome is recorded in the re-test report as "Risk Accepted" rather than "Remediated." It is a legitimate business decision. Your job is to document it accurately so that auditors and stakeholders understand the finding was not fixed, only accepted.
A related but distinct outcome is a compensating control. This is where the client cannot remediate the finding but implements a documented alternative control that reduces the risk to an acceptable level without fixing the root cause. For example, a legacy system that cannot be patched may have its network access restricted instead. Compensating controls are recorded as "Compensating Control" or "Mitigated" in the re-test report, not "Risk Accepted" because the client has taken action to reduce the exposure rather than simply accepting it as-is.
What is the term for the period between report delivery and the re-test, during which the client implements fixes? (Answer Format: two words)
A client signs a formal document stating they will not fix a medium-severity finding due to business constraints. What is this outcome recorded as in the re-test report? (Answer Format: two words)
Knowing how to classify a retest result correctly is the technical core of this engagement type. The categories sound simple until you work through what "fixed" actually requires.
What "Fixed" Actually Means
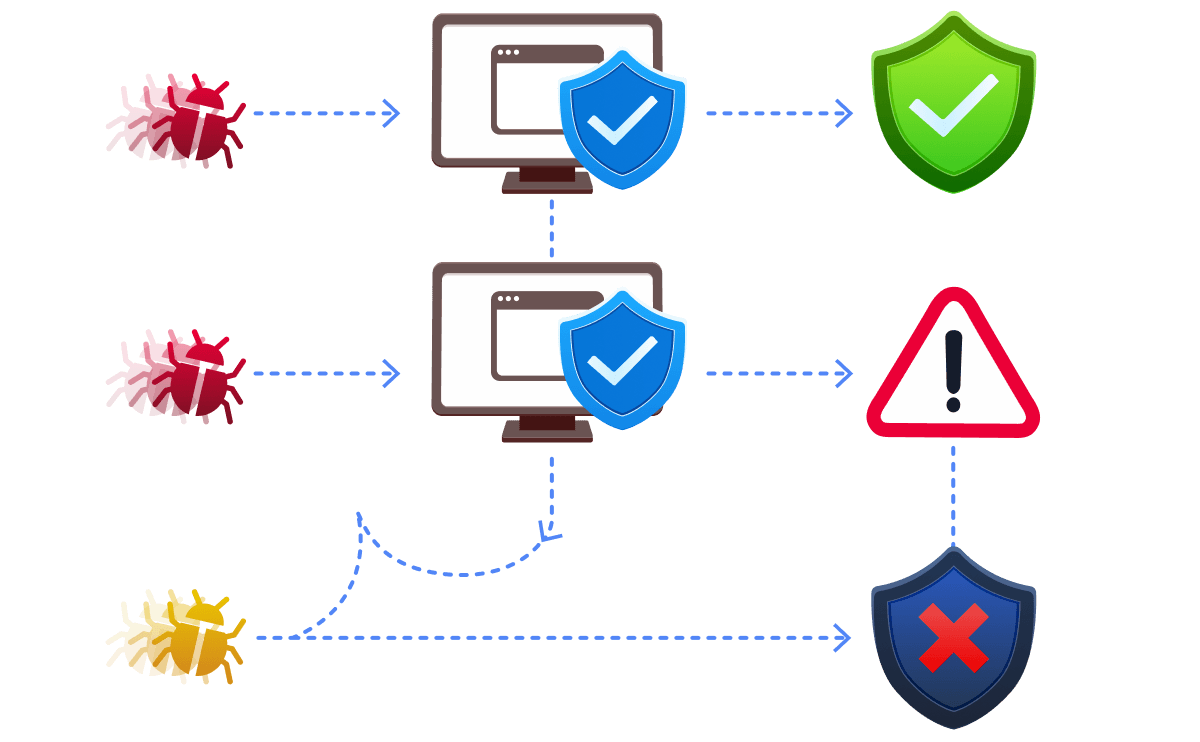
A finding passes re-testing when the original proof-of-concept exploit no longer works and the fix does not introduce any new vulnerability. Both conditions have to hold. A fix that stops the original payload but leaves the root cause intact is not a fix; it is a partial mitigation that will fail re-testing.
 The trap that catches many developers is that they block the specific payload in the report. They see
 ' OR '1'='1 in the findings, they add a check for that string, and they mark the ticket closed. If you test only that exact payload, you will confirm the block works. If you test variants, you will find the underlying vulnerability remains.
Outcome Classification
| Outcome | Criteria |
|---|---|
| Pass | Original PoC blocked; obvious variants also fail; root cause addressed; no regression introduced |
| Fail | Original PoC still works; variant succeeds where specific payload is blocked; same vulnerable pattern exists in adjacent code |
| Partial / Conditional Pass | Vulnerability mitigated but not eliminated; compensating control accepted; lower-severity residual risk remains must be documented explicitly |
| Risk Accepted | Client formally accepted the risk in writing, not tested as fixed; documented separately |
Outcome labels vary by firm "Partial Pass" may appear as "Partial Remediation," "Mitigated," or "Conditional Pass" in different organisations' reporting templates. PTES, OWASP, CREST, and NIST SP 800-115 do not define a standardised four-outcome classification scheme. The criteria matter more than the label.
Verifying a Patch or Software Update
When a client applies a vendor patch, confirm that the version number has changed and matches the patched release. Then re-run the PoC against the updated version. Version confirmation alone is not re-testing; it is version-checking. A scanner that reads the version banner and marks the finding closed is doing the same thing. I have seen environments where the version banner showed the patched release, yet the underlying vulnerability remained fully exploitable.
Check whether the patch was applied to all instances. Clustered environments frequently miss a node. Verify that the patch actually addresses the specific CVE reported. Vendor patches are not always complete (we will cover specific examples in Task 5).
Tools that are useful here: nmap version detection, whatweb, manual banner checks.
Verifying a Code Fix
Attempt the original payload against the patched endpoint. Then test encoding variations and alternative parameter paths. If the fix looks like it might be a blocklist rather than a root-cause fix, it is usually tested accordingly.
When code review is available, review the commit diff to confirm the root cause was addressed, not just a blocklist added. Developers often fix one endpoint while leaving the same vulnerable pattern in three others. Look for adjacent code that uses the same construction. For injection-class vulnerabilities, root cause resolution means the query structure cannot be altered, and input-parameterised queries are the canonical fix. We cover what that looks like in practice in Task 7.
Verifying an Architectural Change
Architectural changes are the most complex to verify. You need to map the new architecture and confirm that the original attack path no longer exists. If a service moved behind a WAF, verify the original endpoint is inaccessible directly AND that the WAF rules are correct for the specific attack type. If network was added, verify that the attacker-reachable subnet cannot reach the target system.
Architectural changes also carry the highest risk of introducing a new attack surface, because large-scale changes touch many systems and the interdependencies are hard to predict.
The original SQLi payload ' OR '1'='1 is now blocked, returning a generic error. A variant payload ' OR 1=1-- still returns all user records. What is the re-test outcome for this finding? (Answer Format: one word)
The pitfalls that cause re-testers to issue false passes are not exotic edge cases. They are the predictable failure modes of reasonable people working under time pressure with incomplete information. Knowing them in advance is how you avoid them.
Pitfall 1: Testing the Symptom, Not the Root Cause
This is the most common failure pattern. A developer receives the report, sees the exact payload that triggered the vulnerability, and blocks that specific string. The underlying vulnerability, unsafe query construction, unvalidated redirect, and deserialised input are still present.
If you only replay the exact from the original report, you will confirm the block works. The finding looks fixed. But the root cause is intact, and any attacker who tries a variant will bypass the block immediately.
The real-world example that makes this concrete: SAP released a patch for -2025-31324 ( 10.0, unauthenticated file upload via Visual Composer) in April 2025. -2025-42999 demonstrates a related problem. After SAP patched the unauthenticated file-upload path in -2025-31324, researchers identified that the Visual Composer still contained an insecure deserialization vulnerability. -2025-42999 requires a privileged attacker, but when chained with -2025-31324, an unauthenticated attacker can use the file-upload path to plant a payload that the deserialization component then executes. An organisation that retested by confirming "is authentication now required on the upload endpoint?" would mark the original finding closed. A re-tester who tested the deserialization path and checked whether the two vulnerabilities could be chained would find tthat he composite risk remained.
Pitfall 2: Missing Instances
A finding that exists in one place usually exists in similar places. injection in the login form often reflects a vulnerable query-building pattern used across multiple forms. Default credentials on the admin web panel may still be the default credentials on the endpoint. A on one path may still exist on another path.
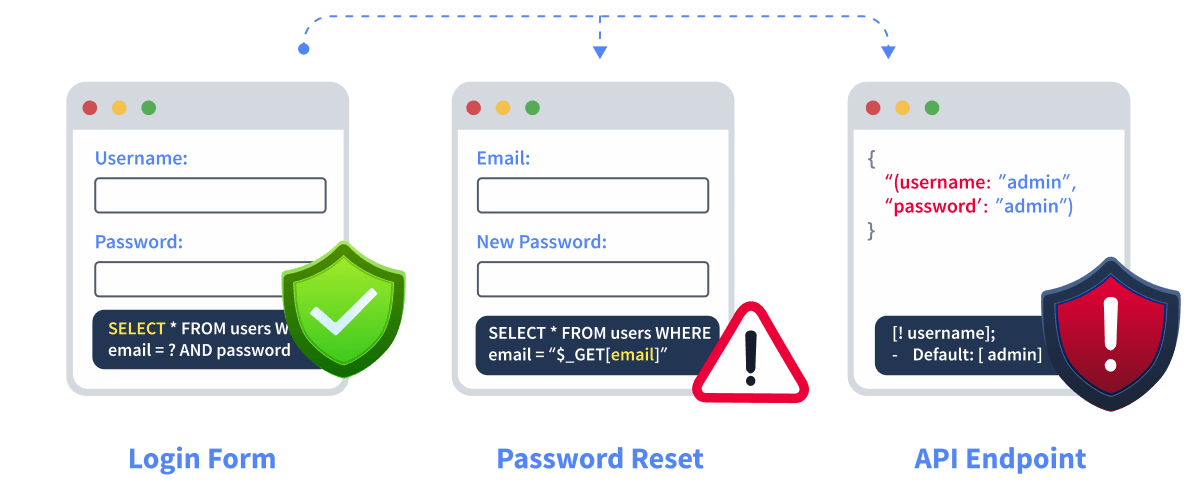 The missing-instance pattern quickly becomes a scope question. If you find that the login form was fixed with parameterised queries, but the password reset form still uses string concatenation, and the password reset form was not in the original report, you have an out-of-scope observation, not a re-test finding. The correct action: document it, flag it to the client as a separate memo, and do not test it further without written authorisation.
Pitfall 3: Patch Applied but Wrong Version or Wrong Environment
Developers sometimes apply a patch that addresses a related issue, but not the specific reported. Or they apply the patch to staging, but the production deployment has not happened yet. Always verify version numbers on the system you are actually authorised to test, not the build server or the staging environment, unless that is in scope.
Pitfall 4: Incomplete Vendor Patches
Vendor patches themselves are sometimes incomplete, and this is not rare. A documented example:
-2023-43208 arose directly from an incomplete patch for -2023-37679. The original was unauthenticated via Java XStream deserialization in Mirth Connect. The patch in version 4.4.0 addressed the vulnerability by adding a denylist of dangerous Java classes. Researchers found that the denylist could be bypassed using alternative gadget chains not on the list. The complete fix arrived in version 4.4.1. A re-tester checking "is version 4.4.0 installed?" would record PASS on the original while leaving the bypass fully exploitable.
Pitfall 5: False Confidence from Automated Scanners
Automated scanners report on known signatures and version numbers. If a patch changes the version banner, the scanner marks the finding resolved. There is a second, equally dangerous failure mode: a scanner may show clean after a denylist patch because the error response format changed, not because the vulnerability was fixed. The scanner no longer matches its signature against the new response, so it reports the finding closed, but the underlying query construction or input handling is intact. This is exactly the scenario we work through in Task 6: the denylist changes what the login form returns, but the root cause remains fully exploitable.
CVE-2023-43208 arose directly from an incomplete patch for which earlier CVE? (Answer Format: CVE-YYYY-NNNNN)
Vendor patches themselves are sometimes incomplete, which pitfall would this failure lie in?
You have returned to re-test the web application from the original engagement. The approach from Task 4 applies directly, starting with the exact from the original report, then testing variant payloads. Suppose the client's development team has confirmed all three findings from the original report are fixed:
- F-01: Injection Login Form (Critical)
- F-02: Default Credentials Admin Panel (High)
- F-03: Missing Security Header (Low)
Your job is to verify each one. We will focus on F-01, because this is where the interesting result lives.
Follow along in the web application as we walk through each step.
Step 1: Review the Original Finding
Consider a pentest report with three main findings as mentioned above.
Locate Finding F-01. The original report documents authentication bypass via injection on the login form, using the payload ' OR '1'='1 in the username field with any password. The evidence shows all user records returned in the response body.
This is your baseline. Everything in the re-test is compared against this.
Step 2: Confirm the Application State
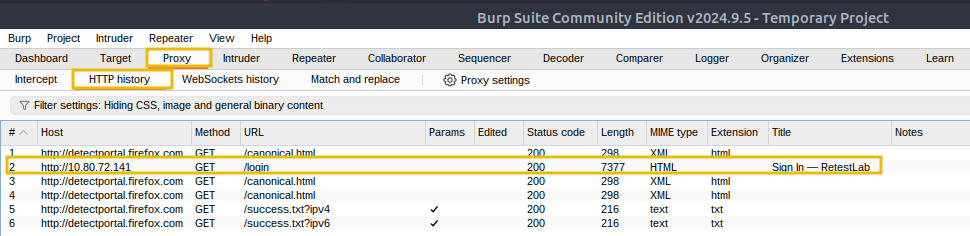
Navigate to http://MACHINE_IP/login in the browser. Confirm the login page loads.

Open Burp Suite and configure the browser to proxy through Burp at 127.0.0.1:8080. or use FoxyProxy in Firefox. Leave Intercept off for now; we are just confirming connectivity. You should see the login page load and the request appear in the HTTP History tab.
Step 3: Attempt the Original Payload
Submit the original payload from the report. In the username field, enter ' OR '1'='1 and use any value for the password field. Submit the form.
Look at the response in Burp Suite's History tab. Look for the Status column in the History table, which shows the three-digit response code for each request. The application returns a page with "Invalid input detected" in the response body.
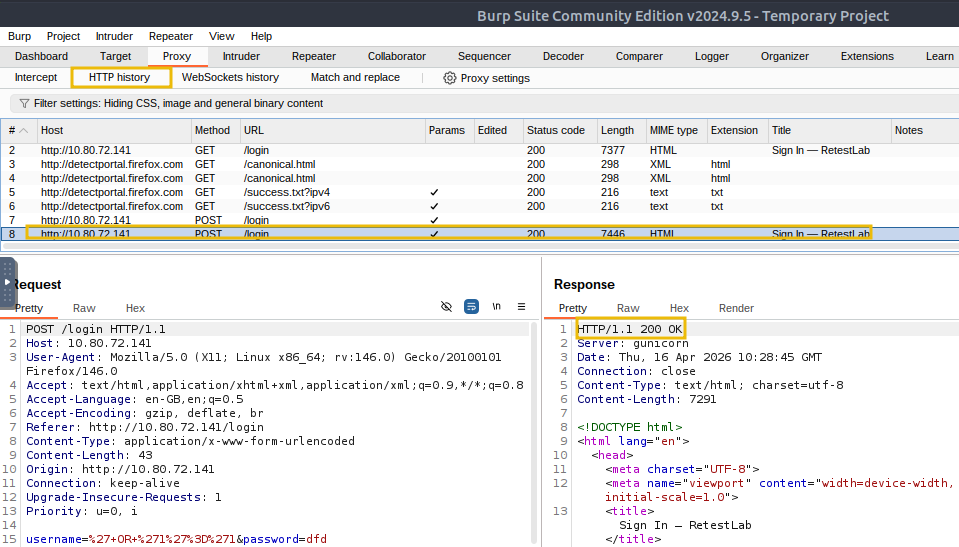 This looks like a pass. The payload documented in the report is blocked. But we are not done. This is exactly the scenario Task 4 warned us about. The developer may have masked the symptom while leaving the root cause intact.
Step 4: Test Encoding Variations
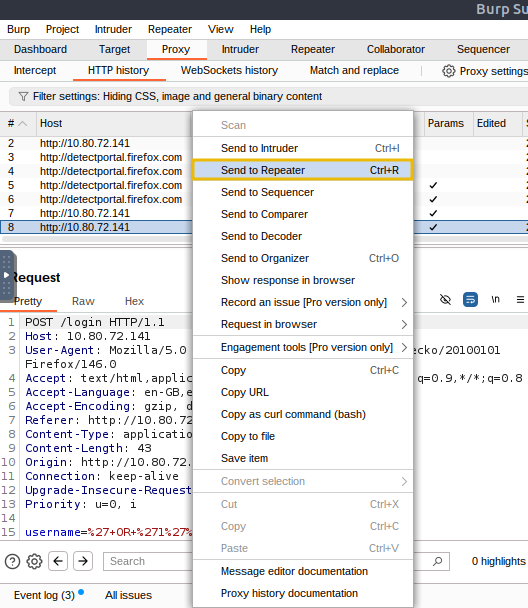
Right-click the POST /login request in HTTP History and send it to Repeater.
In the Repeater request pane, modify the username parameter value. Try the URL-encoded form of the original payload:
Send the request and observe the response. Flask's request.form URL-decodes the parameter before any application code runs, so the denylist sees the same decoded string it blocked before. You should still see "Invalid input detected."
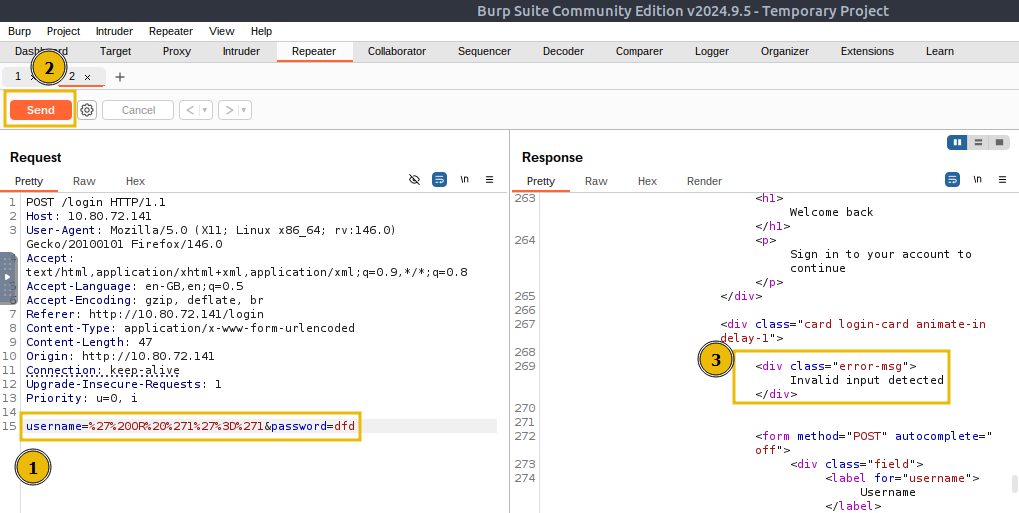 This confirms the denylist is checking decoded input, which is correct hygiene, but it is still not the right fix, because the root cause remains.
Step 5: Test Alternative Injection Syntax
Still in Repeater, try a different injection pattern. Replace the username value with:
Send the request. Watch the response panel, specifically the response headers.
A successful authentication bypass will not return user data in the response body; here, the application redirects to a different page on successful login. Look for the Location header in the response headers section. If authentication succeeds, the response will contain a redirect to /dashboard page.
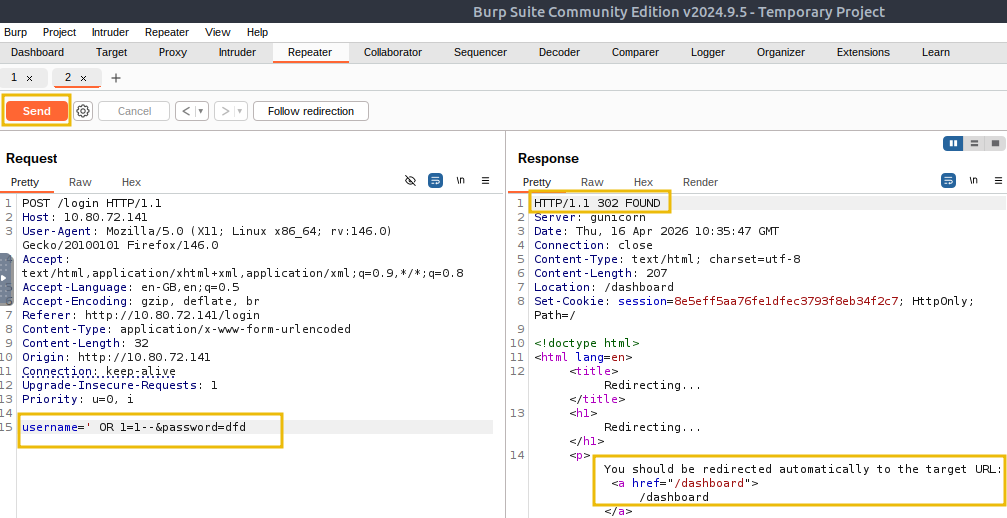
This variant uses a different logical structure than the original payload. The original used string comparison ('1'='1). This variant uses an integer comparison (1=1) and terminates the remainder of the SQL query with the -- comment operator. If the developer's fix was to check the original string against a denylist, this variant will not match it, and if the underlying query is still built via string concatenation, it will execute.
Methodology Reflection
Step back and look at what we just did. We started with the exact payload from the original report, confirmed it was blocked, then moved through encoding variations and alternative syntax until we found a variant that succeeded. The finding fails re-testing, not because the specific payload works, but because the root cause string concatenation in the query is still present. Any variant that reaches the query engine with a valid injection structure will succeed.
The approach is consistent: original first, then variants, then note adjacent observations without testing them. That sequence works for any web application that needs to find where a code fix was claimed.
Submit the original SQLi payload (' OR '1'='1) against the login form. What HTTP response code does the application return? (Answer Format: three-digit number)
Submit the variant payload ' OR 1=1-- in the username field. What URL path does the application redirect to on success? (Answer Format: /path)
Based on your testing, what is the overall re-test result for Finding F-01? (Answer Format: one word)
The re-test report is not a second version of the original pentest report. It does not replace the original and does not include a fresh executive summary or a new business risk narrative. It supplements the original by providing per-finding verification results, and that is all it does.
What makes a re-test report credible is comparable evidence. The same tools, the same methodology, and a clear side-by-side picture of what the original test showed versus what the re-test shows.
Evidence Standards
For fixed findings, capture the attack being blocked. A History screenshot showing the request and the blocked response is the right format. Include the full request and response pair, not just the status code, but the body content that demonstrates the attack did not succeed. If the fix was a version update, include version verification output alongside the blocked .
 Label everything: tool used, date, target URL, and finding ID. The re-test date must be clearly distinguishable from the original test date.
Evidence Organization
Organise evidence by finding ID:
Timestamp everything. Use filenames that include the date and finding ID. When you look at this folder six months later, the re-test date needs to be unambiguous.
The Re-Test Report Structure
Section 1: Re-Test Summary
Cover the re-test dates (not the original assessment dates), the number of findings retested, the pass/fail/risk-accepted breakdown, and recommendations for any findings that failed. An example summary line: "3 findings retested: 1 FAILED, 2 FIXED."
Section 2: Findings Status Table
This is the core deliverable. Every finding in scope gets a row:
| Finding ID | Title | Original Severity | Remediation Type | Re-Test Result | Notes |
|---|---|---|---|---|---|
| F-01 | SQL Injection Login Form | Critical | Code fix | FAIL | Denylist added for specific payload; string concatenation remains; variant ' OR 1=1-- succeeds |
| F-02 | Default Credentials Admin Panel | High | Config change | PASS | Credentials changed; default account disabled |
| F-03 | Missing Security Header | Low | Config change | PASS | The header is present in all responses |
The Notes column captures two things: what the developer changed, and a brief outcome observation for failed findings. For a pass, one clause is enough: "Credentials changed; default account disabled." For a fail, add the observation that explains the failure: "Denylist added for specific payload; string concatenation remains; variant ' OR 1=1-- succeeds." Keep notes brief; the details go in Section 3.
Section 3: Per-Finding Details for Failed Findings
For any finding that failed, include a short section covering:
- A brief summary of the original finding
- What the developer did to remediate it
- How did you test it during the re-test
- The evidence of failure (screenshots, archives)
- An updated recommendation
Section 4: Evidence Appendix
Screenshots with descriptive captions, archives, and tool output. Caption every screenshot with the finding ID, the date, the tool, and what it shows.
What the Re-Test Report Is Not
A re-test report that covers three findings is not a clean bill of health for the application. It covers three findings. If a new attack surface was discovered during the re-test, those observations go in a separate memo, not in the re-test report. Including out-of-scope observations in the re-test report muddies the compliance trail and may expand the scope of what clients believe you have verified.
In the re-test report findings status table, which column captures the specific fix the developer applied for example, "Blocklist added for specific payload"? (Answer Format: column name)
Completing a re-test engagement requires a different discipline than the original assessment. The original test is about discovery finding what is there. A re-test is about comparison, determining whether what was found has actually been addressed. That shift in mindset, from exploration to verification, is what makes re-testing a distinct skill.
The two patterns that cause the most re-test failures in practice are the ones we worked through directly. Symptom patching, where the developer blocks the specific payload reported in the test without addressing the root cause, accounts for a large share of failed re-tests. The missing instance pattern, where a fix applied to one surface leaves the same vulnerability on an adjacent one, accounts for much of the , though Task 5 covers five additional pitfalls that appear regularly in commercial re-test work.
A credible re-test report documents evidence for every finding, not just the ones that failed. Evidence of closure matters as much as evidence of failure, because auditors and regulators need to see that each finding was independently verified, not just closed in a ticket system.
Re-Testing is often a Jr Pentester's first solo engagement responsibility. The structured, comparison-focused nature of the work suits that role well. You are working from a defined list, using the same tools as the original assessment, and producing a document with a clear pass/fail answer for every finding. The analytical challenge comes from knowing when an apparent pass is actually a fail and the skills to recognise that are exactly what this room covered.
I have successfully completed the room.
Ready to learn Cyber Security?
TryHackMe provides free online cyber security training to secure jobs & upskill through a fun, interactive learning environment.
Already have an account? Log in