
Windows Basics
Learn to navigate Windows, manage files, and use essential system tools.
easy

To access material, start machines and answer questions login.
Every operating system has its own personality, and if you’ve used a computer at school, work, or home, there’s a good chance you’ve already met the most familiar one: Microsoft Windows. In the previous room, you explored what an operating system is, the behind-the-scenes manager that keeps your device running smoothly. Now it’s time to step into a real example and see the previously learned concepts take shape on a system you may already recognize. In this room, you’ll get hands-on experience with the Windows interface and begin building practical skills that will lay the foundation for the subsequent rooms of the module.
Scenario
In this room, you’ll take on the role of a new employee starting your first day at TryHatMe. Once you log in to your workstation, you’ll get to know the Windows desktop, learn how the interface works, open tools from the Start menu, and find your way through company folders. Your supervisor will guide you in creating and organizing files, changing system settings, checking the Task Manager, and reviewing basic security settings. By the end of these onboarding tasks, you should feel comfortable using Windows and handling the daily tasks you'll be expected to handle.
Learning Objectives
- Navigate the Windows graphical interface, including the desktop, taskbar, and Start menu
- Use File Explorer to browse folders, understand file paths, and organize files effectively
- Check system settings and personalize the Windows environment using the Settings app
- Use basic system tools like Task Manager and Windows Security to monitor performance and verify system protection
Prerequisites
Before you begin, it is recommended that you complete the following rooms to make sure you have the foundational knowledge needed.
- Work through Inside a Computer System to learn how computers start up and how components like the , , and storage interact
- Go over Computer Types to understand the variety of computing systems and how their roles, capabilities, and designs differ
- Complete Operating Systems: Introduction to build a clear understanding of what an operating system does and how it functions
Machine Access
Click the Start Lab Machine button below to launch your Windows Server 2019 workstation. The machine will open in split-screen mode, giving you access to the Windows desktop used throughout this room.
Set up your virtual environment

I understand the learning objectives and am ready to learn about Windows!
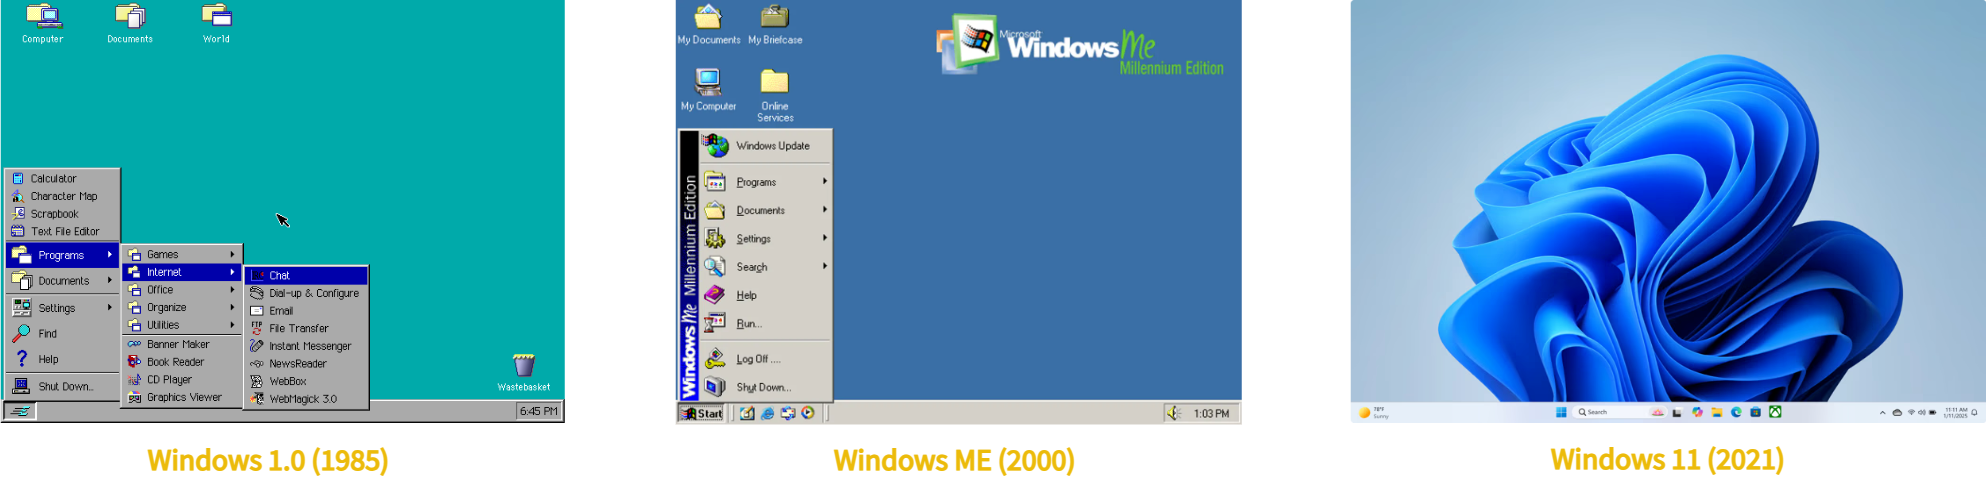
Before Windows had its current polished look, Microsoft’s operating systems were much simpler. Early computers ran MS-, which showed a black screen where you had to type commands instead of clicking icons. In 1985, Microsoft released Windows 1.0, a basic graphical user interface () built on top of , introducing windows, menus, and mouse controls to personal computers. Over time, Windows has added more features, which turned the original shell into a complete operating system. Today, the modern Windows is the result of those changes. Let’s dive into Windows and see how the operating system concepts you learned about in the previous room present themselves in the world’s most widely used desktop operating system.
Logging in and Authentication
Before gaining access to the Windows Desktop, you must authenticate (prove your identity) to the system. The authentication process verifies your identity and determines the actions you're allowed to take once logged in. When a Windows system starts, it displays a login screen where a user account must be selected and authenticated with a password, PIN, or another verification method. Each user is assigned a set of permission levels that determine their access to files, settings, and system functionality. Windows commonly uses the account types below.
- Guest: A restricted account intended for temporary access, with minimal permissions and no ability to change system settings
- Standard: A user account for everyday tasks, such as running applications and changing personal settings, without access to system-wide changes
- Administrator: A privileged account with full control over the system, including software installation, configuration changes, and user management

Upon starting up the machine in the previous task, you are automatically logged in using an Administrator account. This will allow you to explore system settings, install programs, and perform administrative actions without being restricted by permission limitations.
The Windows Desktop
In the last room of this module, we explored the comparison of an to an airport. Let's continue with this analogy. If you, the user, are a passenger, and the login screen represents the airport security checkpoint, you can consider the Desktop to be the airport terminal. After entering, it is the first area you gain access to, and all other subsequent areas branch out from this point.
Let's have a look at the Windows Desktop and cover some of its core features together. When you first log in, you're presented with two main areas.
- Desktop: The main workspace where files, folders, and shortcuts live
- Taskbar: A control strip that provides access to applications, system tools, settings, and notifications
Let's break these down further to get a better picture. Please note that the instance used in this room and the screenshot below are using Windows Server 2019. While newer Windows versions may differ slightly, these core components and concepts remain consistent.
- Desktop icons: Shortcuts to items like the Recycle Bin, folders, and frequently used applications. It is fully customizable
- Start menu: Primary way to access applications, settings, and power options. From here, you can log out, restart, or power off your machine
- Search: Quickly find applications, files, folders, and system settings by using keywords
- Task View: Allows you to see all currently open windows and quickly switch between them
- Pinned Applications and Folders: Your most used applications and folders can be pinned here
- Network and Audio settings: This section can be customized to suit your needs
- Date and Time: Opens up to a full calendar. Date and time settings can be accessed here, too
- Notifications: Displays computer or application notifications. Network and other settings can also be accessed

Start Menu
When using Windows, the Start menu can be accessed by clicking the Windows icon located at the bottom left of the taskbar. If we consider the Windows Desktop to be an airport terminal, the Start menu is the departure board or information desk. It is the area where we see what is available: apps, files, folders, settings, and power options. You can think of it as a quick-access menu.

Built-in Tools and Apps
Windows ships with many useful built-in tools and applications that you will use daily. Beyond the wide range of settings available to manage your system, Windows also includes simple but powerful tools such as Notepad for editing text files and File Explorer for navigating and managing files. These tools are available immediately and form the foundation of everyday Windows usage. All of them can be accessed via the Start menu and search bar. The built-in tools on Windows are like airport services and amenities, the things already available in the terminal to help you get tasks done.

Getting System Information
Windows includes a built-in Settings application that allows you to configure and view information about your system. To get to know your new work PC better, we’ll start by investigating the machine we’re working with. Within the Settings app, there's a helpful section called About your PC, that provides key details about the system. A shortcut to About your PC has been created on the Desktop. Open it now. Alternatively, you can practice using the Start Menu or Search feature to locate it.
The About your PC page provides an overview of security, device, and operating system information. We’ll use this information to become familiar with our environment and begin answering the first questions in this task.

File Exploration and Management
Great, now we have an understanding of the system we are working with. Let’s take a look at how Windows handles file exploration and management as we access some of the onboarding documents for your new position. Before we dive into using File Explorer, let’s quickly cover how Windows organizes files and directories. Windows uses a hierarchical folder structure, meaning folders can contain other folders and files inside them. This structure helps keep data organized and makes it easier to locate information as systems grow larger. Common locations, such as the Desktop, Documents, and Downloads, serve as primary directories for storing files. Within these locations, subfolders are used to group related files together. Understanding this layout will make navigating the system and managing files much easier.
If we continue the airport analogy, File Explorer acts as the directory and floor map of the terminal, helping you navigate between different areas and locate what you need.
You can now open the TryHatMe Onboarding folder on the Desktop. Alternatively, you can open the File Explorer application, which is pinned to the Taskbar, or use the Start menu to locate the folder.
- Open the
TryHatMe Onboardingfolder on your Desktop - This opens the folder in the Windows File Explorer
- Options for viewing, sharing, and editing folders and files
- Clicking the folder name will show us the full path to the chosen folder
C:\Users\Administrator\Desktop\TryHatMe Onboarding - The displayed contents of our chosen folder
- We can use the File Explorer's built-in search function to search our folder

Please ensure the lab machine is open in split-screen, then take a look at the computer's Desktop.
After opening About your PC, navigate to the Device specifications section.
What is the Device name specified?
Continue looking through the Device specifications.
How much RAM is installed on your new work PC?
Scroll down to the Windows specifications section.
Which Version of Windows Server 2019 Datacenter is installed?
Explore the TryHatMe Onboarding folder located on your computer's Desktop.
What is the flag value found within Welcome.txt?
Applications are the programs and tools you use to perform tasks on your computer, from browsing the web and editing photos to managing settings on your PC. We already discussed a few of the built-in applications Windows provides, but knowing how to install, update, and remove applications is a core skill for everyday Windows use. Let's briefly revisit the airport analogy to gain a better understanding of this concept. Updating your or apps is like changing flights or reserving a seat. Installing a new app is comparable to scheduling a new flight, and removing apps is like canceling a booking you no longer need. These three processes enable you to make the necessary changes to your system, ensuring you have exactly what you need and that your system remains secure.
Updating Your Applications
Keeping your operating system and applications up to date is an important part of maintaining a secure and stable system. Updates will often include security patches, performance updates, and bug fixes.
Windows Updates
Windows includes a built-in update tool called Windows Update, which keeps the and some native applications and security features up to date. Windows Update can be accessed through the Settings app and may install updates automatically, depending on your configuration.

Updating Applications
Application updates work differently depending on how the software is installed.
- Built-in applications may update automatically in the background
- Third-party applications often include their own update mechanisms
- Some applications will prompt you to update upon launch
- Some require you to check for updates or download a new installer manually
Installing Applications
Now that you've seen how updates work within the Windows and for applications, let's take a look at installing new ones.
- Microsoft Store: Provides a curated and safe option for installing apps to Windows, although it is not available by default on Windows Server
- From the Internet: In many environments, apps are installed by downloading an installer directly from a trusted vendor's website. They usually come in an
.exeor.msifile and guide the user through the installation process

Hands-On Installation
Great, now you have a solid understanding of updating and installing new applications within a Windows environment. Let's get hands-on and install an app!
- Within the
TryHatMe Onboardingfolder on your Desktop, you'll find an installer namedTryHatMeWelcome - Proceed by double-clicking the installer to start the installation process, then answer the first question of the task
Note: Feel free to click through the installation options; remember that this is a virtual environment, safe for testing and experimentation.

Uninstalling Applications
In a Windows environment, there are multiple ways to uninstall programs.
- Using the Microsoft Store for installed applications
- Add or remove programs feature in system settings
- Uninstall a program section of the Control Panel
- Using an application's built-in uninstaller

Diving Into Settings
In the previous task, you explored the About your PC section of Windows settings. Now, we will take a closer look at the abundance of configurations available to us. There are two primary ways in which a Windows user can modify their environment. There are existing shortcuts for each of the tools below placed on your Desktop.
- Windows Settings: A modern, centralized location for configuring system, device, personalization, and security settings in Windows
- Control Panel: A legacy management interface that provides access to older system configuration tools still required for specific administrative tasks
Windows Settings and the Control Panel enable you to view and modify how your Windows system operates. From these two applications, you can manage system preferences, including display and audio settings, user accounts, apps, network options, accessibility features, and security configurations.

The Task Manager
Task Manager is a built-in Windows tool that allows you to monitor what is happening on your system in real time. It allows you to view running applications and background processes, as well as check system performance, including CPU and memory usage. A shortcut to Task Manager has been placed on your workstation's Desktop. Go ahead and open it now to view your currently running applications and check on your system's performance.
Task Manager has five tabs to help you keep track of your system.
- Processes: Currently running apps and background processes, and their resource usage
- Performance: Graphs and statistics for system resources such as CPU, memory, and network
- Users: Currently logged-in users and used resources
- Details: A more technical view of running processes, including process IDs (PIDs)
- Services: Windows services and their current status (running or stopped)

Native Windows Security
Windows offers built-in security tools designed to help protect your system from threats such as malware, insecure applications, and unauthorized network access. These are enabled by default and allow the monitoring and control of your system's security.
Windows Security
The Windows Security application is your central dashboard for managing Windows' built-in protection measures. It is divided into four main sections, each focusing on a different area of system security.
- Virus & threat protection: Helps detect and remove malicious software using real-time protection and customizable scans
- Firewall & network protection: Controls incoming and outgoing network traffic to help prevent unauthorized access
- App & browser control: Protects users from potentially unsafe apps, files, and websites
- Device security: Provides hardware-based protections that help secure the system
Let's take a closer look at the Virus & threat protection section of Windows Security on your workstation. Go ahead and open it up using the Desktop shortcut or via the Start menu now. Next, we will run a custom scan of your onboarding folder to ensure that there are no malicious files present.
- Open Windows Security using the shortcut on your Desktop
- Select the Virus & Threat protection section
- Choose Scan options
- Select Custom scan, then Scan now
- Select the
TryHatMe Onboardingfolder on your Desktop as the target of your scan

Your custom scan will have found a completely safe test file, and this process shows how Windows is capable of scanning for and detecting threats. Keep in mind that this is just one aspect of the security measures Windows has in place to help you secure your system. Go ahead and click See details to investigate the file and answer the final question of the task.

Windows Defender
Windows Defender is a built-in designed to help protect your computer from unauthorized network traffic. It monitors network connections and applies rules that determine whether the connections are allowed or denied. The operates on different network profiles, allowing you to create custom rules or specify applications that are permitted.
- Domain: Used when a system is connected to an organization’s domain network
- Private: Intended for trusted networks, such as a home or lab environment
- Public: Used for untrusted networks, such as public Wi-Fi

Checking out the Advanced settings of Windows Defender , you can view
- An overview of your 's inbound, outbound, and connection rules
- A detailed view of each rule, including name, group, network profile, status, and action
- Create new rules or filter your current view

Use the TryHatMeWelcome installer located within the TryHatMe Onboarding folder.
What is the flag value you receive after installing and running the application?
Investigate the Time & Language section of the Windows Settings app.
Which country or region is your computer currently set to?
Open the Task Manager on your workstation's Desktop and navigate to the Users tab.
Which account is currently logged in?
After performing your custom scan, click Virus:DOS/EICAR_Test_File and select See details.
What is the file name shown in the Affected items section?
Nicely done! You’ve reached the end of Windows Basics. In this room, you explored the fundamentals of the Windows operating system. You navigated the Windows interface, examined system properties, learned about application management, worked with files and folders, and managed security settings that make up a Windows environment.
Through a hands-on lab, you completed your first day at TryHatMe, using the Windows Server 2019 operating system to read files, install programs, and run security scans on your new workstation. These skills form the foundation for both general system usage and deeper technical understanding later on in your learning and professional journey.
Key Terminology
Let’s recap the core terminology and applications you’ve learned about in this room. These definitions will help solidify your understanding before moving on to further learning.
- Desktop: The main workspace where files, folders, and shortcuts live
- Taskbar: A control strip that provides access to applications, tools, settings, and notifications
- Start Menu: The primary way to access applications, settings, and power options, signified by the Windows logo
- Search: A quick access method of locating applications, settings, and files by entering search terms
- File Explorer: The built-in Windows tool to browse, manage, and organize files and folders
- Windows Update: A built-in update tool that helps keep your , native apps, and security features up to date
- Microsoft Store: The native Windows application for installing trusted applications
- Windows Settings: A centralized location for configuring system, device, personalization, and security settings
- Control Panel: The legacy management interface that provides access to system configuration options
- Task Manager: A Windows tool for monitoring what is happening on your system in real time
- Windows Security: The central dashboard for managing Windows built-in security tools
- Windows Defender : The designed to help protect your system from unauthorized network traffic
Further Learning
In the following rooms of this module, you'll use the command-line (), a text-based interface for interacting with the operating system, to get to know the and further explore Windows.
Complete the room and continue on your cyber learning journey!
Ready to learn Cyber Security?
TryHackMe provides free online cyber security training to secure jobs & upskill through a fun, interactive learning environment.
Already have an account? Log in