macOS Forensics: The Basics
Learn the basics to prepare for performing forensics on macOS.
easy

To access material, start machines and answer questions login.
Apple products have a dedicated fan base. One reason for their popularity is the built-in security features that make it very hard for someone to get into them. On the flip side, these security features hinder any efforts by forensic investigators in cases where such access might be necessary. A very famous example is the Apple-FBI dispute related to unlocking an iPhone seized by the FBI in the aftermath of a terror attack. This event solidified the image of Apple as a company that creates secure end-user devices even more.
Are Apple's devices so secure that even organisations like the FBI can't investigate them? In this room, we will explore macOS, Apple's desktop (and laptop) operating system, to understand the tools we might need to investigate.
Learning Objectives
In this room, we will learn:
- A Brief History of macOS
- File systems of macOS
- macOS directory structure and file formats
- Challenges in acquiring forensic images from a macOS device
Prerequisites
Before continuing, it is recommended that you complete the Digital Forensics and Incident Response module.
Let's begin!
macOS is Apple's operating system for desktop and laptop systems and is the 2nd most used operating system for desktops and laptops after Microsoft Windows. As of December 2024, macOS has a roughly 14% market share (opens in new tab) among desktop and laptop worldwide, significantly higher than distributions. Previously, macOS has had a tumultuous history, going almost extinct once.
The Start of Apple's Journey
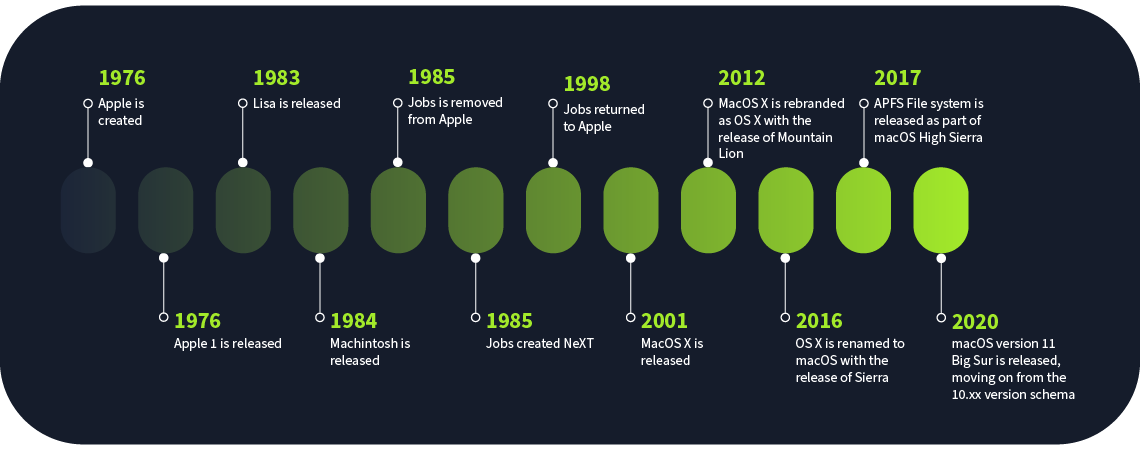
Steve Jobs founded Apple Computer in 1976 with Steve Wozniak and Ronald Wayne as partners. Apple's first computer was named Apple I, followed by Apple II and Apple III in the following years. In the early 1980s, Apple released Lisa, one of the first computers using a graphical user interface (), after being inspired by the technology developed by Xerox. However, Lisa had some teething problems, which caused trouble for Apple. Some of these problems were addressed in the Macintosh, which had promising sales initially but was soon overcome by other PC vendors who overtook the market. During this time, Steve Jobs was forced out of Apple, founding Pixar and NeXT Computer. In Jobs' absence, Apple was a shadow of its former self and could only revive itself after Jobs' return.
The Return of Jobs
Apple acquired Steve Jobs' new venture, NeXT Computer, in 1998, bringing him back to the driving seat of Apple. MacOS 8.1 was released in the same year, and the Hierarchical Plus (HFS+) was introduced as the main in macOS, replacing the previous HFS . We will learn about the HFS+ in the coming tasks. This was the mainstay of macOS until it was replaced by APFS in 2017.
NeXTSTEP and MacOS X
In 2001, the classic MacOS was replaced by MacOS X, a Unix-like operating system derived from the NeXTSTEP from NeXT Computer. Introducing the Unix-like operating system caused some problems for the HFS+ , which did not support features such as hard linking and permissions. These features were added to the to ensure compatibility, which has helped the remain relevant for a long time.
MacOS X, X and macOS
MacOS versions up to MacOS 9 are considered classic macOS now. MacOS 10 was branded by Apple as MacOS X, using the Roman numeral X for the number ten. Following MacOS X, Apple incremented just the minor version numbers for each new MacOS release, keeping the major version as 10, therefore releasing MacOS 10.1, 10.2, 10.3, and so on. In 2012, Apple removed the word 'Mac' from the MacOS X and rebranded the as simply X for version 10.8, Mountain Lion. In 2016, the name was rebranded as macOS with the release of the macOS Sierra (macOS 10.12). This seemed an effort to remain consistent with different variants for Apple products, such as watchOS, iOS, tvOS, and iPadOS. However, Apple kept using macOS 10.xx version numbers till the release of macOS Big Sur, which uses macOS 11 as the version number. Since then, every new macOS version has been an increment to the significant version, so after macOS 11, we got macOS 12 (Monterey), and so on. Previewed in macOS 10.12 Sierra and starting from macOS 10.13 High Sierra, Apple has been using the new Apple (APFS). APFS brought many improvements holding macOS back due to the limitations of the HFS+ , such as better support for SSDs, better security features, and overall bringing macOS file systems to the new age. APFS is now the used for all Apple devices, including Apple Watch, iPhone, Apple TV, and iPad.
In which year was the APFS file system introduced by Apple?
Which file system is common amongst all Apple devices, including iOS, watchOS, and tvOS?
Hierarchical Plus or HFS+ is used in macOS versions up to macOS 10.12 Sierra. HFS+ is also called macOS Extended. As we discussed in the previous task, HFS+ was released by Apple in 1998 and was not initially made for Unix-like systems. Therefore, it was missing some critical features required for the Unix-like macOS introduced in 2001, which were retrofitted for compatibility. HFS+ was used for older Apple devices before 2017, such as the iPod.
Structure of HFS+
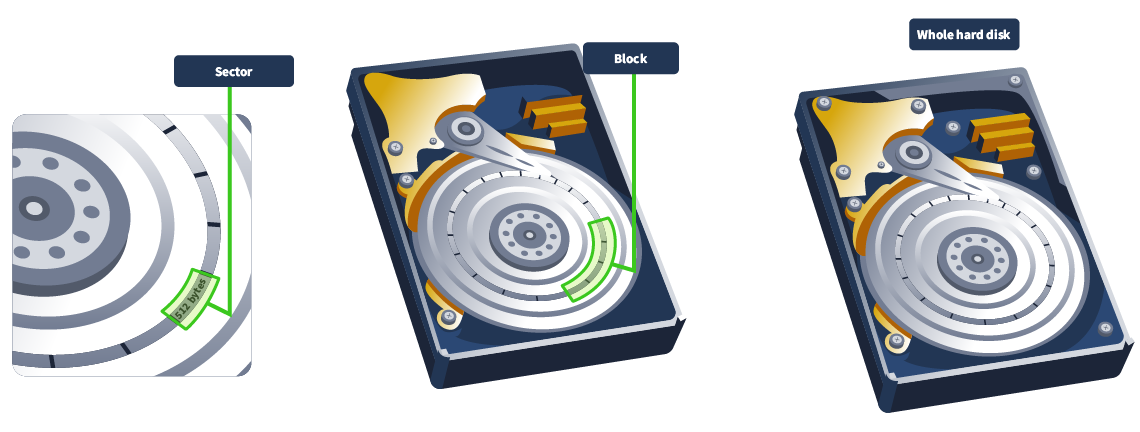
Like most file systems, HFS+ consists of sectors and allocation blocks. Sectors are typically 512 bytes and are the smallest unit in the structure. Allocation blocks are made up of one or more sectors. HFS+ uses 32-bit addresses to access allocation blocks. Therefore, the maximum number of allocation blocks is 2 32.
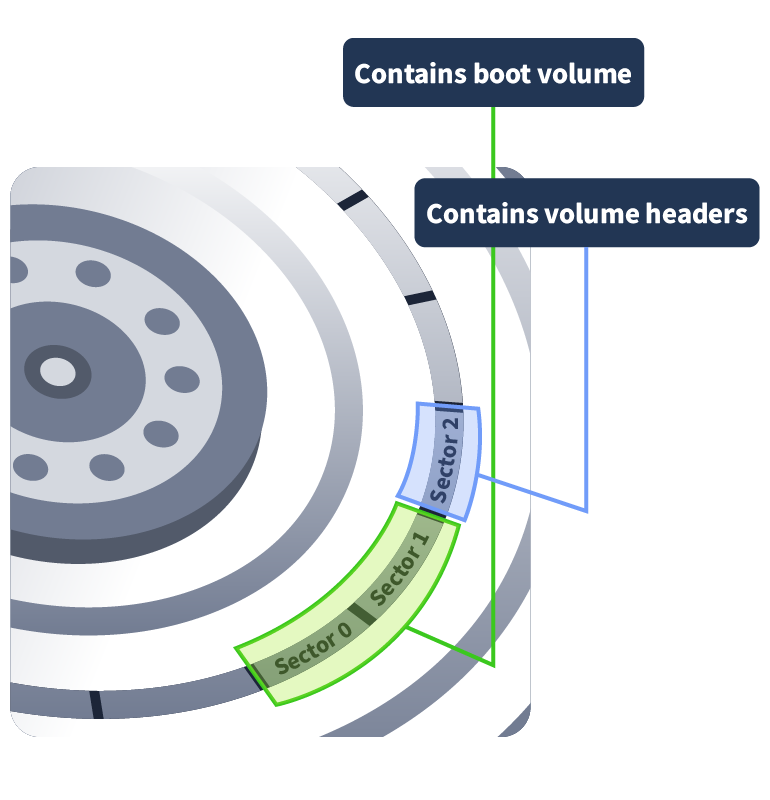
The boot volume resides in sectors 0 and 1, which helps boot up the volume. Sector 2 contains the volume header, which contains metadata about the volume, such as the size of the allocation blocks and the timestamp of volume creation. An allocation file keeps track of the used and the unused allocation blocks. A catalog file contains a catalogue of all the files and directories stored in the volume in a B-tree (opens in new tab) format. Allocation blocks allocated to each file are stored in an extents overflow file. Attributes of the files are stored in the attributes file. File names are encoded in UTF-16 (opens in new tab) and can be up to 255 UTF-16 code unit lengths.
Though the HFS+ improved on many issues present in the HFS , it still had a lot of shortcomings and limitations.
Limitations of HFS+
By 2017, when APFS replaced HFS+, it was already too old. However, it had some key limitations that necessitated its replacement, such as:
- Features of Unix-like systems, such as file permissions and hard links were not present in HFS+ and had been retrofitted by Apple to make up for them.
- The HFS+ did not support dates beyond 6 February 2040.
- Multiple processes could not access the concurrently, causing performance issues, especially in SSD drives.
- Maximum resolution of timestamps is only 1 second, whereas modern file systems support nanosecond timestamps.
- Snapshot capability was unavailable (such as the one enabling file systems to create Volume Shadow Copies).
Considering the age and limitations of the HFS+ , an update was long overdue by the 2010s, and it came in the form of the APFS .
What is the latest date that the HFS+ file system supports? Format DD/MM/YYYY
In the HFS+ file system, which file contains a list of all the files and directories present in the file system?
Apple previewed the Apple (APFS) in macOS 10.12 Sierra and released it as the default from macOS 10.13 High Sierra. APFS is also used in iOS, watchOS, tvOS, and iPadOS. APFS addresses many shortcomings in HFS+ and brings Apple devices into the new age.
Salient Features of APFS
APFS fixed most of the HFS+ issues. Some examples are below:
- APFS supports timestamps up to 1 nanosecond.
- Dates beyond 6 February 2040 are possible.
- Full disk encryption is supported natively.
- Snapshots are available for creating read-only, point-in-time instances.
- Apple introduced redirect-on-write, a crash-protection feature. To avoid data corruption, data is written to new blocks, and the old ones are released once done instead of rewriting existing ones.
- The maximum number of files stored in the system has been increased to 2 63.
Although APFS improved many things for Apple, its support for full disk encryption and hardware and software encryption made forensic investigations very difficult.
Structure of APFS
Although APFS has quite a complex structure, we will discuss some of its key features here.
APFS uses GUID Partition Table (GPT). We discuss MBR and GPT in detail from a forensics point of view in the MBR and GPT Analysis room. Inside the partition are one or more containers.
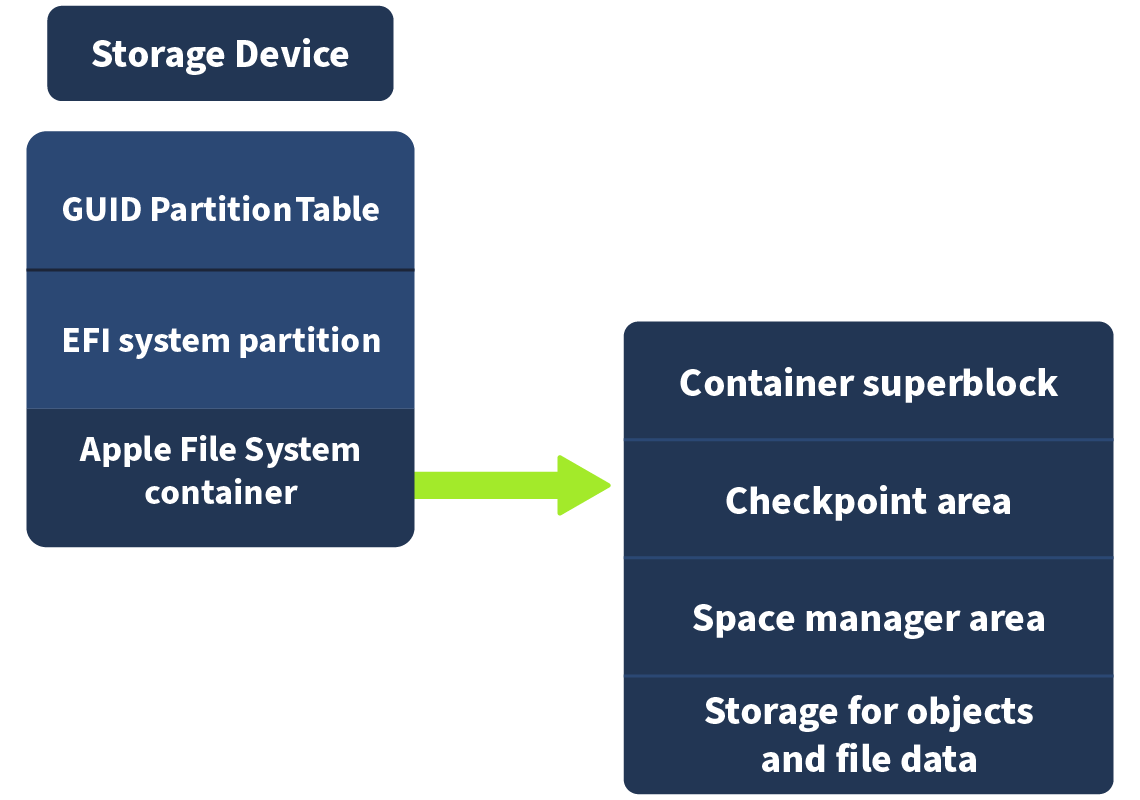
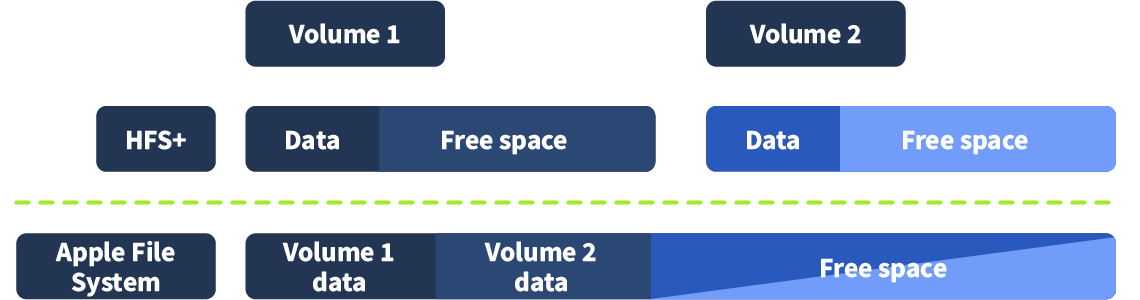
A can contain multiple volumes, each positioned next to each other without any space between them. The free space in a is shared between all the volumes.
We can use the diskutil tool on the command line to manage the disks.
      thm@THM-MacBook-Pro ~ % diskutil
Disk Utility Tool
Utility to manage local disks and volumes
Most commands require an administrator or root user

WARNING: Most destructive operations are not prompted

Usage:  diskutil [quiet]  , where  is as follows:

     list                 (List the partitions of a disk)
     info[rmation]        (Get information on a specific disk or partition)
     listFilesystems      (List file systems available for formatting)
     listClients          (List all current disk management clients)
     activity             (Continuous log of system-wide disk arbitration)
     .
     .
     .
     appleRAID      (Perform additional verbs related to AppleRAID)
     coreStorage    (Perform additional verbs related to CoreStorage)
     apfs           (Perform additional verbs related to APFS)
     image          (Perform additional verbs related to DiskImage)

diskutil  with no options will provide help on that verb
The command diskutil apfs can list the options for APFS images.
      thm@THM-MacBook-Pro ~ % diskutil apfs
Usage:  diskutil [quiet] ap[fs]
        where  is as follows:

     list                (Show status of all current APFS Containers)
     listUsers           (List cryptographic users/keys of an APFS Volume)
     listSnapshots       (List APFS Snapshots in a mounted APFS Volume)
     listVolumeGroups    (List all current APFS Volume Group relationships)
     convert             (Nondestructively convert from HFS to APFS)
     create              (Create a new APFS Container with one APFS Volume)
     createContainer     (Create a new empty APFS Container)
     deleteContainer     (Delete an APFS Container and free or reformat disks)
     .
     .
     .
     updatePreboot       (Update a macOS Volume's related APFS Preboot Volume)
     syncPatchUsers      (Copy Volume Group crypto users System-to-Data role)

diskutil apfs  with no options will provide help on that verb
To see what different kinds of APFS volumes are available in the macOS machine, the diskutil apfs list command can be used.
In the terminal window below, we can see that the attached disk is named disk3 and has a size of 500GB. This disk contains different volumes, such as disk3s1, disk3s2, and so on. We can also see the UUIDs, mount points, capacity, and whether FileVault encrypts the disks.
      thm@THM-MacBook-Pro ~ % diskutil apfs list
APFS Containers (3 found)
|
+-- Container disk3 AAD91E12-4A34-49C0-9F88-5939BD2F4005
    ====================================================
    APFS Container Reference:     disk3
    Size (Capacity Ceiling):      494384795648 B (494.4 GB)
    Capacity In Use By Volumes:   408284758016 B (408.3 GB) (82.6% used)
    Capacity Not Allocated:       86100037632 B (86.1 GB) (17.4% free)
    |
    +-< Physical Store disk0s2 A71C0881-2C2C-49DD-A99B-C5F60F010682
    |   -----------------------------------------------------------
    |   APFS Physical Store Disk:   disk0s2
    |   Size:                       494384795648 B (494.4 GB)
    |
    +-> Volume disk3s1 444529D1-A874-4C4B-BF6F-1AC700D3921D
    |   ---------------------------------------------------
    |   APFS Volume Disk (Role):   disk3s1 (System)
    |   Name:                      Macintosh HD (Case-insensitive)
    |   Mount Point:               Not Mounted
    |   Capacity Consumed:         11200147456 B (11.2 GB)
    |   Sealed:                    Broken
    |   FileVault:                 Yes (Locked)
    |   Encrypted:                 No
    |   |
    |   Snapshot:                  319629D2-9E44-4575-9CDB-8AD289CE890D
    |   Snapshot Disk:             disk3s1s1
    |   Snapshot Mount Point:      /
    |   Snapshot Sealed:           Yes
    |
    +-> Volume disk3s2 892F6456-3DB7-4C90-91FA-AD7F5D33B00C
    |   ---------------------------------------------------
    |   APFS Volume Disk (Role):   disk3s2 (Preboot)
    |   Name:                      Preboot (Case-insensitive)
    |   Mount Point:               /System/Volumes/Preboot
    |   Capacity Consumed:         6874071040 B (6.9 GB)
    |   Sealed:                    No
    |   FileVault:                 No
    |
    +-> Volume disk3s3 D6B80CA2-A0FD-4FD1-9028-365E615E34A5
    |   ---------------------------------------------------
    |   APFS Volume Disk (Role):   disk3s3 (Recovery)
    |   Name:                      Recovery (Case-insensitive)
    |   Mount Point:               Not Mounted
    |   Capacity Consumed:         1033035776 B (1.0 GB)
    |   Sealed:                    No
    |   FileVault:                 No
    |
    +-> Volume disk3s5 E17102D4-2EFF-47C8-9801-970EBE36A925
    |   ---------------------------------------------------
    |   APFS Volume Disk (Role):   disk3s5 (Data)
    |   Name:                      Data (Case-insensitive)
    |   Mount Point:               /System/Volumes/Data
    |   Capacity Consumed:         389014720512 B (389.0 GB)
    |   Sealed:                    No
    |   FileVault:                 Yes (Locked)
    |
    +-> Volume disk3s6 EBDB817B-69C2-4AD3-B2C1-2EDA91B98849
        ---------------------------------------------------
        APFS Volume Disk (Role):   disk3s6 (VM)
        Name:                      VM (Case-insensitive)
        Mount Point:               /System/Volumes/VM
        Capacity Consumed:         24576 B (24.6 KB)
        Sealed:                    No
        FileVault:                 No
As we can infer from this response, the volume information only contains the capacity consumed. In contrast, the free capacity is mentioned at the top, independent of the different volumes, as the free space is shared between all the volumes, as we discussed earlier in the task.
In macOS, which command can be used to list all available APFS volumes?
Although Apple has used a vastly different for macOS, the underlying is quite Unix-like. Essentially, this means that the file structure has some similarities to that of the other Unix/ operating systems.
Directory Structure of macOS
In the root directory of macOS, we will find the following directories similar to Unix/ operating systems.
      thm@THM-MacBook-Pro ~ % cd /
thm@THM-MacBook-Pro / % ls
Applications	System		Volumes		cores		etc		opt		sbin		usr
Library		Users		bin		dev		home		private		tmp		var
thm@THM-MacBook-Pro / %
As mentioned earlier, some of these directories are very similar to what we will find in Linux systems, such as:
- opt - This directory contains files for optional software, such as homebrew.
- sbin - This directory contains system binaries such as launchd, ping, and mount.
- bin - This directory contains binaries such as chmod, rm, and echo.
- dev - This directory contains device files such as Bluetooth accessories.
- private - This directory contains three main directories,
var,etc, andtmp, similar to the same name directories in Linux. Variable files, configuration files, and temporary files are located in these directories, such as logs (similar to/var/log), or the hosts file (similar to/etc/hosts). The directories/etc,/var, and/tmpwe see above are symlinks to/private/etc,/private/var, and/private/tmp, respectively. Any changes to these directories often require sudo privileges.
Domains in macOS
macOS arranges files in different domains based on their intended use. The macOS file system has four domains: Local, User, System, and Network.
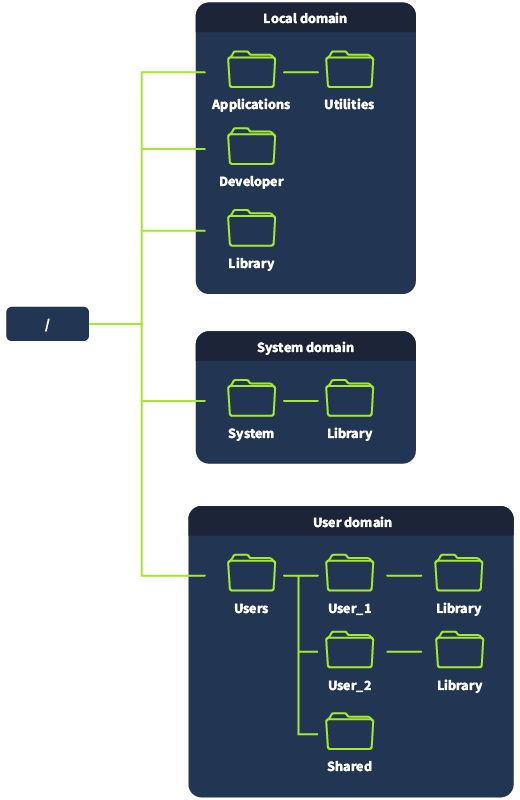
Local Domain
The Local domain contains resources common to all users of the local computer. These resources are generally present in the /Applications and /Library directories. The system manages this domain but can also be managed by users with administrative privileges. The /Applications directory contains user applications such as Discord, Adobe Reader, and Python; the /Library directory contains configuration files shared across all users. The /Developer directory may be found in the /Applications or /Library directory and contains files specific to the Xcode utility.
System Domain
The System domain contains software developed and managed by Apple. It maps to the /System directory and contains critical OS applications and configurations. Apple does not allow users to modify or remove files in this domain, even with root privileges.
      thm@THM-MacBook-Pro /System % pwd
/System
thm@THM-MacBook-Pro /System % mkdir test
mkdir: test: Operation not permitted
thm@THM-MacBook-Pro /System % sudo mkdir test
mkdir: test: Operation not permitted
thm@THM-MacBook-Pro /System % sudo su
sh-3.2# mkdir test
mkdir: test: Operation not permitted
sh-3.2#
User Domain
The User domain contains user data and files. It is located in the /Users directory. Inside this directory is a directory for each user of the machine. By default, one user can not access another user's files. There is also a hidden Library directory inside the User domain in each user's directory (located at /Users/<user>/Library). This directory contains user-specific configurations and application data. As we will learn later, the User domain contains juicy information from a forensics standpoint.
Network Domain
The Network domain contains network resources such as network printers, share servers, and other computers. Network administrators typically manage access to these resources, which local network users share.
Files in which domain can't be modified even by using sudo privileges?
Which domain is the most forensically important domain from a user activity point of view?
macOS has a file structure that is different from other operating systems and has its own file formats. In this task, let's discuss some of the important file formats.
.plist Files
.plist files or property list files contain system configurations similar to the Windows Registry in Microsoft Windows. Therefore, similar to the Windows Registry, .plist files are very important from a forensic standpoint. Generally, two formats are used for .plist files: and binary large object (BLOB) format. We can use a text editor to read the data from .plist files present in the format, but to read BLOB format .plist files, we need to use Xcode, a developer tool that can be installed through the App Store. The image below shows how a .plist file looks when opened using Xcode.

.app Files
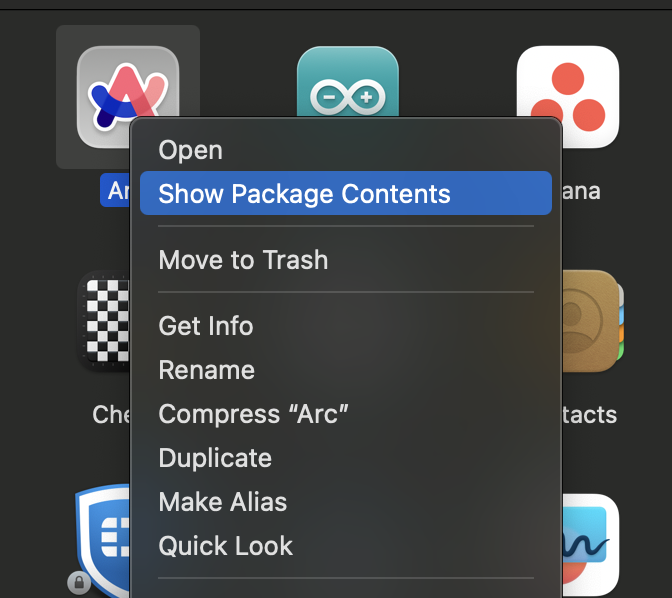
.app files are application executables often found in the Applications directory. Executing a .app file launches the application, just as executing an executable file in Windows can launch an application. These files are bundled, and we can see the bundle's contents using the 'Show Package Contents' option in the right-click menu.
.dmg Files
.dmg files are macOS disk image files. These files can be mounted easily in macOS, and installers often use this format. They can be formatted in any supported by Apple, such as APFS, HFS+ or FAT.
.kext Files
Though deprecated in the newer versions of macOS, the .kext files are kernel extension files. Kernel extensions work similarly to drivers in Windows, providing access to the kernel to third-party apps. However, starting from macOS Big Sur, loading a third-party kernel extension requires a user to give permission, restart the machine in recovery, and then enable loading of kernel extensions.
.dylib Files
These are dynamically loaded library files. They contain shared code used by different programs. They are similar to files in Windows or .so files in .
.xar Files
These are often used for installers or browser extensions. They are archive files (eXtensible ARchive). They have replaced previously used .pkg (Package installer) files.
Which of the file types discussed above are similar to device drivers in Windows?
Apple has been making its products very unfriendly to performing forensics. As we discussed at the start of the room, Apple has resisted strong pressure, even from the US government agencies, to open up its platforms and make forensic investigations easier. But what makes macOS so unfriendly for forensics? Let's go through some challenges that make taking a full disk image of a macOS device hard.
Access to Physical Disk
Acquiring disk images from a macOS device presents several challenges, starting with access to physical disks. In newer Macbooks, the SSD drives are soldered to the motherboard. This means that removing the SSD is not an option without risking damaging the drive or the machine as a whole. In devices where SSDs are not soldered, such as older devices, they often use proprietary interfaces, making it difficult to connect them to hardware.
Hardware Encryption
Even if we can physically access the SSD on a Mac, we won't be able to recover or extract any data from it, as the drive is encrypted through hardware encryption. Starting with the T2-based chips, Apple stores the encryption key of the SSD in a secure enclave separate from the . This means that if the motherboard fails or is otherwise unavailable, the encrypted SSD data is lost and cannot be recovered. This means we can't remove the disk from the original computer to take a disk image, as this effort will be useless without the encryption key.
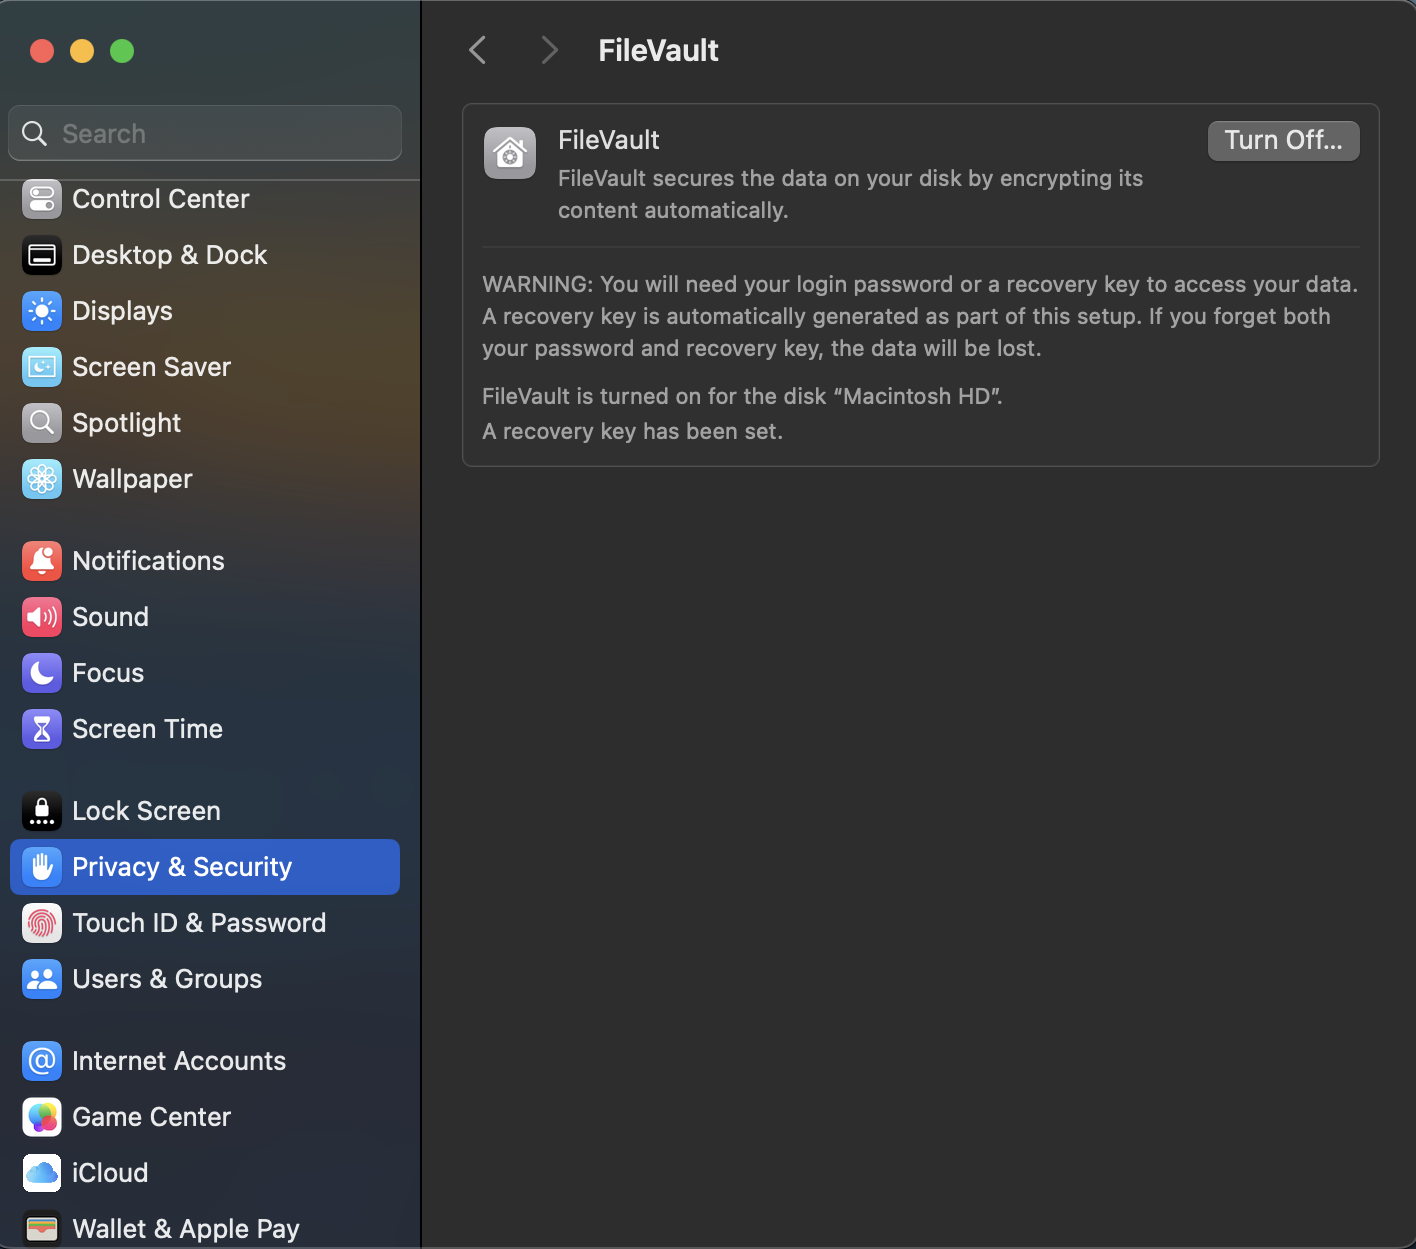
FileVault Encryption
Apple uses FileVault to add another layer to the macOS encryption. FileVault ties the encryption of the data with the user's password, ensuring that the data is encrypted as long as the user has not entered their password. This means that even if a Mac system is turned on using the same hardware, we can not access the data unless the user's password unlocks the FileVault. Therefore, even if we boot the machine into recovery, which is the most reliable way to take a full disk image of the Mac SSD, we will still need to unlock FileVault to access data by providing either the user's password or, if an organisation manages the Mac, the organisation's access key. Although FileVault doesn't stop an investigator from getting a disk image, the investigator will need the password or organisational access keys to unlock the volume and access the data.
Full Disk Access
Thinking that getting a cold acquisition is nearly impossible, we might want to take a live image of the system. However, that is not easy either. macOS does not allow access to all parts of the disk unless an application is explicitly allowed. Therefore, to take a disk image from a live Mac system, we must first grant the tool we use, Full Disk Access (FDA), to the Mac. Full Disk Access can be given to applications by navigating to Settings > Privacy & Security > Full Disk Access.

System Integrity Protection
System Integrity Protection (SIP) is a feature that protects the kernel from unauthorised access, code injection, debugging, or general modifications. SIP can often prevent access to memory or certain parts of the disk, even with root access. Therefore, disabling SIP might be a good idea before acquiring an image. However, since this requires booting into recovery, it might result in the loss of volatile data and changes to the disk. SIP can be disabled by booting into recovery, opening the terminal, and using the command csrutil disable.
Possibilities of Mac Acquisition
Considering the above challenges, there are very limited ways to acquire an image of a Mac device. However, it is not impossible to acquire forensic data from a Mac. We can consider the following possibilities for acquiring data from a Mac.
- Use a proprietary tool such as Magnet AXIOM or Cellebrite, grant Full Disk Access, and image a live system.
- If the user password is known and the machine is physically available, we can boot into recovery, turn off security features, and take a disk image using the terminal using tools such as dd, hdiutil, or dc3dd. Acquiring a disk image using dd or dc3dd is discussed in the Forensic room. Although we will not go into further detail in acquiring a disk image as it is out of the scope of the room, but this is the best way to acquire a full disk image if proprietary tools such as the ones mentioned above are not available.
- After booting into recovery and unlocking the drive using the user password, the Mac can be put into Mac sharing mode or Target mode (for older systems). By connecting the Mac to another device using Firewire or Thunderbolt, a logical acquisition can be done (for Mac sharing mode), or a complete disk image can be taken (if Target mode is available). However, the Target mode is no longer available in newer Macs with Apple silicon chips.
Which command can be used to disable SIP?
Set up your virtual environment

Well, we have gone through a lot of trouble acquiring a disk image from a Mac device. How do we go about analysing it? In most cases, forensic investigators will have mostly or Windows machines (or both) to perform forensics on, but they will seldom have a Mac machine. Let's see how challenging it is to mount an APFS Mac disk on a system.
Machine Access
Before moving forward, press the Start Lab Machine button below to start the attached .
The attached will start in the split view.
APFS-Fuse
To mount an APFS formatted drive on a system, we will use the open-source apfs-fuse utility. This utility can be found on GitHub (opens in new tab), along with the installation instructions. We have already installed this utility in the attached VM.
Checking the APFS Container Info
In the attached VM, a Mac disk image is already placed in the home directory with the name mac.dmg. First, we can list all the volumes in the using the apfsutil tool.
      ubuntu@tryhackme:~$ apfsutil mac-disk.img
Found partitions:
69646961-6700-11AA-11AA-00306543ECAC 68CB0FFE-F676-47D6-D1A2-5707D06D3E49 0000000000000028 00000000000FA027 0000000000000000 iBootSystemContainer
7C3457EF-0000-11AA-11AA-00306543ECAC 449DFC0C-7E1F-44D5-6A9F-7EA2C2AF0ADC 00000000000FA028 0000000002800027 0000000000000000 Container
52637672-7900-11AA-11AA-00306543ECAC A9432466-4751-47B7-1BBC-45B7B70465DE 0000000002800028 00000000031FFFD7 0000000000000000 RecoveryOSContainer
First APFS partition is 1

Volume 0 3B2E79F0-E4D4-4017-8443-597659F89844
---------------------------------------------
Role:               System
Name:               Macintosh HD (Case-insensitive)
Capacity Consumed:  10741764096 Bytes
FileVault:          No
Snapshots:
    40 : 'com.apple.os.update-151731D20D0972F39B434E2361ADB6B6BDD545C4F7D1DA7F6A031731952B6956'

Volume 1 01B18AFB-06F7-488D-AD2D-7BBA4F662516
---------------------------------------------
Role:               Preboot
Name:               Preboot (Case-insensitive)
Capacity Consumed:  5790040064 Bytes
FileVault:          No
Snapshots:

Volume 2 EB33FEA7-EE13-4296-AC6E-7B52B24C9A55
---------------------------------------------
Role:               Recovery
Name:               Recovery (Case-insensitive)
Capacity Consumed:  935395328 Bytes
FileVault:          No
Snapshots:

Volume 3 37074D60-A2AC-441E-B273-E6C504C58618
---------------------------------------------
Role:               Update
Name:               Update (Case-insensitive)
Capacity Consumed:  229376 Bytes
FileVault:          No
Snapshots:

Volume 4 84E5F2BD-503F-4E3A-8105-EEBEBC1925B4
---------------------------------------------
Role:               Data
Name:               Data (Case-insensitive)
Capacity Consumed:  2114285568 Bytes
FileVault:          No
Snapshots:

Volume 5 93123E81-F23A-48C5-91BF-0E227E15EE6B
---------------------------------------------
Role:               VM
Name:               VM (Case-insensitive)
Capacity Consumed:  20480 Bytes
FileVault:          No
Snapshots:
Here, we can see the different volumes present in the APFS , along with information such as the capacity consumed, name, UUID, and FileVault status of the different volumes. Now that we know the different partitions in the disk image, let's see how we can mount it.
Mounting Using APFS-Fuse
To mount the drive using apfs-fuse, we need to get root permissions. The instructions to assign read permissions to another user after mounting as root are present in the GitHub readme file, but we will continue just using the root user to read the image for now. Please note that apfs-fuse does not have write capabilities so the image will be mounted as read-only.
      ubuntu@tryhackme:~$ sudo su
root@tryhackme:/home/ubuntu# apfs-fuse
apfs-fuse [options] <device> <dir>

Options:
-d level      : Enable debug output in the console.
-f device     : Specify secondary device for fusion drives.
-o options    : Additional mount options (see below).
-v volume-id  : Specify number of volume to be mounted.
-r passphrase : Specify volume passphrase. The driver will ask for it if it is
                needed and hasn't been specified here.
-s offset     : Specify offset to the beginning of the container.
-p partition  : Specify partition id containing the container.
-l            : Allow driver to return potentially corrupt data instead of
                failing, if it can't handle something.

Additional mount options (using -o):
uid=N         : Pretend that all files have UID N.
gid=N         : Pretend that all files have GID N.
vol=N         : Same as -v, select volume id to mount.
blksize=N     : Set physical block size. Only needed if a partition table needs
                to be parsed and the sector size is not 512 bytes.
pass=...      : Specify volume passphrase (same as -r).
xid=N         : Mount specific xid.
snap=N        : Mount snapshot with given id. Use apfsutil for getting the ids.
We see that apfs-fuse is working, so let's mount the disk image and see what we get. We can mount the image using the mac directory as the mount point.
      root@tryhackme:/home/ubuntu# apfs-fuse mac-disk.img mac/
root@tryhackme:/home/ubuntu# ls mac
private-dir  root
Ok, the image has been mounted, and we can see that it has two directories, root and private-dir. The data is supposed to be present in the root directory. Let's check.
      root@tryhackme:/home/ubuntu# ls mac/root
Applications  Library  System  Users  Volumes  bin  cores  dev  etc  opt  private  sbin  tmp  usr  var
root@tryhackme:/home/ubuntu#
Okay, it looks like we have the data. Let's check the Users directory.
      root@tryhackme:/home/ubuntu# ls mac/root/Users
root@tryhackme:/home/ubuntu#
Oops! Something isn't right. There should be at least one user in the Users directory. What can be the problem?
Remember the different volumes that we saw when we ran the apfsutil command? It looks like we might have mounted the wrong volume. Let's try again, and this time, let's mount the Data volume. As we can see from the output of apfsutil, the Data volume is volume 4 in the container.
      root@tryhackme:/home/ubuntu# apfs-fuse -v 4 mac-disk.img mac
root@tryhackme:/home/ubuntu# ls mac/root/Users
Shared  thm
root@tryhackme:/home/ubuntu#
In the above command, we have used the -v flag to tell apfs-fuse to mount volume number 4. And voila! We can see that the user data is present now. Let's explore the of the image, see what else we can find, and answer the questions below.
In the disk image provided in the attached VM, what is the UUID of the volume containing user data?
What is the name of the user who used this Mac device?
There is a text file in the User directory of the above-mentioned user. What is the name of this file?
It looks like the file contains credentials for different users and their passwords. What is the password of the user we identified above?
Woah! Looks like we know a lot about macOS now. We are prepared now to perform forensics on a macOS device. However, we still stopped short of performing forensics on a macOS disk.
Well, that is for the macOS Forensics: Artefacts room. We covered a lot of ground in this room, such as:
- History of macOS.
- How does APFS differ from HFS+, and what improvements can we see in APFS?
- The directory structure of macOS and its similarity with the directory structure.
- The different domains in macOS and what kind of files are placed in each.
- The common file types used by macOS.
- Challenges we might face while acquiring a macOS disk image and possible workarounds.
- Mounting an APFS disk image on a to prepare for forensic analysis.
Let us know your thoughts on this room on our Discord channel (opens in new tab) or X account (opens in new tab). See you around.
Hurray! I am ready to perform forensics on macOS devices!
Ready to learn Cyber Security?
TryHackMe provides free online cyber security training to secure jobs & upskill through a fun, interactive learning environment.
Already have an account? Log in