We use cookies to ensure you get the best user experience. For more information see our cookie policy.
Network Room Guide
A room to guide users on how to use Networks on TryHackMe.
Task 1: Introduction
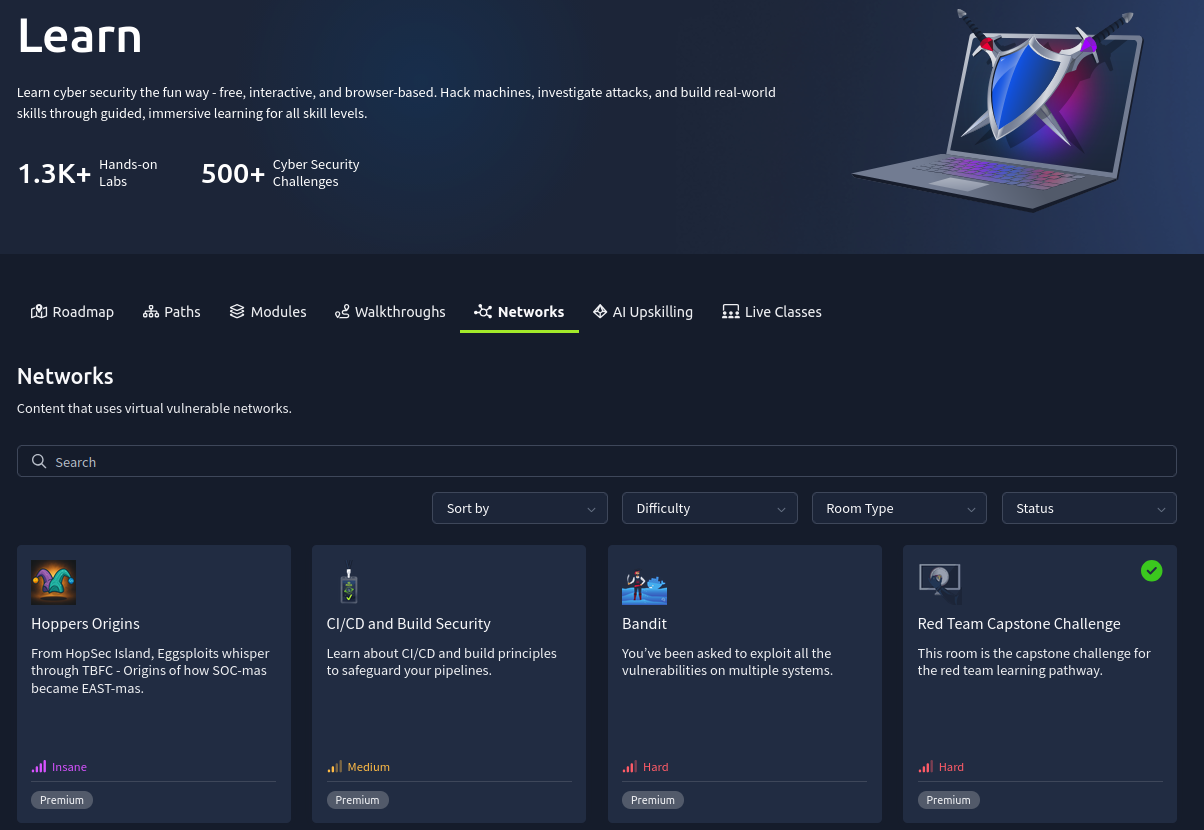
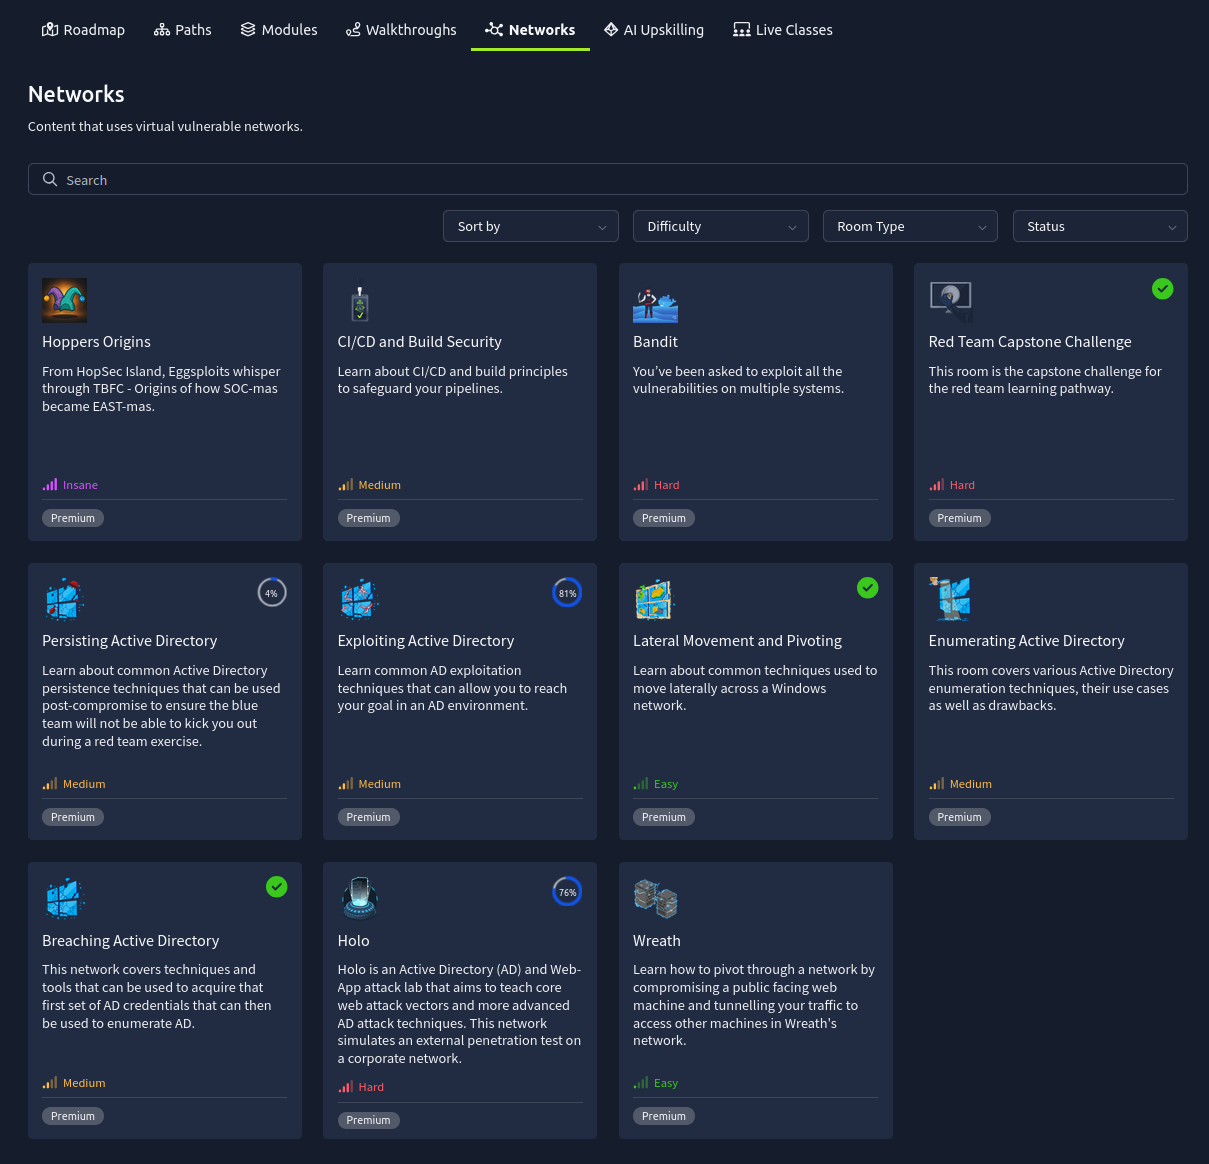
Some of the training provided by TryHackMe makes use of networks. You can find these on the learning tab if you click the Network tab:
Usually, a room will allow you to start a specific VM. However, in network rooms, you will find a complete network attached that can contain several VMs. Given that these work slightly different, this guide is here to help you understand how to connect to them and use them.
Learning Objectives
Learn how to connect and use networks in rooms
Learn how to troubleshoot your connection and the common pitfalls
Learn how to navigate the network and connect to machines within the network
Let's dive in!
Answer the questions below
I am ready to learn about network rooms!
Task 2: Connecting to the Network
Joining the Network
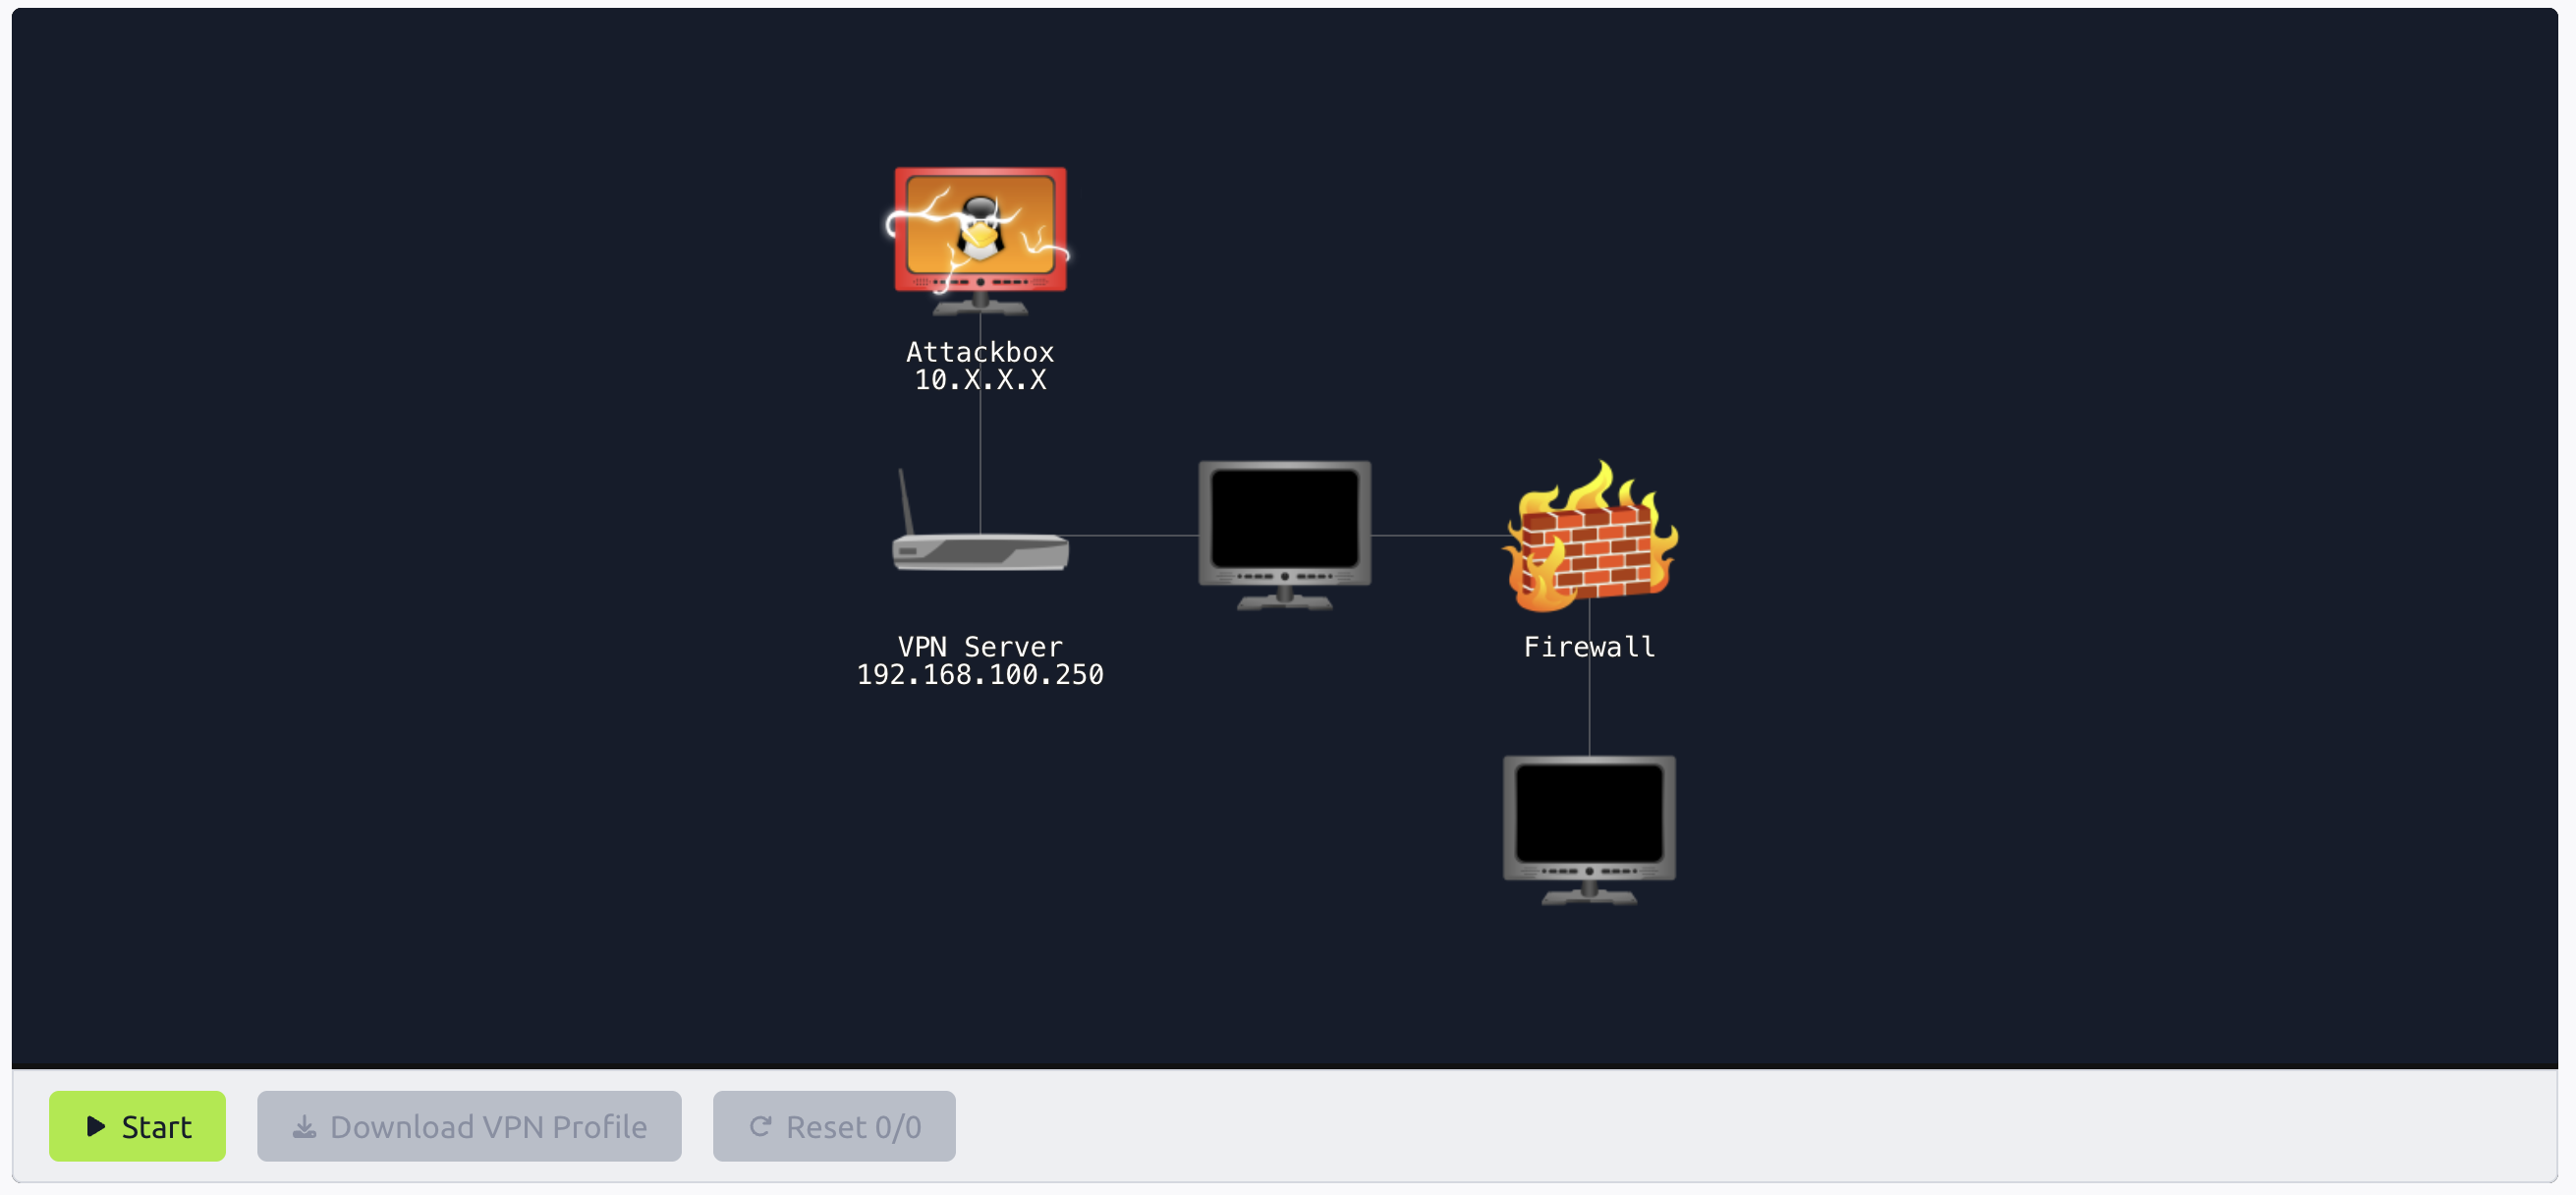
When you first open a network room, you will be met with an image of the network. Your first step to using the network is to click the Start button:
This will allow you to join the network. The first thing to know is that networks are sometimes multi-user. This means that more than one user may be connected to the same network as you. THM's Content Engineers use various metrics to determine how many users can join the same network. For example, given that this network is simply a guide, 250 users can connect to the same network at any given time! However, THM's exam networks are single-user networks, meaning that only one user is allowed in each network. Networks are automatically scaled depending on the demand.
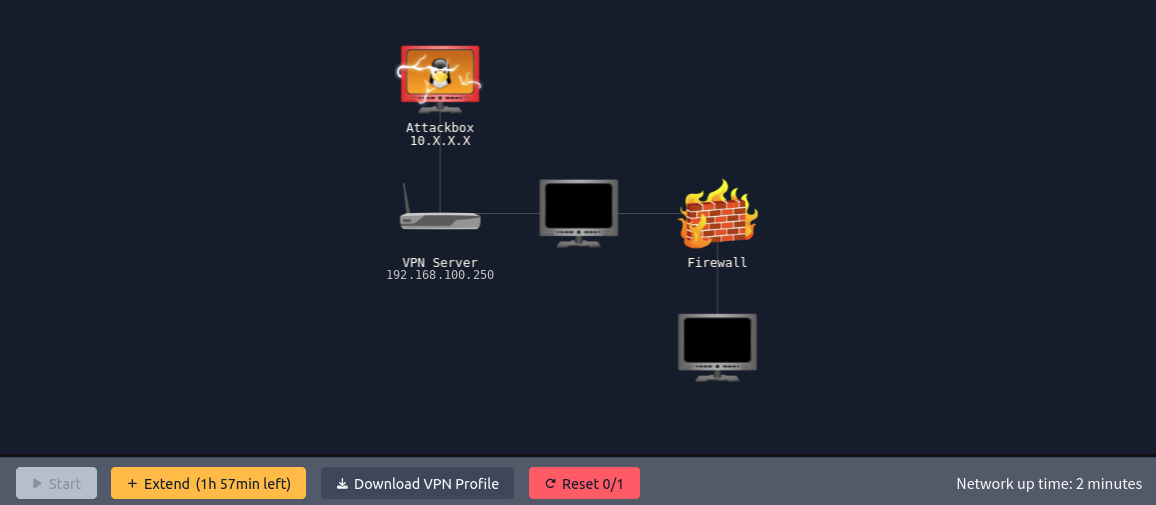
If you pressed the Start button and a loading screen was shown, it means that a new network instance has been brought up. Once the network is initialised, it will show you the same network diagram. If it immediately showed you this network diagram, it means you joined an existing network that has already been initialised:
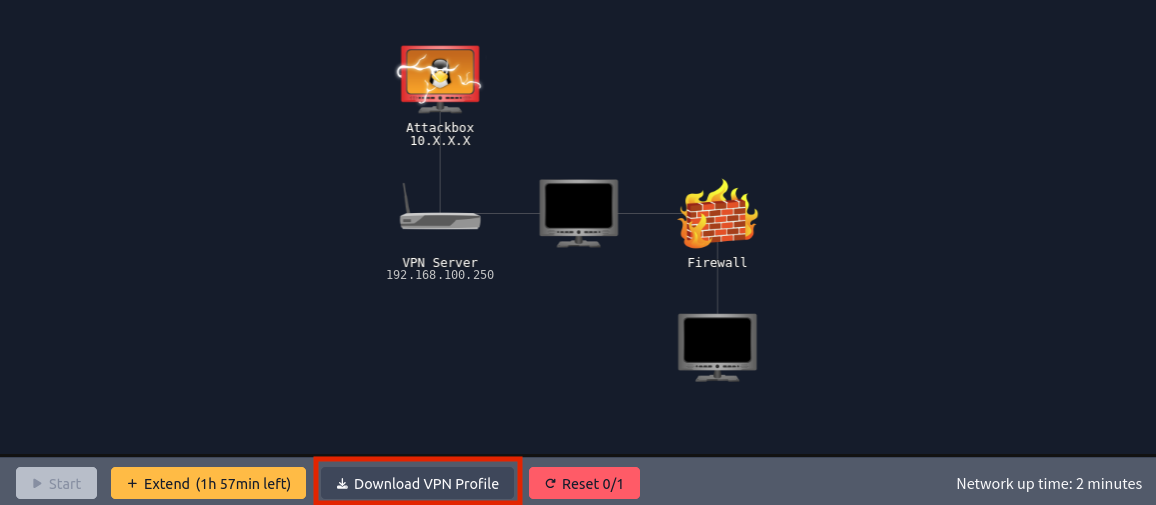
Let's explain the buttons and information on the network pane:
Network diagram: This diagram provides you with an overview of all the hosts and systems you can find in your network. Answering questions may update the network diagram. For example, currently there are two unknown machines. Once you answer the first question of this task, you will notice that the diagram will update. Go try that now!
Start button: Given that the network has already been started, this button is greyed out. When a network goes into the sleep state, this button will become available and can be used to restart the network. A restart will usually take between 1-3 minutes depending on the network size.
Extend button: Similar to the VMs you use in rooms, networks are also only active for a set amount of time. However, with networks, when the timer runs out, it only puts the network in a sleep mode. Progress and changes made in the network will persist until the network is reset. You will also see how much time is currently left on the network before it pauses.
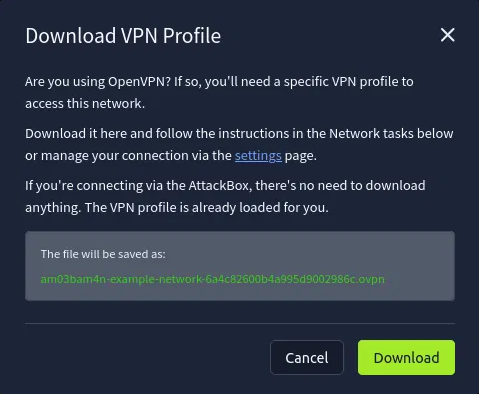
Download VPN Profile button: This button lets you download the VPN profile for this specific network instance. You only need it if you plan to connect from your own machine using OpenVPN. Clicking it opens a dialog that confirms the exact name your profile will be saved as, along with a Download button. More on this in the "Own Machine" section below.
Reset button: This button should be used sparingly. If you suspect that your network instance has been broken or irreparably altered by another user, you can vote for a reset. The counter on the button (for example, 0/1) shows how many votes are currently in against the number needed. You are only allowed to vote once in a set timeframe to ensure that users cannot disrupt the network for others. If enough users vote for the reset, the network instance will be fully rebuilt. This will revert all changes made in the network and usually takes about 5 minutes to complete.
Network up time: This counter shows you how long the current network has been active. While this doesn't really matter, the longer a network has been active, the more likely it is that there are several users busy with it. Once a network resets, the network up time also resets.
Connecting to the Network
Networks make use of a special VPN server. Each network instance has its very own VPN server. You do not need to use your TryHackMe VPN and the network VPN profile together, you simply connect using the network VPN profile directly.
There are a few ways to connect, depending on your account type and how you like to work:
AttackBox (premium and MAX users): The network VPN profile is loaded and run for you automatically. Nothing to download.
Your own machine with Squawker VPN (recommended): A free desktop app from TryHackMe that handles all of your VPN configuration for you.
Your own machine with OpenVPN: Download the network VPN profile yourself and run it manually with OpenVPN.
Premium and MAX users can use the AttackBox or their own machine. Free users will have to use their own machine (Squawker VPN or OpenVPN).
Note: Network VPN servers only allow ONE connection per user at any given time. This means you can only run your VPN profile in ONE location. This includes the AttackBox, which uses the exact same VPN profile you use, as well as Squawker VPN. If you connect in two places at once, they will disconnect each other, which will break your connection. This is the most common mistake leading to instability in VPN connections. More on this later in troubleshooting your connection.
AttackBox
If you are using the AttackBox, your VPN profile should be automatically downloaded and executed. Typing ip a in a terminal on the AttackBox should show you a tunnel interface for 10.100.10.X where X is your specific IP as shown below:
Terminal
      root@ip-10-82-78-70:~# ip a
1: lo: <LOOPBACK,UP,LOWER_UP> mtu 65536 qdisc noqueue state UNKNOWN group default qlen 1000
    link/loopback 00:00:00:00:00:00 brd 00:00:00:00:00:00
    inet 127.0.0.1/8 scope host lo
       valid_lft forever preferred_lft forever
    inet6 ::1/128 scope host
       valid_lft forever preferred_lft forever
11: tun0: <POINTOPOINT,MULTICAST,NOARP,UP,LOWER_UP>>mtu 1500 qdisc fq_codel state UNKNOWN group default qlen 500
    link/none
    inet 10.100.10.X/24 scope global tun0
       valid_lft forever preferred_lft forever
    inet6 fe80::69b8:adcd:d834:5cef/64 scope link stable-privacy
       valid_lft forever preferred_lft forever
You can also use route -n to confirm that there is a new route to connect you to the network's subnet of 192.168.20.0/24 as shown below:
Terminal
      root@ip-10-82-78-70:~# route -n
Kernel IP routing table
Destination     Gateway         Genmask         Flags Metric Ref    Use Iface
0.0.0.0         10.82.64.1      0.0.0.0         UG    100    0        0 ens5
10.82.64.0      0.0.0.0         255.255.192.0   U     100    0        0 ens5
10.82.64.1      0.0.0.0         255.255.255.255 UH    100    0        0 ens5
10.100.10.0     0.0.0.0         255.255.255.0   U     0      0        0 tun0
192.168.100.0   10.100.10.1     255.255.255.0   UG    1000   0        0 tun0
In the event that you cannot see this tunnel interface, you can make use of the tryconnectme script to debug the connection. More on this will be provided in the next task. Skip forward if you are having connection issues using the AttackBox.
Own Machine
If you are connecting from your own machine, you have two options: Squawker VPN (recommended) or OpenVPN.
Squawker VPN (Recommended)
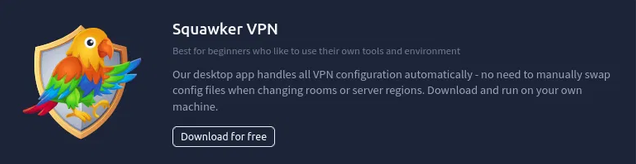
Squawker VPN is a free desktop app from TryHackMe that manages your VPN connection for you. It is best for beginners who like to use their own tools and environment. The app handles all VPN configuration automatically, so there is no need to manually swap config files when you change rooms or server regions.
You can download Squawker VPN from the Manage Account page under VM and VPN Settings:
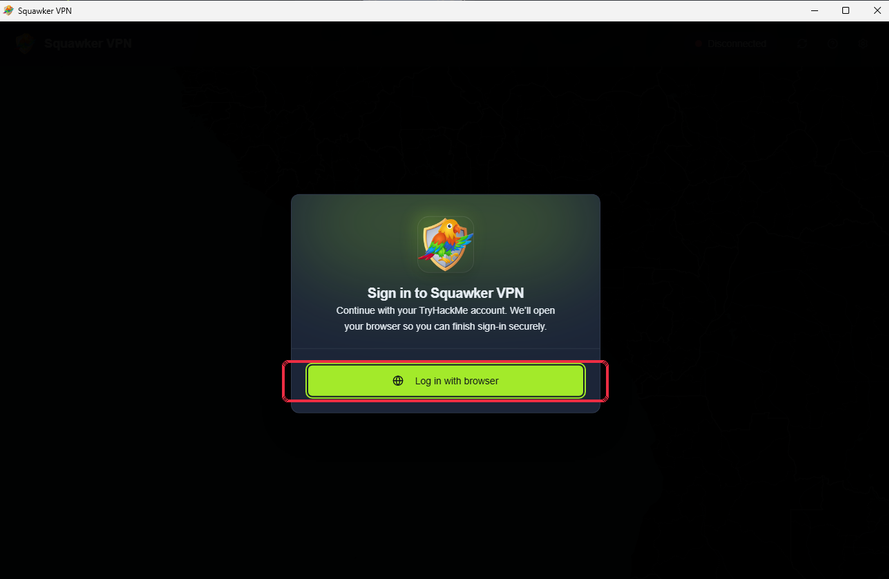
Once downloaded and installed, open the app. On the sign-in screen, click Log in with browser. Squawker will open your browser so you can sign in securely with your TryHackMe account:
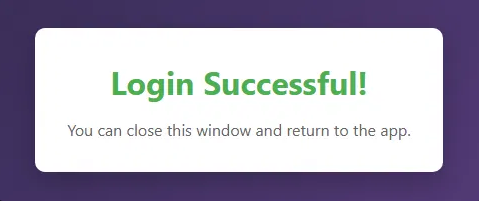
Once you have signed in, your browser will confirm that the login was successful. You can close the browser and return to the app:
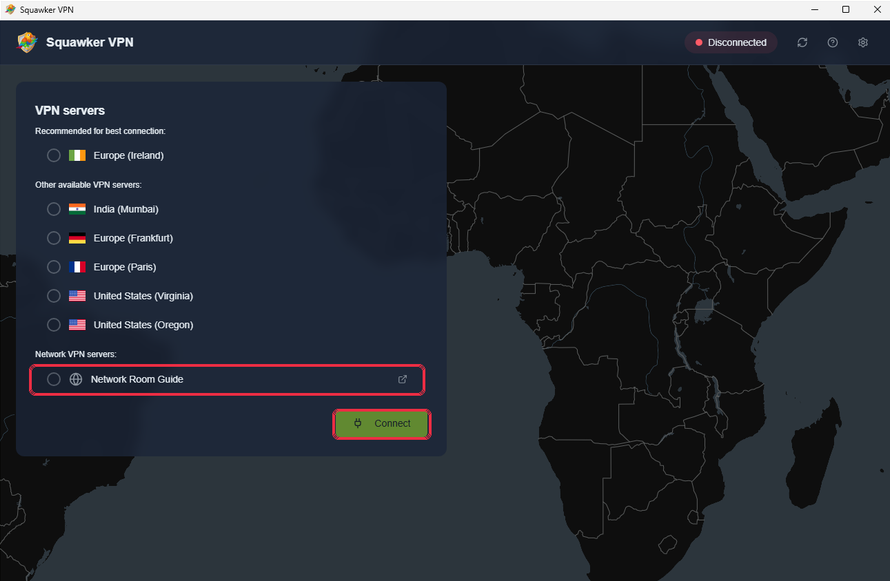
Back in the app, you will see a list of VPN servers. The network room you are working on appears under Network VPN servers — in this guide it is listed as Network Room Guide. Select it and click Connect:
That's it. Squawker handles the VPN configuration for you, so there are no config files to download or swap. Once connected, the status indicator in the top-right corner will change from Disconnected to Connected, and you can start exploring the network.
OpenVPN
If you would rather run the VPN profile yourself with OpenVPN, download it directly from the network pane using the Download VPN Profile button (highlighted below):
Clicking it opens a dialog confirming the exact filename your profile will be saved as. Click Download to save it.
Note that if you are connecting via the AttackBox, there is no need to download anything. The profile is already loaded for you. Once you have the profile, use OpenVPN to connect with the following command:
openvpn <location to OVPN configuration file>
Once executed, you should see the following lines:
Terminal
      ubuntu@server$openvpn am03bam4n-example-network.ovpn
2026-01-11 18:47:07 Note: --cipher is not set. OpenVPN versions before 2.5 defaulted to BF-CBC as fallback when cipher negotiation failed in this case. If you need this fallback please add '--data-ciphers-fallback BF-CBC' to your configuration and/or add BF-CBC to --data-ciphers.
2026-01-11 18:47:07 Note: cipher 'AES-256-CBC' in --data-ciphers is not supported by ovpn-dco, disabling data channel offload.
2026-01-11 18:47:07 OpenVPN 2.6.17 x86_64-pc-linux-gnu [SSL (OpenSSL)] [LZO] [LZ4] [EPOLL] [PKCS11] [MH/PKTINFO] [AEAD] [DCO]
2026-01-11 18:47:07 library versions: OpenSSL 3.0.2 15 Mar 2022, LZO 2.10
2026-01-11 18:47:07 DCO version: N/A
2026-01-11 18:47:07 TCP/UDP: Preserving recently used remote address: [AF_INET]108.128.224.180:1194
2026-01-11 18:47:07 Socket Buffers: R=[212992->212992] S=[212992->212992]
2026-01-11 18:47:07 UDPv4 link local: (not bound)
2026-01-11 18:47:07 UDPv4 link remote: [AF_INET]108.128.224.180:1194
2026-01-11 18:47:07 TLS: Initial packet from [AF_INET]108.128.224.180:1194, sid=7234bcde 7ceb3705
2026-01-11 18:47:08 VERIFY OK: depth=1, CN=ChangeMe
2026-01-11 18:47:08 VERIFY KU OK
2026-01-11 18:47:08 Validating certificate extended key usage
2026-01-11 18:47:08 ++ Certificate has EKU (str) TLS Web Server Authentication, expects TLS Web Server Authentication
2026-01-11 18:47:08 VERIFY EKU OK
2026-01-11 18:47:08 VERIFY OK: depth=0, CN=server
2026-01-11 18:47:08 Control Channel: TLSv1.3, cipher TLSv1.3 TLS_AES_256_GCM_SHA384, peer certificate: 2048 bits RSA, signature: RSA-SHA256, peer temporary key: 253 bits X25519
2026-01-11 18:47:08 [server] Peer Connection Initiated with [AF_INET]108.128.224.180:1194
2026-01-11 18:47:08 TLS: move_session: dest=TM_ACTIVE src=TM_INITIAL reinit_src=1
2026-01-11 18:47:08 TLS: tls_multi_process: initial untrusted session promoted to trusted
2026-01-11 18:47:09 SENT CONTROL [server]: 'PUSH_REQUEST' (status=1)
2026-01-11 18:47:09 PUSH: Received control message: 'PUSH_REPLY,route 192.168.20.0 255.255.255.0,route-metric 1000,route-gateway 10.100.10.1,topology subnet,ping 5,ping-restart 120,ifconfig 10.100.10.2 255.255.255.0,peer-id 0'
2026-01-11 18:47:09 OPTIONS IMPORT: --ifconfig/up options modified
2026-01-11 18:47:09 OPTIONS IMPORT: route options modified
2026-01-11 18:47:09 OPTIONS IMPORT: route-related options modified
2026-01-11 18:47:09 Using peer cipher 'AES-256-CBC'
2026-01-11 18:47:09 net_route_v4_best_gw query: dst 0.0.0.0
2026-01-11 18:47:09 net_route_v4_best_gw result: via 192.168.1.1 dev enx00e04c43856d
2026-01-11 18:47:09 ROUTE_GATEWAY 192.168.1.1/255.255.255.0 IFACE=wlp0s20f3 HWADDR=f0:d4:15:be:19:af
2026-01-11 18:47:09 TUN/TAP device tun1 opened
2026-01-11 18:47:09 net_iface_mtu_set: mtu 1500 for tun1
2026-01-11 18:47:09 net_iface_up: set tun1 up
2026-01-11 18:47:09 net_addr_v4_add: 10.100.10.2/24 dev tun1
2026-01-11 18:47:09 net_route_v4_add: 192.168.100.0/24 via 10.100.10.1 dev [NULL] table 0 metric 1000
2026-01-11 18:47:09 Initialization Sequence Completed
2026-01-11 18:47:09 Data Channel: cipher 'AES-256-CBC', auth 'SHA512', peer-id: 0
2026-01-11 18:47:09 Timers: ping 5, ping-restart 120
2026-01-11 18:47:09 Protocol options: explicit-exit-notify 3
You do not need to worry about most of these lines, but there are a few to keep a lookout for:
TUN/TAP device tun1 opened: This tells us that our tunnel interface will be named tun1.
net_iface_up: set tun1 up: This tells us that our tunnel interface has been opened.
net_addr_v4_add: 10.100.10.2/24 dev tun1: This tells us that the IP associated with our tunnel interface is 10.100.10.2. This is important as this is our IP connected into the network.
net_route_v4_add: 192.168.100.0/24 via 10.100.10.1: This tells us the subnet for which a new route has been added to the tunnel interface. In this case, it is for the 192.168.100.0/24 subnet. All traffic to this subnet will now be sent through our tunnel interface. Looking at the network diagram now, we can see this matches the IPs we have in our diagram.
Once connected, we can start to explore the network! However, before we do so, let's take a look at how to debug your network connection, if needed.
Answer the questions below
Answer this question to update the network diagram.
Open your OVPN file using a text editor. You will notice that there is a flag embedded as a comment. What is the value of this flag?
Task 3: Troubleshooting the Connection
Connecting to the network should be straightforward. However, in the event that you experience an issue, please use the following to help you out.
Multiple Active Profiles
As mentioned before, the most common issue seen is users running the VPN profile more than once. The network's VPN server only accepts a single connection. That includes the AttackBox and Squawker VPN. If you are running the profile in more than one place, they will disconnect each other. In the terminal where you are running the VPN profile, it will look something like this:
You need to ensure that you are only connected in one place at a time. Disconnect any other sessions. This includes an OpenVPN profile running on your own machine, the AttackBox, and Squawker VPN. Make sure only one of these is active.
Profile Not Connecting
Sometimes when you run the VPN profile, it will not progress past the connection stage, as shown here:
This means that the VPN server cannot be contacted, which is due to two main reasons:
The network instance you are connected to is currently not running.
Your VPN profile is old, as you have been placed in a new network instance. This happens every 7 days automatically.
Solution
Refresh the room page and make sure that your network instance is running. If it isn't, click the Start button and wait 5 minutes before trying again.
If your network instance is running and the connection is still not working, download a fresh copy of the VPN profile using the Download VPN Profile button on the network pane (see the previous task) and connect with that. This ensures you are using the profile for your current network instance.
AttackBox Connection
Please note that Network VPNs can only be used on the AttackBox by premium and MAX users. If you are a free user, you will have to use your own machine.
In the event that the VPN profile is not showing on the AttackBox using ip a and route -n as explained in the previous task, you can simply run tryconnectme in a terminal to debug the network connection:
Terminal
      root@ip-10-82-78-70:~# tryconnectme

 _____          _____                             _  ___  ___
|_   _|        /  __ \                           | | |  \/  |
  | |_ __ _   _| /  \/ ___  _ __  _ __   ___  ___| |_| .  . | ___
  | | '__| | | | |    / _ \| '_ \| '_ \ / _ \/ __| __| |\/| |/ _ \
  | | |  | |_| | \__/\ (_) | | | | | | |  __/ (__| |_| |  | |  __/
  \_/_|   \__, |\____/\___/|_| |_|_| |_|\___|\___|\__\_|  |_/\___|
           __/ |
          |___/

TryHackMe's network room connection debugger, at your service!

Before we dive deeper, please make sure that you are only using the AttackBox
and do not have your network VPN profile running anywhere!

The AttackBox uses the same VPN profile as you would use on your own machine
and you are only allowed to run the VPN profile once!

If you are running in two places, stop the other VPN and restart the AttackBox please!

If you confirm that you are only using the AttackBox, press [Y], otherwise, the debugger will quit:
The TryConnectMe program will require the following information from you in order to perform the debug steps:
An IP address from your network: This will be provided in the network diagram or in Task 1 of the room. In this example network, the IP is 192.168.100.X.
The Network Profile name of the specific network: You can find this by clicking the Download VPN Profile button on the network pane. The dialog shows the exact name your profile will be saved as, in the format <username>-<network-name>-<network-id>.ovpn. The network profile name is the middle portion: everything after your username and before the trailing network ID (the long string of letters and numbers). For example, if the file is saved as am03bam4n-example-network-6a4c82600b4a995d9002986c.ovpn, then your username is am03bam4n, the network ID is 6a4c82600b4a995d9002986c, and the network profile name is example-network. Note that a network name can itself contain hyphens, so match on your username at the front and the network ID at the end rather than simply splitting on the first hyphen.
How It Works
The steps provided here can help you reproduce the debug process if you are using your own machine.
The TryConnectMe program first attempts to ping the network's VPN server. In all networks, this VPN server lives at X.X.X.250 where X.X.X is the specific network's subnet range. If you (or TryConnectMe) are able to ping the VPN server, it means the connection is working as it should. Your issue connecting to a host in the network is then for a different reason, as explained in the next task.
In the event that the TryConnectMe program cannot connect to the VPN server, it will start the debug process as follows:
Determine if the VPN profile has been downloaded: In the event that the profile hasn't been downloaded, it will ask you to download your profile before continuing.
If the VPN profile is downloaded, determine if the VPN profile is running: Sometimes the VPN profile may be downloaded but isn't currently running. The program will then provide you with the command to run the profile.
If the profile is running, determine if multiple profiles are being executed at the same time: Sometimes the AttackBox may run the same profile twice. If this is the case, the program will terminate all instances of the profile and provide you with the command to run the profile once.
These steps are able to solve almost all of the problems you can experience trying to connect to the network using the AttackBox. If you still experience problems, the TryConnectMe program requests that you reach out to support. If this is the case, please make sure to provide support with the following to ensure the best chance of receiving proper assistance:
Which network room you are doing
The output from the TryConnectMe program
Your OVPN profile
Squawker VPN
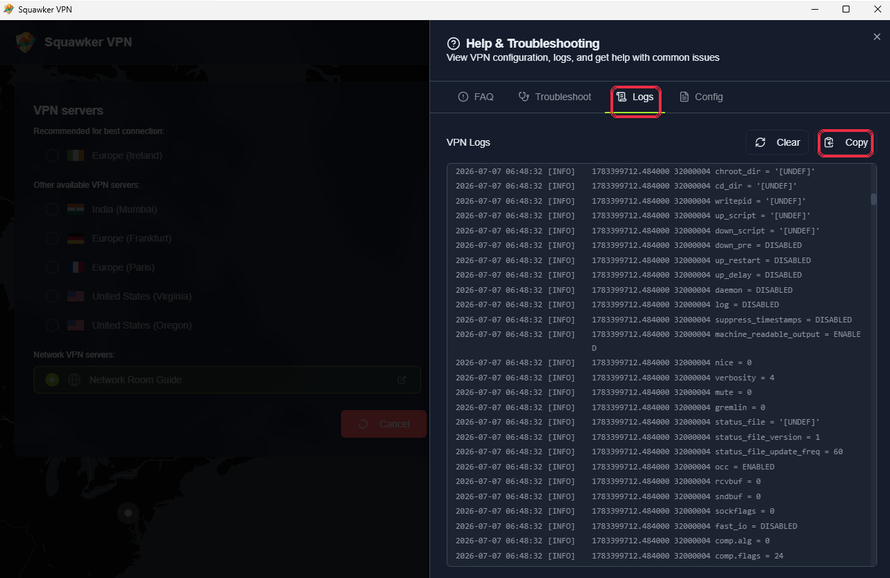
If you are using Squawker VPN and run into connection trouble, the app has a built-in Help & Troubleshooting panel. Open it using the help (?) icon in the top-right corner of the app. The FAQ and Troubleshoot tabs cover the most common issues and can help you resolve them yourself.
If you still need to reach out to support, open the Logs tab and click Copy to grab the VPN logs. Include these logs in your support request, along with which network room you are doing, to give support the best chance of helping you quickly:
Final Thoughts
Some network rooms may have additional steps for you, such as configuring your DNS. It is worth making sure that your network connection is working first before moving on to these additional steps. If your network connection is giving issues and you continue, it becomes incredibly hard to discern whether the issues stem from your connection or the additional steps. Take the time to make sure that your network connection is working like it should before moving on. A lot of the network rooms are rated harder and are for more experienced users. Taking the extra bit of time to ensure you are properly connected to the network can save you a lot of time down the road.
Testing the Connection
Now that you are connected to the example network, let's connect to our first host. Use the credentials provided below to connect to the perimeter host (notice you will connect from your Attacker machine through the VPN server to the Perimeter Ubuntu machine):
Credentials
Username
hop1
Password
hop1
IP address
192.168.100.101
Connection via
SSH
ssh hop1@192.168.100.101
Answer the questions below
What is the flag in the /home/hop1/ directory on the Perimeter Ubuntu host?
Task 4: Security Groups, Firewalls, and Pivoting
Firewalls and Security Groups
Network rooms are often more complex than single-VM rooms. In network rooms, you will often find entire environments that you have to compromise. Similar to what you can expect on real pentesting engagements, network segregation controls can exist in network rooms.
Restriction Types
There are two main controls you may come up against:
Host-based Firewalls: In certain networks, the hosts may have their host-based firewall enabled. On Windows, this will be mostly Windows Defender and on Linux, ufw. These firewalls will place restrictions on what you can access from the get-go. However, once you gain privileged access to the host, you have the ability to disable the firewall or make it more permissive.
Security Groups: Networks can be configured to restrict traffic based on Security Groups. This control is similar to switches and physical firewall devices that you may encounter on corporate networks. You will NOT be able to gain access to this device, meaning the restrictions will remain in effect throughout your journey through the network. If you encounter this type of restriction, you will have to create pivots. Just because you cannot access a host directly does not mean it is a mistake, the restriction is often intentional. Once you gain access to another host, you can retry to connect to this host to see if different controls apply.
Restriction Direction
Restrictions can also be applied in a specific direction:
Inbound: Inbound restrictions will filter traffic coming INTO the host. This means when you try to connect to the host, a filter will apply.
Outbound: Outbound restrictions will filter traffic coming OUT from the host. This means that when the host tries to connect back to you or another host, the filter will apply.
It is important to understand in what direction the restriction is being applied. Just because you often cannot connect in doesn't mean that something cannot connect out.
Pivoting in a Network
Take for instance the Corporate Ubuntu host. If you try to access this host directly from your VPN connection, you will see that it isn't possible. Security Group restrictions have been created to prevent this. Hence, you will have to use your access on Perimeter Ubuntu to access this host. Use the SSH access you have gained from the previous task and access the Corporate Ubuntu host using the following credentials:
Credentials
Username
hop2
Password
hop2
IP address
192.168.100.10
Connection via
SSH
ssh hop2@192.168.100.10
Answer the questions below
What is the flag in the /home/hop2/ directory on the Corporate Ubuntu host?
Task 5: Conclusion
By learning how to connect to a network room and debug any potential issues you may have, you are well on your way to enhancing your cybersecurity knowledge by doing some of the more complex rooms that TryHackMe has to offer.
Where To Next?
Now that you understand networks, check them out of the Learning page:
A room to guide users on how to use Networks on TryHackMe.
info
30 min
4,310
To access material, start machines and answer questions login.
Press 'Start' to begin
Please join this room to start the network
This will be enabled once the network is live. Please wait.
Can't reconnect? Try regenerating your VPN config.
When there are enough votes, the network will reset to its default state
Some of the training provided by TryHackMe makes use of networks. You can find these on the learning tab if you click the Network tab:
Usually, a room will allow you to start a specific . However, in network rooms, you will find a complete network attached that can contain several VMs. Given that these work slightly different, this guide is here to help you understand how to connect to them and use them.
Learning Objectives
Learn how to connect and use networks in rooms
Learn how to troubleshoot your connection and the common pitfalls
Learn how to navigate the network and connect to machines within the network
Let's dive in!
Answer the questions below
I am ready to learn about network rooms!
Joining the Network
When you first open a network room, you will be met with an image of the network. Your first step to using the network is to click the Start button:
This will allow you to join the network. The first thing to know is that networks are sometimes multi-user. This means that more than one user may be connected to the same network as you. 's Content Engineers use various metrics to determine how many users can join the same network. For example, given that this network is simply a guide, 250 users can connect to the same network at any given time! However, THM's exam networks are single-user networks, meaning that only one user is allowed in each network. Networks are automatically scaled depending on the demand.
If you pressed the Start button and a loading screen was shown, it means that a new network instance has been brought up. Once the network is initialised, it will show you the same network diagram. If it immediately showed you this network diagram, it means you joined an existing network that has already been initialised:
Let's explain the buttons and information on the network pane:
Network diagram: This diagram provides you with an overview of all the hosts and systems you can find in your network. Answering questions may update the network diagram. For example, currently there are two unknown machines. Once you answer the first question of this task, you will notice that the diagram will update. Go try that now!
Start button: Given that the network has already been started, this button is greyed out. When a network goes into the sleep state, this button will become available and can be used to restart the network. A restart will usually take between 1-3 minutes depending on the network size.
Extend button: Similar to the VMs you use in rooms, networks are also only active for a set amount of time. However, with networks, when the timer runs out, it only puts the network in a sleep mode. Progress and changes made in the network will persist until the network is reset. You will also see how much time is currently left on the network before it pauses.
Download Profile button: This button lets you download the VPN profile for this specific network instance. You only need it if you plan to connect from your own machine using OpenVPN. Clicking it opens a dialog that confirms the exact name your profile will be saved as, along with a Download button. More on this in the "Own Machine" section below.
Reset button: This button should be used sparingly. If you suspect that your network instance has been broken or irreparably altered by another user, you can vote for a reset. The counter on the button (for example, 0/1) shows how many votes are currently in against the number needed. You are only allowed to vote once in a set timeframe to ensure that users cannot disrupt the network for others. If enough users vote for the reset, the network instance will be fully rebuilt. This will revert all changes made in the network and usually takes about 5 minutes to complete.
Network up time: This counter shows you how long the current network has been active. While this doesn't really matter, the longer a network has been active, the more likely it is that there are several users busy with it. Once a network resets, the network up time also resets.
Connecting to the Network
Networks make use of a special VPN server. Each network instance has its very own VPN server. You do not need to use your TryHackMe VPN and the network VPN profile together, you simply connect using the network VPN profile directly.
There are a few ways to connect, depending on your account type and how you like to work:
AttackBox (premium and MAX users): The network VPN profile is loaded and run for you automatically. Nothing to download.
Your own machine with Squawker VPN (recommended): A free desktop app from TryHackMe that handles all of your VPN configuration for you.
Your own machine with OpenVPN: Download the network VPN profile yourself and run it manually with OpenVPN.
Premium and MAX users can use the AttackBox or their own machine. Free users will have to use their own machine (Squawker VPN or OpenVPN).
Note: Network VPN servers only allow ONE connection per user at any given time. This means you can only run your VPN profile in ONE location. This includes the AttackBox, which uses the exact same VPN profile you use, as well as Squawker VPN. If you connect in two places at once, they will disconnect each other, which will break your connection. This is the most common mistake leading to instability in VPN connections. More on this later in troubleshooting your connection.
AttackBox
If you are using the AttackBox, your VPN profile should be automatically downloaded and executed. Typing ip a in a terminal on the AttackBox should show you a tunnel interface for 10.100.10.X where X is your specific IP as shown below:
Terminal
root@ip-10-82-78-70:~# ip a1: lo: <LOOPBACK,UP,LOWER_UP> mtu 65536 qdisc noqueue state UNKNOWN group default qlen 1000
link/loopback 00:00:00:00:00:00 brd 00:00:00:00:00:00
inet 127.0.0.1/8 scope host lo
valid_lft forever preferred_lft forever
inet6 ::1/128 scope host
valid_lft forever preferred_lft forever
11: tun0: <POINTOPOINT,MULTICAST,NOARP,UP,LOWER_UP>>mtu 1500 qdisc fq_codel state UNKNOWN group default qlen 500
link/none
inet 10.100.10.X/24 scope global tun0
valid_lft forever preferred_lft forever
inet6 fe80::69b8:adcd:d834:5cef/64 scope link stable-privacy
valid_lft forever preferred_lft forever
You can also use route -n to confirm that there is a new route to connect you to the network's subnet of 192.168.20.0/24 as shown below:
Terminal
root@ip-10-82-78-70:~# route -n
Kernel IP routing table
Destination Gateway Genmask Flags Metric Ref Use Iface
0.0.0.0 10.82.64.1 0.0.0.0 UG 10000 ens5
10.82.64.0 0.0.0.0 255.255.192.0 U 10000 ens5
10.82.64.1 0.0.0.0 255.255.255.255 UH 10000 ens5
10.100.10.0 0.0.0.0 255.255.255.0 U 000 tun0
192.168.100.0 10.100.10.1 255.255.255.0 UG 100000 tun0
In the event that you cannot see this tunnel interface, you can make use of the tryconnectme script to debug the connection. More on this will be provided in the next task. Skip forward if you are having connection issues using the AttackBox.
Own Machine
If you are connecting from your own machine, you have two options: Squawker VPN (recommended) or OpenVPN.
Squawker VPN (Recommended)
Squawker VPN is a free desktop app from TryHackMe that manages your VPN connection for you. It is best for beginners who like to use their own tools and environment. The app handles all VPN configuration automatically, so there is no need to manually swap config files when you change rooms or server regions.
You can download Squawker VPN from the Manage Account page under VM and VPN Settings:
Once downloaded and installed, open the app. On the sign-in screen, click Log in with browser. Squawker will open your browser so you can sign in securely with your TryHackMe account:
Once you have signed in, your browser will confirm that the login was successful. You can close the browser and return to the app:
Back in the app, you will see a list of VPN servers. The network room you are working on appears under Network VPN servers — in this guide it is listed as Network Room Guide. Select it and click Connect:
That's it. Squawker handles the VPN configuration for you, so there are no config files to download or swap. Once connected, the status indicator in the top-right corner will change from Disconnected to Connected, and you can start exploring the network.
OpenVPN
If you would rather run the VPN profile yourself with OpenVPN, download it directly from the network pane using the Download VPN Profile button (highlighted below):
Clicking it opens a dialog confirming the exact filename your profile will be saved as. Click Download to save it.
Note that if you are connecting via the AttackBox, there is no need to download anything. The profile is already loaded for you. Once you have the profile, use OpenVPN to connect with the following command:
openvpn <location to OVPN configuration file>
Once executed, you should see the following lines:
Terminal
ubuntu@server$openvpn am03bam4n-example-network.ovpn
2026-01-11 18:47:07 Note: --cipher is not set. OpenVPN versions before 2.5 defaulted to BF-CBC as fallback when cipher negotiation failed in this case. If you need this fallback please add'--data-ciphers-fallback BF-CBC' to your configuration and/or add BF-CBC to --data-ciphers.
2026-01-11 18:47:07 Note: cipher 'AES-256-CBC'in --data-ciphers is not supported by ovpn-dco, disabling data channel offload.
2026-01-11 18:47:07 OpenVPN 2.6.17 x86_64-pc-linux-gnu [SSL (OpenSSL)][LZO][LZ4][EPOLL][PKCS11][MH/PKTINFO][AEAD][DCO]2026-01-11 18:47:07 library versions: OpenSSL 3.0.2 15 Mar 2022, LZO 2.102026-01-11 18:47:07 DCO version: N/A
2026-01-11 18:47:07 TCP/UDP: Preserving recently used remote address: [AF_INET]108.128.224.180:1194
2026-01-11 18:47:07 Socket Buffers: R=[212992->212992]S=[212992->212992]2026-01-11 18:47:07 UDPv4 link local: (not bound)2026-01-11 18:47:07 UDPv4 link remote: [AF_INET]108.128.224.180:1194
2026-01-11 18:47:07 TLS: Initial packet from [AF_INET]108.128.224.180:1194, sid=7234bcde 7ceb3705
2026-01-11 18:47:08 VERIFY OK: depth=1, CN=ChangeMe
2026-01-11 18:47:08 VERIFY KU OK
2026-01-11 18:47:08 Validating certificate extended key usage
2026-01-11 18:47:08 ++ Certificate has EKU (str) TLS Web Server Authentication, expects TLS Web Server Authentication
2026-01-11 18:47:08 VERIFY EKU OK
2026-01-11 18:47:08 VERIFY OK: depth=0, CN=server
2026-01-11 18:47:08 Control Channel: TLSv1.3, cipher TLSv1.3 TLS_AES_256_GCM_SHA384, peer certificate: 2048 bits RSA, signature: RSA-SHA256, peer temporary key: 253 bits X25519
2026-01-11 18:47:08 [server] Peer Connection Initiated with [AF_INET]108.128.224.180:1194
2026-01-11 18:47:08 TLS: move_session: dest=TM_ACTIVE src=TM_INITIAL reinit_src=12026-01-11 18:47:08 TLS: tls_multi_process: initial untrusted session promoted to trusted
2026-01-11 18:47:09 SENT CONTROL [server]: 'PUSH_REQUEST'(status=1)2026-01-11 18:47:09 PUSH: Received control message: 'PUSH_REPLY,route 192.168.20.0 255.255.255.0,route-metric 1000,route-gateway 10.100.10.1,topology subnet,ping 5,ping-restart 120,ifconfig 10.100.10.2 255.255.255.0,peer-id 0'2026-01-11 18:47:09 OPTIONS IMPORT: --ifconfig/up options modified
2026-01-11 18:47:09 OPTIONS IMPORT: route options modified
2026-01-11 18:47:09 OPTIONS IMPORT: route-related options modified
2026-01-11 18:47:09 Using peer cipher 'AES-256-CBC'2026-01-11 18:47:09 net_route_v4_best_gw query: dst 0.0.0.0
2026-01-11 18:47:09 net_route_v4_best_gw result: via 192.168.1.1 dev enx00e04c43856d
2026-01-11 18:47:09 ROUTE_GATEWAY 192.168.1.1/255.255.255.0 IFACE=wlp0s20f3 HWADDR=f0:d4:15:be:19:af
2026-01-11 18:47:09 TUN/TAP device tun1 opened
2026-01-11 18:47:09 net_iface_mtu_set: mtu 1500for tun1
2026-01-11 18:47:09 net_iface_up: set tun1 up
2026-01-11 18:47:09 net_addr_v4_add: 10.100.10.2/24 dev tun1
2026-01-11 18:47:09 net_route_v4_add: 192.168.100.0/24 via 10.100.10.1 dev [NULL] table 0 metric 10002026-01-11 18:47:09 Initialization Sequence Completed
2026-01-11 18:47:09 Data Channel: cipher 'AES-256-CBC', auth 'SHA512', peer-id: 02026-01-11 18:47:09 Timers: ping5, ping-restart 1202026-01-11 18:47:09 Protocol options: explicit-exit-notify 3
You do not need to worry about most of these lines, but there are a few to keep a lookout for:
TUN/TAP device tun1 opened: This tells us that our tunnel interface will be named tun1.
net_iface_up: set tun1 up: This tells us that our tunnel interface has been opened.
net_addr_v4_add: 10.100.10.2/24 dev tun1: This tells us that the IP associated with our tunnel interface is 10.100.10.2. This is important as this is our IP connected into the network.
net_route_v4_add: 192.168.100.0/24 via 10.100.10.1: This tells us the subnet for which a new route has been added to the tunnel interface. In this case, it is for the 192.168.100.0/24 subnet. All traffic to this subnet will now be sent through our tunnel interface. Looking at the network diagram now, we can see this matches the we have in our diagram.
Once connected, we can start to explore the network! However, before we do so, let's take a look at how to debug your network connection, if needed.
Answer the questions below
Answer this question to update the network diagram.
Open your OVPN file using a text editor. You will notice that there is a flag embedded as a comment. What is the value of this flag?
Connecting to the network should be straightforward. However, in the event that you experience an issue, please use the following to help you out.
Multiple Active Profiles
As mentioned before, the most common issue seen is users running the profile more than once. The network's VPN server only accepts a single connection. That includes the AttackBox and Squawker VPN. If you are running the profile in more than one place, they will disconnect each other. In the terminal where you are running the VPN profile, it will look something like this:
You need to ensure that you are only connected in one place at a time. Disconnect any other sessions. This includes an OpenVPN profile running on your own machine, the AttackBox, and Squawker VPN. Make sure only one of these is active.
Profile Not Connecting
Sometimes when you run the VPN profile, it will not progress past the connection stage, as shown here:
This means that the VPN server cannot be contacted, which is due to two main reasons:
The network instance you are connected to is currently not running.
Your VPN profile is old, as you have been placed in a new network instance. This happens every 7 days automatically.
Solution
Refresh the room page and make sure that your network instance is running. If it isn't, click the Start button and wait 5 minutes before trying again.
If your network instance is running and the connection is still not working, download a fresh copy of the VPN profile using the Download VPN Profile button on the network pane (see the previous task) and connect with that. This ensures you are using the profile for your current network instance.
AttackBox Connection
Please note that Network VPNs can only be used on the AttackBox by premium and MAX users. If you are a free user, you will have to use your own machine.
In the event that the VPN profile is not showing on the AttackBox using ip a and route -n as explained in the previous task, you can simply run tryconnectme in a terminal to debug the network connection:
Terminal
root@ip-10-82-78-70:~# tryconnectme
_____ _____ _ ___ ___
|_ _| / __ \|||\/ |||_ __ _ _| / \/ ___ _ __ _ __ ___ ___||_|..| ___
||'__| | | | | / _ \| '_ \|'_ \ / _ \/ __| __| |\/| |/ _ \
| | | | |_| | \__/\ (_) | | | | | | | __/ (__| |_| | | | __/
\_/_| \__, |\____/\___/|_| |_|_| |_|\___|\___|\__\_| |_/\___|
__/ |
|___/
TryHackMe's network room connection debugger, at your service!
Before we dive deeper, please make sure that you are only using the AttackBox
and do not have your network VPN profile running anywhere!
The AttackBox uses the same VPN profile as you would use on your own machine
and you are only allowed to run the VPN profile once!
If you are running in two places, stop the other VPN and restart the AttackBox please!
If you confirm that you are only using the AttackBox, press [Y], otherwise, the debugger will quit:
The TryConnectMe program will require the following information from you in order to perform the debug steps:
An IP address from your network: This will be provided in the network diagram or in Task 1 of the room. In this example network, the IP is 192.168.100.X.
The Network Profile name of the specific network: You can find this by clicking the Download VPN Profile button on the network pane. The dialog shows the exact name your profile will be saved as, in the format <username>-<network-name>-<network-id>.ovpn. The network profile name is the middle portion: everything after your username and before the trailing network ID (the long string of letters and numbers). For example, if the file is saved as am03bam4n-example-network-6a4c82600b4a995d9002986c.ovpn, then your username is am03bam4n, the network ID is 6a4c82600b4a995d9002986c, and the network profile name is example-network. Note that a network name can itself contain hyphens, so match on your username at the front and the network ID at the end rather than simply splitting on the first hyphen.
How It Works
The steps provided here can help you reproduce the debug process if you are using your own machine.
The TryConnectMe program first attempts to ping the network's VPN server. In all networks, this VPN server lives at X.X.X.250 where X.X.X is the specific network's subnet range. If you (or TryConnectMe) are able to ping the VPN server, it means the connection is working as it should. Your issue connecting to a host in the network is then for a different reason, as explained in the next task.
In the event that the TryConnectMe program cannot connect to the VPN server, it will start the debug process as follows:
Determine if the VPN profile has been downloaded: In the event that the profile hasn't been downloaded, it will ask you to download your profile before continuing.
If the VPN profile is downloaded, determine if the VPN profile is running: Sometimes the VPN profile may be downloaded but isn't currently running. The program will then provide you with the command to run the profile.
If the profile is running, determine if multiple profiles are being executed at the same time: Sometimes the AttackBox may run the same profile twice. If this is the case, the program will terminate all instances of the profile and provide you with the command to run the profile once.
These steps are able to solve almost all of the problems you can experience trying to connect to the network using the AttackBox. If you still experience problems, the TryConnectMe program requests that you reach out to support. If this is the case, please make sure to provide support with the following to ensure the best chance of receiving proper assistance:
Which network room you are doing
The output from the TryConnectMe program
Your OVPN profile
Squawker VPN
If you are using Squawker VPN and run into connection trouble, the app has a built-in Help & Troubleshooting panel. Open it using the help (?) icon in the top-right corner of the app. The FAQ and Troubleshoot tabs cover the most common issues and can help you resolve them yourself.
If you still need to reach out to support, open the Logs tab and click Copy to grab the VPN logs. Include these logs in your support request, along with which network room you are doing, to give support the best chance of helping you quickly:
Final Thoughts
Some network rooms may have additional steps for you, such as configuring your . It is worth making sure that your network connection is working first before moving on to these additional steps. If your network connection is giving issues and you continue, it becomes incredibly hard to discern whether the issues stem from your connection or the additional steps. Take the time to make sure that your network connection is working like it should before moving on. A lot of the network rooms are rated harder and are for more experienced users. Taking the extra bit of time to ensure you are properly connected to the network can save you a lot of time down the road.
Testing the Connection
Now that you are connected to the example network, let's connect to our first host. Use the credentials provided below to connect to the perimeter host (notice you will connect from your Attacker machine through the VPN server to the Perimeter Ubuntu machine):
Credentials
Username
hop1
Password
hop1
IP address
192.168.100.101
Connection via
ssh hop1@192.168.100.101
Answer the questions below
What is the flag in the /home/hop1/ directory on the Perimeter Ubuntu host?
Firewalls and Security Groups
Network rooms are often more complex than single- rooms. In network rooms, you will often find entire environments that you have to compromise. Similar to what you can expect on real pentesting engagements, network segregation controls can exist in network rooms.
Restriction Types
There are two main controls you may come up against:
Host-based Firewalls: In certain networks, the hosts may have their host-based enabled. On Windows, this will be mostly Windows Defender and on , ufw. These firewalls will place restrictions on what you can access from the get-go. However, once you gain privileged access to the host, you have the ability to disable the firewall or make it more permissive.
Security Groups: Networks can be configured to restrict traffic based on Security Groups. This control is similar to switches and physical firewall devices that you may encounter on corporate networks. You will NOT be able to gain access to this device, meaning the restrictions will remain in effect throughout your journey through the network. If you encounter this type of restriction, you will have to create pivots. Just because you cannot access a host directly does not mean it is a mistake, the restriction is often intentional. Once you gain access to another host, you can retry to connect to this host to see if different controls apply.
Restriction Direction
Restrictions can also be applied in a specific direction:
Inbound: Inbound restrictions will filter traffic coming INTO the host. This means when you try to connect to the host, a filter will apply.
Outbound: Outbound restrictions will filter traffic coming OUT from the host. This means that when the host tries to connect back to you or another host, the filter will apply.
It is important to understand in what direction the restriction is being applied. Just because you often cannot connect in doesn't mean that something cannot connect out.
Pivoting in a Network
Take for instance the Corporate Ubuntu host. If you try to access this host directly from your connection, you will see that it isn't possible. Security Group restrictions have been created to prevent this. Hence, you will have to use your access on Perimeter Ubuntu to access this host. Use the access you have gained from the previous task and access the Corporate Ubuntu host using the following credentials:
Credentials
Username
hop2
Password
hop2
IP address
192.168.100.10
Connection via
SSH
ssh hop2@192.168.100.10
Answer the questions below
What is the flag in the /home/hop2/ directory on the Corporate Ubuntu host?
By learning how to connect to a network room and debug any potential issues you may have, you are well on your way to enhancing your cybersecurity knowledge by doing some of the more complex rooms that TryHackMe has to offer.
Where To Next?
Now that you understand networks, check them out of the Learning page:
Answer the questions below
Happy network hacking!
Ready to learn Cyber Security?
TryHackMe provides free online cyber security training to secure jobs & upskill through a fun, interactive learning environment.