

Red Queen Protocol
Understand what reverse engineering is and explore different approaches in this guided challenge.
easy


To access material, start machines and answer questions login.

You find yourself in a research facility buried several levels underground, sealed from the world, run entirely by an called the Red Queen.
You wake up on a cold metal floor with emergency lights bathing everything around you in red light. The doors are sealed, and a wall terminal shows a single, flashing line: "Lockdown initiated. Red Queen Protocol in effect."
Learning Objectives
- Understand what reverse engineering is and when different techniques apply
- Use simple text filters and file identification tools to inspect an unknown binary
- Use to decompile and reverse a simple encoding scheme
- Use with to inspect a running program's memory
- Use angr to solve constraint-based validation logic with symbolic execution
Prerequisites
- Be comfortable with the command line (Linux Fundamentals room)
- Basic x86-64 assembly concepts (registers, instructions, calling conventions - Windows x64 Assembly room)
Connect to the Machine
You can start the lab machine using the button below. The will take a few minutes to start, and Split View will open.
Set up your virtual environment

Alternatively, if you prefer to use your own machine, you can use the credentials below to connect through VNC to the lab machine.
Credentials
Only needed if you are using your own machine and the TryHackMe .
Regardless of how you connect, it is recommended that you expand the view to see the terminal or tools properly.

The first door is sealed, but you notice a terminal next to it. You manage to extract the binary running the terminal and start analyzing it.
Theory
Reverse engineering is the process of analyzing a compiled program to understand what it does without access to its original source code. When software ships, human-readable code is compiled down into machine instructions, and reverse engineers work backwards from those instructions to recover intent, logic, and hidden data.
It shows up constantly in real-world scenarios:
- Malware analysts use it to work out what a sample actually does.
- Vulnerability researchers use it to find bugs in software with no available source code.
- Security teams use it to audit third-party binaries they didn't write.
There are several reverse engineering techniques, and picking the right one for the situation is the true skill. Here are a few approaches you will explore in this room:
| Approach | What it means | When to use it |
| Simple Analysis | Search for readable strings inside the binary. | The data you want might be stored in plaintext. |
| Read the disassembly or decompiled pseudocode. | Plain strings are absent, but the logic is readable without running anything. | |
| Run the binary and observe it live under a debugger. | The logic is complex, but the result appears in memory at runtime. | |
| Symbolic Execution | Treat the program as a system of equations and solve it. | Too many interdependent constraints to trace by hand. |
Supporting Tools
Before analyzing any unfamiliar binary, you can inspect it using a set of supporting tools. This will help you better identify the right reverse engineering tools to use.
There is a wide variety of useful supporting tools. Here are three you can use on almost any distribution:
File
The file command inspects a file's magic bytes and reports back what it finds. It extends xxd by also displaying additional information about the file.
In the target machine, open a terminal, navigate to the ~/recovered_terminals folder, and test it out on the hive_terminal file.
           emp7749@HIVE-NODE-7749:~$ pwd
/home/emp7749

emp7749@HIVE-NODE-7749:~$ cd ./recovered_terminals/
emp7749@HIVE-NODE-7749:~/recovered_terminals$ pwd
/home/emp7749/recovered_terminals

emp7749@HIVE-NODE-7749:~/recovered_terminals$ file ./hive_terminal
./hive_terminal: ELF 64-bit LSB pie executable, x86-64, version 1 (SYSV),
dynamically linked, interpreter /lib64/ld-linux-x86-64.so.2,
BuildID[sha1]=2f972fcea000dde19b449129833854398c6516f8, for GNU/Linux 3.2.0, not stripped
For a compiled Linux program, you should see it identified as an ELF binary, along with its target architecture and whether it's dynamically or statically linked. This will help you pick the right family of tools.
Xxd
Magic bytes, or file signatures, are short, fixed sequences of bytes located at the beginning of a file that uniquely identify the file format or data type. They act as a fingerprint for the file type, and allow operating systems and software to recognize a file's true type quickly, regardless of its file extension.
Many tools can dump raw binary information. You can use xxd and look at the first bytes:
           emp7749@HIVE-NODE-7749:~/recovered_terminals$ xxd hive_terminal | head -n 1
00000000: 7f45 4c46 0201 0100 0000 0000 0000 0000  .ELF............
In this case, the file is an ELF (Executable and Linkable Format). For a full list of well-known signatures, you can look at this Wikipedia article.
Checksec
Another useful supporting tool is checksec. This will show you what security measures are built into a binary. Go ahead and run this as well against the hive_terminal binary.
           emp7749@HIVE-NODE-7749:~/recovered_terminals$ checksec --file=hive_terminal --format=json | jq
{
  "hive_terminal": {
    "relro": "full",
    "canary": "yes",
    "nx": "yes",
    "pie": "yes",
    "rpath": "no",
    "runpath": "no",
    "symbols": "yes",
    "fortify_source": "yes",
    "fortified": "1",
    "fortify-able": "2"
  }
}
Checksec opens up a deep topic. For starters, here are the security features worth looking for:
- Canary - Detects stack buffer overflows before they're exploited.
- NX - Marks memory areas non-executable, blocking classic shellcode injection.
- PIE - Randomizes where the binary loads in memory on each run.
- RELRO - Restricts what the dynamic linker is allowed to overwrite after startup.
None of these gets in the way of solving this room. They matter far more when exploiting an executable, but this is a good habit to build early as a reverse engineer, too.
For example, you have to take into account whether PIE is enabled or not, as it will tell you if the program was compiled to run from any random memory address. If enabled, it is much harder to reliably target specific functions during exploits.
Lastly, it is worth knowing that checksec also works on different binaries, like PE (Windows OS) or Mach-O (macOS, iOS).
Practical
The simplest question you can ask a binary is: "What plaintext data do you have?"
When a developer writes a string literal in C (e.g., a hardcoded message, a password, an error string), the compiler writes those bytes directly in the .rodata section, the binary's read-only data section, verbatim and in plain ASCII.
The tool for this is strings. It can scan a binary and show every sequence of printable characters above a minimum length (four, by default). Raising the minimum with the -n parameter cuts a lot of the noise. Go ahead and run this against the hive_terminal.
           emp7749@HIVE-NODE-7749:~/recovered_terminals$ strings ./hive_terminal
/lib64/ld-linux-x86-64.so.2
mgUa
fgets
stdin
puts
__stack_chk_fail
__printf_chk
[...]
You can extract a lot of useful information just by looking at a binary's strings. See if you can find the correct input to grant you access, as well as the flag for this task.
What string stands out in the list you extracted from the hive_terminal binary?

The second terminal you manage to find is a security keypad. You extract the binary from the keypad. Running strings did not reveal much, so it is time you dig deeper.
Theory
means examining a binary without running it. You can read disassembled instructions or reconstructed pseudo-C to work out what the program does. This is the natural next step if the strings command comes up empty: instead of looking for plaintext, you read the logic that produces certain values.
The standard tool for this is Ghidra, a free, open-source reverse engineering suite that disassembles binaries, decompiles functions into readable pseudocode, and lets you browse data structures and do cross-references.
Other similar tools are:
- IDA Free
- Binary Ninja
- objdump
- dnSpy (for .NET applications)
- uncompyle6 (for Python bytecode)
When the code is simple enough to read, static analysis gets the job done without even running the program.
Practical
You can run strings on the keypad file, but there is no relevant hardcoded string you can use this time.
The next step is to use a better tool, so go ahead and open Ghidra from the Desktop. It can take a few minutes for Ghidra to start. The keypad binary should already be loaded into the project.
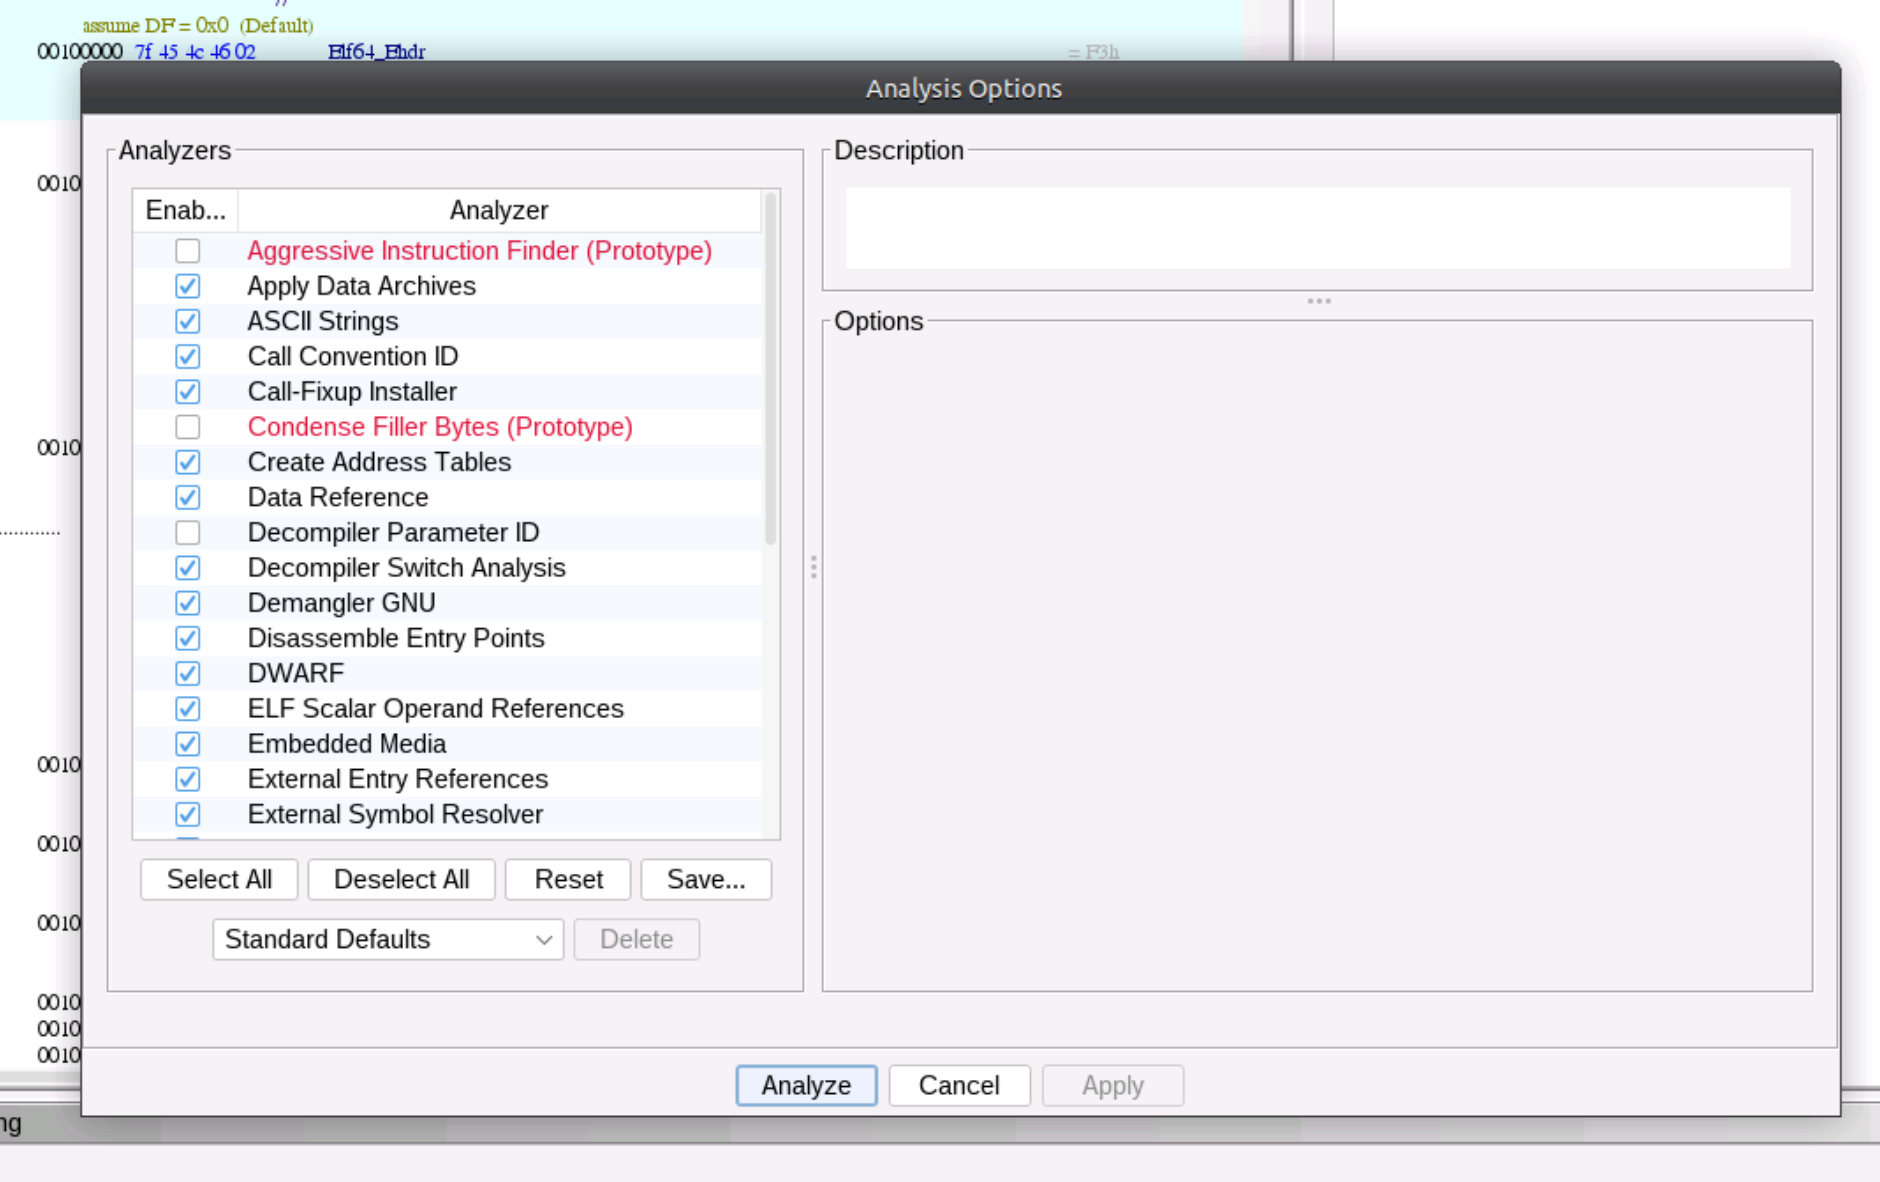
Run the initial analysis with the default options.
On the left side, you can see Symbol Tree. Expand Functions on the left side, go to the main function, and examine it.
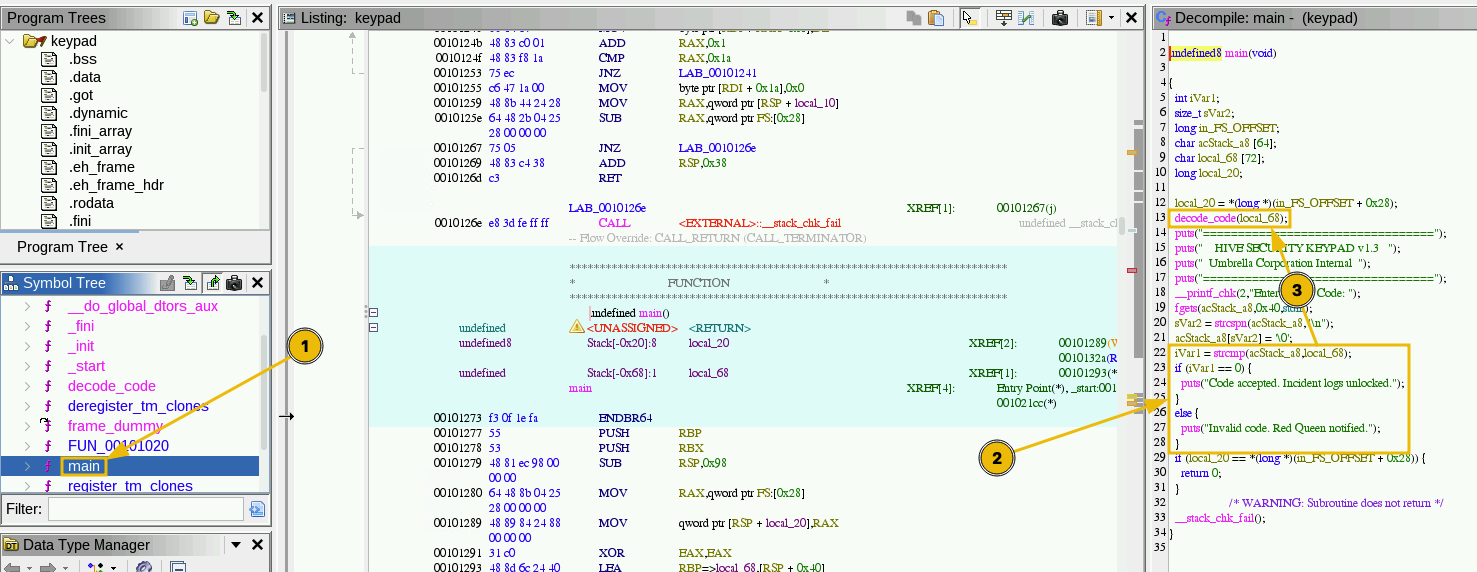
By following the program logic, you can see that strcmp is used to validate the input. One of the parameters is used in another function to decode it. Double-click the decode_code function and dig deeper.
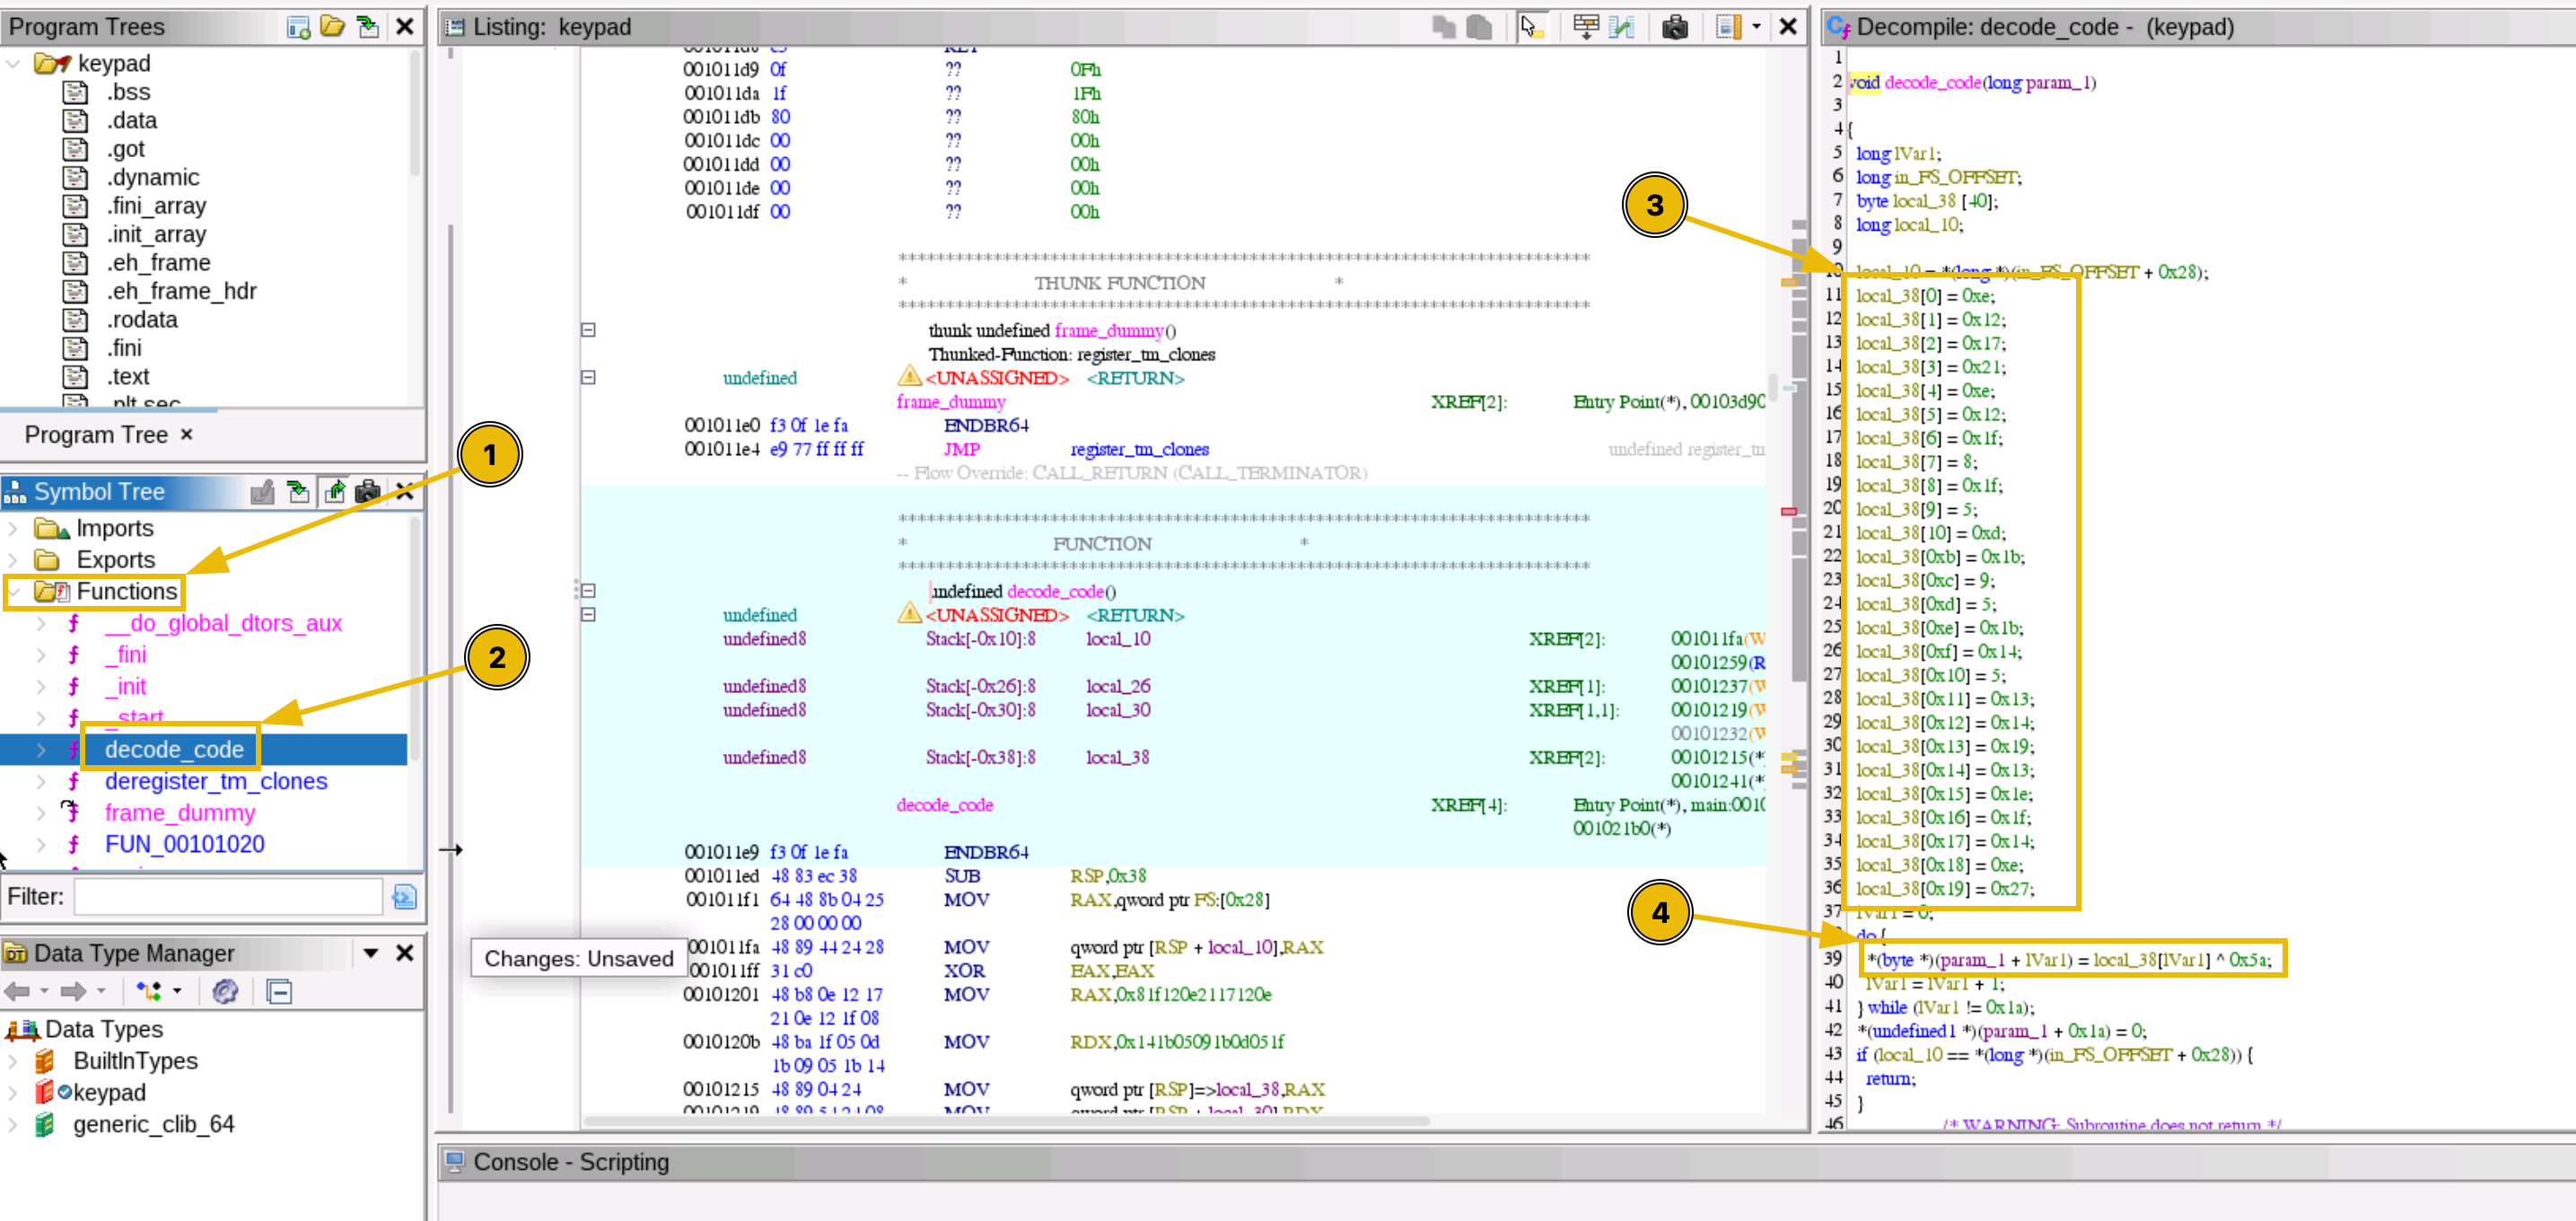
This is already a step forward. You can see that the comparison logic is using an array of encoded values and a loop that XORs each value against a fixed key (0x5a). This is a simple XOR encoding that is easily reversible.
           # XOR's Mathematical Property
A XOR B = C
C XOR B = A
C XOR A = B

# Symbol Used
XOR = ^ (caret)

# XOR Encrypt
Plain Text ^ Key = Encoded Text

# XOR Decrypt
Encoded Text ^ Key = Plain Text

Info: is commonly used as an "encryption" method because it is lightweight, so it is worth being aware of it during reverse engineering sessions.
You have the encoded values and can XOR against the found key to retrieve the initial information. A simple Python parsing script can solve this. Alternatively, you can clean up the code and put it into CyberChef.
Go ahead and save the array values, as they show up in , in a text file (e.g., input.txt) and run the Python script below to parse and apply an XOR to each value. Make sure the text file is in the same folder as the Python script.
           import re

INPUT_FILE = "input.txt"
XOR_KEY = 0x5A

def extract_encoded_bytes(file_path):
    values = []
    with open(file_path) as f:
        for line in f:
            stripped = line.strip()
            if not stripped.startswith("local_38"):
                continue
            match = re.search(r"=\s*(0x[0-9a-fA-F]+|\d+)\s*;", stripped)
            if match:
                values.append(int(match.group(1), 0))

    if not values:
        raise ValueError(
            f"No 'local_38[...] = ...;' lines found in {file_path}. "
            "Make sure you pasted the raw decompiled data in the file."
        )
    return values


def decode(encoded_bytes, key):
    return "".join(chr(b ^ key) for b in encoded_bytes)


if __name__ == "__main__":
    encoded = extract_encoded_bytes(INPUT_FILE)
    print(f"Extracted {len(encoded)} bytes: {encoded}")
    print(f"Decoded flag: {decode(encoded, XOR_KEY)}")
Save the script as decode.py and run it with python3 decode.py.
This is a simple example of how static analysis can reveal encoded values that can be used to uncover sensitive or important information.
Once the values are decoded, what is the flag they reveal?
You walk in and find the override console. You extract the binary and start analyzing it. On closer inspection, it seems the decoding mechanism uses a changing key. Time for some real-time analysis.
Theory
means observing a program while it's actually running, especially if looking at static code does not reveal much, or it is too complicated to extract or compute values directly. A debugger lets you pause the execution at any instruction, inspect registers and memory, and even step forward one instruction at a time.
The standard tool on is (GNU Debugger), a command-line tool used to debug programs written in various programming languages. On its own, it is fairly bare; (GDB Enhanced Features) is a plugin that adds automatic register and memory display, along with other features that make runtime inspection significantly faster.
Here are a few commands that are used most of the time:
| Command | What it does |
disassemble function_name |
Shows the disassembly of function_name. |
b function_name or b *0x... |
Sets a breakpoint in execution at a function name or memory address. |
run |
Starts program execution. |
x/s $rsi |
Prints the null-terminated string pointed to by the RSI register. |
info registers |
Shows all current register values. |
Practical
You could inspect the binary as before, using Ghidra to extract the required information, and build a script to decode the data. However, this is a simple example in which the encoding key increments with each character; in real life, things get complicated fast.
Open a terminal and load the binary in GDB by running gdb ./override in the recovered_terminals folder.
Once done, use run to go through a normal execution. This will execute the program in a normal flow, and during a second run, you will set a breakpoint to actually look at the register values.
Info: Even if PIE is enabled, GDB disables ASLR automatically, so the address will remain fixed. As a rule of thumb, always check the base + offset when dealing with PIE and ASLR.
Next, use the disassemble main to find the strcmp address. This is the place where the comparison happens, and the compared values should already be loaded in the registers: the one you typed and the value you are looking for.
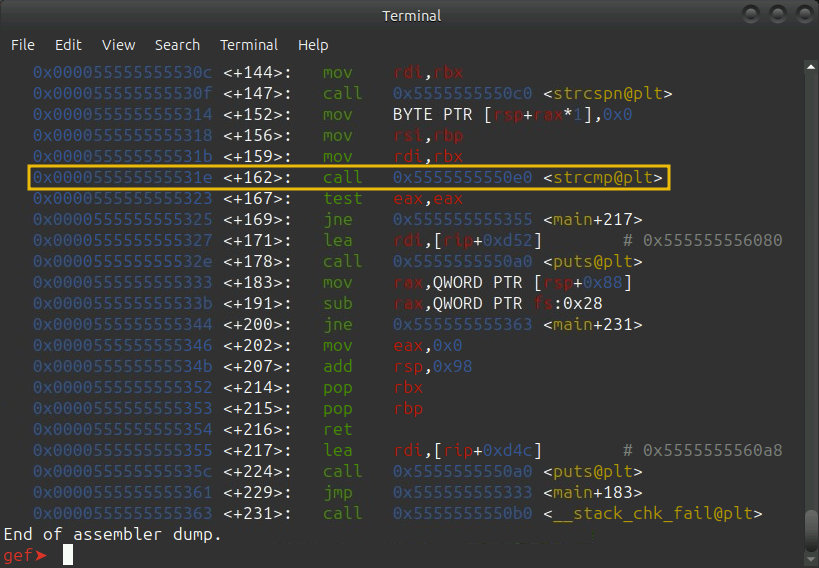
Once located, run b *0x000055555555531e to set a breakpoint right before the strcmp call. In this way, the execution will be stopped, and you can examine the register values.
Now, use run again to start the execution, and enter any value at the prompt. This time, the program will stop before the compare, and you will be dropped back in GDB. The CLI should already show the values loaded in the registers. If they do not show up, use info registers to display all the register addresses and look for the rdi and rsi register values using the x/s [memory_address] or x/s $rsi.
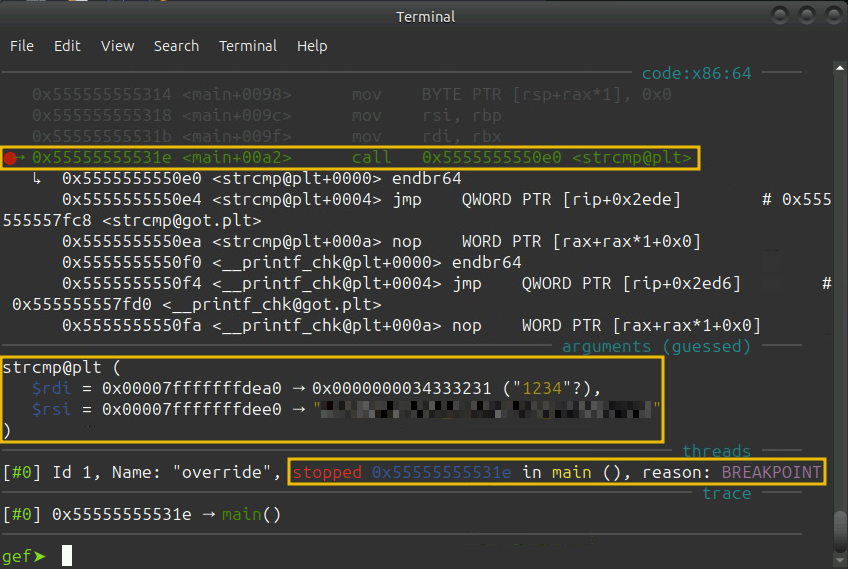
This was a very simple example. In reality, you might need to set up multiple breakpoints and also look at the assembly code to understand exactly what values are loaded in which register.
Great work so far!
What is the flag found in one of the register?
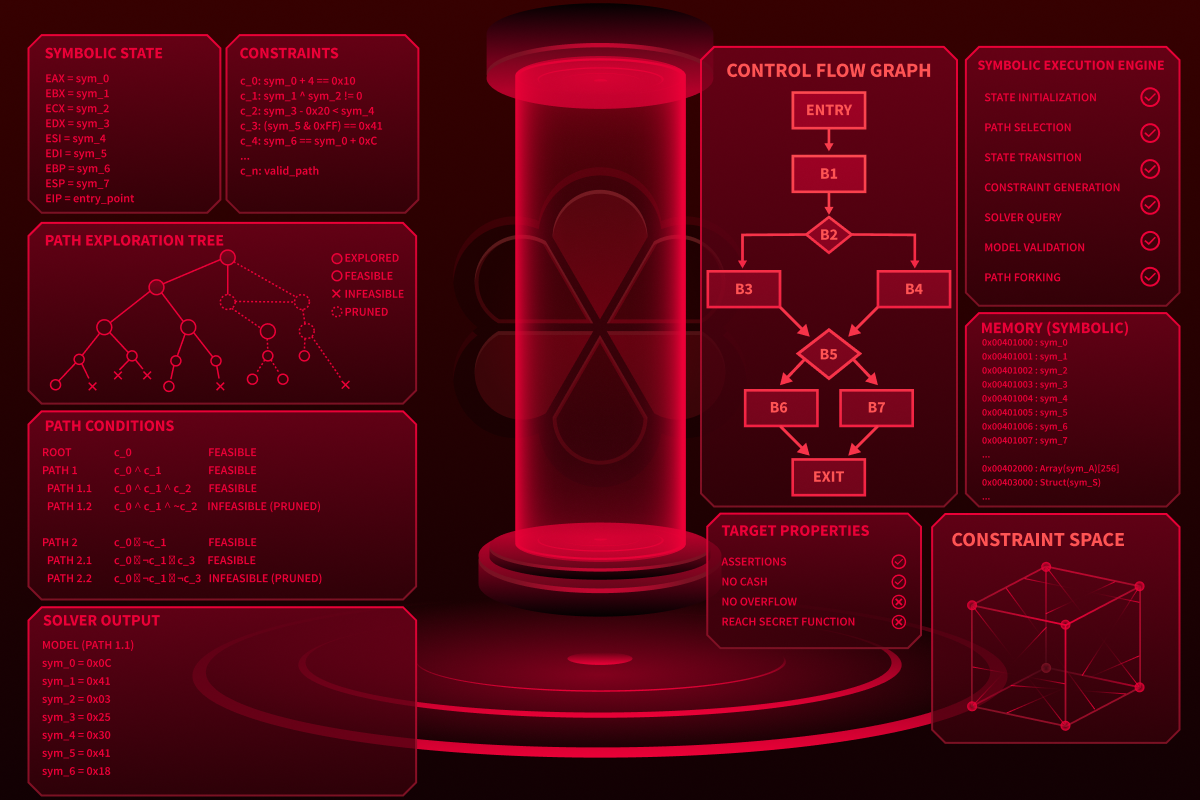
You managed to unlock the doors, but there is one more thing to do: retrieve the memory files so you can study them to understand what happened. You walk up to the main terminal, extract the binary that protects the memory files, and start analyzing it for any flaws.
Theory
The previous three techniques all assume there is something concrete to find in the binary: a plaintext string or encoded data. Symbolic execution is for when none of that applies: when the answer isn't stored anywhere, but is instead the output that satisfies every constraint a program checks against.
A very simple example is when choosing a password. A program runs through a few checks (e.g., minimum length, presence of alphanumeric characters, special characters), and an input is considered a strong password if it passes specific constraints. This can be extrapolated so the program has only one, deterministic, valid input without storing that input anywhere in the binary.
Instead of running a program with real values, symbolic execution runs it with mathematical unknowns and turns every conditional branch in the program into an equation, also called a constraint. Once execution reaches the success path, it hands the accumulated equations to an SMT (Satisfiability Modulo Theories) solver and asks a direct question: what values make all of this true at once?
One of the well-known tools for this is angr, a Python framework for binary analysis built on top of the Z3 solver.
There are a few caveats to be aware of:
- This is a slow and heavy technique as it explores every branch a program has.
- Symbolic execution doesn't scale to everything, and on a binary with loops, cryptographic operations, or heavy library calls, the number of paths can explode far faster than any solver can keep up.
- Refining and bounding the constraints is a fine-tuning iterative process, as too few will make the solver run for a long time with no real result shown, while too many might end up not finding any solution.
- Another point to keep in mind is that the solver will hand you a solution that fits the constraints; similarly to how an equation can have multiple solutions, the result might not be the expected solution.
Practical
To get a grasp of the level of complexity, even if this is a simple example, open memory_unlock with Ghidra and have a look at the validate function.
In the binary folder, there is a Python script called task5_solve.py. You can read through it to understand how angr is set up and what constraints are applied during symbolic execution.
It is built with some knowledge of the expected solution. This means you will have to gather some initial data to set this up (e.g., identifying meaningful strings in the binary, the approximate structure and format of the result).
It defines one symbolic byte per expected character, feeds them to the binary as input, tells angr to keep exploring until it reaches the successful output, while discarding any path that doesn't.
emp7749@HIVE-NODE-7749:~/recovered_terminals$ python3 task5_solve.py
The script takes a little while to finish because the solver is trying to reconcile every constraint in the function against the symbols.
Info: To understand how thin the line is between a stable solution and a result with multiple solutions, you can examine and run the task5_underconstrain.py script. Multiple runs will produce different valid solutions for the constraint system. As you can see, almost all of them are not the one you are looking for.
Mastering angr takes a lot of time, practice, and patience. To get things started, here are a few of useful resources:
After running the Python angr solver, what is the revealed flag?
Everything comes together. The Red Queen did not malfunction; there was an incident. The door to the surface slowly opens. You grab your gear and dash for the door.
Key Takeaways
Reverse engineering isn't one tool or technique. It is the discipline of asking: "How does this actually work?" and picking the right way to find out.
| Technique | Tool | When to use |
| Simple Analysis | strings, xxd |
Simple cases where data is in plaintext. |
| Static Analysis | Ghidra, IDA, objdump |
The binary logic is readable and easy to follow without running it. |
| Dynamic Analysis | GDB, GEF | The result exists in memory at any point during runtime. |
| Symbolic Execution | angr |
The input has multiple constraints, with no single execution point holding the answer. |
A few pointers for tackling any reverse engineering task:
- Start with the cheapest technique that could plausibly work, and escalate or combine techniques when it comes up empty.
- The xxd,
file, andcheckseccommands take a few seconds to use, but provide you with a very strong starting point and can point you in the right direction. - Recognizing logic patterns and operations in code is most of the work, so being familiar with a binary's structure and reading assembly code goes a long way.
- If a program's logic is too tangled to trace or visualize, symbolic execution could save the day.
Ready to learn Cyber Security?
TryHackMe provides free online cyber security training to secure jobs & upskill through a fun, interactive learning environment.
Already have an account? Log in