

SOC Simulator: Introduction to Phishing
Play your first SOC Simulator scenario and learn to triage phishing alerts, one alert at a time.
easy

To access material, start machines and answer questions login.
Imagine it's your first shift as a analyst. Alerts are coming in, and it's your job to look at each one and decide what's real and what isn't.
That's what the SOC Simulator is. It gives you a simulated company, a queue of alerts that arrive over time, and the tools an analyst would use to investigate them: a to search through logs, and a threat intelligence tool for checking suspicious things like IP addresses. For each alert, you investigate, decide what it is, and write a short case report about it.
In this room, we'll play the Introduction to scenario together, from start to finish. It has five alerts. We'll work through them one at a time: what each alert says, where to look, what we find, and what call to make.
Learning Objectives
- Learn how a SOC Simulator scenario works and when it ends.
- Find your way around the alert queue, the SIEM, and the documentation.
- Learn the difference between a true positive and a false positive, and when an alert needs to be escalated.
- Investigate phishing alerts using email and logs.
- Write a case report for each alert you close.
- Understand the results screen and the feedback on your reports.
How to Use This Room
The scenario runs on the SOC Simulator platform, which you can access here.
The easiest way to follow along is to keep this room open in one browser tab and the scenario in another, then switch between the two.
Don't start the scenario just yet, though. We'll do that in Task 2.
I'm ready to play my first SOC Simulator scenario!
Time to start! Open the Introduction to scenario in a new tab by clicking this link. Then click Start.
You'll be asked to choose which to use. Pick the SIEM you're most comfortable with. If you're unsure, pick , since the screenshots and search steps in this room use it. Then click Start scenario.
If this is your first time in the Simulator, you'll also see a short guide to how it works, seven slides in all. Have a read and click through it.
Then the scenario needs a minute or two to set up. You'll see a Building detection rules screen while it does, so just wait it out. Once it's ready, you'll land on the Dashboard:
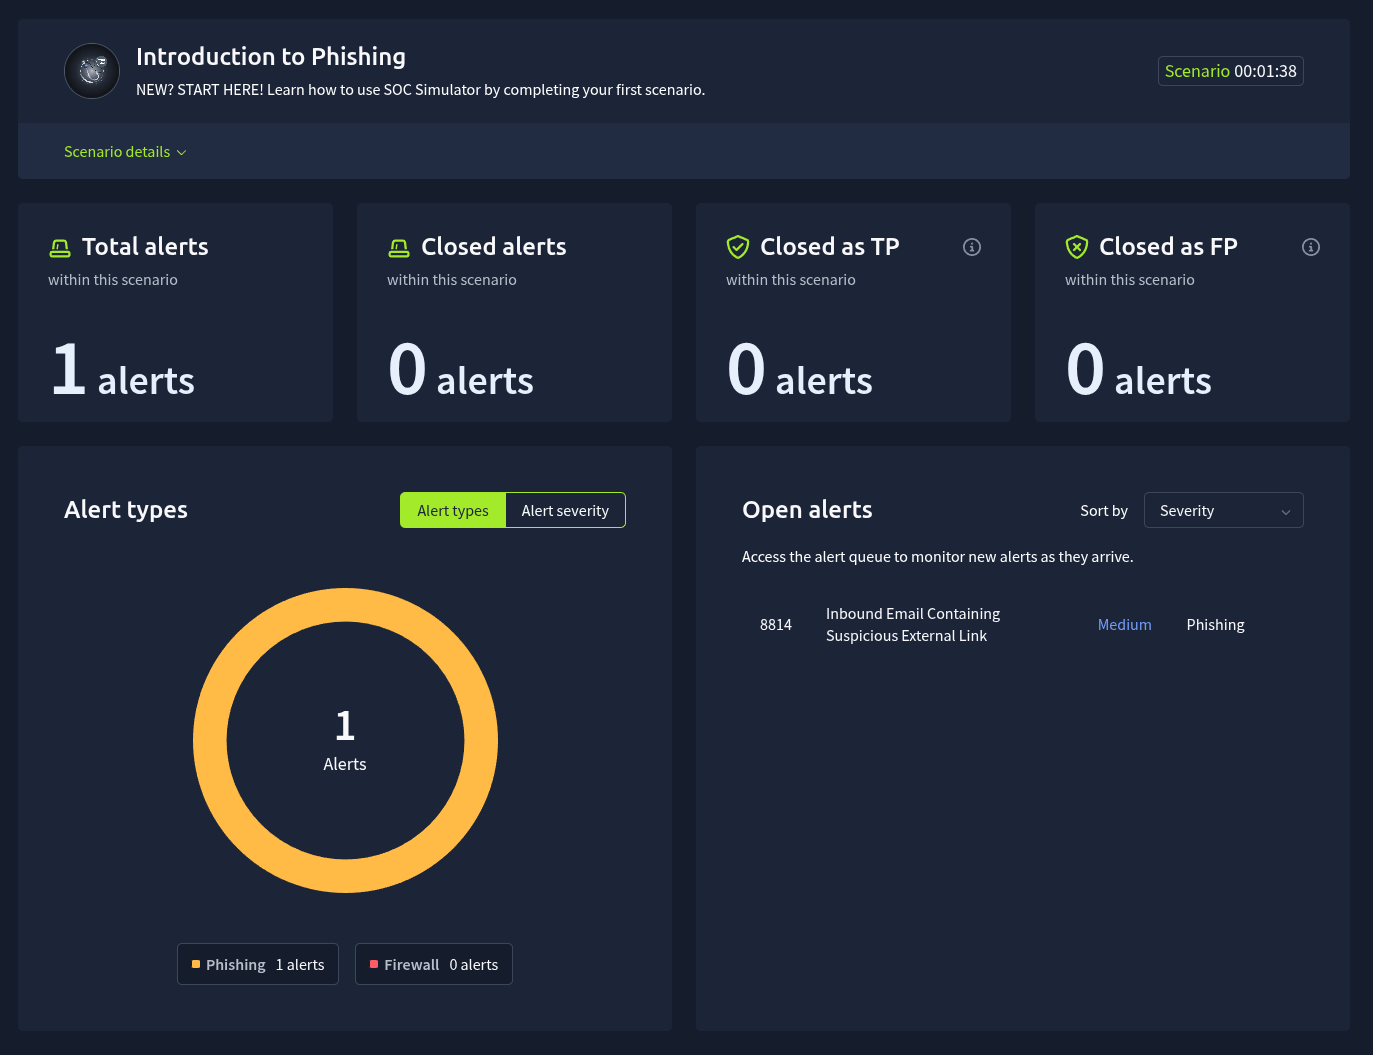
The Dashboard gives you an overview of the scenario: how many alerts have come in, how many you've closed as true or false positives, and which ones are still open. The timer in the top-right corner shows how long the scenario has been running.
Your first alert should show up within a minute. When it does, you'll see it under Open alerts, and a red dot appears next to Alert queue in the sidebar. If it hasn't come in yet, just wait. It will come in. While you wait, let's have a quick look around.
Finding Your Way Around
Everything else is in the sidebar on the left:
- Alert queue: every alert that has come in. Click the dropdown arrow next to an alert's name to see its details. To work on an alert, assign it to yourself with the icon in the Action column. It then shows up under Assigned alert(s) at the top of the page. The bar next to the page title shows how many more alerts are still on their way.
- SIEM: where all the company's logs are collected. You'll use it to search for anything mentioned in an alert, like an email address, a domain, or an IP address.
- TryDetectThis: a threat intelligence tool for checking whether an IP address, domain, URL, or file hash is known to be malicious. More on this below.
- Documentation: everything you need to know about the company you're protecting.
- Playbooks: some scenarios come with playbooks for their alerts. This one doesn't, so you'll find the page empty.
- Case reports: every alert you've closed, with the date you resolved it.
- Guide: a short guide to using the SOC Simulator, if you'd like a second look at the basics.
If you need to step away, click Exit simulation at the bottom of the sidebar and choose to save and exit.
The Documentation
The documentation is split into tabs:
- Welcome: a short introduction to the simulator.
- Alert triage: the step-by-step process for handling an alert.
- Alert Classification: how to decide between true and false positive, and when to escalate. The examples in the next task come from here.
- Alert Reporting: what to include in your case report, with two example reports.
- Company information: who the company is, what logs you have, and a table of all its employees.
- Asset Inventory: the company's network ranges.
Open the Company information tab now. The company is called The Try Daily, and the table at the bottom lists every employee: their department, email address, logged-in host, and IP address.
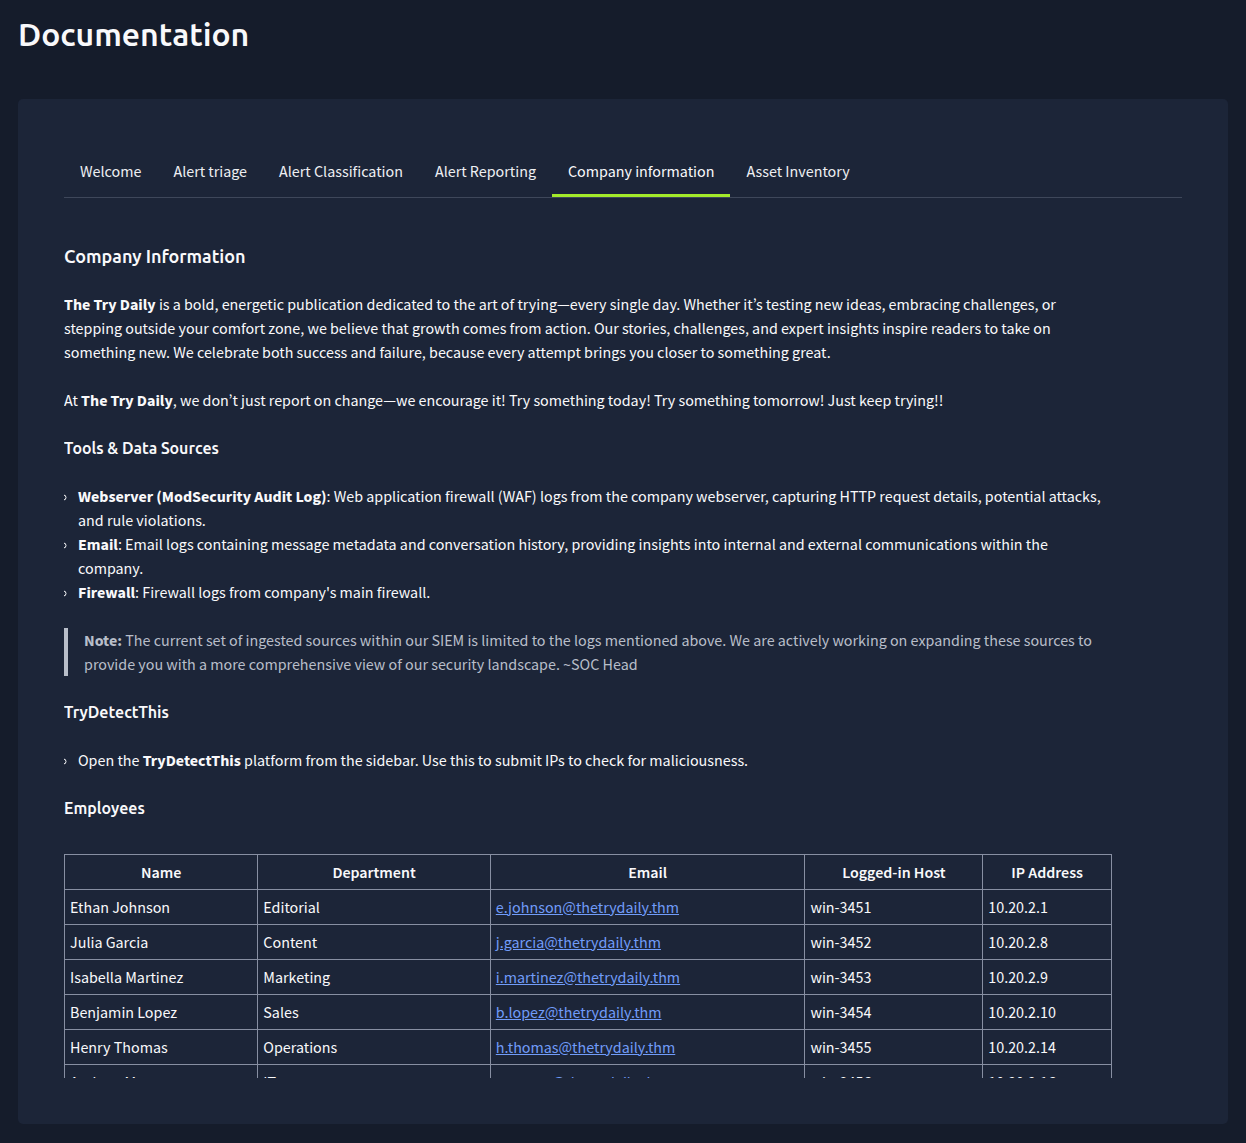
Keep this table handy. The alerts will mention email addresses and IP addresses, and this table is how you figure out who they belong to.
The tab also lists the company's log sources, including webserver logs. In this scenario, though, the SIEM only has two kinds of logs: email logs and logs. That's all we need.
Checking Indicators With TryDetectThis
When an alert mentions something suspicious, like an IP address, a domain, or a URL, one of the first things you'll want to know is whether it's already known to be malicious. These clues are called indicators. In a real SOC, analysts look them up on threat intelligence sites like VirusTotal. In the SOC Simulator, you use TryDetectThis.
TryDetectThis works like VirusTotal. You enter an IP address, a domain, a URL, or a file hash, and it tells you whether it's known to be malicious. The difference is that TryHackMe controls what's in it. So even if the real VirusTotal changes how it rates something, the results you get in a scenario stay the same.
To open it, click TryDetectThis in the sidebar. It opens in a new tab.
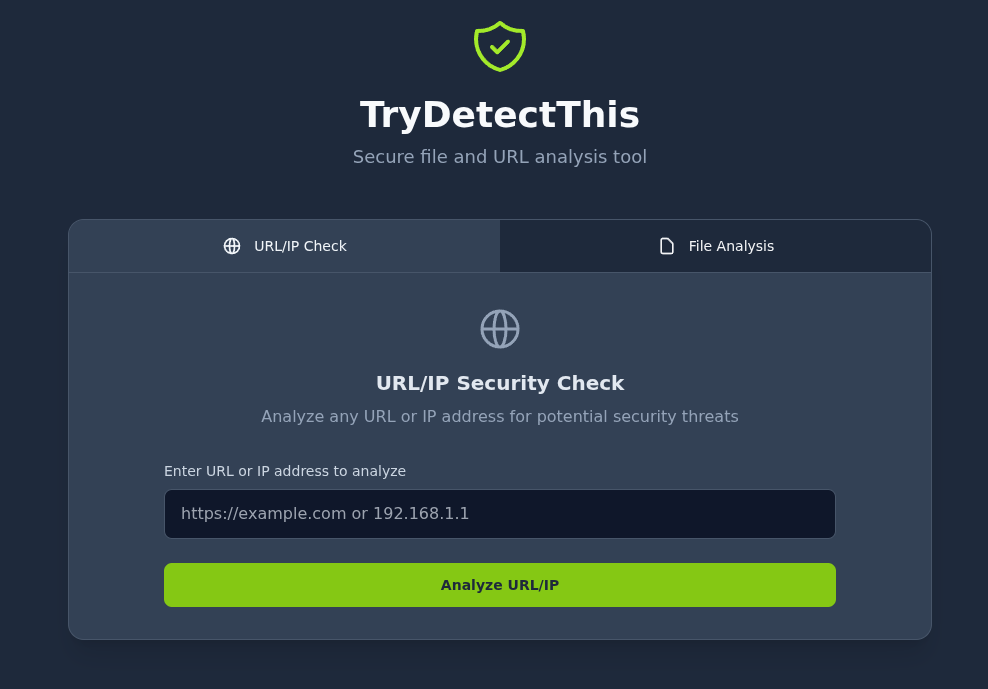
Using it is simple:
- Copy the indicator you want to check from the alert or from the SIEM.
- Paste it into the TryDetectThis search box and click Analyze URL/IP.
- Read the result. It tells you whether the indicator is known to be malicious.
Keep one thing in mind, though. A clean result doesn't prove that something is safe. It only means it isn't known to be malicious. Attackers register new domains all the time. So treat TryDetectThis as one piece of evidence, and weigh it against what the logs are telling you.
We'll use it in Tasks 6 and 7 to check a couple of IP addresses.
Which documentation tab lists the company's employees?
Before you open your first alert, there are a few things you need to know. Don't worry, it's not a lot. Your first alert will wait for you in the queue, so take your time.
The Goal
Every scenario has the same goal, which is to find and close all the true positive alerts. Once you've closed every one of them, the scenario ends.
So what exactly is a true positive?
True Positives and False Positives
An alert fires when something matches a detection rule. For example, a rule might fire on any email that contains a link to an external website. But matching a rule doesn't automatically mean it's an attack. Plenty of normal emails contain links too.
That's why you need to investigate every alert and then classify it as one of two things:
- True positive (TP): the alert caught something bad. , malware, brute force, unauthorized access, or an action that breaks the company's security policies.
- False positive (FP): the activity turned out to be legitimate. No malicious intent, no harm to the company, and no policy broken. The rule fired, but nothing bad actually happened.
Here's an example taken from the scenario's own documentation, for a rule called "Windows Account Brute Force":
- True positive: a threat actor attempted a brute force attack, even if it was unsuccessful.
- False positive: the user's password had expired, and they tried to log in with their old one six times.
Both look the same to the detection rule. It's the investigation that tells them apart.
False positives still need to be closed. You close both kinds of alerts, and the only difference is what you classify them as.
Escalation
For true positives, there's one more decision to make. Does this alert need to be escalated?
Escalating means handing it over so more action can be taken, like isolating a machine or resetting a password. According to the documentation, a true positive must be escalated if additional actions or remediation are required, or if it's part of a bigger attack that is connected to other alerts that need escalation.
The documentation gives examples of both. Escalation is not required when:
- An employee downloaded cracked software, but the antivirus quarantined it before it ran.
- The mail server flagged an email as phishing and quarantined it before anyone could open it.
- A botnet scanned the company website for common vulnerabilities, and it caused no performance or security issues.
Escalation is required when:
- A threat actor got into a company server or workstation and ran a scan from it, even if the scan failed.
- A threat actor tried to dump credentials from a breached server, even though the blocked the attempt.
Notice something about that last one? The attempt was blocked, but it still needs escalation, because the attacker was already inside the server. So "was it blocked?" isn't the whole question. What matters is whether anything was actually harmed and whether something still needs to be done about it. Keep this in mind, because we'll run into it again in Tasks 5 to 7.
Alerts Arrive Over Time
The point of the Simulator is to give you an idea of what it's like to work in a real SOC. And in a real SOC, you never know exactly when the next alert is coming. Alerts come in when something happens, not on a fixed schedule.
The scenarios work the same way. Alerts don't all show up at once. They come in over time, depending on what's happening in the scenario. Some will come in within 5 minutes of each other, and some will take longer. The scenario's documentation says it directly: "Delays are intentional to mirror a realistic workflow and give you time to think through each case."
After your first alert, the scenarios are designed so that the next alert comes in within about 10 minutes, give or take. You shouldn't ever find yourself waiting for half an hour.
Ten minutes is still a long time to stare at an empty queue, though. So don't. Use the time to read the documentation or look around the , and check back on the alert queue every now and then.
The same goes for the logs in the SIEM. New log entries keep coming in as the scenario plays out, so something you search for might not show up until a minute or two later.
It's All in the Documentation
You don't have to memorize any of this. Everything in this task comes from the scenario's documentation, which you can open from the sidebar of the SOC Simulator at any time.
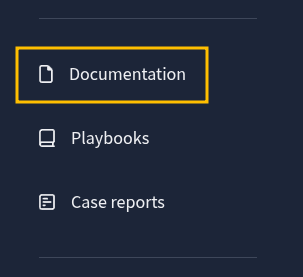
The documentation has a lot more than just the rules, too. It also tells you about the company you're protecting: who works there, which machine each person uses, and what the network looks like. In other scenarios, you'll also find SOC handover notes, left by the analysts on the previous shift. For example, a note might tell you that a new threat intelligence feed just went live in the SIEM, or that a log forwarder was only recently rolled out to every machine. Little details like these can change how you read an alert.
So get into the habit of reading the documentation at the start of every scenario, before you pick up your first alert.
An alert fires on activity that turns out to be completely legitimate. Is it a true positive or a false positive?
By now, your first alert should be in the queue. If it isn't there yet, give it a little more time. Let's take a look at it.
What the Alert Says
The alert's rule is Inbound Email Containing Suspicious External Link. Click the dropdown arrow to see the details:
| Field | Value |
|---|---|
| Sender | onboarding@hrconnex.thm |
| Recipient | j.garcia@thetrydaily.thm |
| Subject | Action Required: Finalize Your Onboarding Profile |
| Link in the email | https://hrconnex.thm/onboarding/15400654060/j.garcia |
The email asks Ms. Garcia to click a link and finish setting up her profile.
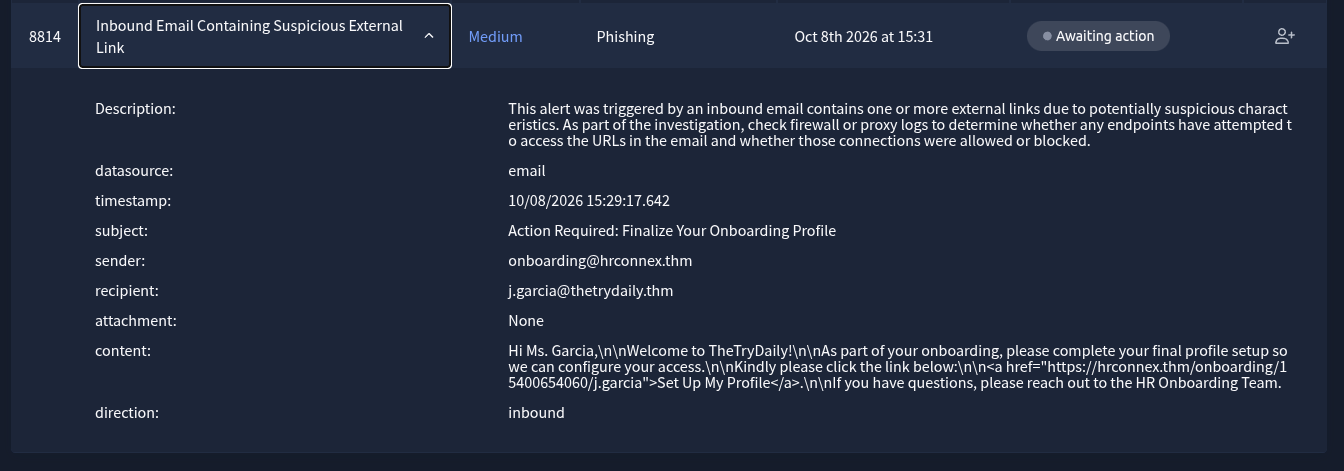
At first glance, this does look suspicious. The subject line says "Action Required," the sender is from outside the company, and there's a link to click. Those are all things phishing emails like to use.
But looking suspicious isn't enough. Let's investigate before deciding.
Taking Ownership
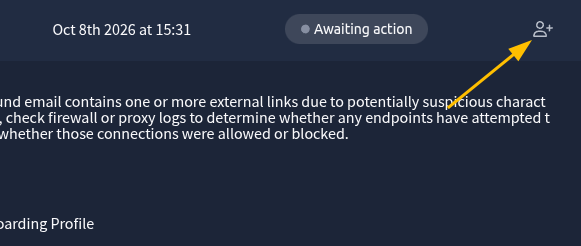
Click the assign icon (a person with a plus sign) in the Action column to take ownership of the alert. It moves to the Assigned alert(s) section at the top of the alert queue, and the icon changes to a person with a minus sign.
Investigating
Read the alert's description first. It tells you exactly what to check:
As part of the investigation, check firewall or proxy logs to determine whether any endpoints have attempted to access the URLs in the email and whether those connections were allowed or blocked.We'll do that. But first, let's find out who the sender is.
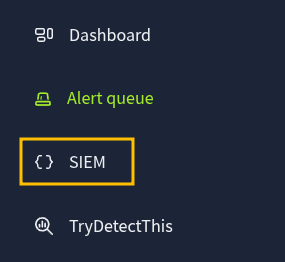
Go to the SIEM by clicking SIEM in the sidebar. It opens the SIEM you picked in Task 2 in a new tab:
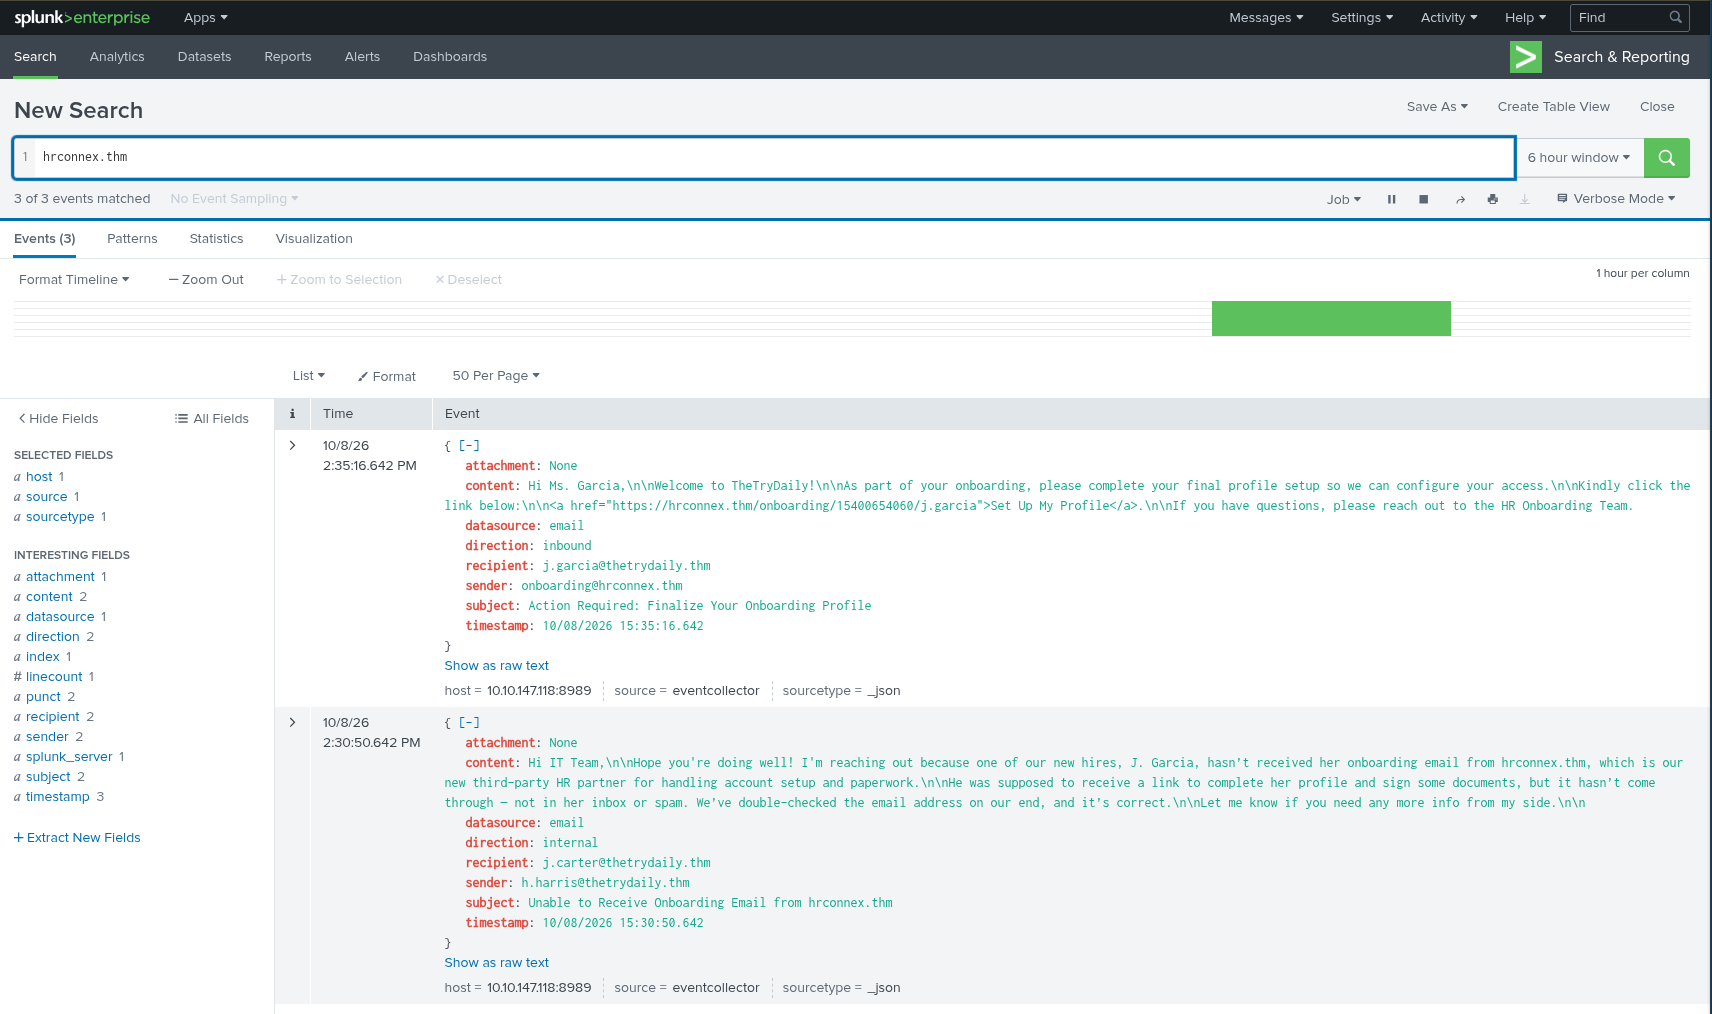
The steps in this room use Splunk. Type the sender's domain into the search bar, then click the green search button:
hrconnex.thm
Your times will be different from the ones in the screenshots. They depend on when you started the scenario.
Among the results, you'll find an internal email sent from h.harris@thetrydaily.thm to j.carter@thetrydaily.thm, with the subject Unable to Receive Onboarding Email from hrconnex.. Here's part of it:
I'm reaching out because one of our new hires, J. Garcia, hasn't received her onboarding email from hrconnex.thm, which is our new third-party HR partner for handling account setup and paperwork.If you don't see this email yet, wait a minute and search again. Logs keep coming in as the scenario plays out.
Let's check who these people are in the Company information tab. Hannah Harris works in Human Resources, and Jacob Carter works in IT Support. So HR told IT, in writing, that hrconnex.thm is a real HR partner and that J. Garcia should be getting an onboarding email from it.
Now for what the alert description asked for: did anyone try to open the link? The search you just ran covers every log in the SIEM, firewall logs included. Every result is an email, so nobody has connected to hrconnex.thm.
Making the Call
This alert is a false positive. The email looked suspicious, but the company's own HR department confirmed that the sender is a real partner, and the email is exactly what they were expecting.
Since it's a false positive, there's nothing to escalate.
Not every alert with scary words in it is an attack. That's why we check.
Writing the Report
Open the case report for this alert by going back to the alert queue and clicking Write case report in the Assigned alert(s) section.

A small window pops up, titled Close alert with event ID: 8814, asking whether the alert was a true positive or a false positive. Select False positive, then click Write case report. This opens the report form, with False positive already selected under Incident classification.
The Alert Reporting tab in the documentation lists what a good report includes. For a false positive, the most important part is explaining why it's legitimate.
A simple way to check that your report is complete is to make sure it answers the five Ws:
- Who: the people and machines involved.
- What: what happened.
- When: the time of the activity.
- Where: where it happened, like the source and destination of a connection.
- Why: the reason behind it, such as what an attacker was trying to do, or why the activity is legitimate.
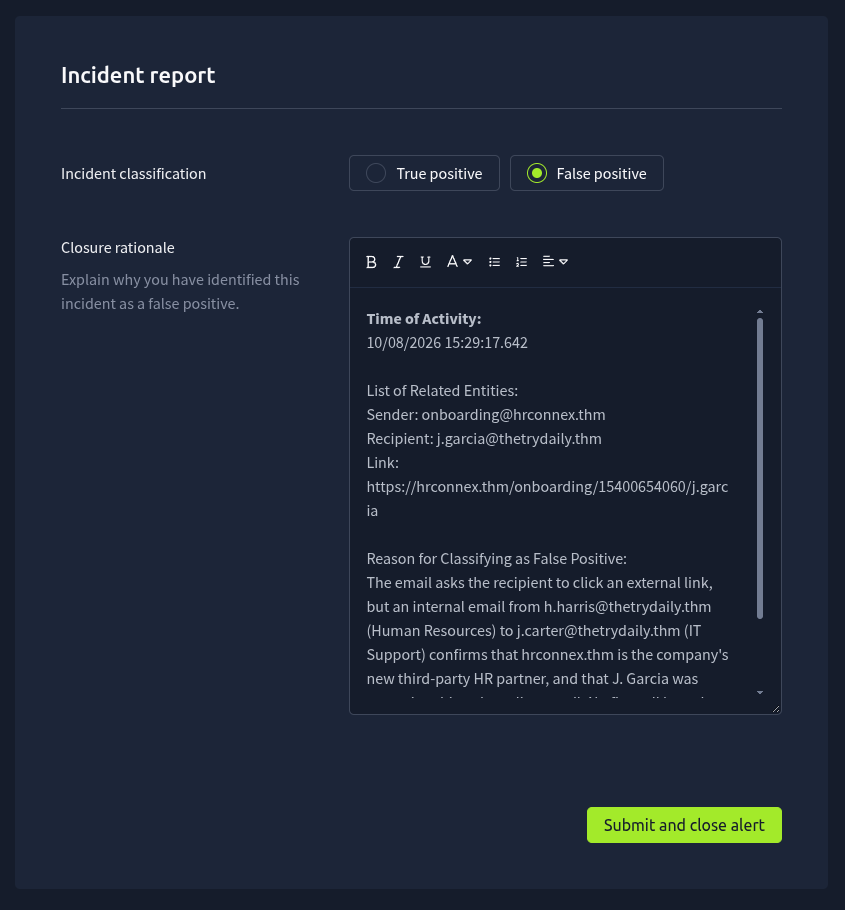
The Closure rationale box comes with a template, so you don't have to start from a blank page. For a false positive, it has three fields. Here's how you could fill them in. Replace the blanks with what you found:
Time of Activity:
______ [the onboarding email's timestamp field in the SIEM]

List of Related Entities:
Sender: ______
Recipient: ______
Link: ______

Reason for Classifying as False Positive:
The email asks the recipient to click an external link, but an internal email from ______ (Human Resources) to ______ (IT Support) confirms that ______ is the company's new third-party HR partner, and that J. Garcia was expecting this onboarding email. No firewall logs show any connection to the link. No further action is needed.
For the time, use the event's own timestamp field rather than 's Time column. The two can be an hour apart, so check which one you're copying.
Write the report in your own words if you like. What matters is that someone else reading it would understand exactly why you decided it's safe.
Here's what a filled-in report looks like:
When you're done, click Submit and close alert.
Is this alert a true positive or a false positive?
A few minutes into the scenario, a second alert shows up. It's the same rule as before, Inbound Email Containing Suspicious External Link, but this one is a very different email.
What the Alert Says
| Field | Value |
|---|---|
| Sender | urgents@amazon.biz |
| Recipient | h.harris@thetrydaily.thm |
| Subject | Your Amazon Package Couldn't Be Delivered – Action Required |
| Link in the email | http://bit.ly/3sHkX3da12340 |
Here's the email:
Dear Customer,

We were unable to deliver your package due to an incomplete address.

Please confirm your shipping information by clicking the link below:

http://bit.ly/3sHkX3da12340

If we don't hear from you within 48 hours, your package will be returned to sender.

Thank you,

Amazon Delivery
Take ownership of the alert, the same way you did with the first one.
Investigating
This time, the email itself gives a lot away. Here's what stands out:
- The sender's domain is
amazon.biz, not Amazon's real domain. Anyone can register a domain that has a brand name in it. - It says "Dear Customer." A real delivery notice would usually use your name.
- The link is shortened with bit.ly, which hides where it actually goes.
- It creates urgency. Act within 48 hours, or else. Phishing emails love a deadline, because people who are rushing don't stop to check.
That's enough to say it's phishing. But the alert description asks one more question, and it's an important one. Did anyone click the link?
Let's search the SIEM for the link:
bit.ly/3sHkX3da12340
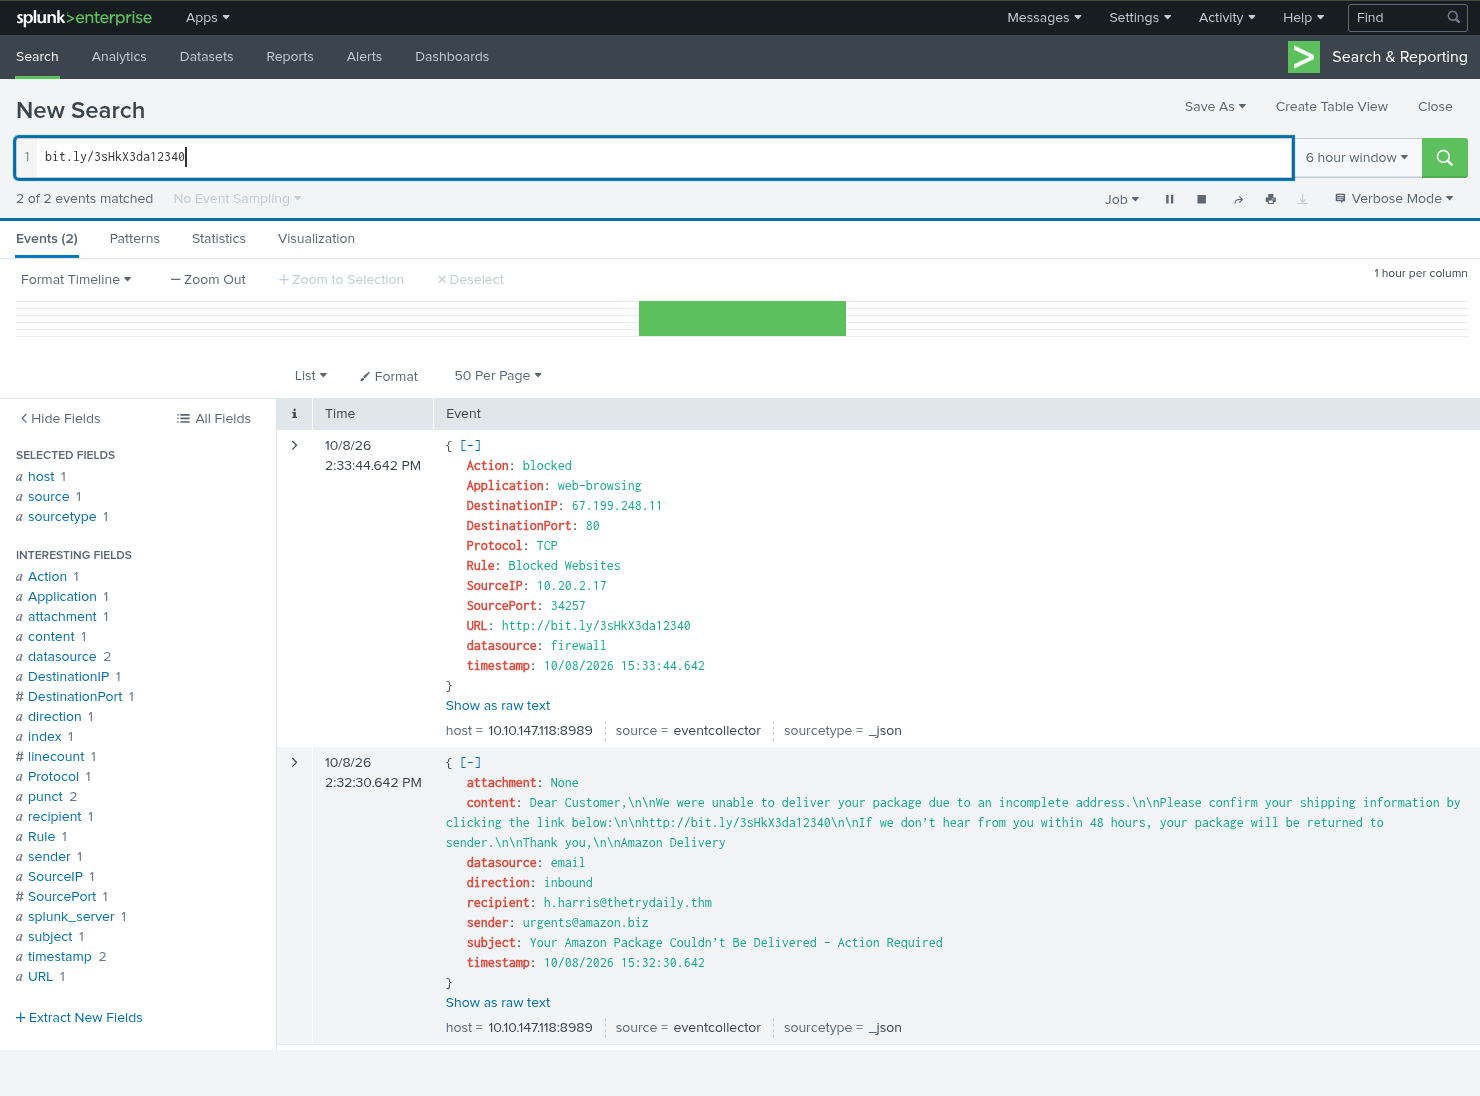
You'll find a firewall log where the machine at 10.20.2.17 tried to open that exact link. Check the Company information tab. That's Hannah Harris's machine, the same person who received the email. So she clicked it.
But look at the Action field of that firewall log. It says blocked. The stopped the connection under a rule called Blocked Websites.
If you can't find the firewall log yet, wait a moment. It's about to show up as the next alert, which we'll look at in Task 6.
Making the Call
This alert is a true positive. It's a phishing email, sent from a fake domain, trying to get an employee to click a malicious link.
Does it need escalation? Think back to Task 3. What matters is whether anything was harmed, and whether something still needs to be done. Hannah did click, but the firewall blocked the connection before the link could load. Nothing reached her machine, so there's nothing left to clean up. This alert does not need escalation.
Writing the Report
This time, select True positive in the Close alert with event ID window, then click Write case report. Because it's a true positive, the report form has one more question further down: Does this alert require escalation? Select No.

For a true positive, the Alert Reporting tab asks for a few more things: who was affected, where and when it happened, the indicators of compromise (IOCs), and what the attacker was trying to do. IOCs are the concrete clues that identify the attack, like the sender's address, a domain, a URL, or an IP address.
Remember to answer the five Ws in your report: who, what, when, where, and why.
The Closure rationale template is also longer, with six fields. The IOCs go in List of Attack Indicators, and Reason for Escalating the Alert is where you explain your escalation decision, even when the answer is no. Here's how you could fill it in. Replace the blanks with what you found:
Time of activity:
From ______ to ______ [the phishing email's and the firewall event's timestamp fields in the SIEM]

List of Affected Entities:
User: ______
Source IP: ______
Destination IP: ______
Email from: ______, subject: "Your Amazon Package Couldn't Be Delivered – Action Required"

Reason for Classifying as True Positive:
The email pretends to be an Amazon delivery notice. The sender's domain is not Amazon's, the greeting is generic, the link is shortened, and the email pressures the recipient to act within 48 hours. The user clicked the link, but the firewall ______ the connection.

Reason for Escalating the Alert:
No escalation needed. ______ [why nothing more needs to be done]

Recommended Remediation Actions:
______ [what, if anything, should be done next]

List of Attack Indicators:
URL: ______
Sender: ______
Destination IP: ______
Source IP: ______
When you're done, click Submit and close alert.
What did the firewall do with that connection?
Right after the Amazon email, a third alert comes in. This time it's a different rule: Access to Blacklisted External URL Blocked by .
What the Alert Says
This alert doesn't come from the email logs. It comes from the firewall.
| Field | Value |
|---|---|
| Source IP | 10.20.2.17 |
| Destination IP | 67.199.248.11 |
| URL | http://bit.ly/3sHkX3da12340 |
| Action | blocked |
| Rule | Blocked Websites |
Look familiar? It's the same firewall log we found in the last task. This alert is the other half of the same story. Hannah received the fake Amazon email, clicked the link, and the firewall blocked it.
Take ownership of the alert.
Investigating
We already know most of this from Task 5, but let's confirm the pieces.
- Who is
10.20.2.17? Check the Company information tab. It's Hannah Harris, from Human Resources, on the machinewin-3457. - Where did the link come from? Search the SIEM for the URL,
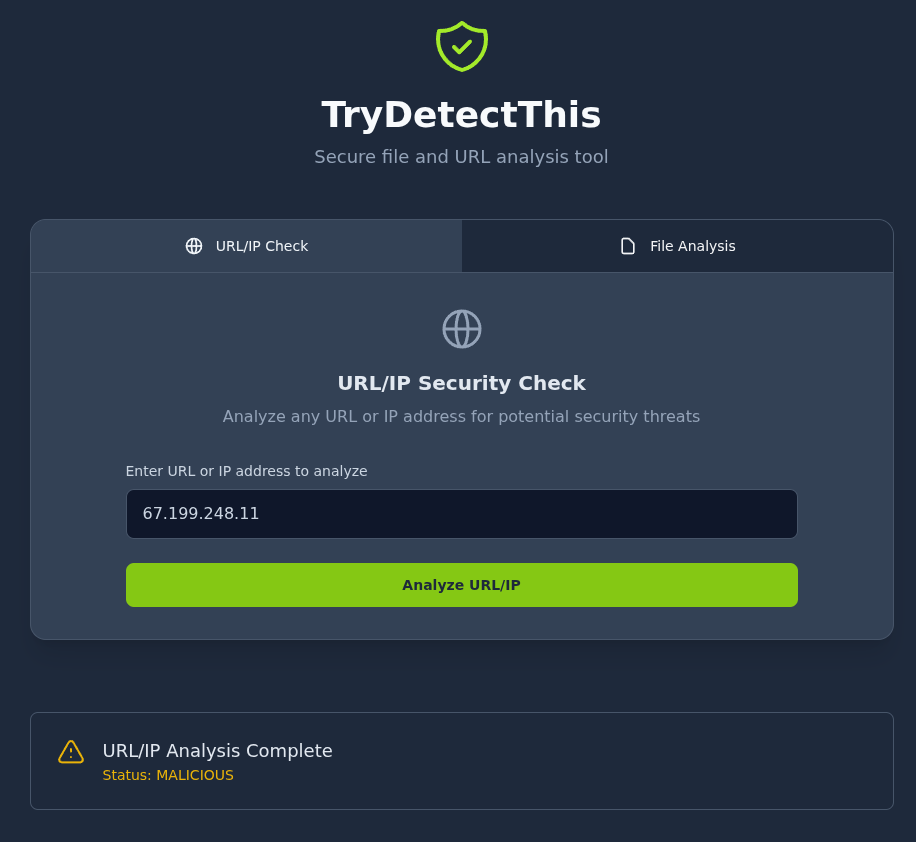
bit.ly/3sHkX3da12340. You'll see the Amazon phishing email toh.harris@thetrydaily.thm, followed shortly after by this firewall log. - What is the destination? Let's check the destination IP with TryDetectThis. Click TryDetectThis in the sidebar and look up
67.199.248.11. TryDetectThis reports it as MALICIOUS. So the link didn't just look suspicious. It led somewhere known to be bad. - Did anything get through? Search the SIEM for
10.20.2.17. You'll also see an earlier Google search from Hannah's machine, which is normal browsing. The only connection to the bit.ly link or its IP is the blocked one.
The alert's own description has a useful note too:
The blacklist only covers known threats. It does not guarantee protection against new or unknown malicious domains.The firewall caught this one, but it won't catch everything. You'll see that in the next alert.
Making the Call
This alert is a true positive. An employee really did try to open a malicious link that came from a phishing email. That's not legitimate activity, even though it was stopped.
Does it need escalation? This is the question a lot of people get stuck on, so let's go back to the documentation. Escalation is required when additional actions or remediation are needed. Here, the firewall blocked the connection before anything loaded. Nothing reached Hannah's machine, so there's nothing to remediate. This alert does not need escalation.
It's similar to the documentation's example of the antivirus quarantining a download before it ran. The threat was real, but it was stopped before any impact.
Compare that with the credential-dumping example from Task 3. There, the attempt was also blocked, but the attacker was already inside the server, so it still needed escalation. Here, the attacker never got in at all.
Writing the Report
In the Close alert with event ID window, select True positive, then click Write case report. For Does this alert require escalation?, select No.
Remember to answer the five Ws in your report: who, what, when, where, and why.
Here's how you could fill in the template. Notice that it connects this alert to the phishing email, since they're part of the same story:
Time of activity:
______ [the firewall event's timestamp field in the SIEM]

List of Affected Entities:
User: ______ (Human Resources)
Source IP: ______
Destination IP: ______

Reason for Classifying as True Positive:
The user's machine tried to open a link from a phishing email pretending to be an Amazon delivery notice, sent from ______. TryDetectThis reports the destination IP as ______. The firewall ______ the connection under the "Blocked Websites" rule, so the link never loaded.

Reason for Escalating the Alert:
No escalation needed. ______ [why nothing more needs to be done]

Recommended Remediation Actions:
______ [what, if anything, should be done next]

List of Attack Indicators:
URL: ______
Destination IP: ______
Source IP: ______
When you're done, click Submit and close alert.
Does this alert need escalation? (Yea/Nay)
The fourth alert is another Inbound Email Containing Suspicious External Link.
What the Alert Says
| Field | Value |
|---|---|
| Sender | no-reply@m1crosoftsupport.co |
| Recipient | c.allen@thetrydaily.thm |
| Subject | Unusual Sign-In Activity on Your Microsoft Account |
| Link in the email | https://m1crosoftsupport.co/login |
Here's the email:
Hi C.Allen,

We detected an unusual sign-in attempt on your Microsoft account.

Location: Lagos, Nigeria

IP Address: 102.89.222.143

If this was not you, please secure your account immediately to avoid unauthorized access.

Thank you,

Microsoft Account Security Team
The Review Activity button in the email links to https://m1crosoftsupport.co/login.
Take ownership of the alert.
Investigating
Look closely at the sender's domain: m1crosoftsupport.co. That's a number 1 where the letter i should be. It's a lookalike domain, made to pass a quick glance. And it's not a Microsoft domain at all.
The email is also built to scare. It reports a sign-in from another country, adds a specific IP address to make it look real, and offers a button to "secure your account immediately." The button leads to a fake login page, where the attacker hopes the user will type in their real password.
The email also mentions an IP address and a location. Don't let those confuse you. The attacker made them up to make the email look convincing. They're not evidence of an actual sign-in.
So it's phishing. And again, the big question is: Did anyone click?
Search the SIEM for the domain:
m1crosoftsupport.co
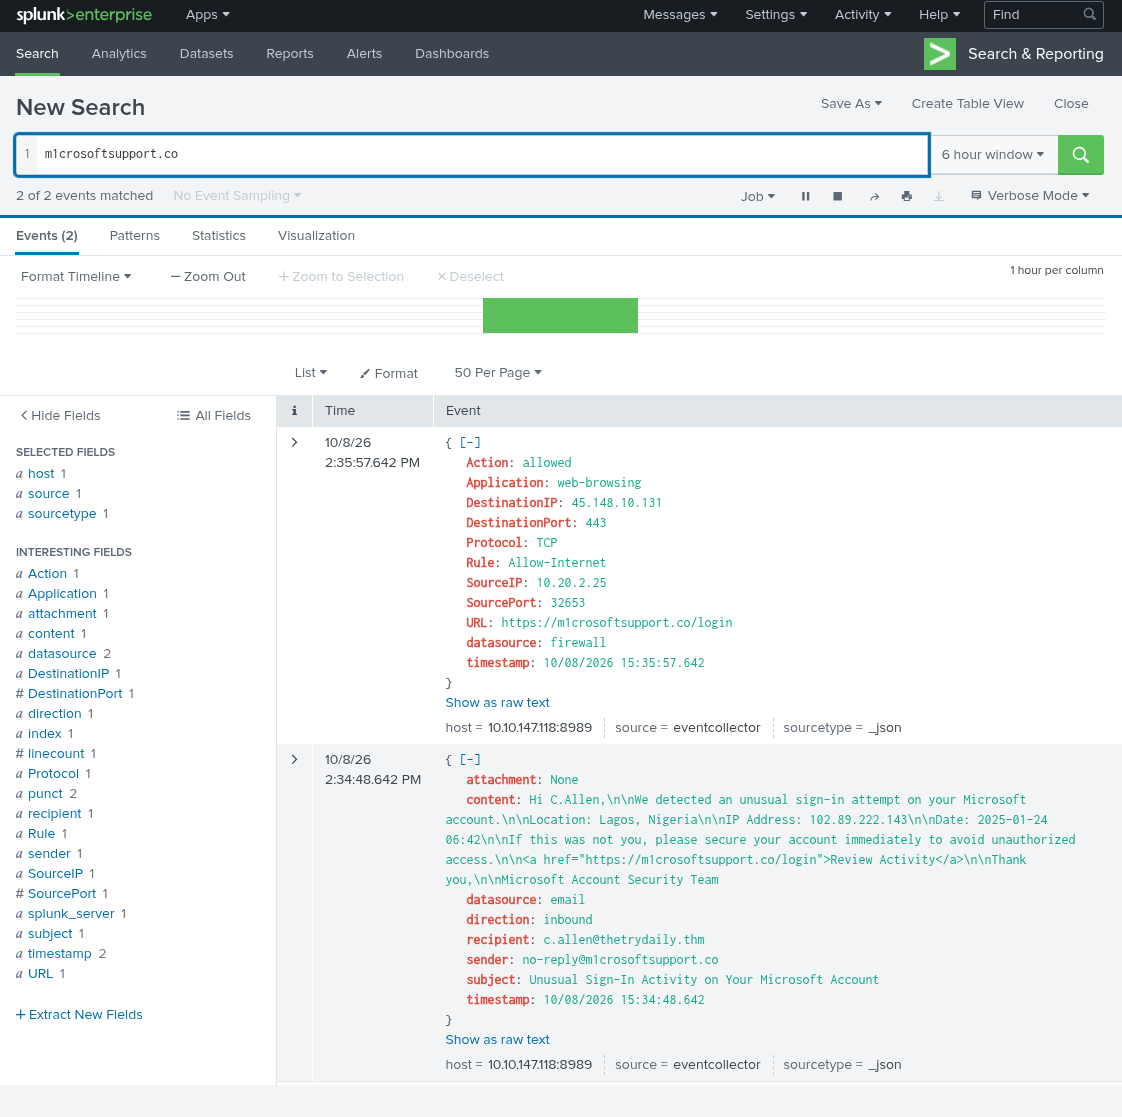
This time, you'll find a firewall log from 10.20.2.25 connecting to https://m1crosoftsupport.co/login at the IP address 45.148.10.131. Now look at the Action field. It says allowed.
If you don't see the firewall log right away, wait a minute and search again. It comes in a little after the alert does.
Check the Company information tab. 10.20.2.25 is Charlotte Allen's machine, win-3463, the same person the email was sent to. So Charlotte clicked the button, and this time the firewall didn't stop it. Her machine connected to the fake login page.
Let's also check the destination IP. Open TryDetectThis from the sidebar. If the search box still has the IP address from the last task in it, clear it first, or the new one gets joined onto it. Then look up 45.148.10.131. TryDetectThis reports it as MALICIOUS. So Charlotte's machine connected to a server that's known to be bad.
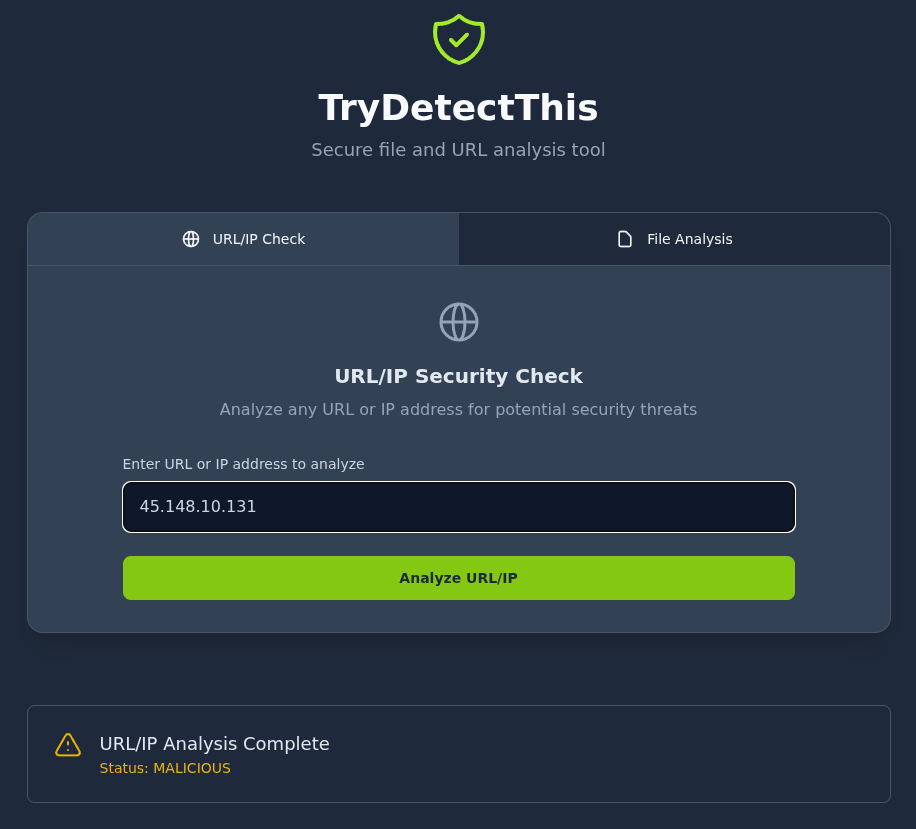
Remember the note from the last alert? The only blocks threats it already knows about. This time, it let the connection through under its normal Allow-Internet rule.
Making the Call
This alert is a true positive. It's a phishing email from a lookalike domain, designed to steal the user's Microsoft password.
And this time, it needs escalation. Charlotte's machine reached the fake login page, and we can't tell from the logs whether she typed in her password. If she did, the attacker now has it. That means more needs to be done: her password should be reset, and her account checked for any sign-ins she didn't make. That's exactly what the documentation means by additional actions or remediation.
Compare this with Tasks 5 and 6. Same kind of attack, but there the firewall blocked the link and nothing reached the user. Here, it reached the user. That one difference is what changes the escalation decision.
Writing the Report
In the Close alert with event ID window, select True positive, then click Write case report. For Does this alert require escalation?, select Yes.
Remember to answer the five Ws in your report: who, what, when, where, and why.
The Alert Reporting tab asks you to explain why escalation is needed and what remediation may be required, so make sure your report covers that. Here's how you could fill in the template:
Time of activity:
From ______ to ______ [the phishing email's and the firewall event's timestamp fields in the SIEM]

List of Affected Entities:
User: ______ (Web Development)
Source IP: ______
Destination IP: ______
Email from: ______, subject: "Unusual Sign-In Activity on Your Microsoft Account"

Reason for Classifying as True Positive:
The email impersonates Microsoft from a lookalike domain that replaces the letter "i" with the number "1". It claims there was an unusual sign-in and urges the user to "Review Activity" through a link to a fake login page. Firewall logs show that the user's machine connected to the link, and the connection was ______. TryDetectThis reports the destination IP as ______.

Reason for Escalating the Alert:
Escalation is required. ______ [what could have happened after the connection went through]

Recommended Remediation Actions:
______ [what should happen to the user's password and account, and to the domain]

List of Attack Indicators:
URL: ______
Sender: ______
Destination IP: ______
Source IP: ______
When you're done, click Submit and close alert.
This is the last true positive, so as soon as you submit it, the scenario ends and takes you to your results. Task 8 explains why.
Does this alert need escalation? (Yea/Nay)
When you submitted the report for the Microsoft alert, the scenario ended, even though a fifth alert had already come in. That's how the Simulator works: the scenario ends as soon as every true positive is closed. Any alerts still waiting in the queue are simply left open, and they aren't counted in your results. The fifth alert was another onboarding email from hrconnex.thm to J. Garcia, almost word for word the same as the first one, so it was a false positive anyway.
But there's a catch. If you had taken ownership of the fifth alert before closing the Microsoft one, both would have been closed together as true positives. That's because when you own more than one alert, Write case report closes all of them with a single classification. So stick to one alert at a time.
The Results Screen
Once the scenario ends, you'll land on the results screen. The top of the page gives you a short summary of how your run went.
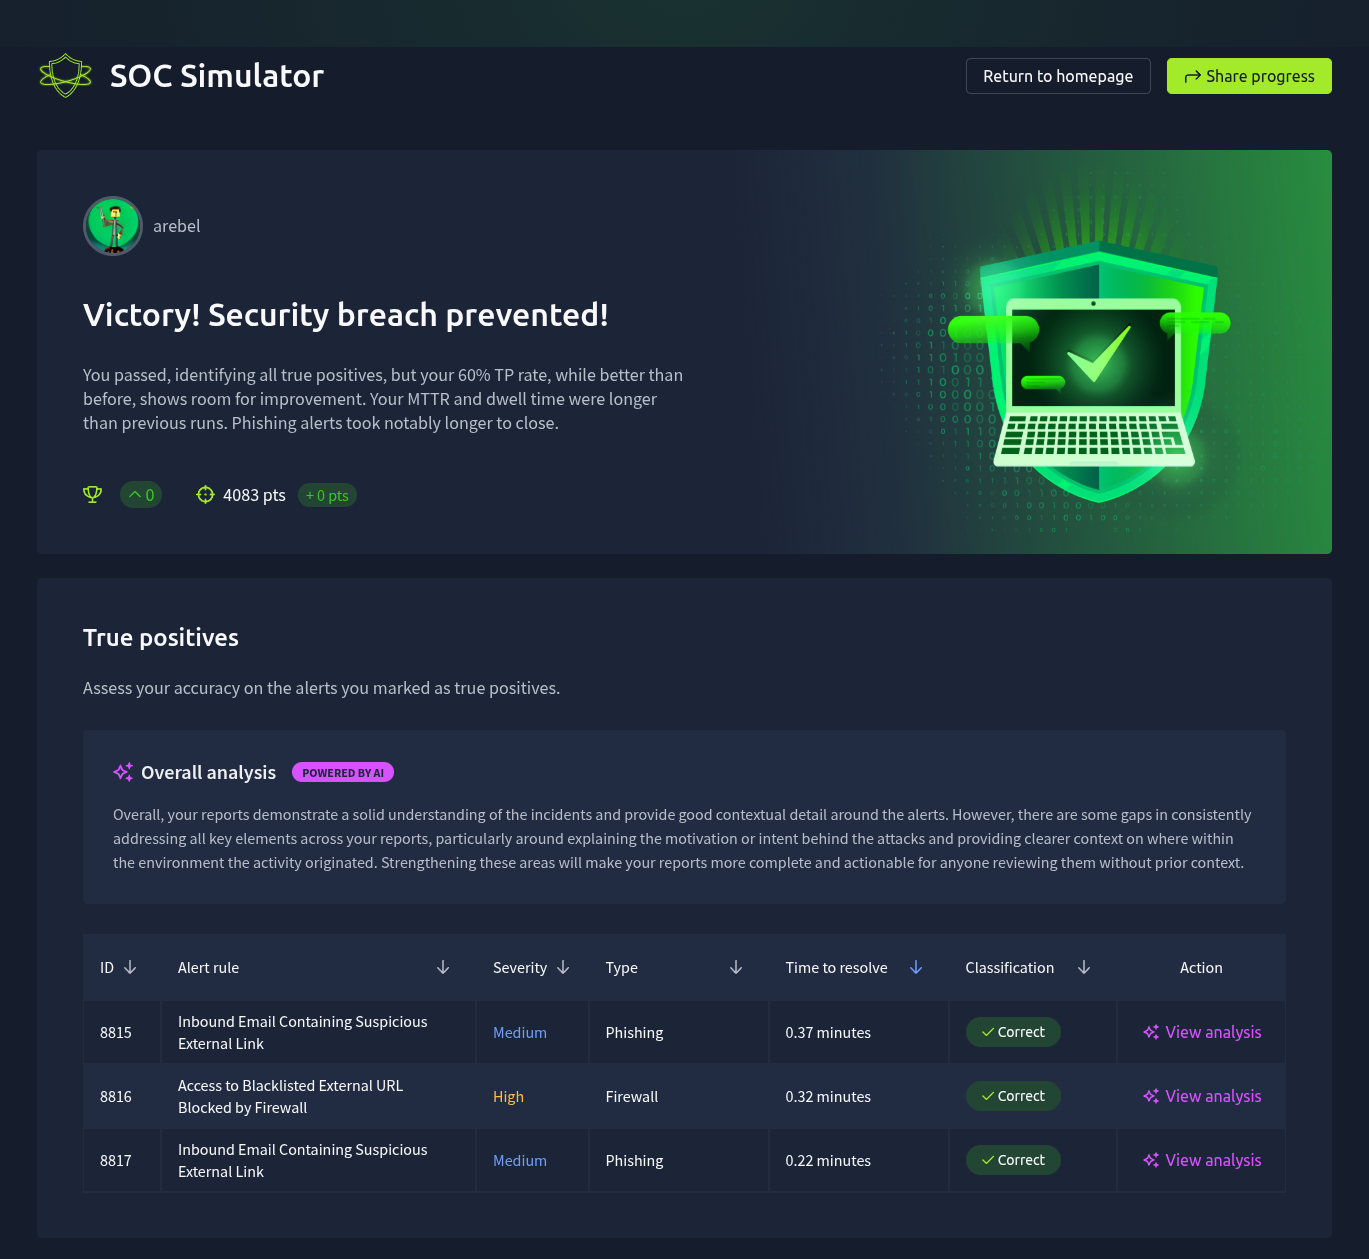
The Overall analysis section can take a little while to appear. You don't need to wait on it. Look around the of the page in the meantime, and come back to it once it's loaded.
Overall Analysis
Under True positives, the Overall analysis looks at all your case reports together. It points out what you did well and what you could add next time. It's generated by , based on the reports you submitted.
Below it is a table of the alerts you closed as true positives. It shows how long each one took you and whether your classification was correct. To see the feedback for a single report, click View analysis.
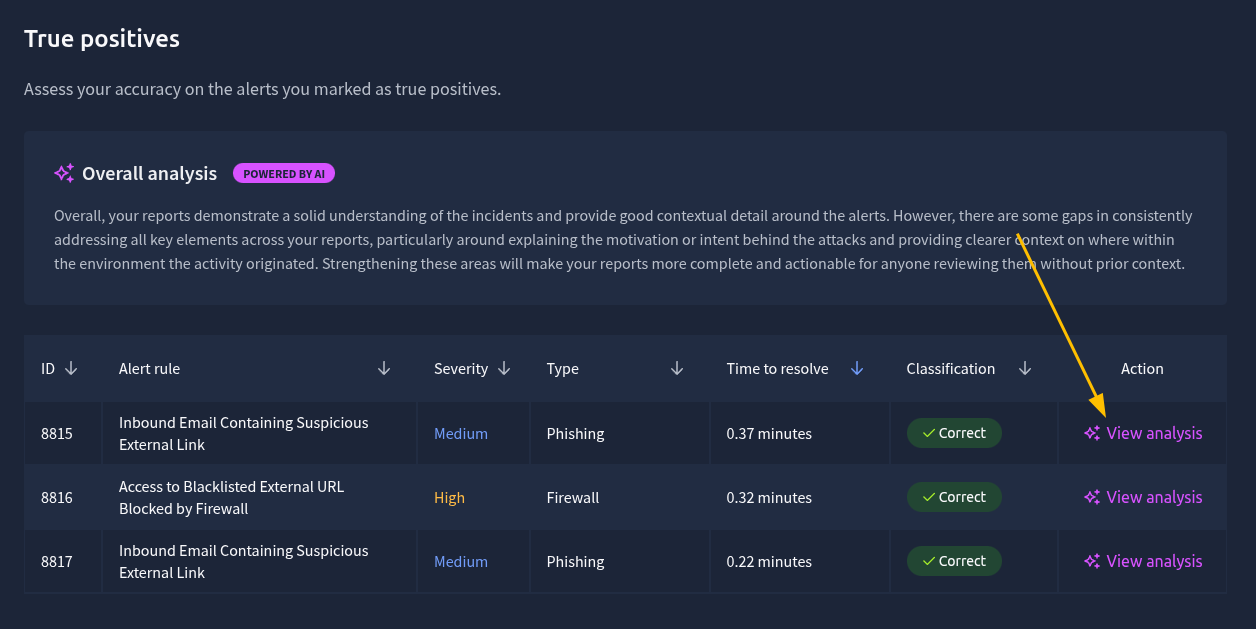
The Analysis for Each Report
View analysis opens your case report, along with the points you earned for the classification and for the report itself. Underneath is the Report analysis.
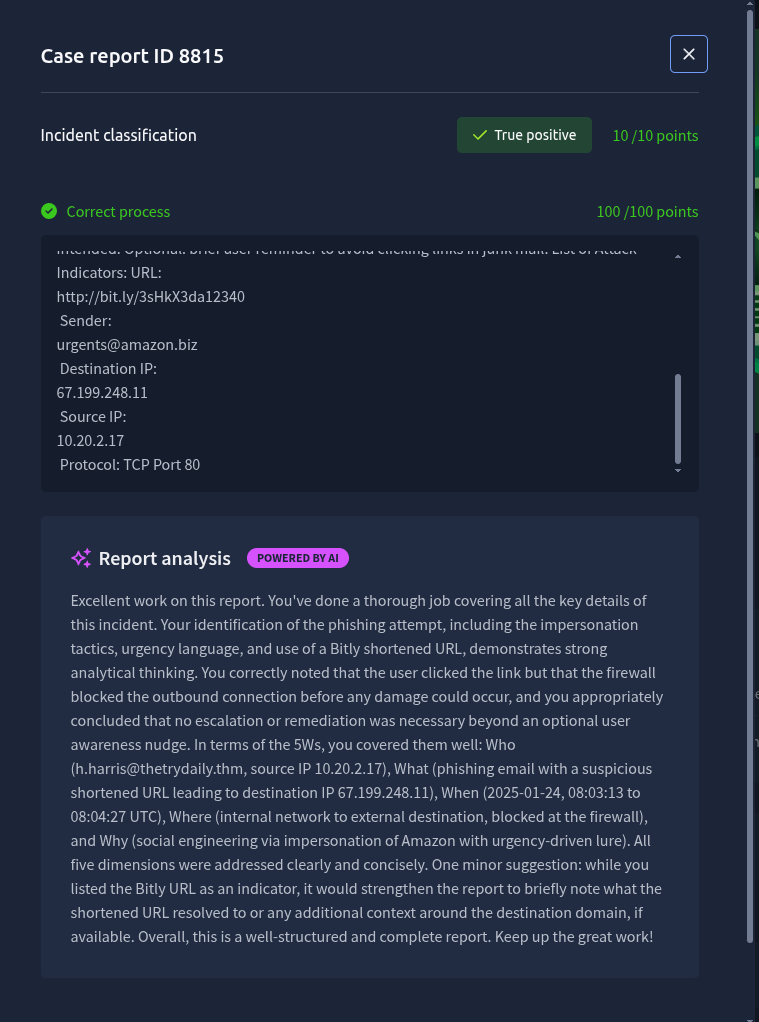
Your analysis will be different from the one in the screenshot, because it's based on the report you wrote.
The report analysis looks for specific details about the alert, the same five Ws you've been covering in your reports: who was involved, what happened, when and where it happened, and why. In the example above, the report covered all five. So the analysis could confirm each one, and it suggested a small addition.
The analysis can only work with what you write. If your report leaves something out, like the time of the activity or the destination IP, the analysis can't give you credit for it, and its feedback will be more general. The more detail you include, and the more clearly you explain your reasoning, the more points you'll earn and the more useful the feedback will be.
Don't worry if you didn't get full points on every report this time. Use the feedback to see which details were missing, and include them in your next scenario.
There's more on the results screen if you scroll down. Take a look, because it gives you a fuller picture of how you did.
Congratulations, you've finished your first SOC Simulator scenario!
I've completed my SOC Simulator scenario!
Before you move on, here's a quick recap of what you did.
What We Did
Let's look back at the alerts you worked on:
| Alert | What it was | Call | Escalate? |
|---|---|---|---|
| Onboarding email from hrconnex. | A real HR partner, confirmed by HR | False positive | No |
| Fake Amazon delivery email | , clicked, but blocked by the | True positive | No |
| Blocked connection to the bit.ly link | The same click, stopped at the firewall | True positive | No |
| Fake Microsoft sign-in email | Phishing, clicked, and the connection went through | True positive | Yes |
Every email had a link in it, and only two were phishing. Just one alert needed escalation, and the difference came down to a single word in a firewall log: blocked or allowed.
Habits Worth Keeping
These will help you in every scenario, not just this one:
- Read the documentation first. Especially the Company information tab. You can't tell who
10.20.2.25is without it. - Check before you decide. The first alert looked suspicious and turned out to be fine. Search the before making the call.
- Answer the question the alert asks. The alert descriptions tell you what to check. In this scenario, it was always "Did anyone access the link, and was it allowed or blocked?"
- Take one alert at a time, and give each its own report. Each alert is its own case.
- Classify on the evidence. Closing everything as a true positive "just to be safe" isn't safe. A false positive called a true positive is still the wrong call.
- Cover the five Ws. Who, what, when, where, and why. The more of them your report answers, the more useful your feedback will be.
What's Next?
If you want another phishing scenario, try Phishing Unfolding. It's the other free scenario, and a bigger one: a phishing attack that develops into a full breach, with a lot more alerts to work through.
I'm ready for my next scenario!
Ready to learn Cyber Security?
TryHackMe provides free online cyber security training to secure jobs & upskill through a fun, interactive learning environment.
Already have an account? Log in