
Windows Incident Surface
Learn how to implement DFIR techniques to explore the Windows incident surface.
medium

To access material, start machines and answer questions login.
Set up your virtual environment

In the everchanging cybersecurity landscape, one can not rely solely on a reactive approach of detection and responding to attacks. Instead, it is always a good idea to hunt for suspicious activity and analyze the results. To avoid going down rabbit holes and wasting precious time, this has to be done tactfully. The goal isn't exhaustive analysis, rather efficient triage and actionable discovery. In this room, we will identify some of the artefacts that can give us a good ROI on such hunts.
Learning Objectives
- Verify the of system tools to maintain the of the investigation.
- Collect system information to identify system and user profile and uncover some indicators of anomalies.
- Read data from crucial forensic artefacts to hunt for unwanted persistent objects.
- Analyze processes and directories to find traces of suspicious activity.
Room Prerequisites
To benefit from this room in the best way, please ensure you have completed the following rooms:
Furthermore, it would be very beneficial if you are comfortable with Windows Command Line and .
Connecting to the :
Please press the Start Lab Machine button below to connect to the .
The machine will start in a split view. You might see some unexpected session disconnects since the machine is infected. If that happens, make sure to select Administrator account to log in. You can also use to connect to the machine using or the Attackbox. Following are the credentials for this machine.
Credentials
Required for connecting using your own machine or the Attackbox.
Let's begin.
I have deployed the machine and am ready to hunt!
Attackers can modify the environment variables to hijack the execution flow (ATT&CK ID: T1574.007). Before starting a live investigation, it is important to check for any signs of execution flow hijack. We will explore a few of these artefacts in this task.
Profiles
A profile is a script that executes every time is executed. We can say that a profile is to , what a startup program is to Windows. Therefore, before even executing , we should look for traces of compromise in the profile. Since we were going to use to perform our analysis, this creates a chicken and egg problem for us. If only we could bring our own , right?
Bring Your Own Tools
What if we can? In the attached , we can navigate to the following directory to access tools that we brought with ourselves to perform initial analysis.
C:\Users\Administrator\Desktop\tools\shells
The toolbox contains the trusted shell executables and other tools we will use during the investigation. We will start with the Windows Command Prompt (CMD-DFIR[.]exe) to do the initial checks. The reason we chose Command Prompt is that unlike PowerShell, it does not require a profile to execute, therefore, making it immune to execution flow hijack during startup. Once we have ensured that we can safely use PowerShell, we will move to that for the rest of the analysis. Let's navigate to the directory and start our investigation by running the Windows Command Prompt (CMD-DFIR.exe) as an administrator.

Please note that you might come across missing features or receive error messages while using this toolbox, since it is relying only on default environment variables. This is expected and should not cause a problem in carrying out the task.
Since we are looking for anomalies in environment variables, we can use the below commands to dump and read them. We have shown a snipped version of the actual result.
           C:\Users\Administrator\Desktop\tools\shells> set > env_vars.txt

C:\Users\Administrator\Desktop\tools\shells> type env_vars.txt
ALLUSERSPROFILE=C:\ProgramData
APPDATA=C:\Users\Administrator\AppData\Roaming
CommonProgramFiles=C:\Program Files\Common Files
CommonProgramFiles(x86)=C:\Program Files (x86)\Common Files
CommonProgramW6432=C:\Program Files\Common Files
COMPUTERNAME=CCTL-WS-018-B21
ComSpec=C:\Windows\system32\cmd.exe
DriverData=C:\Windows\System32\Drivers\DriverData
HOMEDRIVE=C:
HOMEPATH=\Users\Administrator
LOCALAPPDATA=C:\Users\Administrator\AppData\Local
LOGONSERVER=\\CCTL-WS-018-B21
NUMBER_OF_PROCESSORS=2
OS=Windows_NT
Path=C:\Windows\system32;C:\Windows;C:\Windows\System32\Wbem;C:\Windows\System32\WindowsPowerShell\v1.0\;C:\Windows\System32\OpenSSH\;C:\Program Files\Amazon\cfn-bootstrap\;C:\Program Files\Aurora-Agent;C:\Program Files\dotnet\;C:\Program Files\TortoiseSVN\bin;C:\Users\Administrator\AppData\Local\Programs\Python\Python310\Scripts\;C:\Users\Administrator\AppData\Local\Programs\Python\Python310\;C:\Users\Administrator\AppData\Local\Microsoft\WindowsApps;
PATHEXT=.COM;.EXE;.BAT;.CMD;.VBS;.VBE;.JS;.JSE;.WSF;.WSH;.MSC
.
.
.
PSModulePath=C:\Program Files\WindowsPowerShell\Modules;C:\Windows\system32\WindowsPowerShell\v1.0\Modules;C:\Program Files (x86)\AWS Tools\PowerShell\
TEMP=C:\Users\ADMINI~1\AppData\Local\Temp\2
TMP=C:\Users\ADMINI~1\AppData\Local\Temp\2
USERNAME=Administrator
USERPROFILE=C:\Users\Administrator
windir=C:\Windows
We have to look for fields that might be frequently hijacked, such as:
- ComSpec: Windows prompt command executable (
cmd[.]exe). - Path: Environment path values.
- PSModulePath: PowerShell directories.
- Public: Public folder.
- TEMP and TMP: Temp locations.
Although the path of the directories doesn't look abnormal, we should perhaps look inside the PowerShell directories just to make sure that the actual profile files are not modified. There are six different profiles in PS paths, but only four are used by the PowerShell console and applications (Windows PowerShell ISE uses two). Below are the default locations of profile files.
| Profile Scope | Profile File Path |
|
$HOME\Documents\WindowsPowerShell\profile.ps1 |
|
$PSHOME\Microsoft.PowerShell_profile.ps1 |
|
$HOME\Documents\profile.ps1 |
|
$PSHOME\profile.ps1 |
The above mentioned paths are relative paths, but since we are using our own command shell, we will need to translate them to absolute paths. We can take help from the environment variables we previously listed to do that. The USERPROFILE variable shows the absolute path to the $HOME directory. The PSModulePath variable shows the absolute path to the $PSHOME and other relevant directories. In case there are multiple directories present for the PSModulePath, we can use the location of the PowerShell executable as our PSModulePath. Profile file needs to reside in the same directory as this executable. Therefore, we can use the command below to reveal the absolute path of the $PSHOME.
           C:\Users\Administrator\Desktop\tools\shells> where powershell.exe
C:\Windows\System32\WindowsPowerShell\v1.0\powershell.exe
We have identified the absolute paths for $HOME and $PSHOME; Now, let's start checking the profiles. We can execute the following commands to identify the available profile files.
           C:\Users\Administrator\Desktop\tools\shells>if exist "C:\Windows\System32\WindowsPowerShell\v1.0\Microsoft.PowerShell_profile.ps1" (echo PROFILE EXISTS) else (echo PROFILE DOES NOT EXIST)
PROFILE DOES NOT EXIST

C:\Users\Administrator\Desktop\tools\shells>if exist "C:\Users\Administrator\Documents\profile.ps1" (echo PROFILE EXISTS) else (echo PROFILE DOES NOT EXIST)
PROFILE DOES NOT EXIST

C:\Users\Administrator\Desktop\tools\shells>if exist "C:\Users\Administrator\Documents\WindowsPowerShell\profile.ps1" (echo PROFILE EXISTS) else (echo PROFILE DOES NOT EXIST)
PROFILE DOES NOT EXIST

C:\Users\Administrator\Desktop\tools\shells>if exist "C:\Windows\System32\WindowsPowerShell\v1.0\profile.ps1" (echo PROFILE EXISTS) else (echo PROFILE DOES NOT EXIST)
PROFILE EXISTS
We have identified that a PowerShell profile exists and is valid for all users and hosts. Let's read this file to determine if an event-triggered execution (ATT&CK ID: T1546.013) is present in the system. We can do that by executing the commands in the terminal below.
           C:\Users\Administrator\Desktop\tools\shells> type "C:\Windows\System32\WindowsPowerShell\v1.0\profile.ps1"
Set-PSReadlineOption -HistorySaveStyle SaveNothing
Remove-Item (Get-PSReadlineOption).HistorySavePath -ErrorAction SilentlyContinue
Write-Host "Less Murphy Ventures  Co. Ps-History-Shredder Profile" -ForegroundColor Green
Write-Host "Loading Secure Console" -ForegroundColor Green
wevtutil el | ForEach-Object {wevtutil cl $_}; Stop-Service -Name "eventlog" -Force
New-ItemProperty -Path "HKLM:\SYSTEM\CurrentControlSet\Control\SecurityProviders\WDigest" -Name "UseLogonCredential" -Value 1 -PropertyType DWORD -Force
Set-Location "$Env:UserProfile\Desktop"
We can find several red flags in the profile, such as deleting terminal history (ATT&CK ID: T1070.003), clearing eventlogs (ATT&CK ID: T1070.001), stopping eventlog service (ATT&CK ID: T1562.002), and saving credentials in the registry (ATT&CK ID: T1552.002). Based on the organization and the environment we are working on, some of these points may or may not be outright malicious, but based on our knowledge of an organization, we can draw further conclusions from this information. Anyhow, we have explored how adversaries can modify environment variables to achieve some of their objectives.
Restoring Justice
Just like our toolbox, we also brought our own profile. Let's restore the original profile by replacing it with the PS-DFIR-Profile.ps1 in our toolbox. In an actual scenario, we can do that by bringing a profile from a trusted golden image. We can follow the steps in the below terminal to replace the malicious PS profile with a clean one.
           # Rename the safe PS profile file to be used in the system.
C:\Users\Administrator\Desktop\tools\shells> ren PS-DFIR-Profile.ps1 profile.ps1

# Change the existing profile file extension to backup (.bak) so we can move the safe profile file.
C:\Users\Administrator\Desktop\tools\shells> ren C:\Windows\System32\WindowsPowerShell\v1.0\\profile.ps1 profile.bak

# Move the safe profile file to the existing profile path.
C:\Users\Administrator\Desktop\tools\shells> copy profile.ps1 C:\Windows\System32\WindowsPowerShell\v1.0\
We might see an error on this last command, however, the file will be copied regardless. We can verify this by running PowerShell as an administrator, where we see Profile in red on top. This indicates that we have fixed the profile. We can now use PowerShell for the rest of our analysis. Please note that going through the previous steps in order is necessary for the rest of the task to work properly. Therefore, if you haven't performed the previous steps before executing PowerShell, please restart the VM.
Loaded Modules
Before we proceed further, it would be prudent to make note of the PowerShell version and loaded modules to see if any malicious module is loaded. This can be matched with a trusted baseline to ensure nothing malicious is happening in the system. Let's execute the following commands to achieve this objective.
           C:\Users\Administrator\Desktop\tools\shells> Get-Module | ft ModuleType, Version, Name

ModuleType Version Name
---------- ------- ----
  Manifest 3.1.0.0 Microsoft.PowerShell.Management
  Manifest 3.1.0.0 Microsoft.PowerShell.Utility
    Script 2.0.0   PSReadline


C:\Users\Administrator\Desktop\tools\shells> Get-Module -ListAvailable | select ModuleType, Version, Name

ModuleType Version   Name
---------- -------   ----
    Script 0.4.7     powershell-yaml
    Script 1.0.1     Microsoft.PowerShell.Operation.Validation
    Binary 1.0.0.1   PackageManagement
    Script 3.4.0     Pester
    Script 1.0.0.1   PowerShellGet
    Script 2.0.0     PSReadline
.
.
.
We can write the module list to a file to compare with a trusted baseline and explore any suspicious modules. Once we have completed our analysis of and Environment Variables, we can move to profiling the system.
What tool did the adversary use to delete the logs?
What was the registry path used by the adversary to store and steal the login credentials?
Now that we have fixed our analysis tools, we can start the analysis by first profiling the system. Analyzing system details and configuration is important as it sets the tone for the of the analysis, by ensuring we are looking at the right system, and finding out important information that might be crucial to the of the analysis. Although we can use the built-in as well, but to be on the safer side, we will still use our own as we have more confidence on that.
System Name and Network Information
The following command can be used to identify the system Hostname, IP addresses, and MAC addresses of all the interfaces. It is a good practice to note this information down for future reference. Please note that this command is most useful when performing live analysis while the system is connected to its regular network.
           C:\Users\Administrator\Desktop\tools\shells> Get-CimInstance win32_networkadapterconfiguration -Filter IPEnabled=TRUE | ft DNSHostname, IPAddress, MACAddress

DNSHostname          IPAddress                                 MACaddress
[REDACTED]018-B21   {[REDACTED], fe80::[REDACTED]}      02:49:[REDACTED]
OS Version and Installation Details
The following command will give us the computer name, OS version, Build Number, Install Date, Last Boot time, and Architecture information.
           C:\Users\Administrator\Desktop\tools\shells> Get-CimInstance -ClassName Win32_OperatingSystem | fl CSName, Version, BuildNumber, InstallDate, LastBootUpTime, OSArchitecture
CSName         : [REDACTED]
Version        : [REDACTED]
BuildNumber    : [REDACTED]
InstallDate    : XX/XX/20XX 2:59:06 PM
LastBootUpTime : [REDACTED]
OSArchitecture : 64-bit
Leveraging our knowledge of organizational policies, we can infer if any of the details we find here are anomalous. For example, if the orgainsation has a policy of N-1 update patches installed on all systems, and we find an older update version on this system, that can be worth looking into. However, that might be due to a misconfiguration more than an adversary's activity.
As we can notice, we are using queries based on Get-CimInstance and then filtering the output for our required information. To learn more about Get-CimInstance, we can visit the Microsoft Learn page (opens in new tab) about it.
Date and TimeZone Info
It is important for an analyst to note down the current date and the timezone of the system. This will come in handy in the subsequent steps of the investigation as we will need to refer to the current time and the timezone to identify the context of different activities. We can use the following commands to get this information.
           PS C:\Users\Administrator\Desktop\tools\shells> Get-Date ; Get-TimeZone

Monday, June 2, 2025 7:58:26 AM

Id                         : [REDACTED]
DisplayName                : [REDACTED]
StandardName               : [REDACTED]
DaylightName               : [REDACTED]
BaseUtcOffset              : [REDACTED]
As mentioned earlier, it is important to note down the current time and timezone information. Furthermore, we might be able to find out if there is an anomaly in this information by matching it with organizational baselines, such as the time at the organization wide NTP server, or the timezone in the rest of the machines in the same location.
Reviewing Policies
Policies on any system are especially important when performing analysis. Adversaries can often modify policies for achieving their objectives (ATT&CK ID: T1484.001). Therefore, it is prudent to look into policies to identify any anomalies there might be.
The following command can be used to create an HTML report for system policies. Please note that the below command will fail if you did not replace the infected profile with the DFIR profile in the previous task.
           PS C:\Users\Administrator\Desktop\tools\shells> Get-GPResultantSetOfPolicy -ReportType HTML -Path (Join-Path -Path (Get-Location).Path -ChildPath "RSOPReport.html")

RsopMode        : Logging
Namespace       : [REDACTED]
LoggingComputer : [REDACTED]
LoggingUser     : [REDACTED]
LoggingMode     : UserAndComputer
The command creates an HTML file in our current working directory. We can open this file using a browser. We will see a retro-looking interface with some important information about system policies as shown below.
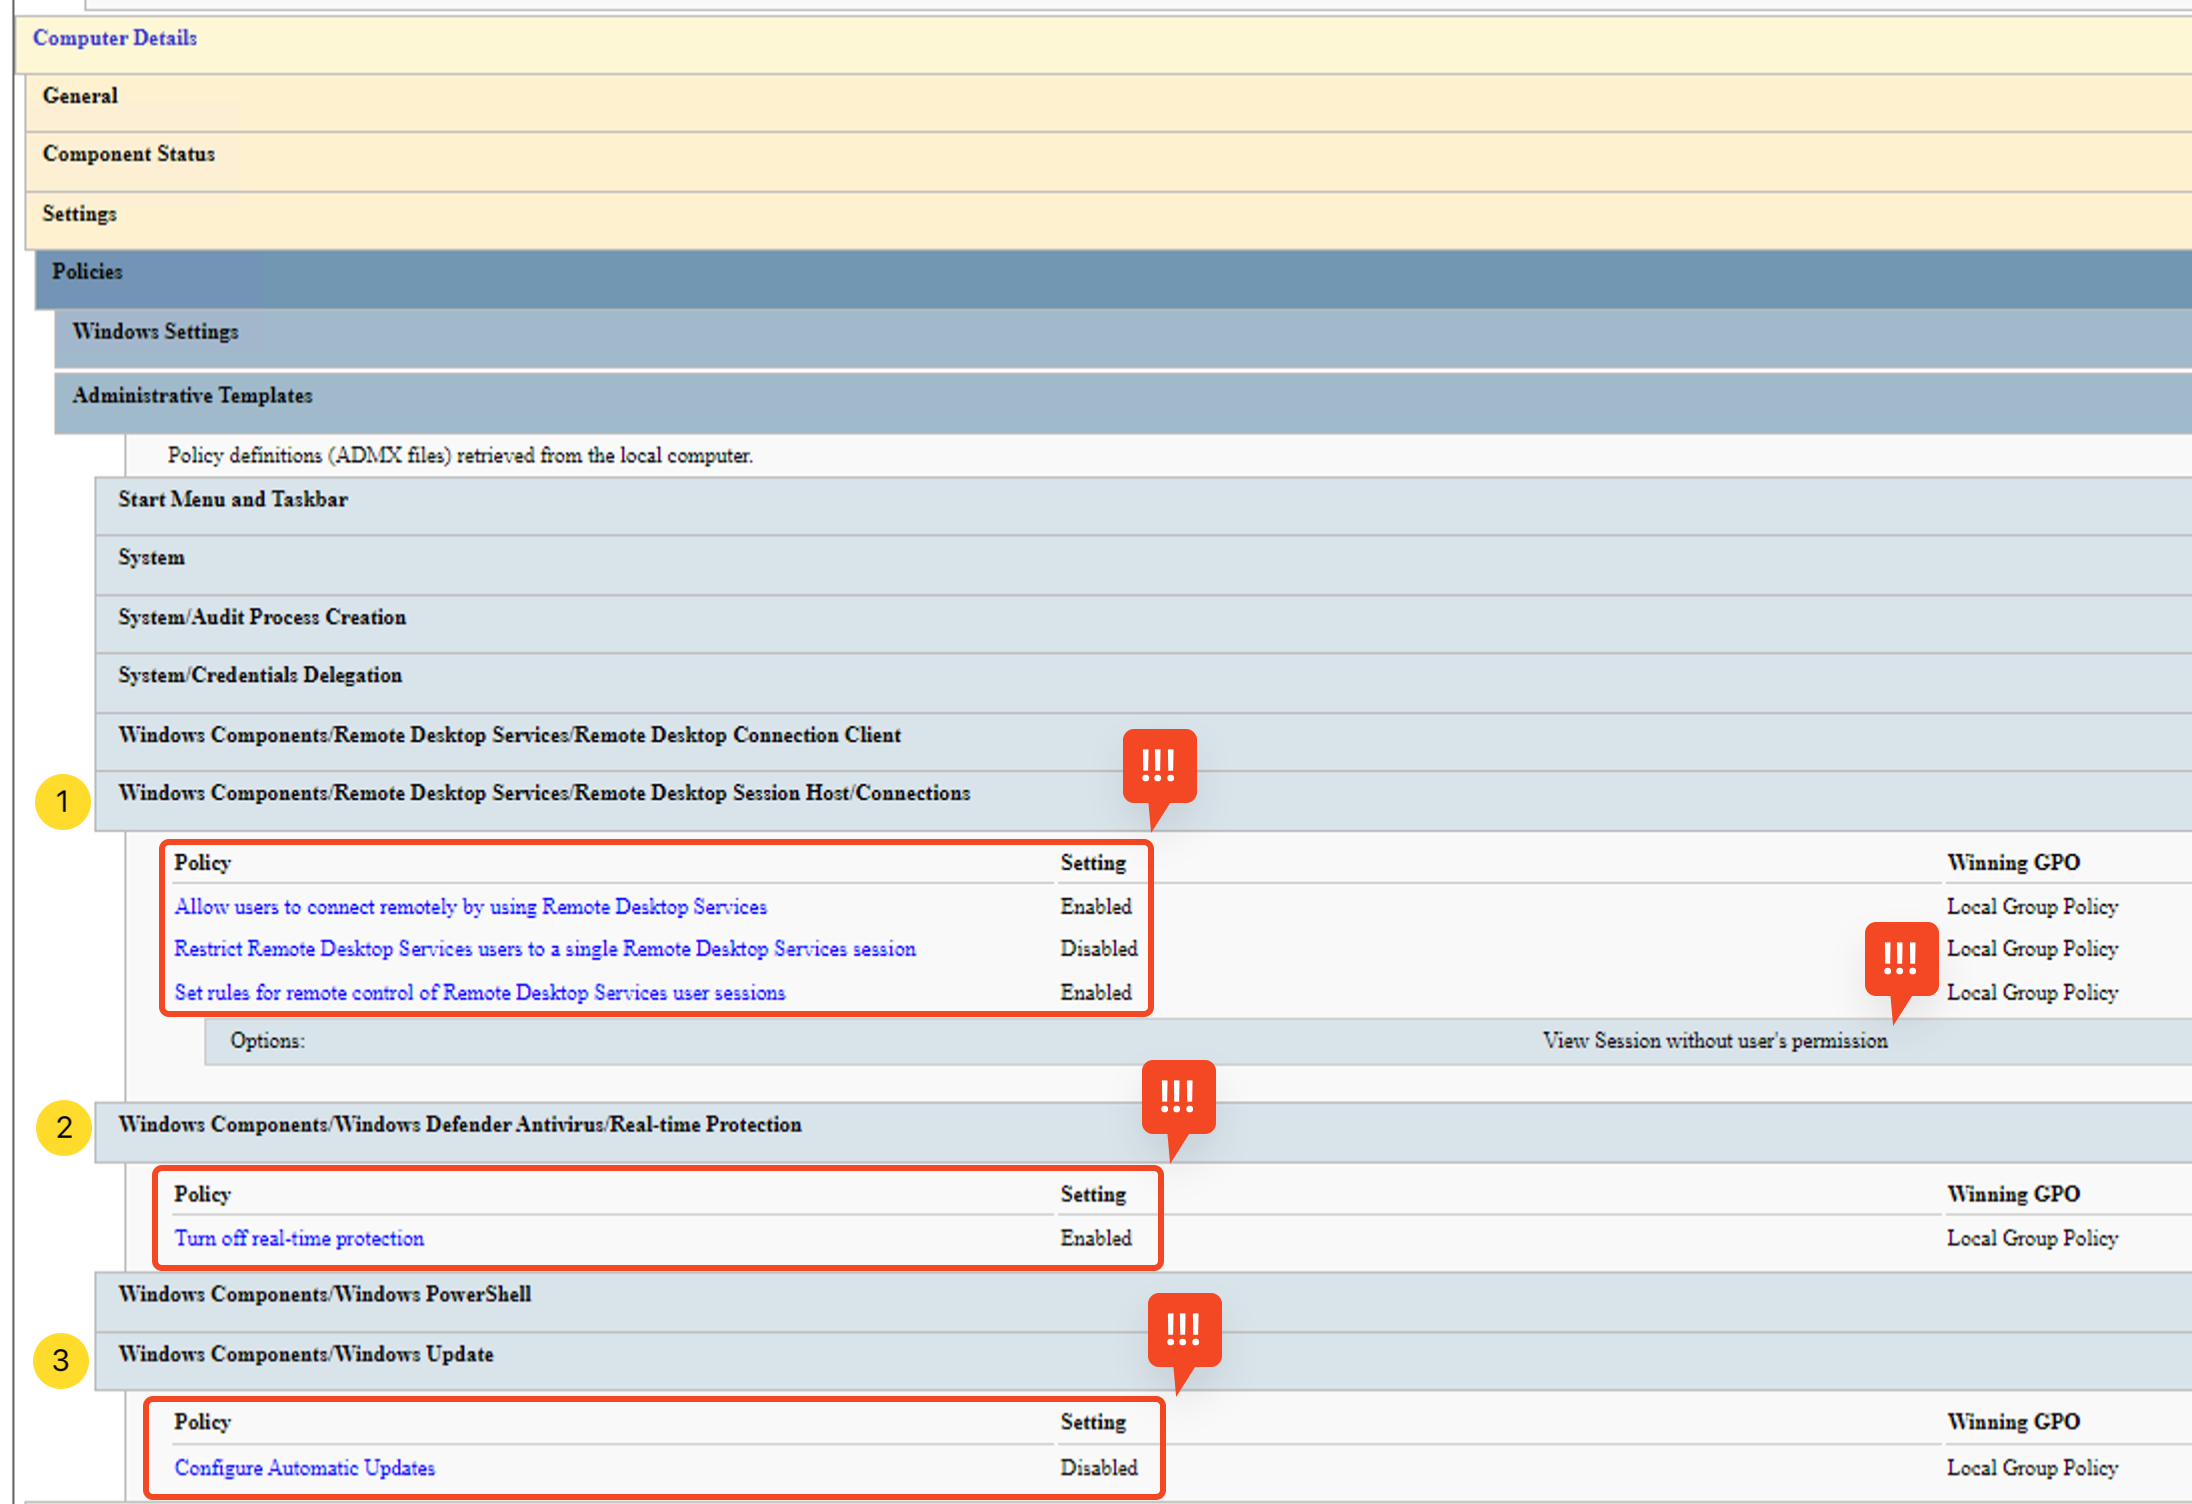
The report is long and can take some time to review completely. We might have to expand some tabs to unveil more information. As we can see, there are several policies here that might be a cause of concern, such as the ones highlighted in the screenshot above. Can you find any other suspicious policies on the system?
What is the OS version of the compromised host?
What is the Time ID of the compromised host?
Users
Adversaries can create new accounts (ATT&CK ID: T1136) or manipulate the existing ccounts (ATT&CK : T1098 and T1078) to maintain or elevate their access in the victim system. Therefore analyzing the user accounts and the current sessions of these accounts are a crucial part of any investigation.
We can see the available local users in the system by using the command shown in the terminal below.
PS C:\Users\Administrator\Desktop\tools\shells> Get-LocalUser | tee l-users.txt

Name               Enabled Description
ADMIN[REDACTED]    True    Trusted admin account of LMV Co. for administering the *-SRV and CCTL-* zones.
Admin[REDACTED]    True    Built-in account for administering the computer
Admin[REDACTED]    True    Built-in account for administering the computer
DefaultAccount     False   A user account managed by the system.
Guest              True    Built-in account for guest access to the computer
WDAGUtilityAccount False   A user account managed and used by the system for Windows Defender Application Guard scenarios.

PS C:\Users\Administrator\Desktop\tools\shells> Get-CimInstance -Class Win32_UserAccount -Filter "LocalAccount=True" | Format-Table  Name, PasswordRequired, PasswordExpires, PasswordChangeable | Tee-Object "user-details.txt"

Name               PasswordRequired PasswordExpires PasswordChangeable
ADMIN[REDACTED]                True           False              False
Admin[REDACTED]                True           False               True
Admin[REDACTED]                True           False               True
DefaultAccount                False           False               True
Guest                         False           False              False
WDAGUtilityAccount             True            True               True
In the output of the above command, you can see that there are three user accounts that look like Admin accounts from their names. Only one of these admin accounts through which we are logged in is a legitimate one. If we look closely at these accounts, one of them is also incorrectly spelled. Besides these three accounts, we can also see an account named Guest with no password required.
Now, let's explore the local group memberships to see which user account groups they belong.
PS C:\Users\Administrator\Desktop\tools\shells> Get-LocalGroup | ForEach-Object { $members = Get-LocalGroupMember -Group $_.Name; if ($members) { Write-Output "`nGroup: $($_.Name)"; $members | ForEach-Object { Write-Output "`tMember: $($_.Name)" } } } | tee gp-members.txt

Group: Administrators
        Member: [REDACTED]018-B21\Admin[REDACTED]
        Member: [REDACTED]018-B21\ADMIN[REDACTED]
        Member: [REDACTED]018-B21\Admin[REDACTED]

Group: Backup Operators
        Member: CCTL-WS-018-B21\ADMIN[REDACTED]
        Member: CCTL-WS-018-B21\Admin[REDACTED]
[REDACTED]...
We can see that all 3 of them belong to Administrators group and some of them belong to other groups as well.
Sessions
In a live system, you can also look for the current sessions in the system. These sessions identify who's on the system. If the attacker is active and currently connected to the system, you can identify their session. Let's list the active sessions using the Sysinternals PsLoggedon utility. This utility is located in the following directory of our toolbox.
C:\Users\Administrator\Desktop\tools\utils
PS C:\Users\Administrator\Desktop\tools\utils> .\PsLoggedon64.exe | tee sessions.txt

Users logged on locally:
     [REDACTED]2024 2:04:24 PM       [REDACTED]018-B21\Admin[REDACTED]
     [REDACTED]2024 12:30:06 PM      [REDACTED]018-B21\Guest

No one is logged on via resource shares.
Ah! Two users are currently logged in. The first session is the one we are on, and the second one is associated with the "Guest" account with no password implemented.
In this task, we learned how to identify any unexpected user accounts or sessions in a system. A few things, like three admin accounts, one of which had a typo, and a guest account (with no password implemented) currently logged in, seemed suspicious to us. However, these findings are not enough to jump to any conclusion without correlating with other artefacts and knowing the system’s baseline configuration.
What is the security identifier (SID) of the Guest account?
When was the last time the Admin account (the one with the deliberate typo) was logged in?
Answer format: MM/DD/YY HH:MM:SS XM
Active Ports and Connections
Adversaries can move laterally across the network (ATT&CK ID: TA008) and can maintain a connection with the victim (ATT&CK ID: TA0011) to achieve their objectives. Therefore, analyzing active ports and connections of a system is crucial.
Let's quickly review the active ports and connections for in the following snippet:
PS C:\Users\Administrator\Desktop\tools\utils> Get-NetTCPConnection | select Local*, Remote*, State, OwningProcess,` @{n="ProcName";e={(Get-Process -Id $_.OwningProcess).ProcessName}},` @{n="ProcPath";e={(Get-Process -Id $_.OwningProcess).Path}} | sort State | ft -Auto | tee tcp-conn.txt

LocalAddress LocalPort RemoteAddress RemotePort  State OwningProcess ProcName  ProcPath
0.0.0.0          49689 0.0.0.0                0  Listen           632 lsass    C:\Windows\system32\lsass.exe
0.0.0.0          49670 0.0.0.0                0  Listen          1704 svchost  C:\Windows\system32\svchost.exe
[REDACTED]
There are quite a lot of interesting things to observe in the connections here. There is an active connection on the local port 3389, which is associated with an RDP connection. It's the one that we are on port 3389 -RDP/VNC-so let's ignore it. There are multiple connections withssh.exe, which could indicate an anomaly. There are also some connection attempts and open ports linked with AnyDesk. Malicious actors often use this application to access the system remotely, but it can also be legitimately used. Additionally, a connection attempt originates from a process launched from a temporary path [REDACTED]\\AppData\\[REDACTED].
Note:You may need to re-run the TCP connections command multiple times to validate all the findings above.
Network Shares
Network shares, as the name suggests, are the folders or drives shared across the network. Misconfigurations in the network shares can lead to data exposure, they can also be used to spread malicious stagers through a network. For instance, if a user account with higher privileges gets compromised, an attacker may be able to upload and execute arbitrary files on the remote hosts through shared folders. These are also being explained in the following MITRE techniques: Data from Network Shared Drive (ATT&CK ID: T1039), Lateral Tool Transfer (ATT&CK ID: T1570) ,Remote Services (ATT&CK ID: T1021), and Taint Shared Content (ATT&CK ID: T1080).
Let's list the network shares using the given snippet.
PS C:\Users\Administrator\Desktop\tools\utils> Get-CimInstance -Class Win32_Share | tee net-shares.txt

Name   Path       Description
ADMIN$ C:\Windows Remote Admin
C$     C:\        Default share
IPC$              Remote IPC
[REDACTED]
Look at the output of the above snippet. These are default hidden shares, so nothing seems suspicious here. But during some investigations, you may find some juicy artefacts from here.
Firewall (Network)
The firewall is another gold mine of information that is tedious to evaluate manually but provides pinpoint results. Identifying rules that enable generic ports used in security assessment and by some threat profiles, such as 4444, is relatively easy. However, identifying advisedly altered or crafted rules requires strong collaboration with the system administrator, a grasp of the environment profile, and a strong knowledge of adversarial TTPs. First, let's identify the status of the available firewall profiles.
PS C:\Users\Administrator\Desktop\tools\utils> Get-NetFirewallProfile | ft Name, Enabled, DefaultInboundAction, DefaultOutboundAction | tee fw-profiles.txt

Name    Enabled DefaultInboundAction DefaultOutboundAction
Domain    False        NotConfigured         NotConfigured
Private   False        NotConfigured         NotConfigured
Public    False        NotConfigured         NotConfigured
None of the profiles are enabled, so the configuration is probably not promising. This can be suspicious if it is not a recognized configuration. However, during some legitimate uses, like using alternative security layers, this is a normal configuration.
Let's run the fw-summary.ps1script available in theC:\Users\Administrator\Desktop\tools\utilsdirectory to list all the active firewall rules to see if we can find something juicy there:
PS C:\Users\Administrator\Desktop\tools\utils> .\fw-summary.ps1 | tee fw-rules.txt

DisplayName             Protocol LocalPort RemotePort RemoteAddress Direction Action Program
AllJoyn Router (TCP-In) TCP      9955      Any        Any             Inbound  Allow %SystemRoot%\system32\svchost.exe
AllJoyn Router (TCP-... TCP      Any       Any        Any            Outbound  Allow %SystemRoot%\system32\svchost.exe
AllJoyn Router (UDP-In) UDP      Any       Any        Any             Inbound  Allow %SystemRoot%\system32\svchost.exe
[REDACTED]
The script can be slower while giving the results. You can expect this processing time to increase when summarising a more extensive set of rules. Let's take a look at the outcomes as they come.
The results show that the AnyDesk application we also saw in the active connections list has two path rules pointing to separate drives.
In this task, we saw how important it is to view the active network connections, network shares, and configuration. The results we got may or may not point to an ongoing incident. All of the findings that seemed suspicious to us may or may not be legitimate. During any incident, these artefacts should be taken into account, along with verifying the baseline configurations and correlating with other artefacts for validation.
What is the directory path where the malicious process is located?
What is the remote port used by the malicious process?
What is the full path of the suspicious program for AnyDesk? Enter your answer in a defanged format.
What port is used by the LMV Co. firewall rules?
Boot-Time Execution Entries
The Windows startup is a traditional location for implementing execution (ATT&CK ID: TA002) and (ATT&CK ID: TA003) tactics. Attackers use the scheduled tasks after compromising the systems to maintain the backdoors, implants, malicious tasks, and services. Let's use Sysinternals Autorunsctool to list down all the entries along with their hash values, which are implemented on boot-time startup of all the users:
PS C:\Users\Administrator\Desktop\tools\utils>  .\autorunsc64.exe -a b * -h | tee boot.txt

HKLM\System\CurrentControlSet\Control\Session Manager\BootExecute
   autocheck autochk
     autocheck autochk
     Auto Check Utility
     Microsoft Corporation
     10.0.17763.1697
     c:\windows\system32\autochk.exe
     8/30/1918 4:18 PM [REDACTED]
The above output shows that autochk.exeis implemented on the boot-time startup. It is a legitimate Windows utility which performs a disk check. Its legitimacy can also be verified from the hash.
Startup Programs and Commands
Now, let's list the programs and commands executed in the startup sequence through the command given in the snippet below:
PS C:\Users\Administrator\Desktop\tools\utils> Get-CimInstance Win32_StartupCommand | Select-Object Name, command, Location, User | fl | tee autorun-cmds.txt

Name     : RunWallpaperSetup
command  : RunWallpaperSetup.cmd
Location : Startup
User     : [REDACTED]

Name     : AnyDesk
command  : C:\PROGRA~2\AnyDesk\AnyDesk.exe  --control
Location : Common Startup
User     : [REDACTED]

Name     : SecurityHealth
command  : %windir%\system32\SecurityHealthSystray.exe
Location : HKLM\SOFTWARE\Microsoft\Windows\CurrentVersion\Run
User     : [REDACTED]
We can see that three entries were assigned to different user profiles. Even if the list entries look standard and brief, we need to consider the additional user profile spaces and note down the entries linked with unexpected user profiles.
Logon-Time Execution Entries
Just as the boot-time autostart programs can be used for system-level persistence, there are user logon autostart programs meant for user-level persistence. These programs run every time the user logs in, unlike the boot-time autostart programs that run every time the system boots. Let's extract them through the same command we used previously by just replacing the bwith anl.
PS C:\Users\Administrator\Desktop\tools\utils>  .\autorunsc64.exe -a l * -h | tee logon.txt

HKLM\System\CurrentControlSet\Control\Terminal Server\Wds\rdpwd\StartupPrograms
   rdpclip
     rdpclip
     RDP Clipboard Monitor
     Microsoft Corporation[REDACTED]
Look at the output; we have started to get more detailed results than in the previous steps, so we have a better chance of spotting anomalies. Almost all entries seem expected and legitimate, except the second one: HKLM\SOFTWARE\Microsoft\Windows NT\CurrentVersion\Winlogon\Userinit. Let's skim through the findings and elaborate on why the second entry has attracted our attention.
This registry value's functionality is to execute the required programs when a user logs on. By default, and in most cases, it's supposed to execute only the userinit.exe, which is responsible for initializing the user session during the OS boot-logon sequence. But we also have a cmd executable,cmd.exe, here. There can be a legitimate reason behind this implementation, or it may also be malicious if we dig into its details.
Registry
The Windows Registry is a goldmine of information, providing insights into system details such as configuration and custom preferences. Almost all system-wide changes implemented by system administrators or adversaries can be identified and verified through registry hive keys and values. However, the registry contains many things. It's important to limit your investigation to the relevant keys. For example, we marked the cmd executable suspicious in the previous logon autostart checks. So, let's examine the two essential registry paths associated with the logon setting and user initialization phases.
HKLM\SOFTWARE\Microsoft\Windows NT\CurrentVersion\Winlogon\UserinitHKLM\SOFTWARE\Microsoft\Windows NT\CurrentVersion\Winlogon\Shell
PS C:\Users\Administrator\Desktop\tools\utils> $winlogonPath = "HKLM:\SOFTWARE\Microsoft\Windows NT\CurrentVersion\Winlogon"; "Userinit: $((Get-ItemProperty -Path $winlogonPath -Name 'Userinit').Userinit)"; "Shell: $((Get-ItemProperty -Path $winlogonPath -Name 'Shell').Shell)"

Userinit: C:\Windows\system32\userinit.exe, cmd.exe [REDACTED]
Shell: explorer.exe
Looking at the output, we can see that the userinit key contains two values. The suspicious CMD executable starts the NetShell executable silently, which seems anomalous! This means that we should maybe explore HKLM\SOFTWARE\Microsoft\NetShkey as well.
These results are very interesting. Some privilege escalation and persistence techniques rely on a netshell executable to trigger arbitrary code executions through helper DLLs (ATT&CK ID: 1546). That's why we take it into account so much. Let’s explore this key through the command given below:
PS C:\Users\Administrator\Desktop\tools\utils> Get-ItemProperty -Path "HKLM:\SOFTWARE\Microsoft\NetSh" | tee netsh-records.txt

2            : ifmon.dll
4            : rasmontr.dll
authfwcfg    : authfwcfg.dll
dhcpclient   : dhcpcmonitor.dll
dot3cfg      : dot3cfg.dll
fwcfg        : fwcfg.dll
hnetmon      : hnetmon.dll
netiohlp     : netiohlp.dll
nettrace     : nettrace.dll
nshhttp      : nshhttp.dll[REDACTED]
If we look at these results, there is a suspicious entry named ****shield. According to our knowledge, it's not a part of the default OS configuration. If you compare this entry with the rest, you'll see it's the only one with a different pattern. The potential reason is loading this DLL using the netshell executable from a temporary location. Probably, the adversary implemented this remotely through the command line; that's why the.\pattern is recorded here. Note that identifying this without any related pattern can be a rabbit hole, as we'd need to have a firm knowledge of the default and native functionality of the internals.
So, in this task, we saw how the startup items and the registry can help you identify crucial things during an investigation. We saw that in the attached machine, the Userinit, which executes on logon, was modified to run a command throughcmd.exe. The command launches netsh.exe, a legitimate Windows utility, but when we dug into thenetsh.exekey, we found a suspicious . This is a perfect example of how you follow the traces of an attack and get more evidence. This is why correlation is very important during any incident investigation.
What is the value data stored in the "Userinit" key? Enter your answer in a defanged format.
What is the name of the suspicious DLL linked under the netshell hive key?
Services and scheduled tasks both function in a system’s background. Attackers often use both for and execution. Due to the nature of the Windows boot-logon-startup process cycle, services start before the scheduled tasks. Therefore, let's start by analyzing the services and then the scheduled tasks.
Services
Services are long-running applications and typically independent of user interaction. These are loaded during the boot process. This makes them a great spot to implement impactful TTPs. Service name, display name, state, start mode, and path are the essential details to look for while analyzing the service.
Let’s first list down the running services of the machine through the command given in the snippet below:
PS C:\Users\Administrator\Desktop\tools\utils> "Running Services:"; Get-CimInstance -ClassName Win32_Service | Where-Object { $_.State -eq "Running" } | Select-Object Name, DisplayName, State, StartMode, PathName, ProcessId | ft -AutoSize | tee services-active.txt

Running Services:

Name    DisplayName     State   StartMode PathName                                        ProcessId

AnyDesk AnyDesk Service Running Auto      "C:\Program Files (x86)\AnyDesk\AnyDesk.exe"    [REDACTED]
Appinfo Application Inf Running Manual    C:\Windows\system32\svchost.exe -k netsvcs -p   [REDACTED]
[REDACTED]
Let's look at the running services we got through the above command. To identify any anomaly, we should analyze the name, description, and the executable paths fields and ensure they are aligned with the approved baselines. Do you see a service named LMVCSS? Now, look at the executable path with this service. It has a suspicious executable located in a temporary directory path. If you remember, we also saw a network connection associated with this executable in the previous tasks.
This is just an example of how attackers can use running services to have persistence inside the system. If, during any investigation, you find a suspicious service, you can also dig into its associated file details by extracting its hash, creation, and execution timeframes. You can also dive into the details of the process associated with the service through the process ID linked with the service.
Let’s now list down the non-running/idle services of the machine through the command given in the snippet below:
PS C:\Users\Administrator\Desktop\tools\utils> "Non-Running Services:"; Get-CimInstance -ClassName Win32_Service | Where-Object { $_.State -ne "Running" } | Select-Object @{Name='Name'; Expression={if ($_.Name.Length -gt 22) { "$($_.Name.Substring(0,19))..." } else { $_.Name }}}, @{Name='DisplayName'; Expression={if ($_.DisplayName.Length -gt 45) { "$($_.DisplayName.Substring(0,42))..." } else { $_.DisplayName }}}, State, StartMode, PathName, ProcessId | Format-Table -AutoSize | Tee-Object services-idle.txt
Non-Running Services:

Name         DisplayName            State   StartMode PathName
AppMgmt      Application Management Stopped Manual    C:\Windows\system32\svchost.exe -k netsvcs -p
AppReadiness App Readiness          Stopped Manual    C:\Windows\System32\svchost.exe -k AppReadiness -p
[REDACTED]
Let's take a look at these findings. We can see that there is an aurora-agent service. Let's look at it closer; it seems like a part of the endpoint security implementations, and the start mode is set to auto. However, it's not running; we could have spotted an implementation of impairing defences (ATT&CK ID: T1562), or it could be just an agent failure case. If you dig down into the details of the executable attached to this aurora-agent service, you’ll come to know that it is not a legitimate aurora-agent file.
So, we saw that idle services can also reveal attack traces during investigations. It's all about understanding the relevance of the suspicious artefacts we find in the attack we are investigating.
Scheduled Tasks and Scheduled Jobs
Scheduled tasks are created to automate executing programs, commands, or scripts at any pre-defined time or when a specific action is triggered. They are usually executed after the system is initialized.
Let’s list all the available scheduled tasks using the command given in the snippet below:
PS C:\Users\Administrator\Desktop\tools\utils> $tasks = Get-CimInstance -Namespace "Root/Microsoft/Windows/TaskScheduler" -ClassName MSFT_ScheduledTask; if ($tasks.Count -eq 0) { Write-Host "No scheduled tasks found."; exit } else { Write-Host "$($tasks.Count) scheduled tasks found." }; $results = @(); foreach ($task in $tasks) { foreach ($action in $task.Actions) { if ($action.PSObject.TypeNames[0] -eq 'Microsoft.Management.Infrastructure.CimInstance#Root/Microsoft/Windows/TaskScheduler/MSFT_TaskExecAction') { $results += [PSCustomObject]@{ TaskPath = $task.TaskPath.Substring(0, [Math]::Min(50, $task.TaskPath.Length)); TaskName = $task.TaskName.Substring(0, [Math]::Min(50, $task.TaskName.Length)); State = $task.State; Author = $task.Principal.UserId; Execute = $action.Execute } } } }; if ($results.Count -eq 0) { Write-Host "No tasks with 'MSFT_TaskExecAction' actions found." } else { $results | Format-Table -AutoSize | tee scheduled-tasks.txt }
141 scheduled tasks found.

TPath TaskName                      State Author   Execute

\     aurora-agent-program-update   Ready  SYSTEM  C:\Program Files\Aurora-Agent\aurora-agent-util.exe
\     aurora-agent-signature-update Running SYSTEM C:\Program Files\Aurora-Agent\aurora-agent-util.exe
[REDACTED]
Let's look at the findings. For now, we will only glance at the active tasks. Active tasks are the ones with the state "Running" or “4” (if it's displayed in numeric values). Two running jobs are linked with the Aurora agent. Look at the path details of the executed file. It's the one that we also discovered during the examination of services. We can also investigate it further.
So, if we start mind mapping findings during an investigation, it can help us establish the whole chain of the attack.
What is the name of the suspicious active service?
What is the name of the non-running service that caught our attention?
What is the SHA256 value of the non-running service executable?
What is the original filename of the non-running service executable? Enter your answer in a defanged format.
Processes
Processes are a crucial part of the live investigation as they are dynamic and can contain obvious signs of anomalies. Attackers use process injection (ATT&CK ID: T1055) and breaking process trees (ATT&CK ID: T1036.009), which can be identified through a detailed analysis of the processes. However, some general-level analysis, like identifying unusual names and paths, parent-child process relationships, and commands of the processes, can also reveal fruitful information about an ongoing malicious activity.
Let’s list down the current running processes through the command given in the snippet below to do some general-level analysis:
PS C:\Users\Administrator\Desktop\tools\utils> Get-WmiObject -Class Win32_Process | ForEach-Object {$owner = $_.GetOwner(); [PSCustomObject]@{Name=$_.Name; PID=$_.ProcessId; P_PID=$_.ParentProcessId; User="$($owner.User)"; CommandLine=if ($_.CommandLine.Length -le 60) { $_.CommandLine } else { $_.CommandLine.Substring(0, 60) + "..." }; Path=$_.Path}} | ft -AutoSize | tee process-summary.txt

Name                   PID P_PID User   CommandLine   Path
System Idle Process      0     0
System                   4     0
Registry                84     4 SYSTEM
smss.exe               280     4 SYSTEM
csrss.exe              392   384 SYSTEM
wininit.exe            468   384 SYSTEM
csrss.exe              476   460 SYSTEM
winlogon.exe           532   460 SYSTEM winlogon.exe  C:\Windows\system32\winlogon.exe
[REDACTED]
Let’s analyze the output. Do you remember the network connections with ssh.exeandINITIAL.LANTERN.exethat we got inTask #5? We have some juicy results associated with those files here. The process IDs and the parent process IDs relationship show that the ssh instance's parent is the suspiciousaurora-agentinstance, which we also found while analyzing the services. However, some of the instances are also independent. In addition, we also see the executableINTIAL_LANTERN.exefrom the same temporary path, and it does not seem to be linked to other processes.
Directories
Quick directory checks help identify artefacts left behind by the attacker. These could be dumped data or scripts for persistence or lateral movement purposes. However, investigating directories can be overwhelming and intrusive. Still, quick checks on the paths where suspicious instances are found could be fruitful.
Let’s use the command given in the snippet below to list down the Temp folders for all the user profiles:
PS C:\Users\Administrator\Desktop\tools\utils> Get-ChildItem -Path "C:\Users" -Force | Where-Object { $_.PSIsContainer } | ForEach-Object { Get-ChildItem -Path "$($_.FullName)\AppData\Local\Temp" -Recurse -Force -ErrorAction SilentlyContinue | Select-Object @{Name='User';Expression={$_.FullName.Split('\')[2]}}, FullName, Name, Extension } | ft -AutoSize | tee temp-folders.txt

User          FullName                                                Name           Extension
Administrator C:\Users\Administrator\AppData\Local\Temp\2             2
Administrator C:\Users\Administrator\AppData\Local\Temp\Low           Low
Administrator C:\Users\Administrator\AppData\Local\Temp\WPF           WPF
Default       C:\Users\Default\AppData\Local\Temp\[REDACTED].exe      [REDACTED].exe .exe
Default User  C:\Users\Default User\AppData\Local\Temp\[REDACTED].exe [REDACTED].exe .exe
Guest         C:\Users\Guest\AppData\Local\Temp\1                     1
[REDACTED]
In the results, we can see that the default profile contains an executable in multiple temporary directories. If you calculate the hash and analyze this file’s details, you’ll find out that it's the same as the Aurora-agent executable
As we are analyzing the temporary paths, how can we forget the file INITIAL_LANTERN.exethat was found in the services and processes with the pathC:\Users\Administrator\AppData\SpcTmp\INITIAL_LANTERN.exe? Let's quickly review thisC:\Users\Administrator\AppData\SpcTmp\path to see if there is anything else we can find here:
PS C:\Users\Administrator\Desktop\tools\utils> Get-ChildItem -Path "C:\Users\Administrator\AppData\SpcTmp\" -Recurse -Force | ft FullName, Name, Extension

FullName                                                     Name                   Extension
C:\Users\Administrator\AppData\SpcTmp\INITIAL_LANTERN.exe    INITIAL_LANTERN.exe    .exe
C:\Users\Administrator\AppData\SpcTmp\Invoke-SocksProxy.psm1 Invoke-SocksProxy.psm1 .psm1
Interesting. This path contains two files: the suspicious INITIAL_LANTENR.exeand a PowerShell script Invoke-SocksProxy.psm1. You can dig into the details of this file and continue your investigation if you like.
Before completing this last task, as a part of general analysis, let's also check the disk volumes of this system through the command given in the snippet below:
PS C:\Users\Administrator\Desktop\tools\utils> Get-CimInstance -ClassName Win32_Volume | ft -AutoSize DriveLetter, Label, FileSystem, Capacity, FreeSpace | tee disc-volumes.txt

DriveLetter Label              FileSystem    Capacity   FreeSpace
----------- -----              ----------    --------   ---------
C:                             NTFS       33282846720 13339987968
            [REDACTED]         NTFS        1073737728  1007841280
In the results, we can see a hidden disk volume without a drive letter. This is very suspicious, and it can also be investigated in detail. However, we will wind up our learning of the Windows Incident Surface here.
Which user name is used for the SSH connection attempts?
What is the parent process of the malicious aurora process? Enter your answer in a defanged format.
What is the file name located in the default user's temp directory? Enter your answer in a defanged format.
What is the name of the potential proxy script located in the suspicious non-default temp folder? Enter your answer in a defanged format.
What is the SHA256 value of the potential proxy script located in the suspicious non-default temp folder?
What is the label of the hidden disc volume?
In this room, we learned some major forensic artifacts of Windows and analyzed them in the attached . During the analyses, some artefacts revealed juicy information pointing to a possible attack. We also tried to link up the results found in the different areas. This was just a flavour of how an incident investigation is carried out. It is also important to note that every investigation demands a different procedure. For instance, while following the attack chain and the clues in some investigations, you may only analyze some of these artefacts and don’t touch the others. It all depends on the mind mapping and the correlation you do during an investigation. However, knowing these artefacts will greatly help during your Windows incident investigations.
Ready to learn Cyber Security?
TryHackMe provides free online cyber security training to secure jobs & upskill through a fun, interactive learning environment.
Already have an account? Log in