
Nmap Basic Port Scans
Learn in-depth how nmap TCP connect scan, TCP SYN port scan, and UDP port scan work.
easy

To access material, start machines and answer questions login.
Set up your virtual environment

This room is the second in the series (part of the Introduction to Network Security module).
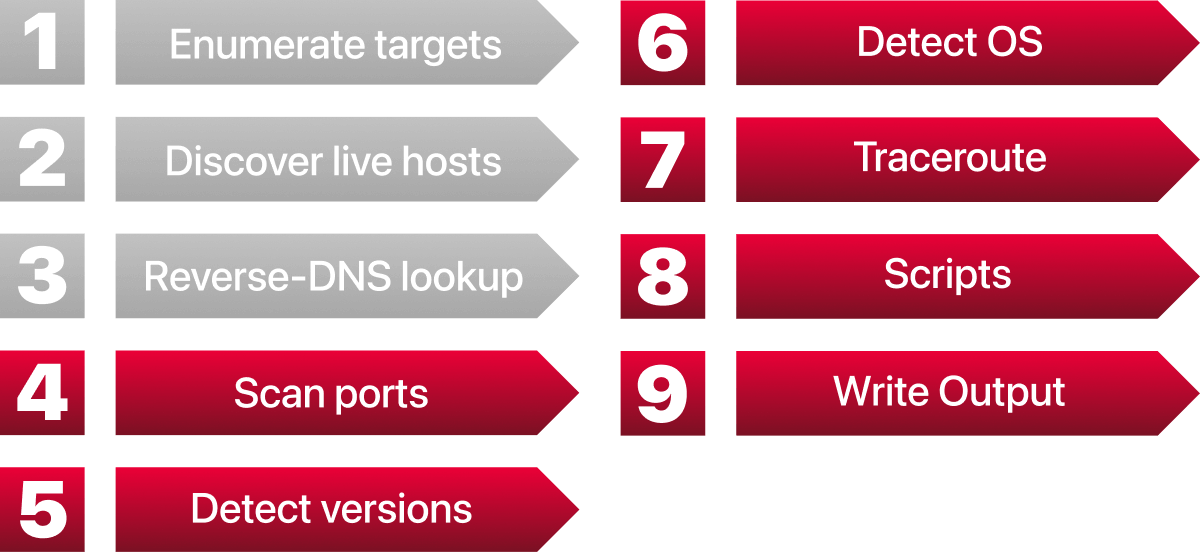
In the previous room, we focused on discovering online systems. So far, we have covered three steps of an scan:
- Enumerate targets
- Discover live hosts
- Reverse- lookup
Learning Objectives
The next step would be to check which ports are open and listening, and which are closed. Therefore, in this room and the next one, we focus on port scanning and the different types of port scans used by nmap. This room explains:
- TCP connect port scan
- TCP SYN port scan
- UDP port scan
Moreover, we discuss the options for specifying ports, the scan rate, and the number of parallel probes.
Prerequisites
Before diving in, make sure you have completed the following rooms, as we will build on the concepts covered there.
Connecting to the Machine
Please click the Start Machine button to boot up the VM and Start AttackBox to start the AB. It will take approximately 1-2 minutes to load and warm up all the services. You will need the in Task 4, so by the time you reach that task, the will be fully ready for use.

I have started the machine.
In the same way that an IP address specifies a host on a network among many others, a or port identifies a network service running on that host. A server provides a network service and adheres to a specific network protocol. Examples include providing time, responding to queries, and serving web pages. A port is usually linked to a service using that specific port number. For instance, an server would bind to port 80 by default; if it supports SSL/, it would also listen on port 443. ( ports 80 and 443 are the default ports for and HTTPS; however, the web server administrator might choose other port numbers if necessary.) Furthermore, no more than one service can listen on any or port (on the same IP address).
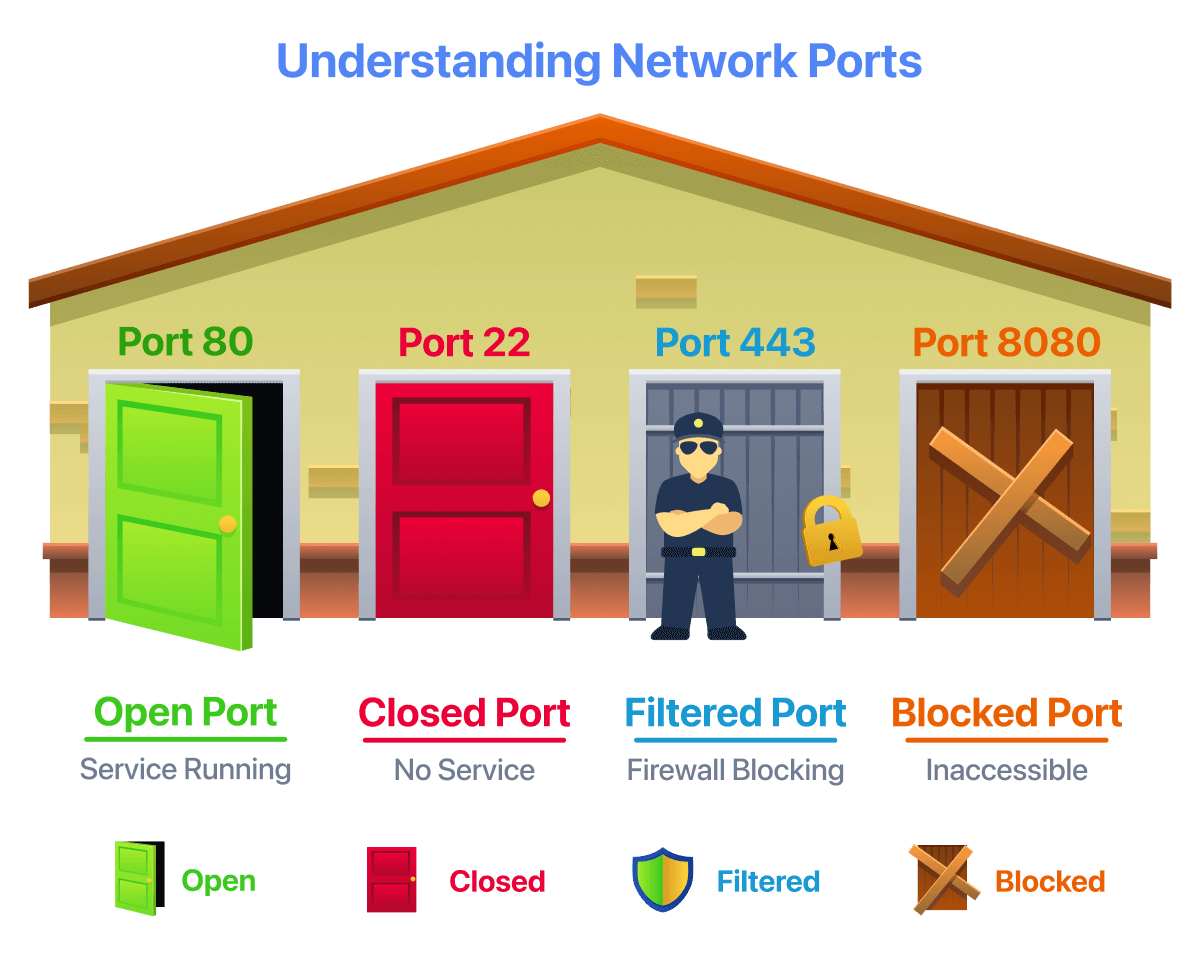
At the risk of oversimplification, we can classify ports into two states:
- An open port indicates that a service is listening on that port.
- A closed port indicates that no service is listening on that port.
However, in practical situations, we need to consider the impact of firewalls. For instance, a port might be open, but a might be blocking the packets. Therefore, considers the following six states:
- An open port indicates that a service is listening on the specified port.
- A closed port indicates that no service is listening on the specified port, although the port is accessible. By accessible, we mean that it is reachable and is not blocked by a or other security appliances/programs.
- Filtered means that cannot determine whether the port is open or closed because it is not accessible. This state is usually due to a preventing from reaching that port. ’s packets may be blocked from reaching the port; alternatively, responses may be blocked from reaching ’s host.
- Unfiltered means that cannot determine whether the port is open or closed, even though the port is accessible. This state is encountered when using an ACK scan
-sA. - Open|Filtered: This means that cannot determine whether the port is open or filtered.
- Closed|Filtered: This means that cannot decide whether a port is closed or filtered.
Which service uses UDP port 53 by default?
Which service uses TCP port 22 by default?
How many port states does Nmap consider?
Which port state is the most interesting to discover as a pentester?
supports different types of port scans. To understand the difference between these port scans, we need to review the header. The header is the first 24 bytes of a segment. The following figure shows the header as defined in 793 (opens in new tab). This figure looks sophisticated at first; however, it is pretty simple to understand. In the first row, we have the source port and the destination port. We can see that the port number is allocated 16 bits (2 bytes). In the second and third rows, we have the sequence number and the acknowledgement number. Each row has 32 bits (4 bytes) allocated, for a total of 6 rows, making 24 bytes.
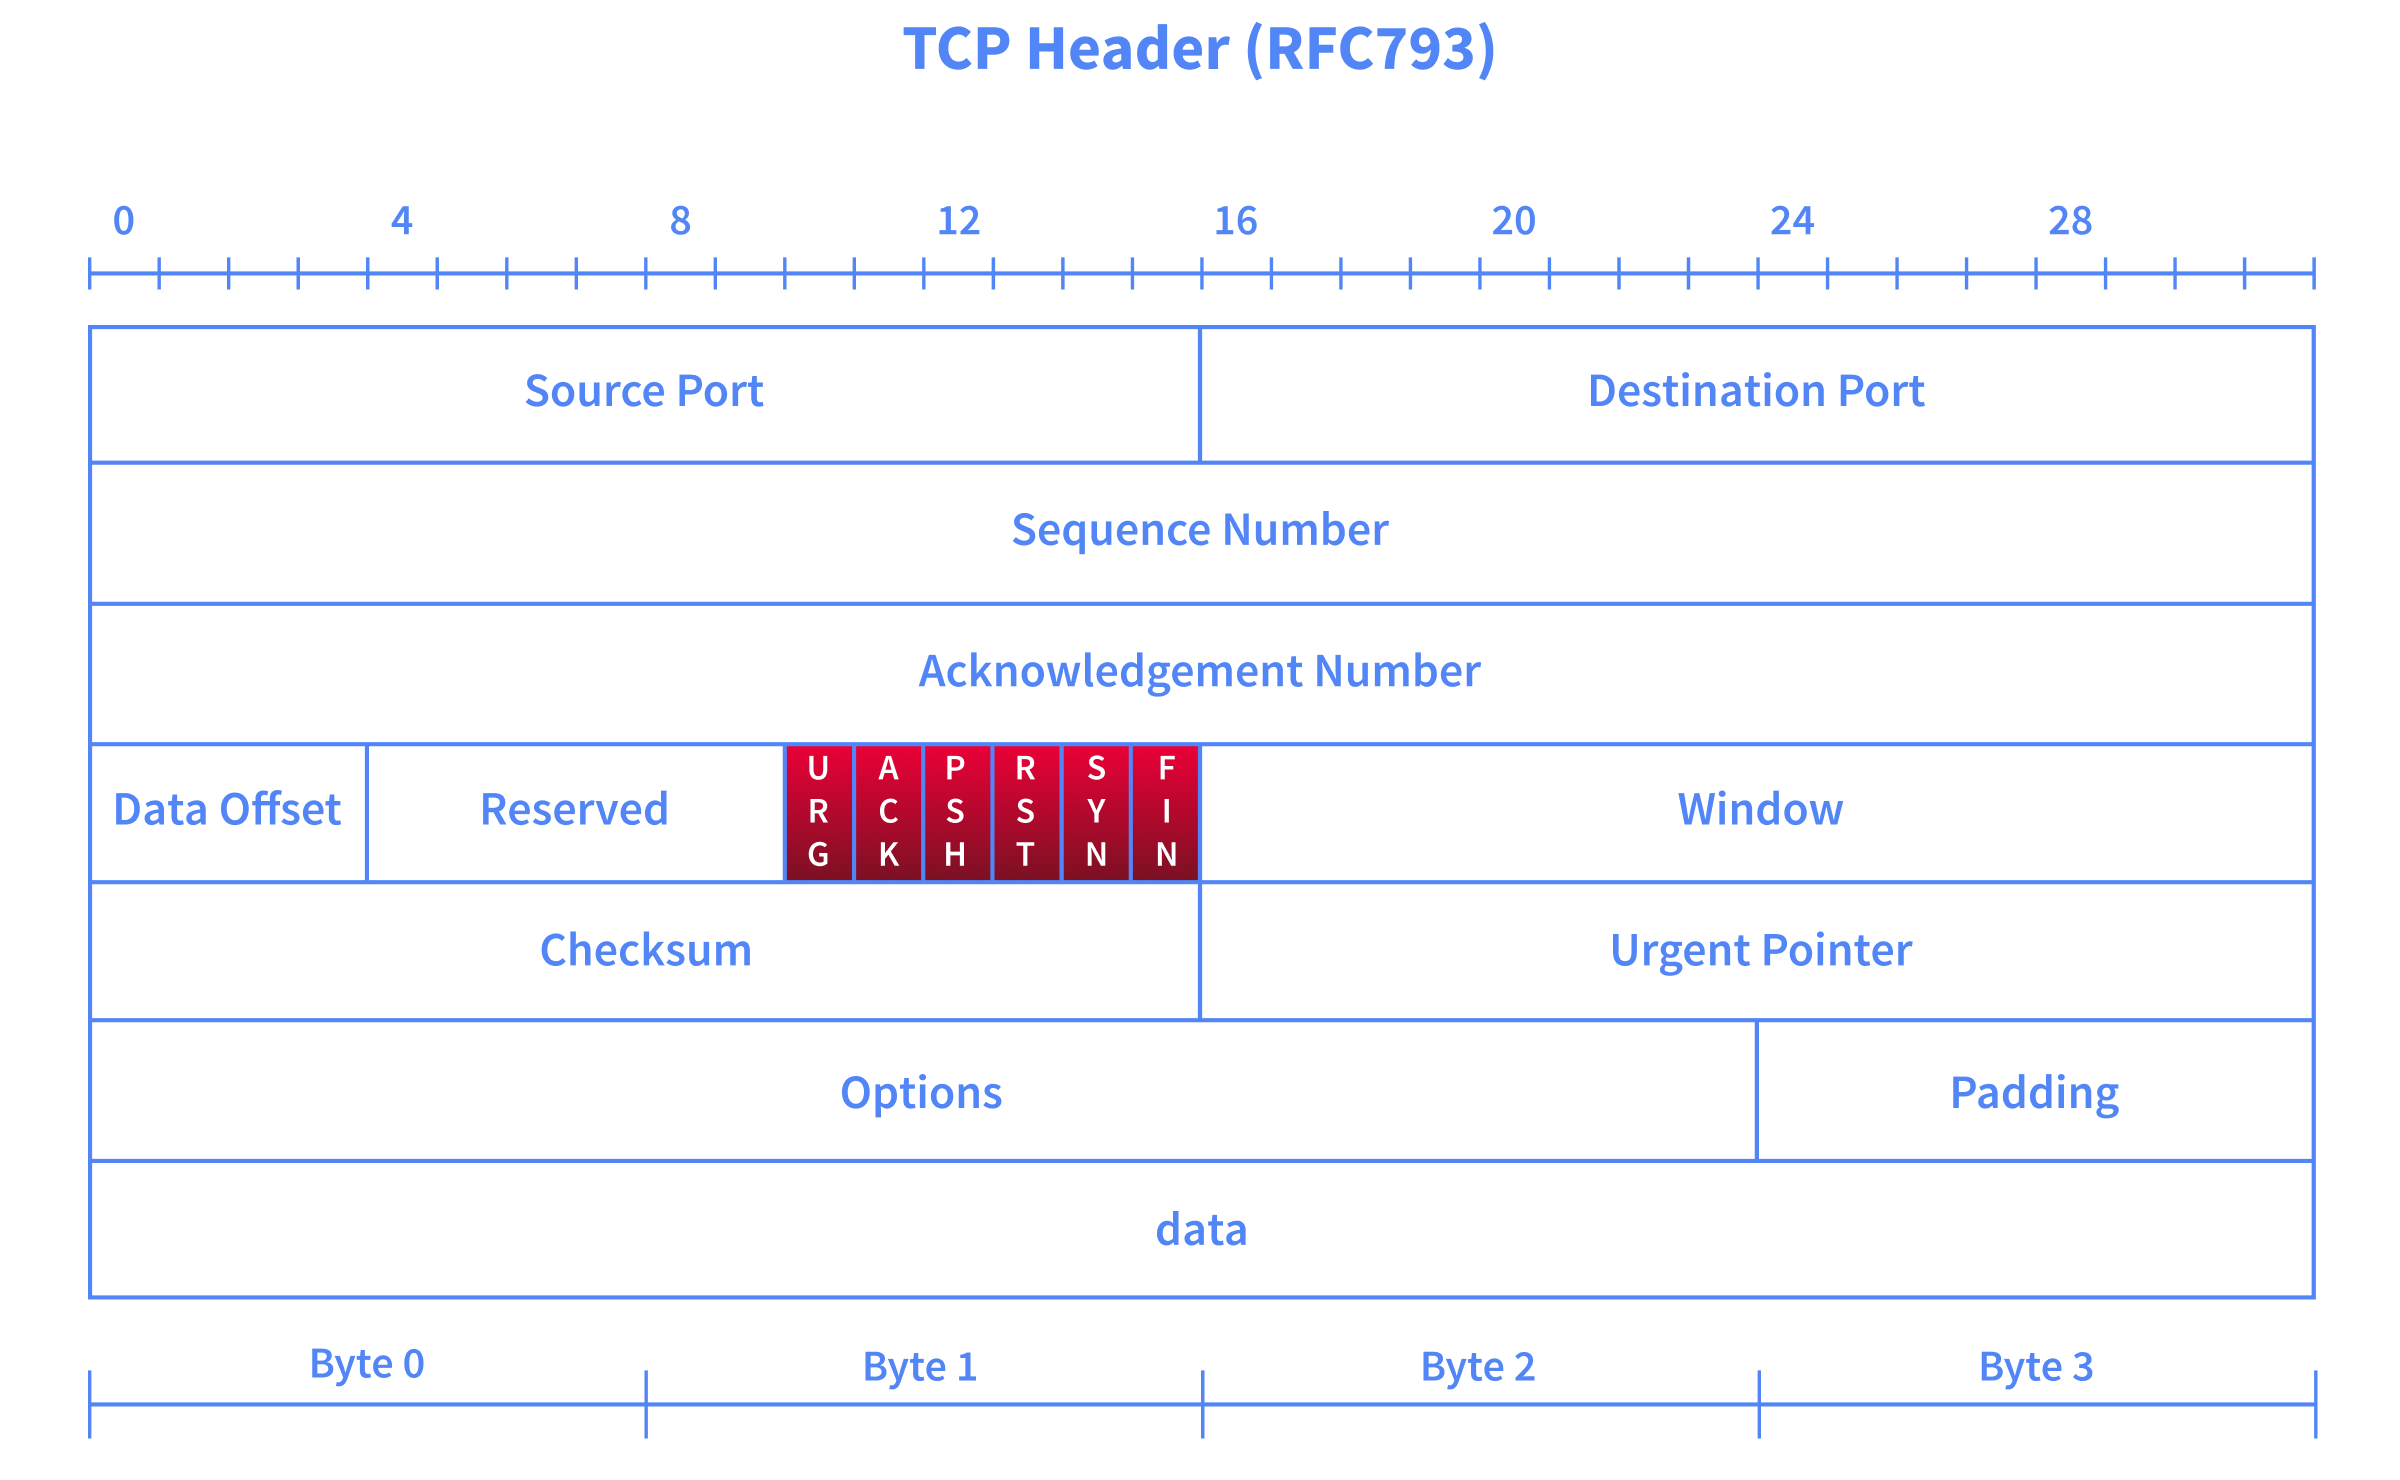
In particular, we need to focus on the flags that can set or unset. We have highlighted the flags in red. Setting a flag bit means setting its value to 1. From left to right, the header flags are:
- URG: Urgent flag indicates that the urgent pointer field is significant. The urgent pointer indicates that the incoming data is urgent, and that a segment with the URG flag set is processed immediately, without waiting for previously sent segments.
- ACK: Acknowledgement flag indicates that the acknowledgement number is significant. It is used to acknowledge the receipt of a segment.
- PSH: Push flag asking to pass the data to the application promptly.
- RST: The reset flag is used to reset the connection. Another device, such as a , might send it to tear a connection. This flag is also used when data is sent to a host, and there is no service on the receiving end to answer.
- SYN: The synchronise flag is used to initiate a 3-way handshake and synchronise sequence numbers with the other host. The sequence number should be set randomly during connection establishment.
- FIN: The sender has no more data to send.
What 3 letters represent the Reset flag?
Which flag needs to be set when you initiate a TCP connection (first packet of TCP 3-way handshake)?
connect scan works by completing the 3-way handshake. In standard connection establishment, the client sends a packet with the SYN flag set, and the server responds with SYN/ACK if the port is open; finally, the client completes the 3-way handshake by sending an ACK.
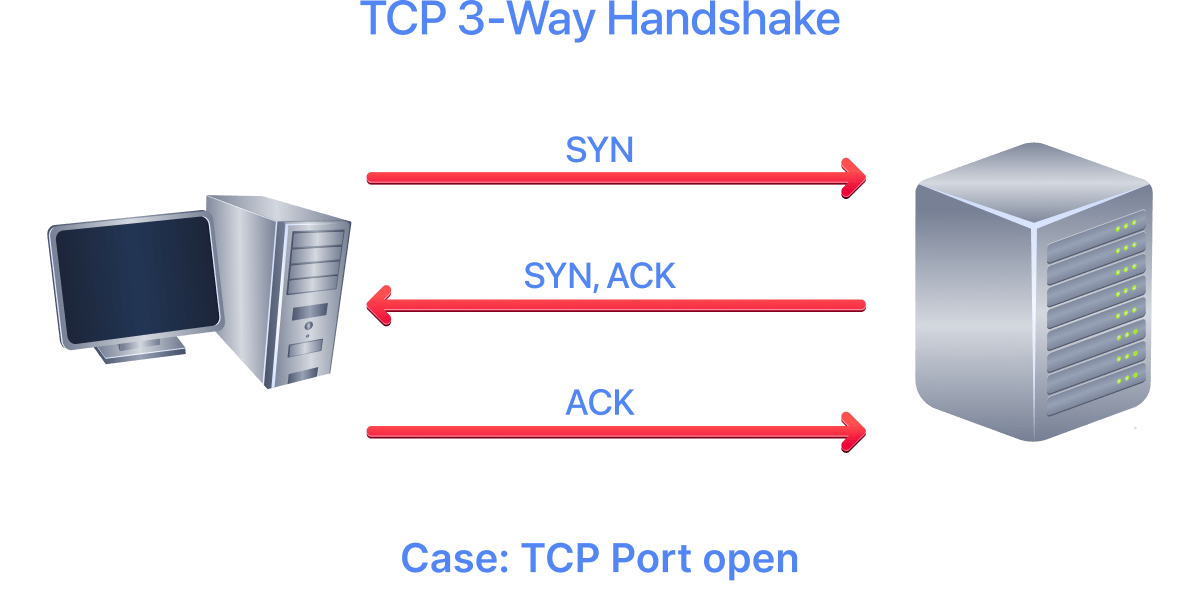
We are interested in learning whether the port is open, not in establishing a connection. Hence, the connection is torn as soon as its state is confirmed by sending a RST/ACK. You can choose to run a connect scan using -sT.
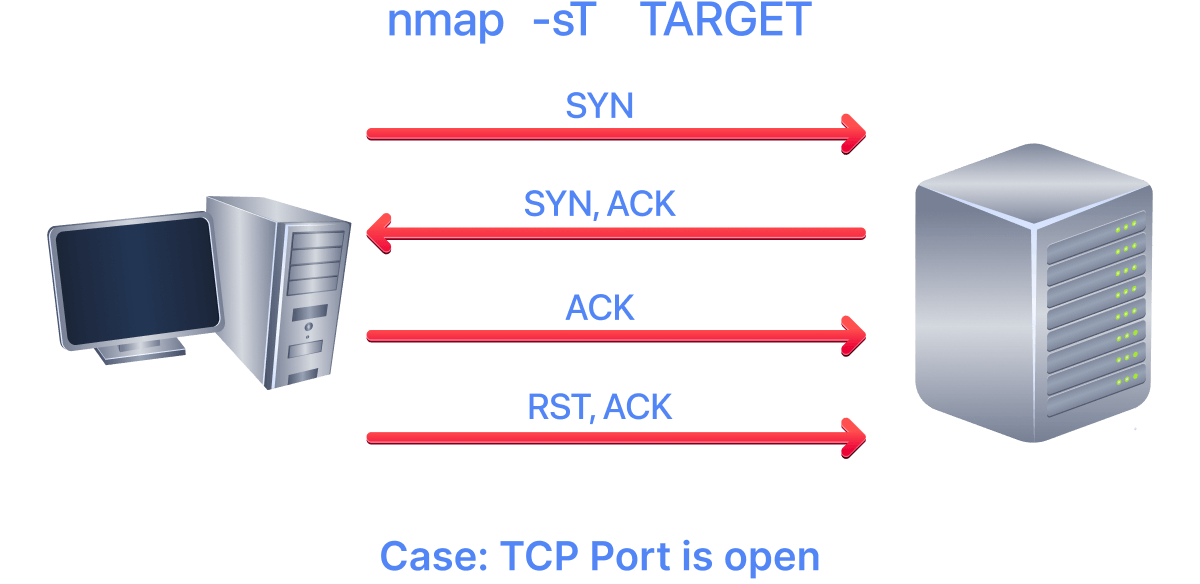
It is important to note that if you are not a privileged user (root or sudoer), a TCP connect scan is the only possible option to discover open TCP ports.
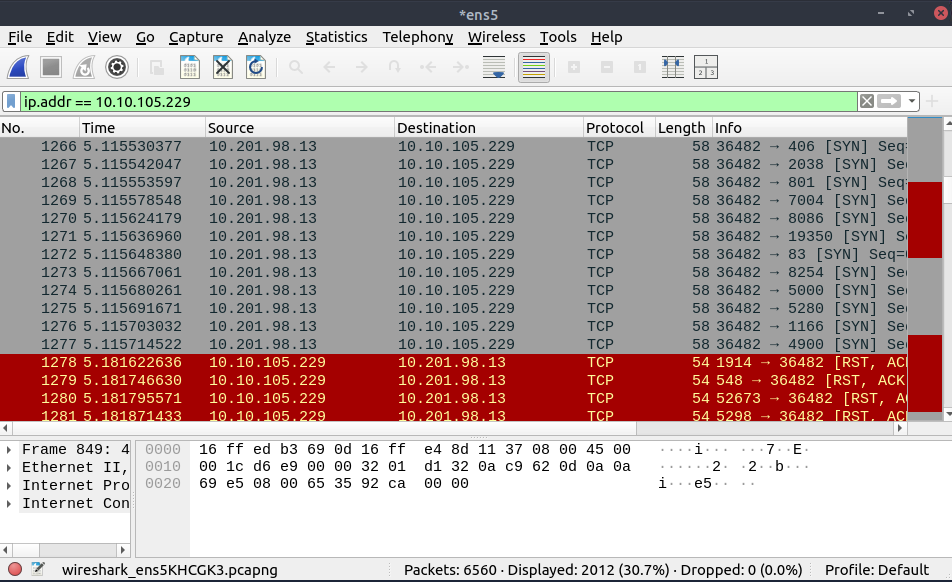
In the following Wireshark packet capture window, we see Nmap sending TCP packets with the SYN flag set to various ports, 5900, 22, 80, and so on. By default, Nmap will attempt to connect to the 1000 most common ports. A closed TCP port responds to a SYN packet with RST/ACK to indicate that it is not open. This pattern will repeat for all the closed ports as we attempt to initiate a TCP 3-way handshake with them.
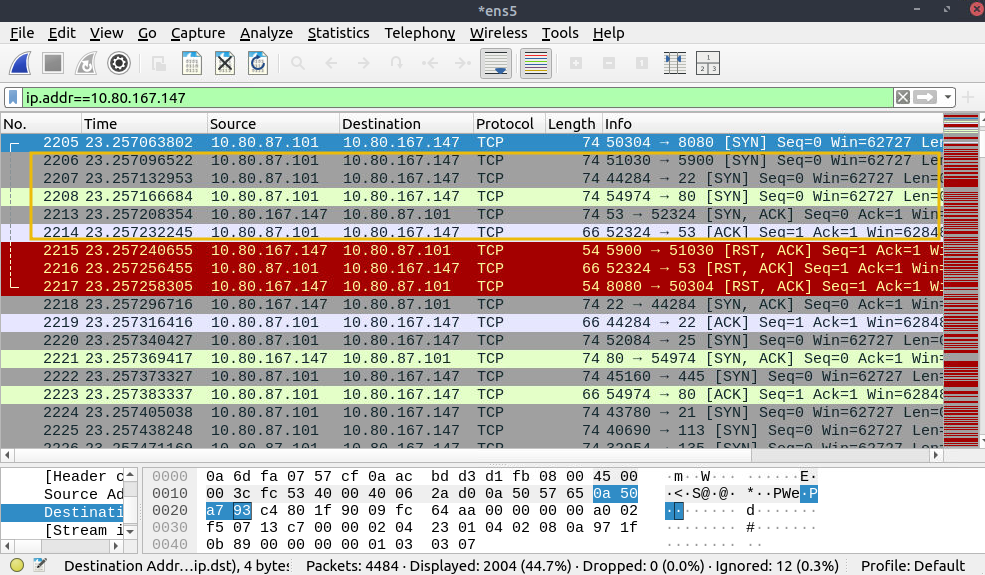
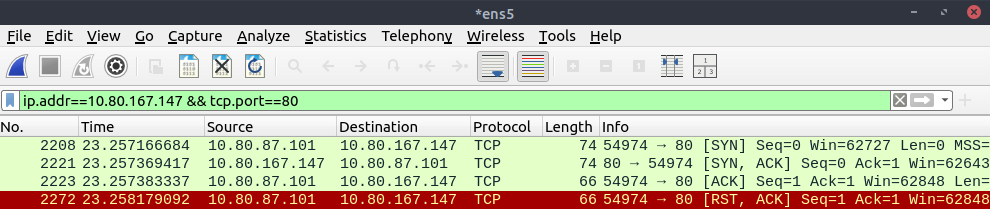
We notice that port 80 is open, so it replied with a SYN/ACK, and Nmap completed the 3-way handshake by sending an ACK. The figure below shows all the packets exchanged between our Nmap host and the target system’s port 80. The first three packets are the TCP 3-way handshake. Then the fourth packet tears it down with an RST/ACK.
To illustrate the -sT ( connect scan), Run the following command in the AB to get a detailed list of the open ports.
           root@ip-10-201-98-13:~# nmap -sT MACHINE_IP
Starting Nmap 7.80 ( https://nmap.org ) at 2026-02-10 12:16 GMT
mass_dns: warning: Unable to open /etc/resolv.conf. Try using --system-dns or specify valid servers with --dns-servers
mass_dns: warning: Unable to determine any DNS servers. Reverse DNS is disabled. Try using --system-dns or specify valid servers with --dns-servers
Nmap scan report for MACHINE_IP
Host is up (0.070s latency).
Not shown: 996 closed ports
PORT STATE SERVICE
21/tcp xxxx ftp
22/tcp open ssh
53/tcp open xxxxxx
80/tcp open http

Nmap done: 1 IP address (1 host up) scanned in 1.25 seconds
Note that we can use -F to enable fast mode and decrease the number of scanned ports from 1000 to 100 most common ports.
It is worth mentioning that the -r option can also be added to scan the ports in consecutive order instead of random order. This option is useful for testing whether ports open consistently, for instance, when a target boots up.
What is the state of the FTP service running on port 21?
What is Nmap’s guess about the service running on port 53?
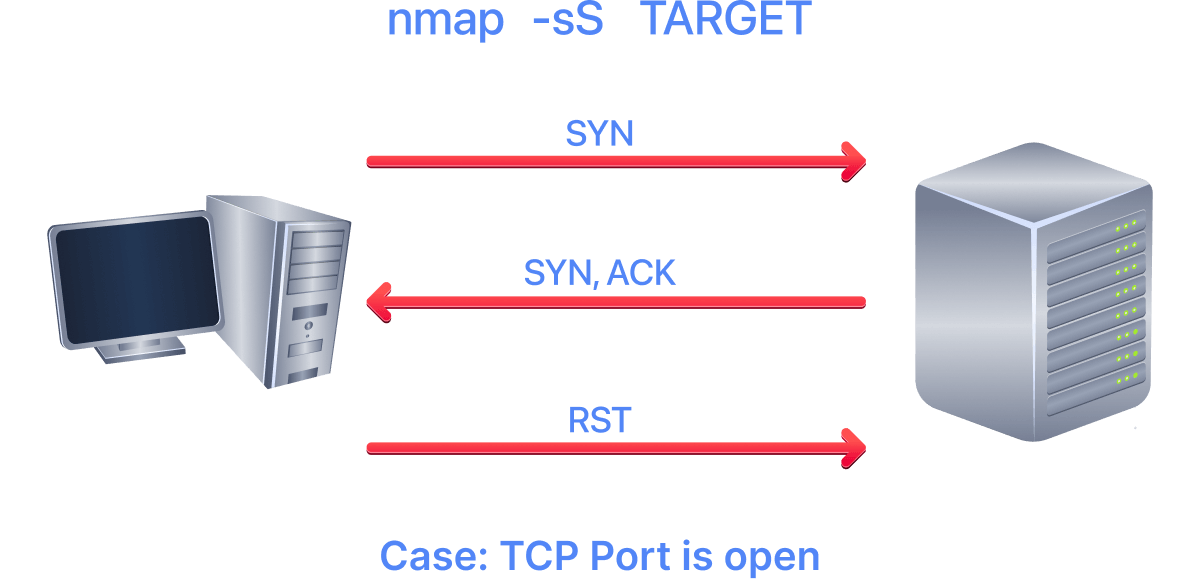
Unprivileged users are limited to the connect scan. However, the default scan mode is a SYN scan, and it requires a privileged (root or sudo) user to run. SYN scan does not need to complete the 3-way handshake; instead, it tears down the connection after receiving a response from the server. Because we didn’t establish a connection, the scan is less likely to be logged. We can select this scan type by using the -sS option. The figure below shows how the TCP SYN scan works without completing the TCP 3-way handshake.
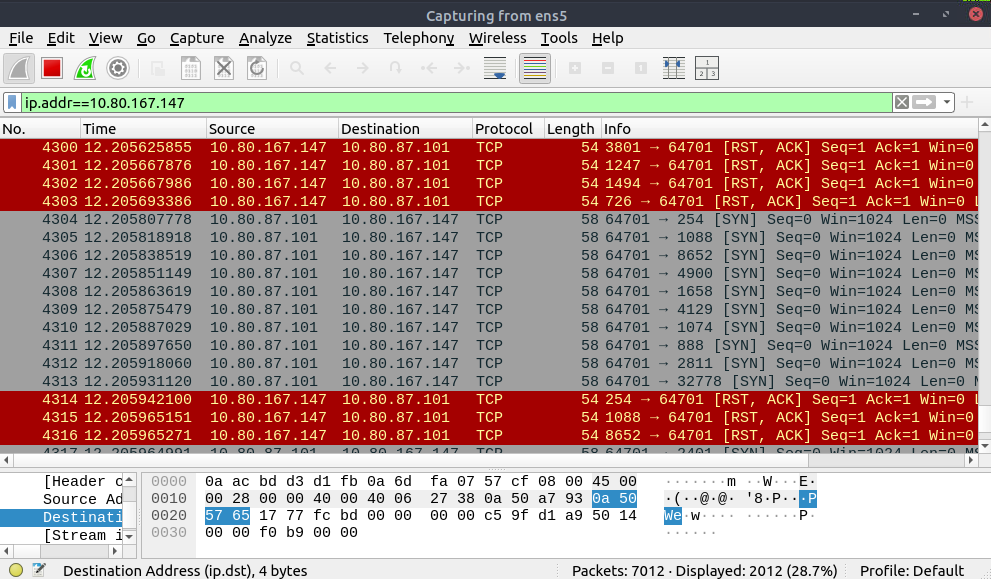
The following screenshot from Wireshark shows a TCP SYN scan. The behaviour when TCP ports are closed is similar to that of a TCP connect scan.
To better see the difference between the two scans, consider the following screenshot. In the upper half of the following figure, we can see TCP connect scan -sT traffic. Any open port will require to complete the 3-way handshake before closing the connection. In the lower half of the following figure, we see how a SYN scan -sS does not need to complete the TCP 3-way handshake; instead, Nmap sends an RST packet once a SYN/ACK packet is received.

TCP Connect Scan

TCP SYN Scan
TCP SYN scan is the default scan mode when running Nmap as a privileged user (root or sudo), and it is a very reliable choice. It has successfully discovered the open ports you found earlier with the TCP connect scan, yet no TCP connection was fully established with the target.
           root@ip-10-201-98-13:~# nmap -sS 10.10.105.229
Starting Nmap 7.80 ( https://nmap.org ) at 2026-02-10 12:08 GMT
mass_dns: warning: Unable to open /etc/resolv.conf. Try using --system-dns or specify valid servers with --dns-servers
mass_dns: warning: Unable to determine any DNS servers. Reverse DNS is disabled. Try using --system-dns or specify valid servers with --dns-servers
Nmap scan report for 10.10.105.229
Host is up (0.070s latency).
Not shown: 996 closed ports
PORT STATE SERVICE
21/tcp open ftp
22/tcp open ssh
53/tcp open domain
80/tcp open http

Nmap done: 1 IP address (1 host up) scanned in 1.36 seconds
After launching a TCP SYN scan, how many SYN-ACK packets are successfully received in AttackBox?
How many ports are open on the target machine?
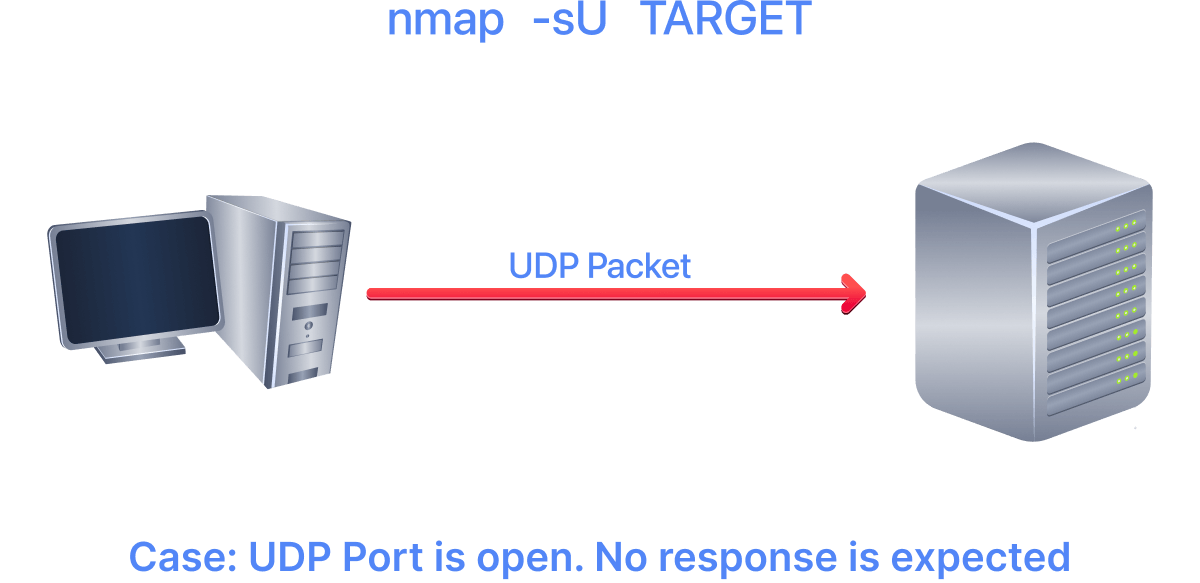
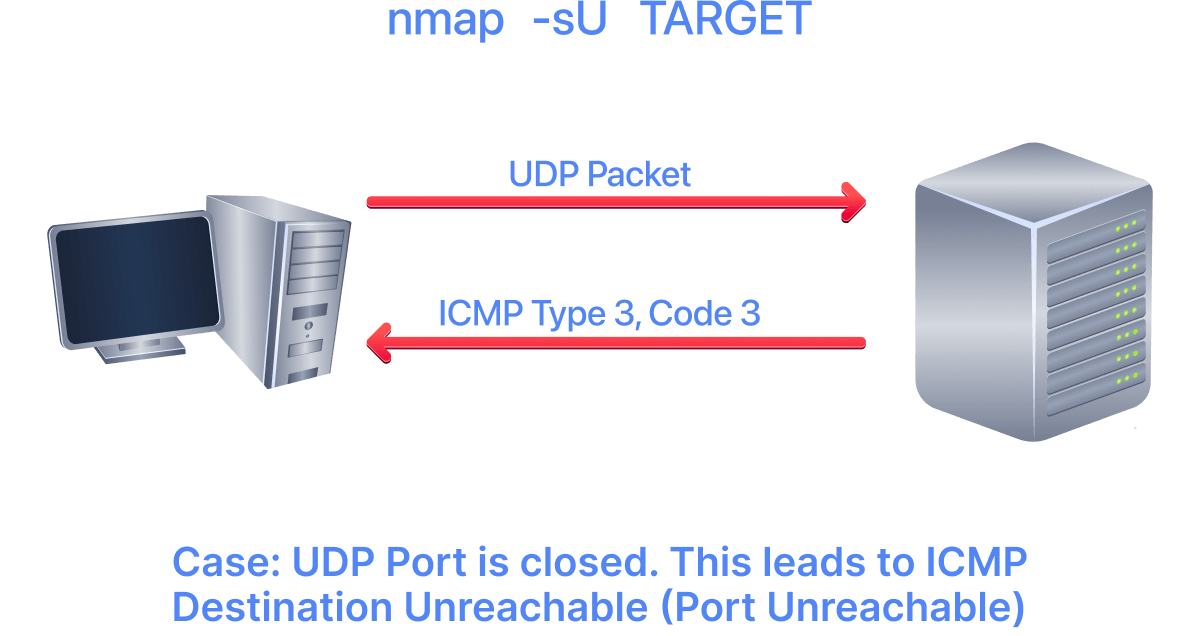
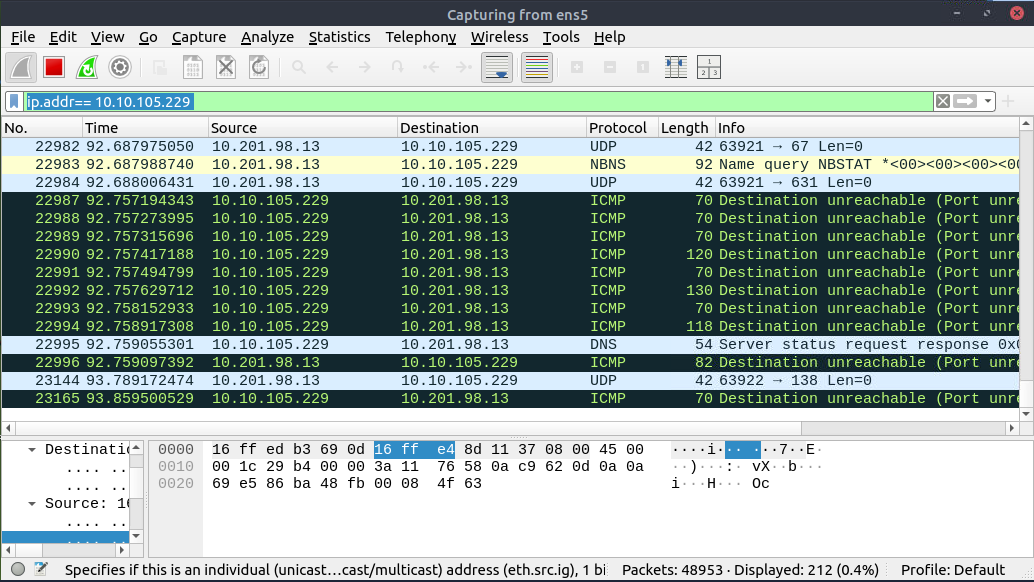
is a connectionless protocol; hence, it does not require a handshake for connection establishment. We cannot guarantee that a service listening on a port would respond to our packets. However, if a packet is sent to a closed port, an ICMP port unreachable error (type 3, code 3) is returned. You can select scan using the -sU option; moreover, you can combine it with another TCP scan.
The following figure shows that if we send a UDP packet to an open UDP port, we cannot expect a reply. Therefore, sending a UDP packet to an open port won’t tell us anything.
However, as shown in the figure below, we expect to receive an ICMP type 3, code 3, destination unreachable, port unreachable message. In other words, the UDP ports that don’t generate any response are the ones that Nmap will state as open.
In the Wireshark capture below, we can see that every closed port generates an ICMP destination unreachable (port unreachable) message.
From the AB, use the following command to perform a UDP scan of the top 10 ports on the target machine:
           root@ip-10-201-98-13:~# nmap -sU --top-ports 10 MACHINE_IP
Starting Nmap 7.80 ( https://nmap.org ) at 2026-02-10 12:29 GMT
mass_dns: warning: Unable to open /etc/resolv.conf. Try using --system-dns or specify valid servers with --dns-servers
mass_dns: warning: Unable to determine any DNS servers. Reverse DNS is disabled. Try using --system-dns or specify valid servers with --dns-servers
Nmap scan report for MACHINE_IP
Host is up (0.070s latency).

PORT STATE SERVICE
53/udp open domain
67/udp closed dhcps
123/udp closed ntp
135/udp closed msrpc
137/udp closed netbios-ns
138/udp closed netbios-dgm
161/udp closed snmp
445/udp closed microsoft-ds
631/udp closed ipp
1434/udp closed ms-sql-m

Nmap done: 1 IP address (1 host up) scanned in 1.45 seconds
Launching a scan against this server proved valuable, and indeed, we learned that port 53 is open, while it also shared the status of multiple closed ports.
What is the state of port number 161 over UDP in the target machine?
What is the service name according to Nmap on port 161?
You can specify the ports you want to scan instead of the default 1000 ports. Specifying the ports is intuitive by now. Let’s see some examples:

- port list:
-p22,80,443will scan ports 22, 80 and 443. - port range:
-p1-1023will scan all ports between 1 and 1023 inclusive, while-p20-25will scan ports between 20 and 25 inclusive.
You can request the scan of all ports by using -p-, which will scan all 65535 ports. If you want to scan the most common 100 ports, add -F. Using --top-ports 10 will check the ten most common ports.
You can control the scan timing using -T<0-5>. -T0 is the slowest (paranoid), while -T5 is the fastest. According to the Nmap manual page, there are six templates:
- paranoid (0)
- sneaky (1)
- polite (2)
- normal (3)
- aggressive (4)
- insane (5)
To avoid IDS alerts, you might consider -T0 or -T1. For instance, -T0 scans one port at a time and waits 5 minutes between sending each probe, so you can guess how long scanning one target would take to finish. If you don’t specify any timing, Nmap uses normal -T3. Note that -T5 is the most aggressive in terms of speed; however, this can affect the accuracy of the scan results due to the increased likelihood of packet loss. Note that -T4 is often used during CTFs and when learning to scan on practice targets, whereas -T1 is often used during real engagements where stealth is more important.
Alternatively, you can choose to control the packet rate using --min-rate <number> and --max-rate <number>. For example, --max-rate 10 or --max-rate=10 ensures that your scanner is not sending more than ten packets per second.
Moreover, you can control probing parallelisation using --min-parallelism <numprobes> and --max-parallelism <numprobes>. Nmap probes targets to discover which hosts are live and which ports are open; the probing parallelisation parameter specifies the number of such probes that can run in parallel. For instance, --min-parallelism=512 pushes to maintain at least 512 probes in parallel; these 512 probes are related to host discovery and open ports.
What is the option to scan all the TCP ports between 5000 and 5500?
How can you ensure that Nmap will run at least 64 probes in parallel?
What option would you add to make Nmap very slow and paranoid?
This room covered three types of scans.
| Port Scan Type | Example Command |
|---|---|
| Connect Scan | -sT MACHINE_IP |
| SYN Scan | sudo -sS MACHINE_IP |
| Scan | sudo -sU MACHINE_IP |
These scan types should get you started discovering running and services on a target host.
| Option | Purpose |
|---|---|
| -p- | all ports |
| -p1-1023 | scan ports 1 to 1023 |
| -F | 100 most common ports |
| -r | scan ports in consecutive order |
| -T<0-5> | -T0 being the slowest and T5 the fastest |
| --max-rate 50 | rate <= 50 packets/sec |
| --min-rate 15 | rate >= 15 packets/sec |
| --min-parallelism 100 | at least 100 probes in parallel |
Ensure you have noted all the scan options covered in this room. It is time to learn advanced port-scanning techniques by joining the Nmap Advanced Port Scans room.
Ready to learn Cyber Security?
TryHackMe provides free online cyber security training to secure jobs & upskill through a fun, interactive learning environment.
Already have an account? Log in