
Accessing a Compromised Network
Learn the ways to access a compromised network for DFIR needs.
medium


To access material, start machines and answer questions login.
This room will continue OpenDoor's breach scenario and answer an important question for every project: how to access the compromised Active Directory network. The question isn't as simple as it sounds, and we will explore different pitfalls that might be waiting for you at every stage.
Learning Objectives
- Explore the methods to reach the compromised environment
- Discover how to collect forensic artifacts at scale and securely
- Learn the pitfalls that can await you: both human and tech-caused
Prerequisites
- Complete the Introduction to Windows room
- Remind yourself of the OpenDoor scenario
You are an external DFIR specialist hired by OpenDoor LTD, a large UK-based real estate company, to investigate a security incident. A 2,500-user Active Directory network has been compromised and data has been exfiltrated. OpenDoor's IT team noticed the attack and isolated the network before ransomware encryption. Now, it's your turn.
Lab Access
Throughout the tasks, you will need to access a Windows machine. Start it now by clicking the Start Machine button below, and use it according to the task instructions; split-view won't open automatically. You also need to launch DefenseBox if you don't have your own Windows machine.
Set up your virtual environment
For a smooth experience, we highly recommend using DefenseBox over OpenVPN and connecting via . The RDP credentials for DefenseBox are DFIRUser:Secure!.
Let's begin!
Your first task is to access the infected hosts to collect forensic artifacts.
Let's see what options you have to reach the hosts remotely via the network.
Network Access Options
You can rely on OpenDoor's IT to run the collection scripts for you, but it's best to do it yourself and control the process from start to finish. There's also an important reason: if IT handles collection insecurely or if their devices are compromised, they may alert an adversary who still has access to the network, or leak your custom scripts, collection profiles, and other secrets you shared. You can suggest a few options to access the network:
- Ask for access (e.g., OpenVPN)
- Set up remote desktop (e.g., AnyDesk)
- Visit on-site (e.g., travel to the data center)
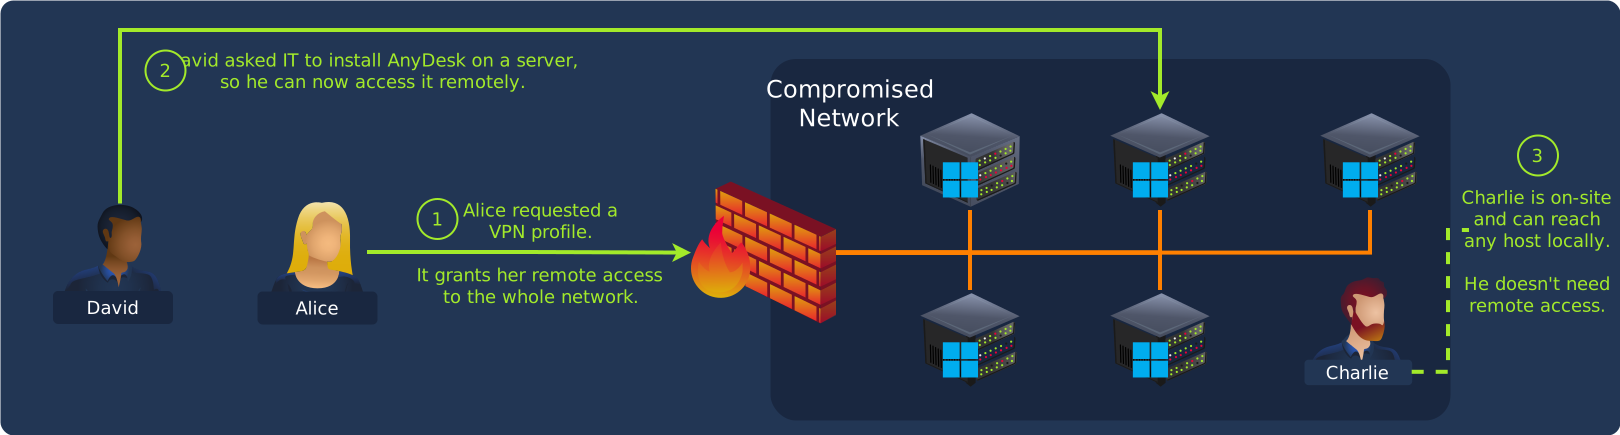
| Access Method | Pros | Cons |
|---|---|---|
| VPN access | One VPN profile allows you to reach all servers in a corporate network | Can't provide access to personal devices of remote employees |
| Remote desktop | The quickest way to reach one host; covers the cons of VPN access | Requires setup on each device separately; might be limited |
| Visit on-site | Best for ransomware cases, where network infrastructure may be down | Visiting on-site may be time-consuming or not possible at all |
Playbook
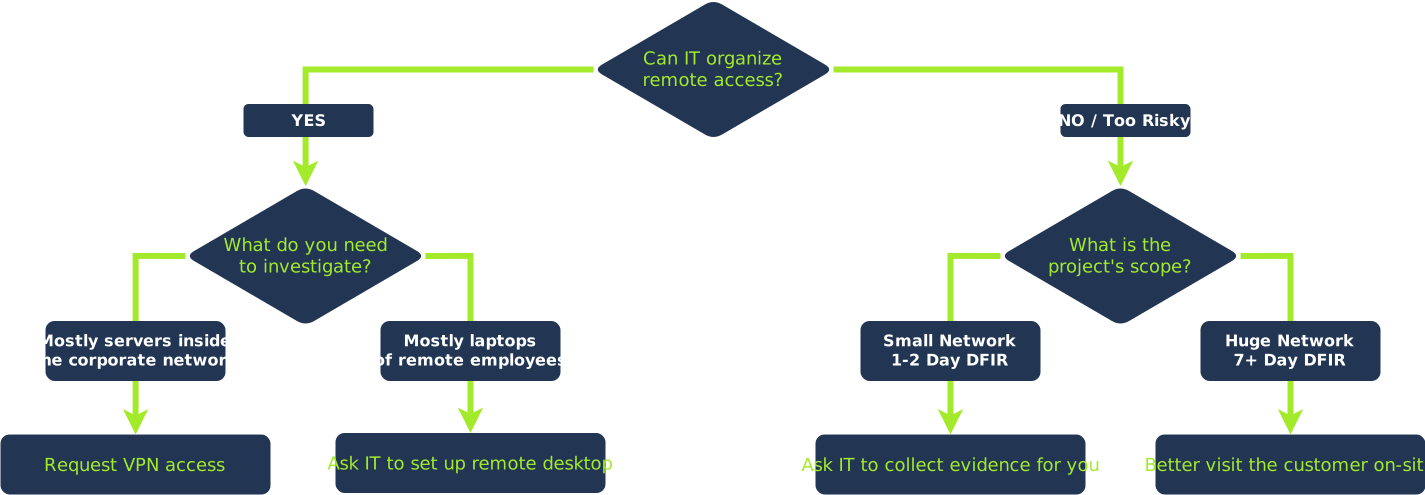
After a ransomware or wiper attack, network infrastructure may be broken and the VPN unavailable. Remote desktop tools may also be blocked by , or unavailable if outbound traffic was restricted during containment. There are many more situations that can block one access method and force you to combine approaches as needed. As a general tip, refer to the playbook below and consult with the customer's IT to find the best solution for each host.
Practice
OpenDoor's environment is pretty big, and your work will last more than a week, so you definitely need to request VPN access and not depend on IT availability. We can't simulate the VPN logon process in the lab, but that's trivial anyway; install the right client, use the provided credentials, and reach the hosts you need. Instead, we'll practice something harder: try to convince OpenDoor's IT to grant you full VPN access.
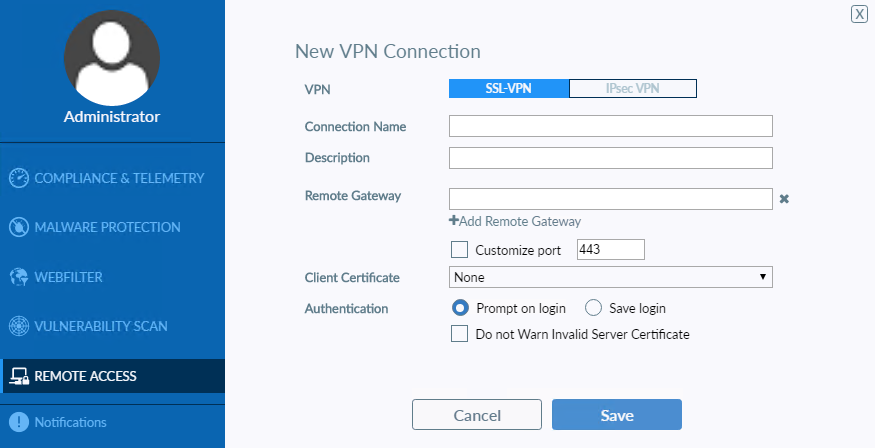
FortiClient, a popular VPN client used by OpenDoor
Open the chat above and convince Jesse from OpenDoor's IT department to share VPN access. Consider the arguments below if he insists on collecting the artifacts for you:
- Data : Evidence can be altered by untrained IT members during the collection
- Speed: VPN access removes the ask & wait loop that slows both DFIR and IT members
- Exploration: VPN access is needed to explore the network and map the intrusion path
- Compromise risk: IT staff and their accounts may be compromised (the OPSEC point)
Open the chat and start the conversation.
Who is responding to you? (Full name, role)
What is the address of OpenDoor's VPN portal?
What password was "created" for your VPN profile?
You managed to get access to OpenDoor's network in Task 2.
Now, let's see how to use remote desktop software for access instead.
How Remote Desktop Works
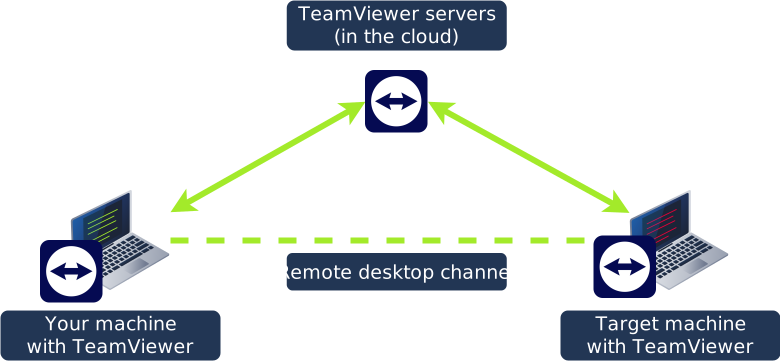
Most remote desktop software works the same way. Let's take TeamViewer as an example: both devices install a TeamViewer client, each client connects to TeamViewer's servers, and then one device connects to the other (e.g., you connecting to the compromised ) using a unique connection code. Behind the scenes, all communication is encrypted and relayed through TeamViewer's cloud servers, so both devices can exist behind NAT but must have outbound internet access.
RustDesk Setup
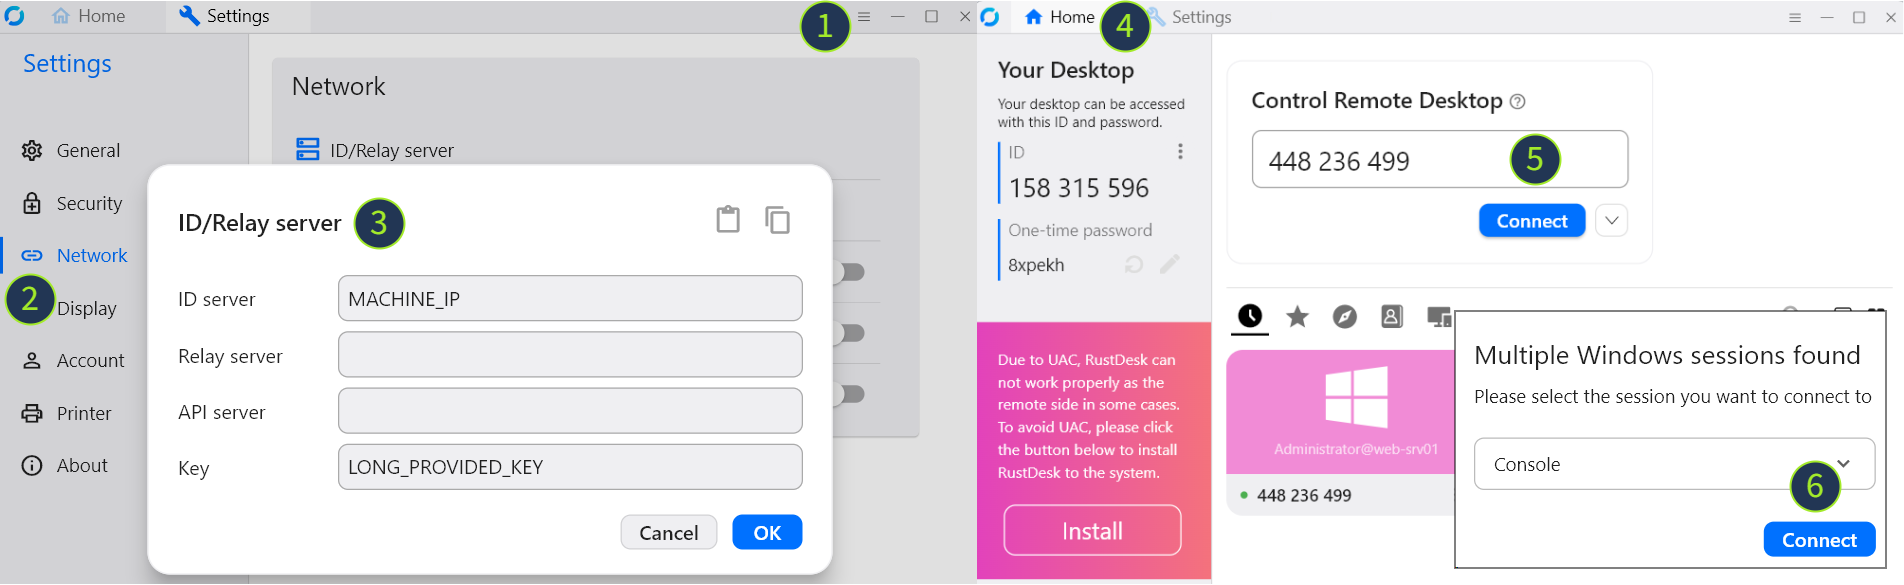
In real engagements, you'd typically use the cloud apps explained above. However, due to internet restrictions in our lab, we'll practice with RustDesk, a self-hosted alternative to TeamViewer. The interface is nearly the same, but the configuration is a bit more complex. For this lab, complete all steps below. But in most scenarios, you'd just need steps 1, 5, and 6:
- Open RustDesk and go to Settings
- DefenseBox: Desktop > Tools > Misc Utilities
- Your machine: Download (opens in new tab) RustDesk (all supported)
- Navigate to Settings > Network > ID/Relay server
- ID server: MACHINE_IP. Key will be provided by Jesse
- Save the settings and go back to the Home page
- Ask Jesse for the connection code and password
- Click Connect. If asked, choose the Console session
Important Forensic Note
Tools like AnyDesk, TeamViewer, ScreenConnect, and Quick Assist are frequently abused by adversaries. Before asking IT to install one, have them check whether it's already present. If it is, choose a different tool that was never in the environment, so that every log entry for it is clearly yours, with no risk of mixing your activity into the attacker's traces. Otherwise, you risk contaminating the evidence of tool abuse.
Practice
VPN access got you to most of the servers you need for DFIR, but it didn't cover remote workstations and standalone servers. OpenDoor's IT flagged WEB-SRV01 as a possible "patient zero", but noted it's hosted outside the VPN infrastructure. To collect evidence from it, remote desktop is the easiest option. Configure RustDesk and connect to the machine.
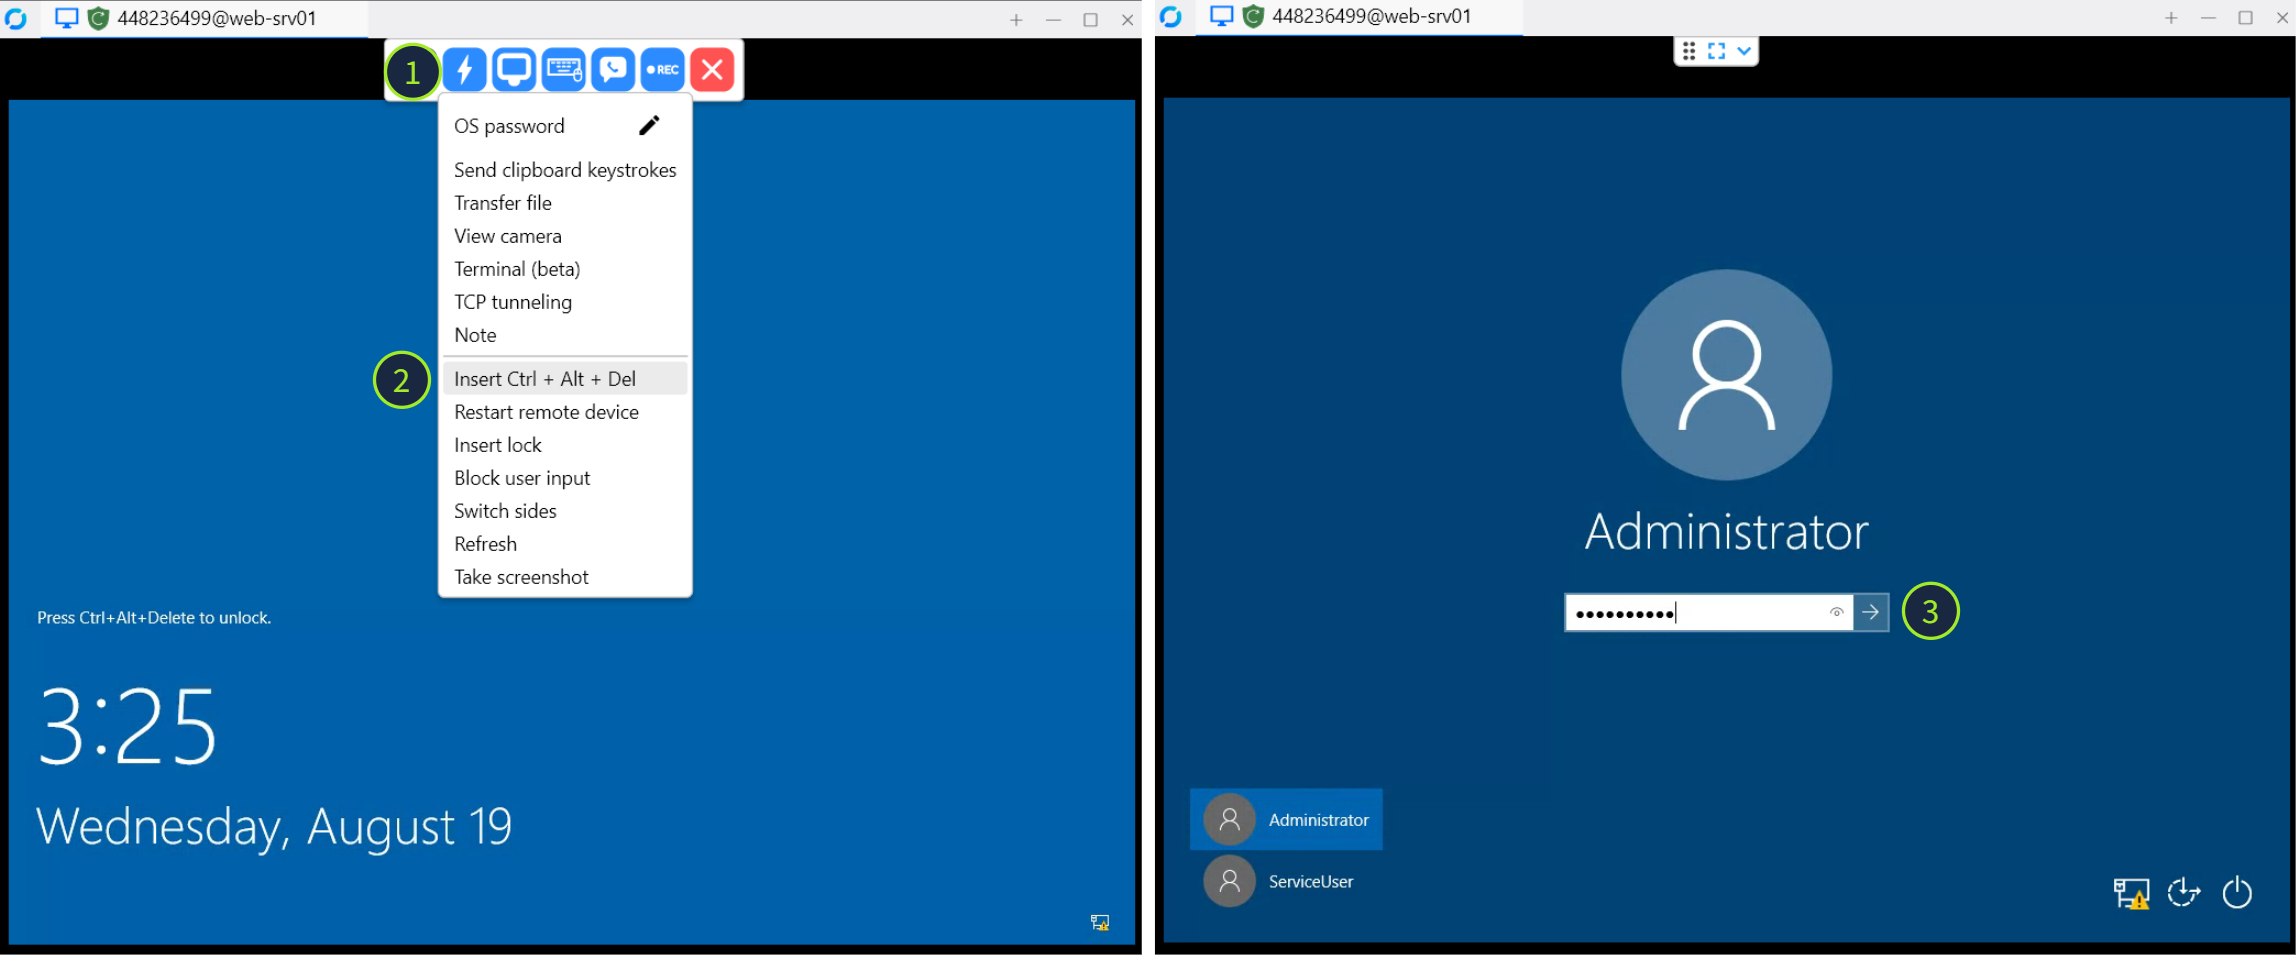
Once connected, open RustDesk menu (1), insert Ctrl+Alt+Del (2), and log in (3)
Grab the instructions from the chat with Jesse, connect to the target via RustDesk from your DefenseBox or OpenVPN-connected machine, and answer the questions below.
What is the RustDesk access code you received?
What is the provided Administrator's password?
Access the host and navigate to the IIS root (C:\inetpub)
What PHP file was backdoored with a web shell?
An alternative approach to reach the hosts is to use or agents.
We'll dive into this topic in the following rooms, but let's do a quick overview.
EDR for Network Access
Some incident response service providers choose a different route to access the networks. They purchase EDR licenses with forensic capabilities (e.g., CrowdStrike or MDE), ask the customer's IT team to deploy the provided agents on all infected hosts, and use the EDR console to collect evidence. We won't explore this route in the path, but you are encouraged to consider it, especially if your company partners with a well-known EDR vendor.
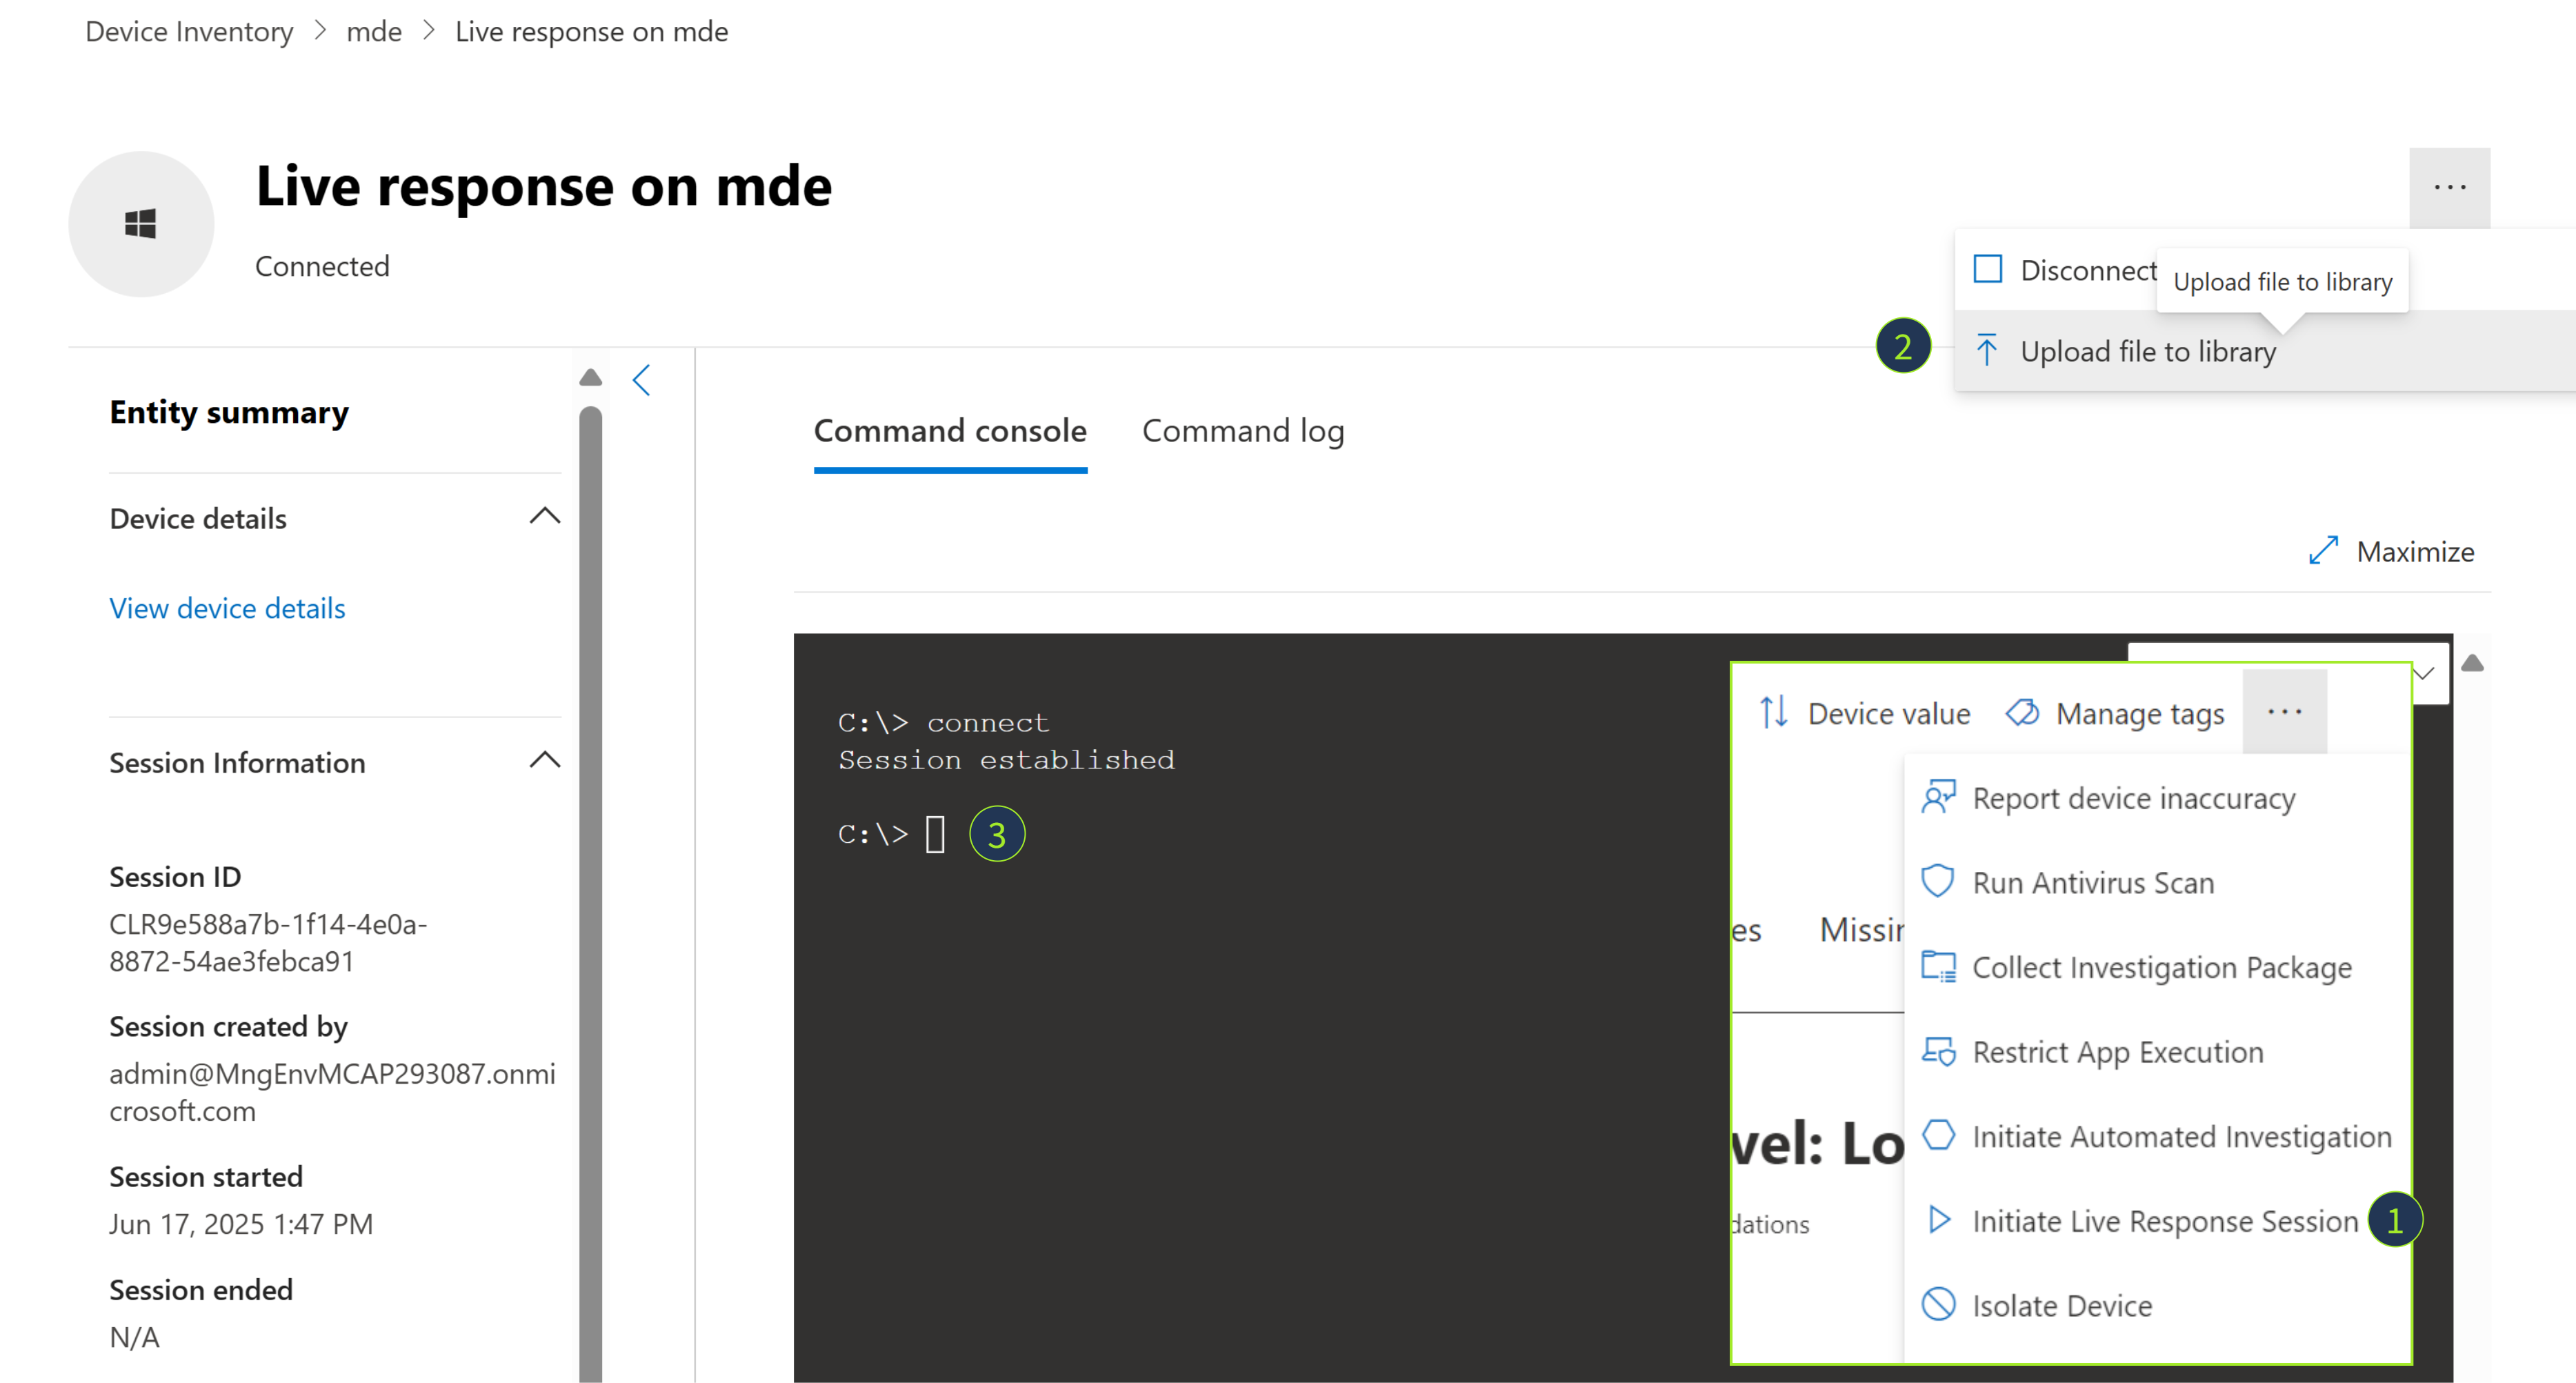
Example of how MDE can be used to upload and use artifact collectors, such as (Microsoft (opens in new tab))
Velociraptor Overview
Velociraptor is a tool for collecting host-based state information and is heavily used for forensic artifact collection. Some people even call it an EDR solution because it is agent-based and has many features for collecting endpoint telemetry, detecting threats, and running containment tasks. We will cover Velociraptor in future rooms, but it could have been a nice solution for OpenDoor's case if the IT team approved its deployment on all hosts.

RMM for Network Access
The customer may insist that it's best to use their Remote Monitoring and Management (RMM) tool, such as MeshCentral or Intune, to deploy collection scripts rather than providing access or installing EDR agents. While it sounds tempting, it's best to rely on tested workflows rather than trying something new when the network is on fire. Consider the suggestion critically and keep in mind four common pitfalls:
- Some tools can time out or truncate output, which you'll find out too late
- Other tools work with insufficient permissions (you need local SYSTEM)
- Using an untested tool can be slower than running scripts manually
- The tool itself may be backdoored or monitored by adversaries
This time, we won't be using EDR or RMM agents to access OpenDoor.
However, keep this content in mind! We'll come back to it in the future rooms.
The profile from Task 2 allowed you to reach the hosts, but not authenticate there.
Now you need to agree on the privileges you need to do your job efficiently.
Requesting AD Credentials
In enterprises, VPN profiles are typically integrated with AD via , so you can authenticate to the hosts with the same VPN credentials. If not, you'd need to request a separate DFIR domain account. Since you can't know in advance which hosts you'll need to access, requesting Domain Admin (DA) straight away is generally more suitable. Just don't forget to use DA responsibly and avoid using it on hosts that aren't isolated, where attackers could steal the credentials from cache or memory.

*Even when using , you might still benefit from a Domain Admin.
For example, to resolve GUIDs, list AD users, or verify attack scenarios
Security Policies vs DFIR
IT may ask you to follow security rules meant for regular staff, especially when you request Domain Admin. For example, they might require you to log in only from a specific country, work only from an IT-provided machine, or install their MDM on your device before granting access. Some of these are mandatory regulations, but others are internal policies that can be bypassed. If a rule slows your DFIR work too much, involve management from both sides to ask for an exception.
Choosing First Targets
Finally, when you have network access (VPN) and host access (AD account), you can start collecting forensic artifacts. In an ideal scenario, you know which host is compromised based on an indicator match or customer findings, and start the collection from there. In addition, consider collecting data from the locations below:
- Domain Controllers: Valuable places to look for attackers' domain logons and AD changes
- Internet-Exposed Servers: Exchange, , VDI, and RDS servers are classic entry points
- Hosts Pointed Out: Collect artifacts from all devices that the customer suspects of being infected
- Workstations of IT Admins: To ensure the attackers aren't hiding there and reading DFIR chats
Practice
It isn't hard to use Domain Admin, and we will prove it many times along the path. The harder part is to justify why you need it and comply with (or bypass) the strict security policies the customer enforces. Continue your conversation with Jesse and request the separate AD credentials.
Does the VPN profile already grant you AD access? (Yea/Nay)
What DA username have you received from Jesse?
Now you can reach the infected Windows hosts and authenticate.
The next question is how to authenticate. Let's explore the options!
Access Types
In Windows, the most common host access method is . It gives you a session, is easy to use, and is enabled on most servers. However, RDP creates an interactive session that can contaminate some forensic artifacts, and it leaves your credentials in the host's memory - a major risk on infected machines, especially ones that aren't isolated. RDP is also unsuitable for automated artifact collection at scale. For those reasons, consider the protocols below before rushing to use RDP.
Access
Windows Remote Management (WinRM) is a service for managing Windows hosts remotely over the command line. It's also the transport behind Remoting (opens in new tab), which lets you run PowerShell on remote machines. WinRM communicates over /5985 () or TCP/5986 (HTTPS). Both workstation and server editions ship with WinRM preinstalled, but only Windows Server enables it by default. To connect to a target from outside the domain, run these PowerShell commands:
           # Add all target IPs to the WinRM TrustedHosts
PS C:\> Start-Service WinRM
PS C:\> Set-Item WSMan:localhost\client\trustedhosts -Value *

# Prepare domain credentials
PS C:\> $password = ConvertTo-SecureString "DcG3w4b8" -AsPlainText -Force
PS C:\> $cred = New-Object System.Management.Automation.PSCredential("ServiceUser", $password)

# Connect to the target with WinRM
PS C:\> whoami
defense-box\dfiruser
PS C:\> Enter-PSSession -ComputerName MACHINE_IP -Credential $cred
[10.82.15.35]: PS C:\> whoami
web-srv01\administrator
The benefit of WinRM is that it doesn't store your credentials on the target host like RDP and supports all PowerShell cmdlets. Another huge benefit is how you can use WinRM at scale. Let's say you want to run a collector script on three servers at once, and then list local users on all corporate devices. This is how you can do it with WinRM, assuming you have sufficient permissions:
           # Run a collector script on SRV1, SRV2, and SRV3
# Note: You should prepare the PS1 scripts yourself
PS C:\> Invoke-Command -ComputerName SRV1,SRV2,SRV3 -Credential $cred -FilePath C:\DFIR\Collector.ps1

# Fetch local users on all hosts in the text file
PS C:\> $hosts = Get-Content .\hosts.txt
PS C:\> Invoke-Command -ComputerName $hosts -Credential $cred -ScriptBlock `
{Get-LocalUser | Select-Object PSComputerName,Name,PasswordLastSet}
Name            : Administrator
PasswordLastSet : 3/17/2021 5:31:12 PM
PSComputerName  : SRV1
RunspaceId      : 9ee18648-656d-4094-bb9d-b6bb46a2a55e
[...]
Note that to use WinRM, your account must belong to the local Administrators or Remote Management Users group on the remote host (Domain Admins are usually a member of the local Administrators group by default). WinRM may also be blocked by Windows or disabled altogether. All of these issues can be resolved by adjusting or consulting the customer's IT team.
Access
WMI can be used for collecting evidence in rare cases where WinRM is not enabled and or Velociraptor deployment isn't possible. WMI is enabled by default on essentially every device (although it can be blocked on a firewall). The bad thing is that WMI can't spawn a live shell like WinRM's Enter-PSSession, and doesn't support file transfer. This means you'll need to first copy the collection tool, such as , via the network share, run the tool without seeing its output, and then download its results via share again:
           PS C:\> copy .\Tools\KAPE \\SRV1\C$\Temp\KAPE /s
PS C:\> Invoke-WmiMethod -ComputerName MACHINE_IP -Credential $cred `
  -Class Win32_Process -Name Create `
  -ArgumentList "cmd.exe /c C:\Temp\KAPE\kape.exe [...] --tdest C:\Temp\Out"
PS C:\> copy \\SRV1\C$\Temp\Out\*.zip .\Evidence\SRV1\
The above option isn't very convenient, but possible. On the positive side, WMI is really good at collecting system information at scale. Say you want to check whether any host in the domain has a specific process running or a specific app in startup. The commands below would give you the quickest answer. Note that the ComputerName argument can accept multiple values, and the Credential object is formed the same way as for WinRM.
           # Running Processes
PS C:\> Get-WmiObject -ComputerName MACHINE_IP -Credential $cred -Class Win32_Process |
Select Name, ProcessId, ParentProcessId, CommandLine, ExecutablePath
# Startup Entries
PS C:\> Get-WmiObject -ComputerName MACHINE_IP -Credential $cred -Class Win32_StartupCommand
Other Methods
- PsExec: Convenient, but can overwrite evidence of malicious PsExec usage. Not recommended
- : A very convenient alternative to WinRM, but SSH is rarely enabled in Windows networks
Practice
Continue with the lab and try to collect more information from it with RDP, WinRM, and WMI. Access the server from DefenseBox, or use your own -connected machine. Use the Administrator's credentials from Task 3 for the RDP logons, and switch to the service account below for WinRM and WMI.
Credentials
Use these credentials to answer the last three questions
Open a RDP session as Administrator.
What session name does the quser command show?
Now open a WinRM session as ServiceUser.
Does quser show your session in the list? (Yea/Nay)
Open flag.txt in the ServiceUser's Documents.
What is the flag's value?
WMI's Win32_StartupCommand shows a suspicious entry.
What is the full malicious command persisting in startup?
You have covered the flow for reaching and accessing the compromised hosts and identified the pitfalls you can encounter at each stage. We strongly encourage you to imagine OpenDoor's scenario at your company and think about how you would access your network, when you would use remote desktop, and whether or would help. In the next room, we'll explore which artifacts exist and what to collect in the first place. Read the topic below and complete the room!
Human Factor in DFIR
Before wrapping up the room, remember that the human factor plays a big role. We focused on communication in this room because it can make "real" DFIR much easier, or block it right from the start. To ensure you aren't blocked, never defend your position right away (which can create conflict), but explain your reasoning and try to understand the customer's concerns. Then, any DFIR is more like a lab at TryHackMe - you and the technical problem, and nothing in the way.

Complete the room!
Ready to learn Cyber Security?
TryHackMe provides free online cyber security training to secure jobs & upskill through a fun, interactive learning environment.
Already have an account? Log in